1
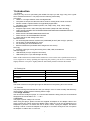
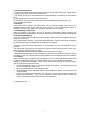
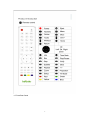
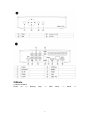
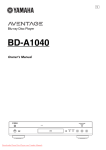
HD 680 user manual Please read this manual thoroughly before use Contents 1.Introduction .................................................................................................................................... 1 1.1 Preface................................................................................................................................. 1 1.2 Packing List......................................................................................................................... 1 1.3 Cautions .............................................................................................................................. 1 1.4 Remote control .................................................................................................................... 2 1.5 Front/Rear Panel ................................................................................................................. 3 2.Movie ............................................................................................................................................. 4 2.1Movie Playback.................................................................................................................... 4 2.2 Movie Playback Menu ........................................................................................................ 5 3.Music.............................................................................................................................................. 7 4. Photo ............................................................................................................................................. 8 5. IMS ............................................................................................................................................. 10 6. File Manager ............................................................................................................................... 11 7. Web Browser ............................................................................................................................... 14 8. Setup ........................................................................................................................................... 16 8.1 System settings: Press the "ok" key on the remote control to enter setup menu ............... 16 8.2 Audio Settings: Press the "ok" key on the remote control to enter the Audio Settings menu ................................................................................................................................................ 26 8.3 Video Settings: Press the "ok" key on the remote control to enter the Video Settings menu ................................................................................................................................................ 29 8.4 Network Settings: Press the "ok" key on the remote control to enter the Network Settings menu ........................................................................................................................................ 32 0 1.Introduction 1.1 Preface Thank you very much for purchasing the HD680. We hope you will enjoy using it as a great home entertainment device. This player has the following functionality. A/V Output • HDMI V1.3 for high-definition video and digital audio • Composite & component video and stereo audio for analog audio-visual connection • S/PDIF coaxial & optical interface for high-fidelity digital audio • Adjustable video output resolution (NTSC, PAL, 480p, 576p, 720p, 1080i, 1080p) Multimedia Playback • Supports major audio, video and image file formats (1080p HD video decoding) • Video formats: AVI/MKV/TS/TP/TRP/M2TS/MPG/MP4/M4V/MOV/VOB/ISO/IFO/DAT/ WMV/ASF/RM/FLV • Music formats: MP3/OGG/WMA/WAV/AAC/FLAC • Photo formats: HD JPEG/BMP/GIF/TIF/PNG • Photo slide show with background music Network Feature • A/V streaming/transmission via Ethernet (10M/100M) & Wi-Fi (802.11b/g/n, optional) • File sharing via Samba,NFS,FTP server • A/V streaming via UPnP Media Server • BitTorrent download (controlled and managed via web server) File Copy • Supports copying & moving files among Card, USB, HDD, and Network USB 2.0 Support • USB DEVICE port (for computer connection) • USB HOST port x 2 (for USB storage devices) Note: All the information contained in this manual was correct at the time of publication. However, as our engineers are always updating and improving the product, your device’s software may be slightly different or may have slightly different functionality than described in this manual. 1.2 Packing List Part Quantity Player 1 Remote Control 1 DC adapter 1 User Manual 1 Note: The actual contents in the package might be different from the packing list in this manual. 1.3 Cautions This player’s design and manufacture has your safety in mind. In order to safely and effectively use this player, please read the following before usage. 1.3.1 Usage Cautions User should not modify this player. If a commercial hard disk is being used, the environmental temperature should be within +5℃ ~ +35℃. 1.3.2 Power The player’s power voltage: DC 12V 2A. When using this player, please connect the supplied AC adapter or AC adapter cable to the player’s power jack. When placing the adapter cable, make sure it can not get damaged or be subjected to pressure. To reduce the risk of electric shock, unplug the adapter first before cleaning it. Never connect the adapter to the player in a humid or dusty area. Do not replace the adapter or cable’s wire or connector. 1 1.3.3 Radio Interference - If not properly shielded, almost all electronic devices will get radio interference. Under certain conditions, your player might receive interference. - The design of this player has followed the FCC/CE standard, and adheres to the following rules: (1) This player may not cause harmful interference; (2) This player can accept some interference received including interference that may cause undesired operation. 1.3.4 Repair If the player has a problem, you should take it to an appointed repair center and let the specialists do the repair, never repair the player yourself. You may damage the player or endanger yourself or your data if you attempt to repair the device yourself. 1.3.5 Disposing of the Player When you dispose of the player, be sure to dispose it appropriately. Some countries may regulate disposal of electrical devices, please consult with your local authority before disposal. 1.3.6 Hard Disk Cautions The player uses an internal hard disk for data storage. Under normal circumstances, format or repair is not required. You should carefully read the < Frequently Asked Questions > chapter, and check our website for the latest information available before formatting the hard disk. - Physical impact may create a bad sector in the hard disk, you can use CHKDSK to fix the problem. - All data stored in the player may be lost due to physical impact, electrical shock, power loss, HDD format etc. Please backup your data. - It is suggested to defragment the hard disk after a long period of usage. - Regularly backup the data on the hard disk so that it can be recovered in the event of data corruption or loss. Our company takes no responsibility for loss of data stored on the hard disk. 1.3.7 Others When using this player, please do not let the player come into contact with water or other liquid, if water is accidentally spilled on the player, please use a dry cloth to absorb the spillage. Electronic products are vulnerable. When using, please avoid shaking or hitting the player, and do not press the buttons too hard. Do not disassemble, repair, or change the design of the player. Any damage done will not be included in the repair policy. Do not press the buttons of the player too hard. Avoid hitting the player with hard objects, avoid shaking the player, and stay away from magnetic fields. During electrostatic discharge and in the presence of strong electromagnetic fields, the product will malfunction. If this occurs, unplug the power cable and the product will return to normal performance the next time it is powered on. 1.4 Remote control 2 1.5 Front/Rear Panel 3 2.Movie 2.1Movie Playback Power on ---> Booting Logo ---> 4 Main Menu ---> Movie ---> Preview: Press the "up" or "down" key on the remote control to preview 2.2 Movie Playback Menu Info: Press the "info" key on the remote control to display this information during movie playback 5 Subtitle: Press the "subtittle" key on the remote control to display this setting during movie playback Audio: Press the "audio" key on the remote control to display this setting during movie playback 6 Quick Back to the Main menu: Press the "HOME" key on the remote control to return to the Main Menu during movie playback 3.Music Music Playback: Power on ---> Booting Logo ---> Main Menu ---> "Music" ---> 7 Preview: Press the "up" or "down" key on the remote control to preview 4.Photo 4.1Photo Playback: Power on ---> Booting Logo ---> Main Menu ---> "Photo" ---> 8 Preview: Press the "up" or "down" key on the remote control to preview List type: Press the "HOME" key on the remote control to display this setting 9 Info: Press the "info" key on the remote control to display the picture information 5.IMS IMS Playback Power on ---> Booting Logo ---> Main Menu ---> "IMS" ---> 10 Built in on-line streaming servers 6.File Manager Power on ---> Booting Logo ---> Main Menu ---> "File Manager" ---> 11 List type: Press the "OK" key on the remote control to display this setting 12 Copy: Press the "green" key on the remote control to display this setting Delete 13 Rename: 7.Web Browser Power on ---> Booting Logo ---> Main Menu ---> "Browser" ---> 14 Press “ok” to open the web browser 15 8.Setup Power on ---> Booting Logo ---> Main Menu ---> "setup" ---> 8.1 System settings: Press the "ok" key on the remote control to enter setup menu 16 Menu language: Press the "ok" key on the remote control to enter the Menu language setup Press the "up" or "down" key on the remote control to select a different menu language 17 Text encoding: Press the "ok" key on the remote control to enter the Text encoding setup Press"up" and "down" key of remote control to select different Text encodings Key Tone: Turn on or off 18 R/RW Auto-Play: Press the "ok" key on the remote control to turn Auto-Play "on" or "off" Screen Saver: Press the "ok" key on the remote control to set up the screen saver 19 Screen Saver setup options: Timing and default 20 DLNA DMR: Press the “ok” key on the remote control to turn DLNA DMR on or off 21 Device Name: Press the "ok" key on the remote control to name your device Mini Keyboard for naming your device: 22 MiniKBD Language: Press the "ok" key on the remote control to select the appropriate language Scan Storage: Press the "ok" key on the remote control to setup 23 Resume Play: Press the "ok" key on the remote control to turn Resume Play "on" or "off" Format: Press the "ok" key on the remote control to format a disk 24 BD Menu: Press the "ok" key on the remote control to setup Auto standby: Press the "ok" key on the remote control to turn Auto Standby "on" or "off" 25 Factory Default: Press the "ok" key on the remote control to reset the device to Factory Settings 8.2 Audio Settings: Press the "ok" key on the remote control to enter the Audio Settings menu 26 Night Mode: Switch between "off","on" and "comfort" HDMI Output: Switch between LPCM and RAW modes 27 SPDIF Output: Switch between LPCM and RAW modes Surround Sound: Switch between degrade 5.1 CH and HD Audio 28 Lip Sync: Switch between Auto, Manual, Off 8.3 Video Settings: Press the "ok" key on the remote control to enter the Video Settings menu 29 Setting Options: Aspect Ratio, TV System, Video Zoom, 1080P 24Hz, and Deep Color Aspect Ratio: Switch between Pan Scan 4:3, Letter Box 4:3, 16:9, and 16:10 mode TV System: Switch between HDMI Auto, NTSC, 480P, 720P 60Hz, 1080i 60Hz, and 1080P 60Hz 30 Video Zoom: Turn "on" or "off" 1080P 24Hz: Turn "on" or "off" 31 Deep Color: Switch between Auto, 12 bit, 10bit, and off 8.4 Network Settings: Press the "ok" key on the remote control to enter the Network Settings menu 32 Setting Options: Wired Lan Setup, Wireless Setup, PPPoE Setup, Samba Process, and Samba Security Wired Lan Setup: Select either DHCP IP(auto) and FIX IP(manual) 33 Wireless Setup: Turn "on" or "off" If your home has multiple routers, they will all be displayed as below PPPoE modes Setup: Switch between 34 Wired or Wireless Wired/Wireless: Input PPPoE user ID Finish inputting the PPPoE user ID using the following mini keyboard 35 Samba Process: Turn "on" or "off" Samba Security: Turn "on" or "off" 36 8.5 MISC Settings: Press the "ok" key on the remote control to enter the MISC Settings menu Setting Options: Version Info, Network Info, and USB upgrade 37 Version Info Network Info 38 USB Upgrade Upgrade Guide 1) Download firmware to your USB device root folder and unzip the file from kdLinks.com website 2) Connect your USB device to the player 3) Power on the player, enter Setup -> System -> MISC -> USB upgrade -> Upgrade via USB Note: Please do not power off when your player is upgrading. When you see the "update successful" message, the player will power off and restart itself, and then will reset the system. 39