1
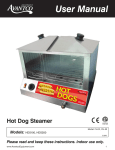
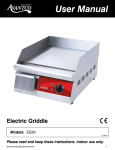
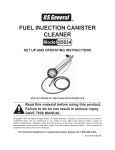
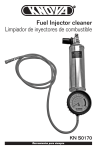
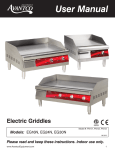
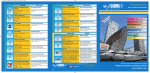
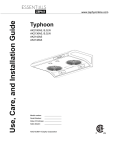
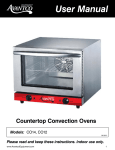
User Manual
Panini Grills
Models: 177P78, 177P84, 177P70S, 177P75SG, 177P85S, 177P88SG
10/2013
Please read and keep these instructions. Indoor use only.
www.AvantcoEquipment.com
1
User Manual
Thank you for purchasing and using our Panini/Sandwich Grill. To make best use of this product and avoid damage
and injury, please read this manual carefully before using the machine, and keep it handy for future reference. The
Sandwich Grill design combines the advantages of stylish design, efficient construction, ease of operation and simple
maintenance. The grill temperature can be easily adjusted to suit cooking requirements, and, while mainly used for
sandwich grilling, the grill may be used for other foods.
WARNING: Any modifications or incorrect installation, unauthorized adjustments or maintenance by unauthorized personnel may result in property loss or injury. Please contact the supplier for any
necessary adjustment or repair, which should only be done by trained professionals.
CAUTION: For your safety, do not place or store any flammable liquid or gas items near the sandwich grill.
WARNING: This equipment must be connected to a grounded power outlet for your safety.
External Structure & Parts List
8
9
7
9
8
7
10
10
6
6
5
5
4
4
3
2
1
11
3
2
1
Single Grill
Double Grill
Models: P78, P70S, P75SG
Models: P84, P85S, P88SG
1. Power Indicator
2. On/Off switch & temperature control
3. Heating cycle indicator
4. Lower body
5. Grease collector
6. Lower grill
7. Feed wire protective tube
8. Upper grill
9. Handle
10. Power supply cord
11. Rubber feet
1. Power Indicator
2. On/Off switch & temperature control
3. Heating cycle indicator
4. Lower body
5. Grease collector
6. Lower grill
7. Feed wire protective tube
8. Upper grill
9. Handle
10. Power supply cord
11. Rubber feet
11
2www.AvantcoEquipment.com
User Manual
Notes
1. This product is intended for commercial use only.
2. Do not disassemble or modify the machine.
3. Lift the upper grill assembly smoothly; jerking it up may cause damage or injury.
4. Before cleaning, disconnect power and allow machine to cool.
5. Do not immerse in water or spray water onto the grills. Water may cause short circuit and injury or damage.
6. To avoid damage, do not jam materials onto the grill or place heavy objects there.
7. When the machine is in use, the body and grill plates are hot, and will cause burns if touched.
8. Do not use an ungrounded power supply cord.
Cautions
1. It is recommended that the machine be unplugged during thunderstorms to avoid potential damage from nearby
lightning strikes.
2. Avoid damaging the controls or grill surfaces with sharp or heavy objects.
3. Turn off power after daily use.
4. Do not use the machine with a damaged power cord.
5. Any internal repair or maintenance should be performed by a factory authorized repair technician.
Important Features
1. Convenient independent temperature controls are easy to set and may result in overall power savings (double unit).
2. Grill temperatures may be set for different uses at the same time (double unit).
3. External shell and grease collector tray are stainless steel.
4. The grills are designed to be easy to use and maintain.
www.AvantcoEquipment.com3
User Manual
Specifications
Single Panini Grill
Double Sandwich Grill
Model Number
P78, P70S, P75SG
P84, P85S, P88SG
Voltage
120V, 60 Hz
120V, 60 Hz
Power
1.75 Kw
2x1.75 Kw
Temp. Controls
1
2
Temp. Range
120 F - 570 F
120 F- 570 F
Upper Grill (overall)
13"x 8 3/4"
8 7/16"x 16 7/8"
Lower Grill
13"x 8 3/4"
9 1/16"x 18 3/16"
Overall Size
17"x 12"x 10"
22 7/16"x 15 9/16"x 8 1/4"
Notes
1. This machine is intended for use at 120V 60 Hz only.
2. A suitable circuit protector (fuse, circuit breaker, etc. ) should be located near the machine.
3. Be certain cable is properly connected to voltage source.
4. Do not place any hard objects on the grill. Do not slam the grill closed.
5. Recommended temperature range for normal use is 392°-482° F.
6. The machine is intended for use where room temperature is below 113°F and humidity below 85%.
7. Do not use caustic or abrasive products for cleaning.
Operating Instructions
1. Be sure power cord is properly connected to a proper source (120V, 60 Hz)
2. Power indicator should indicate power available (light on).
3. S
et to desired temperature (heating indicator will come on). Warm-up time is approximately 7-8 minutes. Heating
indicator will cycle at set temperature.
4. W
hen set temperature is reached, lift top grill, using black handle, and lightly grease grill plates with vegetable oil.
Place food on grill and lightly press handle down. Excess oil will collect in the grease collection tray. Remove food
when cooked. The heating elements will automatically cycle as needed.
5. Turn machine off when no longer needed and unplug from power source.
Instructions for First Time Use
In order to protect the plates of your new grill during transportation, a layer of food-safe oil was coated on the surface
prior to shipment. This oil is harmless, but must be removed before you begin to use. To remove, preheat the grill until
the oil liquifies. Next, carefully wipe away the melted oil with a clean, soft cloth. Once all of the oil is removed you can
begin to use your grill
4www.AvantcoEquipment.com
User Manual
Cleaning and Maintenance
1. Disconnect machine before cleaning and allow to cool.
2. Use only a damp towel with non-corrosive cleaner. Do not immerse or flush with water.
3. Wipe down outside surface to remove any soil.
4. Store in a dry clean area when not in use.
Attack tough grease, oil, and carbon with this ready to use decarbonizer
and degreaser. Its unique formula is designed to clean ovens, grills,
hoods and a wide variety of other surfaces.
Troubleshooting
Problem
Possible Cause
Action
Grill plates do not heat even though power
indicators are lit.
Defective controller
Replace controller
Defective heater(s)
Replace heater(s)
Temperature can not be controlled.
Defective controller
Replace controller
Heating appears normal but power indicators
are not lit.
Defective indicator(s)
Replace
No action when power is turned on.
Defective fuse or open circuit
breaker
Replace fuse or reset circuit
breaker
Do not use the machine if any of the above occur.
Any troubleshooting corrections should be performed by a qualified technician.
Daily Check
Before using the machine, visually inspect for any signs of damage or frayed power cord.
Be certain machine is on a level countertop.
After turning it on, check for anything unusual before you use it.
Inspect the machine every day before using.
If there is any question about operation, do not use.
www.AvantcoEquipment.com5
User Manual
Single Grill
Parts List
Parts List Single Grill
1. Power Light
2. Temperature Control with Switch
1. Power
3.Light
Screw M4x6
2. Temperature
Control
with
Switch
4. Heating
Cycle
Indicator
3. Screw
5. M4x6
Lower Case
4. Heating
Cycle Indicator
6. Internal
Wrenching Screw M6x10
5. Lower
7.Case
Flat Washer
6. Internal
Wrenching
Screw M6x10
8. Internal
Wrenching
Screw M5x25
7. Flat Washer
9. Flat Spacer
8. Internal
Screw M5x25
10. Wrenching
Torsion Spring
9. Flat Spacer
11. Rear Shaft
10. Torsion
SpringRetainer
35. Handle
12. Shaft
11. Rear13.
Shaft
Internal Wrenching Screw M6x40
12. Shaft Retainer
14. Rear Upper Cover
13. Internal Wrenching Screw M6x40 15. Slotted Screw M4x8
14. Rear Upper Cover 16. Spring Pin
15. Slotted Screw M4x8 17. Ground Screw M6x15
16. Spring Pin 18. Power Cord
17. Ground Screw M6x15 19.Cord
Lower
18. Power
Grill
20.
Upper
19. Lower Grill Grill Cover
21.Grill
Slotted
Screw
M4x8
20. Upper
Cover
22.
Top
Cover
21. Slotted Screw M4x8 Slotted
Screw M4x8
22. Top23.
Cover
24.
Upper
Insulator
23. Slotted Screw M4x8 24. Upper Insulator
52. Bottom Cover
54. Hex Nut M6
26. Upper Platen
27. Upper Heater
26. Upper Platen 28. Wiring Guide Tube
27. Upper Heater 29. Wiring Guide Tube Stop
28. Wiring Guide 30.
Tube
Guide Tube Retainer
29. Wiring Guide 31.
Tube
Stop
Retaining
Ring
30. Guide Tube Retainer
32. Upper Platen Shaft
31. Retaining Ring
33. Internal Wrenching Screw M6x8
32. Upper Platen 34.
Shaft
Internal Wrenching Screw M6x8
33. Internal Wrenching
Screw M6x8
35. Handle
34. Internal Wrenching
Screw
M6x8
36. Handle Frame
35. Handle Frame37. Oil Tray
36. Grease Collector
40. Bottom Insulator
37. Oil Tray
41. Bottom Pan
40. Bottom Insulator
42. Slotted Screw M4x8
41. Bottom Pan
43. Barrier Strip Mounting Plate
42. Slotted Screw M4x8
44. Slotted Screw M4x8
43. Barrier Strip Mounting Plate
45. Ceramic Terminal Board
44. Slotted Screw M4x8
46. Hex
Head Screw M6x20
45. Ceramic Terminal
Board
47.
Hex
Nut
46. Hex Head Screw M6x20 M4
47. Hex Nut M4 48. Rubber Foot
48. Rubber Foot 49. Rubber Heater Pressure Plate
50.
Bottom Plate
Heater
49. Rubber Heater
Pressure
51.
Internal
Wrenching Screw M6x8
50. Bottom Heater
52.
Bottom
Cover
51. Internal Wrenching Screw M6x8
Phillips
53. Phillips Head 53.
Screw
M4x8Head Screw M4x8
54. Hex Nut M6
6www.AvantcoEquipment.com
User Manual
Double Grill
Parts List
Parts List Double Grill
1. Power Light
26. Upper Platen
2. Temperature Control with Switch
27. Upper Heater
3.
Screw
M4x6
28.
Wiring Guide Tube
1. Power Light
26. Upper Platen
4.
Heating
Cycle
Indicator
29.
Guide Tube Retainer
2. Temperature Control with Switch
27. Upper Heater
5.
Lower
Case
30.
3. Screw M4x6
28. Wiring Guide Tube Retaining Ring
6.
Internal
Wrenching
Screw
M6x10
31. Upper Platen Shaft
4. Heating Cycle Indicator
29. Guide Tube Retainer
7.
Flat
Washer
5. Lower Case
30. Retaining Ring 32. Internal Wrenching Screw M6x8
8.
Internal
Wrenching
Screw
M5x25
33. Internal Wrenching Screw M6x8
6. Internal Wrenching Screw M6x10
31. Upper Platen Shaft
9. Flat Spacer
34. Handle
7. Flat Washer
32. Internal Wrenching Screw M6x8
10. Torsion Spring
35. Handle Frame
8. Internal Wrenching Screw M5x25
33. Internal Wrenching Screw M6x8
11. Rear Shaft
36. Oil Tray
9. Flat Spacer
34. Handle
12. Shaft Retainer
37. Bottom Insulator
10. Torsion Spring
35. Handle Frame
13. Internal Wrenching Screw M6x40
39. Slotted Screw M4x8
11. Rear Shaft
36. Oil Tray
14. Rear Upper Cover
40. Barrier Strip Mounting Plate
12. Shaft Retainer
37. Bottom Insulator
15. Slotted Screw M4x8
41. Slotted Screw M4x8
13. Internal Wrenching Screw M6x40
39. Slotted Screw M4x8
16. Spring Pin
42. Ceramic Terminal Board
14. Rear Upper Cover
40. Barrier Strip Mounting Plate
17. Ground Screw M6x15
43. Hex Head Screw M6x20
15. Slotted Screw M4x8
41. Slotted Screw M4x8
18. Power Cord
44. Hex Nut M4
16. Spring Pin
42. Ceramic Terminal Board
19. Lower Grill
45. Rubber Foot
17. Ground Screw
M6x15
43. Hex Head Screw
20. Upper
Grill Cover
46.M6x20
Rubber Heater Pressure Plate
18. Power Cord
44.
Hex
Nut
M4
21. Slotted Screw M4x8
47. Bottom Heater
19. Lower Grill
45. Rubber Foot 48. Internal Wrenching Screw M6x8
22. Top Cover
20. Upper Grill
Cover
46. Rubber Heater Pressure
Plate
23. Slotted Screw M4x8
49. Bottom
Cover
21. Slotted Screw
M4x8
47.
Bottom
Heater
24. Upper Insulator
50. Phillips Head Screw M4x8
22. Top Cover
48. Internal Wrenching
Screw
51. Hex
NutM6x8
M6
23. Slotted Screw M4x8
49. Bottom Cover
24. Upper Insulator
50. Phillips Head Screw M4x8
51. Hex Nut M6
www.AvantcoEquipment.com7
User Manual
8www.AvantcoEquipment.com
User Manual
www.AvantcoEquipment.com9