1
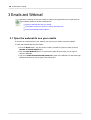
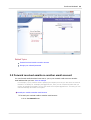
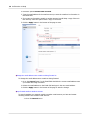
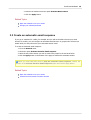
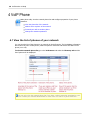
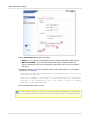
Dramatically simplifying voice and data networking
USER MANUAL V4.6
Disclaimer
Precautions have been taken to assure accuracy of the information written in this user’s manual. Typographic or pictorial
errors that are brought to our attention will be corrected in subsequent issues.
Product specifications in this manual are nominal and are provided for the convenience of our customers. They
are all correct at the date of publication. Critical Links reserves the right to make product changes from time to
time, without prior notification, which may change certain specifications or characteristics shown. We therefore
recommend you to check for changes or updates before using for customer projects or further product
developments
No material will be accepted for return unless Critical Links grants permission in writing.
The handling, installation and usage of the edgeBOX are applicable to certain environments and may be
required for code compliance. Features of the device will not provide protection against abuse, misuse, improper
installation or maintenance. It is important that installation, operation and maintenance are performed in
accordance with instructions supplied in the manual. Electricity and electrical devices must always be treated
with caution and respect.
Product Support
The edgeBOX software is distributed according to the End User License Agreement EULA included at the end of this User
Guide. By using the software you agree to be bound by this EULA. If you do not agree to the terms and
limitations of the EULA you should not use the software.
End User License Agreement
For product technical support please visit the following web site http://www.edgebox.com or contact us at the
following email address: [email protected].
Critical Links
695 Route 46 West
Fairfield, NJ 07004
USA
Phone: 973.276.9006
Support Hotline: +1 888 433 4326
Website: www.critical-links.com
Email: [email protected]
Messages and Voicemail
5
Table of Contents
1. About Self Service
6
6
1.1. Open the.....................................................................................................................
Self Service
2. General Settings
8
8
2.1. Change .....................................................................................................................
your network password
.....................................................................................................................
8
2.2. View your
current disc usage
3. Emails and Webmail
10
.....................................................................................................................
10
3.1. Open the
webmail to see your emails
.....................................................................................................................
11
3.2. Forward
received emails no another email account
13
3.3. Create .....................................................................................................................
an automatic email response
4. VoIP Phone
14
.....................................................................................................................
14
4.1. View the
list of phones of your network
15
4.2. Make a.....................................................................................................................
call to a phone of your network
.....................................................................................................................
15
4.3. Forward
received calls to another phone
17
4.4. Change.....................................................................................................................
your VoIP password
5. Messages and Voicemail
18
.....................................................................................................................
18
5.1. Check your
voicemail for new messages
20
5.2. Play or .....................................................................................................................
delete a received voicemail message
21
5.3. Change.....................................................................................................................
the email address were you receive your voicemail messages
21
5.4. Change.....................................................................................................................
your voicemail PIN
6
Self Service 4.6 Help
1 About Self Service
Self Service is the area where you can overview and configure the details about your
network account. You can:
· View and change some general settings about your account.
· Access the webmail and configure the some properties of your email account as
email forwarding to another email account.
· Make phone calls, view the network phone list or forward calls to another phone, for
example.
· Play and delete received voicemail messages or configure the voicemail settings.
Homepage of the Self Service area
1.1 Open the Self Service
Opening the Self Service can be done in different ways. A common way is to:
1. Go to a computer of the local network (LAN).
2. With a browser, open the webpage https://myedgebox.com.
About Self Service
3. After the page opens, click the link Login.
4. Type your network username and the password to login.
5. Click the Login button.
login to Self Service
7
8
Self Service 4.6 Help
2 General Settings
View and change some general settings about your account.
Change your network password
View the space you are using on your Home and Mail directories
2.1 Change your network password
Your network password is the password you use to login in the self service area - to manage
your account settings, in the webmail - to view your emails, in the local network - to have
access to the network services like using the internet (login to the network is only necessary case
your network access policy forces users to login).
To change your network password:
1. Go to the General menu.
2. Type your new password in the Password field.
3. Retype the new password again in the Confirm field.
4. Click the Apply button in the bottom of the page to save your new password.
You should change your password regularly and use secure passwords, to keep your
network account more protected.
2.2 View your current disc usage
If you use your Home Directory of the network to storage files and if you have a network email
account than you should regularly check the amount of disc space you are using and the amount
you still have left.
To check the disc space you are using, go to the General menu.
In the table in the middle of the page you can see:
· the current disc space you are using to storage your files (Home Dir.) and to storage your
emails (Mail Dir.) in the Used Space column,
· the maximum disc space you can use in the Max. Space column.
General Settings
9
The maximum amount of disc space you can use to storage files and emails in the network is
defined by your network administrator.
Related Topics:
Access your Home Directory
View your emails
Share files with your coworkers using temporary shared folders
10 Self Service 4.6 Help
3 Emails and Webmail
Access the webmail to see your emails or configure the properties of your email account
as forwarding emails to another email account.
Open the webmail and see your emails
Forward the emails you receive to another email account
Create an automatic email response
3.1 Open the webmail to see your emails
If you have an email account in your network, you can see your emails using the webmail.
To open the webmail and see your emails:
1. Go to the Home menu. You can see the number of emails you have not read yet in the
Number of Unread Emails label.
2. Click the Open Webmail button. A new browser page will open were you can login to
enter the Webmail.
3. Type your network username and password to login in the webmail. It's the same login
and password that you use to login in the Self Service.
Emails and Webmail 11
Related Topics:
Forward received emails to another account
Change your webmail password
3.2 Forward received emails no another email account
You can forward emails that have been sent to you to your network email account to another
email address that you have. View an example
For example, if your network email is [email protected] but you also have an email at
Hotmail or at Gmail, for emample [email protected], then you can forward all mails that you
receive at [email protected] to the email account [email protected]. This way you can
read and manage all emails in one place.
Forward your emails to another email account
To forward your received emails to another email account:
1. Go to the General menu.
12 Self Service 4.6 Help
2. Check the option Activate Mail Forward.
3. Type the email address of the email account you want the emails to be forward to in
the Email field.
4. If you want to forward the emails to another account but still keep a copy of them in
this account, select the option Leave a Copy in The Inbox.
5. Click the Apply button in the bottom of the page to save.
Change the email address were emails are being forward to
To change the email address were emails are being forward:
1. Go to the General menu. In the Email field should be the current email address were
your emails are being forward to.
2. Delete the email address on the Email field and type in the new email address.
3. Click the Apply button in the bottom of the page to save the change.
Stop forward emails to another account
To stop forwarding your network emails to another email account you have and restart
receiving emails in the network email account:
1. Go to the General menu.
Emails and Webmail 13
2. Remove the selection from the option Activate Mail Forward
3. Click the Apply button.
Related Topics:
Open the webmail to see your emails
Change your webmail password
3.3 Create an automatic email response
If you go on vacations for a while, for example, and you will not be able to access your email
account for a while, you can configure an automatic email answer. So, people who will send you
emails while your way will receive your automatic answer email.
To create an automatic email response:
1. Go to the General menu.
2. Check the option Activate Vacation Email response.
3. Write the text of the answer you wish to send to the people in the text area below.
4. Click the Apply button in the bottom of the page to activate the automatic answer.
When you come back and want to stop the automatic email response, remove the
selection of the Activate Vacation Email Response option and click the Apply button.
Related Topics:
Open the webmail to see your emails
Forward received emails to another account
14 Self Service 4.6 Help
4 VoIP Phone
Make phone calls, view the network phone list and configure properties of your phone
extension.
View the phone list of the network
Make a call to a phone of the network
Forward your calls to another phone
Change the extension password
4.1 View the list of phones of your network
You can view the list of the phones in our network in the Self service. The list displays information
about who's the user of each phone, what's the phone's extension and what is the status of the
phone (on or off).
To view the network phone list, go to the VoIP menu and select the Directory tab and the
list of phones will be displayed.
You can only view the network phone list if you have a phone extension associated to your
account. Contact your network administrator to know more or to ask for a phone extension.
VoIP Phone 15
Related Topics:
Make a call to a phone of your network
4.2 Make a call to a phone of your network
You can make a phone calls to other phones of your network using the Self Service if your phone
and the phone you want to call are switched on.
To make a call to another phone of the network:
1. Check if your phone is switched on. If it isn't, switch it on.
2. Go to the VoIP menu and select the Directory tab. The list of phones of your network will
appear.
3. Select the phone you want to call from the list of phones. Make sure the selected phone in
switched on (status up).
4. Click the Call button
. Your phone will start ring.
5. Pick up your phone and the phone you are calling will also start to ring.
You can make phone calls using the Self Service only if you have a phone extension
associated to your account. Contact your network administrator to know more or to ask him for
a phone extension.
4.3 Forward received calls to another phone
You can forward the calls you receive in your extension to another phone. It can be to another
extension of your network or to a cell phone, for example.
You can forward them just when you are not available (for example, when you do not answer the
call or you have the phone shut down) or you can forward them at all times.
To forward calls to another phone:
1. Go to the VoIP menu and select the Settings tab.
16 Self Service 4.6 Help
2. In the Call Forward group, select the option:
· Always - if you want the received calls you to be always forwarded to another phone.
· When Unavailable - if you want the received calls to be forward just when your
phone is shut down, when you are answering another call or when you do not answer
the phone.
3. Indicate the phone you want to forward the calls to in the Number field. You can indicate
any phone. View Example
If you want to forward calls to another phone of your network, just type in the phone's
extension number. eg.: 2001.
If you have to forward to a phone exterior to your network, type in the number of the
phone, eg.: 231922965: , or the prefix + number of the phone, eg.: 0231922965,
depending on the configurations of your VoIP network. Contact your network
administrator if you have further doubts.
4. Click the Apply button below to save.
You can forward calls only if you have a phone extension associated to your network
account. Contact your network administrator to know more or to ask him for a phone extension.
VoIP Phone 17
Related Topics:
Change your VoIP password
Check your voicemail for new messages
4.4 Change your VoIP password
The extension password is the password the phone uses to authenticate in the network to be
allowed to make and receive calls. If you have a phone extension you should change every once
in a while your phone's password.
To change your VoIP access password:
1. Go to the VoIP menu and select the Settings tab.
2. Type the new password in the Secret field. How must the password be?
The VoIP password must be between 2 and 10 characters and cannot have spaces nor
any of the following characters: \ / # " ? < > # $ % 0 = |
3. Click the Apply button below to save.
To increase security, try always to create secure passwords when you change your
passwords.
18 Self Service 4.6 Help
5 Messages and Voicemail
Play and delete received voicemail messages or configure the voicemail settings:
Open the voicemail
Play and delete voicemail messages
Change the email were you receive the voicemail messages
Change your voicemail PIN
5.1 Check your voicemail for new messages
You can use the Self Service to check if you have new voicemail messages and also to play and
hear those messages.
Alternatively, you can see if you have new messages by making a call to the Voicemail with
one of the network phones.
You can even check your email account for received voicemail messages because each
time a person leaves you a message in the voicemail, you receive an email in your email account
with the message in a sound file.
Check for received messages using the Self Service
To check if you received new voicemail messages:
1. Go to the Homepage of the Self Service.
2. Check the information label Number of New Voicemails.
Messages and Voicemail
19
3. If you received any messages, click the Open Inbox button to open the Self Service
Voicemail. The received messages will appear in the list of received messages.
4. You can play or delete the received messages.
Check for received messages using a network phone
1. Pick up your network phone or any other phone of the network (you can use any
phone of the network to hear your voicemail messages).
2. Dial the voicemail number. The voicemail's default number is 9999, but your
network administrator can change it.
3. Follow the steps of the assistant to play the messages.
Check for received messages using your email
Voice messages are sent to your email address as a regular emails with the message
attached in a wave sound file. By default, these emails are sent to your network email
account.
1. Open the webmail to see your emails.
2. If you received a new voicemail message as an email, open the email and download
the wave sound file in attach to your computer.
20 Self Service 4.6 Help
3. To hear the message, play it in your regular media player.
You may not have the voicemail active, even if you have a phone extension associated to
your account. If so, the option to change the voicemail PIN is not possible because you are not
able receive voicemail messages. To know more contact your network administrator.
Related Topics:
Play a received voicemail message
Open the webmail
Change the email address were you receive your voicemail messages
5.2 Play or delete a received voicemail message
You can play your voicemail messages directly from the Self Service. You can also delete older
messages that you have already played.
Play a received message
To play a received voicemail messages:
1. Go to the VoIP menu, the Voicemail tab.
2. Select the message you want to play from the list. When the message is selected, a
media player will appear in the Play Our Message group.
3. Press the Play button
of the media player to play the message.
To play voicemail messages you need to have installed the Apple's Quick Time player plug
in.
Delete a message
To delete a received voicemail message:
1. Go to the VoIP menu, Voicemail tab.
2. Select the message you want to delete from the list and click the Delete Message
button.
Related Topics:
Check your voicemail for new messages
Messages and Voicemail
21
5.3 Change the email address were you receive your
voicemail messages
The voicemail email is the email account were you can receive the sound messages that
people who call you leave in your voicemail. By default your voicemail email is your network
email, but you can change it and received the voicemail messages in another email account that
you might have.
Change the email address were you receive your voicemail messages:
1. Go to the VoIP menu and select the Settings tab.
2. In the Email field of the Voicemail group, type the new email address.
3. Click the Apply button below to save.
You may not have the voicemail active, even if you have a phone extension associated to
your account. If so, the option to change the voicemail email address is not possible because
you are not able receive voicemail messages. To know more contact your network
administrator.
5.4 Change your voicemail PIN
You can hear your voicemail messages from the phones of your network. To hear them you need
to indicate your voicemail PIN to authenticate. Why do I need to have a PIN?
The voicemail PIN is asked each time you try to hear your voicemail messages from a phone.
This away, it allows you to hear your voicemail messages in any phone of the network and it
prevents other network users to hear your voice mail messages from your phone.
Change your voicemail PIN:
1. Go to the VoIP menu and select the Settings tab.
2. In the PIN field of the Voicemail group, type the new PIN. How must the PIN be?
The voicemail must be a 4 digits number, 2345, for example.
3. Click the Apply button below to save.
You may not have the voicemail active, even if you have a phone extension associated to
your account. If so, the option to change the voicemail PIN is not possible because you are not
able receive voicemail messages. To know more contact your network administrator.
Related Topics:
22 Self Service 4.6 Help
Check for received messages using a network phone