1
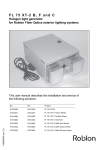
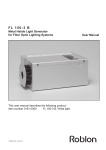
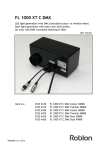
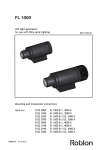
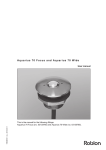
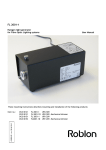
FL 250 B, C and F
250 W Metal halide light generator
for fibre optic lighting systems
User manual
This mounting instruction describe installation and service of the following products:
+99082036 rev. 5.07.2006
Item no.:
01700010
01700050
01700055
01700020
01700030
01700035
01700040
FL 250 B
FL 250 F Colour Wheel
FL 250 F Twinkle Wheel
FL 250 C DMX Dual Wheel
FL 250 C DMX Colour Wheel
FL 250 C DMX Dimmer Wheel
FL 250 C Synchron
1. Introduction
Your ROBLON Fiber Optics metal halide light generator, type FL 250 is intended for indoor use
in fibre optic lighting systems using either glass or PMMA fibres.
The metal halide light generator has been developed to meet the requirements of a Roblon fibre
optic lighting system, where the light output intensity and efficiency is optimised in order to
ensure the best performance and safety.
This manual should serve as a guideline to how the system is operated in the safest way.
Following the recommendations in this guideline all contribute to:
· Enhanced functionality
· Extended lifetime of components
· Uninterrupted system illumination
Contents
1. Introduction .......................................................................................................................... 2
2. Product Overview and Packing List ................................................................................... 3
3. Technical Info ...................................................................................................................... 3
4. Installation Instructions ...................................................................................................... 4
5. Changing lamp ..................................................................................................................... 5
6. Changing fuse ...................................................................................................................... 5
7. DMX Stand Alone Mode for FL250 C .................................................................................. 6
8. Control Cabling of FL 250 C ............................................................................................... 7
9. DMX 512 Control Features for FL 250 C ............................................................................ 8
10. Controlling the FL 250 C synchron light generators ........................................................ 9
11. Troubleshooting ................................................................................................................ 10
12. Spare parts and accessories ............................................................................................ 11
IMPORTANT SAFETY INSTRUCTIONS
Lighted lamp is HOT!
WARNING - To reduce the risk of FIRE, ELECTRIC SCHOCK, EXPOSURE TO
EXCESSIVE UV RADIATION; OR INJURY TO PERSONS:
1) Turn OFF/unplug and allow to cool before replacing bulb (lamp).
2) Bulb (lamp) gets HOT quickly! Only contact switch/plug when turning ON.
3) Do not remain in light if skin feels warm.
4) Do not look directly at lighted bulb (lamp).
5) Use only with bulb (lamp) provided by/ordered from ROBLON.
6) Do not operate the unit unless top is closed and secured by screws.
SAVE THESE INSTRUCTIONS
2. Product Overview and Packing List
Contents of this box:
- Plastic bag
- Light generator FL250 series
- Allen key
- User manual
- Power cord
3. Technical Info
Light port size:
Fibre type
Supply voltage:
Lamps:
Power consumption:
Fuse:
Power cord
Data connection
Ballast:
Thermal protection:
Cooling system:
Fan noise level:
Ambient temperature:
Lamp type
Lamp life time
Lamp colour temp. :
Material:
Dimensions:
Weight:
Safety approvals:
Ø28
PMMA/Glass
100-240 V (nominal) 50-60 Hz
250W BLV type MHR 250 N 4200K
288 - 300 W
5A
Power cord W/ground
5-pin XLR
Electronic
Auto reset
DC axial fan
38 db(A)
-30°C to 40°C
Metal halide
5000 hours
4200 K
Aluminium, anodised
(L x W x H) 414 x 234 x 160mm
4.5-4.8 kg
CE
EMC comply
FCC comply
CB
cULus
3
4. Installation Instructions
Unpack the unit and make sure that the grounded power supply cord is suitable for your
country. The light generator is prepared for universal power input, capable of running from 100240 V (nominal) 50 or 60 Hz.
1. Fully insert the fibre harness
common end into the light.
port of the light generator.
2.Tighten the grille screw with
the supplied Allen key.
3. Connect the power cord at
the back of the light source.
NOTE!
Before switching on, make sure that the requirements in the installation instructions are
observed.
Place the light generator:
Do not place the light generator
Too close to a wall. The light
generator has too get rid of the
heat from the lamp.
Do not place the front of the light
generator too close to a wall.
Always place the light
generator on the feet.
Do not place the light generators
on top of each other.
The heat cannot come from
the light from generator.
Make sure that hot air from one light generator
does not blow directly into the air intake of the
light generator next to it.
4
5. Changing lamp
1. Remove the locking screw at the back.
2. Open the lid.
3. Release the lamp plug.
4. Loosen the thumb screw in the lamp
bracket.
5. Tip the bracket
6. Remove the lamp and bracket.
7. Remove the lamp from the bracket
8. install the new lamp in reverse order.
Orient the lamp such that the front wire
points upwards close to mark.
Mark
Front wire
6. Changing fuse
1. Use a screwdriver to
loosen the fuse holder.
2. Check the fuse.
3. Change the fuse if necessary
and push the fuse holder back in
place.
5
7. DMX Stand Alone Mode for FL250 C
Six built in programs for colour changing and choosing are available.
Code Wheel 1: Towards the light port
9
The light source is in stand alone mode.
Code Wheel 2:
0-9
In the middle
Varies the pauses between the changes. 0 is the shortest and 9 is the longest.
Code Wheel 3: Towards the back
0
1
2
3
4
5
6
7
8
9
Not used
Colour changes between all the colours of the wheel.
Smooth (5 sec.) colour changes between all the colours of the wheel.
Smooth colour changes between colours green and orange. Colour changes at
50% dimming.
Smooth colour changes between colours blue and red. Colour changes at 50%
dimming.
Smooth colour changes between colours green, orange, blue, red, yellow and
backward. Colour changes at 50% dimming.
Full colour. Use code wheel 2 to change colour. 1. White, 2. Green, 3. Orange,
4. Blue, 5. Red, and 6. Yellow.
Not used.
Not used.
Not used.
6
8. Control Cabling of FL 250 C
Connections with 5-pin XLR.
Max signal cable length of the whole installation is 120 meters.
1 Connect the first light
Generator to DMX controller.
2 If there are more than one light
generator they must be connected
serially. (See drawing below)
2 In the last light generator a line
termination must be mounted in the
DMX out.
Serial data connection of
light generators
7
9. DMX 512 Control Features for FL 250 C
When the light generator's address is defined it is possible to control it using a standard DMX
console like the Linebacker or Alcorn McBride. The lists below define the available features.
The numbers refer to the real-DMX values of each channel.
Address is set with three 10-digit code wheels in the lid. Each light generator take up 2
addresses and 3 addresses if they contain dimming wheel. First channel is specified with the
code wheel. The second and possible third follow increasingly.
Address settings:
Code wheel 1:
Code wheel 2:
Code wheel 3:
Control:
000 - 018
019 - 039
040 - 050
051 - 070
071 - 080
081 - 100
101 - 120
121 - 144
145 - 160
161 - 179
180 - 220
221 - 239
240 - 255
Towards the light port. x100
In the middle.
x10
Towards the back.
x1
(1st channel) 5 sec. delay on all functions
Not assigned
Lamp OFF
Not assigned
Shortest mode
Not assigned
Linear mode
Not assigned
Reset colour and dimming wheels
Not assigned
Reset colour wheel
Not assigned
Lamp ON
Not assigned
Colour wheel: (2nd channel)
000 - 200
201 - 205
206 - 230
231 - 255
Position of colour wheel.
Not assigned
Variable speed of rotation clockwise (1 rev./min. at 217)
Variable speed of rotation counterclockwise (1 rev./min. at 242)
Frames 1 through 6 at
Colour
000
200
033
067
100
133
167
White
Green
Orange
Blue
Red
Yellow
Dimming wheel: (3rd channel)
000 - 200
201 - 205
206 - 230
231 - 255
Position of dimming wheel. (000 is no light, 167 is full light)
Not assigned
Variable speed of rotation clockwise (1 rev./min. at 217)
Variable speed of rotation counterclockwise (1 rev./min. at 242)
Frames 1 through 6 at
000
200
033
067
100
133
167
Intensity
0%
6%
12%
25%
50%
100%
8
10. Controlling the FL 250 C synchron light generators
Connect the synchron light generators into the line of light generators via a standard type DMX
cable with a 5-pin male XLR plug. For instructions, see chapter 8.
Set all the connected "slave" light generators to channel "800" and they will be synchronized
with your choice of program on the "master" light generator that should be set according to the
following.
Set one light generator as Master by setting code wheel 1 to "9".
Programs are set with the code wheel 3:
“1” Fast (0.2 sec.) colour changes between all the colours of the wheel.
“2” Smooth (5 sec.) colour changes between all the colours of the wheel.
Pauses in programs 1 and 2:
Code wheel 2
0
1
2
3
4
5
6
7
Pause in sec.
0,8
1,7
2,5
3,3
4,2
5
5,8
6,7
8
7,5
9
8,3
“3” Smooth colour changes between colours green and orange.
“4” Smooth colour changes between colours blue and red.
“5” Smooth colour changes between colours green, orange, blue, red, yellow and backward.
Pauses in programs 3, 4 and 5:
Code wheel 2
0
1
2
3
4
5
6
7
8
9
Pause in sec.
7,5
10
12,5
15
“6” Fixed colour
Colours in program 6:
Code wheel 2
0
1
2
3
Colour
White White Green orange
17,5
4
blue
“7” Not used. (White light)
“8” Constant rotation clockwise
“9” Constant rotation counter clockwise
In programs 8 and 9 the speeds are equivalent to:
Code wheel 2
0
1
2
3
4
RPM
0,1
0,2
0,4
0,6
0,8
“0”
20
22,5
25
27,5
5
red
6
7
8
yellow White White
5
1
6
1,2
7
1,5
8
2
30
9
white
9
3
Not used. (White light)
9
11. Troubleshooting
Symptom
No light
No light, fan running
Light switches ON and
OFF
Cause
Solution
Is the power ON?
Turn ON the power.
Is the supply fuse intact?
Replace the fuse.
Is the power cord properly
Reinsert the power cord.
connected?
Is the lid closed and the lock screw
completely tightened (interlock will Tighten the screw completely.
be activated)?
Check with the installation
instructions. Let it cool off for
Is the light generator too hot?
approx. 5 minutes and try
again.
Replace the lamp with a new
Is the lamp blown?
one.
Let light generator cool off for
Was the power away shortly?
5 minutes before switching
OFF and then ON. *
Is the light generator too hot while Check with the installation
operating?
instructions.
Is the fan blocked?
Is the fan not running?
Is the lamp old?
The light output has
diminished
Are the filters dirty?
Is the fiber harness common end
dirty?
Clear the airways.
Replace the fan with a new
one.
Replace the lamp with a new
one.
Clean the filters with a damp
cloth. Finish by wiping off with
a dry lint-free cloth.
Clean the harness common
end with a damp cloth. Finish
by wiping off with a dry lint-free
cloth.
* Note:
When taking the power away shortly, the light generator's ballast will try to reignite the lamp only
once. This means that if the lamp is too hot the lamp will not start immediately. It will be
nescesary to let the lamp cool off for about 5 minutes then take the power from the light
generator and reinsert the power again to ignite the lamp.
Warning.
Only a properly trained person should undertake the work of servicing other than the
above mentioned.
10
12. Spare parts and accessories
Description
Model designation
Lamp
BLV 250W, MHR 250N
6525 0003
Fan
Papst 4212 NM
6412 0012
Colour filter
Dichroic Yellow colour filter, with bracket
Dichroic Green colour filter, with bracket
Dichroic Blue colour filter, with bracket
Dichroic Red colour filter, with bracket
7800 0390
7800 0391
7800 0392
7800 0393
CTC filter
CTC filter –500K
CTC filter –900K
CTC filter –1200K
7800 0397
7800 0399
7800 0398
Colour wheel
Dimmer wheel
Twinkle Wheel
Standard colour wheel
Standard dimming wheel
Standard Twinkle wheel
5100 0078
5100 0088
5100 0084
Electronic ballast
250W, 100-240 VAC 50/60 Hz
6708 0065
Motor for C DMX models
Gear motor for F models
Stepper motor 1,8°
1 rpm/50sec. 110 Vac
6400 4000
6400 1215
DMX 512 control unit
LineBacker
Alcorn McBride
0160 0300
0160 0301
DMX 512, Splitter
Y-distributor in a DMX system
0160 0310
Syncron control unit
Roblon item no.:
0160 0325
DMX and Synchron Cable
Incl. 2 plugs, male and female
Length 2.5 m
Length 5 m
Length 10 m
Length 51-100 m Please state required length
9903 0056
9903 0052
9903 0057
9903 0058
Synchron Line Termination
Female
9903 0066
DMX and Synchron line
Termination
Male
9903 0065
Roblon accepts no responsibility for possible errors in printed and electronic material. Roblon reserves the right to alter
or discontinue products without notice. © 2012, Roblon A/S.
Roblon Lighting
Nordhavnsvej 1
9900 Frederikshavn
Denmark
Tel: +45 9620 3300
Fax: +45 9620 3399
[email protected]
www.roblon.com
12