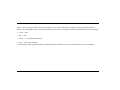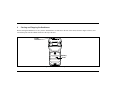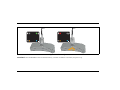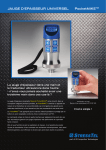
1
GE
Sensing & Inspection Technologies
Ultrasonic
Bondtracer
Operating Manual
021-002-477 Rev. 2
February 2010
Bondtracer
Composite Checker for Airframes
Operating Manual
021-002-477, rev. 2
February 2010
GESensingInspection.com
©2010 General Electric Company. All rights reserved.
Technical content subject to change without notice.
[no content intended for this page - proceed to next page]
Contents
1
2
3
4
5
6
7
8
9
Important Notice . . . . . . . . . . . . . . . . . . . . . . . . . . . . . . . . . . . . . . . . . . . . . . . . . . . . . . . . . . . . . . . . . . . . . . . . . . . . . . . . . . . . . . . . . . . . . 1
General Warnings . . . . . . . . . . . . . . . . . . . . . . . . . . . . . . . . . . . . . . . . . . . . . . . . . . . . . . . . . . . . . . . . . . . . . . . . . . . . . . . . . . . . . . . . . . . . 1
Testing Limitations . . . . . . . . . . . . . . . . . . . . . . . . . . . . . . . . . . . . . . . . . . . . . . . . . . . . . . . . . . . . . . . . . . . . . . . . . . . . . . . . . . . . . . . . . . . 1
3.1
Ultrasonic Test Measurement Critical Operating Procedures . . . . . . . . . . . . . . . . . . . . . . . . . . . . . . . . . . . . . . . . . . . . . . . . . . . . . 2
Safety Information . . . . . . . . . . . . . . . . . . . . . . . . . . . . . . . . . . . . . . . . . . . . . . . . . . . . . . . . . . . . . . . . . . . . . . . . . . . . . . . . . . . . . . . . . . . 3
4.1
Batteries. . . . . . . . . . . . . . . . . . . . . . . . . . . . . . . . . . . . . . . . . . . . . . . . . . . . . . . . . . . . . . . . . . . . . . . . . . . . . . . . . . . . . . . . . . . . . . 3
4.2
Defects/Errors and Exceptional Stresses . . . . . . . . . . . . . . . . . . . . . . . . . . . . . . . . . . . . . . . . . . . . . . . . . . . . . . . . . . . . . . . . . . . . . 3
4.3
Service . . . . . . . . . . . . . . . . . . . . . . . . . . . . . . . . . . . . . . . . . . . . . . . . . . . . . . . . . . . . . . . . . . . . . . . . . . . . . . . . . . . . . . . . . . . . . . . 4
The Bondtracer . . . . . . . . . . . . . . . . . . . . . . . . . . . . . . . . . . . . . . . . . . . . . . . . . . . . . . . . . . . . . . . . . . . . . . . . . . . . . . . . . . . . . . . . . . . . . . 5
Starting and Stopping the Bondtracer . . . . . . . . . . . . . . . . . . . . . . . . . . . . . . . . . . . . . . . . . . . . . . . . . . . . . . . . . . . . . . . . . . . . . . . . . . . . . 8
Calibrating the Bondtracer . . . . . . . . . . . . . . . . . . . . . . . . . . . . . . . . . . . . . . . . . . . . . . . . . . . . . . . . . . . . . . . . . . . . . . . . . . . . . . . . . . . . . 9
Testing Suspect Material with the Bondtracer . . . . . . . . . . . . . . . . . . . . . . . . . . . . . . . . . . . . . . . . . . . . . . . . . . . . . . . . . . . . . . . . . . . . . 11
Technical Specifications . . . . . . . . . . . . . . . . . . . . . . . . . . . . . . . . . . . . . . . . . . . . . . . . . . . . . . . . . . . . . . . . . . . . . . . . . . . . . . . . . . . . . . 12
9.1
Size . . . . . . . . . . . . . . . . . . . . . . . . . . . . . . . . . . . . . . . . . . . . . . . . . . . . . . . . . . . . . . . . . . . . . . . . . . . . . . . . . . . . . . . . . . . . . . . . 12
9.2
Weight . . . . . . . . . . . . . . . . . . . . . . . . . . . . . . . . . . . . . . . . . . . . . . . . . . . . . . . . . . . . . . . . . . . . . . . . . . . . . . . . . . . . . . . . . . . . . . 12
9.3
Battery Life . . . . . . . . . . . . . . . . . . . . . . . . . . . . . . . . . . . . . . . . . . . . . . . . . . . . . . . . . . . . . . . . . . . . . . . . . . . . . . . . . . . . . . . . . . 12
9.4
Operating Temperature . . . . . . . . . . . . . . . . . . . . . . . . . . . . . . . . . . . . . . . . . . . . . . . . . . . . . . . . . . . . . . . . . . . . . . . . . . . . . . . . . 12
9.5
Storage Temperature . . . . . . . . . . . . . . . . . . . . . . . . . . . . . . . . . . . . . . . . . . . . . . . . . . . . . . . . . . . . . . . . . . . . . . . . . . . . . . . . . . . 12
9.6
Environmental Sealing . . . . . . . . . . . . . . . . . . . . . . . . . . . . . . . . . . . . . . . . . . . . . . . . . . . . . . . . . . . . . . . . . . . . . . . . . . . . . . . . . 12
Bondtracer User’s Manual
iii
1
Important Notice
The following information must be read and understood by any user of GE ultrasonic test equipment. Failure to follow these instructions can
lead to errors in test results. Decisions based on erroneous results can, in turn, lead to property damage, personal injury or death.
2
General Warnings
Proper use of ultrasonic test equipment requires two essential elements: knowledge of the specific test application requirements, and
training on the part of the instrument operator.
This operating manual provides instruction in the basic set up and operation of the GE Bondtracer.
3
Testing Limitations
In ultrasonic testing, information is obtained only from within the limits of the sound beam. Operators must exercise great caution in making
inferences about the test material outside the limits of the sound beam. For example, when testing large materials it may be impossible or
impractical to inspect the entire test piece.
When a less-than-complete inspection is to be performed, the operator must be shown the specific areas to inspect. Inferences about the
condition of areas not inspected, based on data from the evaluated areas, should only be attempted by personnel fully trained in applicable
statistical and probability techniques. In particular, materials subject to erosion or corrosion, in which conditions can vary significantly in
any given area, should only be evaluated by fully trained and experienced operators.
Bondtracer User’s Manual
1
Sound beams reflect from the first interior surface encountered. Because of part geometry and over-lapped flaws or overlapped surfaces,
thickness gauges may measure the distance to an internal flaw rather than to the back wall of the material. Operators must take steps to
ensure that the entire thickness of the test material is being examined.
3.1
Ultrasonic Test Measurement Critical Operating Procedures
The following operating procedures must be observed by all users of ultrasonic test equipment in order to minimize errors in test results.
1. Effects of Temperature on Calibration
Temperature variations change the sound velocity of materials and transducer delay lines and, therefore, calibrations. All calibrations should
be performed on-site, and with test blocks at the same temperature as the test piece, to minimize errors due to temperature variations.
2. Transducer Selection
The transducer used in testing must be in good condition without noticeable wear of the front surface. Badly worn transducers will have a
reduced effective measuring range. The specified range of the transducer must include the complete range of thicknesses to be tested. The
temperature of the material to be tested must be within the transducer.s temperature range.
3. Use of Couplants
Operators must be familiar with the use of ultrasonic couplants. Testing skills must be developed so that couplant is used and applied in a
consistent manner to minimize variations in couplant layer thickness and errors in test results. Calibration and actual testing should be
performed under similar coupling conditions, using a minimum amount of couplant and applying consistent pressure on the transducer.
2
Bondtracer User’s Manual
4
Safety Information
IMPORTANT: The Bondtracer is an instrument for materials testing. Any use for medical applications or other purposes is not allowed.
The Bondtracer may only be used in industrial environments.
The Bondtracer can be operated with batteries.
4.1
Batteries
For the battery operation of the Bondtracer, GE recommends the use of three high quality AA alkaline batteries.
4.2
Defects/Errors and Exceptional Stresses
If you have reason to believe that a safe operation of your Bondtracer is no longer possible, you have to disconnect the instrument and
secure it against unintentional reconnection. Remove the batteries if necessary.
A safe operation is no longer possible if:
• The instrument shows visible damages
• The instrument no longer operates perfectly
Bondtracer User’s Manual
3
• After prolonged storage under adverse conditions like exceptional temperatures and/or especially high air humidity, or corrosive
environmental conditions.
• Being subjected to heavy stresses during transportation
4.3
Service
Every effort has been made to provide you with a reliable GE product. However, should service become necessary, GE Inspection
Technologies has established a number of Factory Trained Service Centers. For the location of the nearest facility, refer to GE Customer
Service.
4
Bondtracer User’s Manual
5
The Bondtracer
The Bondtracer is a pulse-echo hand held instrument for inspection of composite parts ranging from 0.070 in. to 0.625 in. in thickness.
This instrument enables airport ramp personnel to map, size and assess the severity of damage to a composite part, and thus determine if
more inspection is required. The Bondtracer can be used in cramped and darkly lit areas, hot and bright sunlight, and cold environments. In
addition, it can withstand aircraft fuel, oil, hydraulic fluids, shock, vibration, RF emissions, large temperature changes, and both wet and dry
climates.
The Bondtracer package includes:
• The Bondtracer instrument (022-509-665)
• Probe (113-843-660)
• Test/calibration block (118-540-980)
• Probe cable, 4 ft. (022-509-786)
• Couplant - 4 oz. (118-300-810)
• 3 AA batteries (021-010-020)
• User’s manual (021-002-477)
Bondtracer User’s Manual
5
Figure 1 on the next page shows the front of the Bondtracer. Users operate the Bondtracer through a front keypad with three buttons:
On/Off, Cal, and Brightness. They view indicator LEDs through a clear lens on the front window. Four LEDs display instrument readings:
• Green — Pass
• Red — Fail
• Yellow — CAL (Calibration)/Coupled
• Blue — Power On/Low Battery
To accommodate different lighting conditions, the Brightness button enables users to select from three different levels of brightness.
6
Bondtracer User’s Manual
Figure 1: The Bondtracer
The Bondtracer runs on three AA batteries for a total of 8 hours of continuous use, when the probe is attached and coupled.
Bondtracer User’s Manual
7
6
Starting and Stopping the Bondtracer
Before starting the Bondtracer, be sure you have installed three AA batteries in the rear of the unit (as shown in Figure 2 below), and
inserted the probe into the LEMO connector at the top of the unit.
Probe
Connector
Battery
Cover
Figure 2: Rear Panel for Battery Insertion
8
Bondtracer User’s Manual
To power up the Bondtracer, press the On/Off button. The Bondtracer runs an internal self-check and lights all the LEDs in a chase pattern.
After power-up, the blue LED remains lit as long as the Bondtracer is on.
Note: If the Bondtracer fails the self-check, the working LEDs blink for 10 seconds, and then the Bondtracer will power down.
To turn off the Bondtracer, press the On/Off button. An Auto Off feature shuts down the Bondtracer after 15 minutes of no use (not coupled,
and no keypad buttons being pressed).
The power LED will begin to flash when about 30 minutes of run time remain on the batteries. The Bondtracer will shut down automatically
when the battery level is too low to provide proper operation.
7
Calibrating the Bondtracer
Once the Bondtracer is powered on, it can be calibrated against a known good block of composite material. To calibrate, couple the attached
probe to a known good composite that is similar to the suspected area in thickness, coating, and other necessary physical characteristics.
Press the CAL keypad button for one second. The Bondtracer stores the Time-Of-Flight and amplitude of the known good part.
The Yellow LED is used to indicate calibration and coupling status. No calibration is stored when the yellow LED is off. A flashing yellow
LED indicates that a calibration has been stored, and that the probe is currently uncoupled. A solid yellow LED indicates a calibration has
been stored and the probe is coupled.
Bondtracer User’s Manual
9
Figure 3: Bondtracer Lights
IMPORTANT: Since the Bondtracer has no internal memory, you must recalibrate it each time you power it up.
10
Bondtracer User’s Manual
8
Testing Suspect Material with the Bondtracer
To test a piece of suspect material with the calibrated Bondtracer, couple the probe to the suspect material. The Bondtracer fires a pulse at 60
Hz, and then detects the echo from the material. It compares the amplitude and TOF (Time Of Flight) with the values from the known-good
material and delivers a pass or fail result.
• If the amplitude and TOF of the signal from the area being inspected are within the defined limits, the green LED will illuminate,
indicating a “pass.”
• If the amplitude and TOF of the signal from the area being inspected is less than the defined limits, the red LED will illuminate,
indicating a “fail.”
• If the amplitude and TOF of the signal from the area being inspected is greater than the defined limits, the red LED and yellow LED will
blink, indicating an “above calibrated range.”
The Bondtracer remains in this mode until you press the CAL button, or until it is powered down, either manually or through auto shutdown.
Bondtracer User’s Manual
11
9
9.1
Technical Specifications
Size
180 mm (H) x 92 mm (W) x 46 mm (D)
9.2
Weight
450 g (including batteries)
9.3
Battery Life
8 hours of continuous use on three AA alkaline batteries
9.4
Operating Temperature
0° to +55°C
9.5
Storage Temperature
-20° to +70°C
9.6
Environmental Sealing
Impact resistant, dust and splash proof, gasket sealed, case tested to IP54
12
Bondtracer User’s Manual
GE Inspection Technologies is an active participant in Europe’s Waste Electrical and Electronic Equipment (WEEE) take-back initiative,
directive 2002/96/EC.
The equipment you purchased required the extraction and use of natural resources for its production. It may contain hazardous substances
that could impact health and the environment. In order to avoid the dissemination of those substances in our environment and to diminish
the pressure on the natural resources, we encourage you to use the appropriate take-back systems. If you need more information on the
collection, reuse and recycling systems, please contact your local or regional waste administration.
Visit http://www.geinspectiontechnologies.com/en/aboutus/ehs/index.html for take-back instructions and more information about this
initiative.
Bondtracer User’s Manual
13
This product contains a battery that cannot be disposed of as unsorted municipal waste in the European Union. See the product
documentation for specific battery information. The battery is marked with this symbol, which may include lettering to indicate cadmium
(Cd), lead (Pb), or mercury (Hg). For proper recycling return the battery to your supplier or to a designated collection point.
What do the markings mean?
Batteries and accumulators must be marked (either on the battery or accumulator or on its packaging, depending on size) with the separate
collection symbol. In addition, the marking must include the chemical symbols of specific levels of toxic metals as follows:
• Cadmium (Cd) over 0.002%
• Lead (Pb) over 0.004%
• Mercury (Hg) over 0.0005%
14
Bondtracer User’s Manual
The risks and your role in reducing them
Your participation is an important part of the effort to minimize the impact of batteries and accumulators on the environment and on human
health. For proper recycling you can return this product or the batteries or accumulators it contains to your supplier or to a designated
collection point.
Some batteries or accumulators contain toxic metals that pose serious risks to human health and to the environment. When required, the
product marking includes chemical symbols that indicate the presence toxic metals: Pb for lead, Hg for mercury, and Cd for cadmium.
Cadmium poisoning can result in cancer of the lungs and prostate gland. Chronic effects include kidney damage, pulmonary emphysema,
and bone diseases such as osteomalcia and osteoporosis. Cadmium may also cause anemia, discoloration of the teeth, and loss of smell
(anosmia).
Lead is poisonous in all forms. It accumulates in the body, so each exposure is significant. Ingestion and inhalation of lead can cause severe
damage to human health. Risks include brain damage, convulsions, malnutrition, and sterility.
Mercury creates hazardous vapors at room temperature. Exposure to high concentrations of mercury vapor can cause a variety of severe
symptoms. Risks include chronic inflammation of mouth and gums, personality change, nervousness, fever, and rashes.
Bondtracer User’s Manual
15
Customer Support Centers
North/South America
50 Industrial Park Road
Lewistown, PA 17044
U.S.A.
Tel: 866 243 2638 (toll-free)
717 242 0327
United Kingdom/Ireland
892 Charter Avenue Canley
Coventry CV4 8AF
England
Tel: +44 845 130 3925
France
68, Chemin des Ormeaux
Limonest 69760
France
Tel: +33 47 217 9216
Germany
Robert Bosch Str.
50354 Hürth
Germany
Tel: +49 2233 601 0
Spain
San Maximo,31, Planta 4A, Nave 6
Madrid 28041
Spain
Tel: +34 195 005 990
E-mail: [email protected]
www.geinspectiontechnologies.com
021-002-477 Rev. 2
©2010 General Electric Company. All rights reserved.
Technical content subject to change without notice.
China
5F, Building 1, No.1 Huatuo Road,
Zhangjiang High-Tech Park,
Shanghai 201203
China
Tel (toll-free): +86 800 915 9966
Tel: +86 (0)21-3877 7888
Japan
7F Medie Corp Bldg. 8
2-4-14-Kichijoji Honcho,
Musashino-shi
Tokyo 180-0004
Japan
Tel: +81 442 67 7067