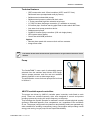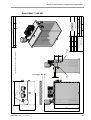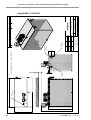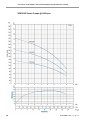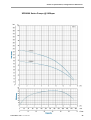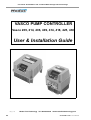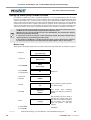
1
ScubaTANK™
VX2
SERIES
Combined Water Storage
& Booster Package
FULL USER GUIDE
© Manual Copyright Dutypoint Systems 2011/12/13/14
The contents, information and copyright of this manual are the sole property of Dutypoint Systems. No part of this manual may be copied,
reproduced, stored or transmitted in any form, or be translated into any language without prior written permission of the owners.
Every effort has been made to ensure the accuracy of this manual at the time of printing, however our policy of continuous improvement
means that specifications and instructions may change without notice.
DUTYPOINT SYSTEMS
SHEPHERD ROAD GLOUCESTER
GL2 5EL
UK
Tel: 44 (0) 1452 300592
Fax: 44 (0) 1452 303691
Email: [email protected]
www.dutypoint.com
Dutypoint Part Number ScubaTANK™ VX2 - M03
Iss.2 - Mar 2014
Contents
ScubaTANK™ VX2 Iss.2 - Mar 2014
1
User Guide - ScubaTANK™ VX2 Combined Water Storage & Booster Package
SAFETY
Important Health & Safety Information
User Guide - Document Conventions .........................................................................6
United Kingdom Health & Safety at Work Act 1974 .................................................... 7
Dutypoint responsibility ...................................................................................7
Customer / Contractor responsibility ...............................................................7
ScubaTANK™ Servicing .............................................................................................7
Electrical Safety ..........................................................................................................7
High voltages ...................................................................................................7
Electronic safety devices .................................................................................8
High voltage testing may damage electronic components .............................. 8
Operating Limits For The Standard Dutypoint ScubaTANK™ Range ........................ 8
Water Regulations ......................................................................................................9
Section 1
Introduction
Welcome .....................................................................................................................12
Overview .....................................................................................................................12
Technical features ...........................................................................................13
Pump ...............................................................................................................13
VASCO variable speed controllers ..................................................................13
Control box ......................................................................................................14
Pressure vessel ...............................................................................................14
Section 2
Specifications, Configurations & Dimensions
Identifying Your ScubaTANK™ ..................................................................................16
Detailed Specifications ...............................................................................................16
Pump rating .....................................................................................................16
Arrangement & Dimensions ........................................................................................17
ScubaTANK™ VX2 375 ..................................................................................17
ScubaTANK™ VX2 490 ..................................................................................18
ScubaTANK™ VX2 650 ..................................................................................19
ScubaTANK™ VX2 800 ..................................................................................20
ScubaTANK™ VX2 1050 ................................................................................21
ScubaTANK™ VX2 1250 ................................................................................22
ScubaTANK™ VX2 1650 ................................................................................23
ScubaTANK™ VX2 2250 ................................................................................24
Pump Performance .....................................................................................................25
XPR3000 Series Pumps @ 2850rpm ..............................................................25
XPR5000 Series Pumps @ 2850rpm ..............................................................26
XPR9000 Series Pumps @ 2850rpm ..............................................................27
Pump Controller Specification ....................................................................................28
Section 3
Installation & Commissioning
Basic Installation Information ...................................................................................... 30
Installation help ...............................................................................................30
Water regulations ............................................................................................ 30
Identifying your ScubaTANK™ system ...........................................................30
Installation Sequence ................................................................................................. 31
Siting the ScubaTANK™ ............................................................................................ 31
Hydraulic Connection ..................................................................................................32
Electrical Supply .........................................................................................................32
Commissioning ...........................................................................................................32
Section 4
Using the ScubaTANK™
The User Control Panels ............................................................................................ 36
System Isolation ..............................................................................................36
Basic Operational Information ....................................................................................36
The VASCO display ........................................................................................36
2
ScubaTANK™ VX2 Iss.2 - Mar 2014
Contents
Initial view ....................................................................................................... 36
Menu view ....................................................................................................... 37
Restoring the Controller Configuration ....................................................................... 38
Starting and Running the ScubaTANK™ ................................................................... 38
Initial installation .............................................................................................. 38
Normal running ............................................................................................... 39
Protection and Fault Alarms ....................................................................................... 39
Alert Messages and Possible Causes ........................................................................ 40
Accessing the Advanced Parameters ........................................................................ 41
Section 5
Troubleshooting
Operational Alarms and Alerts (VASCO Pump Controllers) ....................................... 44
General Tank Troubleshooting ................................................................................... 44
Section 6
Routine Maintenance & Repair
Routine User Maintenance ......................................................................................... 46
Recommended user weekly checks ............................................................... 46
Recommended user monthly checks .............................................................. 46
Recommended user 6 monthly checks ........................................................... 46
Essential 12 monthly (maximum interval) service ........................................... 46
Pressure Vessel Servicing ......................................................................................... 47
Periodic maintenance ..................................................................................... 47
Precharge pressure check .............................................................................. 47
General guidance notes for vessel repair & replacement ............................... 48
Replacing the diaphragm ............................................................................... 48
Installing a replacement vessel ....................................................................... 48
Inlet Solenoid Close Control & Bypass Screw Adjustment ......................................... 49
Opening the Tank ....................................................................................................... 49
Pump Servicing .......................................................................................................... 49
Routine maintenance ...................................................................................... 49
Pump replacement .......................................................................................... 49
Checking the direction of rotation ................................................................... 50
VASCO Controller Servicing ...................................................................................... 50
Appendix A
VASCO User Manual ..................................................................................................... 52
Appendix B
Miscellaneous Technical Information
Net Positive Suction Head (NPSH) ............................................................................ 80
Cavitation ........................................................................................................ 80
Calculating NPSH ........................................................................................... 80
Convertion Factors ..................................................................................................... 81
Variable Speed Flow, Head and Power Calculations ................................................. 82
General Operating Limits (Standard Dutypoint Pumpsets) ........................................ 82
ScubaTANK™ VX2 Iss.2 - Mar 2014
3
User Guide - ScubaTANK™ VX2 Combined Water Storage & Booster Package
4
ScubaTANK™ VX2 Iss.2 - Mar 2014
SAFETY
Important Health & Safety
Information
Please read this section before attempting to use
or work on your ScubaTANK™ VX2 Combined
Water Storage & Booster Package as it contains
important Safety Information and the System
Operating Limitations.
ScubaTANK™ VX2 Iss.2 - Mar 2014
5
User Guide - ScubaTANK™ VX2 Combined Water Storage & Booster Package
User Guide - Document Conventions
Throughout this manual, text may be accompanied by one of the following icons.
Where these occur the conventions shown below are applied.
In general these conventions will also apply to OEM Manufacture’s manuals that are
included within this User Guide, however variations may occur, but these will be
redefined at the beginning of their manual.
DANGER
Denotes attention to the possibility of the risk of personal injury or
damage to adjacent property if the information is ignored.
ELECTRIC Denotes attention to the possibility of life-threatening electric shock if
SHOCK
the information is ignored.
WARNING
Denotes attention to a condition that may result in under-performance or
damage to the equipment if the information is ignored.
NOTE
Denotes attention to an important factor applicable to the action being
performed.
or
WARNING
PLEASE READ THE FOLLOWING INFORMATION WHICH IS PROVIDED FOR YOUR SAFETY
6
ScubaTANK™ VX2 Iss.2 - Mar 2014
Important Health & Safety Information
United Kingdom Health & Safety at Work Act 1974
Dutypoint responsibility
Section 6(a) of this Act requires manufacturers to advise their customers on the safety
and the handling precautions to be observed when installing, operating, maintaining
and servicing their products. The user’s attention is therefore drawn to the following:
• The appropriate sections of this manual must be read before working on the
equipment.
• Installation, operating and maintenance must only be carried out by suitably
trained/qualified personnel.
• Normal safety precautions must be taken and appropriate procedures
observed to avoid accidents.
Refer to DUTYPOINT SYSTEMS for any technical advice or product information.
Customer / Contractor responsibility
It is the responsibility of the customer and/or the contractor:
• To ensure that anyone working on the equipment is wearing all necessary
protective gear/clothing.
• Is aware of appropriate health & safety warnings
• has read the information in this section of the manual.
ScubaTANK™ Servicing
Before attempting to open any unit or service a pump:
• Familiarise yourself with the relevant contents of this manual.
• Installation, maintenance and repair work must only be carried out by
trained, skilled and suitably qualified personnel.
• Disconnect or lock-out the power source to ensure that the pump(s) will
remain inoperative.
Locking out the equipment by switching off the release mechanism or
set value WILL NOT prevent accidental starting of the motor.
• Allow the pump(s) to cool if over-heated.
• CLOSE the isolating valves on the suction and discharge connections of
the affected pump(s).
• VENT the pump(s) slowly and cautiously – Refer to Section 4 of this
manual.
• DRAIN the pump(s).
Electrical Safety
High voltages
Especially applicable when Variable Speed Controllers (Inverters) are fitted.
• When the inverter variable speed drive head is connected to the power
supply the components of the power unit – as well as certain components of
the master control unit – are also connected to the power supply.
TOUCHING THESE COMPONENTS CAN SERIOUSLY ENDANGER LIFE!
ScubaTANK™ VX2 Iss.2 - Mar 2014
7
User Guide - ScubaTANK™ VX2 Combined Water Storage & Booster Package
• Before removing the frequency inverter cover, the system must be
disconnected from the power supply. After switching off the power supply
wait at least 5 minutes before starting work on or in the inverter drive head
– the capacitors in the intermediate circuit must be given time to discharge
completely via the discharge resistors.
Up to 800 volts can be present – if there are faults this can be higher.
• All work carried out when the frequency inverter is open must be performed
only by suitably qualified and properly authorised personnel.
When connecting external control wires care must be taken not to short
circuit adjacent components. Bare cable ends which are not in use must be
insulated.
THE SYSTEM MUST ONLY BE OPERATED WHEN IT HAS BEEN CORRECTLY
EARTHED AND PIPES BONDED TO EARTH IN ACCORDANCE WITH IEE
REGULATIONS
Electronic safety devices
• The inverter drive heads used in Dutypoint Systems Pumpsets contain
electronic safety devices which switch off the control element in the event of
a fault developing.
The motor will have zero current but will remain energised as it stops.
• The motor can also be stopped by ‘mechanical blocking’.
• If it is switched off electronically, the motor is disconnected from the mains
voltage supply via the electronics in the frequency converter.
The motor is not voltage-free in the circuit itself.
• Voltage fluctuations and power failures (temporary outages) can cause the
motor to switch itself off.
Repair of faults can cause the motor to start up again unexpectedly!
High voltage testing may damage electronic components
• High voltage tests of the inverter or the motor may damage the electronic
components.
Bridge before the incoming/outgoing terminals L-L2-L3 and U-V-W.
• To avoid incorrect metering by capacitors incorporated in the electronic
circuits, isolate the motor from the inverter drive head.
Operating Limits For The Standard Dutypoint ScubaTANK™ Range
8
Type of pumped liquids.
Water with
substances.
no
gas
or
aggressive
Maximum pumped liquids temperature.
+23°C
Minimum pumped liquid temperature.
1°C to avoid icing.
Operating ambient temperature.
+5°C to 40°C for indoor installation.
(CEI EN 60439-1).
Relative humidity.
Max 50% at 40°C.
Storage temperature.
+5°C to 50°C.
ScubaTANK™ VX2 Iss.2 - Mar 2014
Important Health & Safety Information
ScubaTANK™ VX2 Iss.2 - Mar 2014
9
User Guide - ScubaTANK™ VX2 Combined Water Storage & Booster Package
10
ScubaTANK™ VX2 Iss.2 - Mar 2014
1
Introduction
This
Section
introduces
the
Dutypoint
ScubaTANK™ VX2 Combined Water Storage &
Booster Package and provides an overview of the
Pumps and Controllers.
ScubaTANK™ VX2 Iss.2- Mar 2014
11
User Guide - ScubaTANK™ VX2 Combined Water Storage & Booster Package
Welcome
Thank you for purchasing one of the DUTYPOINT range of ScubaTANK™ VX2
Combined Water Storage & Booster Packages.
Dutypoint Systems is a Division of Elmbridge Pumps Company and manufactures
pressure boosting pump systems. Since its beginnings as a supplier of pumpsets to
the water industry the name 'Dutypoint' has become synonymous with unrivalled
quality, service and reliability.
This manual is compiled as a composite to include both the Dutypoint package
information and the specific manufacturer’s information necessary for the installation,
safe operation and user maintenance of your ScubaTANK™.
Please read and familiarise yourself with the contents of this manual.
Overview
The ScubaTANK™VX2 is a space-saving dual-pump booster system designed to
supply water to properties where mains pressure is insufficient.
The vented insulated tank incorporates two stainless steel submersible pumps
variable speed inverter drives. A pressure vessel and required valves are also
integrated into the assembly. The inlet water supply is controlled by a slow-close
solenoid valve.
It is the Installer’s responsibility to ensure that the Overflow and Warning Pipe (if
fitted) are suitably piped.
The overall design, combining submersible pumps in an insulated tank, eliminates
most of the noise associated with domestic booster systems. Also the internal
pipework design has been optimised to minimise hydraulic noise, and the controllers
selected for optimum reliability and low running costs.
Outlet &
Isolation Valve
Pressure Vessel
Vessel
Isolation/Drain
Valve
VASCO Pump
Controllers x2
Control Panel
& Isolator
Vent
Overflow
Connection
Submersible
Pumps x2
Overflow
Warning Pipe
(Tanks over
800ltr only)
GRP Tank
Inlet/Solenoid
Valve
Fixing
Bracket
Fig. 1-1 ScubaTANK™ VX2
12
ScubaTANK™ VX2 Iss.2- Mar 2014
Section 1 Introduction
Technical features
• GRP construction tank, 25mm insulation (HCFC and CFC free).
Reinforced base (encapsulated multi-ply board).
•
•
•
•
•
Stainless steel submersible pumps.
Stainless steel pressure vessel with drain valve.
1” Probe-controlled high-flow solenoid valve input.
1¼” BSP full-bore discharge connection (2” available on request).
2“Overflow pipe. Overflow warning pipe fitted to tanks above 800 litres.
•
•
•
•
•
Low water level pump protection device.
Stainless steel pumps.
2xVASCO Inverter pump controllers (230 volt single phase).
LED system status display.
Control box with MCB protection.
Options
• Remote alarm panel with common fault volt-free contacts.
• Integral flow meter.
Full details of tank sizes and technical specifications are provided in Section 2 of this
manual.
Pump
The ScubaTANK™ uses a pair of submersible pumps
selected from the stainless steel Modus XPR range.
Various pumps pressure and flow rate are available
allowing selection to suit a wide usage range.
The specification curves for these pumps can be found
in Section 2.
Fig. 1-2 Modus XPR Pump
VASCO variable speed controllers
The pumps are driven by VASCO (variable speed controller) units fitted to each
pump. These are variable frequency drive units designed to control and protect
pumping systems by varying the output frequency to the pump.
They manages the system operation to maintain a certain constant physical quantity
(pressure, differential pressure, flow, temperature, etc.) regardless of the conditions
of use. The pumps (configured in duty/assist or duty/standby mode) are operated only
when needed thus avoiding unnecessary energy consumption and providing overall
energy cost saving, longer pump life and improved reliability.
ScubaTANK™ VX2 Iss.2- Mar 2014
13
User Guide - ScubaTANK™ VX2 Combined Water Storage & Booster Package
The design of the controller incorporates
motor overload and dry-running protection
with soft-start/stop functionality for
increased system life and reduction in
current surges. An indication of current
consumption, voltage, and power is
provided together with a run time record,
and list any errors and/or failures reported
by the system.
Dangerous induced surges associated
with long power cables can be eliminated
by using the units in association an
optional inductive filter.
Full detail of operating display and setting
up of the VASCO controller is given in the
manufacturer’s manuals republished in
Appendix B of this manual.
Fig. 1-3 VASCO Controller
Control box
Power to the ScubaTANK™ pumps and
controllers is connected through a control box
mounted between the two VASCO pump
controller units. Two MCBs in the box act as
electrical isolators for each pump. The input
power requirement varies from 5 to 12A @230v
50hz dependent upon tank/pump size.
The control box also houses the probe relay units
which services the flow control system.
Fig. 1-4 Control Box
Pressure vessel
The ScubaTANK™ system has an integral stainless
steel sealed pressurisation vessel of 12ltr capacity. An
isolation/drain valve is provided below the vessel to
facilitate maintenance.
Fig. 1-5 Pressure Vessel
14
ScubaTANK™ VX2 Iss.2- Mar 2014
2
Specifications,
Configurations &
Dimensions
This Section lists specifications and the specific
details for available variants of the ScubaTANK™
VX2 Combined Water Storage & Booster Package.
• Identifying Your ScubaTANK™
• Detailed Specifications
• Arrangement & Dimensions
• Pump Performance
ScubaTANK™ VX2 Iss.2- Mar 2014
15
User Guide - ScubaTANK™ VX2 Combined Water Storage & Booster Package
Identifying Your ScubaTANK™
Attached to each tank is a label (fig 2-1) that identifies the type and specification.
XPR Pump Type
Controller
Type &
Quantity.
VX2
3080
250
Actual
Tank
Capacity
Fig. 2-1 Labelling
Detailed Specifications
Suitability
Flow range
Pressure range
Liquid temperature
Water with no gas or aggressive substances.
1.2 - 3.1Litres/sec.
2.5 - 7.0 Bar.
Max +23°C for domestic uses. Min +1°C to
avoid icing.
Operating temperature +5 to 40°C for indoor installation. Relative humidity Max 50% @ +40°C.
Storage temperature
+5 to 50°C.
Modus VASCO (x2).
Controller type
Protection
Low water level via probe control.
GRP construction.
Tank construction
25mm Insulation (HCFC and CFC free).
Base reinforced with encapsulated multi-ply
board and fitted with security fixing brackets.
375ltr, 650ltr, 800ltr, 1050ltr, 1250ltr, 1650ltr,
Tank Capacity
2250ltr.
Tank Dimensions
Refer to page 17 to page 24 for details.
Inlet Valve
Discharge
Pressure vessel
1” Full bore solenoid valve
1¼” BSP (2” available on request).
Screened vent and overflow.
12ltr, Stainless steel construction.
Pump rating
3040
3060
3080
5040
5060
5080
9040
9060
16
Pump
Type
XPR3040
XPR3060
XPR3080
XPR5040
XPR5060
XPR5080
XPR9040
XPR9060
Motor
Power
0.55kW
0.75kW
1.10kW
0.75kW
1.10kW
1.50kW
1.50kW
2.20kW
Full Load
Current
4.1A
5.2A
7.4A
5.0A
7.4A
10.5A
10.5A
11.9A
ScubaTANK™ VX2 Iss.2- Mar 2014
1703
*
600
1200
950
*SIZES MAY INCREASE TO 2" FOR HIGH FLOW UNITS
MIN
CLEARANCE 150mm
INLET
1" BSPF
62
ScubaTANK™ VX2 Iss.2- Mar 2014
160
OVERFLOW
2" PUSHFIT
196
OUTLET
1 1/4"" BSPF
SCUBATANK 375 DOUBLE
DATE
REV
APPROVED
A3
SCUBATANK 375 DOUBLE
FILE NAME: SCUBATANK 375 DOUBLE.dft
SCALE:
WEIGHT:
SHEET 1 OF 1
SIZE DWG NO
TITLE
REVISION HISTORY
DESCRIPTION
NAME
DATE
DRAWN
nigel
22/11/12
CHECKED
ENG APPR
MGR APPR
UNLESS OTHERWISE SPECIFIED
DIMENSIONS ARE IN MILLIMETERS
ANGLES ±X.X°
2 PL ±X.XX 3 PL ±X.XXX
REV
Section 2 Specifications, Configurations & Dimensions
Arrangement & Dimensions
ScubaTANK™ VX2 375
17
OUTLET
1 1/4"" BSPF
*
MIN
CLEARANCE 150mm
INLET
1" BSPF
62
REV
SCUBATANK 490 DOUBLE
DATE
REV
APPROVED
A3
SCUBATANK 490 DOUBLE
FILE NAME: SCUBATANK 490 DOUBLE.dft
SCALE:
WEIGHT:
SHEET 1 OF 1
SIZE DWG NO
TITLE
REVISION HISTORY
DESCRIPTION
NAME
DATE
DRAWN
nigel
22/11/12
CHECKED
ENG APPR
MGR APPR
UNLESS OTHERWISE SPECIFIED
DIMENSIONS ARE IN MILLIMETERS
ANGLES ±X.X°
2 PL ±X.XX 3 PL ±X.XXX
OVERFLOW
2" PUSHFIT
*SIZES MAY INCREASE TO 2" FOR HIGH FLOW UNITS
160
18
196
950
User Guide - ScubaTANK™ VX2 Combined Water Storage & Booster Package
ScubaTANK™ VX2 490
ScubaTANK™ VX2 Iss.2- Mar 2014
1200
750
1703
ScubaTANK™ VX2 Iss.2- Mar 2014
OUTLET
1 1/4"" BSPF
*
MIN
CLEARANCE 150mm
62
INLET
1" BSPF
REV
SCUBATANK 650 DOUBLE
DATE
REV
APPROVED
A3
SCUBATANK 650 DOUBLE
FILE NAME: SCUBATANK 650 DOUBLE.dft
SCALE:
WEIGHT:
SHEET 1 OF 1
SIZE DWG NO
TITLE
REVISION HISTORY
DESCRIPTION
NAME
DATE
DRAWN
nigel
22/11/12
CHECKED
ENG APPR
MGR APPR
UNLESS OTHERWISE SPECIFIED
DIMENSIONS ARE IN MILLIMETERS
ANGLES ±X.X°
2 PL ±X.XX 3 PL ±X.XXX
OVERFLOW
2" PUSHFIT
*SIZES MAY INCREASE TO 2" FOR HIGH FLOW UNITS
160
196
1200
Section 2 Specifications, Configurations & Dimensions
ScubaTANK™ VX2 650
19
1200
1703
750
OUTLET
1 1/4"" BSPF
*
INLET
1" BSPF
MIN
CLEARANCE 150mm
62
1160
1503
*SIZES MAY INCREASE TO 2" FOR HIGH FLOW UNITS
160
20
196
1160
SCUBATANK 800 DOUBLE
DATE
REV
APPROVED
A3
SCUBATANK 800 DOUBLE
FILE NAME: SCUBATANK 800 DOUBLE.dft
SCALE:
WEIGHT:
SHEET 1 OF 1
SIZE DWG NO
TITLE
REVISION HISTORY
DESCRIPTION
NAME
DATE
DRAWN
nigel
22/11/12
CHECKED
ENG APPR
MGR APPR
UNLESS OTHERWISE SPECIFIED
DIMENSIONS ARE IN MILLIMETERS
ANGLES ±X.X°
2 PL ±X.XX 3 PL ±X.XXX
OVERFLOW
2" PUSHFIT
REV
User Guide - ScubaTANK™ VX2 Combined Water Storage & Booster Package
ScubaTANK™ VX2 800
ScubaTANK™ VX2 Iss.2- Mar 2014
1000
OUTLET
1 1/4"" BSPF
*
MIN
CLEARANCE 150mm
INLET
1" BSPF
62
REV
SCUBATANK 1050 DOUBLE
DATE
REV
APPROVED
A3
SCUBATANK 1050 DOUBLE
FILE NAME: SCUBATANK 1050 DOUBLE.dft
SCALE:
WEIGHT:
SHEET 1 OF 1
SIZE DWG NO
TITLE
REVISION HISTORY
DESCRIPTION
NAME
DATE
DRAWN
nigel
22/11/12
CHECKED
ENG APPR
MGR APPR
UNLESS OTHERWISE SPECIFIED
DIMENSIONS ARE IN MILLIMETERS
ANGLES ±X.X°
2 PL ±X.XX 3 PL ±X.XXX
OVERFLOW
2" PUSHFIT
WARNING PIPE
3/4" PUSH FIT
*SIZES MAY INCREASE TO 2" FOR HIGH FLOW UNITS
160
ScubaTANK™ VX2 Iss.2- Mar 2014
196
1500
Section 2 Specifications, Configurations & Dimensions
ScubaTANK™ VX2 1050
21
1500
2003
800
1160
OUTLET
1 1/4"" BSPF
*
MIN
CLEARANCE 150mm
INLET
1" BSPF
SCUBATANK 1250 DOUBLE
DATE
REV
APPROVED
A3
SCUBATANK 1250 DOUBLE
FILE NAME: SCUBATANK 1250 DOUBLE.dft
SCALE:
WEIGHT:
SHEET 1 OF 1
SIZE DWG NO
TITLE
REVISION HISTORY
DESCRIPTION
NAME
DATE
DRAWN
nigel
22/11/12
CHECKED
ENG APPR
MGR APPR
UNLESS OTHERWISE SPECIFIED
DIMENSIONS ARE IN MILLIMETERS
ANGLES ±X.X°
2 PL ±X.XX 3 PL ±X.XXX
OVERFLOW
2" PUSHFIT
WARNING PIPE
3/4" PUSH FIT
160
196
22
62
*SIZES MAY INCREASE TO 2" FOR HIGH FLOW UNITS
REV
User Guide - ScubaTANK™ VX2 Combined Water Storage & Booster Package
ScubaTANK™ VX2 1250
ScubaTANK™ VX2 Iss.2- Mar 2014
1500
2003
1160
OUTLET
1 1/4"" BSPF
*
INLET
1" BSPF
REV
SCUBATANK 1650 DOUBLE
DATE
REV
APPROVED
A3
SCUBATANK 1650 DOUBLE
FILE NAME: SCUBATANK 1650 DOUBLE.dft
SCALE:
WEIGHT:
SHEET 1 OF 1
SIZE DWG NO
TITLE
REVISION HISTORY
DESCRIPTION
NAME
DATE
DRAWN
nigel
22/11/12
CHECKED
ENG APPR
MGR APPR
UNLESS OTHERWISE SPECIFIED
DIMENSIONS ARE IN MILLIMETERS
ANGLES ±X.X°
2 PL ±X.XX 3 PL ±X.XXX
OVERFLOW
2" PUSHFIT
WARNING PIPE
3/4" PUSH FIT
*SIZES MAY INCREASE TO 2" FOR HIGH FLOW UNITS
MIN
CLEARANCE 150mm
62
1160
2003
160
ScubaTANK™ VX2 Iss.2- Mar 2014
196
1500
Section 2 Specifications, Configurations & Dimensions
ScubaTANK™ VX2 1650
23
1500
1160
2003
OUTLET
1 1/4"" BSPF
*
*SIZES MAY INCREASE TO 2" FOR HIGH FLOW UNITS
MIN
CLEARANCE 150mm
INLET
1" BSPF
62
24
REV
SCUBATANK 2250 DOUBLE
DATE
REV
APPROVED
A3
SCUBATANK 2250 DOUBLE
FILE NAME: SCUBATANK 2250 DOUBLE.dft
SCALE:
WEIGHT:
SHEET 1 OF 1
SIZE DWG NO
TITLE
REVISION HISTORY
DESCRIPTION
NAME
DATE
DRAWN
nigel
22/11/12
CHECKED
ENG APPR
MGR APPR
UNLESS OTHERWISE SPECIFIED
DIMENSIONS ARE IN MILLIMETERS
ANGLES ±X.X°
2 PL ±X.XX 3 PL ±X.XXX
OVERFLOW
2" PUSHFIT
WARNING PIPE
3/4" PUSH FIT
196 160
2000
User Guide - ScubaTANK™ VX2 Combined Water Storage & Booster Package
ScubaTANK™ VX2 2250
ScubaTANK™ VX2 Iss.2- Mar 2014
1500
Section 2 Specifications, Configurations & Dimensions
Pump Performance
XPR3000 Series Pumps @ 2850rpm
ScubaTANK™ VX2 Iss.2- Mar 2014
25
User Guide - ScubaTANK™ VX2 Combined Water Storage & Booster Package
XPR5000 Series Pumps @ 2850rpm
26
ScubaTANK™ VX2 Iss.2- Mar 2014
Section 2 Specifications, Configurations & Dimensions
XPR9000 Series Pumps @ 2850rpm
ScubaTANK™ VX2 Iss.2- Mar 2014
27
User Guide - ScubaTANK™ VX2 Combined Water Storage & Booster Package
Pump Controller Specification
Modus VASCO Type 209 or 214
• Input Voltage
Nominal 230Vac, single phase, 50/60 Hz.
• Max. Input Current
[209] 15A, [214] 20A
• Max. Motor Current
230V ~1
• Typical P2 Motor
1.1KW, 1.5HP.
• Protection index
IP55 (NEMA 4).
• Max. altitude
1000m @ nominal current.
• Max. ambient temperature
40°C at nominal current.
• PWM configurable
2.5, 4, 6, 8,10 kHz.
• Serial Comms
RS485.
9A / phase.
VASCO is able to power the motor with a higher current for a short period of time
according to the linear relation: 101% of the nominal current for 10min., 110% nominal
current for 1 min.
28
ScubaTANK™ VX2 Iss.2- Mar 2014
3
Installation &
Commissioning
This Section provides information on siting,
connecting and commissioning the ScubaTANK™
VX2 Combined Water Storage & Booster Package.
• Basic Installation Information
• Installation Sequence
• Siting the ScubaTANK™
• Hydraulic Connection
• Electrical Supply
• Commissioning
ScubaTANK™ VX2 Iss.2- Mar 2014
29
User Guide - ScubaTANK™ VX2 Combined Water Storage & Booster Package
Basic Installation Information
Installation help
Before shipment, all Dutypoint ScubaTANKs are run and pressure tested. Parameters
including pressure settings and delay timers can be adjusted on commissioning to
suit the site conditions. In practice, a system can almost invariably be made to
perform more efficiently on site.
For pre or post-installation help, call the Dutypoint Technical Service Help line:
01452 300590
Identifying your ScubaTANK™ system
The label attached to the tank identifies the system, allowing the installation
requirements to be clarified. The label information and resulting full specification can
be found by referring to Section 2.
Fig. 3-1 ScubaTANK VX2 Typical Installation
30
ScubaTANK™ VX2 Iss.2- Mar 2014
Section 3 Installation & Commissioning
Installation Sequence
• Position and secure the Tank.
• Connect the inlet water supply via a Y-type strainer and an isolation valve.
• Connect the overflow system.
• Connect the outlet pipe.
• Connect the electrical supply cable.
• Fill the system and vent the pump.
• Test and commission.
Siting the ScubaTANK™
The ScubaTANK VX2™ MUST be installed on a level stable floor or plinth capable of
supporting the liquid weight of the full tank. (Details of the tank footprint and height
are shown in fig 3-2.)
• Refer to fig 3-2 for an overview of tank dimensions and footprint or to
Section 2 for full details.
An additional 150mm MUST be allowed below any top surface to allow
access for maintenance.
• The area should be dry, frost-free and well ventilated, away from extremes
of temperature (refer to page 16 for temperature information). All pipe work
must be adequately protected from freezing.
• Adequate provision should be made for drainage, leakage damage
protection and service access
• The tank is freestanding and is provided with fixing feet for secure fastening
to the floor.
Tank
375
490
650
800
1050 **
1250 **
1650 **
2250 **
Footprint (mm) Overall Height Height to Top of
D x W (mm)
(mm) *
Open Tank (mm)
600 x 950
750 x 950
750 x 1200
1160 x 1160
800 x 1500
1160 x 1160
1160 x 1500
1160 x 2000
1703
1703
1703
1503
2003
2003
2003
2003
1200
1200
1200
1000
1500
1500
1500
1500
•
•
•
* An additional 150mm
minimum clearance is required
above overall height.
Inlet centre: 62mm below open
tank top height.
** Additional Overflow Warning
Pipe: ¾” pushfit
Fig. 3-2 ScubaTANK™ Dimensions
ScubaTANK™ VX2 Iss.2- Mar 2014
31
User Guide - ScubaTANK™ VX2 Combined Water Storage & Booster Package
Hydraulic Connection
• All pipework must be in accordance with local Water Authority regulations.
• A Y-type strainer, fitted horizontally) and an isolation valve should be fitted
to the mains water supply to the unit.
• The discharge pipework must be sized according to the system demand.
• All pipework must be securely supported and not over-stressed.
• The overflow and the warning pipe (if fitted) must be suitably piped.
The factory-set closing speed screw on the inlet solenoid valve adjusts the input flow
rate and MUST NOT be re-adjusted except by a competent engineer following the
procedure on page 49. Correct operation MUST be verified before leaving the unit
unattended.
ADJUSTING WILL INVALIDATE THE WARRANTY.
The bypass screw is only for temporarily use in the event of an electrical failure.
Electrical Supply
ALL ELECTRICAL WORK MUST BE CARRIED OUT BY A SUITABLY QUALIFIED
PERSON FOLLOWING THE LATEST IEE REGULATIONS
THE SYSTEM MUST ONLY BE OPERATED WHEN IT HAS BEEN CORRECTLY
EARTHED AND PIPES BONDED TO EARTH IN ACCORDANCE WITH THE LATEST IEE
REGULATIONS.
VASCOCONTROLLER ELECTRIC SHOCK DANGER
The Controller contains high voltage. NEVER open the Controller or work with any
electrical connections within it, unless the electrical supply to the unit is isolated.
Wait a further 2 minutes after isolation for the internal circuitry to discharge.
Referring to fig 3-3:
• The electrical supply feed to the ScubaTANK™ should be a dedicated line
to minimise electromagnetic interference.
• The electrical supply rating can be ascertained from the inset pump rating
table.
• The control panel isolator cable should be connected via a suitably rated
external MCB.
The probe relay settings are factory preset and should conform with the inset
information in fig 3-3.
ADJUSTMENT WILL INVALIDATE THE WARRANTY
Commissioning
• Refer to fig 3-3 and ensure that the probe relay is set correctly.
• Refer to Section 4, and run up the system to fill the tank.
• Verify that there are no leaks.
• Verify correct running.
• If required, refer to Appendix A to access the control parameters to optimise
them.
• Advise the user on correct operation.
32
ScubaTANK™ VX2 Iss.2- Mar 2014
Section 3 Installation & Commissioning
Electrical Supply Ratings
3040
3060
3080
5040
5060
5080
9040
9060
Pump
Type
XPR3040
XPR3060
XPR3080
XPR5040
XPR5060
XPR5080
XPR9040
XPR9060
Motor
Power
0.55kW
0.75kW
1.10kW
0.75kW
1.10kW
1.50kW
1.50kW
2.20kW
Full Load
Current
4.1A
5.2A
7.4A
5.0A
7.4A
10.5A
10.5A
11.9A
Probe Relay Settings
Time = 1
Sensitivity
= 0.9
Mode = A
The probe relay settings are factory preset.
ADJUSTMENT WILL INVALIDATE THE
WARRANTY
Fig. 3-3 Electrical Connections & Probe Relay Settings
ScubaTANK™ VX2 Iss.2- Mar 2014
33
User Guide - ScubaTANK™ VX2 Combined Water Storage & Booster Package
34
ScubaTANK™ VX2 Iss.2- Mar 2014
4
Using the ScubaTANK™
This Section provides information on controlling
and adjusting the ScubaTANK™ VX2 Combined
Water Storage & Booster Package.
• The User Control Panels
• Basic Operational Information
• Restoring the Controller Configuration
• Starting and Running the ScubaTANK™
• Protection and Fault Alarms
• Accessing the Advanced Parameters
ScubaTANK™ VX2 Iss.2- Mar 2014
35
User Guide - ScubaTANK™ VX2 Combined Water Storage & Booster Package
The User Control Panels
System Isolation
The individual pump/controller system can
be isolated using the MCBs located in the
control box. All other pump control is
carried out using the VASCO controllers.
The probe relay settings are factory
preset and should conform with the inset
information in fig 3-3.
ADJUSTMENT WILL INVALIDATE THE
WARRANTY
Probe Relay
Timers
Pump/
Vasco MCB
Isolators
Fig. 4-1 System Isolators
Basic Operational Information
The VASCO display
The display screen on the VASCO is a
back-lit LCD displaying 2 rows of 16 digits
each. Alarms are indicated by an audible
signal
ENTER
Scroll
Down
Initial view
When first powering the VASCO, the
display shows:
LCD = X.XX
INV = X.XX
Release of display software
Release of inverter software
START
motor
STOP motor
Menu exit
Alarms reset
Scroll Up
Fig. 4-2 The VASCO Display
.
One pump/VASCO combination will have been set as master (display name 00) and
one as slave (display name 01). The term “INV:” will be replaced by the appropriate
display name, “00:” or “01:”
Various End User messages are then displayed. Increment to the next by pushing the
Scroll buttons:
The First Row of the display gives the VASCO/Pump status as follows:
• Inv: ON XXX.X Hz VASCO is powered and is powering the motor
showing its frequency.
• Inv: ON Mot: OFF VASCO is powered but motor is not running (i.e.
motor/pump was stopped due to minimum frequency being reached).
• Inv: OFF Mot: OFF VASCO is not powered.
The Second Row of the display provided the following information:
Inv: ON/OFF Mot: ON/OFF
p_m = XX.X [bar]
36
p_m is the value read by the pressure transducer.
By pressing ENTER the pressure set value is displayed. By
keeping ENTER pressed for more than 5 seconds, it is possible
to modify the set pressure in real time.
ScubaTANK™ VX2 Iss.2- Mar 2014
Section 4 Using the ScubaTANK™
Inv: ON/OFF Mot: ON/OFF
f = XXX [Hz]
Inv: ON/OFF Mot: ON/OFF
V = X.XX [V]
I= XX.X [A]
Inv: ON/OFF Mot: ON/OFF
cosphi = XXX
Inv: ON/OFF Mot: ON/OFF
P = XXXXX [W]
f is the supply frequency to the motor.
By pressing ENTER you can change the f value manually (the
word “set” is displayed). Press ENTER again to exit parameter
setting (the word “set” disappears).
V is the voltage supplied to the motor.
This value is displayed only if motor is OFF.
If the motor is ON, a value I equal to the absorbed motor current
is displayed.
cosphi index means the phase angle phi between the voltage
and current absorbed by the motor.
P is the power in Watts supplied to the pump.
Inv: ON/OFF Mot: ON/OFF
STATUS: NORMAL
Inverter Life
xxxxx h : xx m
Motor Life
xxxxx h : xx m
%f 25 50 75 100
%h XX XX XX XX
XXXXXXXXXXXXXXX
NORMAL status means no alarms.
If an alarm occurs, a message blinks on the display and an
audible signal is activated.
Pressing ENTER accesses:
VASCO hours run, PUMP hours run, Consumption statistics,
Alarm list.
PUMP hours refer to pump powered time.
To return to previous views, press ENTER.
XXXXXXX h : XX m
Menù
ENT to access
Menu view
Pressing ENTER when you are in initial display [MENU / ENT] will display the
following sub MENUs to allow access to the installer and advanced options.
You should only access and adjust installation and advanced parameters if you are
trained to do so, as improper setting of them could compromise the integrity and the
life of the controller and the pump. A full description of the installation and advanced
parameters is available in Appendix A of this manual.
Call the Dutypoint Technical Service Help line 01452 300590.
MENU’
Install. param.
MENU’
Advanced. param.
MENU’
Retrive init. set
MENU’
Change init. set.
Installer password required to enter level 1 (default 001)
Advanced password required to enter level 2 (default 002)
Installer password required to enter level 1 (default 001)
Here it is possible to return to original set parameters.
Advanced password required to enter level 2 (default 002)
To exit the MENU level and return to initial display, press the STOP button.
ScubaTANK™ VX2 Iss.2- Mar 2014
37
User Guide - ScubaTANK™ VX2 Combined Water Storage & Booster Package
Restoring the Controller Configuration
Your pumpset will have been tested and set to a default initial set of parameters to
configure pump characteristics, pressure sensor range, and system characteristics.
Without these initial settings it is impossible to run the pump.
If required, the initial settings can be restored using the 1st level password as
described above.
A full description of these settings is available in Appendix A of this manual.
Call the Dutypoint Technical Service Help line 01452 300590.
Starting and Running the ScubaTANK™
Initial installation
As supplied the tank will have been tested and set to a default initial set of
parameters configuring pump, sensor range, and system characteristics, allowing
the user to run the pump on installation.
The master pump/VASCO will be identified as “00” and the slave as “01”.
Ensure that the Outlet Valve is OFF (no demand).
Switch on the pumps as follows:
• Power On the VASCOs in turn using the control box contact breakers.
Ensure that the LCD screens initially display the software issue, then
reports 00:(or 01:) On Motor Off, (refer to page 36).
The tank should start to fill.
• Turn on one pump by pressing the START MOTOR button on the
associated VASCO.
The LCD screen then reports 00:(or 01:) On Motor On on the duty pump.
• Open the Tank outlet to create a demand.
The pump should respond to demand.
• Turn off the running pump using the STOP MOTOR button.
• Turn on the other pump by pressing the START MOTOR button on the
associated VASCO.
The LCD screen then reports 01:(or 00:) On Motor On on the duty pump.
• Open the Tank outlet to create a demand.
The pump should respond to demand and confirms that both pumps are working.
• Turn the other pump back on by pressing the START MOTOR button on the
associated VASCO.
The LCD screen should only reports 00:(or 01:) On Motor On on the duty
pump.
• Open the Tank outlet to create a demand.
• Simulate a failure of the running pump by switching its main MCB isolator
off.
The off -line pump should start to maintain output flow.
• Switch the “faulted” pump back on and repeat the test by turning off the
other MCB isolator.
The standby pump should immediately come on to satisfy demand.
38
ScubaTANK™ VX2 Iss.2- Mar 2014
Section 4 Using the ScubaTANK™
Normal running
Ensure that the tank is full before starting the VASCOs
Switch on the pumps as follows:
• Power On the VASCOs in turn using the control box contact breakers.
Ensure that the LCD screens initially display the software issue, then
reports 00:(or 01:) On Motor Off (refer to page 36).
• Turn on both pumps by pressing the START MOTOR button on the
VASCOs.
The LCD screen then reports 00:(or 01:) On Motor On on the duty pump;
01:(or 00:) On Motor Off on the standby pump.
Both pump/VASCO combinations will have been configured to identical parameters.
In case of an alarm or failure of a pump in a system, this pump’s operation will be replaced
(temporary or permanently) by the other pump.
Protection and Fault Alarms
Whenever a fault is detected, a flashing message is displayed on the Controller
display together with an audible alarm.
The STATUS message in the initial view will display the fault.
• Pressing the STOP button will attempt to reset the alert. If the reset is
unsuccessful the message is re-displayed and the alarm re-sounds.
• If dry-running occurs for over 2 seconds, the Controller will stop the pump. It
will then attempt to re-run the pump at 10, 20, 40, 80, 160 minute intervals
and then permanently stop it.
If dry-running occurs, the Controller will try to restart the pump automatically.
ENSURE YOU SWITCH OFF THE POWER BEFORE ATTEMPTING MAINTENANCE.
• The Controller will stop the pump if the motor current is higher than the
preset motor current for an extended time.
By pressing the START button it is possible to run the pump again.
• The Controller will stop the pump if the input voltage goes higher than the
preset voltage for an extended time.
By pressing the START button it is possible to run the pump again.
• The Controller will stop the pump if the input voltage goes lower than the
preset voltage for an extended time.
By pressing the START button it is possible to run the pump again.
Other possible causes of general faults and their solutions can be found in
Section 5.
ScubaTANK™ VX2 Iss.2- Mar 2014
39
User Guide - ScubaTANK™ VX2 Combined Water Storage & Booster Package
Alert Messages and Possible Causes
You should only adjust attempt to rectify faults by accessing and adjusting
installation and advanced parameters if you are trained to do so, as any improper
setting of them could compromise the integrity and the life of the controller and the
pump. A description of the installation and advanced parameters is available
Appendix A of this manual.
Call the Dutypoint Technical Service Help line 01452 300590.
ALARM MESSAGE
ALARM DESCRIPTION
POSSIBILE SOLUTIONS
Make sure that the motor current setting
parameter is higher than the rated current.
OVERCURRENT MOT.
Motor overload. The input current of the
motor is higher than the rated motor
current setting parameter.
Motor voltage drop caused by the
inverter causes the motor input current
to be higher than the rated current.
Contact the manufacturer to check if
the motor is capable of accepting this
current.
UNDER VOLTAGE
Supply voltage too low.
Check possible causes of undervoltage.
OVER VOLTAGE
Supply voltage too high.
Check possible causes of overvoltage.
Check for other possible causes of over
current.
Make sure than ambient temperature is less
than 40 °C (104 °F).
OVER TEMP. INV.
Inverter over temperature.
Check the cooling fan is working properly and
providing proper cooling.
Reduce the PWM value (Advanced Parameter
Menu).
NO LOAD
SENSOR FAULT
No load.
Sensor error.
Check if motor is properly connected to the
VASCO terminals.
Check the transducer.
Check the wiring from the transducer.
Check if the pump is primed.
NO WATER
(DRY RUN COSPHI)
40
Motor cosphi is lower than the set value
of the dry running cosphi.
MAX.VALUE ALARM
Measured value has reached the
maximum value accepted by the
system.
MIN.VALUE ALARM
Measured value has reached the
lowest value accepted by the system.
Check the set value of dry running cosphi. Dry
running cosphi is approximately 60% of the
rated cosphi (at rated frequency) listed on the
motor plate.
If pump’s cosphi is lower than the set dryrunning cosphi for at least 2 seconds, the
controller stops the pump. It then tries to run
the pump again at 10, 20, 40, 80, 160 minute
intervals and then the pump is stopped.
WARNING: If dry running protection occurs, the
controller will try to start the pump
automatically. Be sure to switch off the power
source to before performing any maintenance.
Check possible causes of max value.
Check max value parameter setting.
Check possible causes of min value (e.g.
broken pipe, open pressure relief valve, etc.).
Check min alarm value parameter setting.
ScubaTANK™ VX2 Iss.2- Mar 2014
Section 4 Using the ScubaTANK™
IGBT TRIP ALARM
The current drawn by the load exceeds
the capacity of the fitted controller.
The controller is still able to continue to
power the load for 10 minutes with an
output current of 101% of nominal and
for 1 minute with an output current of
110% of nominal.
Increase the ramp-up time.
Make sure that the load current is at least 10%
below the controller nominal current.
Check the voltage drop along the supply cable
to the motor.
Check the wiring connections.
NO COMMUNICATION
Communication between Master and
Slave(s) has been interrupted.
Make sure the Master is not in the Menu level.
If so, exit from the level.
In STATUS on the Slave (where the alarm is
displayed) try to reset the alarm by pushing
STOP button.
ADDRESS ERROR
Same address as other Controllers in
the group.
The address of each controller needs to be set
differently.
KEYBOARD FAULT
A button on the keyboard has been
pressed for more than 150 seconds.
Make sure buttons are not depressed.
DIGITAL INPUT
ALARM SLAVE XX
Call manufacturer’s service assistance.
Digital input opened/closed.
Check the input digital configuration (Located in
Installer Parameters menu.)
Slave XX error detected by Master
Check the status of the Slave.
Accessing the Advanced Parameters
You should only adjust attempt to rectify faults by accessing and adjusting
installation and advanced parameters if you are trained to do so, as any improper
setting of them could compromise the integrity and the life of the controller and the
pump. A description of the installation and advanced parameters is available
Appendix A of this manual.
Call the Dutypoint Technical Service Help line 01452 300590.
ScubaTANK™ VX2 Iss.2- Mar 2014
41
User Guide - ScubaTANK™ VX2 Combined Water Storage & Booster Package
42
ScubaTANK™ VX2 Iss.2- Mar 2014
5
Troubleshooting
This Section provides general troubleshooting
tips applicable to the Dutypoint ScubaTANK™
VX2 Combined Water Storage & Booster Package.
ScubaTANK™ VX2 Iss.2 - Mar 2014
43
User Guide - ScubaTANK™ VX2 Combined Water Storage & Booster Package
When a fault first occurs, turning off the main power to the Tank, leaving off for
around 1 minute before powering back on, may be sufficient to clear the fault.
Operational Alarms and Alerts (VASCO Pump Controllers)
The VASCO controllers continuously monitor and provide operational alarms and
alerts. These are listed in this manual in Section 4 (page 39). Additional VASCO
troubleshooting information can be found in the manufacturers manual in Appendix A.
General Tank Troubleshooting
Item/Fault
Pump will not start.
Possible Cause(s)
1.
No electrical power.
1.
Check and rectify.
2.
Blown fuse(s).
2.
Check and rectify.
3.
Overload trip.
3.
Check and try to reset the overload trip.
4.
Faulty Controller
4.
Refer to controller operational troubleshooting
in Section 4 (page 38).
1.
The rotating part of the pump is
partially or completely obstructed
e.g: impeller obstructed by foreign
matter.
1.
Open the tank to examine the pump to
inspect and rectify. Refer to page 49.
2.
Pump not primed.
WARNING: running the pump ‘dry’
can cause serious damage to the
mechanical seal.
2.
Low water level. Check and rectify.
3.
Valve fully or partially closed.
3.
Check all appropriate valves are fully open.
4.
Incorrect pump rotation direction.
4.
Pump is either incorrectly wired or the
controller is incorrectly programmed.
Refer Section 6 to check and rectify.
5.
Pump failing.
5.
Replace pump.
1.
Pump is cavitating.
1.
Increase the discharge back pressure slightly
by progressively closing a manual isolating
valve on the discharge side until the cavitation
stops.
1.
Motor bearings worn.
2.
Replace pump.
2.
The rotating part of the pump is
partially or completely obstructed
e.g: impeller obstructed by foreign
matter.
3.
Open the tank to examine the pump to inspect
and rectify. Refer to page 49.
1.
The pump is switched to “Hand”
operation.
1.
Switch back to “Auto”.
2.
Controller fault.
2.
Arrange an immediate service visit.
1.
Pipework or the pump chamber has a
partial blockage.
1.
Check and rectify.
Reset the trip and try again.
2.
Momentary loss of power supply.
2.
Reset the trip and try again.
3.
Discharge flow rate too high.
3.
Reduce by the discharge flow rate by
increasing the discharge back pressure
slightly by progressively closing the manual
isolating valve on the discharge side.
Reset the trip and try again.
4.
Incorrect overload trip value.
4.
Check value (Section 3) and if incorrect
change the overload trip.
Low (or zero) output
(discharge rate).
Pump vibrates and/
or is noisy
Pump running
continuously
Recommended Action
Overload Trip
44
ScubaTANK™ VX2 Iss.2 - Mar 2014
6
Routine Maintenance &
Repair
This
Section
provides
information
on
maintenance and repair ScubaTANK™ VX2
Combined Water Storage & Booster Package.
• Routine User Maintenance
• Pressure Vessel Servicing
• Pump Servicing
• VASCO Controller Servicing
ScubaTANK™ VX2 Iss.2 - Mar 2014
45
User Guide - ScubaTANK™ VX2 Combined Water Storage & Booster Package
Routine User Maintenance
Dutypoint Pumpsets have been designed to keep major maintenance requirements
to a minimum. Planned maintenance of the pumps and other principal components
should therefore be undertaken at the intervals recommended below.
In addition, the user should routinely make visual checks of the equipment during use,
noting particularly any unusual noises or vibrations. This will give an immediate
indication of any irregularity in the operation of the system.
It is essential that a full test following the Commissioning procedure (refer to
Section 3) is carried out on an annual basis.
DO NOT COMMENCE ANY MAINTENANCE WORK UNLESS YOU ARE SUITABLY
QUALIFIED TO SO AND HAVE READ THE SAFETY SECTION AT THE BEGINNING OF
THIS MANUAL.
Refer to the information that is provided in this section for procedures.
Recommended user weekly checks
• Inspect the ScubaTANK™ and system for leaks, etc.
• Observe the running of the pump and note any unusual vibration, etc.
Recommended user monthly checks
• Switch off and visually check the security of the ScubaTANK™ hydraulic
and electrical connections.
• Observe the running of the pump and note any unusual vibration, etc.
• Check the vents on the controller and clear any dust or other obstructions.
• Operate the manual isolating valve three times to ensure continued efficient
working.
Recommended user 6 monthly checks
• The pressure vessel should be drained and the pre-charge pressure
checked with a gauge and if necessary corrected (refer to page 47).
• Undo the tank lid (refer to page 49), and check the cleanliness of the pump
inlet grating. Replace the lid.
Essential 12 monthly (maximum interval) service
Carry out the full Commissioning procedure to verify correct safe operation. Refer to
Section 3 for details.
46
ScubaTANK™ VX2 Iss.2 - Mar 2014
Section 6 Routine Maintenance & Repair
Pressure Vessel Servicing
Service information below is taken from the Manufacturer’s Installation Manual.
Periodic maintenance
Periodic maintenance is recommended at least twice a year and should be carried out
by authorised specialised personnel only.
1. First check that the expansion or pressure tank is totally drained of water, and
that the system is switched off and no electrical parts are live.
2. Check and, if necessary reset the precharge pressure, using the following
procedure. Ensure that the pressure does not exceed the value specified.
Precharge pressure check
The precharge air pressure for vessels should be 90% of the maximum pressure
generated by the pump in the pipework system. e.g: If the max. pressure generated
by the pump in a system is 6 bar, the required pre-charge pressure is 5.4 bar.
Refer to the following table:
Required Pressure
Precharge Pressure
Fig. 6-1 Pump PreCharge Pressure Calculator
Refer to fig 6-2 to verify the precharge pressure:
1. First check that the expansion vessel is
totally drained of water, and that the
system is switched off and no electrical
parts are live. Use the drain valve to drain
the vessel.
2. Locate the vessel charging valve (either
underneath or adjacent to the plastic cap
on top of the vessel, and connect a
portable pressure gauge which has a
flexible hose and Schrader-type connector
to the valve. (The gauge measuring range
must be compatible with the expected
pressures in your application.)
2
2
3
3. Verify that the pre-charge pressure above
the diaphragm corresponds to the 90%
criteria in fig 6-1.
4. If necessary, release or add air.
To add air, inflate the diaphragm using a
hand or footpump.
5. When the precharge pressure is correct
replace the air valve cap and vent cover.
ScubaTANK™ VX2 Iss.2 - Mar 2014
Fig. 6-2 Pre-charging a Vessel
47
User Guide - ScubaTANK™ VX2 Combined Water Storage & Booster Package
General guidance notes for vessel repair & replacement
• Always ensure that the maximum working pressure and temperature is
never exceed.
• During installation ensure adequate drainage to limit potential damage
caused by leakage during draining.
• The vessel must be installed and regularly inspected to conform to current
legislation by qualified personnel only.
• The appliance must be protected by an appropriate earthing systems or
isolated from the system by a dielectric joint.
• The manufacturer shall not be held liable for any personal or material
damage caused by the product or to the product if it is installed and/or used
improperly or in way that differs from the manufacturer’s specifications.
ELECTRIC SHOCK DANGER
Before beginning to work on the vessel you MUST isolate the Electrical Supply and
make sure that it cannot be accidentally reconnected.
It is the installer’s responsibility to perform the connection in compliance with local
regulations and all electrical guidelines.
Replacing the diaphragm
Air Vent Cover
To replace the diaphragm refer to fig 6-3.
Air Vent
1. Turn off the ScubaTANK™.
2. Empty the expansion tank.
3. Remove the pre-charging by releasing the
air-vent.
Tank
4. Loosen the M8 screws fastening the flange.
5. Remove the flange.
6. Extract the diaphragm and replace it.
Diaphragm
Installing a replacement vessel
1. Turn off the ScubaTANK™ and remove the
old vessel
2. Make sure the replacement is in good
condition. If the product is damaged do not
start on installation.
3. The product must be installed in the same
position as the original.
Flange
M8 Washers &
Screws
Fig. 6-3 Pressure Vessel Diaphragm
4. Set the precharge pressure, using the
procedure given earlier in this section on page 47. Ensure that the pressure does
not exceed the value specified in the procedure.
5. Make sure the cap of the valve is fitted tightly after pre-charging and that there is
no leakage.
48
ScubaTANK™ VX2 Iss.2 - Mar 2014
Section 6 Routine Maintenance & Repair
Inlet Solenoid Close Control & Bypass Screw Adjustment
The factory-set closing speed screw on the inlet solenoid valve adjusts the input flow
rate and MUST NOT normally be re-adjusted except by a competent engineer
following the procedure below. Correct operation MUST be verified before leaving the
unit unattended.
ADJUSTING WILL INVALIDATE THE WARRANTY.
The bypass screw is only for temporarily use in the event of an electrical failure.
The closing speed screw alters the operating speed of the solenoid and is used to
reduce water-hammer and flow noise.
If the input flow is set higher than the overflow discharge capability, there is a high
possibility that the tank will overfill.
The bypass screw permanently opens the valve to temporarily allow tank use in the
event of an electrical failure.
If either screws are adjusted, verify correct operation before leaving the unit
unattended.
CLOSING
SPEED
Off
Reduce
BYPASS
Increase
On
Fig. 6-4 Inlet Solenoid Valve Control Screws
Opening the Tank
To remove the tank lid:
1. Remove the 4x plastic covers to expose the M6 domed screws securing the lid.
2. Remove the screws to open the lid.
3. Replace the lid, screws and caps before returning the tank to use.
Pump Servicing
The following information is extracted from the manufacturer’s documentation.
Routine maintenance
The pump requires no detailed maintenance except to:
• Periodically verify that the suction grate is clear
• Periodically with the supply power turned off, check the condition of the
cables and electrical power and earth connections.
Pump replacement
The electrical pump must never be used outside the limitations described in the
technical specifications. Replacement pumps should remain in their supplied original
packing until installation.
ScubaTANK™ VX2 Iss.2 - Mar 2014
49
User Guide - ScubaTANK™ VX2 Combined Water Storage & Booster Package
1. Before installation, check the new pump and verify its integrity and that it is the
correct type/rating. Contact the supplier if there are any anomalies.
ELECTRIC SHOCK DANGER
Before beginning to work on the pump, you MUST isolate the Electrical Supply and
make sure that it cannot be accidentally reconnected.
Wait a further 2 minutes for the internal circuitry to discharge BEFORE opening or
working with any electrical connections on the MODULATOR controller.
It is the installer’s responsibility to perform the connection in compliance with local
regulations and all electrical guidelines.
2. Locate the 4x plastic screw covers protecting the M6 screws securing the tank lid.
Remove the covers and screws and lift off the tank lid to access the old pump.
3. Disconnect the pump pipework.
4. Referring to the instructions in Section A disconnect the pump electrical cable,
noting the cable colour coding.
5. Insert the replacement pump into the tank and reconnect the pipework.
To avoid damage, do not use excessive force when screwing the pipe to the pump
discharge outlet.
6. Feed the pump cable through the watertight glands and make the electrical
connections to the controller as noted in step 4 above, verifying that the earth
connection is securely made.
7. Fix the power cable to the delivery pipe using suitable strap.
8. Replace the covers on the controller.
9. Test the system, checking rotation direction (see below).
10. When testing is complete, replace the tank lid and screw it down, refitting the
plastic caps.
Checking the direction of rotation
If the direction of rotation is reversed due to incorrect connection or controller
programming, the pump performance will be significantly lower than the nominal
values. To verify a correct connection, proceed as follows:
1. Start the electrical pump before it is submerged. Correct rotation is in a counterclockwise direction as viewed from above.
This operation will be performed dry and MUST NOT last more than a few seconds.
2. With the pump operating, installed and submerged, use a clamp meter to
measure the current. If the rotation is reversed, you will see values about double
those indicated on the name plate.
3. Correct before using the system.
VASCO Controller Servicing
Maintenance, repair and replacement of the VASCO controllers is contained in the
manufacturer’s guide published in Appendix A of this manual.
50
ScubaTANK™ VX2 Iss.2 - Mar 2014
A
Appendix A
Manufacturer’s Guide VASCO
This Section contains a facimile copy of the
Installation, Safety and Configuration instructions
provided by supplier of the VASCO Controller
series:
All data is subject to change without notice.
ScubaTANK™ VX2 Iss.2 - Mar 2014
51
User Guide -ScubaTANK™ VX2 Combined Water Storage & Booster Package
VASCO User Manual
VASCO PUMP CONTROLLER
Vasco 209, 214, 406, 409, 414, 418, 425, 430
User & Installation Guide
Iss 2_11.13
52
Modus Fluid Technology Tel: 0844 8007052 www.modusfluidtechnology.com
ScubaTANK™ VX2 Iss.2 - Mar 2014
Appendix A
Contents
Contents
Safety Information
Introduction
.................................................................................................................2
............................................................................................................................3
Basic Operational Information ...............................................................................................3
The VASCO Display .........................................................................................................3
Initial View ...................................................................................................................4
Menu view ...................................................................................................................5
Restoring the Controller Configuration .............................................................................5
Protection and Fault Alarms ..................................................................................................6
Alert Messages and possible causes ...............................................................................6
Troubleshooting VASCO
.......................................................................................................8
VASCO Installation, Replacement & Connection Details ......................................................9
Electrical Considerations ..................................................................................................9
Technical Characteristics ..................................................................................................9
Mounting instructions ........................................................................................................10
Electrical and signal connection .......................................................................................11
VASCO serial connection .................................................................................................15
Pressure control ................................................................................................................15
Pressure Vessel ..........................................................................................................15
Sensor installation or replacement ..............................................................................15
Parameter Setting
.................................................................................................................16
Accessing the VASCO Parameters ..................................................................................16
Access Passwords ............................................................................................................16
Initial Controller Configuration ..........................................................................................16
Installer Parameters ..........................................................................................................17
Advanced Parameters ......................................................................................................21
Setting Up a Multi-pump COMBO Function ......................................................................25
Master setup ...............................................................................................................25
Slave setup .................................................................................................................26
IMPORTANT SAFETY INFORMATION
Safety Information
BEFORE INSTALLING OR OPERATING ANY CONTROL SWITCH, ENSURE THAT YOU HAVE CAREFULLY READ
AND UNDERSTOOD THIS MANUAL
This manual contains safety, installation and troubleshooting information for the Vasco 209, 214, 409, 414, 415, 425
Controllers current at the time of compilation. Do not throw away this manual after installation. The manufacturer
declines all responsibility in the event of accident or damage due to negligence or failure to observe the
instructions described in this manual or in conditions that differ from those indicated on the device. Failure to
observe and follow the instructions in this manual may result in dangerous and potentially lethal electric shock.
Safety symbols are used in manual are:
Denotes attention to the possibility of the risk of
personal injury or damage to the equipment or
adjacent property if the information is ignored.
Denotes attention to the possibility of lifethreatening electric shock if the information is
ignored.
Hydraulic and electrical installations must be carried out by qualified personnel according to the local
safety regulations, standards and legislation.
Disconnect the VASCO from the main power supply before commencing any work. The device must
be connected to the main power supply via a switch to ensure provision for complete disconnection
before any work is commenced (including visual inspection) on it or the connected load.
For the entire period VASCO is powered, high voltage is present on the output terminals of the inverter
whether or not the pump is running. Do not remove the cover and the cable plate for any reason
without having first disconnected the device from the main power supply and waiting at least a further
5 minutes.
The VASCO and pumping system must be grounded properly before operation. To eliminate the risk
of electric shock or even death, before powering the device after installation or maintenance, it is
recommended to retighten all 4 washered cover screws to ensure a maintained ground connection
Avoid any shock or significant impact when handling.
Check any replacement VASCO immediately upon delivery for damage and/or missing parts. If either occurs, immediately
notify the supplier. Damages due to transport, incorrect installation, or improper use of the device will null and void the
warranty. Tampering or disassembly of any component will automatically void the warranty.
2
Modus Fluid Technology Tel: 0844 8007052 www.modusfluidtechnology.com
ScubaTANK™ VX2 Iss.2 - Mar 2014
Iss2_11.13
53
User Guide -ScubaTANK™ VX2 Combined Water Storage & Booster Package
User Guide - VASCO Pump Controller
Introduction
VASCO is a variable frequency drive designed to control and protect
pumping systems by varying the output frequency to the pump. VASCO can
be applied to both new and existing pumping systems, and provides:
• energy and cost savings.
• simplified installation and an overall lower pumping system cost.
• longer life of the pumping system and relevant components.
• improved reliability.
When connected to a pump, VASCO manages the system operation to
maintain a certain constant physical quantity (pressure, differential pressure,
flow, temperature, etc.) regardless of the conditions of use. The pump is
operated only when needed thus avoiding unnecessary energy
consumption. VASCO is able to:
• protect the motor from overload and dry running.
• implement soft start and soft stop to increase the system life and
reduce current peaks.
• provide an indication of current consumption, voltage, and
power.
• maintain a record of run time and display any errors and/or
failures reported by the system.
• control up to two additional pumps at a constant speed (Direct
On Line).
• connect to other VASCO units for combined operation.
To implement this each controller has a Control/Display panel which
provides user access to general running information and allows user
intervention and parameter modification under password protection.
Fig. 1-1 VASCO Single and
3 Phase Units
If supplied fitted to a pumpset it will have been tested and set to a default initial set of parameters to
configure pump characteristics, pressure sensor range, and system characteristics. Without these
initial settings it is impossible to run the pump.
Basic Operational Information
The VASCO Display
The display screen on the VASCO is a back-lit LCD displaying 2 rows of 16 digits each. Alarms are indicated by an
audible signal
Fig. 1-2 The VASCO Display
Iss 2_11.13
54
Modus Fluid Technology Tel: 0844 8007052 www.modusfluidtechnology.com
3
ScubaTANK™ VX2 Iss.2 - Mar 2014
Appendix A
User Guide - User Guide - VASCO Pump Controller
Initial View
When first powering the VASCO, the display shows:
LCD = X.XX
INV = X.XX
Release of display software
Release of inverter software
Various End User messages are displayed. Increment to the next one by pushing the Scroll buttons:
The First Row of the display gives the VASCO/Pump status as follows:
• Inv: ON XXX.X Hz VASCO is powered and is powering the motor showing its frequency.
• Inv: ON Mot: OFF VASCO is powered but motor is not running (i.e. motor/pump was stopped due to
minimum frequency being reached).
• Inv: OFF Mot: OFF VASCO is not powered.
If the Combo function is activated (e.g. Duty/Standby mode), the VASCO address is placed close to the word “Inv”.
The Second Row of the display provided the following information:
Inv: ON/OFF Mot: ON/OFF
p_m = XX.X [bar]
Inv: ON/OFF Mot: ON/OFF
f = XXX [Hz]
Inv: ON/OFF Mot: ON/OFF
V = X.XX [V]
I= XX.X [A]
Inv: ON/OFF Mot: ON/OFF
cosphi = XXX
Inv: ON/OFF Mot: ON/OFF
P = XXXXX [W]
p_m is the value read by the pressure transducer.
By pressing ENTER the pressure set value is displayed. By
keeping ENTER pressed for more than 5 seconds, it is possible
to modify the set pressure in real time.
f is the supply frequency to the motor.
By pressing ENTER you can change the f value manually (the
word “set” is displayed). Press ENTER again to exit parameter
setting (the word “set” disappears).
V is the voltage supplied to the motor.
This value is displayed only if motor is OFF.
If the motor is ON, a value I equal to the absorbed motor current
is displayed.
cosphi index means the phase angle phi between the voltage
and current absorbed by the motor.
P is the power in Watts supplied to the pump.
Inv: ON/OFF Mot: ON/OFF
STATUS: NORMAL
Inverter Life
xxxxx h : xx m
Motor Life
xxxxx h : xx m
%f 25 50 75 100
%h XX XX XX XX
XXXXXXXXXXXXXXX
NORMAL status means no alarms.
If an alarm occurs, a message blinks on the display and an
audible signal is activated.
Pressing ENTER accesses:
VASCO hours run, PUMP hours run, Consumption statistics,
Alarm list.
PUMP hours refer to pump powered time.
To return to previous views, press ENTER.
XXXXXXX h : XX m
Menù
ENT to access
4
Modus Fluid Technology Tel: 0844 8007052 www.modusfluidtechnology.com
ScubaTANK™ VX2 Iss.2 - Mar 2014
Iss2_11.13
55
User Guide -ScubaTANK™ VX2 Combined Water Storage & Booster Package
User Guide - VASCO Pump Controller
Menu view
Pressing ENTER when you are in initial display [MENU / ENT] will display the following sub MENUs to allow access
to the installer and advanced options, (refer to page 16 for further information).
You should only access and adjust these parameters if you are trained to do so.
Improper setting of these advanced parameters could compromise the integrity and the life of the
controller and the pump.
MENU’
Install. param.
MENU’
Advanced. param.
MENU’
Retrive init. set
MENU’
Change init. set.
Installer password required to enter level 1 (default 001)
Advanced password required to enter level 2 (default 002)
Installer password required to enter level 1 (default 001)
Here it is possible to return to original set parameters.
Advanced password required to enter level 2 (default 002)
To exit the MENU level and return to initial display, press the STOP button.
Restoring the Controller Configuration
Your pumpset will have been tested and set to a default initial set of parameters to configure pump characteristics,
pressure sensor range, and system characteristics. Without these initial settings it is impossible to run the pump.
If required, the initial settings can be restored using the 1st level password as described above.
A full description of the parameters and their allowable settings can be found in the Advanced Parameter Section
of this manual on page 16.
Iss 2_11.13
56
Modus Fluid Technology Tel: 0844 8007052 www.modusfluidtechnology.com
5
ScubaTANK™ VX2 Iss.2 - Mar 2014
Appendix A
User Guide - User Guide - VASCO Pump Controller
Protection and Fault Alarms
Whenever a fault is detected, a flashing message is displayed on the Controller display together with an audible
alarm.
The STATUS message in the initial view will display the fault.
• Pressing the STOP button will attempt to reset the alert. If the reset is unsuccessful the message is redisplayed and the alarm re-sounds.
• If dry-running occurs for over 2 seconds, the Controller will stop the pump. It will then attempt to re-run
the pump at 10, 20, 40, 80, 160 minute intervals and then permanently stop it.
If dry-running occurs, the Controller will try to restart the pump automatically.
ENSURE YOU SWITCH OFF THE POWER BEFORE ATTEMPTING MAINTENANCE.
•
•
•
The Controller will stop the pump if the motor current is higher than the preset motor current for an
extended time.
By pressing the START button it is possible to run the pump again.
The Controller will stop the pump if the input voltage goes higher than the preset voltage for an
extended time.
By pressing the START button it is possible to run the pump again.
The Controller will stop the pump if the input voltage goes lower than the preset voltage for an extended
time.
By pressing the START button it is possible to run the pump again.
A full list of messages, together with possible causes and solutions can be found in this manual in
the Troubleshooting Section on page 8.
Alert Messages and possible causes
ALARM MESSAGE
ALARM DESCRIPTION
POSSIBILE SOLUTIONS
Make sure that the motor current setting
parameter is higher than the rated current.
OVERCURRENT MOT.
Motor overload. The input current of the
motor is higher than the rated motor
current setting parameter.
Motor voltage drop caused by the
inverter causes the motor input current
to be higher than the rated current.
Contact the manufacturer to check if
the motor is capable of accepting this
current.
UNDER VOLTAGE
Supply voltage too low.
Check possible causes of undervoltage.
OVER VOLTAGE
Supply voltage too high.
Check possible causes of overvoltage.
Check for other possible causes of over
current.
Make sure than ambient temperature is less
than 40 °C (104 °F).
OVER TEMP. INV.
Inverter over temperature.
Check the cooling fan is working properly and
providing proper cooling.
Reduce the PWM value (Advanced Parameter
Menu).
NO LOAD
No load.
SENSOR FAULT
6
Sensor error.
Check if motor is properly connected to the
VASCO terminals.
Check the transducer.
Check the wiring from the transducer.
Modus Fluid Technology Tel: 0844 8007052 www.modusfluidtechnology.com
ScubaTANK™ VX2 Iss.2 - Mar 2014
Iss2_11.13
57
User Guide -ScubaTANK™ VX2 Combined Water Storage & Booster Package
User Guide - VASCO Pump Controller
Check if the pump is primed.
NO WATER
(DRY RUN COSPHI)
Motor cosphi is lower than the set value
of the dry running cosphi.
MAX.VALUE ALARM
Measured value has reached the
maximum value accepted by the
system.
MIN.VALUE ALARM
Measured value has reached the
lowest value accepted by the system.
IGBT TRIP ALARM
The current drawn by the load exceeds
the capacity of the fitted controller.
The controller is still able to continue to
power the load for 10 minutes with an
output current of 101% of nominal and
for 1 minute with an output current of
110% of nominal.
Check the set value of dry running cosphi. Dry
running cosphi is approximately 60% of the
rated cosphi (at rated frequency) listed on the
motor plate.
If pump’s cosphi is lower than the set dryrunning cosphi for at least 2 seconds, the
controller stops the pump. It then tries to run
the pump again at 10, 20, 40, 80, 160 minute
intervals and then the pump is stopped.
WARNING: If dry running protection occurs, the
controller will try to start the pump
automatically. Be sure to switch off the power
source to before performing any maintenance.
Check possible causes of max value.
Check max value parameter setting.
Check possible causes of min value (e.g.
broken pipe, open pressure relief valve, etc.).
Check min alarm value parameter setting.
Increase the ramp-up time.
Make sure that the load current is at least 10%
below the controller nominal current.
Check the voltage drop along the supply cable
to the motor.
Check the wiring connections.
NO COMMUNICATION
Make sure the Master is not in the Menu level.
If so, exit from the level.
In STATUS on the Slave (where the alarm is
displayed) try to reset the alarm by pushing
STOP button.
ADDRESS ERROR
Same address as other Controllers in
the group.
The address of each controller needs to be set
differently.
KEYBOARD FAULT
A button on the keyboard has been
pressed for more than 150 seconds.
Make sure buttons are not depressed.
DIGITAL INPUT
ALARM SLAVE XX
Iss 2_11.13
58
Communication between Master and
Slave(s) has been interrupted.
Call manufacturer’s service assistance.
Digital input opened/closed.
Check the input digital configuration (Located in
Installer Parameters menu.)
Slave XX error detected by Master
Check the status of the Slave.
Modus Fluid Technology Tel: 0844 8007052 www.modusfluidtechnology.com
7
ScubaTANK™ VX2 Iss.2 - Mar 2014
Appendix A
User Guide - User Guide - VASCO Pump Controller
Troubleshooting VASCO
Fault
LCD does not switch on after powering
the VASCO
Possible Cause / Solution
Check the connecting flat cable between the LCD board (attached to
the cover) and the control board.
Check the fuses.
Check that the power cables are properly connected.
Check the EMC filter leakage current to ground.
Power line of VASCO is interrupted by the
differential protection contactor
When performing the Offset operation of
the pressure device, a SENS.PRESS.OFF
alarm occurs
Frequency and pressure oscillation on
constant pressure control mode
Following a rapid off/on the power supply, the differential contactor can
interrupt the power. After turning off the VASCO it is recommended to
wait at least 1 minute before restarting.
Check that the sensor cable is properly connected to the sensor device
and to the VASCO.
Make sure that the sensor and its cable are not damaged.
Check that the operating range of pressure sensor is of 4 -20mA type
and the value of 15V is within the voltage feed range of the sensor
Check that the pressure vessel and its air pressure is correctly set. It
may be necessary to increase the tank volume or reduce the precharge pressure.
Check the Ki & Kp parameters (Installer Parameters menu). At first, try
increasing the Ki value. If there is still oscillation, try reducing the last
digit of the Kp value by one.
Increase the delta start pressure (Installer Parameters menu)
DOL pump stops and starts continuously
Check to see if the water tank and it’s air pressure are correctly set. It
may be necessary to increase the tank volume or reduce the precharge pressure.
Decrease the delta start pressure (Installer Parameters menu)
Measured pressure drops too much
before VASCO starts the pump
Check to see if the water tank and it’s air pressure are correctly set. It
may be necessary to increase the tank volume or reduce the precharge pressure.
Modify the value of the Ki & Kp parameters (Installer Parameters
menu). At first, try reducing the Ki value. If the start is still incorrect try
increasing the last digit of the Kp value by one.
8
Modus Fluid Technology Tel: 0844 8007052 www.modusfluidtechnology.com
ScubaTANK™ VX2 Iss.2 - Mar 2014
Iss2_11.13
59
User Guide -ScubaTANK™ VX2 Combined Water Storage & Booster Package
User Guide - VASCO Pump Controller
VASCO Installation, Replacement & Connection
Details
Electrical Considerations
Protection
The protections required upstream of each VASCO depends on the type of installation and local regulations. We
recommend to use overload protection with the characteristic curve of type C and type B circuit breaker, sensitive
to both AC and DC current.
Electromagnetic compliance
To ensure electromagnetic compatibility (EMC) of the system, it is necessary to apply the following measures:
•
Always ensure that the device connected to ground.
•
Use shielded signal cables connecting the screen at
one end only.
• Keep the motor cable as short as possible (<1 m / <3
ft). For longer lengths, it is recommended to use
shielded cables, connecting the screen at both ends.
• Separate signal, motor, and power supply cables.
VASCO will periodically refresh the display to maintain the screen
information in the event of electromagnetic corruption.
Installation with long motor cables
With long motor cables it’s recommended to decrease the
commutation frequency from 10 kHz (default) to 2.5 kHz
(advanced parameters). This reduces the probability of voltage
spikes in the motor windings which may damage the insulation.
Fig. 1-3 Commutation Frequency
Technical Characteristics
Model
209
214
Vin+/-15%
(V AC)
230
x 1 phase
230
x 1 phase
Vout max
(V)
Line Current
max
(A)
1 x Vin
Motor Current
max
(A)
Typical P2 Motor
(KW
HP)
9
1.1
1.5
7
1.5
2
9
1.1
1.5
11
3
4
15
3 x Vin
1 x Vin
20
3 x Vin
406
380 - 460
x 3 phase
3 x Vin
10
6
2.2
3
409
380 - 460
x 3 phase
3 x Vin
13.5
9
4
5.5
414
380 - 460
x 3 phase
3 x Vin
16
14
5.5
7.5
418
380 - 460
x 3 phase
3 x Vin
21
18
7.5
10
425
380 - 460
x 3 phase
3 x Vin
31
25
11
15
430
380 - 460
x 3 phase
3 x Vin
35
30
15
20
Power frequency: 50-60Hz, Max amb. temp at nom. current: 40°C (104 °F ) Max altitude at nom. current: 1000m
Protection: IP55 (NEMA 4, Serial connect: RS485,
Iss 2_11.13
60
PWM configurable: 2.5, 4, 6, 8, 10 kHz.
Modus Fluid Technology Tel: 0844 8007052 www.modusfluidtechnology.com
9
ScubaTANK™ VX2 Iss.2 - Mar 2014
Appendix A
User Guide - User Guide - VASCO Pump Controller
Mounting instructions
The VASCO is installed directly on the fan cover of the motor and is cooled by the motor fan. A supplied Motor
Mounting Kit allows a solid coupling of the two units.
VASCO 209, 214, 406, 409
Motor Mounting Kit
Qty 4 x Rods
Qty 4 x M5 nuts
Qty 4 x Hooks
Qty 1 x Cooling ring
Use the cooling ring for best cooling of VASCO during
operation.
Warning: when using the cooling ring, the cooling air
of the motor is slightly warmer than without the
VASCO; if the resulting motor temperature exceeds
the indicated maximum allowable value, remove the
cooling ring, leaving the VASCO to be cooled by itself.
If possible, coupling hooks should be attached to the
motor shield instead of the cooling fan cover.
Fig. 1-4 VASCO 209 Motor Mounting
VASCO 414,418,425,430
Motor Mounting Kit
Qty 4 x M5 screws
Qty 4 x Clamps
Qty 1 x Centre pin
Fig. 1-5 VASCO 414,418,425 Motor Mounting
10
Modus Fluid Technology Tel: 0844 8007052 www.modusfluidtechnology.com
ScubaTANK™ VX2 Iss.2 - Mar 2014
Iss2_11.13
61
User Guide -ScubaTANK™ VX2 Combined Water Storage & Booster Package
User Guide - VASCO Pump Controller
Electrical and signal connection
Power Connection to Model VASCO 209, 214
Power Board
Control Board
Power Supply In
Aux Fan Connection
Output to Motor
LINE: L1, earth, L2
It is recommended to use
cable lugs
FAN: F1, F2
230VAC
(Wall mounting kit)
1 Phase Motor:
earth, U (common), V (running)
3 Phase Motor:
earth, U, V, W
It is recommended to use cable lugs
For Signal connections to the Control Board refer to fig 1-9
For Combo (multi-pump) RS485 connection to other VASCOs refer to fig 1-10
Recommended Line and Motor Cable Stripping
Fig. 1-6 VASCO 209, 214 Power Board Connection
Iss 2_11.13
62
Modus Fluid Technology Tel: 0844 8007052 www.modusfluidtechnology.com
11
ScubaTANK™ VX2 Iss.2 - Mar 2014
Appendix A
User Guide - User Guide - VASCO Pump Controller
Power & Signal Connection to three phase model VASCO 406, 409
Power Board
Control Board
0 +
Power Supply In
Earth,
LINE
L1, L2, L3
Output to Motor
Aux Fan Connection
MOTOR U, V, W, Earth,
It is recommended to use cable lugs
0VE, +VE
12VDC
Warning: Respect
Polarity
It is recommended to use
cable lugs
For Signal connections to the Control Board refer to fig 1-9
For Combo (multi-pump) RS485 connection to other VASCOs refer to fig 1-10
Recommended Line and Motor Cable Stripping
50
5
Fig. 1-7 VASCO 406, 409 Power Board Connection
12
Modus Fluid Technology Tel: 0844 8007052 www.modusfluidtechnology.com
ScubaTANK™ VX2 Iss.2 - Mar 2014
Iss2_11.13
63
User Guide -ScubaTANK™ VX2 Combined Water Storage & Booster Package
User Guide - VASCO Pump Controller
Power Connection to three phase model VASCO, 414, 415, 425, 430
Control Board
Power Board
Power Supply In
Output to Motor
Aux Fan Connection
earth, LINE: L1, L2, L3
It is recommended to use cable
lugs
MOTOR: U, V, W, earth,
It is recommended to use cable
lugs
VENT: -, +
12VDC
Warning: Respect Polarity
For Signal connections to the Control Board refer to fig 1-9
For Combo (multi-pump) RS485 connection to other VASCOs refer to fig 1-10
Recommended Line and Motor Cable Stripping
Fig. 1-8 VASCO 414, 418, 425, 430 Power Board Connection
Iss 2_11.13
64
Modus Fluid Technology Tel: 0844 8007052 www.modusfluidtechnology.com
13
ScubaTANK™ VX2 Iss.2 - Mar 2014
Appendix A
User Guide - User Guide - VASCO Pump Controller
Signal (Control Board) Connections
RS485
• S+
• S• G
It is recommended to respect
the polarity linking more
VASCOs in series.
Digital Outputs
Motor run signal:
• NO1, COM1: closed contact
with motor running.
• NC1,COM1: closed contact
with motor stopped.
Alarm signal
• NO2,COM2: opened contact
without alarm.
• NC2,COM2: closed contact
without alarm.
DOL1 pump relay:
• NO3,COM3: closed contact
with DOL1 running.
• NC3,COM3: opened contact
with DOL1 running.
DOL2 pump relay:
• NO4,COM4: closed contact
with DOL2 running.
• NC4,COM4: opened contact
with DOL2 running.
Relays are no voltage contacts.
Max. voltage to the contacts is 250V with
max current of 5A.
Digital Inputs
• IN1
• IN2
• IN3
• IN4
• 0V
We recommend using only no voltage
contacts. Opening or closing the digital
contacts (depending on software
configuration set (see inst. parameters)
you can start or stop the motor.
Analog Inputs (10 or 15 Vdc)
• AN1: 4-20 mA
• AN2: 4-20 mA
• AN3: 4-20 mA / 0 - 10 Vdc
(settable by jumper C.C.)
• AN4: 4-20 mA / 0 - 10 Vdc
(settable by C.C.)
Fig. 1-9 VASCO Control Board Connection
14
Modus Fluid Technology Tel: 0844 8007052 www.modusfluidtechnology.com
ScubaTANK™ VX2 Iss.2 - Mar 2014
Iss2_11.13
65
User Guide -ScubaTANK™ VX2 Combined Water Storage & Booster Package
User Guide - VASCO Pump Controller
VASCO serial connection
For Combo (multi-pump) use, VASCO’s communication is made through a protocol using the RS485
port. Each VASCO must be connected to each other by using a tripolar cable (0,5 mm2) wired on
S+,S-,G pins on the control board, see fig 1-9.
Fig. 1-10 RS485 Serial Connection
Pressure control
Vasco controls pump speed to maintain a constant pressure independent of water demand using a sensor,
(see fig 1-11)
Pressure Vessel
Check
Valve
Pump
Valve
Pressure
Sensor
Valve
Fig. 1-11 Pressure Control
Pressure Vessel
Installation of a pressure tank in the hydraulic system is recommended to compensate leakage of water in the
system (or during minimum water demand) and to avoid continuous start/stop cycling of the pump. Selecting the
proper volume and pre-charge pressure of the tank is very important; smaller tank volumes will not compensate
adequately for minimum water usage or leakage, while larger volumes make it more difficult for VASCO to control
the pressure evenly.
Recommended tank volume is equal to the 10% of the maximum water flow of the system (expressed in volume
unit/min) e.g. Flow = 50litres/min, Tank = 5 Litres
Pre-charge pressure of the pressure tank should be at least 80% than the set-pressure of the system. e.g. Set
system pressure = 4 bar, Precharge pressure = 3.2 bar.
Sensor installation or replacement
To use the Combo (multi-pump) function in a system incorporating several interconnected VASCOs an individual
pressure sensor must be connected to each VASCO. The value of the set pressure is communicated to the slaves
via the serial port.
VASCO requires a pressure sensor with a linear output signal within the range 4 – 20 mA. The pressure transducer
can be powered by any range of DC Voltage which includes the value 15VDC.
A 2nd pressure sensor can be connected to the VASCO:
• to prevent the shutdown of the system due to single pressure sensor failure.
• to action constant differential pressure (AN1 - AN2)
• switch pressure sensor by closing digital input 1N2
It will be necessary to set the pressure sensor characteristics in the initial configuration, or in the installer menu.
Referring fig 1-9, connect the sensor wires to the analogue input terminals as below:
Primary
Sensor
Iss 2_11.13
66
0V GND signal (if available)
AN1 signal 4-20mA (-)
+15 Power supply 15Vdc (+)
Secondary
Sensor
(if fitted)
0V GND signal (if available)
AN2 signal 4-20mA (-)
+15 Power supply 15Vdc (+)
Modus Fluid Technology Tel: 0844 8007052 www.modusfluidtechnology.com
15
ScubaTANK™ VX2 Iss.2 - Mar 2014
Appendix A
User Guide - User Guide - VASCO Pump Controller
Parameter Setting
Accessing the VASCO Parameters
Although the VASCO software is extremely simple to use, it allows a wide variety of parameters to be set for ideal
system configuration. A password is required to gain access to the set up parameters. Without a password it is
impossible to set up and/or modify any parameters although they can however still be displayed.
You should only adjust these parameters if you are trained to do so.
Improper setting of these advanced parameters could compromise the integrity and the life of the
controller and the pump.
Access Passwords
There are two levels of access to Parameter setting permitted, both requiring passwords:
• Installer level - Default password 001
• Advanced level - Default password 002
A different password can be set up if required once the menu is accessed.
Initial Controller Configuration
The pumpset will have been tested and set to a default initial set of parameters to configure pump characteristics,
pressure sensor range, and system characteristics. Without these initial settings it is impossible to run the pump.
If required, the initial setting procedure can be repeated by accessing the controller using the 2rd level password.
This will allow alteration of the parameters.
A brief description of the initial configuration parameters and their allowable ranges is as follows:
Parameter
Language
XXXXXX
Unit
bar/psi
Motor type
singlephase/threephase
Rated motor Amp
I + XX.X [A]
Rated motor frequency
f + XX.X [Hz]
Default
Description
XXXXXXX
End user communication language.
bar
Pressure unit.
threephase
Type of motor connected.
(VASCO 209, 214)
XX
Rated current of the motor on its nameplate plus 10%.
Note: The voltage drop caused by the inverter leads to higher
input current than nominal. Make sure motor is capable of
accepting increased current.
50
Rated frequency of the motor on its nameplate.
Control mode: Constant pressure
F.s press.sensor
20mA = XX.X [bar]
16
Sensor test
If the transducer is not connected or connected improperly, the
signal SENS. PRESS OFF is displayed when pressing ENTER.
Press ENT
Max alarm press
p = XX.X [bar]
16
Maximum pressure of pressure transducer. Set the upper value
of the pressure transducer i.e. the 20mA output signal level.
(i.e. 0 – 10 bars transducer range) 10 bars = 20 mA
10
Maximum pressure allowed in the system. If the pressure goes
over this value, an alarm occurs and the pump is stopped. Pump
is automatically restarted if the pressure goes below the
maximum value for a at least 5 seconds.
Modus Fluid Technology Tel: 0844 8007052 www.modusfluidtechnology.com
ScubaTANK™ VX2 Iss.2 - Mar 2014
Iss2_11.13
67
User Guide -ScubaTANK™ VX2 Combined Water Storage & Booster Package
User Guide - VASCO Pump Controller
Press START/STOP to run a test at rated frequency
Warning: This will start the system. Make sure it is safe to
run without damage.
Motor test
START / STOP
Rotation sense
---> / <--Set pressure
p = XX.X [bar]
Autorestart
ON/OFF
--->
When testing the system, if the motor runs in reverse, it is
possible to reverse the rotation via software without physically
changing wires at the terminals.
3
The pressure value to be kept constant.
OFF
If ON is selected, VASCO automatically returns to its normal
status after a voltage failure.
i.e. if it was powering the pump before, it resumes powering the
pump.
THIS MAY BE CONSIDERED HAZARDOUS
Once the Setting procedure is completed you will get this
indication on the display and the setting parameters are stored.
These parameters can be individually changed later in either the
INSTALLER Parameters menu or ADVANCED Parameters
menu.
INITIAL SETUP
COMPLETED
Installer Parameters
Control Mode
Fix speed 2 val
External Speed
Fix Speed 2 val
Const.value.2val
Fix Speed
Constant value:
VASCO changes the speed of pump to keep the set value constant,
independent of water demand.
Constant Value.
Const.value.2val
Description
Mode of control:
Constant value.
Fix Speed
Constant Press
Parameter
Default
Many of the Installer Parameters are set during the Initial Configuration (page 16).
However, through the Installer Parameters menu, it is possible to change the set parameters or set others in order
to perfect the calibration of VASCO to the pumping system.
External speed
Fixed frequency:
VASCO feeds the pump a set frequency, so the speed of motor is kept
constant.
Constant pressure control with two values:
the two values are selected by opening or closing the digital input IN2.
Fixed frequency control with two values:
the two values to be selected by opening or closing the digital input IN2.
External speed:
control motor frequency by using analogue control signal AN4.
Unit
bar/psi
F.scale.sensor
p = XX.X [bar]
Min value sensor
20mA = XX.X [°C]
Iss 2_11.13
68
bar
Pressure unit
16
Sensor full scale value
0
Sensor minimum value
Modus Fluid Technology Tel: 0844 8007052 www.modusfluidtechnology.com
17
ScubaTANK™ VX2 Iss.2 - Mar 2014
Appendix A
Max alarm value
p = XX.X [bar]
Min alarm value
p = XX.X [bar]
Ext set enabling
ON/OFF
Set value
p = XX.X [bar]
Compensation
p = XX.X [bar]
Set value 2
p = XX.X [bar]
Compensation2
p = XX.X [bar]
Set value update.
t = XX [s]
Operating freq.
f = xxx [Hz]
Operating freq. 2
f = xxx [Hz]
Freq min control
fmin = xxx [Hz]
Stop delay
t = XX [s]
Control Ramp
t = XX [s]
18
This enables the changing of Set Value via the
analogue input AN3
3
The set value to be kept constant.
0
Value compensation at the maximum frequency for
each pump. See fig 1-12 on page 21. You can
reverse the sign (+/-) by pressing the green button.
3
The pressure value to be kept constant.
0
Value compensation at the maximum frequency for
each pump. See fig 1-12 on page 21. You can
reverse the sign (+/-) by pressing the green button.
5
Time to update the set value for compensation.
50
Set the frequency (speed) value to feed the pump.
50
Set the frequency value (or the speed) to feed the
pump.
50
Minimum frequency at which the pump must stop.
5
Delay after which the pump will stop once the
minimum frequency is reached (f min Q=0)
20
Ramp time from freq min control to motor freq min.
If, during this time, the p checked goes below the
(set value - delta control), VASCO powers the motor
again; otherwise, VASCO will stop the pump.
See fig 1-13 on page 21.
Modus Fluid Technology Tel: 0844 8007052 www.modusfluidtechnology.com
ScubaTANK™ VX2 Iss.2 - Mar 2014
External Speed
OFF
Fix Speed 2 val
0
Minimum pressure allowed in the system. If the
monitored value goes lower than this value, an
alarm occurs and the pump is stopped.
The pump is automatically restarted if the monitored
value goes higher than the minimum value for at
least 5 seconds.
This parameter is particularly useful in the event a
system pipe breaks. It is suggested to set a value
higher than 0.
Const.value.2val
10
Maximum value allowed in the system. If the
monitored value goes over this value, an alarm
occurs and the pump is stopped.
The pump is automatically restarted if the monitored
value goes below the maximum value for at least 5
seconds.
Fix Speed
Description
Constant Press
Parameter
Default
User Guide - User Guide - VASCO Pump Controller
Iss2_11.13
69
User Guide -ScubaTANK™ VX2 Combined Water Storage & Booster Package
Delta control
p = XX.X [bar]
Delta start
p = XX.X [bar]
Delta stop
p = XX.X [bar]
0.5
This value represents the value drop below the set
value required to start the pump from stopped.
0.5
This value is the increase of value above the value
set which must be passed so that there is a forced
shutdown of the pump.
Kp and Ki parameters allow the dynamic control of
system by VASCO.
Set values (Ki=50, Kp=005) are usually enough to
get a valid dynamic control.
If the set pressure do not provide a valid control,
proceed as follows:
Increase or reduce Ki while keeping Kpconstant; if
the problem persists, increase Kp value and
increase or reduce the Ki value again till a good
dynamic control is reached.
Ki
XXX
Kp
XXX
Pump DOL 1
ON/OFF
Pump DOL 2
ON/OFF
Alternance
ON/OFF
Start delay AUX
t = XX [s]
COMBO
ON/OFF
PI control
Direct/Reverse
Rotation sense
---> / <---
Dry run cosphi
cosphi = X.XX
Iss 2_11.13
70
External Speed
This value represents the value drop below the set
value required to restart the pump during the control
ramp period.
Fix Speed 2 val
0.1
Const.value.2val
Description
Fix Speed
Default
Parameter
Constant Press
User Guide - VASCO Pump Controller
OFF
Function to activate (ON) the second auxiliary pump
DOL 1 (Direct On Line pump).
OFF
Function to activate (ON) the second auxiliary pump
DOL 2 (Direct On Line pump).
OFF
Function to allow alternating starting priority
between the DOL pumps in order to allow equality of
use.
1
Delay time for the DOL pumps start after the
variable speed pump has reached the maximum
speed and the pressure value has fallen below the
set pressure (Delta start pressure).
OFF
Enable multiple VASCOs to work in parallel.
e.g. duty/standby /assist modes.Theoretically up to
8 VASCO units can be connected in parallel.
Communication is RS485 by a private protocol.
Direct
Direct: Increasing the measured pressure, VASCO
decreases motor frequency.
Inverse: Increasing the measured pressure, VASCO
increase motor frequency.
--->
When testing the system, if the motor runs in
reverse, it is possible to reverse the rotation via
software without physically changing wires at the
terminals.
0.65
If the pump goes into dry running, the cosphi
reaches its lowest level. To set this value, contact
the pump Manufacturer.
Alternatively test by closing the suction and then
checking the value on the VASCO display. A value
can then be set by assuming a dry cosphi equivalent
to 60% of the rated cosphi specified by the
manufacturer.
Modus Fluid Technology Tel: 0844 8007052 www.modusfluidtechnology.com
19
ScubaTANK™ VX2 Iss.2 - Mar 2014
Appendix A
Restarts delay
t = XX [min]
Digital input 1
N.O. / N.C.
Digital input 2
N.O. / N.C.
Digital input 3
N.O. / N.C.
Digital input 4
N.O. / N.C.
Dig.In2/3 delay
t = xx [s].
Change PASSWORD1
ENT
20
N.O.
By selecting N.A. (normally open) the motor runs if
the digital input 2 is open, and stops if the digital
input 2 is closed.
By selecting N.C. (normally closed) the motor runs if
the digital input 2 is closed, and stops if the digital
input 2 is opened.
N.O.
Vasco 209, 214, 414, 418, 425 Only
By selecting N.A. (normally open) the motor runs if
the digital input 3 is open, and stops if the digital
input 3 is closed.
By selecting N.C. (normally closed) the motor runs if
the digital input 3 is closed, and stops if the digital
input 3 is opened.
N.O.
Vasco 209, 214, 414, 418, 425 Only
By selecting N.A. (normally open) the motor runs if
the digital input 4 is open, and stops if the digital
input 4 is closed.
By selecting N.C. (normally closed) the motor runs if
the digital input 4 is closed, and stops if the digital
input 4 is opened.
1
Digital input IN2 and IN3 delay.
Digital input IN1 and IN4 have a 1 second fixed
delay.
Pressing ENTER allows the installer level password
(1st level) (default 001) to be changed.
Modus Fluid Technology Tel: 0844 8007052 www.modusfluidtechnology.com
ScubaTANK™ VX2 Iss.2 - Mar 2014
External Speed
N.O.
By selecting N.A. (normally open) the motor runs if
the digital input 1 is open, and stops if the digital
input 1 is closed.
By selecting N.C. (normally closed) the motor runs if
the digital input 1 is closed, and stops if the digital
input 1 is opened.
Fix Speed 2 val
The restart delay after a dry running alarm.
At each attempt (max 5) the restart delay will be
doubled
Const.value.2val
10
Fix Speed
Description
Constant Press
Parameter
Default
User Guide - User Guide - VASCO Pump Controller
Iss2_11.13
71
User Guide -ScubaTANK™ VX2 Combined Water Storage & Booster Package
User Guide - VASCO Pump Controller
To ensure proper operation of pressure control is recommended to place the sensor near the pump.
To compensate the pressure loss in the pipes (proportional to flow) it is possible to vary the pressure set in a linear
relation with respect to frequency.
Perform the following test to verify the correct value of compensation:
1. Install another pressure gauge away from the pressure sensor. Open the valve completely and read the gauge.
2. Set the value of compensation to equal to the difference of the values from the two gauges.
For a group of pumps, the pressure compensation to be applied to each pump is equal to the total pressure
compensation (when all the pumps are running at full speed) divided by the number of pumps in the group.
Fig. 1-12 Compensation Calculation
Fig. 1-13 Ramp Time Calculation
Advanced Parameters
All the advanced parameters, due to their importance, are already set during initial setup (see page 16), however it
is always possible to modify individual parameters or modify the Advanced password from default 002.
Parameter
Default
Description
Vasco 209,214
Motor rated voltage (as shown on the motor plate)
Average voltage drop due to the inverter is between 20V
and 30Vrms based on load condition.
e.g. when the input voltage is 230V the average VASCO
output voltage will be 200/210V.
Rated motor Volt.
230 or 400
V = XXX [V]
Vasco 409,
414,418,425
400
Voltage boost
V = XX [%]
Iss 2_11.13
72
1%
This sets a voltage increase during the start up of the motor.
Warning: An excessive value can seriously damage the
motor. Contact the manufacturer for information.
If a single-phase motor is used, a value of 1% is suggested
to increase the starting torque.
Modus Fluid Technology Tel: 0844 8007052 www.modusfluidtechnology.com
21
ScubaTANK™ VX2 Iss.2 - Mar 2014
Appendix A
User Guide - User Guide - VASCO Pump Controller
Parameter
Rated motor Amp.
I = XX.X [A]
Rated motor freq
f = XXX [Hz]
Max motor freq.
f = XXX [Hz]
Min motor freq.
f = XXX [Hz]
Ramp up time
t = XX [sec]
Ramp down time
t = XX [sec]
Ramp f min mot.
t = XX [sec]
PWM
f = XX kHz]
V/f lin. --> quad.
XXX %
Autorestart
ON/OFF
22
Default
Description
XX
Rated current of the motor (as shown on the motor plate)
increased by 10%.
The voltage drop caused by the inverter leads to higher
input current than nominal. Make sure motor is capable
of accepting increased current.
50
Rated frequency of the motor from its nameplate.
50
Maximum frequency of the motor.
Note: Reducing the maximum frequency of the motor, will
also reduce the maximum current.
30
Minimum frequency of the motor.
Note: It is not advisable to set minimum frequency lower
than 30 Hz in order to protect the integrity of the thrust
bearings.
4
Ramp-up time to reach the speed required to achieve the
set pressure (or speed value).
Refer to fig 1-14 on page 24.
Longer times delay the system reaching the preset value
but better protect system components.
Excessively long ramp-up times can create difficulties in
setup, and can also cause false overload alarms.
4
Ramp-down time to reach zero speed.
Refer to fig 1-14 on page 24.
Longer times keep the system pressurised, while still
protecting the system components.
Excessively long ramp-down times can create difficulties in
setup. Excessively short ramp-down times can cause false
overload alarms.
1.5
Time to reach the minimum frequency (speed) of the motor
and vice versa.
Refer to fig 1-14 on page 24.
Carrier frequency (switching frequency).
Choose PWM in the range of 2.5, 4, 8, 10 kHz.
Higher values give a more sinusoidal wave with fewer
losses. Refer to fig 1-15 on page 24.
8
If long cables are used (>20 m / >76 ft), it is recommended
to install an inductive filter between the controller and the
motor (available upon request) and to set the value of PWM
to 2.5 kHz. This reduces the risk of voltage spikes, which
can damage motor and cable insulation.
85%
This parameter allows you to change the V/f characteristic
with which VASCO feeds the pump. The linear
characteristic corresponds to constant torque with variable
speed. The quadratic characteristic is normally used with
centrifugal pumps. The selection of torque characteristic
should be done to ensure a smooth operation, a reduction
of energy consumption and a lower level of heat and
acoustic noise. Refer to fig 1-15 on page 24.
OFF
If ON is selected, VASCO automatically returns to its normal
status after a voltage failure.
i.e. if it was powering the pump before, it resumes powering
the pump.
THIS MAY BE CONSIDERED HAZARDOUS
Modus Fluid Technology Tel: 0844 8007052 www.modusfluidtechnology.com
ScubaTANK™ VX2 Iss.2 - Mar 2014
Iss2_11.13
73
User Guide -ScubaTANK™ VX2 Combined Water Storage & Booster Package
User Guide - VASCO Pump Controller
Parameter
Rated motor Amp.
I = XX.X [A]
Rated motor freq
f = XXX [Hz]
Max motor freq.
f = XXX [Hz]
Min motor freq.
f = XXX [Hz]
Ramp up time
t = XX [sec]
Ramp down time
t = XX [sec]
Ramp f min mot.
t = XX [sec]
f = XX kHz]
V/f lin. --> quad.
XXX %
Autorestart
Iss 2_11.13
74
Description
XX
Rated current of the motor (as shown on the motor plate)
increased by 10%.
The voltage drop caused by the inverter leads to higher
input current than nominal. Make sure motor is capable
of accepting increased current.
50
Rated frequency of the motor from its nameplate.
50
Maximum frequency of the motor.
Note: Reducing the maximum frequency of the motor, will
also reduce the maximum current.
30
Minimum frequency of the motor.
Note: It is not advisable to set minimum frequency lower
than 30 Hz in order to protect the integrity of the thrust
bearings.
4
Ramp-up time to reach the speed required to achieve the
set pressure (or speed value).
Refer to fig 1-14 on page 24.
Longer times delay the system reaching the preset value
but better protect system components.
Excessively long ramp-up times can create difficulties in
setup, and can also cause false overload alarms.
4
Ramp-down time to reach zero speed.
Refer to fig 1-14 on page 24.
Longer times keep the system pressurised, while still
protecting the system components.
Excessively long ramp-down times can create difficulties in
setup. Excessively short ramp-down times can cause false
overload alarms.
1.5
Time to reach the minimum frequency (speed) of the motor
and vice versa.
Refer to fig 1-14 on page 24.
Carrier frequency (switching frequency).
Choose PWM in the range of 2.5, 4, 8, 10 kHz.
Higher values give a more sinusoidal wave with fewer
losses. Refer to fig 1-15 on page 24.
PWM
ON/OFF
Default
8
If long cables are used (>20 m / >76 ft), it is recommended
to install an inductive filter between the controller and the
motor (available upon request) and to set the value of PWM
to 2.5 kHz. This reduces the risk of voltage spikes, which
can damage motor and cable insulation.
85%
This parameter allows you to change the V/f characteristic
with which VASCO feeds the pump. The linear
characteristic corresponds to constant torque with variable
speed. The quadratic characteristic is normally used with
centrifugal pumps. The selection of torque characteristic
should be done to ensure a smooth operation, a reduction
of energy consumption and a lower level of heat and
acoustic noise. Refer to fig 1-15 on page 24.
OFF
If ON is selected, VASCO automatically returns to its normal
status after a voltage failure.
i.e. if it was powering the pump before, it resumes powering
the pump.
THIS MAY BE CONSIDERED HAZARDOUS
Modus Fluid Technology Tel: 0844 8007052 www.modusfluidtechnology.com
23
ScubaTANK™ VX2 Iss.2 - Mar 2014
Appendix A
User Guide - User Guide - VASCO Pump Controller
Parameter
Periodic Autorun
t + xx[h]
AN1,AN2 function
ON/OFF
Offset input 1
x = XX.X[%]
Offset input 2
x = XX.X[%]
Offset input 3
x = XX.X[%]
Offset input 4
x = XX.X[%]
Change PASSWORD2
ENT
Default
Description
0
Pump periodic auto run after XX hours of inactivity.
THIS MAY BE CONSIDERED HAZARDOUS
A value 0 disables the function
Independent
Function logic for analogue AN1, AN2.
(VASCO 209, 214, 414, 418, 425 only)
20%
Zero correction for analogue input 1.
(20mA x20% =4mA)
20%
Zero correction for analogue input 2.
(20mA x20% =4mA)
20%
Zero correction for analogue input 3.
(20mA x20% =4mA)
00%
Zero correction for analogue input 4 (default 0-10).
(10v x00% = 0v)
Pressing ENTER allows the advanced level password (2st
level) (default 002) to be changed.
Fig. 1-14 Advanced Ramp Time Calculation Graph
Fig. 1-15 Voltage/Frequency Graph
24
Modus Fluid Technology Tel: 0844 8007052 www.modusfluidtechnology.com
ScubaTANK™ VX2 Iss.2 - Mar 2014
Iss2_11.13
75
User Guide -ScubaTANK™ VX2 Combined Water Storage & Booster Package
User Guide - VASCO Pump Controller
Setting Up a Multi-pump COMBO Function
For VASCOs to interact when used in multi-pump applications e.g in a duty/standby/assist mode, the Combo
function in the Installer Parameters menu must be enabled. (This Combo function will theoretically allows serial
communication between up to 8 VASCO pumps). One pump will be designated as the Master and the others as
Slaves. Communication is made through a protocol using the RS485 port. Refer to page 15 for connection details.
To achieve the Combo function in a system requires the use a pressure sensor connected to each VASCO. The
value of the set pressure is then communicated to the slaves via the serial port. To prevent the shutdown of the
system due to pressure sensor failure, a 2nd identical pressure sensor can also be connected to each VASCO.
The procedure below sets up the offset operation of the sensors in the Combo (multi-pump) system
and MUST be done to EACH VASCO using the Installer Parameters menu.
Whenever the user accesses the Menu screen of the VASCO Master, the communication between
VASCOs is automatically interrupted.
In case of alarm or failure of a pump in a Combo (multi-pump) system, this pump’s operation will be
replaced (temporary or permanently) by another pump.
In case of failure of the Master in a Combo (multi-pump) system, it will be replaced by the next Slave.
To achieve this, all parameters must independently be setup as Master mode on each inverter.
Master setup
Supply power to the VASCO master and if not yet done, perform the initial configuration as described on page 16.
Initial View
1. Scroll until
2. Press ENTER
3. Press ENTER
4. Insert password
5. Scroll until
6. Set ON
7. Set 00
8. Set OFF
9. Set 1
10. Press STOP
11. Press STOP
Iss 2_11.13
76
Inv: ON/OFF
Mot: ON/OFF
p_mis =XX.X [bar]
Menu
ENT to access
MENU
Param. install.
001
Default 001
Combo
ON/OFF
Address
XX
Alternance
ON/OFF
Start delay AUX
t = XX [s]
Vasco’s address in parallel operation.
00 = VASCO master
This function allows alternating
between the VASCOs connected in
parallel.
Sets the Delay time for the slaves to
start after the variable speed pump
has reached the maximum frequency
and the pressure value has fallen
below set pressure – delta start
pressure.
RED Button
Modus Fluid Technology Tel: 0844 8007052 www.modusfluidtechnology.com
25
ScubaTANK™ VX2 Iss.2 - Mar 2014
Appendix A
User Guide - User Guide - VASCO Pump Controller
Slave setup
In case of a failure of the master in a Combo system, it will be replaced by slave. As a consequence,
all master mode parameters must be setup independently on each inverter.
Follow Master setup until point 10 then, instead of exiting (Stop):
Address
11. Set 01
XX
12. Press STOP
Vasco’s address in parallel operation.
01...07 = VASCO slave.
RED Button
This will be repeated to set other slaves - 02, etc.
Proceed to the advanced menu.
1. Scroll until
2. Press ENTER
3. Press ENTER
4. Insert password
5. Scroll until
6. Set ON
7. Press STOP
8. Press STOP
26
Menu
ENT to access
MENU
Param. install.
002
Default 002
This enters the Advanced menu
Autorestart
ON/OFF
RED Button
Modus Fluid Technology Tel: 0844 8007052 www.modusfluidtechnology.com
ScubaTANK™ VX2 Iss.2 - Mar 2014
Iss2_11.13
77
User Guide -ScubaTANK™ VX2 Combined Water Storage & Booster Package
78
ScubaTANK™ VX2 Iss.2 - Mar 2014
B
Appendix B
Miscellaneous Technical
Information
This Appendix contains miscellaneous technical
information applicable to Dutypoint equipment.
• Net Positive Suction Head (NPSH)
• Convertion Factors
• Variable Speed Flow, Head and Power
Calculations
• General
Operating
Dutypoint Pumpsets)
ScubaTANK™ VX2 Iss.2 - Mar 2014
Limits
(Standard
79
User Guide - ScubaTANK/TM VX2 Combined Water Storage & Booster Package
Net Positive Suction Head (NPSH)
The minimum operating values that can be reached at the pump suction end are
limited by the onset of cavitation.
Cavitation
Cavitation is the formation of vapour-filled cavities within liquids where the pressure
is locally reduced to a critical value, or where the local pressure is equal to, or just
below the vapour pressure of the liquid. The vapour-filled cavities flow with the current
and when they reach a higher pressure area the vapour contained in the cavities
condenses.
The cavities collide, generating pressure waves that are transmitted to the walls.
These, being subjected to stress cycles, gradually become deformed and yield due
to fatigue. This phenomenon, characterised by a metallic noise produced by the
hammering on the pipe walls, is called incipient cavitation.
The damage caused by cavitation may be magnified by electro-chemical corrosion
and a local rise in temperature due to the plastic deformation of the walls. The
materials that offer the highest resistance to heat and corrosion are alloy steels,
especially austenitic steel. The conditions that trigger cavitation may be assessed by
calculating the total net suction head, referred to in technical literature with the code
NPSH (Net Positive Suction Head).
Calculating NPSH
The NPSH represents the total energy (expressed in m) of the liquid measured at
suction under conditions of incipient cavitation, excluding the vapour pressure
(expressed in m.) that the liquid has at the pump inlet.
To find the static height hz at which to install the machine under safe conditions, the
following formula must be verified:
hp + hz ≥ (NPSHr + 0.5) + hf + hpv
Where:
hp
is the absolute pressure applied to the free liquid surface in the suction
tank, expressed in m. of liquid; hp is the quotient between the
barometric pressure and the specific weight of the liquid.
hz
is the difference in height between the pump axis and the free liquid
surface in the suction tank, expressed in m; hz is negative when the
liquid level is lower than the pump axis.
hf
is the friction loss in the suction line and its accessories, such as:
fittings, foot valve, gate valve, elbows, etc.
hpv the vapour pressure of the liquid at the operating temperature,
expressed in m of liquid. hpv is the quotient between the Pv vapour
pressure and the liquid’s specific weight.
0.5 is the safety factor.
The maximum possible suction head for installation depends on the value of the
atmospheric pressure (i.e. the elevation above sea level at which the pump is
installed) and the temperature of the liquid.
To help the user, with reference to water temperature (4°C) and to the elevation above
sea level, the following tables show the drop in hydraulic pressure head in relation to
the elevation above sea level, and the suction loss in relation to temperature.
80
ScubaTANK™ VX2 Iss.2 - Mar 2014
Appendix B Miscellaneous Technical Information
Water temp
(°C)
20
40
60
80
90
110
120
Suction loss
(m)
20
40
60
80
90
110
120
Elevation above
sea level (m)
500
1000
1500
2000
2500
3000
Suction loss (m)
0,55
1,1
1,65
2,2
2,75
3,3
Friction loss must be calculated using a recognised formula. To reduce it to a
minimum, especially in cases of high suction head (over 4-5m.) or within the operating
limits with high delivery values, we recommend using a suction line having a larger
diameter than that of the pump’s suction inlet.
It is always a good idea to position the pump as close as possible to the liquid to be
pumped.
Make the following calculation:
Liquid:
water at ~ 15 °C g = 1 Kg/dm3
Delivery required:
30 m3/h
Head for required delivery:
43 m
Suction difference in height: 3,5 m
The selection is a FHE 40-200/75 pump whose NPSH required value
is 2.5m @ 30 m3/h
For water at 15°C the hpv term is: Pv/g = 0.174 m (0.01701 bar)
eh = Pa/g = 10.33 m
The hf friction loss in the suction line with foot valves is 1.2 m.
By substituting the parameters in formula with the numeric values above:
10.33 + (-3.5) ≥ (2.5 + 0.5) + 1,2 + 0.17
6.8 > 4.4. The relation is therefore verified.
Convertion Factors
Flow conversion
Pressure conversion
L/min.
÷ 60
= L/Sec
m Hd
÷ 10.2
= Bar
m3/hr
÷ 3.6
= L/Sec
Psi
÷ 14.47
= Bar
Gpm
÷ 13.2
= L/Sec
Kpa
÷ 100
= Bar
Kg/Sec
÷ 1.0
= L/Sec
Kg/cm3
÷ 1.02
= Bar
ScubaTANK™ VX2 Iss.2 - Mar 2014
81
User Guide - ScubaTANK/TM VX2 Combined Water Storage & Booster Package
Variable Speed Flow, Head and Power Calculations
V1
= Full speed
V2
= Reduced speed
Q1
= Flow rate at full speed
Q2
= Flow rate at reduced speed
H1
= Head at full speed
H2
= Head at reduced speed
P1
= Power at full speed
P2
= Power at reduced speed
V2
Q 2 = ⎛ --------⎞ Q 1
⎝ V 1⎠
2
V2
H 2 = ⎛ --------⎞ H 1
⎝ V 1⎠
2
V2
P 2 = ⎛ --------⎞ P 1
⎝ V 1⎠
General Operating Limits (Standard Dutypoint Pumpsets)
Type of pumped liquids
Maximum pumped liquids
temperature
Minimum pumped liquid temperature
Operating ambient temperature
Relative humidity
Air impurities
Storage temperature
Suction Conditions
82
Water with no gas or aggressive substances
+23°C
1°C to avoid icing
+5°C to 40°C for indoor installation
(CEI EN 60439-1)
Max 50% at 40°C
The air must be clean and free of acid
vapours, corrosive gases and excessive amounts of dust
+5°C to 50°C
Minimum positive pressure 0.1 Bar,
Max 0.5 Bar
ScubaTANK™ VX2 Iss.2 - Mar 2014
DUTYPOINT SYSTEMS
SHEPHERD ROAD GLOUCESTER
GL2 5EL
UK
Tel: 44 (0) 1452 300592
Fax: 44 (0) 1452 303691
Email: [email protected]
www.dutypoint.net