1
Maintenance & Servicing
For a complete list of spare parts and accessories
contact your Stovax or call 01392 474011
1.2
1. Annual Service
Use genuine Stovax replacement parts to keep the
appliance in safe, efficient working order. This is a list of the
maintenance products that may need be required:
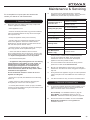
Task
Product name
Preventing build-up of
creosote in flue
Protector (15 sachets)
Protector (1kg tub)
1.1
Before the start of the heating season strip, inspect and
clean the appliance as detailed:
—Allow appliance to cool.
Sealing flue pipe joints
—Remove all internal parts: baffle, log guard and firebricks.
Take care handling firebricks as they can become fragile
after a period of use.
Re-painting
Touch Up Paint (150ml aerosol)
Protecting your hands
Heat resistant leather gloves
Thermic seal glue
(50ml bottle)
—Sweep the appliance at this point if necessary.
—Vacuum clean any remaining ash and debris from the
inside of the appliance. Stovax offer a filter/collection
attachment for vacuum cleaners to protect them from fire
ash: Ash Clean (Stovax Part No. 2091).
—Check the parts for any damage. Replace any damaged
parts using genuine Stovax replacements parts.
— Check and clean the firebricks with a soft brush.
Some surface damage will occur during use. The life of the
bricks will depend on the type of fuels burnt and the level of
use. Replace damaged bricks as soon as possible.
— Re-fit cleaned internal parts.
Cleaning Glass
— On appliances with printed glass do not use cleaning
agents that have a high alkaline or acidic content, for
example Stovax Gel Cleaner, these are aggressive
cleaning agents designed to be used with heavily
stained clear glass. On printed glass surfaces, use
Stovax Glass Cleaner (Stovax No.4103) which is better
formulated for this application.
Do not use abrasive cleaners to remove tar or soot
deposits from the glass.
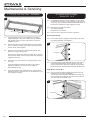
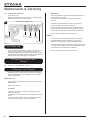
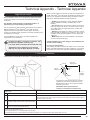
—Fit new door rope seal (see Maintenance and Servicing, Section 3).
—Lightly oil the door catch mechanism and hinge pins. Avoid getting oil onto the door seals and glass.
—To refresh painted finishes a touch up spray is available.
Contact your Stovax retailer quoting the serial number found
on the appliance data badge.
Fire Cement (500g tub)
Fire Cement (600g cartridge)
Stovax Glass Cleaner (No. 4103)
Stovax Gel Cleaner
Ash Clean
Vacuum Cleaner Attachment
Door Maintenance
(Studio 3 only)
Anti-Seize Grease
These products, available online at www.stovax.com
or from your local Stovax dealer, along with regular
maintenance and use of correct fuels, will keep the
appliance in the best possible condition.
1.3
For more information about the Stovax Group products
please visit our web site at www.stovax.com
1.4
Burn at a low temperature for the first day of use after any
maintenance. This allows the seals, fixing glues and paint to
fully cure.
1.5
During this time the appliance may give off some unpleasant
odours. Keep the room well ventilated to avoid a build-up of
fumes.
1.6
Your Stovax dealer can carry out service and maintenance.
2. Removal of Internal Parts
2.1
To service and maintain the good working condition of your
appliance it will be necessary to remove several internal
parts. Consult the section for the following:
Door Assembly - Pre-Installation Section 2, page 18.
Upper Baffles - Pre-Installation Section 4, page 19.
Firebricks - Maintenance & Servicing Section 6, page 38.
2.2
Reverse the method of installation to remove the Lower
Baffle Bricks, Firebricks and the Log Guard see
Installation Section 6.
35