1
Mini pony DMX512 Cod. 9801036605 (F)– Cod. 9801016605 (PC) v 1
EN
With its compact dimensions and modern elegant design, Mini pony dmx is ideal for theatrical, live shows and architectural applications.
The new high power COB LED technology allows a bright and uniform illumination, reduces considerably the consumption and removes
maintenance and lamp changing.
IMPORTANT!
READ CAREFULLY THE INSTRUCTION LEAFLET IN ALL ITS PARAGRAPHS. THE KNOWLEDGE OF THE INFORMATION AND OF THE
LIMITATION HELD IN IT, IS BASIC AND FOUNDAMENTAL FOR A CORRECT AND SAFE USAGE OF THIS PRODUCT.
IMPORTANT!
BEFORE ANY (MAINTENANCE, CLEANING ETC.) ACTION, SWITCH OFF THE POWER SUPPLY.
IMPORTANT!
This device is suitable for indoor use (room temperature cannot be higher than 35°C).
This device is suitable for direct assembling on normally flammable surfaces.
5
5
Technical specifications:
•
•
•
•
•
•
•
•
•
•
5
5
5
3
3
3
Dimensions:
Body made of die-cast aluminium + steel sheets
Black epoxy powder coating
Power supply:100/240V 50/60Hz
Current: 0,22 A (230v)
Power: 50 Watts
Source: 1 COB LED
Colour temperature: 3200°K or 5400°k
Functioning: DMX Signal and automatic mode
Channels: ½ DMX 512, 8/16 bit
Weight: 1,7Kg
Installation:
The projector can be fixed in any position. For suspending use, it is needed to install an appropriate clamp. It must be located in a well
ventilated position, using an M8 screw, a nut and a washer. Make sure the structure You are fixing the product to can stand the
product load.
Connection
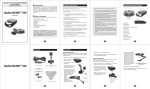
The projector is fitted with a power supply cable and two XLR 5 Poles connectors for DMX IN and OUT signal (Fig.1)
3
Power supply connection:
Power supply: 100/240V 50/60Hz
2
1
1
DMX IN
DMX OUT
2
3
DMX connectors:
1: GND (shield)
2: data –
3: data +
4: NC
5: NC
RJ45
RJ45 connectors:
1: DALI / Cont1
2: DALI / Cont2
3: Common
4: CAN H
5: CAN L
6: Analogue 0 +10V
7: DMX 8: DMX+
Any modification to this product is forbidden.
This lantern must be powered according to the voltage and frequency showed on its label (100/240V 50/60Hz). Connect the power
cable to the socket. We suggest to connect each projector to its own switch so that they can be individually switched on with a remote
control.
Pagina 5