1
Migrating Physical Desktops
to a Virtual Desktop Pool
with VMware View
TEC H N I C A L W H ITE PA P E R
Migrating Physical Desktops to a Virtual
Desktop Pool with VMware View
Defining the Problem: Deconstructing the User Productivity Stack
Traditionally, a desktop PC environment contained all of the applications required by a user to do their job.
Applications were installed on the local desktop computer and were tightly coupled to the desktop operating
system which was in turn tightly coupled to the underlying desktop hardware. The operating system required
specific drivers to interface with the PC hardware. Applications required the installation of DLLs onto the
operating system and entries in the local Windows registry. Each user’s specific application settings and profile
configuration were stored in the local Windows Registry and their user profile.
In this scenario, user data and documents have often been accessible only from the user’s assigned workstation.
Or, if the user data is accessible by logging into another computer on the network, the required applications may
not be installed to allow the documents to be opened, or user specific settings may not be accessible making
applications more difficult to use.
This tight coupling of hardware, operating systems, applications, and user data results in a user productivity stack
that is difficult to upgrade and maintain, especially when a new operating system needs to be rolled out. Additionally,
problems at any of the layers can cause the entire stack to fail preventing users from accessing their data.
In this document, we describe a methodology for breaking the tight coupling between users, their desktop
operating system, applications and data. By breaking these bonds, it becomes possible to deliver an environment
that is more flexible, easier and less expensive to maintain, yet still provides the rich experience that users have
come to expect over the years. Additionally, we lay the foundations for significantly simplifying operating system
and application upgrades in the future without risking user data, or impacting user productivity due to
application incompatibilities.
The Desktop Operating System
As discussed earlier, in a physical environment, the desktop operating system is tightly coupled to specific
hardware due to required drivers to support the hardware. For example, video card drivers on one desktop may
not be the same as those for another desktop. Likewise, different desktops may use different chipsets on the
motherboard which also require different drivers. Because of this, desktop hardware and operating systems
cannot be readily replaced without a significant amount of effort.
TECH N I C AL WH ITE PAPE R / 2
Migrating Physical Desktops to a Virtual
Desktop Pool with VMware View
By virtualizing the hardware layer, we are able to break the bond between the physical hardware and the
operating system. Within the virtual machine the operating system sees exactly the same virtual hardware,
regardless of the underlying physical hardware. This means that the underlying hardware infrastructure can be
upgraded or changed without affecting the virtual machine operating system. This effectively breaks the bonds
between the virtual machine operating system and the underlying physical hardware. This allows us to change
the underlying physical hardware without affecting the functionality of the operating system.
Applications
The next layer in our user productivity stack is occupied by the applications users require to access their data. As
discussed earlier, the current application deployment model ties applications tightly to the underlying operating
system, due to dependence on locally installed DLLs and registry entries. Because of this, the current model does
not allow for most applications to be run without first being installed onto the operating system. This presents
some significant problems form a maintenance, productivity and security standpoint.
To look at the maintenance concerns, let’s assume we are running a network with 5,000 separate desktop
computers spread across multiple facilities. Each of these computers will have a standard set of applications
installed along with the operating system. Additionally, some percentage of computers will have specialized
applications installed to support tasks specific to the users role (i.e. financial applications, Computer aided design,
video production, etc). In this environment, each of the 5,000 computers must be patched independently. This
can be done using automated tools, but each desktop still maintains its own copy of every application and must
therefore execute a copy of patches for applications locally. Even using automated tools to push patches across
the network, there will be some percentage of machines that will not properly execute the patch installation.
Even if we assume only 2 percent failure rate for automated patches that leaves 100 machines that will require
some form of manual remediation. Multiply this by an average of 80 patches per year per system and we end up
with 8.000 maintenance touches per year or an average of 1.6 touches per machine annually. This issue is further
exacerbated by the fact that many patches have unintended results based on application dependencies for particular
DLLs or other support software. For example, a patch to an underlying DLL to fix vulnerability in one application
may actually render another application unusable which can further increase the required touch maintenance
even if patches are deployed successfully.
TECH N I C AL WH ITE PAPE R / 3
Migrating Physical Desktops to a Virtual
Desktop Pool with VMware View
The tight integration of applications and the underlying operating system can also impact productivity,
especially for users of specialized application software since these users cannot simply work form another
computer if theirs is unavailable, or if they are in another location on the network. This means that users must
often wait to return to their personal desktop to perform work, even if they are able to login to a computer on
another part of the network.
So in order to successfully break the bonds between the operating system and applications, we must be able to
virtualize the application so that it can be run by users without having to be installed locally. We also need to be
able to encapsulate applications so that they can run independently without interfering with each other. In this
way, applications can be placed in a centralized location on the network and accessed by users regardless of the
workstation they are actually using.
However, we still need to be able to successfully patch applications without incurring a significant overhead in
support and to control application access so that only authorized users may run applications.
User Data and Profiles
User data and profiles settings are the final pieces of our user productivity stack puzzle. Traditionally information
about the configuration of a user’s desktop and applications has been stored locally in the user profile and local
registry settings. These settings can range from the desktop wall paper settings on the user’s desktop, to configuration
of the email client, to their web browser favorites. This is why most of the time when a user logs into a different
system on the network their application and profile settings do not follow them.
On today’s Windows operating systems, user data is, by default, stored in the “My Documents” folder assigned
to the user. The exact location of this folder differs between Windows XP and Windows Vista/Windows 7, but by
default this folder resides on the local hard drive of the user’s computer. This of course means that user data is
not accessible if the user logs into a different computer on the network.
To try to resolve this, the concept of roaming profiles was introduced in Windows NT and has continued to
today. Roaming profiles have over the years been the bane of many administrators existence. This comes from
the fact that each time a user logs into a different computer a copy of their profile, including the “My Documents”
folder is copied to the local hard drive of the computer they are logging in to. And to keep the roaming profile up
TECH N I C AL WH ITE PAPE R / 4
Migrating Physical Desktops to a Virtual
Desktop Pool with VMware View
to date when the user logs off all changes to the local copy of the profile have to be replicated back to the network
copy of the user’s profile. This results in longer log in and log out times for users and leaves extra copies of user
profiles residing on computers across the network, even if the user only logged in to that computer once. These
stagnant profiles can use a considerable amount of disk space and often require administrators to perform
regular purges on workstations to free up space.
To make user roaming more palatable Microsoft introduced concept of folder redirection in Windows 2000. For
operating systems up to Windows XP folder redirection allowed the contents of the Application Data, Desktop,
My Documents, and Start Menu folders to be redirected transparently to a network folder such as the user’s home
directory. This meant that when users moved from computer to computer on the network, their user data from
these locations was available to them. This significantly reduced the amount of data being replicated during
login and logout by roaming profiles, but did not solve the application issue (i.e. even though the user could
access their data on another computer, if the application required to access the data is not installed locally, then
the user still could not make use of their data). In Windows Vista Microsoft changed the default location of some
user data folder locations, added some additional folders and extended the folders that could be redirected to
ten including Contacts, Desktop, Documents, Downloads, Favorites, Music, Videos, Pictures, Searches.1
To sever the link between the user’s data and the local computer, we utilize folder redirection to move user data
to a centralized location and reduce the amount of data in the user’s roaming profile. We then use roaming profiles
to replicate user profile data to a network location where it can be accessed. While this will still result in the profile
being copied to/from the network location during login/logout, the profile is much smaller because folder redirection
has moved the local user documents to a network share.
There is one other wrinkle to this process which will be addressed in more depth later. In moving from Windows
XP to Vista /Windows 7 there was a change in the format of the user profile from Version 1 to Version 2 profiles.
Because the format of Version 1 and Version 2 profiles differ they cannot be used interchangeably between
Windows XP and Vista/Windows 7. So we will also have to convert the user’s profile from Version 1 to Version 2.
The good news is that if you are simply moving from physical desktops to virtual and not changing operating
system versions, or are going from Vista to Windows 7, there is not need to convert the profile.
Defining the Migration Process: Breaking the Bonds
As we have seen, the goal in migrating from a physical Windows XP infrastructure to a virtual Windows Vista/
Windows 7 infrastructure is to break the bonds between the different layers of the traditional user productivity
stack. This allows us to separate the hardware, operating system, applications, and user data into separate
pieces that can be patched or replaced independently from each other. By doing this we create a much more
flexible and manageable environment allowing us to increase user productivity by allowing users to move freely
between systems on the network while still maintaining access to all their required applications, data, and profile
settings. We also reduce maintenance costs by reducing the number of systems that require patching and
updates, reducing issues related to application incompatibility and patching, and as we will discuss later,
allowing us to run legacy applications on updated operating systems.
1
Managing Roaming User Data Deployment Guide, http://go.microsoft.com/fwlink/?LinkId=73760
TECH N I C AL WH ITE PAPE R / 5
Migrating Physical Desktops to a Virtual
Desktop Pool with VMware View
Components Required
In order to implement this migration process we will require a number of software and infrastructure components
from both Vmware and Microsoft. The required components and their purpose in the process are outlined in
Table 1. The configuration and deployment of each of these components will be outlined further in the process
steps later in this document.
COMPONENT
O B TA I N E D F R O M
PURPOSE
Vmware View™ 4.5
Vmware
Provides virtual desktop infrastructure needed
for migration
Vmware ThinApp™ 4.5
Vmware
Application virtualization allowing for secure
centralized application access
Microsoft User State Migration Tool
4.0
Microsoft 2
Used to migrate user profiles from Version 1 (XP)
to Version 2 (Vista/Windows 7)
Active Directory
Used to create required groups, OU’s
Remote Server Administration Tools
for Windows Vista
Microsoft3
Used to configure folder redirection GPO’s
from Vista
Remote Server Administration Tools
for Windows 7
Microsoft4
Used to configure folder redirection GPO’s from
Windows 7
System running either Windows
Vista or Windows 7 and the
appropriate version of the Remote
Server Administration Tools
Some Assumptions
The process outlined in this document makes the following assumptions:
1. The customer is operating in an Active Directory environment in which group policy objects (GPO) can be utilized.
2. VMware View, View Composer, and ThinApp are already installed and fully functional, or will be prior to the
start of the migration.
3. The customer has an understanding of VMware View, and ThinApp.
4. Adequate server resources exist to support the required virtual desktop pools.
5. Adequate storage resources exist in the environment to support the migration of user data and profiles to a
shared network location.
2
USMT 4.0 is part of The Windows® Automated Installation Kit (AIK) for Windows® 7 and is available for download from the Microsoft download site at:
http://www.microsoft.com/downloads/details.aspx?FamilyID=696dd665-9f76-4177-a811-39c26d3b3b34&displaylang=en
3
The Remote Server Administration Tools for Windows Vista provides additional folder redirection settings when run from a Windows Vista machine.
It can be downloaded from the Microsoft download site at: http://www.microsoft.com/downloads/details.aspx?familyid=9ff6e897-23ce-4a36-b7fcd52065de9960&displaylang=en
4
The Remote Server Administration Tools for Windows 7 provides additional folder redirection settings when run from a Windows 7 machine. It can be
downloaded from the Microsoft download site at: http://www.microsoft.com/downloads/details.aspx?displaylang=en&FamilyID=7d2f6ad7-656b4313-a005-4e344e43997d#filelist
TECH N I C AL WH ITE PAPE R / 6
Migrating Physical Desktops to a Virtual
Desktop Pool with VMware View
Building the Virtual Desktop Pool
In order to migrate users from their existing physical desktops to virtual desktops we will need to create the
required desktop pools. In doing so we can choose to use either a Dedicated pool, in which users are always
connected the same desktop each time they login, or a Floating pool, in which users are connected to the next
available desktop when they login. Further details about Dedicated versus Floating pools are available in the
VMware View Administrator’s Guide. Either user assignment type could be used as part of the migration process.
Which to use is a decision best left to the administrators of a specific environment. There is one difference however
which does bear directly on the process of profile migration. Dedicated desktops allow the user profile information
to be redirected to a persistent virtual disk assigned to the specific user. This allows the use of “local” profiles
within the virtual desktop. For example, we can define a persistent disk D: be assigned to each user in a
Dedicated pool and that the user profile be redirected to this disk. Since this persistent virtual disk follows
the user’s dedicated desktop, the user’s profile information is always available locally.
Floating desktops do not currently support the redirection of profile data to a persistent disk and would
therefore require a roaming profile be created for the user. Both methods will be discussed in the profile
migration section of this document.
1. Create the baseline image for your virtual desktop pool. (Detailed instructions can be found in the
Creating and Preparing Virtual Machines section of the VMware View Administrator’s Guide)
2. Create a snapshot of your baseline image to be used as the parent image for your desktop pool.
3. Using VMware vCenter™ Server, create a new resource pool to house your desktop pool.
4. Using View Manager create a new automated desktop pool
5. Select the user assignment type (we are using Dedicated assignment in this example)
TECH N I C AL WH ITE PAPE R / 7
Migrating Physical Desktops to a Virtual
Desktop Pool with VMware View
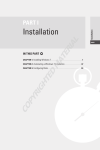
6. Now select to use View Composer Linked Clones as the virtual desktop format. This will allow us to assign
a persistent virtual disk for each user’s profile.
7. Next provide an ID and Display Name for your pool. (We are using Win7_Desktop_Pool, but your desktop
pool names should follow conventions that are meaningful to your organization.)
8. The Pool Settings are explained in depth in the VMware View Administrator’s Guide. For the purposes of
this exercise we are changing the “Refresh OS Disk after Logoff” setting to every 5 days. This will cause the
linked clone desktop images to refresh, shrinking them back to their original size (linked clone images grow
with use unless they are periodically refreshed).
TECH N I C AL WH ITE PAPE R / 8
Migrating Physical Desktops to a Virtual
Desktop Pool with VMware View
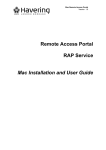
9. In the View Composer Disk dialog, we have selected to redirect Windows Profile data to a persistent disk
for each user and set the size to 2048MB (2GB). This may seem like a fairly small profile space, but we will
be using folder redirection to decrease the size of the user profiles as part of the migration. We have also
redirected disposable files (the page file and system Temp folder) to a separate non-persistent disk that will
be deleted when the user logs out.
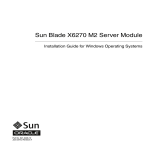
10. The Provisioning Settings are fully explained in the VMware View Administrator’s Guide. For the purposes
of this exercise we have selected to use a naming pattern of Win7-dt-{n} where {n} will be replaced with an
incremental number. Since we have chosen to deploy ten desktops in this pool they will be named Win7-dt-1
through Win7-dt-10.
TECH N I C AL WH ITE PAPE R / 9
Migrating Physical Desktops to a Virtual
Desktop Pool with VMware View
11.In the vCenter Settings dialog select the default parent image, VM folder, host or cluster, resource pool, and
datastore to house your virtual desktop pool.
12.In the Guest customization select the location for the creation of your virtual desktops assigned to this pool.
In this case we are using an OU in the Testlab domain called “Win7 Desktops” which was created previously.
13.Select “Finish” to begin deployment of your desktop pool. After deployment is completed View Manager will
show your newly created pool.
14. Next we will create a Active Directory group that we will use to as part of the migration process. This
group will be used to authorize the users to use our newly created desktop pool and to assign specific
login scripts for use in the profile conversion process. For the purposes of this exercise we will be using
the “Win7_Users” group.
TECH N I C AL WH ITE PAPE R / 1 0
Migrating Physical Desktops to a Virtual
Desktop Pool with VMware View
15.Next we have to entitle the Win7_Users group within our new desktop pool. This is done from within View
Manager. Expand the Inventory listing on the left and then select Pools. Next highlight the new desktop
pool and select Entitlements.
16. From the Entitlements dialog select Add. This will bring up the Find User or Group dialog. Type all or part
of the Active Directory group created above and click the Find button. Next select the group and click OK
until you return to the View Manager Pools list.
17. You will now see that the pool is both Enabled (ready to accept connections) and Entitled (has users or
groups assigned to it).
TECH N I C AL WH ITE PAPE R / 11
Migrating Physical Desktops to a Virtual
Desktop Pool with VMware View
Preparing Users for Migration: Reducing Profile Size
One of the biggest challenges of migrating users between machines, or upgrading the operating system on a user’s
desktop, is dealing with user profiles and data. Users are understandably protective of their data since they have
put a significant amount of effort into compiling it. Because of this user profiles, or at least the folders associated
with user profiles, can be very large and unwieldy when trying to migrate from one operating system to another.
One of the best ways to reduce the size of user profiles on the local desktop is to use Microsoft’s folder redirection
feature to actually move the folders associated with user’s profiles to a shared network folder such as the user’s
home drive. Folder redirection has several other advantages as well. It moves user data from the local desktop to
a network share where it can be backed up by administrators, and it also places the data on a network share
which the user can access from other systems on the network.
To illustrate how folder redirection works we will go through the process of setting up redirection for a group of
users within the Active Directory domain. To start this process, we must create a GPO that enables folder redirection
and then link it to an OU which will contain the users being migrated. It is advisable to initially start with a new OU to
which we can move groups of users as we migrate them. This will also allow monitoring of storage resources as we
redirect their folders and move their documents and data to a shared location on the network.
1. Create a new OU within the Active Directory domain that will contain our migrated users. For this exercise
we are using an OU called “Win7_Users”.
2. Create a shared location on the network on which to host the redirected user folders. This process is
explained in depth in the Microsoft document Managing Roaming User Data Deployment Guide5 In this
example we will be using Basic Redirection which redirects all users folders to a single network share and
creates individual secured folders for each user. We have created a hidden share at \\labdc01\users$ to
accept all user folders for redirection. NOTE: One option is to redirect the user’s folders to the same
location as their Active Directory home drive. This will keep all of the user data in a single location
accessible by the user.
3. Create a GPO that redirects all user folders to the shared location. NOTE: You will need to use a computer
running either Windows Vista or Windows 7 with the appropriate version of the Remote Server Administration
Tools, or a Windows 2008 server to create this GPO. If you use a Windows XP or Windows Server 2003 system
you will only see four folder objects to redirect, the Application Data, Desktop, My Documents, and Start Menu.
The Remote Server Administration Tools and Windows 2008 group policy editor shows the full list of thirteen
folders that can be redirected.
This guide can be found on the Microsoft download site at: http%3A%2F%2Fdownload.microsoft.com%2Fdownload%2F3%2Fb%2Fa%2F3ba6d659-6e394cd7-b3a2-9c96482f5353%2FManaging%2520Roaming%2520User%2520Data%2520Deployment%2520Guide.doc&ei=Of5LTI-lMYz4swPv1KGSCw&usg=
AFQjCNG4ISu7BTufUYtUG_4rjEueRN7LeA
5
TECH N I C AL WH ITE PAPE R / 12
Migrating Physical Desktops to a Virtual
Desktop Pool with VMware View
4. After installing and opening the appropriate group policy manager, drill down to the User Configuration\
Policies\Windows Settings\Folder Redirection folder.
TECH N I C AL WH ITE PAPE R / 13
Migrating Physical Desktops to a Virtual
Desktop Pool with VMware View
5. Starting with the AppData(Roaming) setting right-click and select Properties. We are using Basic Redirection,
but it may be more appropriate in some organizations to use Advanced Redirection which allows setting up
different shared locations for different groups of users. On the Target tab we are selecting “Create a folder
for each user under the root path” and providing the path to our \\labdc01\users$ share.
6. On the Settings tab, select “Grant User exclusive rights…”, “Move contents…”, “Also apply redirection policy
to Windows 2000, XP,….” . In this case we are also checking the “Leave the folder in the new location when
policy is removed” checkbox. NOTE: The “Grant users exclusive rights…” option is an excellent way to secure
redirected folders. It does however change permissions on the redirected folders so that only the user and
the “System” account can view contents. This will protect the folders, but still allow them to be backed up.
Administrators cannot view the contents of the folders however unless permissions are altered. If you
choose not to use this setting then care must be taken to prevent users from accessing each other’s files.
This is another good reason to utilize the user’s home directory as these permissions are typically already
restricted to prevent access by other users.
TECH N I C AL WH ITE PAPE R / 14
Migrating Physical Desktops to a Virtual
Desktop Pool with VMware View
7. Click OK and repeat steps 5 & 6 for the remaining twelve folders. NOTE: When you redirect the Documents
folder you will be asked if you want the Pictures, Music, and Videos folders to follow the Documents folder.
Select “Yes”. This will change their targets to “Follow the Documents Folder” in within their settings. Open
each to verify this. This will also gray out all options on the Settings tab. Also all of the settings from Favorites
down are unique to Windows Vista and Windows 7 and so they cannot be applied to Windows 2000 or XP.
This is by design and this option will be grayed out on the Settings tab.
8. Now link the GPO to the OU we created in step 1 to house our migrating user accounts and the OU that
contains the new virtual desktop systems. NOTE: After initial testing be sure to link any other required
policies to these OU’s as well to ensure that all of the required policies applied, then test functionality again.
9. Using Active Directory Users and Computers move a few test accounts to this OU to validate that folder
redirection is performing as expected. Once the user accounts have been moved have the users logoff and
log back into the network. NOTE: By default the GPO refresh time is every 90 minutes. So if the user does
not logoff and back on the GPO will still be applied sometime within the refresh interval. You can use the
Windows gpresult command from a command prompt to validate which GPO’s have been applied.
10. If the GPO is working properly you should see redirected folders being created for each user in the location
specified in the GPO. Here we see redirected folders for The Desktop, My Documents, and Start Menu for
the user BloggJ. Remember, the Pictures, Video, and Music folders are redirected under My Documents.
11.On the user’s desktop redirected files and folders are noted by a special symbol in the lower left corner
of the file/folder icon. Here we see the contents of the “My Documents” folder on BloggsJ’s workstation
showing the redirected My Music and My Pictures folders along with a redirected document file.
TECH N I C AL WH ITE PAPE R / 15
Migrating Physical Desktops to a Virtual
Desktop Pool with VMware View
12.Opening the properties on a redirected file or folder will show the actual network location of the object.
From an application and use standpoint however the files and folders appear to be local to the user’s system.
13.Now that we have validated that folder redirection is functional in the environment we can begin to move
groups of users into our migration OU so that their local folders can be redirected to a network share thus
reducing the size of the profile on the desktop. NOTE: It is not advisable to simply move all of the existing
users into this OU in one pass unless you are fully confident that the shared folder being used for folder
redirection has adequate space to accommodate all of the user data from each user’s desktop. Moving
users incrementally is a much sounder approach and will allow for the monitoring of space usage as data is
copied to the assigned share. Depending on the number of users and available storage it may be advisable
to either create multiple OU’s each with an assigned share and unique GPO, or to use the Advanced Folder
Redirection settings in the GPO to redirect different groups of users to different shares.
Profile Migration
User profiles store user unique settings such as network drive mappings, network and local printers, desktop
settings, and application configuration data such as Microsoft Outlook and Microsoft Office configuration
information. Normally, profiles also contain the user’s document folders (i.e. My Documents), but since we have
already redirected the user’s document folders to a network share, these files no longer reside within the profile.
So the next step in the process is to setup Roaming Profiles for all of our users. This will allow users to access
their profile data regardless of the network computer they are logged into.
TECH N I C AL WH ITE PAPE R / 1 6
Migrating Physical Desktops to a Virtual
Desktop Pool with VMware View
Setting up roaming profiles is fairly straight forward and is well documented. The steps can be accomplished
manually via the Active Directory Users and Computers (ADUC) interface or via script. In this case we are using
ADUC to set the user’s profile path to the same location as their Home Folder:
Next time the user logs off and back on a copy of their profile settings will be copied to this path and from that
point forward the user can access their profile from any location on the network. If we are not changing operating
system versions, or if we are moving from Windows Vista to Windows 7, users should now be able to login to
their virtual desktop and have access to their profile settings (via roaming profiles) and data (via folder redirection).
If we are moving from Windows XP to Windows Vista or Windows 7, we will need to migrate the user profile
from Version 1 to Version 2 to allow the user access to their profile settings.
One option is to use Microsoft’s User State Migration Tool (USMT) to export user profiles from Windows XP Version 1
profiles and then import them into a Version 2 profile under Vista or Windows 7. USMT 4.0 is the latest version
of this utility and is part of The Windows Automated Installation Kit (AIK) for Windows 7. USMT is actually a group
of applications designed to facilitate the migration of user data and profiles from one machine to another. USMT
also converts between Version 1 and Version 2 profiles by exporting the profile information to an intermediate format.
The scanstate.exe application in USMT scans a computer and exports existing user profiles to an intermediate
compressed store. If run as an administrator it will export all user profiles by default, but can be configured to
export a specific user profile as well. Under Windows XP scanstate.exe can also be run under the context of a
standard (non-administrative) user. In this case, it will export only the profile of the currently logged on user.
Scanstate.exe syntax can be found in The Windows Automated Installation Kit (AIK) for Windows 7. The specific
usage of this utility will be dependent on the environment it is being deployed in. The following example shows a
scanstate.exe command line that will export the user state of the user testlab\bloggsj to a migration store called
XP_export on a shared network location. The one parameter of particular note is /localonly which tells scanstate.
exe to only copy files which are resident on the local computer. If this is not used then scanstate.exe will also
copy files from mapped network drives, including our redirected folders.
Scanstate.exe \\filesrerver1\USMT\bloggsj\XP_export /l:c:\temp\scanstate.log /i:migapp.xml
/i:miguser.xml /o /localonly /ui:testlab\bloggsj
We can also use environment variables to build a more generic version of the command that will work with any
logged in user. Here we have substituted the hard coded path to the user’s home directory, logfile path, the
TECH N I C AL WH ITE PAPE R / 17
Migrating Physical Desktops to a Virtual
Desktop Pool with VMware View
domain name, and user name with the variables %HOMESHARE%, %USERDOMAIN%, and %USERNAME%
respectively to build a more generic version of the command:
Scanstate.exe %HOMESHARE%\XP_export /l:%temp%/scanstate.log /i:migapp.xml /i:miguser.
xml /o /localonly /ui:%USERDOMAIN%\%USERNAME%
Once we have the user’s profile backed up we can use the loadstate.exe tool, which is also part USMT, to convert
the user’s profile from Version 1 to Version 2 and import it into their new desktop.
Loadstate.exe %HOMESHARE%\XP_export /l:%temp%/loadstate.log /i:migapp.xml /i:miguser.xml
The good news is that the export of the user profile can be run by the user under Windows XP. The bad news is
that because of User Access Control (UAC) in Vista and Windows 7 you must supply admin credentials to be
able to run loadstate.exe to be able to import the user’s profile. There are a couple of methods to accomplish
this including having administrators run the import for the user, using PowerShell scripts to run the command in
an elevated account (this requires storing the username and password in plain text), building an executable that
runs in an elevated user context but can be run by a non-admin user, or using automated tools such as Microsoft
SCCM, CA Unicenter, or IBM Tivoli to execute the import script.
Another approach to profile migration involves the use of tools such as Liquidware Labs ProfileUnity which
produce a consolidated profile that can be used by either Version 1 (XP, Windows 2000) or Version 2 (Vista,
Windows 7) users. This approach provides a low touch method for moving users from Version 1 profiles to Version
2 profiles since users can transparently move between clients running different profile versions. This would allow
users to move from Physical XP systems to virtual Vista/Windows 7 desktops without administrator intervention.
Finally, administrators may simply decide to migrate users using folder redirection only, especially in environments
where users have limited capability to change their environment or their environment is setup via login scripts or
GPOs. For example, if all user network share drives and printers are setup via login scripts then it may be simpler
and more cost effective to simply use folder redirection to migrate user data to a shared location.
Floating Desktops Versus Dedicated
In our example above we created a pool of dedicated desktops with a persistent user disk for local profile
redirection, but didn’t go into a great deal of detail as to why. This is actually a subject that deserves some
additional explanation as the choice of Dedicated versus Floating desktop pools has a significant bearing on
how we deal with user data and profiles long term. If we are using Floating desktop pools then users are simply
assigned to the next available desktop image in the pool. In this environment none of the user’s data or profile
information is connected in any way to the desktop they are assigned. So in this environment folder redirection
and roaming profiles will need to be permanently maintained in order to provide users access to this data
regardless of the desktop they log into.
TECH N I C AL WH ITE PAPE R / 1 8
Migrating Physical Desktops to a Virtual
Desktop Pool with VMware View
If however we use a Dedicated pool in which users are assigned to a particular desktop within the pool and have
a persistent data disk to which their profile is redirected we can choose to simply use roaming profiles and folder
redirection as a temporary measure during migration. Once users have logged into their dedicated desktops and
their profile has been copied to their persistent data disk we can simply turn off roaming profiles by removing
the Profile Path setting in the user’s account setting in ADUC.
Likewise, we can change the settings in the folder redirection GPO to “Redirect the folder back to the local
userprofile location when policy is removed”. Then when we remove this GPO setting the users data folders
would be redirected back to the local user profile path, in this case the persistent data disk, and then all the user
data would be copied from the shared location to the local profile. NOTE: User data is not automatically deleted
from the shared location. It is left there until deleted by the user or the administrator.
In this scenario though we have to give all users within a pool a persistent data disk that is at least as large as the
largest user profile. So if there are 100 users in a pool and one of them has 40GB of user data, then either the
user must delete some of their data, or all users of that pool must be given at least a 40GB persistent disk. For
this reason it may be better to simply remove roaming profiles and leave folder redirection in place. This will also
leave user data in shared locations where it can be backed up as part of normal server backup operations.
Application Migration
The final piece to the migration puzzle involves dealing with applications. In general most organizations have a
baseline OS image that includes some number of standard applications. In some instances the baseline image
configuration is directed by a parent company, desktop organization, contracted services, or by government
mandate. Often the applications included in these baseline configurations cannot be changed. In these cases it is
often simpler to include these standard applications in the parent OS image for the VMware View desktop pools.
This ensures that all of the required standard applications will be available to all users during the migration process.
It does mean more patching of the parent image since any patches required by these applications must be rolled
into the parent image and then the desktop pools recomposed, this however is still significantly less
maintenance that would be required for continuing to patch individual desktops.
This still leaves us with applications which are not part of the standard desktop deployment. The graphics department
for example may have need for a specific drawing application which is unique to their group. Likewise the engineering
department may require access to CAD applications in order to perform their job functions.
TECH N I C AL WH ITE PAPE R / 1 9
Migrating Physical Desktops to a Virtual
Desktop Pool with VMware View
There may also be legacy applications which are still required for users to be able to function which are either
not compatible with a newer operating system, or which have been replaced by a newer version. For example,
users may be required to use Internet Explorer 6 (IE6) to get to an internally developed web application, but IE6
is not available under Windows Vista or Windows 7.
ThinApp provides the ability to virtualize applications into a self contained virtual environment, thus breaking the
tight coupling between applications and the operating system. Applications can be packaged to run completely
within these virtual environments allowing legacy applications that would otherwise not run on newer operating
systems to run just as they did on older operating systems. Applications that require access to shared DLL’s and
registry entries in order to function can be captured in merged isolation mode allowing them to access the
required elements, while the rest of the application operates in an isolated sandbox within the virtual environment.
We will only discuss the basic functionality of ThinApp here, but more information, including step by step
guidelines on packaging particular applications, is available in the VMware ThinApp User’s Manual or in the
ThinApp section of the VMware Communities portal: http://communities.vmware.com/community/vmtn/
entdesk/thinapp
The process of packaging an application in ThinApp can be broken down into seven distinct steps, each having
a number of sub steps:
1. Prescan – Performs a scan of the system configuration before the installation of the application being
packaged. This should be done using a pristine operating system at the lowest level you plan to support
(i.e. Windows XP). This lends itself well to using a virtual machine as the capture machine since snapshots
can be used to return the system to a pristine state between captures.
2. Installation and Postscan – During this portion of the capture the application being packaged is installed
and then a postscan is run to capture all the changes (DLL’s, registry entries, files, folders, etc.) that
occurred as part of the installation. In this case we are installing Mozilla Thunderbird.
TECH N I C AL WH ITE PAPE R / 20
Migrating Physical Desktops to a Virtual
Desktop Pool with VMware View
3. Configuring capture options – This portion of the packaging process allows us to configure settings such
as which users are authorized to execute the captured application, the isolation mode of the application,
the location of the application sandbox, the location of the project files, name of the application package,
and whether to package the application as a single executable file. In this case we have restricted the
application so that only members of the “Thunderbird Users” group may execute it.
4. Build – At this point ThinApp builds the application package based on the results of the changes detected
during the postscan and the configuration changes made by the administrator packaging the application.
5. Test – Now test your ThinApp package as and ensure that it works as expected. Be sure to also test as
a non-privileged user since most users run in a non-privileged mode. If the package does not run as
expected correct any issues (see Application Tools and Tips for VMware ThinApp here:
http://blogs.vmware.com/thinapp/2009/05/app-troubleshooting.html).
6. Deploy – Now that your ThinApp application is operating as expected you have several deployment options
available including using deployment tools such as Symantec, BMC, SCCM to deploy the applications via
MSI file, using the thinreg.exe application that comes with ThinApp to register the application, or simply
storing the packaged applications on a network share where authorized users can execute them. All of
these deployment methods are further explained in the ThinApp Users Guide.
7. Update – Applications will obviously require updates during their lifecycle. By using ThinApp we have
isolated these updates to the specific application rather than the entire operating system on a computer.
This means that updates to the DLL’s of one application will no longer cause another application to stop
functioning. Updates to ThinApp packages can be performed in a number of ways by administrators. In
some cases it may be as simple as opening the application as an administrator and using the applications
own update mechanism. Other applications may require the use of the submerge.exe utility to perform
TECH N I C AL WH ITE PAPE R / 21
Migrating Physical Desktops to a Virtual
Desktop Pool with VMware View
incremental updates to an application. More information on all of the methods for updating applications are
outlined in the ThinApp Users Guide. Regardless of the method you use don’t forget to repeat to test the
application after any updates.
Client Deployment
The one area that will require some level of interaction at the end user location is the deployment of clients to
connect users to their virtual desktop. Clients can take several forms including thin clients, zero clients, or soft
clients. Soft clients such as the VMware View Client which runs on Windows, or the Open Client which runs on
Linux, provide the capability to use existing desktop hardware as a VMware view client.
Which client to choose, and how to deploy it, is going to be driven by requirements in each organization. For
example, some organizations may choose to initially use PXE to boot a network Linux image running the Open
client on their user’s existing desktop hardware. Others may opt to change out all of their existing desktop
hardware for zero clients to more quickly reduce the power consumption associated with desktops in their
environment. Still other may decide to change out one hundred desktops at a time for thin clients.
Regardless of the method used for client deployment the methodologies outlined above allow for a controlled
deployment of virtual desktops to your users community. By using OU’s and security groups within Active
Directory we can easily select which users will be part of our migration at any point in time. Simply adding users
computers to the appropriate OU or group begins the migration process by applying the required GPO settings
to begin redirecting user folders to a shared network location. Likewise roaming profiles can be setup on a per
user basis or via scripts for groups of users. In this manner groups of users can be migrated as quickly, or as
slowly, as their clients can be setup to access their virtual desktops.
Conclusion
We have presented here a series of methodologies using technologies already inherent in organizations using
Windows desktops and Active Directory. These methodologies allow an organization to break the tight coupling
between desktop hardware, operating systems, applications, and user data. This allows for the rapid transition
from existing physical desktops to virtual desktop pools in a highly automated fashion with little interaction
required by administrators. In fact, if users are moving from a physical desktop to a virtual running the same
operating system, or an operating system with a compatible profile version, all user data and profile information
can be moved from the physical desktop to the new virtual desktop in a completely automated fashion. In cases
where the profile version for the operating system differs (i.e. Windows XP -> Windows Vista/Windows 7) all
user data can be moved without interaction, but profiles must either be converted using USMT or third-party
tools, or recreated in the new environment.
We have also shown how ThinApp allows us to further separate applications from the underlying operating
system by virtualizing the application environment. This allows applications to run completely isolated from each
other, eliminating problems caused by application incompatibility such as DLL conflicts. ThinApp also allows
applications to run on up level operating systems which would otherwise be unable to run. This allows for
migration to newer operating systems, even if legacy applications are not supported.
Planning will still be necessary in order to conduct a successful migration. For example, user and organization
unique applications will need to be identified ahead of time so that plans can be made to package them via
ThinApp, or roll them into a special desktop pool specific to a group of users. Storage capacity on the servers
that will be utilized for folder redirection and user profile storage will also need to be evaluated to ensure that
adequate space exists to support the migration. Existing management tools such as SCCM, SMS, or BMC can be
used to help identify these applications. If no management tools are currently deployed in the environment then
tools that specialize in physical to virtual migrations such as Lakeside Software’s Systrack Virtual Machine
Planner or Liquidware Labs Stratusphere Fit should be investigated.
With adequate planning, and the use of the methods outlined here it is possible to migrate users from existing
physical to virtual desktops as quickly, or as slowly, as an organization desires.
TECH N I C AL WH ITE PAPE R / 2 2
VMware, Inc. 3401 Hillview Avenue Palo Alto CA 94304 USA Tel 877-486-9273 Fax 650-427-5001 www.vmware.com
Copyright © 2011 VMware, Inc. All rights reserved. This product is protected by U.S. and international copyright and intellectual property laws. VMware products are covered by one or more patents listed at
http://www.vmware.com/go/patents. VMware is a registered trademark or trademark of VMware, Inc. in the United States and/or other jurisdictions. All other marks and names mentioned herein may be
trademarks of their respective companies. Item No: VMW-TECH-WP-VIEW-MIGRATING-FROM-PHYSICAL-VIRTUAL-USLET-101