1
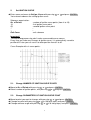
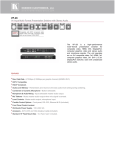
www.zeeltronic.com
[email protected]
updated 29.10.2013
program version: 20.131029
USER MANUAL
PSR-P02 PROGRAMMABLE CDI IGNITION
PSR-P02 is programmable CDI and is specially designed to work with PVL ignition
with inner rotor. It does not work with original PVL ignition coil and require ignition coil
for CDI ignitions. PSR-P02 also requires small 9V, or 12V battery. Current draw is
very low and it is about 25mA when engine running. Small 9V block battery is enough
for more than 10h operation, when shift light and power jet are not used.
Very important!
Resistor spark plugs must be used, because they produce less electromagnetic
disturbances.
TECHNICAL DATA
Limit values:
- minimum revs
- maximum revs
- minimum supply voltage
- maximum supply voltage
- max. supply voltage for 1 minute
- current draw
- maximum continuous current for shift light output
- peak current for shift light output
500 RPM
20000 RPM
8 Volts
16 Volts
35 Volts
25 mAmp
1 Amp
5 Amp
Circuit is protected against reverse supply voltage (wrong connection).
Features:
- CDI charged from hi voltage charging coils (generator)
- running with PVL and Selettra rotor/stator without pickups
- store and load function for 2 ignition maps
- external switch for changing ignition map while riding
- shift light output
- quick shift (shift kill)
- tachometer output
- advance/retard whole ignition curve
- rev limit
- timing compensation curve
- fast processing for high accuracy - delays from 1us
1
1.
HOW TO ENTER MENU
Connect programmer to PSR and wait few seconds for activation of programmer
and press 'ENTER'.
With pressing '+', or '-' you can move through menu and select with pressing
'ENTER'.
Exit menu with selecting Exit.
2.
MENU ORGANISATION
Load Ign. Curve
Save Ign. Curve
Set Ign. Curve
Advance
Shift Light
Shift Kill Time
Rev Limit
Remote SW
Power Jet
Compensation Curve
Exit
3.
- load previously saved ignition curve set (from #1 to #2)
- save new ignition curve set (from #1 to #2)
- ignition curve parameters submenu
- advance/retard whole ignition curve
- shift light
- shift kill time
- rev limit
- activating/deactivating external switch
- power jet
- timing compensation curve
LOAD IGN. CURVE
Enter menu and move to Load Ign. Curve with pressing '+', or '-' and press 'ENTER'.
Select number of previously saved ignition curve, with pressing '+', or '-' and press
'ENTER' to confirm.
4.
SAVE IGN. CURVE
Enter menu and move to Save Ign. Curve with pressing '+', or '-' and press 'ENTER'.
Select number to which you want to save your ignition curve, with pressing '+', or '-'
and press 'ENTER' to confirm.
2
5.
Set IGNITION CURVE
Enter menu and move to Set Ign. Curve with pressing '+', or '-' and press 'ENTER'.
You entered submenu for setting ignition curve.
Submenu organisation:
Nr. of Points
1)
2)
...
...
Exit Curve
- number of ignition curve points (from 4 to 10)
- first ignition curve point
- second ignition curve point
...
...
- exit submenu
Important!
To avoid wrong processing, don't make unreasonable curve course.
Every time you make any changes to ignition curve, it is automatically saved to
position #0. Later you can save it to other position from #1 to #2.
Curve Example with six curve points:
5.1.
Change NUMBER OF IGNITION CURVE POINTS
Move to Nr. of Points with pressing '+', or '-' and press 'ENTER'.
Select number of ignition points, with pressing '+', or '-' and press 'ENTER'.
5.2.
Change PARAMETERS OF IGNITION CURVE POINT
Move to point you want to change, with pressing '+', or '-' and press 'ENTER'.
Change rev point with pressing '+', or '-' (in 100 rpm steps) and press 'ENTER'.
Change advance angle with pressing '+', or '-' (in 0.1deg steps) and press 'ENTER'.
3
6.
Set ADVANCE
With Advance setting is possible to advance, or retard whole ignition curve. When
setting is positive then ignition curve is advanced and when setting is negative then
ignition curve is retarded. With Advance 0.0deg, ignition curve is unchanged.
Enter menu and move to Advance with pressing '+', or '-' and press 'ENTER'.
Set advance with pressing '+', or '-' (in 0.1deg steps) and press 'ENTER'.
7.
Set SHIFT LIGHT
Enter menu and move to Shift Light with pressing '+', or '-' and press 'ENTER'.
Change rev point with pressing '+', or '-' (in 100 rpm steps) and press 'ENTER'.
8.
Set SHIFT KILL TIME
Enter menu and move to Shift Kill Time with pressing '+', or '-' and then press
'ENTER'.
Change kill time with pressing '+', or '-' (in 10 ms steps) and then press 'ENTER'.
9.
Set REV LIMIT
Enter menu and move to Rev Limit with pressing '+', or '-' and press 'ENTER'.
Change rev limit with pressing '+', or '-' (in 100 rpm steps) and press 'ENTER'.
10.
Set REMOTE SW
Enabling, or disabling external switch for changing ignition curves while riding.
Enter menu and move to Remote SW with pressing '+', or '-' and then press
'ENTER'.
Enable, or disable external switch with pressing '+', or '-' and then press 'ENTER'.
11.
Set POWER JET parameters
Enter menu and move to Power Jet with pressing '+', or '-' and then press
'ENTER'.
Submenu organisation:
Power Jet ON RPM
Power Jet OFF RPM
Exit
- revs for activating power jet
- revs for deactivating power jet
- exit submenu
4
Example:
Power jet ON (RPM) = 8000rpm
Power jet OFF (RPM) = 10000rpm
Power jet is switched on, when revs are above 8000rpm.
Power jet is switched off, when revs are above 10000rpm.
11.1. Set POWER JET ON RPM
Enter menu and move to Power Jet ON RPM with pressing '+', or '-' and then press
'ENTER'.
Change rev limit with pressing '+', or '-' (in 100 rpm steps) and then press 'ENTER'.
11.2. Set POWER JET OFF RPM
Enter menu and move to Power Jet OFF RPM with pressing '+', or '-' and then press
'ENTER'.
Change rev limit with pressing '+', or '-' (in 100 rpm steps) and then press 'ENTER'.
12.
Set COMPENSATION CURVE
Stator has only charging coils and no pickup. Trigger timing is not constant, because
signal is taken from charging coil. Compensation curve is needed to correct possible
timing error.
Important!
Do not make any changes, if you are not sure about procedure. Unit is already
compensated and normally does not need corrections.
To check, if timing is correct, flat ignition curve must be programmed to 30deg.
Check with stroboscope light, if marks on the rotor and stator are aligned.
Enter menu and move to Compensation Curve with pressing '+', or '-' and then
press 'ENTER'. Programmer will show information Read instructions!!! and then
press '+'.
Move through the points with pressing '+', or '-' to the point you want to change and
press 'ENTER'.
Set compensation angle with pressing '+', or '-' and press 'ENTER' to confirm.
5
Compensation curves and maximum advances for different PVL stators:
PVL 1419:
Compensation curve:
Maxmum programmable advance:
500rpm @ 5,0deg
1000rpm @ 5,0deg
2000rpm @ 2,2deg
3000rpm @ 1,0deg
4000rpm @ 0,0deg
5000rpm @ 0,0deg
6000rpm @ -0,5deg
7000rpm @ -1,0deg
8000rpm @ -2,0deg
10000rpm @ -5,5deg
12000rpm @ -7,0deg
14000rpm @ -7,0deg
16000rpm @ -6,5deg
18000rpm @ -6,0deg
20000rpm @ -5,0deg
500rpm @ 32,0deg
1000rpm @ 36,8deg
2000rpm @ 38,6deg
3000rpm @ 38,4deg
4000rpm @ 38,5deg
5000rpm @ 38,0deg
6000rpm @ 38,0deg
7000rpm @ 37,7deg
8000rpm @ 37,8deg
10000rpm @ 37,5deg
12000rpm @ 37,0deg
14000rpm @ 37,0deg
16000rpm @ 36,5deg
18000rpm @ 36,0deg
20000rpm @ 35,0deg
PVL 1424:
Compensation curve:
Maxmum programmable advance:
500rpm @ 4,5deg
1000rpm @ 4,5deg
2000rpm @ 1,0deg
3000rpm @ -0,6deg
4000rpm @ -1,5deg
5000rpm @ -2,0deg
6000rpm @ -2,5deg
7000rpm @ -3,1deg
8000rpm @ -4,0deg
10000rpm @ -7,5deg
12000rpm @ -9,0deg
14000rpm @ -8,4deg
16000rpm @ -7,5deg
18000rpm @ -6,8deg
20000rpm @ -6,0deg
500rpm @ 32,5deg
1000rpm @ 37,3deg
2000rpm @ 39,8deg
3000rpm @ 40,0deg
4000rpm @ 40,0deg
5000rpm @ 40,0deg
6000rpm @ 39,9deg
7000rpm @ 39,8deg
8000rpm @ 39,8deg
10000rpm @ 39,5deg
12000rpm @ 39,0deg
14000rpm @ 38,4deg
16000rpm @ 37,5deg
18000rpm @ 36,8deg
20000rpm @ 36,0deg
PVL 1443:
Compensation curve:
Maxmum programmable advance:
500rpm @ 0,0deg
1000rpm @ 0,0deg
2000rpm @ 0,0deg
3000rpm @ 0,0deg
4000rpm @ 0,0deg
5000rpm @ 0,0deg
6000rpm @ 0,0deg
7000rpm @ 0,0deg
8000rpm @ 0,0deg
10000rpm @ 0,0deg
12000rpm @ 0,0deg
14000rpm @ 0,0deg
16000rpm @ 0,0deg
18000rpm @ 0,0deg
20000rpm @ 0,0deg
500rpm @ 37,0deg
1000rpm @ 41,8deg
2000rpm @ 40,8deg
3000rpm @ 39,4deg
4000rpm @ 38,5deg
5000rpm @ 38,0deg
6000rpm @ 37,4deg
7000rpm @ 36,7deg
8000rpm @ 35,8deg
10000rpm @ 32,0deg
12000rpm @ 30,0deg
14000rpm @ 30,0deg
16000rpm @ 30,0deg
18000rpm @ 30,0deg
20000rpm @ 30,0deg
6
13.
MONITORING
Connect programmer to PSR-P02 and wait few seconds for activation of
programmer. Fist information displayed on the programmer is software version.
With programmer you can watch revs, calculated ignition advance angle.
Information!
You can connect, or disconnect programmer any time you want, without any harm. It
is not important, if motor running, or not and if power supply is connected, or not.
Important!
Do not use too much force when connecting, or disconnecting programmer unit!
7