1
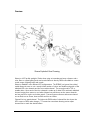
Neeva – LED Profile User Manual Strong Entertainment Lighting 4350 McKinley Street Omaha, NE 68118 April, 2011 Rev 1 Table of Contents Overview ................................................................................................................................................... 3 User Interface Conventions ....................................................................................................... 4 DMX Channel Information........................................................................................................... 5 Setting DMX Address ................................................................................................................... 5 Recording Scenes ............................................................................................................................. 6 Programming Steps ..................................................................................................................................... 6 Fixture Info .............................................................................................................................................. 7 Set ................................................................................................................................................................ 7 Adjustments .......................................................................................................................................... 9 Focusing the beam ........................................................................................................................................ 9 Shaping the beam........................................................................................................................................... 9 The Yoke ................................................................................................................................................... 9 Adjusting Yoke Position............................................................................................................................. 9 Adjusting fixture angle..............................................................................................................................10 Cleaning Lenses ............................................................................................................................... 10 2 Overview Neeva Exploded View Drawing Neeva is a LED profile spotlight. Rather than using an incandescent lamp, a dimmer and a color filter to create lighting levels and moods Neeva is directly DMX controllable to create a wide range of lighting levels and moods. Neeva is available in two different LED configurations. The RGBW (red, green, blue, white) model allows the user to mix a nearly infinite number of colors and shades using each of the individual LED color channels and the extra white channel. The second model is TW or tunable white. Here each of the four channels is made up of white LEDs with each individual channel varying from warm to cool white (channel one and three are the warm channels and two and four are the cool white output. Current fixture software references channel one as Red, two as Green, three as Blue and four as White. Channel five is a speed channel. The higher the DMX value of channel five the slower the LEDs react to DMX value changes. To create the smoothest dimming action adjust channel five to reach the desired effect. 3 User Interface Conventions The Neeva features a robust user interface that consists of a two line LCD display and four buttons. The left button below the display in the “Menu” function, the right button is the “Enter” function and the two buttons on the side are the “Up” and “Down” functions. For the purpose of this manual any time you see these four functions listed in bold type this refers to pressing that function button. The user interface is available to set the DMX address, display various information about the current operating state, control operational mode, record steps for standalone playback, and calibrate the output of the individual LED color channels. Display text for the purpose of this manual will appear as italicized type. Note: The Neeva LCD display has a time-out function. If the fixture is powered and the display is blank hit the Enter function to activate the display. 4 DMX Channel Information The home display of the user interface is the DMX status screen. If this screen is not the current display press the Menu function until this display appears: Dmx: On Addr:XXX The word after Dmx: will be either On or Off indicating that the fixture is either receiving DMX from a control source or not. It the fixture is in Auto mode you will not be able to access this screen no matter how many times you press the Menu function. You will see a display like this: Auto:On Step: X From either the Dmx or Auto screen simply press the Enter function to access the full set of fixture functions. For detailed information on Auto operation see the section on Recording Scenes below. Setting DMX Address DmxAdr Setting the DMX address is likely to be the most common operation accessed via the user interface. From the home display do this press the Enter function: XXX Use the Enter function to move the Up/Down arrow to the lower line of the display. The value on the second line of the display will now be shown with brackets around that value. This indicates that the Up and Down function have incremented that value and that you must use the Enter function to save this new value. Pressing the Menu function at any point will move you up the path you took to get to your current display and will not record a pending change in value. [XXX] DmxAdr 5 Use the Up and Down functions to increment the display to the desired address. Once that address is displayed use the Enter function to confirm that value. Then press the Menu function and the Up/Down arrow will return to the first line of the display allowing you to either return to the main display or use the Up and Down functions to access other fixture functions. Recording Scenes Auto The Auto menu is used to enable and record scenes for standalone operation of the Neeva. Player To start the menu use the Enter function from the Auto display. On Fact From this screen you can use the Enter function to move the Up/Down arrow to the second line and then change the state of the Player from On to Off by using the Up or Down function. Alternatively, you can use the Up and Down functions while the Up/Down arrow is on the first line to move to the next menu. The first of these is the Fact Settings menu. Settings If you use the Enter function you will see the Fact Set? screen and a second press of the Enter function will reset your fixture to original Factory Settings clearing your scene memory. Programming Steps Edit If you are at the Player screen display show above you can use the Up function to proceed to the Edit Steps display. Steps When you use the Enter function you will see the Edit Step X display. 6 Step X Edit There are four steps available of edit. Use the Up and Down functions to move to the step you wish to edit. Use the Enter function to drop down into a new set of menus. These are Enable, Delay, Speed, White, Blue, Green, and Red. Use the Enter, Up and Down function buttons to set values for each of these step attributes. Use the Menu function to move up from each value to be able to proceed to the next attribute. The Enable screen can be set to On or Off. This chooses the steps that will be part of your show. Once you have programmed your steps and enabled them you can use the Player screen to set the fixture to On. This will place the fixture in Auto mode and play your show. Turning the Player screen to Off returns the fixture to DMX mode. Fixture Info Info Neeva includes some informational screens with important troubleshooting information. From the main display press the Enter function then the Up function until you see the following display. From here use the Enter function and then the Up or Down function to display the SftVer (Software Version), LedTemp, and FanRPM of the fixture. Use the Menu function to move back to the main display. Set Set Neeva includes a set of Setup screens that program important operational aspects of the fixture. From the main display press the Enter function then the Up function until you see the following display. From the Set screen you can first access the Fact Defaults screen. This function is different from the Fact Setings function in that this function resets the values programmed 7 Fact in Set back to their factory defaults of LcdLite=Auto and Led Cal all colors to full. If you press Enter while on this screen the Neeva will respond with Busy and then Done when it has reset the defaults values. Press the Menu function to move back up to the previous level. Defaults LcdLite The LcdLite can be set to function in two ways. The factory default is for the LCD backlight to time-out and turn off after a period of non-use. Setting LcdLite to On will force the backlight to stay on continuously and Off will turn off the backlight. Auto Press the Enter function and the Up/Down arrow will move to the second like where the Up or Down function will rotate through the options. As always the Menu function returns you to the upper level menu. Led Cal Like all LED based lighting fixtures the Neeva mixes colors based on the proportional use of Red, Green and Blue LEDs. Neeva adds to this with an extra channel of White LEDs to expand the range of possible colors. The Neeva is set at the factory to balance the RGB mix of the LEDs to give a White output. To do this we lower the output of the brightest colors to match the output of the lowest color. You can override this setting to meet your own operational requirements. In the Led Cal menu. Red Cal Press Enter and then use the Up or Down function to move through the four color levels. The value 255 represents full output and each of the four channels in a Neeva can be adjusted. Once adjusted the total output of a change is proportional to the level you set in Led Cal. XXX In some cases you might fine that the factory balance is not to your liking or you may just want the fixture to output the maximum level of light with no regard to the color balance. In these cases adjust the Neeva to your desired effect. 8 Adjustments Focusing the beam To focus the beam, loosen the two beam focus knobs located on the top and bottom of the lens tube. Slide the lens tube forward or backward to achieve a sharp focus. Note: Due to the unique nature of the Neeva LED Profile a soft focus is not desirable. Best results are achieved by using your choice of diffusion materials when you want to achieve a soft focus effect. After you have the fixture in focus, tighten the beam focus knobs. Shaping the beam The beam can be shaped using the four built-in shutters or via the drop in pattern holder. The pattern holder slot in just in front of the shutters. The supplied patter holder is a B-Size device and hold 2.5” and 2.75” patterns. Note: Because the Neeva has a 2.125 inch aperture it is recommended that the image area of a pattern be limited to 2 inches or less for best results. A drop-in slot is located in front of the pattern holder slot that is designed for optional iris or pattern spinning devices. A small cover is installed to prevent light leaks when an accessory is not installed. Loosen the two screws that hold the cover (do not remove) and slide the cover forward so that the accessory can be installed. Fit the cover appropriately to the accessory and tighten the screws. When installing an accessory device in this slot make sure to follow the accessory manufactures instructions. The Yoke Adjusting Yoke Position The Neeva provide for two yoke configurations; the standard use position and a low clearance position. To change the fixture from its standard position, remove the yoke locking knobs, screws, washers, and hex bolts from either side of the fixture. Move the yoke to the alternate position and reinstall the hardware. Add figure 3 here showing yoke configurations 9 Note: In neither position will the Neeva be able to be turned through the yoke with DMX cables attached. To rotate yoke past the rear panel it is necessary to remove the DMX cables. Adjusting fixture angle Loosen the yoke locking knobs but do not remove them. Tilt the fixture to the desired angle and then tighten the yoke locking knobs to set in that position. Cleaning Lenses Keeping the Neeva optical system clean will greatly enhance it performance. Please follow these easy instructions to get the best results. Do not use commercial glass cleaners these contain harsh chemicals that may damage your optics. The most preferred choice is Isopropyl alcohol. Optionally you can use distilled water or a 50/50 mixture of Isopropyl alcohol and distilled water. Always use a clean, lintfree cloth, ideally one designed for this purpose. The optical system consists of three lenses. To access these it is necessary to remove the lens tube and separate the rear housing of the fixture from the lens barrel (see figure 1). Additionally you will have to open the lens tube to remove the lens from the tube for best results. To open the lens tube, remove the two screws from the bottom side of the color frame holder. Set the screws and casting aside. Now remove four screws located along the tube, two on each side. Separate the two halves while making sure to support the lens so that it does not fall and get damaged. Leave the color frame retaining clip in place. Once the lens is cleaned reverse the process making sure that the lens is seated correctly and that the color frame retaining clip is correctly in place. While the lens tube is still removed from the fixture you can access both surfaces of the main lens located at the aperture plate. Before returning the lens barrel to the rear housing clean the front of the main condenser lens. Carefully reassemble the rear housing to the lens barrel and reinstall the lens tube to the lens barrel and the process is complete. Be sure to install the lens tube with the color frame retaining clip facing up. 10