1
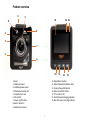
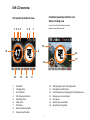
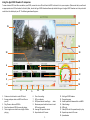
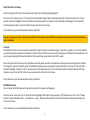
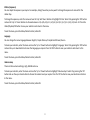
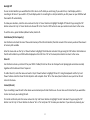
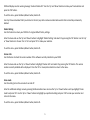
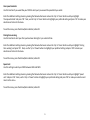
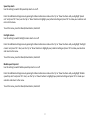
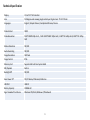
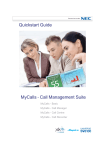
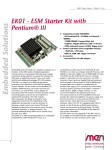
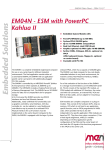
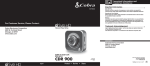
SPEED VISION DX20 DVR User Manual
www.aguriworld.co.uk
1.
Contents
2. What’s in the box?
3. Product overview
4. DVR LCD overview
5. Installation
5. Connecting to power
6. Basic features
7. Video playback
8. Aguri Viewbox PC software
9. Video recording settings
10. Video recording settings cont.
11. Setting G-Sensor
12. Change language
12. Set volume
13. Set time
13. Adjust touch tone
14. Set LCD backlight on/off
14. Format SD card
15. Set voice on or off.
16. Over speed reminder
16. Set speed units to KMH or MPH
17. Set speed trap alerts on or off
17. Set red light camera alerts on or off
17. Set mobile speed trap alerts on or off
18. Park mode
18. Camera operation
19. Technical specification
20. Disposal of Old Electrical & Electronic Equipment
21. Service under warranty
What’s in the box?
1 x Aguri Speed Vision DX20 DVR
1 x USB cable
1 x Vehicle charger
1 x Windscreen bracket
1 x User guide
2.
Product overview
4
5
15 16
14
8
9
3
2
7
1
6
10
1. Reset
2. HDMI out socket
3. USB data/power socket
4. Windscreen bracket slot
5. Video/Camera Lens
6. SD card slot
7. Power on/off button
8. Built-in Antenna
9. Ambarella processor
11
12
13
10. Menu/Return button
11. Video Playback/Up/Mute button
12. Camera/Down/SOS button
13. Video Record/OK button
14. 2” Full colour LCD
15. Red LED power/charging indicator
16. Blue LED video recording indicator
3.
DVR LCD overview
Combined speed trap detection and
Video recording view.
Full speed trap detection view
1 2 3 4
User tip. Press the Menu button to switch
between these different views
7
5 6
15
13
8
16
17
14
12
1.
2.
3.
4.
5.
6.
7.
8.
9.
11
10
9
Resolution
Charging status
SD card status
GPS Compass direction
Recording status
Video timer
GPS status
Speed trap alert graphic
Manual record button
10.
11.
12.
13.
14.
15.
16.
4.
SOS/Emergency lock recording button
Microphone on/off button
Enter Setting menu/change Speed Trap/Video view.
Displays your current speed
Your speed
Video loop time selected
Speed trap alert graphic
Installation
Insert the 8GB micro SD card in to the SD card slot on the side of the unit and attach the windscreen bracket to the DX20.
Mount your DX20 in a safe and convenient position in the front windscreen where it has an unobstructed view of the road ahead. We
recommend mounting it at the top of the windscreen near to the rear view mirror. However remember that you will need to attach the
power cable, so find a position where the power cable can be attached to the vehicle’s cigarette lighter socket where it will not obstruct,
or become a danger to the driver.
Once you have chosen a location, check the windscreen bracket lever is in the unlocked position, press the suction cup bracket to the
glass and push the lever to the locked position.
Connecting to power
Attach the small end of the USB cable to the USB power socket on the side of the unit . Attach the other end to the vehicle charger
provided. Plug the vehicle charger in to an appropriate cigarette lighter or 12V/24V socket in your vehicle.
Installation tips
Before mounting your DX20, clean the area of the windscreen with a good quality glass cleaner to ensure the suction cup makes a good contact.
Remember to mount the unit and install the power cable safely in a location where it does not interfere with the driver or the controls of the vehicle.
Although your DX20 comes as standard with an 8GB micro SD card, it will support up to a 32GB micro SD card if you want to update the card to a
larger size. If you do update the SD card, remember to select an SD card which is minimum SDHC Class 6.
It is also possible to ‘hard-wire’ DX20 and hide the power cables providing a neater installation. Please contact an auto electrician or your local car
dealer for further details.
5.
Basic features.
Your Aguri Speed Vision DX20 DVR comes as standard with all features set to their optimum settings, however the unit has certain user
selectable features you can change to suit your own requirements.
Switching views and entering the Setting menus.
You can switch between two different views; full screen speed trap detection mode and a combined view of speed trap detection and
video. Use the Menu button to switch between the two different views as well as to enter the Settings menu and the Additional
Settings menu.
Power on/off
Your DX20 will power on and start to record automatically as soon as it is connected to power. You can also power it on and off
manually. Press the power button for 1 second to power on, press and hold the power button for 2 seconds to power off.
Video/camera mode
You can only take photographs when your DX20 is not recording. To stop the unit recording and switch to camera mode press button
#4, the Video Record/OK button. The LCD will now display a ‘camera’ icon over button #3. To take a photograph whilst in camera mode,
press button #3. To switch back to video mode and to start recording video again, press the Video Record/OK button again.
Audible recording (Mic on/off)
When recording video you have a choice of whether you want to have the mic turned on to record audible sounds within your vehicle
or to record video only with no sound. To turn the mic on and off press button #2, the Video Playback/Up/Mute button. The Mic icon
on the LCD display will change to confirm your selection. To turn the Mic back on, press button #2 again.
Emergency SOS function
If you want to ensure you save and lock a section of video, for example, during an emergency or after an accident, press button #3, the
Camera/Down/SOS button whilst the device is recording. The section of video just recorded will be locked and saved in the Event folder
of the SD card so that it will not be deleted or automatically over-written.
Automatic video and event recording.
Your DX20 DVR has been designed to be as simple to use as possible. The purpose of a DVR is to continually record the road ahead and
to automatically record and save any incidents or accidents you might be involved in. To ensure that your DX20 does this as efficiently
as possible, it will always power up in to video mode and begin recording automatically. Simply connect your DX20 to a power source
that comes on when you start the engine of your vehicle, and DX20 will start recording automatically without you having to remember
to touch a button.
6.
Video playback on your DX20 DVR.
To review any video recorded directly on your DX20 DVR, stop the video from recording by pressing button #4, the Video Record/OK button
and then press button #2, the Video Playback/Up/Mute button. Select either the ‘Event’ or ‘Normal’ folder and then use the ‘up’ and
‘down’ buttons to find the video file you would like to review and press the ‘OK’ button to play it.
Press the ‘Return’ button at any time to exit the menu.
Deleting video files from your DX20 DVR.
To delete one or all of the video files saved to the SD card, press button #1, the Menu/Return file twice to enter the menu and into the
‘Delete’ function. Select either the ‘Event’ or ‘Normal’ folder and use the ‘Up’ or ‘Down’ buttons to locate the video file you would like to
delete and press ‘OK’. Your DX20 DVR will give you the option to delete the file selected or delete all files in that folder.
Use the ‘Up’ or ‘Down’ buttons to make your selection and press the ‘OK’ button to confirm.
Press the ‘Return’ button to exit the menu.
Video playback using the HDMI socket (HDMI cable not included)
Connect your DX20 to your TV or monitor using a suitable HDMI cable. Power on your unit and follow the instructions for ‘Video Playback
on your DX20 DVR’ above
Please note you cannot enter the Video playback mode whilst the video is recording. To stop your DX20 from recording at any time
press, the Video Record/OK button, button #4.
Video playback and tracking using Aguri DX20 Viewbox PC companion.
To view video recordings on your PC, install the Aguri DX20 Viewbox PC companion on your PC. The software can be found on the CD ROM
supplied or downloaded from www.aguriworld.co.uk
To install from the CD ROM.
Insert the CD in to your PC, open it and double click the Aguri DX20 Viewbox set-up file displayed. Follow the on-screen instructions until
the software has been successfully installed.
To install from www.aguriworld.co.uk
Copy and paste this link in to your web browser and download the Aguri DX20 Viewbox set-up software to your PC and follow the onscreen instructions until the software has been successfully installed.
7.
Using the Aguri DX20 Viewbox PC companion.
To view video and GPS track files recorded on your DX20, remove the micro SD card from the DX20 and insert it in to your computer. (Please note that you will need
an appropriate micro SD Card reader for this task) Next, launch the Aguri DX20 Viewbox software by double clicking on the Aguri DX20 Viewbox icon that you should
now find on the desktop of your PC. The following window will appear:-
17
15
16
10
14
18
6
7
8
19
9
1
13
2
3
1.
2.
3.
4.
5.
4
Distance vehicle travels in each GPS track.
Browse and open video and GPS track files on
your PC.
Play/Pause a video and GPS file
Stop the video and GPS file currently playing.
Take a single screen shot from a length of video
playing.
11
5
12
6.
7.
8.
9.
Time of recording.
GPS co-ordinates.
GPS Speed vehicle travelling in
video.
Maximum speed vehicle achieves in each
GPS track recorded.
10. Average GPS speed of vehicle.
11. Expand video to fill screen
8.
12.
13.
14.
15.
16.
17.
18.
19.
Exit Aguri DX20 Viewbox
Change language
Switch speed unit between Kmh and MPH
Video footage
GPS track
Video/GPS track files opened ready to play
Expand map view to fill screen
Speedometer
To view a recording and display the GPS track, click on the ‘Search Directory’ button and browse your computer until you find your
DX20 displayed as a ‘Removable disc’ (You should find it in the ‘My Computer’ or ‘This PC’ directory of your PC if connected correctly)
Double click on the ‘Removable disc’ folder and select either ‘Event’ or ‘Normal’ and press ‘OK’ to import the files in to the DX20
Viewbox software. The video/GPS track files recorded will appear in the two data lists at the bottom of the Aguri DX20 Viewbox as
indicated above. Highlight the video file you want to run and press the Play button or simply double click the video file you want to
review to launch it.
Video recording settings.
If you would like to fine tune any of the settings on your DX20, follow the instructions below.
Enter the Menu by pressing button #1, the Menu/Return button and then press the ‘Up’ or ‘Down’ buttons to scroll through the video
settings.
Resolution
To change the Resolution, enter the Menu and use the ‘Up’ or ‘Down’ buttons until you highlight ‘Resolution’ and press the ‘OK’ button
to select. Use the ‘Up’ or ‘Down’ buttons to choose between 1920*1080P 30fps 16:9 / HDR 1920*1080P 30fps 16:9 / 1280*720 60fps
16:9 or 1280*720 30fps 16:9. Press the ‘OK’ button to make your selection and return to the menu.
To exit the menu, press the Menu/Return button, button #1.
User tip. The higher the resolution selected the more memory required to save and store lengths of video. If you want to store more
video on one SD card, try reducing the resolution.
Recycle Record/Loop recording
You can adjust the length of each loop of video recorded.
To change the Loop time, enter the menu and highlight ‘Recycle Record’. Select it by pressing the ‘OK’ button and use the ‘Up’ or
‘Down’ button to choose between 1 minute, 3 minutes, 5 minutes or Off. Press the ‘OK’ button to save your selection and return to the
menu.
To exit the menu, press the Menu/Return button, button #1.
9.
Motion Detection
If Motion Detection is switched on, your DX20 will stop recording when there is no activity in front of it. By only recording when the
device senses any activity, your DX20 is able to ignore unimportant periods and save space on the SD card.
To switch Motion Detection on or off, enter the additional settings menu, by pressing the menu button twice and use the ‘Up’ or ‘Down’
buttons to highlight ‘Motion Detection’. Select it by pressing the ‘OK’ button and use the ‘Up’ or ‘Down’ buttons to choose between ‘on’
or ‘off’. Press the ‘OK’ button to save your selection and return to the menu.
To exit the menu, press the Menu/Return button, button #1.
User tip. If you turn off Park Mode your DX20 will continue to record everything in front of it as long as it remains powered on with no breaks in
the recording.
Image Quality
Use this setting to select the quality of the video or photograph you would like to capture.
Enter the menu and use the up and down buttons to highlight ‘Image Quality’. Press ‘OK’ to select it and use the ‘Up’ or ‘Down’ buttons
to choose between Super Fine, Fine and Normal. Press the ‘OK’ button to save your selection and return to the menu.
To exit the menu, press the Menu/Return button, button #1.
Microphone.
Use this setting to switch the microphone on or off.
Enter the menu and use the ‘Up’ or ‘Down’ buttons to highlight ‘Mic’. Select it by pressing the ‘OK’ button and use the ‘Up’ or ‘Down’
buttons to choose between ‘On’ or ‘Off’. Press the ‘OK’ button to save your selection and return to the menu.
To exit the menu, press the Menu/Return button, button #1.
10.
Date/Time/Driver ID Stamp
Use this setting to add a date, time and driver ID stamp to all recordings and photographs.
Enter the menu and use the ‘Up’ or ‘Down’ buttons to highlight ‘Stamp’. Select it by pressing the ‘OK’ button and use the ‘Up’, ‘Down’
and ‘OK’ buttons to highlight and select the information you would like to ‘stamp’ on each recording or photograph. Press button #1,
the ‘Menu/return button, to exit the ‘Stamp’ feature and return to the menu.
To exit the menu, press the Menu/Return button, button #1.
User tip: If you want to ‘stamp’ a ‘Driver ID’ you will have to first add one to your DX20. Find instructions on how to set the ‘Driver ID’ further on,
in this User Guide.
G-Sensor
Your DX20 has a built-in G-Sensor which continually monitors for impact or sudden changes in direction or speed, so it can sense whether
you vehicle has been involved in an incident or accident. If the G-Sensor senses one of these things, your DX20 will automatically lock and
save the preceding length of video recorded so that you will have a permanent record of the event.
Your unit comes with the G-Sensor set to Medium sensitivity, which we think is the optimum setting but you can change this if required.
To change the G-Sensor sensitivity, enter the additional settings menu by pressing the menu button twice, and use the ‘Up’ and ‘Down’
buttons to highlight ‘G-Sensor’. Select it by pressing the ‘OK’ button and use the ‘Up’ and ‘Down’ button to choose between Off, High,
Medium or Low. Press the ‘OK’ button to save your selection and return to the menu.
To exit the menu, press the Menu/Return button, button #1.
WB (White balance)
You can adjust the White balance to improve the quality of the video or photograph.
Enter the menu and use the ‘Up’ or ‘Down’ buttons to highlight ‘WB’. Select it by pressing the ‘OK’ button and use the ‘Up’ and ‘Down’
buttons to choose between Auto、Incandescent、Sunny、Cloudy and Fluorescent. Press the ‘OK’ button to make your selection and
return to the menu.
To exit the menu, press the Menu/Return button, button #1.
11.
EV Bias (Exposure)
You can adjust the exposure you require. For example, during the winter you may want to change the exposure to account for the
darker days.
To change the exposure, enter the menu and use the ‘Up’ and ‘Down’ buttons to highlight ‘EV Bias’. Select it by pressing the ‘OK’ button
and use the ‘Up’ or ‘Down’ buttons to choose between +2.0,+5/3,+4/3,+1.0,+2/3,+1/3,+0.0,-1/3,-2/3,-1.0,-4/3,-5/3 and -2.0. Press the
Video/Playback/OK button to save your selection and return to the menu.
To exit the menu, press the Menu/Return button, button #1.
Language
You can change the menu language between English / Simple Chinese/ Complicated Chinese/ Russia .
To make your selection, enter the menu and use the ‘Up’ or ‘Down’ buttons to highlight ‘Language’. Select it by pressing the ‘OK’ button
and use the up or down button to choose the language you require. Press the ‘OK’ button to save your selection and return to the
menu.
To exit the menu, press the Menu/Return button, button #1.
Volume setup
There are three volume settings, High, Middle and Low.
To make your selection, enter the menu and use the ‘Up’ or ‘Down’ buttons to highlight ‘Volume setup’. Select it by pressing the ‘OK’
button and use the up or down button to choose the volume level you require. Press the ‘OK’ button to save your selection and return
to the menu.
To exit the menu, press the Menu/Return button, button #1.
12.
Time Setup
It is important to set the date and time, so that any accidents or incidents recorded are saved with the appropriate time and date
information attached to them.
To set the date and time, enter the menu and use the ‘Up’ or ‘Down’ button to highlight ‘Time Setup’. Select it by pressing the ‘OK’ button
and use the ‘Up’ or ‘Down’ buttons to change each value and press the ‘OK’ button to save your selection and move on to the next value.
Once you have completed all sections, press the ‘OK’ button or Menu/Return button to save and exit.
Beep Sound Setting
DX20 will emit a beep each time you press a button. You can switch this beep on or off depending on your preference.
To make your selection, enter the menu and use the ‘Up’ or ‘Down’ buttons to highlight ‘Beep Sound Setting’. Select it by pressing the ‘OK’
button and use the ‘Up’ or ‘Down’ buttons to choose between Off or On. Press the ‘OK’ button to save your selection and return to the
menu.
To exit the menu, press the Menu/Return button, button #1.
Auto Power Off Setting
If you would like your DX20 to power off when not in use, you can set it to automatically power off after 1, 3 or 5 minutes.
To make your selection, enter the menu and use the ‘Up’ or ‘Down’ buttons to highlight ‘Auto Power Off Setting’. Select it by pressing the
‘OK’ button and use the ‘Up’ or ‘Down’ buttons to choose between Off, 1 minute, 3 minutes or 5 minutes. Press the ‘OK’ button to save
your selection and return to the menu.
To exit the menu, press the Menu/Return button, button #1.
User tip: If you select ‘Off’ your DX20 will remain powered on. If you want to use functions such as Motion detection or Parking Mode, you
must leave Auto power off set to ‘Off’.
13.
Backlight Off
You can control whether you would like the LCD to be on or off whilst you are driving. If you switch it on, it will display what it is
recording at all times. If you switch it off, it will display what it is recording for a short period after you first power on your DX20 but will
then switch off automatically.
To make your selection, enter the menu and use the ‘Up’ or ‘Down’ buttons to highlight ‘Backlight off’. Select it by pressing the ‘OK’
button and use the ‘Up’ or ‘Down’ buttons to choose Off or On. Press the ‘OK’ button to save your selection and return to the menu.
To exit the menu, press the Menu/Return button, button #1.
Card Volume (SD Card capacity)
Use this feature to check the size of the overall memory of the SD card installed, the total amount of the memory used and the amount
of memory still available.
Enter the menu and use the ‘Up’ or ‘Down’ buttons to highlight ‘Card Volume’ and select it by pressing the ‘OK’ button. Information on
the SD card installed in your DX20 will be displayed on the LCD. Press ‘OK’ or the menu/return button to return to the menu.
Driver ID
Use this feature to set-up a Driver ID for your DX20. If added, this Driver ID can be ‘stamped’ on all photographs and video recorded,
together with the date and time if required.
To add a Driver ID, enter the menu and use the ‘Up’or ‘Down’ buttons to highlight ‘Driver ID’. Using the keyboard and the ‘Up’ and
‘Down’ buttons enter the Driver ID letter by letter until complete. Press ‘OK’ or the menu/return button to save your Driver ID and
return to the menu.
Format (SD card)
If you are adding a new SD card to the device we recommend you format it before use. You can also use this function if you would like
to clear and re-set your existing SD card.
To Format an SD card, enter the menu and use the ‘Up’ and ‘Down’ buttons to highlight ‘Format’ and select it by pressing the ‘OK’
button. Use the ‘Up’ or ‘Down’ buttons to choose ‘Yes’ or ‘No’ and press ‘OK’ to make your selection. If you choose to proceed, your
14.
DX20 will display one last warning message ‘Caution! Delete All?’. Use the ‘Up’ and ‘Down’ buttons to make your final selection and
press the ‘OK’ button.
To exit the menu, press the Menu/Return button, button #1.
User tip: Please remember that if you Format an SD card, any data or video recorded and saved to that card will be permanently
deleted.
Default Setting
Use this function to return your DX20 to it’s original default factory settings.
Enter the menu and use the ‘Up’ and ‘Down’ buttons to highlight ‘Default Setting’ and select it by pressing the ‘OK’ button. Use the ‘Up’
or ‘Down’ buttons to choose ‘Yes’ or ‘No’ and press ‘OK’ to make your selection.
To exit the menu, press the Menu/Return button, button #1.
Version Info
Use this feature to check the version number of the software currently installed on your DX20.
Enter the menu and use the ‘Up’ or ‘Down’ buttons to highlight ‘Version Info’ and select it by pressing the ‘OK’ button. The version
number currently installed will be displayed. Press the ‘OK’ or menu/return button to return to the menu.
To exit the menu, press the Menu/Return button, button #1.
Voice mode
Use this setting to turn the voice alerts on and off.
Enter the additional settings menu by pressing the Menu button twice and use the ‘Up’ or ‘Down’ buttons until you highlight ‘Voice
mode’ and press ‘OK’. Use the ‘Up’ or ‘Down’ buttons to highlight your preferred setting and press ‘OK’ to make your selection and
return to the menu.
To exit the menu, press the Menu/Return button, button #1.
15.
Over speed reminder
Use this function if you would like your DX20 to alert you if you exceed the speed limit you select.
Enter the additional settings menu by pressing the Menu button twice and use the ‘Up’ or ‘Down’ buttons until you highlight
‘Overspeed remind’ and press ‘OK’. Next, use the ‘Up’ or ‘Down’ buttons to highlight your preferred setting and press ‘OK’ to make your
selection and return to the menu.
To exit the menu, press the Menu/Return button, button #1
Driving time warning
Use this function to alert you after you have been driving for a pre-selected time.
Enter the additional settings menu by pressing the Menu button twice and use the ‘Up’ or ‘Down’ buttons until you highlight ‘Driving
time warning’ and press ‘OK’. Next, use the ‘Up’ or ‘Down’ buttons to highlight your preferred setting and press ‘OK’ to make your
selection and return to the menu.
To exit the menu, press the Menu/Return button, button #1
Speed unit
Use this setting to switch your DX20 between KMH and MPH
Enter the additional settings menu by pressing the Menu button twice and use the ‘Up’ or ‘Down’ buttons until you highlight ‘Speed
unit’ and press ‘OK’. Next, use the ‘Up’ or ‘Down’ buttons to highlight your preferred setting and press ‘OK’ to make your selection and
return to the menu.
To exit the menu, press the Menu/Return button, button #1
16.
Speed trap alerts
Use this setting to switch GPS speed trap alerts on or off.
Enter the additional settings menu by pressing the Menu button twice and use the ‘Up’ or ‘Down’ buttons until you highlight ‘Speed
unit’ and press ‘OK’. Next, use the ‘Up’ or ‘Down’ buttons to highlight your preferred setting and press ‘OK’ to make your selection and
return to the menu.
To exit the menu, press the Menu/Return button, button #1
Red light camera
Use this setting to switch Red light camera alerts on or off.
Enter the additional settings menu by pressing the Menu button twice and use the ‘Up’ or ‘Down’ buttons until you highlight ‘Red light
camera’ and press ‘OK’. Next, use the ‘Up’ or ‘Down’ buttons to highlight your preferred setting and press ‘OK’ to make your selection
and return to the menu.
To exit the menu, press the Menu/Return button, button #1
Mobile speed trap alert
Use this setting to switch Mobile speed trap alerts on or off.
Enter the additional settings menu by pressing the Menu button twice and use the ‘Up’ or ‘Down’ buttons until you highlight ‘Mobile
speed trap alert’ and press ‘OK’. Next, use the ‘Up’ or ‘Down’ buttons to highlight your preferred setting and press ‘OK’ to make your
selection and return to the menu.
To exit the menu, press the Menu/Return button, button #1
17.
Park Mode
If Park Mode is switched on, your DX20 will power off during periods of inactivity but as soon as any movement is sensed ie there is
an external disturbance to your vehicle, it will power up and start recording automatically.
To switch Park Mode on or off, enter the additional settings menu by pressing the Menu button twice and use the ‘Up’ or ‘Down’
buttons to highlight ‘Park Mode’. Select it by pressing the ‘OK’ button and use the ‘Up’ or ‘Down’ buttons to choose between ‘On’ or
‘Off’. Press the ‘OK’ button to save your selection and return to the menu.
To exit the menu, press the Menu/Return button, button #1.
User tip: If you turn off Park Mode your DX20 will continue to record everything in front of it as long as it remains powered on with
no breaks in the recording.
Camera operation
Your Aguri DX20 DVR has been designed primarily to function as a DVR, to record the road ahead and to save any incidents or
accidents you may be involved in. However, in addition to the DVR function, your DX20 can also be used to take still photographs.
DX20 will always power up in Video mode and start recording automatically, so to switch to Camera mode, press button #4, the
Video Record/OK button, to stop Video recording.
To take a picture, simply line up the object you want to capture using the LCD and press the Camera mode button, button #3, once.
To return to video and start recording press button #4, the Video Record/OK button, again.
18.
Technical Specification
Display
2.0 inch TFT LCD monitor
Lens
150 degree wide viewing angle and 6 layer all glass lens. TTL:21~22mm
Languages
English / Simple Chinese/ Complicated Chinese/ Russia
Video Format
.MOV
Video Resolution
1920*1080P 30fps 16:9 / HDR 1920*1080P 30fps 16:9 / 1280*720 60fps 16:9/1280*720 30fps
16:9
Motion Detection
ON/OFF
Audio Recording
ON/OFF
Image Resolution
4M Pixels
Image Format
JPEG
Memory Card
Supports Micro SD card up to 64GB
MIC/Speaker
Built-in
Backlight Off
ON/OFF
Auto Power Off
OFF/1 Minute/3 Minutes/5 Minutes
USB Port
USB2.0
Battery Capacity
250MAH 3C
Aguri ViewBox PC software
Windows XP2/Vista/Windows 7/Windows 8
19.
Disposal of Old Electrical & Electronic Equipment - applicable in the European Union.
If you see this symbol on a product or its packaging, it indicates that the product should not be treated as normal household waste. If you
see this symbol on any product or packaging it should be handed over to an applicable collection point for the recycling of electrical
equipment.
By ensuring that this product is disposed of correctly you will help prevent a potentially negative impact on the environment. In addition
the recycling of materials will help to conserve natural resources. For further information about recycling please contact your local civic
office or recycling centre.
20.
Warranty
Please note that to receive technical support or service under warranty, you must first register
your unit at www.aguriworld.co.uk
Having a problem with your Aguri Speed Vision DX20 DVR?
Try visiting the FAQ section at www.aguriworld.co.uk. We find that most issues can be resolved there.
If you are still experiencing problems, your Aguri Speed Vision DX20 DVR comes with a standard 12 month warranty. To return your unit under
warranty please ship it in suitable protective packaging, using Special Delivery or an alternative insured delivery service to:Warranty Department
Aguri Limited
Ollershaw Lane,
Marston,
Northwich
Cheshire
CW9 6ER
Please enclose the following information:
(a) Your name, address and a full description of the problem.
(b) A telephone number where you can be reached during business hours.
(c) Your units’ serial number.
(d) A copy of your proof of purchase.
Please note that the warranty will be considered void if the product:Has been dropped or otherwise obviously mistreated.
Has been subjected to heat, moisture or damp conditions.
Has been opened or dismantled.
Has been charged or powered with any cable or charger other than the one supplied.
www.aguriworld.co.uk
21.