1
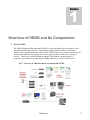
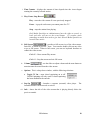
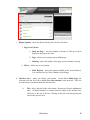
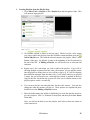
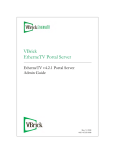
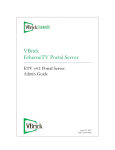
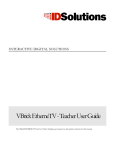
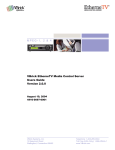
INTERACTIVE DIGITAL SOLUTIONS Pendleton County VBrick Enterprise Media System (VEMS) End User Manual The VBrick VEMS 5.1 Portal Server user guide was the primary reference for this manual Table of Contents SECTION 1 Overview of VEMS and Its Components 2 SECTION 2 Portal Server Home Page 5 SECTION 3 Channel Guide 8 SECTION 4 Live Media 11 SECTION 5 Media Library 15 SECTION 6 Bookmarks and Playlists 23 SECTION 7 Recording and Adding Video 29 SECTION 8 Scheduling 30 SECTION 9 Sharing Media 32 IDSolutions 1 1 Section Overview of VEMS and Its Components I. What Is VEMS? The VBrick Enterprise Media System (VEMS) is a web-based portal for accessing Live and On-Demand audio and video files. The Enterprise Media System can be accessed from Windows PCs, Apple Macintoshes, and/or by the VEMS IP Receivers. Please note that for the most part the operation of the portal server is the same regardless of the device you use to access it. There may be subtle differences though. This manual is written from a PC perspective, so certain screen shots may be slightly different on a MAC or IP Receiver. Fig. 1 Overview of VBrick Products Associated with VEMS IDSolutions 2 II. Overview of individual components of the VEMS system, including a listing of what components Pendleton County Schools have purchased. i. Encoding Appliances - captures a video source, digitizes and compresses the video signal and then delivers it over an IP network. Video source could be CATV, DVD/VCR, Live Camera, etc. Pendleton County Schools has the following equipment: i. 11 Dual Channel WM Encoders – these are located at the head end and are being utilized to stream CATV stations. ii. 4 Dual Channel WM Encoders – one at each of the four school locations. These will be utilized by the Media Specialists. ii. Video on Demand (VOD) Servers - stores and sends previously recorded video over the network on demand. i. Pendleton County Schools has one WM VOD Servers. iii. Network Video Recorder (NVR) – extra recorder for recording additional simultaneous streams. Comes in two sizes NVR-10 and NVR-40. i. Pendleton County Schools has a NVR-10. iv. Media Control Server (also referred to as the Video Portal server) - a webbased management portal to configure, secure and control video operations and assets. The portal server is where you will go to access Ethernet TV (play streams, record streams, create playlists, etc.). The MCS/Portal Server comes with optional software, such as Scheduler, Reporter, Program Guide (a.k.a. Channel Guide) and ETV Backup. i. Pendleton County Schools has a portal server with Scheduler software and Channel Guide. v. Set-Top boxes- units that decode the video from the Windows Media encoders for display on a monitor or projector. i. Pendleton County Schools has 13 Set-Top Boxes. Locations TBD. vi. VBExpress – a kit designed to let you broadcast from anywhere, at anytime. VBExpress is pre-installed in a hard, durable travel case. Simply open the case, connect the camera, power, and network connection, to begin webcasting. i. Pendleton County Schools has 5 VBExpress units. school and one at the district office. IDSolutions One at each 3 III. Applications a. Examples of Applications you may be utilizing now or in the future: i. TV distribution. – currently, you will be able to access 22 CATV stations. Twenty-one stations are fixed and there is one floating channel at the head end, that can be changed as needed. ii. Stream DVDs or VHS tapes using DVD/VCR combo unit hooked to an encoders. Each of your four schools has a dual encoder available for use by the Media Specialist. A DVD Player, VCR or DVD/VCR combo unit can be connected to that encoder if you wish to stream DVDs or VHS tapes. Once the DVD/VCR player is connected to the encoder and turned on, that player will now show on the portal server. Any sites that have been given permission to view that encoder would be able to now see the DVD or VHS tape being played. Due to copyright laws, there may be a limitation on how many classrooms can watch the streamed DVD/VHS tape at one time (this is discussed in more depth in section 3). At the time that the DVD/VHS tape is played, it can also be recorded into the Media Library so that you will have access to it in the future. iii. Digitize content produced at the schools. In addition, each of your four schools has a VBExpress kit that allows the school to produce remote generated content. Examples of remote generated content might include: school announcements, guest speakers, staff training/continuing education programs, convocations, etc. The remote produced content can be broadcast immediately to multiple classrooms and/or schools; the content can also be recorded onto the VOD server for future viewing in the Media Library. iv. Create an On-Demand Video Library, known in the system as the Media Library – this on-demand library will consist of CATV programs that have been recorded, any DVDs or VHS tapes that have been ingested into the system, and any remote content (i.e. training sessions, guest speakers, etc.) that have been ingested or uploaded to the system. IDSolutions 4 2 Section Portal Server Home Page I. To Access the VEMS Portal Server a. To access the portal server go to 10.182.16.63 (At some point in the future, Pendleton Schools will create a domain name to use to access the Portal Server). If your system requires authentication, then a login screen will pop up so you can enter a user name and password. This is the same as your school computer login and password. authentication is not required, you will be taken directly to the portal server. If b. User categories – Within VEMS, users can be set up with different privileges. Your user category will determine some of the choices available to you on the various screens within the portal server. i. Admins– full administration privileges. technicians. This is your district network ii. Media Specialists/Lab Managers/Instructional Coaches/Technical Resource Trainers - able to record, publish content (which allows the capability to add video streams, create thumbnails, move videos to different folders, enter data for the streams, set copyright restrictions, delete video streams, etc.) and schedule in addition to basic user capabilities. iii. Teachers –able to view the available streamed TV stations, access the ondemand library and view the schedule. iv. Students – access given on an as needed basis to watch stored streams. This will mainly be utilized if the student was absent from school. IDSolutions 5 c. There is no true home page. When you enter the portal server, it will take you to the last area (Media Library, Live Media, Channel Guide, Scheduling, etc.) you accessed. FIG 2. PORTAL SERVER KEY AREAS Selection Area, Preview Area (with Control Buttons), Search Tool, Navigation Links Search Tool Preview Area Selection Area Control Buttons Navigation Links Navigation Links – links at the bottom of the page that let you “jump” to another section of the portal server. Note: You will only see the links that you have access to. II. Overview of the areas within the portal server. a. Media Library – pre-recorded content available from the Video-on-Demand (VOD) server on your network. b. Live Media –live streams that are available on the network. c. Channel Guide – VBrick has partnered with a leading content provider to provide a channel guide for the Portal Server much like what you see on your home TV. This optional service requires a license and may not be supported at your site. Pendleton County Schools has a Channel Guide license. d. Scheduling – view or create scheduled broadcasts of live or stored content, as well as schedule recordings. Teachers can view the schedule, but cannot create scheduled broadcasts. IDSolutions 6 e. More Tools – you will only see the selections that are applicable for your site and for your level of privileges. i. Playlist – opens the Playlists page from which you can create and manage playlists. ii. Status – shows the status of any video currently being added or recorded. f. Help – brings up the VBrick user manual for the portal server. g. Logout – always log out when done. The system will automatically log you out if idle for more than a few minutes. h. Search Tool - feature that makes it easy to find video assets. The options available below the search box are page-based. This means that on the Live Media page you can search for live assets; on the Media Library page, you can search for stored assets, etc. The search box is not case-sensitive. In general, you search for a broad category of content using the search box; then, you can narrow down your search by using the folder and date filters. IDSolutions 7 3 Section Channel Guide VBrick has partnered with a leading content provider for TV Stations to provide a channel guide much like what you see on your home TV. This is an optional service that requires a license. Pendleton County Schools has purchased the channel guide license. The channel guide shows programming information for up to two weeks in advance. Just as a reminder: if you have a channel that is not supported by Channel Guide, it will appear in the LIVE MEDIA section instead of in the Channel Guide section, unless a custom channel has been created for it. I. Important Points about Channel Guide a. The Channel Guide page shows you what’s currently on. Use the right or left arrows (or search using the Show Me filter) to search for programming at a different time slot then what is currently showing on screen. Note: if you click on a program listed at a different time than the current time, the system will still play whatever is currently being broadcast on that station – just like a regular TV. IDSolutions 8 b. The message “Program Unavailable” in the Channel Guide means there is no programming data associated with the stream. The stream is still available; there just wasn’t programming information available. Clicking on the stream will play whatever is currently airing on that station. c. The message “Sign Off” means a network TV station (for example, ABC or NBC) does not have programming scheduled in that time slot. During “Sign Off” time, local stations typically air their local content (for example, the local news). II. Playing Streams a. Selection Area – where you choose your stream. On the Channel Guide Page, the selection area lists all of the available CATV channels that are supported by Channel Guide on the network. There are several features to mention about the selection area. i. Channels–Streams are listed in alphabetical order. If channel numbers or custom icons are added to the streams, they will move to the top of the list. Clicking on the title of a program will start playing the video in the preview area. ii. Icons – video streams in the live media section will have one of four icons. Denotes standard Channel Guide streams, such as CATV stations. Custom icons can be assigned by an administrator to a TV station or encoder. A station may, or may not, have programming data. iii. Additional Selections Available: Info – opens a window (a sample is shown below) with any information that has been entered about the video. Information categories include: b. Preview Area – is on the right side of the screen. When you select a video stream, it plays in the preview window. In certain circumstances an external player, such as Windows Media Player or QuickTime Player, may launch to play the stream. Immediately below the preview window are controls for the video. IDSolutions 9 i. Time Counter – displays the amount of time elapsed since the viewer began running the currently selected station. ii. Play, Pause, Stop, Record Play – starts the video stream if it was previously stopped. Pause – is grayed out because you cannot pause live TV. Stop – stops the station from playing. Only Media Specialists or Administrators have the rights to record, so basic end users will not see the record button. If a teacher needs something recorded, then need to give their School Media Specialist at least 48 hours notice. iii. Full Screen - provides a full screen view of the video stream. Push ESC to return to preview. Note: You can also double-click on any video to go to full screen. When in full screen, you can use keyboard shortcuts to control the video stream. Ctrl + P – Pause stream/Play stream Ctrl + S – Stop the stream and exit full screen iv. Volume - use the slider to adjust volume and the mute button to mute/un-mute the sound from the video stream. v. Options: This is a drop down window, with the following selections: Toggle CC On – turns closed captioning on or off. Closed Captioning will only work if closed captioning has been enabled on the encoder. vi. Pop-Up - launches a separate (external) video player. launched window can be moved or resized. The vii. Info – shows the title of the video stream that is playing directly below the preview controls. IDSolutions 10 4 Section Live Media III. What is Live Media? This is a live stream being sent out on the network. The source of the stream could be any video source (camera, live feed from your local cable TV provider, PC, etc.) that is connected to an encoder. Examples of live feeds you may receive at your school: Live streams generated from a VBrick Encoder. Examples include: o Cable TV Stations (if you have not purchased channel guide or the channel is not supported by channel guide). Pendleton County Schools has channel guide, so the only TV stations that will show up in this area are ones that are not supported by the channel guide and have not had a custom station created for them. o VBExpress Kit (These are listed by your school name Live, e.g. NES Live). o A DVD, VCR or DVD/VCR combo unit or other video source connected to your school encoder. (These are listed in the Live Media area as your school name Channel 1 or Channel 2, e.g. SES Channel 1). Manually entered live stream URLs. Active scheduled stored broadcasts (must have scheduler for this feature). IDSolutions 11 c. Display Options – these are shown directly above the file selections. i. Page View Choices a. Show per Page – select the number of streams (5-100) you wish to display on the page at one time. b. Page - allows you to jump to any available page. c. Showing - shows the number of the page you are currently viewing. ii. Filters – allows you to sort content. a. Filter By Date – shows all content available on the selected date(s). You can filter by Day, Week, Month or Date Range. d. Selection Area – where you choose your stream. On the Live Media Page, the selection area lists all of the available live video streams on the network. There are several features to mention about the selection area. iv. Title – this is the title of the video stream. Streams are listed in alphabetical order. If channel numbers or custom icons are added to the streams, they will move to the top of the list. Clicking on the title will start playing the video in the preview area. IDSolutions 12 v. Icons – video streams in the live media section will have one of four icons. Denotes standard live streams, such as TV stations or any encoders that are on your network. Custom icons can be assigned by an administrator to a TV station or encoder. A station may, or may not, have programming data. vi. Additional Selections Available: Share Media – lets you share a stored VOD stream with other local users via an e-mail message. Sharing media is discussed in more detail in section 9 of this manual. Play – plays the selected stream. You can also play the stream by clicking on the title. e. Preview Area – is on the right side of the screen. When you select a video stream, it plays in the preview window. In certain circumstances an external player, such as Windows Media Player or QuickTime Player, may launch to play the stream. Immediately below the preview window are controls for the video. i. Time Counter – displays the amount of time elapsed since the viewer began running the currently selected video. ii. Play, Pause, Stop, Record Play – starts the video stream if it was previously stopped. Pause – is grayed out because you cannot pause the live streams. Stop – stops the video from playing. IDSolutions 13 Only Media Specialists or Administrators have the rights to record, so basic end users will not see the record button. If a teacher needs something recorded, then need to give their School Media Specialist at least 48 hours notice. iii. Full Screen - provides a full screen view of the video stream. Push ESC to return to preview. Note: You can also double-click on any video to go to full screen. When in full screen, you can use keyboard shortcuts to control the video stream. Ctrl + P – Pause stream/Play stream Ctrl + S – Stop the stream and exit full screen iv. Volume - use the slider to adjust volume and the mute button to mute/un-mute the sound from the video stream. v. Options: This is a drop down window, with the following selections: Toggle CC On – turns closed captioning on or off. Closed Captioning will only work if closed captioning has been enabled on the encoder. vi. Pop-Up - launches a separate (external) video player. The launched window can be moved or resized. Closing the main VEMS Portal Server leaves the smaller player on the screen (if this option has been configured by an administrator). vii. Info – shows the title of the video stream that is playing directly below the preview controls. IDSolutions 14 5 Section Media Library I. What is in the Media Library? This is stored content. Your site may not have all the types of content listed in the examples. Examples would include such things as: TV programming that was recorded. DVDs/VHS tapes that have been digitized from your school’s DVD/VHS collection. Purchased digital content. Remote generated content (i.e. School Announcements, Spelling Bees, School Events) that was recorded. Please note: Due to copyright laws, many of the items in the Media Library have limitations to the number of concurrent viewers or to how long the video stream can reside in the Media Library. o Maximum Concurrent Viewers – this refers to how many people (or classrooms, if showing on a projector) can view the stream at one time. If another person attempts to view the stream, they will get a message that they have exceeded the maximum viewers. Note: if someone starts playing a stream and does not stop the stream, the portal server will believe that the stream is in use even if that user switches to viewing a different stream. o Expiration Date – this refers to how long the stream will reside on the VOD server. When using the scheduling function to schedule a recording, you will have the option to set both of these settings for an individual recording. Anyone with administrative privileges can also change these settings for an individual video stream from within the admin settings. IDSolutions 15 General Copyright Guidelines o Recordings from CATV – unlimited viewers. Most things recorded from TV can be kept without infringing on copyright for 60 days. Different stations/programs have different rules, of course. Pendleton County Schools has decided to set a 60 day expiration on their recordings from CATV. o DVDs/VHS tapes that have been ingested - same number of concurrent viewers (in your case this is concurrent viewing classrooms) as you have copies of the DVD or VHS tape at your building. So for example at Pendleton County Schools, if your building owns one copy of The Magic School Bus: Inside the Human Body, then only one class at a time is allowed to view that content. There is no expiration date necessary for this content. o School Generated Content (i.e. morning announcements, school activities) – unlimited viewers. While it is not necessary to have an expiration date on this content, you may want to select an expiration date so that the content is not out on the server indefinitely. II. Using the Media Library Page B a. a. Display Options – these are shown directly above the file selections. i. Page View Choices a. Show per Page – select the number of streams (5-100) you wish to display on the page at one time. b. Page - allows you to jump to any available page. c. Showing - shows the number of the page you are currently viewing. IDSolutions 16 ii. Filters –allow you to sort content. a. Filter By Folder - folders and subfolders can be created to organize content. Please note that a folder will not appear in the list until it has at least one video streamed stored in it. If folders/subfolders are created, then you can Filter By Folder (includes subfolders when applicable) which will then just display the content that resides in that folder. To change between folders that you wish to look in, you will need to click Clear Filters. Note: You will only see the folders/subfolders/files that you have permission to access. Pendleton County Schools has set up the following folders and subfolders: - District PD Board Meetings - Elementary NES SES - Middle/High SMS PHS Subfolders may be added to school folders if desired. Folders and subfolders can only be created by someone with VEMS administrator privileges. In addition, every person on VEMS also has their own MyMedia folder, which is where bookmarks and playlists are stored. Bookmarks and playlists are discussed in more detail later in this manual. The MyMedia folder can only be viewed by that user. b. You can also Filter By Date (Day, Week, Month or Date Range). b. Selection Area – this is where you choose your stream. On the Media Library page, the selection area lists Stored Video Stream selections. There are several features to mention about the selection area. i. Title – available video streams stored on the system are listed in alphabetical order. It is recommended as a district that you come up with a naming strategy for you streams. A consistent naming protocol allows you to find the video file you wish at a glance and helps differentiate between recorded episodes of the same show. A common naming strategy is Program title_topic.wmv. So for example, you might have Sid the Science Kid_nutrition. IDSolutions 17 Note the VEMS portal is the “link” to all content. The content resides on the VOD server, but the list resides on the portal server. The list of stored video files from the VOD server is completely updated every 30 minutes. Clicking on the title will start playing the video stream in the preview area. ii. Icons – video streams in the media library will have one of six icons. Standard icon for a stored video. This can be replaced by a custom image or icon. Denotes a bookmark or playlist. Thumbnail – a small picture from a frame of video. Or a custom image that has been associated with the video stream iii. Date – tells you the date this video stream was added to the VOD server. iv. Additional Selections Available – these are the little square icons that are available after the date listing. All selections may not be available for all streams. Add to Playlist – allows you to create a new playlist or add to an existing playlist. Playlists are discussed in more detail in section 6 of this manual. Edit Playlist – allows you to modify an existing playlist. Clicking this icon will jump you to the playlist page. Again, playlists are discussed in more detail in section 6 of this manual. Info – opens a window (a sample is shown below) with any information that has been entered about the video. Information categories include: IDSolutions 18 a. Name – this is the name that has been assigned to this video. b. Folder – this refers to the location where this video has been stored. This will list the folder/subfolder that the stream resides in. Please note, that you will only be able to move streams to folders/subfolders that you have access to. c. Description – brief description of the video. d. Tags – these are the keywords that have been entered for the search tool. e. Links – these are links to websites, pdfs, or documents that you wish to be associated with this video stream. f. Any Custom Fields your Portal Administrator has added. Pendleton County Schools has created the following custom fields: Date Recorded Grade Running Time Subject Note: Only users with publishing capabilities can enter/modify the information that appears for a video file. If you do not have publishing capabilities, you will not see the Modify Info or Delete Video buttons. Bookmark – adds a bookmark. Bookmarks are discussed in more detail in section 6 of this manual. IDSolutions 19 Share Media – lets you share a stored VOD stream with other local users via an e-mail message. Sharing media is discussed in more detail in section 9 of this manual. Remove Thumbnail – replaces the thumbnail with the standard icon for the video stream. Only those with publishing rights can create or remove a thumbnail. Play – plays the selected stream. You can also play the stream by clicking on the title. Tags – these are searchable keywords that have been entered into the information section. c. Preview Area – is on the right side of the screen. When you select a video stream, it plays in the preview window. In certain circumstances an external player, such as Windows Media Player or QuickTime Player, may launch to play the stream. Immediately below the preview window are controls for the video. i. Time Counter (above the slider bar) – displays the amount of time elapsed since the viewer began running the currently selected video. ii. Slide Bar (above the control buttons) – allows the viewer to quickly move to any point in a stream. iii. Play, Pause, Stop, Rewind, Fast Forward Note: You want to make sure to stop a stream when you are done playing it, before clicking on another stream. If you do not press stop, the VEMS system will still believe the stream is playing. If there is a maximum concurrent viewers restriction on the stream, it will prevent other users from accessing this stream until it has run for its full time. IDSolutions 20 iv. Full Screen - provides a full screen view of the video stream. Push ESC to return to preview. Note: You can also double-click on any video to go to full screen. When in full screen, you can use keyboard shortcuts to control the video stream. - Ctrl + P – Pause stream/Play stream - Ctrl + S – Stop the stream and exit full screen - Ctrl + Shift + F – Fast forward (this function may not work with some browser settings) - Ctrl + Shift + B – Rewind v. Volume - use the slider to adjust volume and the mute button to mute/un-mute the sound from the video stream. vi. Options: This is a drop down window, with the following selections: Toggle CC On – turns closed captioning on or off. This selection will only show if closed captioning has been enable on your encoders. Create Thumbnail – creates a thumbnail from the next frame in the stream. Only users with publishing rights can create thumbnails. Upload Thumbnail – allows you to upload a jpg or gif image from your computer as the thumbnail for the video stream. Again, only users with publishing rights can upload a thumbnail. Create Bookmark – use to bookmark a spot in a stream. This creates a playlist in your My Media folder with one bookmark. Press again only if you want to create another bookmark to the same stream. Bookmarks are discussed in more detail in section 6 of this manual. Note: depending on your user privileges you may not see all options. vii. Pop-Up - launches a separate (external) video player. The launched window can be moved or resized. Closing the main VEMS Portal Server leaves the smaller player on the screen (if this option has been configured by an administrator). viii. Info – shows the title and description of the video stream directly below the preview controls. This is also where closed captioning will display. IDSolutions 21 5 6 Section Bookmarks and Playlists I. What are Bookmarks and Playlists? A bookmark is a pointer to a single location in a video file. Basically, you can think of a bookmark as the starting point you would like to use for that video clip. For example, perhaps I have a two hour program on animals in the ocean in my media library, but for my class I want to only show the section on whales and dolphins which is the last half hour of the show. I can set a bookmark, so that when I press play, it automatically starts at that section of the video and then plays to the end of the video. Once you create a bookmark, it becomes listed as a playlist in the media library, so that you have the ability to edit that bookmark or add additional clips to it. Playlists are made up of a list of pointers (bookmarks) to video streams or parts of streams that can then be played as if they were a single video file. For example, say I’m doing a unit on marine mammals and I want to show clips in my class of dolphins, whales, sea lions and manatees. I can set bookmarks to the segments in the video files I want to show and put them in a playlist together. Then, when I click on my playlist, it’s going to show each of the clips one after another. Important points about bookmarks and playlists: Playlists can include files encoded in different formats and at different bit rates. There is no limit to the number of clips or the length of a clip that can be in a playlist. You can change the order of your playlist at any time as well as skip clips if you need to during the playback of your playlist. Playlists have a special icon and are only created from stored streams. IDSolutions 22 They are not available with live streams and are not available when multiple windows are displayed. Playlists are not supported on Digital IP Receivers/Set-top boxes. Playlists can be saved under any name and played back later. Playlists are saved in your My Media folder, unless you assign them to a different location. Playlists cannot be scheduled in the portal server to run at a later time. Creating a playlist does not change the original video or videos in any way. There may be a slight delay between clips, when playing back your playlist. This is normal portal server behavior as the video loads (buffers). If any content in a playlist is unavailable for any reason (for example the file was moved or the content expired), the portal server will skip that clip, advance to the next clip and display an informational message below the preview window. You cannot have a playlist within a playlist. II. Creating Playlists There are several ways to create playlists. You can bookmark a stream playing in the preview window using the Bookmark button; this creates a playlist with one bookmark. You can also create a playlist from the Media Library or the Playlists page. a. Creating a Bookmark i. Play a video from the Media Library in the preview window (do not go Full Screen). ii. At the location you wish to bookmark, press the Bookmark icon to the right of the program title in the Media Library selection list or select Create Bookmark from the options list below the preview window. An on-screen message will pop-up indicating that you have successfully created the bookmark. IDSolutions 23 iii. Now, click on the Filter by Folder link and select the MyMedia folder. iv. The bookmark you just created will be listed with a playlist icon and will have the original stream title with the date you created/last edited the bookmark listed behind it. If you click on the Edit Playlist icon to the right of the title, you will now open the Playlist that shows that bookmarked clip as the only item. v. If you just want this one bookmarked segment, it will allow you to rename the bookmarked clip. If you don’t change the name, it will stay named after the original file and the date the playlist was created. As the default, the playlist was stored in your MyMedia folder, from this screen, you can select to save the playlist to any folder you have access to. Make sure that if you make any changes to the name or location of the playlist that you select Save Playlist. As mentioned before, a bookmark is just one pointer (in this case a starting point) for this video clip. You can add an ending point as well for this clip. You can also add additional clips to the playlist. For more information on how to do these functions, see the Editing a Playlist directions in this section. IDSolutions 24 b. Creating Playlists from the Playlist Page i. Go to More Tools > Playlist or select Playlist from the Navigation Links. This will open an empty playlist. ii. All available content is shown in the top panel. Mouse-over the video stream you wish to add to the playlist from this available content and then press the Add to Playlist icon. This adds the selected stream to the playlist “editor” at the bottom of the page. By default, it starts at the beginning of the file and ends at the end of the file. In Editing a Playlist, we will discuss how to edit start and end times. iii. Repeat step ii for each stream you wish to add to the playlist. If you will be showing multiple segments from the same video stream, you can add the stream into the playlist as many times as you will have clips (e.g. If I will be showing three different segments from the same video, I will want to add it to my playlist 3 times), but you will need to set a start/end time (which is outlined in the next step) for the first clip before the system will allow you to add the stream to the playlist again to create a second clip. iv. You can now edit the start and end times for the video streams. You can also change the order the streams will play in. These options are explained in more detail below in the Editing a Playlists section. v. Enter the folder name (the default is MyMedia) you wish this playlist stored in, give the playlist a Title (i.e. Mammal Lesson Plan) and then press Save Preset when done. Note: you will not be able to save the playlist, until it has at least one stream of video content in it. IDSolutions 25 c. Creating Playlists from the Media Library Selection Area i. Highlight any video stream in the Media Library and press the Playlist icon. An on-screen message will pop up. Add to ii. Add to an existing playlist by selecting the desired playlist from the dropdown. If you select Create New Playlist, you can choose the folder (My Media is the default) you wish the playlist to reside in and give the playlist a name. iii. Regardless of whether you added the video stream to an existing playlist or created a new playlist, you will need to go into the folder where you have stored the playlist (again the default is My Media) to access the playlist for playing or editing. These functions are covered in more detail in upcoming sections. III. Editing a Playlist In the previous sections we have discussed how to add items to a playlist. The directions below will discuss how to edit items within the playlist. a. Launching the Playlist Editor - you can launch the playlist editor by selecting the Edit Playlist icon located to the right of an existing playlist in the Media Library or you can open the playlist editor for a new playlist by selecting Playlist from the More Tools area. b. Adding Video Streams - to add additional items to a playlist, mouse-over a file from the Available Content files listed in the top half of the screen and then press the Add to Playlist icon. You may need to click on the main root folder by going to Filter by Folder to see all available content. c. Naming Playlists – as mentioned in some of the previous sections, you can give your playlist a name and assign it to any folder you have access to. The default folder for playlists is My Media. d. Saving/Deleting/New – at the bottom of the playlist editor are your save and delete functions. This delete function deletes the entire playlist. Selecting New Playlist will clear the editor, so you can start building another playlist. IDSolutions 26 e. Other Editing Selections Available: i. Remove - use to delete individual clips from the playlist. If the deleted clip is the only item in the list, the playlist itself will be removed. ii. Info - each playlist has its own searchable metadata. You can add/change the name, the folder, tags, etc. for the entire playlist. Within the playlist, you will also have info for each individual clip. iii. Up iv. Down - - moves the clip up one position in the playlist. - moves the clip down one position in the playlist. v. Start - sets bookmark start time (default is the beginning of the file). There are two ways to set the start time. (1) Launch the clip in the preview window, use the FF/Rew buttons to advance to the spot desired, and then press the icon. (2) Mouse-over and press the icon without launching the video. Use the popup to enter Start time in exact format shown, for example 0h 15m 43s. Note: MAC users will only be able to use option 2. vi. End - sets book mark end time (default is the end of the file). There are two ways to set the end time. (1) Launch the clip in the preview window, use the FF/Rew buttons to advance to the spot desired, and then press the icon. (2) Mouse-over and press the icon without launching the video. Use the popup to enter End time in exact format shown, for example 0h 15m 43s. Note: MAC users will only be able to use option 2. IDSolutions 27 IV. Playing a Playlist You always play your Playlist from within the Media Library. It will not play from within the Playlist Editor. a. From within the Media Library, select the My Media folder (or the folder that houses the playlist you wish to play). b. Select the playlist you wish to play. Remember playlists will have a playlist icon in front of them. The first video stream of the playlist will launch in the preview window. Remember, there may be a slight delay between clips. This is normal as the portal server as has to load the content. Also, if you go Full Screen, the server will go back to the preview window when it goes to the next stream in your playlist. c. You can also manually jump ahead or back in the playlist listing by using the Previous and Next control buttons that will now appear under the preview window. IDSolutions 28 7 Section Recording and Adding Video I. Recording - Only administrative level or media specialist level users have the ability to record or add video to the Portal Server. A teacher can request to have a CATV program recorded, something recorded via their school VBExpress Kit, or a DVD/VHS tape digitized into the system. To Request a Recording 1. Make your request to your School Media Specialist. Please allow at least 48 hours notice. 2. Please note that after a video is recorded, it will then be autoingested onto the VOD server. The VOD server contains the final recording and is where the file will be played from. In general, the time the system requires to move and ingest a video file onto the VOD and make it available for users to view is equal to the amount of time it took to record the file. For example, if the video file was recoding for one hour, it will take one hour to move and ingest the file onto the VOD. Keep this in mind, as there will be a small delay between when the video is recorded and when it is actually available on the portal server for viewing. IDSolutions 29 8 Section Scheduling Only Admin level users or Media Specialists level users can schedule, but all teachers can view the schedule. I. What types of things will be on the Schedule? a. Special Live Broadcast – these would be live broadcasts that the media specialist or other admin wanted to highlight. Examples might include: guest speakers, professional development opportunities, a particular show on one of the CATV stations, etc. b. Stored Broadcasts from the Asset Library that are expected to be viewed by several end users at the same time. An example of this might be a stored video on emergency response procedures for the school that all teachers are supposed to show to their students at 10 a.m. on Friday. The advantage as a school district to scheduling a stored broadcast when multiple end users will be viewing the video at the same time is that it sends the stream out as a multi-cast stream instead of multiple unicast streams. This takes less bandwidth on your network and allows the system to function in a more efficient and timely manner. c. Scheduled Recordings – you can schedule the system in advance to record a Live Stream (i.e. TV station or stream from one of the school encoders so that you don’t have to be present at the time of the event to do the recording. II. Viewing The Schedule Anyone can view the schedule by selecting the Scheduling Tab or by selecting scheduling from the navigation link. IDSolutions 30 Items listed in red have expired; the scheduled event is over. Items listed in green are active or currently in progress. Items listed in yellow are scheduled for a future date and time. If you hover your cursor over the event, it will give you additional details, such as the type of event it is (i.e. recording) and who scheduled it. IDSolutions 31 9 Section Sharing Media The envelope icon that appears on the Media Library, Live Media, Channel Guide, and Playlist pages allows you to share VEMS content with other local and remote users. I. Sharing Media a. Press the sharing icon to the right of the stream you wish to share. The following screen will appear. The pop-up window may vary slightly depending on how your system is configured. It may have a local link and/or an internet link. The local link lets you share content with users on your local area network. The internet link must be configured by an administrator and may not be displayed on your system. It lets you share content with users on the outside internet. b. Paste the provided LAN or internet code into a browser or web page. Or click on the email icon to generate an e-mail. The e-mail will have links for local network viewing and for outside internet viewing if both are available. The user receiving the e-mail can click on the link (or paste in into a browser) and enter a user name and password if prompted, to launch the stream on a modified VBrick player page. IDSolutions 32