1
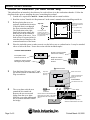
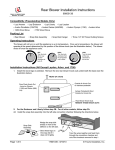
Avalon Small Pedestal
Part # 99200109
CHECK CONDITION OF SHIPMENT
Upon receipt of this kit, check the condition of the packaging. Damage to the package should be noted on the carrier's freight
receipt. Any damage claims as a result of shipping must be handled through the shipper. Travis Industries will provide assistance
in resolving shipping claims or replacing items not included in the package. Please report any missing items immediately.
COMPATIBILITY
• Avalon Pendleton (745/790)
• Avalon Rainier (945/990)
• Avalon Chelan (700) B-Vent or DV Gas Stove
TOOLS REQUIRED
• 9/16" Wrench (if installing outside air, see the section "Outside Air Installation")
PACKING LIST
• Pedestal
• Two Bolts
• Two Lag Bolts, Washers
• Washers
• Two Dowels
• Outside Air Equipment (Rodent Screen, Staples, Cover Plate, Insulation)
INSTALLATION INSTRUCTIONS
?
If using outside air, see "Outside Air Installation" on page 2 of these instructions.
1
Place the pedestal into position on the floor protection. Lift the pedestal up and insert the two
dowels included with this kit onto the forward and rear edge of the pedestal base.
2
Lift the stove onto the pedestal base. Line up the press-nuts on the bottom of the stove with the two
attachment brackets on the pedestal. Insert the two bolts, with washers, through the brackets on the
pedestal and into the stove. Tighten the bolts with a 9/16" wrench.
!
Mobile Home installations require the pedestal to be attached to the floor (use the lag bolts).
Two pedestal bolts
attach the pedestal to
the bottom of the stove
Stove
9/16" Wrench
These brackets are
provided for early
model stoves.
The lag bolts and washers
may be inserted through
these holes to anchor the
pedestal to the floor.
Pedestal
The dowels insert onto
the front and back edge
of the pedestal base.
Page 1 of 2
10850 117th Place N.E. Kirkland, WA 98033
Printed March 18, 2002
Avalon Small Pedestal
Part # 99200109
Outside Air Installation (for wood stoves only)
This pedestal has an internal air duct that may be used to direct air to the combustion chamber. Follow the
directions below prior to installing the stove or attaching the pedestal.
! Outside air is required for mobile home installations and in certain localities.
+ Read the section "Outside Air Requirements" in the owner's manual prior to installing outside air.
1
2
Before placing the stove on
pedestal, determine the location
of the hole that is cut through
the floor protection and floor.
The illustration to the right
details the location where this
hole may be cut in relation to
the faceplate of the stove. Cut a
hole at least 16 square inches in
area that does not interfere with
structural members of the home.
26"
Top View
Outside air may be drawn
from this area underneath
the pedestal
(min. 16 square inches)
16"
FRONT
18-3/4"
The faceplate of the
Pendleton (745/790) and
Rainier (945/990) is 1-1/8" in
front of the forward edge of
the pedestal base.
Pedestal Base
(without dowels)
17"
Place the included screen (or other screen) over the hole to act as a rodent barrier. It may be attached
above or below the floor. Secure the screen with the included staples.
OUTSIDE AIR EQUIPMENT
Screen is used to prevent
rodents from entering.
Cover plate is used
to block off room air .
Staples are used to
attach the screen to
the floor.
Insulation is used to seal the
side edges of the pedestal .
FRONT OF STOVE
3
Prop the front of the stove up 12" and
pry out the outside air knockout with a
large screwdriver.
Drop Chute
Knock-Out
(990 only)
Outside Air Knock-Out
Ashpan Pedestal/Air Boot
Outside Air Knock-Out
(990 only)
DO NOT REMOVE
Rear Blower Knock-Outs
5
The cover plate seals the area
around the air control rod.
Remove the two screws and
bridge from the cover plate.
Slide the cover plate underneath
the air control rod and re-attach
the bridge.
Page 2 of 2
Phillips
Screwdriver
Remove the two screws that hold the
bridge to the cover plate. Then replace
the bridge when the cover plate is in
place.
10850 117th Place N.E. Kirkland, WA 98033
Bridge
Air Control
Rod
The cover plate has a clip which
attaches it underneath the air control.
Printed March 18, 2002