1
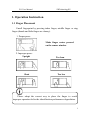
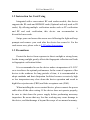
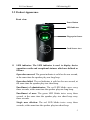
F11 User Manual Version:1.0 Date:Jul. 2010 F11 User Manual V1.0 Introduction: This document mainly introduces the user’s operation of F11. About the device installation please refer to F11 Installation Guide. Notational Conventions This document includes such notational conventions as tips, important notices and precautions. The notations contained in this manual include: : Indicates important information, including precautions, which must be read carefully to achieve the optimal equipment performance. 2 Table of Contents Table of Contents 1. OPERATION INSTRUCTION ......................................... 1 1.1 Finger Placement .......................................................................1 1.2 Instruction for Card Using .........................................................2 1.3 Precautions.................................................................................2 2. DEVICE INTRODUCTION ........................................... 4 2.1 Overview of Device Functions ..................................................4 2.2 Product Appearance ...................................................................5 2.3 Verification State .......................................................................7 2.4 Management Card......................................................................7 2.5 System Password .......................................................................8 2.6 Operation Timeout .....................................................................8 3. DEVICE OPERATIONS ............................................. 9 3.1 Management Card......................................................................9 3.1.1 Enroll a Management Card .............................................9 3.1.2 Enroll an Ordinary User................................................10 3.1.3 Delete a Single User .....................................................16 3.2 User Verification ......................................................................18 3.3 Tamper Switch .........................................................................20 4 APPENDIX ...................................................... 21 4.1 List of Parameters ....................................................................21 4.2 Statement on Human Rights and Privacy ................................22 4.3 Environment-Friendly Use Description...................................24 F11 User Manual ZKTechnologyEU 1. Operation Instruction 1.1 Finger Placement Enroll fingerprint by pressing index finger, middle finger or ring finger (thumb and little finger are clumsy). 1. Proper press: Make finger center pressed on the sensor window. 2. Improper press: Upright Slant Too lean Too low Please adopt the correct way to place the finger to avoid improper operation led to the identification performance degradation. 1 F11 User Manual V1.0 1.2 Instruction for Card Using Integrated with a non-contact RF card reader module, this device supports the ID cards and MIFARE cards (Optional and only used as ID cards). By offering multiple verification modes such as FP verification and RF and card verification, this device can accommodate to diversified user needs. Swipe your card across the sensor area following the light and beep prompts and remove your card after the device has sensed it. For the card sensor area, please refer to 2.2 Product Appearance. 1.3 Precautions Protect the device from exposure to direct sunlight or strong beam, for the strong sunlight greatly affects the fingerprint collection and leads to fingerprint verification failure. It is recommended to use the device under a temperature of 0–50°C so as to achieve the optimal performance. In the event of exposure of the device to the outdoors for long periods of time, it is recommended to adopt sunshade and heat dissipation facilities because excessively high or low temperature may slow down the device operation and result in high false rejection rate (FRR) and false acceptance rate (FAR). When installing the access control device, please connect the power cable after all the other wiring. If the device does not operate properly, be sure to shut down the power supply before performing necessary inspection. Be aware that any live-line working may cause damage to the device, and that damage is beyond the scope of our normal warranty. 2 F11 User Manual ZKTechnologyEU For matters that are not covered in this document, please refer to related materials including the Device Installation Guide, FP Reader Software User Manual. 3 F11 User Manual ZKTechnologyEU 2. Device Introduction 2.1 Overview of Device Functions Our product can either control the electronic lock or connected with external alarm. This device operation is simple and flexible, and supports the use of management cards. With a management card, you can perform such functions as offline enrollment, deletion of users. The light and beep prompts will guide you through all the operations without screen display or keyboard. Featuring a compact and simple design, this device allows users to connect several devices through a PC and supports several communication modes. Door Lock Alarm 4 F11 User Manual ZKTechnologyEU 2.2 Product Appearance Front view: Power Button LED Indicator Fingerprint Sensor Card Sensor Area LED indicator: The LED indicator is used to display device operation results and exceptional statuses which are defined as follows: Operation succeed: The green indicator is solid on for one second, at the same time the speaker play one long beep. Operation failed: The red indicator is solid on for one second, at the same time the speaker play two short beep. Enrollment of administrator: The red LED blinks once every three seconds, at the same time the speaker play one long beep. Enrollment of user: The green LED blinks twice every three second, at the same time the speaker play two short beep every three seconds. Single user deletion: The red LED blinks twice every three seconds, at the same time the speaker play two short beep. 5 F11 User Manual V1.0 Verification state: The green LED blinks once every two second, the beeper with no sound. Card Sensor Area: Refers to the area in the white dashed-line round as shown in the figure above. Fingerprint Sensor: Used to enroll and match fingerprints and delete user. Power Button: Press and hold the power button for three seconds to turn the power off, press and hold the power button one second to turn it on. Bottom view: Speaker Reset Button Reset Button: Used to restart the device. Speaker: Used to play the beep sound, for details please refer to LED Indicator introduction. Rear view: Wiring Terminal Tamper Switch 6 F11 User Manual ZKTechnologyEU Wiring Terminal: Connects with locks and power supply through cables. For details, please refer to F11 Installation Guide. Tamper Switch: Used to generate a tamper alarm. For details, see 3.3 Tamper Switch. 2.3 Verification State Verification state: After the device is powered on, the device enters the verification state if you have enrolled or successfully enrolls a management card or in the event of timeout of any operation. In the verification state, all users are allowed to verify their identity and unlock the door (The administrator bearing a management card can only unlock using his fingerprint previously enrolled). The administrator can perform such operations as user enrollment and deletion. 2.4 Management Card The enrolled users are classified into administrators and ordinary users. Administrators: An administrator is allowed to perform all operations including user enrollment and deletion (Deleting all the other users except himself). The privileges of the device administrators are implemented through the management cards. Ordinary users: Ordinary users are only allowed to verify their identity and unlock. A management card is a card specially allocated for a super administrator. Each device must at least enroll one management card. If no management card is enrolled, you cannot perform any operation. 7 F11 User Manual V1.0 You can implement different functions by swiping a management card for different times in a row: By swiping the management card once, you can go into the single user enrollment state. By swiping the management card five times in a row, you can enter the single user deletion state. Consecutive swipes: Consecutive swipes mean the interval between two swipes in a row is less than 5 seconds. The fingerprints of the user who bears a management card can only be enrolled through FP Reader software. For details, see the FP Reader Software User Manual. Tip: Users who bear management cards can only verify their identity and unlock using their fingerprints previously enrolled. 2.5 System Password A system password is a password used to enhance the security of device data in TCP/IP, RS485/RS232 communications. Tip: The system password can be modified through the FP Reader Software. For details, see the FP Reader Software User Manual. 2.6 Operation Timeout The default operation timeout time is 15 seconds. When you enroll a management card, enroll or delete a user, the green LED will blink twice every three seconds, at the same time the speaker play two short beep every three seconds if there is no operation. After three times of indicator, the device returns to verification state automatically. Tip: You can set the timeout period through the FP Reader Software. 8 F11 User Manual ZKTechnologyEU 3. Device Operations 3.1 Management Card 3.1.1 Enroll a Management Card To enroll a management card, proceed as follows: 1. The device automatically detects whether there exists a management card. 2. If the device fails to detect the presence of a management card, it enters the management card enrollment state. The green LED blinks once every three seconds, at the same time the speaker play one long beep every three seconds. Tip: It is timeout after 15 seconds, and return to verification state. After management card enrolled, you can use the FP Reader Software to set or modify the card number. 3. Register the management card, please swipe your card near to the card sensor area. 4. If enrollment fails, the red LED is solid on for one second, at the same time the speaker play two short beep. The system returns to step 3, and wait for user to swipe card. 5. If enrollment succeed, the green LED is solid on for one second, at the same time the speaker play one long beep. And system returns to verification state. 9 F11 User Manual V1.0 Tip: The system returns to the verification state if any operation in step 3 is timeout, and only prompts you to enroll the management card again after you restart the device again. The management card enrollment procedure is shown below: System power-on Swipe a new card: Red LED is solid on for 1s, 1 long beep every 3s. Management card exist? Verify users: Press your finger or swipe your card. No beep, red LED blinks once every 2s. Yes No Enroll a management card No Enroll Success Enroll successful: Returns to verification state. Green LED is solid on for 1s, 1 long beep. Yes Verification state 3.1.2 Enroll an Ordinary User The mode for you to enter the enrollment state using the 10 F11 User Manual ZKTechnologyEU management card is known as the management card enrollment mode. In this mode, you can only enroll one user every time you enter enrollment state. When you enroll a new user, the system automatically assigns a minimum idle ID to the user. Each user is allowed to enroll 10 fingerprints and one ID card at most. When the fingerprint and ID card enroll completely, or operation timeout, or swipe the management card, the system return to verification state. To enroll a user, proceed as follows: 1. In the verification state, the system goes into the ordinary user enrollment state after you swipe a management card once (In the enrollment state, swiping a management card once will return to the verification state). In this state, you can also enroll the fingerprint for the old user. 2. The system will automatically assign a smallest idle ID for the new user. The green LED blinks twice every three seconds, at the same time the speaker play two short beep every three seconds. You can start user enrollment. There are the following two cases: (1) Swipe ID card first a. When you swipe your new ID card and succeed in enrolling a user, the green LED is solid on for one second, the speaker play one long beep, and you can proceed to step b. If user enrollment fails, the red LED is solid on for one second, the speaker play one long beep and returns to the enrollment state, waiting for you to press your finger or swipe your card. b. The system enters the specified fingerprint enrollment state. Press the same finger over the sensor three times following the light and 11 F11 User Manual V1.0 beep prompts (The green LED blinks twice every three seconds, and the speaker play two short beep). c. If fingerprint enrollment succeeds, the green LED is solid on for one second, the speaker play one long beep, and you can continue the proceed to step b. If fingerprint enrollment fails, the red LED is solid on for one second, and the speaker play one long beep, and repeats step b. d. The system automatically returns to the verification state when both 10 fingerprints and ID card are enrolled, the management card is swiped once or operation times out. (2) Press finger first a. Press the same finger over the sensor three times following the light and beep prompts (The green LED blinks twice every three seconds, at the same time the speaker play two short beep every three seconds) by adopting the proper finger placement. If fingerprint enrollment succeeds, the green LED is solid on for one second, the speaker play one long beep and you can proceed to step b. If fingerprint enrollment fails, the red LED is solid on for one second, the speaker play one long beep and returns to the enrollment state, waiting for your to press your finger or swipe your card. b. The system enters the specified user enrollment state, continue the proceed to step a, and waiting for you to swipe your new ID card or press your finger. c. The system automatically returns to the verification state when both 10 fingerprints and ID card are enrolled, the management card is swiped once or operation times out. 3. If you are already assigned with an ID, then there are the following two cases for you to enroll your fingerprint(s) or card: (1) Enroll fingerprint(s) when you have already enrolled card a. In the state of enrollment state, after you swipe the enrolled card, the system enter the fingerprint enrollment state. You can re-enroll this 12 F11 User Manual ZKTechnologyEU user’s fingerprint,and the new fingerprint(s) will overwrite the previous fingerprints. b. Press the same finger over the sensor three times following the light and beep prompts by adopting the proper finger placement. If fingerprint enrollment succeeds, the green LED is solid on for one second, the speaker play one long beep, and gets ready for enrollment of next fingerprint. c. The system automatically returns to the verification state when both 10 fingerprints and ID card are enrolled, the management card is swiped once or operation times out. Tips: 1. The fingerprint(s) enrolled in this step will overwrite all your previously enrolled fingerprints. Please swipe the card or press the finger one second after the light blinked. 2. In this mode, the fingerprint of the user who bears the management card cannot be enrolled because swiping the management card will return the system to the verification state automatically. (2) Enroll card and fingerprint(s) when you have already enrolled fingerprint(s) a. Press the finger with enrolled fingerprint three times following the light and beep prompts. If you are identified as the same person in each of verification attempt, the system enters the fingerprint enrollment state. b. The system starts to re-enroll your fingerprint and ID card (If the card is not enrolled) when the green LED blinks twice every three seconds, the speaker play two short beep every three seconds (One 13 F11 User Manual V1.0 second after the light blinks). Your fingerprint(s) enrolled in this step will overwrite all your previous fingerprints. c. If you swipe a new card or press a finger three times that is not enrolled before and succeeds in enrollment, the green LED is solid on for one second, the speaker play one long beep, and you can continue enrolling new fingerprints and card. d. The system automatically returns to the verification state when both 10 fingerprints and ID card are enrolled, the management card is swiped once or operation times out. 14 F11 User Manual ZKTechnologyEU The flow chart is shown below: Green LED blinks twice every 3s, 2 short beeps every 3s, start to enroll. Swipe management card Enrollment state Press finger or swipe card? No Red LED is solid on for 1s, 1 long beep, enrollment failure. Verification state Yes New fingerprint or card? Red LED is solid on for 1s, 1 long beep, enrollment failure. Yes User enrollment successful? No No Yes Swipe card Press finger Green LED is solid on for 1s, 1 long beep, enrollment success. No Card enrollment successful? FP enrollment successful? No Yes Green LED is solid on for 1s, 1 long beep, enrollment success. No Red LED is solid on for 1s, 1 long beep, enrollment failure. Enrollment is successful 10 fingerprints and card enrolled? Yes Verification state 15 F11 User Manual V1.0 3.1.3 Delete a Single User The operation steps for single user deletion: 1. In verification state, swipe your management card for five consecutive times to enter the single user deletion state (Swipe your management card one more time to return to the verification state). The red LED blinks twice every three second, the speaker play two short beep every three seconds. 2. The user press the finger or swipe the card: (1) Press your finger onto the sensor to delete a user: Press one of your enrolled fingers properly onto the sensor. If the verification succeeds, the green LED is solid on for one second, the speaker play one long beep. Deletion is successful, and automatically return to the deletion state. If the verification fails, the red LED is solid on for one second, the speaker play one long beep. Deletion is failed, and automatically return to the deletion state. (2) Swipe your card over the reader to delete a user: Swipe a registered card over the reader. If the verification succeeds, the green LED is solid on for one second, the speaker play one long beep. Deletion is successful, and automatically return to the deletion state. If the verification fails, the red LED is solid on for one second, the speaker play one long beep. Deletion is failed, and automatically return to the deletion state. 3. If you swipe your management card one more time or your operation times out, the system will return to the verification state. Tip: In single user deletion mode, management card users cannot be deleted because swiping the management card will return the system to the verification state. 16 F11 User Manual ZKTechnologyEU Single User Deletion Procedure: Verification state Enter the deletion state after swiping the management card 5 times in a row Red LED blinks twice every 3s, 2 short beep every 3s, start to enroll. Does there exist enrolled users? No registered user. The system returns to verification state. No Yes No Card verification Fingerprint verification Is card verification successful? Is FP verification successful? Red LED is solid on for 1s,one long beep, deletion failure. No Yes Yes Delete user success Red LED is solid on for 1s, one long beep, deletion failure. Verification state Red LED is solid on for 1s, one long beep, deletion success. 17 F11 User Manual V1.0 Tip: Please be cautious to do this operation, the deleted data can not be recovered. 3.2 User Verification Operation steps: 1. When the device is in verification state, the green LED blink once every two second to prompt verification. 2. Start user verification. The device supports two verifications modes: fingerprint verification and card verification. (1) Fingerprint verification: Press your finger on the fingerprint sensor in a proper way. If the verification succeeds, the green LED is solid on for one second, the speaker play two short beep. If the verification fails, the red LED is solid on for one second, the speaker play two short beep. (2) Card verification: Swipe your card over the card reader. If the verification succeeds, the green LED is solid on for one second, the speaker play two short beep. If the verification fails, the red LED is solid on for one second, the speaker play two short beep. 18 F11 User Manual ZKTechnologyEU The user verification procedure is show as below: No beep, green LED blinks once every 2s, start to verify. Verification state Door sensor or tamper switch exceptional? Yes Alarm No FP verification Card verification No No FP verification successful? Card verification successful? Yes Red LED is solid on for 1s, 2 short beeps, verification failure. Yes Red LED is solid on for 1s, 2 short beeps, verification failure. Unlock and delay Lock Green LED is solid on for 1s, 2 short beeps, verification success. Verification state Tip: the administrator bearing a management card can only unlock using his fingerprint previously enrolled. 19 F11 User Manual V1.0 3.3 Tamper Switch The tamper switch is pressed and held down with the rear cover. When the device is dismantled, the tamper switch will be lifted up and then it will send an signal to trigger an alarm. Clear alarm: The user can clear the alarm by unlocking the door upon successful verification. Restore factory defaults: The factory defaults can be restored through the tamper switch. When the system generates an alarm for 30–60 seconds, the user can press the tamper switch three times (Till the speaker sounds) to restore default settings, including the device number, system password, IP address, 485 address, and keyboard password. Tip: The user information stored on device will be cleared after the device is restored to factory defaults, please be cautious. 20 F11 User Manual ZKTechnologyEU 4 Appendix 4.1 List of Parameters The following table lists the basic functional parameters of the device. Item Power Supply Function Note 12V 3A Alarm/ Door lock/ Door switch One Wiegand output User quantity 10000 (fingerprint and ID card) Record capacity 100000 pieces of records Enrollment capacity 1500 fingerprints/10000 cards (fingerprint/ card) Verification mode. ID (Mifare) card, fingerprint Communications TCP/ IP, RS485, RS232 Speaker Beep prompt LED Bi-color indication (red/ green) 21 F11 User Manual ZKTechnologyEU 4.2 Statement on Human Rights and Privacy Dear Customers: Thank you for choosing the multi-biometric products designed and manufactured by us. As a world-renowned provider of biometric technologies and services, we pay much attention to the compliance with the laws related to human rights and privacy in every country while constantly performing research and development. We hereby make the following statements: 1. All of our fingerprint recognition devices for civil use only collect the characteristic points of fingerprints instead of the fingerprint images, and therefore no privacy issues are involved. 2. The characteristic points of fingerprints collected by our products cannot be used to restore the original fingerprint images, and therefore no privacy issues are involved. 3. We, as the equipment provider, shall not be held legally accountable, directly or indirectly, for any consequences arising due to the use of our products. 4. For any dispute involving the human rights or privacy when using our products, please contact your employer directly. Our fingerprint products or development tools for police use support the collection of the original fingerprint images. As for whether such a type of fingerprint collection constitutes an infringement of your privacy, please contact the government or the final equipment provider. We, as the original equipment manufacturer, shall not be held legally accountable for any infringement arising thereof. 22 F11 User Manual ZKTechnologyEU Note: The law of the People’s Republic of China has the following regulations regarding the personal freedom: 1. Unlawful arrest, detention or search of citizens of the People's Republic of China is prohibited; infringement of individual privacy is prohibited. 2. The personal dignity of citizens of the People's Republic of China is inviolable. 3. The home of citizens of the People's Republic of China is inviolable. 4. The freedom and privacy of correspondence of citizens of the People's Republic of China are protected by law. At last we stress once again that biometrics, as an advanced recognition technology, will be applied in a lot of sectors including e-commerce, banking, insurance and legal affairs. Every year people around the globe suffer from great loss due to the insecurity of passwords. The fingerprint recognition actually provides adequate protection for your identity under a high security environment. 23 F11 User Manual ZKTechnologyEU 4.3 Environment-Friendly Use Description The Environment Friendly Use Period (EFUP) marked on this product refers to the safety period of time in which the product is used under the conditions specified in the product instructions without leakage of noxious and harmful substances. The EFUP of this product does not cover the consumable parts that need to be replaced on a regular basis such as batteries and so on. The EFUP of batteries is 5 years. Names and Concentration of Toxic and Hazardous Substances or Elements Parts Name Toxic and Hazardous Substances or Elements Pb Hg Cd Cr6+ PBB PBDE Chip resistor Chip capacitor × Chip inductor × Chip diode × ESD components × Buzzer × Adapter × Screws × : Indicates that this toxic or hazardous substance contained in all of the homogeneous materials for this part is below the limit requirement in SJ/T11363-2006. ×: Indicates that this toxic or hazardous substance contained in at least one of the homogeneous materials for this part is above the limit requirement in SJ/T11363-2006. Note: 80% of the parts in this product are manufactured with non-hazardous environment-friendly materials. The hazardous substances or elements contained cannot be replaced with environment-friendly materials at present due to technical or economical constraints. 24