1
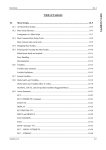
US10 Series User Manual Version: 1.0 Date: Nov. 2010 US10 UserManual ZKTechnologyEU About this Manual: This manual mainly introduces the interface and menu operations of US10 series device. About the installation instructions and the wiring method please refer to the installation guide. Table of Contents Table of Contents 1. Instruction for Use .................................................................. 1 2. Device Appearance ................................................................. 2 3. User Management ................................................................... 3 3.1 Administrator Enrollment.................................................................3 3.3 User Enrollment .............................................................................. 5 3.3.1 Card Enrollment...................................................................5 3.3.2 Password Enrollment........................................................... 6 3.4 Delete User ..................................................................................... 7 3.5 Verification Mode ............................................................................ 9 3.5.1 Card Verification ..................................................................9 3.5.2 Password Verification .......................................................... 9 3.6 Browse Attendance Records......................................................... 10 4. Device Settings ..................................................................... 13 4.1 System Options............................................................................. 13 4.1.1 Date and Time Setting ....................................................... 14 4.1.2 Language Setting .............................................................. 14 4.1.3 Format Setting ................................................................... 14 4.1.4 DLST Setting ..................................................................... 15 4.1.5 Advanced Setting............................................................... 17 4.2 Power Setting................................................................................ 19 4.2.1 Power Setting .................................................................... 19 4.2.2 Scheduled Bell ★ .............................................................. 20 4.2.3 Scheduled State Switch ..................................................... 22 4.3 Communication Setting................................................................. 24 I US10 Series User Manual 4.4 Log Options .................................................................................. 26 4.5 Auto Test ....................................................................................... 26 5. U disk Management .............................................................. 28 5.1 Download Attlog ............................................................................ 28 5.2 Download User Data..................................................................... 28 5.3 Upload User Data ......................................................................... 29 6. System Information .............................................................. 30 Appendix 1 Other Functions.................................................... 31 Appendix 2 Environment-Friendly Use Description ............. 33 II US10 UserManual ZKTechnologyEU 1. Instruction for Use Our products are subject to update from time to time, so our company will neither make a commitment to guarantee the consistency between the actual products and this document, nor assume any responsibility for any dispute arising out of the discrepancy between the actual technical parameters and this manual. This document is subject to change without prior notice. Not all the devices have the function with ★. The real product prevails. If you need it, please contact our business representative or technical support. The photograph in this manual may be different from that of the real product. The real product prevails. 1 US10 UserManual ZKTechnologyEU 2. Device Appearance Front View: LED Indicator Screen Card Reader Keyboard Speaker LED Indicator: In normal state, the green LED blinks once every second. If the verification is success, the green indicator is solid on for three seconds. If the verification is fail, the red indicator is solid on for three seconds. Speaker: Used to play the beep sound and voice prompts. Screen: Display the time and word information, used for user to get the operation prompt. Card Reader: Used to enroll or verify user identity. Keyboard: Used to input the number or execute the menu operation. 2 US10 UserManual ZKTechnologyEU 3. User Management If no administrator has been enrolled in the device, everyone can enroll a new user. If there is an administrator in the system, you should be allowed by an administrator to enroll a new user. The device can enroll two kinds of user: ordinary user and administrator. And the device provides two type of verification mode for the user, such as the password and the card verification. Administrator affirmation: Press MENU button, the device prompt [Admin Affirm], input the administrator ID and press OK button, swipe the administrator card or input the password according the screen prompt. Note: If there is no administrator in the device, the user can enter the menu without administrator affirmation. 3.1 Administrator Enrollment To avoid the unauthorized person to change the setting or damage the data of the device, the device provide the function to set administrator. There are the following four privilege levels: user, enroller, administrator, super administrator (supervisor). Users are people whose identity must be verified, such to gain access to a facility or to have their attendance recorded. Enrollers are users who are authorized to enroll new users or delete from the system. Administrator can do other operations, except set advanced option and enroll supervisor’s privilege. Supervisors are users who access to all functions and change all 3 US10 Series User Manual settings in the system. Note: If there is no administrator and supervisor in the system, the enroller can enroll them. And if there isn’t a supervisor in the system, the administrator can enroll him. Only if there is a supervisor enrolled, the lower privilege user can not enroll the higher privilege administrator. The administrator enrollment operations are as follows: 1) There is no administrator in the device by factory default. Press MENU button to enter the menu of the device, and the interface as the figure. 2) Press OK button, enter the user management interface: Menu ►User Manage Options PenDrive Mng User Manage ► Enroll User Enroll Admin Delete 3) Using “▲/▼” to select [Enroll Admin]. User Manage User Enroll ► Enroll Admin Delete 4) Press OK button, enter the administrator Enroll Admin ► Enroll Enroll PWD enrollment interface. 5) You can select a favor way to enroll an administrator, press OK to enter the administrator authorization interface. Select the Admin Accredit Supervisor ESC OK 4 US10 UserManual ZKTechnologyEU administrator privilege and enter the user enrollment operation. More detail please refers 3.3 User Enrollment. 3.3 User Enrollment Note: The device provides two type of information for the user to enroll, such as the password enrollment and the card enrollment, and one user can enroll only one of them. 3.3.1 Card Enrollment 1) Enter the Enroll User interface from MENU -> User Management, select [Enroll] and enter the card enrollment interface. 2) Press OK, and enter the next step. Enroll User ►Enroll Enroll Pwd New Enroll User ID ESC 00010 OK 3) The device assigned a smallest idle user ID automatically, if you need to modify it, please input the desired ID (1-65534) through the keyboard. Press OK to confirm and enter the next step. 4) Slide the card through the card slot follow the prompt, the device read out the card number and display on the screen: New Enroll Brush Card User ID 00010 ESC OK New Enroll CARD: 0473200009 User ID 00010 ESC OK 5 US10 Series User Manual 5) Press OK to enter the confirm interface: New Enroll 000010-C ESC 6) Press OK to save the data and complete the enrollment process. OK (Save) New Enroll Continue? ESC OK If you need to enroll another user, press OK to continue. Note: “00010-C”: The last letter “C” means ID card enrollment. 3.3.2 Password Enrollment 1) Enter the Enroll User interface from MENU -> User Management, select [Enroll Pwd] and enter the password enrollment interface. 2) Press OK and enter the next step. Enroll User Enroll ►Enroll Pwd New Enroll User ID 00006 ESC OK 3) The device assigned a smallest idle user ID automatically, if you need to modify it, please input the desired ID (1-65534) through the keyboard. Press OK to confirm and enter the New Enroll Input Pwd _____ ESC OK next step. 6 US10 UserManual 4) Input the password through the keyboard, press OK button to enter the next step. 5) Input the same password another time, and press OK to confirm, enter the next step. ZKTechnologyEU New Enroll Input Pwd ***** Pwd Affirm _____ New Enroll 00006-P ESC 6) Press OK to save the data and complete the enrollment process. OK (Save) New Enroll Continue? ESC OK If you need to enroll another user, press OK to continue. Note: “00006-P”: The last letter “P” means password enrollment. 3.4 Delete User If you want to delete an enrolled user, take the following steps. 1) Press the MENU button, and then verify your identity if an administrator is enrolled, and the interface is as the right figure. 2) Press OK button, enter the user management interface. Menu ►User Manage Options PenDrive Mng User Manage ►User Enroll Enroll Admin Delete 7 US10 Series User Manual 3) Using “▲/▼” button to select [Delete] option. 4) Press OK button, enter the process to delete the enrolled user. User Manage User Enroll Enroll Admin ►Delete Delete User ID 00008 ESC OK 5) The device display the smallest user ID automatically, if you need to modify it, input the desired ID through the keyboard. Press OK to confirm and enter the next step. If the user has enrolled the card, the interface is Cancel Card 00008-C ESC OK as the right figure. If the user has enrolled the password, the interface is as the right figure. Del Password 00009-P ESC 6) Press OK to confirm the deletion of card (or password). The device will prompt if you want to OK Del User 00008 delete the user. ESC 7) Press OK to confirm the user deletion. Del User Delete ? ESC OK OK 8) Press OK to confirm again and return to the previous interface. 8 US10 UserManual ZKTechnologyEU 3.5 Verification Mode 3.5.1 Card Verification If you have enrolled the card number in the device, just need to slide the card through the card slot by the proper way. After the voice [Thank You] being heard, the verification is Verify CARD: 0473200009 User ID 00001 Verified! success, and the information displays on the screen. 3.5.2 Password Verification 1) In the initial interface of the device, input the user ID, it will display on the screen. Pwd Affirm User ID 00008 ESC OK 2) Press OK to confirm, the screen prompt to input the user password. Pwd Affirm User ID 00008 Inoput Pwd _____ 3) Input the correct password, and press OK to confirm, the prompt [Verified] means verification success. 4) The prompt [Error Pwd] means verification failed. Pwd Affirm User ID 00008 Verified Pwd Affirm Error Pwd 9 US10 Series User Manual 3.6 Browse Attendance Records This device supports a new function to browse the user’s attendance records on the device, and need not to connect the device with the PC. 1. Inquire methods: The device supports two methods to inquire the records: 1) Enter MENU -> User Management -> Browse AttLogs, input an enrolled user ID that you want to inquire, press OK to search the user’s attendance records whose ID is appointed. 2) After user verification succeeds, before the interface restore to the initial interface, press MENU to inquire this user’s attendance record. For example, query the attendance records which user ID is 00014: 00014 2010-11 1/23 27 08:30 12:10 13:20 18:08 26 08:46 12:15 13:25 18:23 18:55 22:20 25 08:53 12:07 13:19 18:23 2. The way to browse attendance records The attendance records display according to record time from newly to old, while browse the record, you can use the following key to operate: Key Function explain ▲ Display the previous page of content ▼ Display the next page of content 1 Move a rank to left for displaying content 3 Move a rank to right for displaying content OK Restore the displaying information to the original position 2 Move a line up for displaying content 5 Move a line down for displaying content 10 US10 UserManual 4 ZKTechnologyEU Switch the displaying mode of the compact form with complete form records. For example, the right figures are the compact form, and corresponding the complete form figure, which user ID is 00014. Compact form: It can display enough information on the screen. 00014 00014 00014 00014 00014 05-27 05-27 05-27 05-27 05-26 1/23 08:30:21I 12:10:09I 12:20:52I 18:08:01I 08:46:55I The compact form 00014 2010-11 1/23 27 08:30 12:10 13:20 18:08 26 08:46 12:15 13:25 18:23 18:55 22:20 25 08:53 12:07 13:19 The complete form Completes form: It can display the integrity information on the screen. 6 Alter the big font and the small font record displaying mode, like as the right figure. Take user 00014 as an example. Alter from the small to the big font. 27 08:30 12:10 13:20 18:08 26 08:46 12:15 13:25 18:23 18:55 22:20 Small font 00014 2006-5 1/23 27 08:30 12:10 13:20 18:08 26 08:46 12:15 13:25 18:23 18:55 22:20 25 08:53 12:07 13:19 Big font 9 The latest record 0 The oldest record 11 US10 Series User Manual 3. Print records after requiring. When you view record on the fingerprint device, you can press OK to print the record content displaying on the screen currently. 12 US10 UserManual ZKTechnologyEU 4. Device Settings Press the MENU button, and then verify your identity if an administrator is enrolled. The menu interface appears: Menu User Manage ►Options PenDrive Mng System Info Select [Options], and press OK button to enter the setting interface. Options ►System Opt Power Mng Comm. Opt ▼ Log Opt Auto Test The device options included: System Options, Power Management Communication Options, Log Options and Auto Test. The following is the demonstration of these five options. 4.1 System Options Enter the System Options menu, display the detailed options. System Opt ▼ ►Date Time Language ENG Fmt YY-MM-DD DLST Adv Option 13 US10 Series User Manual 4.1.1 Date and Time Setting Set the current date and time displaying on the initial interface. Select [Date Time] option and press OK button, the modification interface displays. YYYY-MM-DD 24H 2010-6-13 9:34:29 ESC OK If you need to notify it, press “▲/▼” button to locate the cursor on the item, and then input the correct date and time. After modification, press OK to save and quit. 4.1.2 Language Setting Set the current language displaying on the screen. Select the language you want and press OK to confirm. Press ESC button, the device will prompt you to save, press OK to save and quit. System Opt ▼ Date Time ►Language ENG Fmt YY-MM-DD System Opt Save? ESC If you select [English], after device restarted, the screen will show in English. OK (Save) Language Please Restart 4.1.3 Format Setting Set the date and time format displaying on the initial interface. Enter the Format option, press “▲/▼” key, and then select the desired date 14 US10 UserManual ZKTechnologyEU and time format, press OK to confirm. There are ten formats: YY-MM-DD, YY/MM/DD, YY.MM.DD, MM-DD-YY, MM/DD/YY, MM.DD.YY, DD-MM-YY, DD/MM/YY, DD.MM.YY, and YYYYMMDD. Press ESC button, the device will prompt you to save, press OK to save and quit. For example, the YY/MM/DD format (left) change to the YY-MM-DD format (right). Welcome Check-In 10:12 05/14/06 Tuesday Welcome Check-In 10:12 06-05-14 Tuesday 4.1.4 DLST Setting DLST, also called Daylight Saving Time, is a system that prescribes the local time setting principle in order to save energy. The unified time adopted during the system date is called “DLST”. Usually, the time will be one hour forward in summer. It can make people sleep early and get up early. So that to reduce lighting and save energy. In autumn, the time will be recovered. The regulations are different in different countries. At present, nearly 110 countries adopt DLST. Enter the MENU -> Options -> System Option -> DLST. 1) Press OK to enter the DLST setting interface. Select DLST state to Y, and press OK to save. If DLST ▼ ►DLST Y Date Mode Mode2 Enter DLST you select N for this parameter, cancel the DLST function. Standard 2) Set the date mode for DLST, there are tow options, Mode 1 and Mode 2. 15 US10 Series User Manual Mode 1: The default setting of the device. Its time format is shown as “Month-day hour: minute”. Mode 2: Its time format is shown as "Month-Weeks-week hour: minute". After setting, press ESC button, the device will prompt you to save, press OK to save and quit. 3) After time format setting, it needs to set the start and end time of DLST. The allowed inputting range is 1-6 for the number of weeks (WS), if you input 1 mean the first week; input 2 means the second week, and so on. The allowed inputting range is 0-6 for each Week (WK), if you input 0, it represents the Sunday, and if you input 1, it represents Monday, and so on. We take 4:00 on September 1, 2008 (that is, Saturday, the first week in September 2008) as an example, these two models displaying as follows. Mode 1 Mode 2 MM-DD 24H 9-1 04:00 ESC OK MM-WS-WK 24H 9-1-6 04:00 WK(0:Sun. 6:Sat.) ESC OK Note: 1. If the begin month of the DLST that you set is bigger than at the end of time, which means the setting is over a year. Like this: begin at 2007-9-1 4:00 and end at 2008-4-1 4:00. 2. If you choose Mode2, enter the DLST is: September Sunday, the sixth week of the month, this year is 2007, then upon 2008, there is not the sixth week of the month, only five weeks. In such circumstances, the system will assign the corresponding time in the last Sunday of this month to DLST. 3. If it is set to enter the DLST is: September the 1st week Monday, the 16 US10 UserManual ZKTechnologyEU current year is 2008, and then upon 2009, the first day is Tuesday, instead of Monday, in which case, the system will automatically find the first Monday in this month. 4.1.5 Advanced Setting There are the following options in the advanced option: Reset Options, Delete AttLogs, Clear All Data, Clear Administrator Privilege, Voice Setting, Update Firmware, Button Beep Setting, Adjust volume and Immediately Print, as the figure below. Adv Option ▼ ►Reset Opts Del AttLogs Clear All Data Clr Admin Pri Voice Y Upd Firmware Button Beep N Adj VOL (%) L Imdt prt Fmt1 Scroll “▲/▼” to up or down the screen to select the option. 1. Reset Options Restore all setup information to factory default. 2. Delete AttLogs Delete all attendance records in the device. 3. Clear All Data Delete all enrolled user information and attendance records. 4. Clear Administrator Privilege Change the Administrator privilege into ordinary user. 17 US10 Series User Manual 5. Voice Setting Whether use the phonic prompt or not. If you set the option as Y, the device will send a prompt sound for the operation. If you set the option as N, the device will not send prompt sound. Only utter the beeper sound for the operation. 6. Update Firmware If you want to upgrade the firmware of the device, you can use the firmware update file in the U disk to carry out the operation process. Caution: If you need the firmware upgrade file, please contact our technical support. Generally the firmware upgrade is not recommended. 7. Button Beep Setting Whether send sound hint while press key, if set the option as Y, when press the keyboard the device will utter, if set the option as N, when press the keyboard the device doesn’t utter. 8. Adjust Volume Adjust the voice volume of the keyboard sound; there are three options, high, middle and low. 9. Immediately Print This item is set as RS232. When the user verified successfully, the device will export signal through serial port, if the device connect with printer, it can print the record. Note: This function only support serial port (RS232) printer, the parallel interface is unavailable. The Baud rate of the device and the printer must be the same. For more detail about the connection, please refer to the installation guide. 18 US10 UserManual ZKTechnologyEU 4.2 Power Setting The device supports to set the time to shutdown, power on and sleep automatically, set the scheduled bell and state switch and so on. 4.2.1 Power Setting Press MENU button to enter the device menu, select Options -> Power Mng, the following interface appears. Power Mng ►Shutdown PowerOn Sleep ▼ N N N Idle SLP Idle Min 0 Bell Delay 10 Scheduled Bell Sch. State Lock Power N The device uses smart manage system, supports the time switch and idle features, it can satisfy the user’s different demands. 1. Shutdown setting Automatically shutdown the device follows the schedule. Select [Shutdown] and press OK to enter the confirm interface. Press OK to set the auto shutdown time. After setting, press OK to save and quit. Press ESC, the device will prompt you Shutdown Set Sch. Fun? ESC OK to save. Press OK to save and finish the setting. 2. Power on setting 19 US10 Series User Manual Automatically power on the device follows the schedule. The detailed setting is similar to the [Shutdown] setting. 3. Sleep setting The device will enter the sleep state automatically follows the schedule, press any key to enter working state. The detailed setting is similar to the [Shutdown] setting. 4. Idle and idle minutes setting These two parameters are related to each other, while the idle minute is 0, the idle setting is invalid; while the idle minute is more than zero (unit was minute), for example, it is one minute, if there is no operation within one minute, the system will enter the idle state: sleep or power off. 5. Lock power button setting If you set this option to N, you can press and hold the [Power] button in the initial interface, the device start to count down, after three seconds, the device will power off. If you set this option as Y, the additional option [Power Off] is appear after the [Lock Power] option, you can power off the device by selecting this option. And there is no reflection when you press the Power button. 4.2.2 Scheduled Bell ★ The system supports 50 scheduled bells to set. You can set the time to ring the bell according to actual need. When the appointed time is arriving, the device will automatically ring the bell. When the time duration is out, the bell will stop automatically. Scheduled bell setting: Bell delay setting Enter MENU -> Options -> Power Management -> Bell Delay, press OK to enter the edit state, input the bell delay time through the keyboard, or press “▲/▼” to increase or decrease the delay time. 20 US10 UserManual ZKTechnologyEU Note: If the scheduled bell time is not set, the bell delay setting is invalid. Time setting for scheduled bell 1) Enter MENU -> Options -> Power Management -> Scheduled Bell, display as the right figure. 2) Press “▲/▼” button to select the desired time period, press OK to enter the confirm interface. Scheduled Bell ▼ ►No.1 N No.2 N No.3 N Scheduled Bell Set Sch. Fun? ESC 3) Press OK to enter the setting interface, input the wanted time through the keyboard, press “▲/▼” button to select hour or minute. After setting, press OK to save and quit. OK Scheduled Bell ▼ ►No.1 8:30 No.2 N No.3 N Press “▲/▼” button to select another time period to edit. 4) After setting, presses ESC, the device will prompt to save. Press OK to save, otherwise press ESC to return to the previous interface Scheduled Bell Save? ESC OK (Save) without saving. 5) If you press OK, the modification will take effect. When the appointed time is arriving, the device will trigger the external bell to ring. Cancel the scheduled bell 1) Enter MENU -> Options Management -> Scheduled Bell. -> Power Scheduled Bell ▼ ►No.1 8:30 No.2 N No.3 N 21 US10 Series User Manual 2) Select the time period you want to cancel, such as the No.1 time period. Press OK to enter the confirm interface. Scheduled Bell Set Sch. Fun? ESC 3) Press ESC to cancel this time period and return to the previous interface. OK Scheduled Bell ▼ ►No.1 N No.2 N No.3 N 4) Press ESC, the device will prompt you to save. Press OK to save, otherwise press ESC to return to the previous interface without saving. 4.2.3 Scheduled State Switch State Switch:While the device is in using, the different time period need to record the different attendance state. There four state keys for user to set the current attendance state. These state key are set manually, you can press the corresponding key to select the state you want, F1 for OT-IN, F2 for OT-OUT, F3 for Check-In, F4 for Check-Out. For convenience operation, there is another setting option in the menu, which allows the user to set the scheduled state switch. Scheduled State Switch: After the user set the scheduled state switch function in the device, when the appointed time is arriving, the attendance state will switch automatically on the initial interface. Scheduled state switch setting: Time setting for scheduled state switch 22 US10 UserManual 1) Enter MENU -> ZKTechnologyEU Options -> Power Management -> Scheduled Switch, display as the right figure. Sch. State State Check-In ESC OK 2) Press “▲/▼” button to select the desired attendance state, such as OT-IN, OT-OUT, Check-In, and Check-Out. Press OK to enter the setting interface. We can select Check-In as an To Check-In ▼ ►No.1 N No.2 N No.3 N example. 3) Select the desired time period, such as No.1 time period, press OK to enter the confirm interface. 4) Press OK to enter the setting interface, input the wanted time through the keyboard, press “▲/▼” button to select hour or minute. After setting, press OK to save and quit. Sch. State Set Sch. Fun? ESC OK To Check-In ▼ ►No.1 8:30 No.2 N No.3 N Press “▲/▼” button to select another time period to edit. 5) After setting, presses ESC, the device will prompt you to save. Press OK to save, otherwise press ESC to return to the previous interface To Check-In Save? ESC OK (Save) without saving. 6) If you press OK, the modification will take effect. When the appointed time is arriving, the device will switch the attendance state automatically. Cancel the scheduled state switch 23 US10 Series User Manual 1) Enter MENU -> Options -> Power Management -> Scheduled Switch. Select the attendance state you want to delete. Press OK to enter the time setting interface. 2) Select the time period you want to delete, press OK to enter the confirm interface. 3) Press ESC to cancel this time period and return to the previous interface. To Check-In ▼ ►No.1 8:30 No.2 N No.3 N Sch. State Set Sch. Fun? ESC OK To Check-In ▼ ►No.1 N No.2 N No.3 N 4) Press ESC, the device will prompt you to save. Press OK to save, otherwise press ESC to return to the previous interface without saving. To Check-In Save? ESC OK (Save) 4.3 Communication Setting Press MENU button to enter the device menu, select Options -> Communication Options, the following interface appears. Comm. Opt ▼ ►BaudRate 115200 Dev Num 1 Net Speed AUTO IP Addr NetMask Gateway Ethernet RS232 COMM Key Y N 0 1. Baud Rate There are five options, 9600, 19200 38400, 57600, 115200. The high baud 24 US10 UserManual ZKTechnologyEU rate is recommended for RS232 communication to use. 2. Device Number Identity ID of the device, the range is 1 to 255. 3. IP address: The default IP address is 192.168.1.201. You can change it to avoid the conflict in the network. 4. Net speed: The default net speed is [Auto]. There are other options such as 10M-F, 10M-H, 100M-F, 100M-H. We recommend using [Auto]. 5. Net Mask: The default Net Mask is 255.255.255.0. You can change it as you need. 6. Gateway: The default Gateway is 192.168.1.1. You can change it as you need. 7. Ethernet: Whether use TCP/IP protocol or not. If you use Ethernet communication, select Y, otherwise, select N. 8. RS232: Whether use RS232 communication or not. If you use RS232 communication, select Y, otherwise, select N. If you want to connect the printer, also select this item to Y. 9. Communication Key If this parameter is 0, there is no communication key, otherwise, you need to input the correct key in communication setting. Note: Be sure to restart the device after setting, so that the configuration will take effect. 25 US10 Series User Manual 4.4 Log Options Press MENU button to enter the device menu, select Options -> Log Options, the following interface appears. Log Opt ▼ ►Alm AttLog 99 ReCheck Min 0 1. Alarm AttLog When the remainder log capacity reached the set value, it will automatically trigger the alarm that logs were full. 2. Recheck Minutes Within the setting time scope (Unit: minute), if someone has verified, then the second verification will not store in the system. 4.5 Auto Test You can test the device by this function. When the device is broke down, it can analyze the cause of the fault and the device will be quickly and easily maintained. Press MENU button to enter the device menu, select Options -> Auto Test, the following interface appears. Auto Test ▼ ►Run All Test LCD Test Voice Test Key Test RTC Test LCD Test: The device can test the LCD display (through displaying W and E letter in white and black background) to see whether the screen works normally. Press OK to continue and press ESC to quit. Voice Test: The device can test the voice prompt through playing the voice files in the device. You will see if the voice is complete and quality is good or not. You can press OK to continue and press ESC to quit during testing. 26 US10 UserManual ZKTechnologyEU Keyboard Test: The device can test any key (except OK and ESC) of the device to see if the key is work normally. Press a key on the test interface to check whether the pressed key is in accordance with that displayed on the screen. Press ESC to quit the testing. RTC Test: The device can automatically test the clock to see if it works normally. Press OK to start the testing, after testing the result will display on the screen, press OK or ESC to return to the previous interface. 27 US10 UserManual ZKTechnologyEU 5. U disk Management Press MENU button to enter the device menu, select [PenDrive Mng], the detailed items display, such as Download AttLog, Download User and Upload User. PenDrive Mng ▼ ►DwnLoad AttLog DwnLoad User UpLoad User 5.1 Download Attlog 1. Plug the U disk into the USB slot of the device. 2. Press the MENU button to enter the PenDrive Management interface, press “▲/▼” to scroll up or down the screen to select [Download AttLog]. 3. Press OK to start downloading data, after operation finished the device prompt [Copy Data Suc]. Copy Data Suc 4. Press ESC to return to the initial interface. Take out the U disk and plug it into the PC USB port,there are three files, X_attlog.dat (attendance log), X_oplog .dat (management log), and X_user (X indicates the device ID). Note: If it prompts [PenDrv No Exist], please insert the U disk or examine if the U disk is insert properly. 5.2 Download User Data The operation is similar to [Download AttLog]. Press “▲/▼” to scroll up or down the screen to select [Download User] in the PenDrive Management interface. After downloading, the file user.dat (User Information) will be stored 28 US10 UserManual ZKTechnologyEU in the U disk. 5.3 Upload User Data The operation is similar to [Download AttLog]. Press “▲/▼” to scroll up or down the screen to select [Upload User] in the PenDrive Management interface. After uploading, the file user.dat (User Information) will be uploading to the device. 29 US10 UserManual ZKTechnologyEU 6. System Information Through this menu you can browse all of the device information, enter the System Information interface in the main menu. Press OK, the following information appears. It displays the User count, S Logs count, attendance records count, the management records count. Sys Info ▼ ►User Cnt 206 Att Log 8046 Admin Cnt 2 S Logs 263 Free Space Info Dev Info In the free space information item, you can check the free space of the device. In the device information item, you can check the device information. Such as Users, AttLog and S Logs capacity, other items such as Manu Time, Serial Num, Vendor, Device Name, Wireless Card, Firmware Ver, View MAC, MCU Version, you can press OK to see the detail information. The information displays as the following figure. Dev Info ▼ ►Users (100) 10 AttLog (10k) 10 S Logs 4096 Manu Time Serial Num Vendor Device Name Wireless Card Firmware Ver View MAC MCU Version 30 US10 UserManual ZKTechnologyEU Appendix 1 Other Functions Note: The function introduced in the appendix is optional; if you need to use these functions, please consult our business representative or the technical support. 1. Scheduled Bell In many factories, the bell is used to announce the working start and end time, and the traditional way is to ring the bell manually or use the special electron machine. We have already embedded the scheduled bell module into the attendance system, you can benefit from the low cost and convenience management. There are two options in the device, the scheduled bell and bell delay, which can perform the scheduled bell function. The system total has 50 time periods for scheduled bell to set. According to the actual need you can set the time to ring the bell, when the appointed time is arrive, the device will ring the bell automatically, after the set bell delay time. When the time duration is out, the bell will stop automatically. Connect the electrical bell to the device; about the connection please refer to the installation guide. 2. WIFI Function The WiFi (short for "wireless fidelity") is a certain type of WLAN (wireless local area network) that use the 802.11b specification. The biggest advantage is the high speed of wireless transmission, which is up to 11Mbps, and the effective transmission distance is long. It’s compatible with most of the 802.11 DSSS device. IEEE 802.11b wireless networking specification is a variant of IEEE 802.11. The maximum bandwidth is 11 Mbps. If the signal is weak or there has interference, the bandwidth can adjust to 5.5Mbps, 2Mbps or 1Mbps. The automatically 31 US10 Series User Manual bandwidth adjustment can protect the network stability and reliability effectively. Its main features are: high speed, high reliability, in the opening area, communications distance is up to 305 meters, in a closed area, communication distance is 76 to 122 meters, convenient, and network costs are lower than the existing wired Ethernet. Our device has also embedded the WiFi function. WiFi modules can be built-in the device, to achieve data transmission through WIFI wireless. For detail, please refer to the external WiFi software user manual. 32 US10 UserManual ZKTechnologyEU Appendix 2 Environment-Friendly Use Description The Environment Friendly Use Period (EFUP) marked on this product refers to the safety period of time in which the product is used under the conditions specified in the product instructions without leakage of noxious and harmful substances. The EFUP of this product does not cover the consumable parts that need to be replaced on a regular basis such as batteries and so on. The EFUP of batteries is 5 years. Names and Concentration of Toxic and Hazardous Substances or Elements Parts Name Toxic and Hazardous Substances or Elements Pb Hg Cd Cr6+ PBB PBDE Chip resistor × ○ ○ ○ ○ ○ Chip capacitor × ○ ○ ○ ○ ○ Chip inductor × ○ ○ ○ ○ ○ Chip diode × ○ ○ ○ ○ ○ ESD components × ○ ○ ○ ○ ○ Buzzer × ○ ○ ○ ○ ○ Adapter × ○ ○ ○ ○ ○ Screws ○ ○ ○ × ○ ○ ○: Indicates that this toxic or hazardous substance contained in all of the homogeneous materials for this part is below the limit requirement in SJ/T11363-2006. ×: Indicates that this toxic or hazardous substance contained in at least one of the homogeneous materials for this part is above the limit requirement in SJ/T11363-2006. Note: 80% of the parts in this product are manufactured with non-hazardous environment-friendly materials. The hazardous substances or elements contained cannot be replaced with environment-friendly materials at present due to technical or economical constraints. 33