1
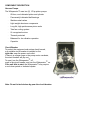
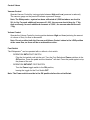
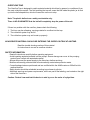
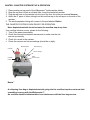
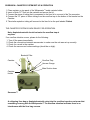
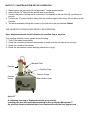
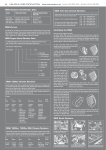
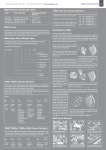
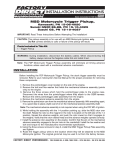
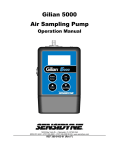
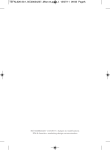
USER’S MANUAL
WHISPERATOR
20-5026-00 (110V)
20-5028-00 (220V)
8000 South Kolb Road
Tucson, AZ 85706
Phone 800.528.1597
Fax
520.885.1189
www.wellsgrp.com
email: [email protected]
GENERAL DESCRIPTION
The Whisperator™ is a high-powered suction system with two oil-less piston vacuum pumps.
The system is designed to pull a vacuum on any closed container or any open process system.
Vacuum is accomplished by mounting the vacuum pumps in parallel.
When the system is connected, the air flow will be from the tip of the cannula through the tubing,
collection system, overflow trap, bacterial filter and finally to the pumps evacuate the air from the
lines, creating a vacuum pulling aspirated material in the same direction as the air flow. Aspirated
material continues to the collection system under normal suction until the cannula is exposed to air
again.
SPECIFICATIONS
Item number
Weight
Dimensions
Configuration
Maximum vacuum
Maximum flow rate
Gauge units
Overflow protection
Sound level
Pump Type
Number of pumps
Horsepower
20-5026-00 (110V)
20-5028-00 (220V)
64 lbs.
18-1/2" x 18" x 15"
mobile
29+ inches of Hg
5.2 cubic feet per minute
Inches Hg/Kilopascals
auto cutoff and in-line filter
50+/- 3db @ 6 ft.
2 cylinder piston
2
2/3 hp
CHECK LIST
Carefully unpack the Whisperator™. Check that the following accessories are included in the
package and were received in good condition.
· Whisperator™
· Canister Holder
· Vacuum Gauge
· Power Cord
· Foot Switch
· 1-box Sterile, Disposable Tubing (10 per box)
· 2-Bacterial Filters
· 1-Overflow Trap
· 1-box of Disposable Canister Liners (10 per box)
· User’s Manual
DVD
Note: You will receive either 1 or 2 canisters, depending on which collection system you
ordered.
Baxter™ System………...1 Canister
Sorenson™ System ……2 Canisters
Quick Fit™ System……...1 Canister
Call Customer Service Immediately to report any damaged or missing items: 800-528-1597
COMPONENT DESCRIPTION
Vacuum Pumps
The Whisperator™ uses two (2) 1/3 hp piston pumps
·
Oil-less, non-lubricated piston and cylinder
·
Permanently lubricated ball bearings
·
Stainless steel valves
·
Light weight aluminum components
·
Long-life, high performance piston seals
·
Twin fan cooling system
·
UL recognized motors
·
Thermal protected
·
Balanced for low vibration operation
·
Capacitor
Circuit Breaker
To protect the equipment and reduce shock hazard,
a re-settable circuit breaker is installed on the
right side, near the power cord outlet.
If there is a voltage surge or the pump motor overheats,
the circuit breaker will pop out.
To reset, turn the Whisperator™ off,
push in the circuit breaker, and turn the Whisperator™ on.
If the unit fails to start, the Whisperator™ may require
a cool-down period or technical repairs.
Note: Do not let technicians by-pass the circuit breaker.
Control Valves
Vacuum Control
Operate Vacuum Control by turning pointer between High and Low (pressure is reduced).
The vacuum gauge on the panel will indicate a pressure change.
Note: The Whisperator™ system has been calibrated at 2,500 feet above sea level to
26+ in. Hg. For each additional increase of 1,000’, the vacuum should drop by 1" Hg.
And conversely, for each additional decrease of 1,000’, the vacuum should increase
1"Hg.
Volume Control
Operate the Volume Control by turning pointer between High and Low (reducing the amount
or volume of flow). Air flow is decreased.
Note: Do not position both the Vacuum and Volume Control valves in the LOW position
at the same time, as there will be no noticeable suction.
Foot Switch
The Whisperator™ can be operated with or without a foot switch.
·
OPERATION WITH FOOT SWITCH
Plug the foot switch cord into the unit. Turn the Foot Switch and Power switches to the
ON position. Press the pedal and the Hercules™ will start. Press the pedal again to stop
the power of the unit.
·
OPERATION WITHOUT FOOT SWITCH
Turn the Power toggle switch to the ON position,
leaving the toggle for the Foot Switch OFF.
Note: The Power switch must be in the ON position before the unit will start.
OVERFLOW TRAP
The Overflow Trap is designed to catch aspirated material which has by-passed, or overflowed, from
the main collection canister. The fluid entering the trap will cause the ball inside the plastic jar to float
up into the bell shaped tube, which will cause the vacuum to stop.
Note: The plastic ball acts as a safety mechanisim only.
There is NO GUARANTEE that the ball will completely stop the power of the unit.
If there is a problem with the overflow, please check the following:
1. The liner may be collapsing, causing material to overflow into the trap.
2. The collection system may be full.
3. The collection system may not be set up properly.
NO ASPIRATED MATERIAL SHOULD BE ENTERING THE OVERFLOW TRAP AT ANYTIME.
Read the trouble shooting section of this material
for instructions to correct an overflow situation.
SAFETY INFORMATION
· Read all instructions carefully before operating equipment.
· Avoid ingesting aspirated material into the pumps. Severe damage can occur to the pumping
system upon contact with aspirated material.
· Always disconnect the power supply to the Hercules™ before servicing.
· Motors are thermally protected and will automatically restart when protector resets.
· Current leakage tests are performed and are certified within the AAMI maximum 300uA limit for
medical devices.
· Safety checks should be scheduled according to purchaser’s policies.
· Additional warnings and power requirements, which are part of the labeling, are located on the right
side of the Hercules™.
Caution: Federal Law restricts this device to sale by or on the order of a physician.
SET UP AND OPERATION
1. Carefully remove the Whisperator™ form the shipping carton. Be sure to save the box and packing
material for convenient maintenance returns.
2. Read all instructions carefully before operating the unit.
3. After you have removed the Whisperator™, open the accessory box and locate the power cord and
foot switch. Plug the foot switch into the Whisperator™. Plug the power cord into the Whisperator™,
then into the power outlet.
4. Locate the vacuum gauge and connect the item to the quick-connect lock on top of the Whisperator™.
5. Turn the Power switch and the Foot Switch ON.
6. To test the unit, place a finger over the main suction hose coming directly out of the top of the
Whisperator™. Note the reading of the vacuum gauge. Keep in mind that vacuum changes according
to elevation. After checking the vacuum, turn the Whisperator™ off.
7. Place the Overflow Trap between the 4 small metal pegs on the top panel of the Whisperator™. The
arrow on the top of the overflow trap should point toward the vacuum gauge.
8. Connect the HEPA Filter to one end of the Overflow Trap using the 6" silicon tube. Connect the other
end of the HEPA Filter to the main suction hose.
Note: Change the HEPA Filter after 10 procedures or every 24hrs use.
9. Locate the Collection System. Determine if the system is a Baxter™, Sorenson™ or Quick Fit™ canister
system., then read the applicable instructions included in this manual to set up the collection system.
Set up the collection system as described.
At this point, the following accessories should now be connected:
· Power cord and foot switch
· Vacuum gauge – to quick connect
· Bacterial filter – connected to the main suction hose and the 6" silicone tubing which is connected
to the overflow trap
· Canister – placed in the canister holder with liner intact
The unit is now ready for operation.
BAXTER™ CANISTER SYSTEM SET-UP & OPERATION
1.
2.
3.
4.
Place canister on top panel of the Whisperator™ inside canister holder.
Snap the red liner lid onto a soft-shell liner. Insert the hard-shell canister.
Plug the red hose on the canister into the top of the liner lid on the port marked Vacuum.
Attach the 9" piece of silicon tubing from the overflow trap to the red spout on the side of the
canister.
5. The sterile aspiration tubing will connect to the port labeled: Patient
THE CANISTER SYSTEM IS NOW READY FOR OPERATION.
Note: Aspirated material should not enter the overflow trap at any time.
If an overflow situation occurs, please do the following:
1. Turn off the power immediately.
2. Check the connections between accessories to make sure the unit
was set up correctly.
3. Check for a crack in the canister.
4. Check the vacuum and volume settings (should be on high).
Bacterial Filter
Overflow Trap
Canister
Vacuum Gauge
Canister
Holder
Main
Suction Hose
Baxter™
A collapsing liner bag or Aspirated material going into the overflow trap does not mean that
something is wrong with the Whisperator™.
An overflow situation indicates there is an interference with the liner bag vacuum.
SORENSON™ CANISTER SYSTEM SET-UP & OPERATION
1. Place canister on top panel of the Whisperator™ inside canister holder.
2. Insert a Quick Fit™ liner into the canister and secure the lid.
3. Connect the piece of tubing that is connected to the liner lid to one end of the Tee connector.
4. Connect the 12" piece of silicon tubing from the overflow trap to the bottom of the bracket on the
Canister.
5. The sterile aspiration tubing will connect to the liner lid on the port labeled: Patient
THE CANISTER SYSTEM IS NOW READY FOR OPERATION.
Note: Aspirated material should not enter the overflow trap at
any time.
If an overflow situation occurs, please do the following:
1. Turn off the power immediately.
2. Check the connections between accessories to make sure the unit was set up correctly.
3. Check for a crack in the canister.
4. Check the vacuum and volume settings (should be on high).
Bacterial Filter
Canister
Overflow Trap
Vacuum Gauge
Main Suction hose
Canister
Holder
Sorenson™
A collapsing liner bag or Aspirated material going into the overflow trap does not mean that
something is wrong with the Whisperator™. An overflow situation indicates there is an
interference with the liner bag vacuum.
QUICK FIT™ CANISTER SYSTEM SET-UP & OPERATION
1. Place canister on top panel of the Whisperator™ inside canister holder.
2. Insert a Quick Fit™ liner into the canister and secure the lid.
3. Connect the piece of tubing that is connected to the bracket to the top of the lid. (as shown on
picture)
4. Connect the 12" piece of silicon tubing from the overflow trap to the bottom of the bracket on the
Canister.
5. The sterile aspiration tubing will connect to the liner lid on the port labeled: Patient
THE CANISTER SYSTEM IS NOW READY FOR OPERATION.
Note: Aspirated material should not enter the overflow trap at any time.
If an overflow situation occurs, please do the following:
1. Turn off the power immediately.
2. Check the connections between accessories to make sure the unit was set up correctly.
3. Check for a crack in the canister.
4. Check the vacuum and volume settings (should be on high).
Bacterial Filter
Canister
Overflow Trap
Vacuum Gauge
Canister
Holder
Main Suction Hose
Quick Fit™
A collapsing liner bag or Aspirated material going into the
overflow trap does not mean that something is wrong with the Whisperator™.
An overflow situation indicates there is an interference with the liner bag vacuum.
MAINTENANCE
·
·
·
·
·
·
·
All Aspirators are thoroughly checked by the Quality Assurance Department before being released
for shipping. Inspect the unit upon receipt to insure the equipment was not damaged during
shipping. The vacuum power should also be checked.
Do not lubricate pumps. The oil-less components are sealed and packed with optimum level of
lubricant, requiring no lubrication.
Do not let liquid or aspirated material enter the pumping system.
The mufflers (Part No. 16-5073) should be changed after approximately 80 hours of operation, or
whenever the white filter inside the muffler becomes black.
No scheduled maintenance is recommended. Follow the procedures established by your
engineering department.
Warnings are part of the labeling and are indicated on the Whisperator™. The serial number is
stamped on a small metal tag, located on the left side of the Aspirator. Record the serial number.
In-services on new equipment can be provided by telephone with either your sales representative,
or our technical support staff. If additional information is needed, call Customer Service or
Technical Support at 800-528-1597.
Change HEPA Filter after 10 procedures or after 24 hours of use.
PARTS LIST
ITEM
PART NO.
Whisperator™ (110V)
Whisperator™ (220V)
Power Cord (AC 110V)
Power Cord (AC 22V)
Foot Switch (Single)
Vacuum Gauge
HEPA Filters (case of 10)
Overflow Trap 6" and 9" silicone tubing
Overflow Ball
6" Silicone Tubing
9" Silicone Tubing
Baxter™ Holder
Baxter™ Canister 1500cc
Baxter™ Disposable Soft-Shell Liners
Standard Tubing, 9ft., sterile
Soft-Flexible Tubing, 12ft., sterile
XL Std Ultra Limp, 14 ft., sterile
Sorenson™ Holder
Sorenson™ Canister 1900cc
Sorenson™ Disposable Soft-Shell Liners
MB Tubing, 9ft., sterile
XL MB Ultra Limp, 14 ft., sterile
Flex Tube A, 12 ft., sterile
Quickfit™ Holder
Quickfit™ Canister 3000cc
Quickfit™ Liners
MB Ultra Limp, 9 ft., sterile
XL MB Ultra Limp, 14ft., sterile
Flex Tube A, 12ft., sterile
Vacuum Pump 1/3 hp, piston, hi-vac (2 ea.)
Vacuum Pump 1/3 hp, piston, hi-vac (1 ea.)
Muffler (MIN) (3per unit)
Tubing (Internal PVC)
20-5026-00
20-5028-00
20-5100-00
20-5101-00
20-5102-00
16-5030-00
20-5201-00
17-5100-00
16-5107-00
17-5101-00
17-5106-00
20-5159-01
20-5153-00
20-5154-00
24-5103-00
24-5102-02
24-5105-00
20-5159-00
20-5157-00
20-5158-00
24-5104-00
24-5106-00
24-5102-01
20-5159-03
20-5156-00
20-5155-00
24-5104-00
24-5106-00
24-5102-01
18-5057-01
18-5058-01
16-5073-00
17-5003-00
TROUBLE SHOOTING
No Suction
1. Turn vacuum and volume control knobs to High. If one or both knobs are on Low, there will be no
noticeable suction.
2. Check for a collapsing liner.
3. Remove bacterial filter and place a finger over the main suction hose. If there is no suction, turn the unit
off, remove finger from hose, wait a moment, then turn the unit on again.
Note: Before starting any suction procedure, let the Whisperator™ go to full vacuum when
switched on. During operation, if the Whisperator™ is momentarily turned off, let the vacuum
gauge indicator return to “0” before restarting the machine. All the air must clear from the
vacuum lines before all the pumps will start again. Failure to follow this procedure can result in
the loss of vacuum.
Overflow Situation
1. Monitor the collection system for fluid level. Do not overflow.
2. A collapsing liner can cause the aspirated material to overflow into the overflow trap.
3. Check for a crack in the canister. This can cause the liner to collapse, resulting in an overflow situation.
A collapsing liner bag does not mean that there is something wrong with the Whisperator™.
Note: With proper operation and monitoring, at no time during any procedure, should an
overflow situation occur.
Broken Canister
1. Do not use a damaged canister. A damaged canister will cause the liner bag to collapse, causing the
aspirated material to overflow into the overflow trap.
WARNING
Ingesting aspirated material into the pumping system can severely damage the pumps and void the
warranty. If material is going into the overflow trap, check the collection system immediately to see if the
liner bag is collapsing or is too full. If further assistance is needed, call technical support at 800-528-1597.
Refer to the collection system section and instructions for proper set up.
·
WARRANTY
Five (5) year on parts and labor from the date of shipment.
·
Unauthorized handling of the Whisperator™ will void warranty of the
unit.
·
Any aspirated material found to have been ingested into the
pumping system will void the warranty.
·
·
Retain the custom-made packing box with foam for returns.
All returns require prior authorization from the Wells Johnson
Quality Assurance Department.
·
For questions about the warranty, call the Quality Assurance Dept:
800-528-1597
For technical assistance call
Customer Service or Technical Support:
520-298-6069
800-528-1597