1
www.somfy.com
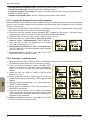
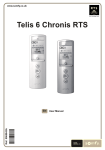
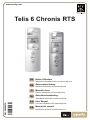
Telis 6 Chronis RTS
FR Notice Utilisateur
DE Gebrauchsanleitung
IT
Manuale d’uso
NL Gebruikershandleiding
Ra~A
Ref. 5065943A
EN User Manual
ES Manual del usuario
Notice Utilisateur
Par la présente, Somfy déclare que l’appareil est conforme aux exigences essentielles et aux autres dispositions pertinentes de la directive 1999/5/CE.
Une déclaration de conformité est mise à disposition à l’adresse Internet www.somfy.com/ce. Images non contractuelles.
Attention !
Remarque
Gebrauchsanleitung
Hiermit erklärt Somfy, dass sich dieses Produkt in Übereinstimmung mit den grundlegenden Anforderungen und den anderen relevanten Vorschriften der
Richtlinie 1999/5/EG befindet. Eine Konformitätserklärung ist unter der Internetadresse www.somfy.com/ce verfügbar. Abbildungen unverbindlich.
Achtung!
Hinweis
Manuale d’uso
Somfy dichiara che il dispositivo è conforme ai requisiti essenziali e alle altre disposizioni pertinenti della Direttiva 1999/5/CE. La dichiarazione di
conformità è disponibile all’indirizzo Internet www.somfy.com/ce. Le immagini hanno uno scopo puramente indicativo.
Attenzione!
NB
Gebruikershandleiding
Bij deze verklaart Somfy dat het product voldoet aan de essentiële eisen en aan de andere beschikkingen van richtlijn 1999/5/CE. Een conformiteitsverklaring staat ter beschikking op de website www.somfy.com/ce. Aan de afbeeldingen kunnen geen rechten worden ontleend.
Waarschuwing!
Opmerking
User Manual
Somfy hereby declares that this product conforms to the essential requirements and other relevant provisions of Directive 1999/5/CE.
A declaration of conformity is available at www.somfy.com/ce. Images are not contractually binding.
Caution!
Note
Manual del usuario
Por la presente, Somfy declara que el producto cumple con los requisitos básicos y demás disposiciones de la directiva 1999/5/CE.
Podrá encontrar una declaración de conformidad en la página web www.somfy.com/ce. Fotos no contractuales.
Atención!
Observación
US products (With FCC ID on the label product) :
US5,414,334
US PATENT PENDING
US D625,693 S
US DESIGN PATENT PENDING
This device complies with Part 15 of the FCC Rules.
Operation is subject to the following two conditions:
- this device may not cause harmful interference, and
- this device must accept any interference received, including interference
that may cause undesired operation.
Warning !
Changes or modifications not expressly approved by the manufacturer
could void the user’s authority to operate the equipment.
Telis 6 Chronis RTS
Contents
1. Introduction
2. Safety
1
1
6. Installation
7. Operation
9
9
2.1. Safety and responsibility
2.2. Specific safety instructions
1
1
7.1. Manual mode
7.2. Automatic mode
9
9
3. Contents
4. The Telis 6 Chronis RTS in detail
5. Commissioning
2
2
3
8. Tips and recommendations
11
Questions about the Telis 6 Chronis RTS?
11
9. Technical data
12
5.1. Battery installation
5.2. Setting the general parameters of the
remote control transmitter
5.3. Programming the channels of the
Telis 6 Chronis RTS
5.4. "Tilt" mode
(Function specifically for installers)
5.5. Programming the days of the week
3
3
5
6
6
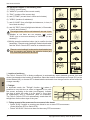
1. Introduction
The Telis 6 Chronis RTS remote control transmitter allows you to control up to 6 end-products or
groups of end-products using Radio Technology Somfy (RTS).
The Telis 6 Chronis RTS can be used in 2 ways: in either manual or automatic mode.
Manual mode allows you to control end-products in the house in groups or individually, depending on
their assignments to the 6 groups on the remote control transmitter, called "channels". The channels,
numbered 1 to 6, can be customised, by assigning them names.
Automatic mode allows you to control the end-products assigned to the channels on the remote
control transmitter automatically, after having created the weekly and daily programs, called "automatic
orders". Up to 6 automatic orders can be programmed for each day of the week.
2. Safety
Please read this guide carefully before installing and using this product.
Any use outside the sphere of application defined by Somfy is prohibited. This invalidates the warranty
and discharges Somfy of all liability, as does any failure to comply with the instructions given herein.
Never begin installing without first checking the compatibility of this product with the associated
equipment and accessories.
2.2. Specific safety instructions
To avoid damaging the product:
1) Avoid impacts!
2) Do not drop it!
3) Do not spray or immerse in liquids.
4) Do not use abrasive products or solvents to clean the product. Its surface can be cleaned with a
soft, damp cloth.
Keep out of the reach of children.
Copyright © 2010 Somfy SAS. All rights reserved.
1
EN
2.1. Safety and responsibility
Telis 6 Chronis RTS
3. Contents
Description
Q.
a
Telis 6 Chronis RTS
1
b
Wall mount with screw cap
1
c
Screw kit
1
d
AAA (LR3) batteries
2
a
b
c
d
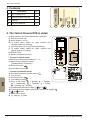
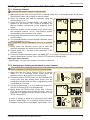
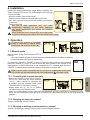
4. The Telis 6 Chronis RTS in detail
e)
f)
g)
h)
i)
j)
k)
l)
Red indicator light (radio transmission indicator)
Selection button ()
Arrow buttons (or)
c button (raise, switch on, open, position and
increase lighting or heating)
e button (stop, go to [my] favourite position)
a button (lower, switch off, close, position and
reduce lighting or heating)
PROG button
Battery compartment cover
• Screen in manual mode:
m) Number of the selected channel (1…6)
n) Name of the selected channel
(5 alphanumeric characters)
o) Set mode active:
p) Low battery symbol:
e
f
i
EN
l
j
n
o
• Screen in automatic mode:
p
q) Simulated presence function active:
r) Current time
s) Set mode active:
t) Low battery symbol:
u) Days of the week:
= Monday,
= Tuesday,
= Wednesday,
= Thursday,
= Friday,
= Saturday,
= Sunday
to 6
)
v) Programmed automatic orders (1
w) Time selected for triggering the order: set time or "twilight"
x)
or
orders
y) Channels to select
z) c, stop/e, a orders
2
k
g
h
m
q
r
s
t
u
v
w
x
y
z
Copyright © 2010 Somfy SAS. All rights reserved.
Telis 6 Chronis RTS
5. Commissioning
Before using the Telis 6 Chronis RTS, we recommend that each motor is programmed in advance
using an individual Telis 1 RTS type control point and that the limit switches of each motor are set.
However, like any RTS remote control transmitter, the Telis 6 Chronis RTS can be used for motor
commissioning operations (limit switch adjustment, etc.).
This manual only describes commissioning using an individual RTS control point such as Telis 1 RTS.
For commissioning with a different RTS control point, refer to the corresponding manual.
After 2 minutes of inactivity, the Telis 6 Chronis RTS screen switches automatically to sleep mode.
When the screen is off, first press any button to turn it on.
When editing the settings, you can return to the operating mode (manual or automatic) at any time
by pressing and holding the selection button (). Only confirmed parameters are saved.
5.1. Battery installation
- Remove the battery cover from the back of the Telis 6
2 x LR03
Chronis RTS.
AAA 1.5 V
- Insert the 2 AAA (LR3) batteries following the polarity
indicated.
- Replace the battery cover on the Telis 6 Chronis RTS.
- Activate the Telis 6 Chronis RTS by pressing any button.
Never use rechargeable batteries.
Replace the batteries when the ( ) symbol appears on
the screen.
If there is no power supply for an extended period of time (batteries out of charge or removed), the
general parameters of the remote control transmitter will have to be reset. However, automatic
orders remain stored in the memory.
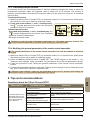
5.2. Setting the general parameters of the remote control transmitter
When the batteries are first installed, "Remote control settings" mode is activated directly: "SET" and
"YEAR" appear on the screen, with the year flashing (this is the first parameter to be set).
After an extended period of time with no power supply, when automatic mode is selected, "Remote
control settings" mode is also activated directly.
At each stage, the parameter to be set flashes.
- Press the arrow buttons ( or ) to change
the parameter (pressing and holding the
button scrolls the characters faster).
EN
- To save the parameter and move to the
next parameter, briefly press the selection
button ().
- "Remote control settings" mode can be
deactivated at any time by pressing and
holding the selection button (). Only
confirmed parameters are saved.
2s
Copyright © 2010 Somfy SAS. All rights reserved.
3
Telis 6 Chronis RTS
The parameters appear in the following order:
1
2
3
4
5
6
12) Briefly press the selection button () to confirm the last 7
parameter: "Remote control settings" mode is deactivated,
and the Telis 6 Chronis RTS returns to automatic mode
8
1)
2)
3)
4)
"YEAR" (current year)
"MONTH" (number of the current month)
"DAY" (number of the current day)
and 5) "TIME" (current time in hours and minutes)
6) "AREA" (location of residence)*
7) and 8) "JUNE" (time of twilight at midsummer, in June, in
hours and minutes)**
9) and 10) "DEC" (time of twilight at midwinter, in December,
in hours and minutes)**
The twilight times must be set between 6 am and 11 pm.
11) Whether or not there are sun sensors ( ): select
"SUN" (one or more sun sensors) or "NO SUN" (no sun
sensors)***
"Remote control settings" mode can be deactivated at any
time by pressing and holding the selection button (). 9
Only confirmed parameters are saved.
11
10
12
EN
* Location of residence
The Telis 6 Chronis RTS is factory-configured to automatically switch between summer time and
winter time based on the location of residence. Select the location of residence as Europe (EU) or the
United States (US), or choose OFF to deactivate the automatic time change function and to make the
change manually.
** Twilight
In automatic mode, the "Twilight" function ( ) makes it
possible to vary the time an order is triggered in line with
the sunset, according to the date (see diagram). Indicate
the time at which the order is to be given in June (time
at midsummer) and in December (time at midwinter).
The Telis 6 Chronis RTS will automatically recalculate the
twilight time for the other days of the year.
*** Taking account of the presence of sun sensors in the house
• Select "SUN" if motors or receivers are linked to one or more RTS sun sensors
(Sunis WireFree RTS or Soliris RTS).
• Select "NO SUN" if the house does not have any RTS sun sensors.
4
Copyright © 2010 Somfy SAS. All rights reserved.
Telis 6 Chronis RTS
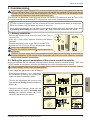
5.3. Programming the channels of the Telis 6 Chronis RTS
5.3.1. Naming a channel
Channels can only be named in manual mode.
1) Make sure that the Telis 6 Chronis RTS is in manual mode (if it is in automatic mode, briefly press
the selection button () to switch to manual mode).
2) Select the channel you want to customise using the
2
3
arrow buttons (or).
3) Press and hold the selection button () until "SET"
appears on the screen: "SET" mode is activated: the
flashing hyphen corresponds to the character to be
edited.
4) Select the location of the character to be edited using 4
5
the navigation buttons (or): the flashing hyphen
corresponds to the character to be edited.
5) Briefly press the selection button () to edit the character
in this location.
6) The character flashes: to select another character, press
the arrow buttons (or).
6
7
The 5 characters can be alphabetic (A to Z) or numeric
(0 to 9).
7) Briefly press the selection button () to save the
character displayed and move to the next character.
8) Repeat steps 4 to 7 for each of the characters in the
channel's name.
9) Press and hold the selection button () until "SET" is no longer displayed on the screen: "SET"
mode is deactivated, and the Telis 6 Chronis RTS returns to manual mode.
Naming the other channels
- Repeat steps 1 to 9 for each channel you want to customise.
5.3.2. Assigning or deleting end-products in each channel
The procedure for assigning end-products to the channels of the Telis 6 Chronis RTS and deleting
them is identical. It can only be done in manual mode.
2
Individual RTS
control point
EN
1) Make sure that the Telis 6 Chronis RTS is in manual
mode (if it is in automatic mode, briefly press the
selection button () to switch to manual mode).
2) Press and hold the PROG button on the individual RTS
control point that has already been linked, until the
end-product moves back and forth: programming mode
is activated for 2 minutes.
3) Use the arrow buttons (or) to select the channel on
the Telis 6 Chronis RTS to be programmed.
4) Briefly press the PROG button on the Telis 6 Chronis
RTS: the end-product moves back and forth, and it is
assigned to or deleted from the chosen channel on the
Telis 6 Chronis RTS.
3
4
- In order to assign or delete the end-product from other
channels, repeat steps 1 to 4, selecting another channel.
- To assign or delete other end-products, repeat steps 1 to 4.
Telis 6 Chronis RTS
Copyright © 2010 Somfy SAS. All rights reserved.
5
Telis 6 Chronis RTS
5.4. "Tilt" mode (Function specifically for installers)
If the end-products has tiltable slats (interior or exterior Venetian blinds, roller shutters with tiltable
slats), slat orientation mode can be configured in "EU" or "US" mode on each channel. For the motors
of interior blinds, other than blinds with tiltable slats: blinds, roller shutters, screens, etc. it is
recommended that the "Tilt" mode be configured in "US" mode. By default, all channels are configured
in "US" mode.
"Tilt" mode can only be changed in manual mode.
1) Make sure that the Telis 6 Chronis RTS is
in manual mode (if it is in automatic mode,
briefly press the selection button () to
switch to manual mode).
2) Select the channel you want to configure
using the arrow buttons (or).
3) Press and hold the selection button ()
until "SET" and "MODE" appear on the
screen: "US" or "EU" flashes. To change
mode, press the arrow buttons (or).
4) Briefly press the selection button () to
save the parameter and exit "Tilt" mode.
- To configure another channel, repeat steps
1 to 5.
2
3
7 s.
4
5.5. Programming the days of the week
EN
The Telis 6 Chronis RTS can automatically send orders to one or more groups of end-products when
it is in automatic mode, after creating a program. Up to 6 automatic orders can be programmed for
each day of the week.
Each of these automatic orders can be:
• Set for a set time or at twilight
• Applied to 1 to 6 channels (all end-products on the same channel are controlled at the same time)
c, e, a,
or
The days of the week can only be programmed in automatic mode.
"Automatic order programming" mode can be deactivated at any time by pressing and holding the
selection button (). Only confirmed parameters are saved.
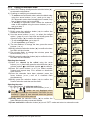
5.5.1. Selecting the day to be programmed
1) Make sure that the Telis 6 Chronis RTS is in automatic
mode (if it is in manual mode, briefly press the selection 1
button () to switch to automatic mode).
2) Press and hold the selection button () until "SET"
appears on the screen: "Automatic order programming"
mode is activated, and the day previously displayed
flashes.
3
3) Select the day you want to program using the arrow
buttons (or).
4) Briefly press the selection button () to program the day
that is flashing: "EDIT" appears and flashes.
6
2
4
Copyright © 2010 Somfy SAS. All rights reserved.
Telis 6 Chronis RTS
5.5.2.
Editing an automatic order
5) When "EDIT" flashes, briefly press the selection button ():
an automatic order flashes.
6) Creating or modifying an automatic order:
• To create a new automatic order: select the blank order
using the arrow buttons (or) and go to step 7.
(If 6 automatic orders have already been created, only
one of these orders can be modified).
• To modify an automatic order: select the automatic
order to be modified using the arrow buttons (or)
and go to step 7.
Selecting the time
7) Briefly press the selection button () to confirm the
selection: the time flashes.
8) Use the arrow buttons (or), to select the twilight
option** (page 4) or at a set time and briefly press the
selection button () to confirm the selection.
• To edit a twilight time, go to step 13.
• To edit a set time, go to step 9.
9) The hour flashes: to change the hour, press the arrow
buttons (or).
10) Briefly press the selection button () to confirm the hour
and then set the minutes.
11) The minutes flash: to change the minutes, press the
arrow buttons (or).
12) Briefly press the selection button () to confirm the time
and then set the channels.
5
6
7
8
9
10
11
12
13
14
Selecting the channels
13) Select the channel to be edited using the arrow
buttons (or) then briefly press the selection button () to
activate (symbol: ) or deactivate (symbol: ) the channel. 15
14) Press the arrow buttons (or) to select another
channel and repeat step 13 to activate or deactivate
each channel.
15) Once the channels have been selected, press the
arrow buttons (or) until all 6 channels flash 17
simultaneously.
16) Briefly press the selection button () to confirm the
channel selection and then set the order.
18
EN
Selecting the order
17) An order flashes: to select an order from
c, e, a,
,
, press the arrow buttons (or).
16
19
The
and
orders are not displayed when
programming the days of the week if "NO SUN" (no sun
sensors)*** (page 4) was selected when the general
parameters of the clock were set.
18) Briefly press the selection button () to confirm the
order selected: the day concerned flashes.
19) Press and hold the selection button () to exit "SET" mode and return to automatic mode.
Copyright © 2010 Somfy SAS. All rights reserved.
7
Telis 6 Chronis RTS
- To modify another automatic order, repeat the procedure starting at step 1.
- To program another day, repeat the procedure starting at step 1.
- To copy the program for one day and assign it to another day, see the "Copying the program from
one day to another" section.
- To delete an automatic order, see the "Deleting an automatic order" section.
5.5.3. Copying the program from one day to another
When the program for one particular day is identical to that of another day of the week, the copy/paste
function can be used to copy the entire program that has already been configured for one day and
paste it to another day.
1) Make sure that the Telis 6 Chronis RTS is in automatic mode (if it is in manual mode, briefly press
the selection button () to switch to automatic mode).
2) Press and hold the selection button () until "SET" appears on the screen: "Automatic order
programming" mode is activated, and the day previously displayed flashes.
3) Select the day you want to copy using the arrow buttons (or).
4) When the day to be copied flashes, press the 2 arrow
buttons (and) simultaneously: "COPY" appears.
5) Select the day to which the program is to be copied
using the arrow buttons (or).
6) Press both arrow buttons (and) simultaneously:
"PASTE" appears, the program that was copied is pasted
onto this other day.
7) Press and hold the selection button () to exit "SET"
mode and return to automatic mode.
EN
5.5.4. Deleting an automatic order
1) Make sure that the Telis 6 Chronis RTS is in automatic mode (if it is in manual mode, briefly press
the selection button () to switch to automatic mode).
2) Press and hold the selection button () until "SET"
2
3
appears on the screen: "Automatic order programming"
mode is activated, and the day previously displayed
flashes.
3) Select the day you want to modify using the arrow
buttons (or).
4) Briefly press the selection button () to modify the 4
5
program of the day that is flashing: "EDIT" appears and
flashes.
5) Press one of the arrow buttons (or) to change menu:
"DELET" (delete) flashes.
6) Briefly press the selection button () to confirm: an
6
7
automatic order flashes.
7) Using the arrow buttons (or) select the automatic
order to be deleted and briefly press the selection button
() to delete the automatic order that is flashing: the
automatic order is deleted.
8) Press and hold the selection button () to exit "SET"
mode and return to automatic mode.
8
Copyright © 2010 Somfy SAS. All rights reserved.
Telis 6 Chronis RTS
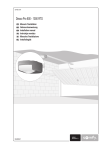
6. Installation
Check the radio transmission range before installing the
Telis 6 Chronis RTS mount. The radio range is 20 m through
2 concrete walls.
- Select a location for the wall mount
- Mark the screw locations (vertical spacing: 40 mm)
- Drill, then secure the mount with the screws (use anchors
if required)
- Fit the screw cap
The use of radio appliances (e.g. Hi-Fi radio
headphones) operating on the same frequency
may cause interference and reduce the product's
performance.
Never install the Telis 6 Chronis RTS on or near metal
surfaces as doing so may reduce the radio transmission range.
40 mm
7. Operation
To switch from manual to automatic
mode, or automatic to manual mode,
briefly press the selection button ().
7.1. Manual mode
Manual mode on the Telis 6 Chronis RTS is
used to:
• Send an occasional order to the end-products assigned to the 6 different channels
• Deactivate automatic order programming
For example, channel 1 "ROOM" is used to open the roller shutters of the parents'
bedroom, channel 2 "LIVIN" is used to move the roller shutter in the lounge to the
ideal position to avoid reflections on the computer and TV screens, and channel 3
"TERRA" is used to lower the terrace awning to go and sit outside, etc.
When manual mode is selected, the Sun function is automatically deactivated.
The function will be reactivated at the next programmed
automatic order.
- Select the channel of the Telis 6 Chronis
RTS to be used with the arrow buttons
(or): each channel is identified by
a number and the selected name (see
"Customisation of channels" section).
- Briefly press the c, e, or a button
corresponding to the desired order.
- When the intermediate position has been programmed and the end-product is stopped, briefly
press e: the end-product or the group of end-products is activated and goes to the (my) favourite
position.
7.1.2. Changing the name of a channel
See the "Naming a channel" section.
7.1.3. Changing or deleting an end-product in a channel
See the "Assigning or deleting end-products in each channel" section.
Copyright © 2010 Somfy SAS. All rights reserved.
9
EN
7.1.1. Controlling the channels manually
Telis 6 Chronis RTS
7.2. Automatic mode
Automatic mode on the Telis 6 Chronis RTS is used to:
• Automatically control the end-products assigned to the 6 different channels, using automatic
orders programmed according to the days of the week
• Program the activation or deactivation of the Sun function, according to the channels
Example of programming a day in winter: at 06:45, e order to gently open the roller
shutters of the parents' bedroom ("ROOM1"); at 07:00, c order to open all the roller
shutters and blinds on the ground floor and take advantage of the sunlight ("LIVIN",
"DININ", and "KITCH"); at 07:45, e order to open the roller shutters of the children's
bedroom ("ROOM2"); at 09:00, c order to open the roller shutters of the bedrooms
and allow the heat to enter via the windows ("ROOM1" and "ROOM2"); at twilight, a
order to all end-products to protect the house from the cold.
- Programming the automatic orders for
each day of the week (see "Programming
the days of the week" section).
- In automatic mode, the current day and
the next automatic order scheduled for that
day are displayed.
- To view all automatic orders that have
been programmed, scroll from one to the
another using the arrow buttons (or).
- To stop an automatic order that is in
progress, return to manual mode by
briefly pressing the selection button (),
select the channel corresponding to the
end-products concerned and press the
stop/my button.
7.2.1. Modifying the programming of the days of the week
See "Programming the days of the week" section.
EN
7.2.2. Activation/Deactivation of the Sun function
The Sun function can only be activated in automatic mode, by programming an
automatic order .
When an
automatic order is programmed for one day of the week, Somfy recommends that
an
order is also programmed later the same day, in particular if other automatic orders are
programmed subsequently.
In automatic mode:
automatic order is programmed, this means that, at the indicated time, the motors or
• If an
receivers linked to one or more RTS sun sensors will take the orders generated by these sensors
into account. The end-products concerned will react according to the amount of sunlight, until the
next
automatic order.
• If an
automatic order is programmed, this means that, at the indicated time, these motors or
receivers will cease to take the orders from the RTS sun sensors into account.
The Sun function is only active in automatic mode. As soon as the Telis 6 Chronis RTS switches
to manual mode, this function is automatically deactivated. It can only be activated at the next
automatic order.
programmed
10
Copyright © 2010 Somfy SAS. All rights reserved.
Telis 6 Chronis RTS
7.2.3. Simulated presence function
In automatic mode, the "Simulated presence" function randomly changes the times at which the
programmed automatic orders are triggered, within a range of 0 to 30 minutes. This function is
specially recommended to simulate your presence when you are away from home for an extended
period of time.
To activate the function:
1) Make sure that the Telis 6 Chronis RTS is in automatic mode (if it is in manual mode, briefly press
the selection button () to switch to automatic mode).
2) Press both arrow buttons (and) simultaneously:
) symbol appears on the screen: the "Simulated
the (
presence" function is activated.
To deactivate the function:
- Press both arrow buttons (and) simultaneously: the
(
) symbol disappears from the screen: the "Simulated
presence" function is deactivated.
- Or switch to manual mode.
Switching to manual mode automatically deactivates the "Simulated presence" function. The
function must be reactivated, if required, when returning to automatic mode.
7.2.4. Modifying the general parameters of the remote control transmitter
The general parameters of the remote control transmitter can only be modified in automatic
mode.
1) Make sure that the Telis 6 Chronis RTS is in automatic mode (if it is in manual mode, briefly press
the selection button () to switch to automatic mode).
2) Press and hold the selection button (f) until "SET" and "YEAR" appear on the screen (> 7 s):
"Remote control settings" mode is activated. The year flashes: this is the first parameter to be set.
3) Follow the procedure in the "Setting the general parameters of the remote control transmitter"
section.
4) Once the last parameter has been confirmed, "Remote control settings" mode is deactivated, and
the Telis 6 Chronis RTS returns to automatic mode.
"Remote control settings" mode can be deactivated at any time by pressing and holding the
selection button (f). Only confirmed parameters are saved.
8. Tips and recommendations
Observations
The end-products on the
selected channel do not
react at all when a button
on the Telis 6 Chronis
RTS is pressed.
Possible causes
EN
Questions about the Telis 6 Chronis RTS?
Solutions
The batteries are low.
Replace the batteries.
The end-product(s) is(are) not on
the selected channel.
Select the corresponding channel or add the
motor or receiver to the channel.
The remote control transmitter is
not programmed.
See the "Adding/Deleting a telis 6 Chronis RTS"
section.
External radio equipment is
interfering with the radio reception.
Turn off any radio appliances nearby.
The remote control transmitter is in Briefly press the selection button to switch to
automatic mode.
manual mode.
The motor(s) or receiver(s) are in
thermal cut-out mode.
Copyright © 2010 Somfy SAS. All rights reserved.
Wait for the motor to cool down, then press the
desired button again.
11
Telis 6 Chronis RTS
An end-product stops
during activation.
The end-products do not
respond to orders from
the sun sensor.
The order has shifted
in relation to the
programmed time.
The end-product has encountered
an obstacle.
Remove the obstacle and try again.
Another control point is sending an
order to the motor or receiver.
Wait until activation of the end-product has
finished, then try again.
The
function has not been
programmed for the current day.
Add an
the day.
Switching to manual mode has
deactivated the sun function.
Wait for the next programmed
order or program
an
automatic order for the current day.
The "Simulated presence" function
is activated.
Deactivate the "Simulated presence" function.
automatic order to the program for
9. Technical data
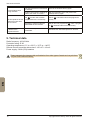
Radio frequency: 433.42 MHz
Protection rating: IP 30
Operating temperature: 0°C to + 60°C (+ 32°F to + 140°F)
Remote control transmitter dimensions: 145 x 47 x 18 mm
Power supply: 2 AAA (LR3) batteries
EN
Please separate the storage cells and batteries from other types of waste and recycle them
via your local collection facility.
12
Copyright © 2010 Somfy SAS. All rights reserved.
Somfy worldwide
Australia:
Somfy PTY LTD
Tel: +61 (2) 8845 7200
Austria:
Somfy GesmbH
Tel: +43 (0) 662 / 62 53 08 - 0
Belgium:
Somfy Belux
Tel: +32 (0) 2 712 07 70
Brasil:
Somfy Brasil Ltda
Tel: +55 11 3695 3585
Canada:
Somfy ULC
Tel: +1 (0) 905 564 6446
China:
Somfy China Co. Ltd
Tel: +8621 (0) 6280 9660
Croatia :
Somfy Predstavnitvo
Tel: +385 (0) 51 502 640
Cyprus :
Somfy Middle East
Tel: +357(0) 25 34 55 40
Czech Republic:
Somfy, spol. s.r.o.
Tel: (+420) 296 372 486-7
Denmark:
Somfy Nordic Danmark
Tel: +45 65 32 57 93
Export:
Somfy Export
Tel: + 33 (0)4 50 96 70 76
Tel: + 33 (0)4 50 96 75 53
Finland:
Somfy Nordic AB Finland
Tel: +358 (0)9 57 130 230
Fax: +358 (0)9 57 130 231
France :
Somfy France
Tel. : +33 (0) 820 376 639
(0,12 TTC/min)
Germany:
Somfy GmbH
Tel: +49 (0) 7472 930 0
Greece:
Somfy Hellas S.A.
Tel: +30 210 6146768
Hong Kong:
Somfy Co. Ltd
Tel: +852 (0) 2523 6339
Hungary :
Somfy Kft
Tel: +36 1814 5120
India:
Somfy India PVT Ltd
Tel : +(91) 11 4165 9176
Indonesia:
Somfy Jakarta
Tel: +(62) 21 719 3620
Iran:
Somfy Iran
Tel: +98-217-7951036
Israel:
Sisa Home Automation Ltd
Tel: +972 (0) 3 952 55 54
Italy:
Somfy Italia s.r.l
Tel: +39-024847181
Japan:
SOMFY KK
Tel: +81 (0)45 481 6800
Jordan:
Somfy Jordan
Tel: +962-6-5821615
Kingdom of Saudi Arabia:
Somfy Saoudi
Riyadh :
Tel: +966 1 47 23 020
Tel: +966 1 47 23 203
Jeddah :
Tel: +966 2 69 83 353
Kuwait:
Somfy Kuwait
Tel: +965 4348906
South Korea:
Somfy JOO
Tel: +82 (0) 2594 4331
Lebanon:
Somfy Lebanon
Tel: +961 (0) 1 391 224
Spain:
Somfy Espana SA
Tel: +34 (0) 934 800 900
Malaisia:
Somfy Malaisia
Tel:+60 (0) 3 228 74743
Sweden:
Somfy Nordic AB
Tel: +46 (0)40 16 59 00
Mexico:
Somfy Mexico SA de CV
Tel: 52 (55) 4777 7770
Switzerland: Somfy A.G. Tel: +41 (0) 44 838 40 30
Morocco:
Somfy Maroc
Tel: +212-22443500
Netherlands:
Somfy BV
Tel: +31 (0) 23 55 44 900
Norway:
Somfy Nordic Norge
Tel: +47 41 57 66 39
Poland:
Somfy SP Z.O.O.
Tel: +48 (22) 50 95 300
Portugal:
Somfy Portugal
Tel. +351 229 396 840
Romania:
Somfy SRL
Tel.: +40 - (0)368 - 444 081
Russia:
Somfy LLC.
Tel: +7 495 781 47 72
Serbia:
SOMFY Predstavnitvo
Tel: 00381 (0)25 841 510
Singapore:
Somfy PTE Ltd
Tel: +65 (0) 6383 3855
Slovak republic:
Somfy, spol. s r.o.
Tel: +421 337 718 638
Tel: +421 905 455 259
Syria: Somfy Syria
Tel: +963-9-55580700
Taïwan:
Somfy Development and
Taiwan Branch
Tel: +886 (0) 2 8509 8934
Thailand:
Bangkok Regional Office
Tel: +66 (0) 2714 3170
Tunisia:
Somfy Tunisia
Tel: +216-98303603
Turkey:
Somfy TurkeyMah.,
Tel: +90 (0) 216 651 30 15
United Arab Emirates:
Somfy Gulf Jebel Ali Free Zone
Tel: +971 (0) 4 88 32 808
United Kingdom:
Somfy Limited
Tel: +44 (0) 113 391 3030
United States:
Somfy Systems
Tel: +1 (0) 609 395 1300
Somfy SAS, capital 20.000.000 Euros, RCS Annecy 303.970.230 - 08/2010
Argentina:
Somfy Argentina
Tel: +55 11 (0) 4737-3700