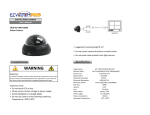
1
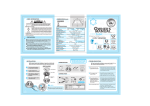
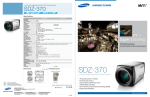
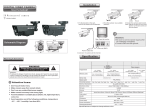
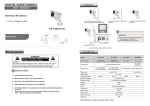
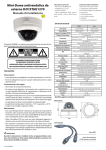
Connect lens and monitor
1.VIDEO OUTPUT CONNECTOR(BNC)
1.0Vp-p 75 composite video signal is provided
at this connector.
2.POWER INPUT CONNECTOR (SCREWTERMINAL)
AC 24V
6.AUTO GAIN CONTROL(AGC) ON/OFF SWITCH
7.EE/AI SWITCH
DC 12V
+
5.AUTO TRACKING WHITE BALANCE(ATW)
-
This switch is used to select EE(electronic exposure
or ELC electronic light control) mode or AI (automatic
AC power
User's manual
lens or ALCautomatic light control) mode.
DC power
This terminal accept DC 12V / AC 24V Power Supply
Recommended Power Supply For
Color Camera: 750~800mA DC
B/WCamera: 300~800mA DC
Regulated Power Supply is strongly recommended!
Box camera
3.Autoiris lens(LENS) DC/VIDEO Switch
4.AUTO IRIS LENS CONNECTOR (AUTO IRIS)
3
1
4
PIN
1
2
3
4
Warning & Attention
SIGNAL
+ 12(DAMP-)
NC(DAMP+)
VIDEO(DRIVE+)
GND (DRIVE-)
3
Autoiris lens cable
if the cable is thick
or the plug cover
does not fir properly
Cut this rib away
2
4
Attention:
To reduce the danger of electronic shock, please don't open the case (or back
cover) of camera; everything is on the surface of camera for user's operation,
please seek help from qualified profeesionals for repair.
autoiris lens. In the AI mode. The CCD shutterspeed
is controlled by the autoiris lens.
To use a video-drive type or the DC-drive type of
autoiris lens,set this switch to the AI position.
Lens plug(supplied)
E4-191 J-100
Back light compensation(BLC)ON/OFF switch if the
Please don't open camera,it's with
danger of electronic shock.
the incoming light level. With this mode selected. a
fixed or manual iris lens can be usedinstead of an
1
8.BACK LIGHT COMPENSATION(BLS)ON/OFF SWITCH
WARNING
shutter isemployed to automatically control the
exposure time of the CCD image sensor according to
is fixed to 1/60/(50) sec. and the incoming light level
Co ver
2
In the EE mode, a continuously variable electronic
9.Power Indicator LED
This LED turns on indicate the power is supplied
to the camera properly.
subjectyou wish to view is too dim because of a bright
background.set the BLC switch to ON to compensate
Monitor rear panel diagram
Video 1
IN OUT
for the brightbackground.
With BLC on the background brightness may saturate in
Video 2
IN OUT
Y/C IN
somecases. This function may not operate properly if
the object isto o s m a l l c o m p ared to the ar e a i f the
background. Thisfunction can be used with either the
Attention items:
Don't touch CCD or lens;
linear shutter (EE mode)or an autoiris lens( All lens
Power in(DC12V/AC24V)
mode).
Make camera away from violent attack;
Don't use any unidentified power supply;
Make camera lens away from strong light;
Avoid installation in unstable places (shake, wet, high temperature, cold, etc);
Avoid operation out of the following conditions, temperature: -10℃~+50℃,
humidity: less than 90%;
BACK LIGHT ON
BACK LIGHT OFF
Notes
1:Connect GND terminal to ground;
2:Make sure to switch on the power supply after all
installation completed.
3:Select the correct displaying channel of the monitor.
4:If you use an intermediate device, please select
75Ω/Hi-Z switch for connection.
FAQ
Specification
If you have problems when using the camera, please refer to the following form.
If it still can not solve your problem, please contact our authorized technicians.
Color super hi-resolution camera
Check if the video output (BNC) of the camera was connected to the?
video in? (BNC) of the Monitor properly.
Check if you selected the correct displaying channel of the monitor.
Check if the power input (DC jack) of the camera is disconnected
to the power source.
Check if the video output (BNC) of the camera is disconnected to
the video input of the monitor.
No Image Display on the Screen
Solutions
Problems
Blurry Screen Image
Lens has dirt? Please use a soft, clean cloth to clean the lens.
Please set the monitor in the correct state.
If the camera is in strong light, please change the position of
the camera.
Adjust focal length of the lens appropriately.
The camera is directly towards the sunshine or fluorescent light?
Please change the position of the camera.
Flashing Screen Image
Check whether the appropriate power supply is properly connected
to the camera or not.
Camera does not work properly
and the surface of the camera
overheats
Adjust contrast of the monitor.
If you use the intermediate device, please set up 75Ω/Hi-Z correctly.
Dark Screen Image
Image Sensor
Effective pixels
PAL:752(H)X582(V)
NTSC:768(H)X494(V)
PAL:1020(H)X596(V)
NTSC:1020(H)X508(V)
1/3″SONY
SUPER HAD Ⅱ CCD
1/3″SONY
EXVIEW CCD
Sensor area
4.9mmX3.7mm
Color camera
1/3″SONY
SUPER HADⅡ CCD
1/4″SONY
CCD
PAL:500(H)X582(V)
NTSC:510(H)X492(V)
3.6mmX2.7mm
PAL/NTSC
Signal system
Horizontal resolution
630TVL 600TVL 550TVL
700TVL
Minimum illumination
0.001Lux/F1.2
Electronic shutter
450TVL
0.1Lux/F1.2
Auto:1/50(1/60)-1/100,000Sec
C/CS
Lens
0.45
Gamma
>48dB
S/N ratio
less than 1.5W
Power consumption
DC 12V±10%
Power supply
1.0Vp-p,75Ω
Video output
Operating temperature
-10℃ ~ +50℃
Specifications are subject to change without notice