1
Copyrights
Text, illustrations and examples have been produced with great care.The editor is neither legally nor in any other
way liable for incorrect information given and its possible consequences.
This document is protected by copyright.All rights reserved.Without written approval no part of this document
may be reproduced through photocopying, microfilming or any other procedure, nor may it be translated into a language used by machines, especially data-processing plants.Rights are likewise reserved for quotation in lectures,
on radio and television.
Microsoft, Windows 2000, Windows XP, Windows Vista, Windows 7, Windows 2003, Windows 2008, and Windows
2008 R2 are registered trademarks of Microsoft Corporation, Redmond, WA, USA.O&O and the O&O-logo are registered trademarks of the O&O Software GmbH, Berlin.
Rev. 5/20/20104:00 PM
©1997 - 2010O&O Software GmbH • Am Borsigturm 48 • 13507 Berlin • Germany
http://www.oo-software.com
O&O Enterprise Management Console-I
Contents
About O&O Enterprise Management Console
1
Important features at a glance
1
Integratable O&O products
2
Design and functionality
Definition of terms
3
3
OOEMC
3
Module
3
Control service
4
Gateway agent
4
Product agent
4
General communication model
4
Functional principle
5
Design of OOEMC
6
System requirements
8
Installation
9
Starting installation
9
Customized installation
10
Complete installation
11
Notes on the application of one's own SQL Server
11
Enter license
11
Use the test version
12
Uninstall
12
Updates
12
Getting started
Step 1: Preparing the target computers
Allow exceptions
14
14
16
Step 2: First start after the installation
17
Step 3: Tutorial
18
O&O Enterprise Management Console-II
End tutorial
19
Step 4: Setting up computer permissions/remote installation
19
Step 5: Manage licenses
20
Enter license key for module
21
Step 6: Add new computer
23
Step 7: Create new Job
25
Create schedule for new job
27
Step 8: Assign Job to computer
28
Assign Job to computer site
Additional features of the computers
29
30
Find and add computer
30
Import/export site list
31
Remove computer or site
31
Update computer information
32
Remote installation check
32
Remote control
32
Display computer properties
33
Execute Job on a computer
34
Additional features of sites
36
Create site
36
Add computer to site
37
Remove computer from site
37
Find computers and administrative units
38
Import/export sites
38
Copy sites
38
Additional features of Jobs
39
Create new Job
39
Specific features for Jobs with O&O DiskImage
40
Map network drive
40
O&O Enterprise Management Console-III
Change Job settings
43
Assign Job to computer
44
Delete Job
44
Readout module overlapping information
View all Jobs (Job monitor)
Job calendar
45
45
45
Read transfer status (status monitor)
45
Reports
46
Search reports
Options
46
48
Login to the database
48
User management
49
Manage control service
49
Retry-connection interval
50
Synchronization interval
51
SSL encryption
52
Pause service activities
52
Computer access
52
E-mail notification of events
53
Log file
54
Report settings
54
Miscellaneous
55
Automatic update of views
56
Hide synchronization of computers
56
Load product start page from the Internet
56
Module options
Update the installation of the module
Tutorial options
Imaging the database
56
57
58
59
O&O Enterprise Management Console-IV
Maintenance and repair
60
Apply O&O EventViewer
61
Frequently asked questions
62
Support and Contact
63
Authorized resellers
63
End user license agreement 2.6 (EULA)
64
O&O Enterprise Management Console-V
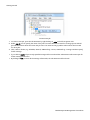
About O&O Enterprise Management Console
About O&O Enterprise Management Console
O&O Enterprise Management Console (OOEMC) will allow you to manage all your O&O products from a central
location across your network. From there you can allocate Jobs to single computers or sites, and schedule automatic remote installations of the product agents. All events and data will be saved in a database, which ensures that
you can always be supplied with detailed reports about the success of any jobs and about the status of the agents.
We hope that OOEMC will make your working in a network easier and that you’ll be able to save all the time you’d
otherwise need for managing every one of your company’s computers manually.
Yours O&O Software
http://www.oo-software.com
Note:Please bear in mind that the charts in the handbook or the Online Help might vary from you program interface, due to program updates.
More:
Important features at a glance
Installation and preliminary measures
Getting started
Important features at a glance
You can manage various O&O programs (Server or Workstation Editions)in the network with the OOEMC. The Console offers a fully automated remote installation and Job distribution on Clients. If, for example, a Client is not available when a Job is being allocated, the request will be repeated automatically at a specified interval. The user
interface does not need to be started for this. The background components of the OOEMC will automatically
execute the Jobs. You can thereby reach a significantly larger number of computers in much less time than you’d
need when using the manual request method.
A further advantage is that the components of OOEMC are always active, which means that Jobs and reports are
constantly in synch. The SQL Server serves as storage location. There is no longer any need to wait for reports
because these can be accessed from the database at any time and do not have to be accessed from the Client. The
database has now become the central storage location for jobs and reports.
Features at a glance:
l
l
l
l
l
l
l
l
l
l
l
l
Central management for controlling jobs across a network
Schedule the automatic running of jobs across a network
Automated remote installation of O&O Products in the network
Running of Windows commands (Batches) before and after the running of a job across a network
Detailed Job Assistant with product specific setting options
Constantly active Control Service for communicating between clients and SQL
Detailed reporting
Automated licensing on the target computers
NEW: O&O DriveLED as new module options
NEW: O&O EventViewer integrated as default module
NEW: Dynamical loading of modules, also from the Internet
NEW: Tutorials for easy entry
O&O Enterprise Management Console-1
About O&O Enterprise Management Console
l
l
l
NEW: Even faster execution of Jobs
NEW: Graphical interactive view of the Job status
NEW: Automated cyclical updates of the computer list.
Integratable O&O products
You can manage the following O&O Products in their current version with the O&O Enterprise Management Console in the network:
l
l
l
l
l
O&O Defrag
O&O DiskImage
O&O DiskStat
O&O DriveLED
O&O EventViewer
Please bear in mind that only the Workstation and Server Editions of the listed O&O programs include an interface
for the O&O Enterprise Management Console.
O&O Enterprise Management Console-2
Design and functionality
Design and functionality
The following chapters explain the structure and functions of the O&O Enterprise Management Console.
Definition of terms
A short explanation of the following terms will contribute to a better understanding of the documentation. Please
use the charts “General Communication Model“ and “Functional Principle of OOEMC” as an added help for understanding the text.
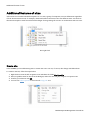
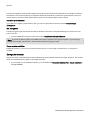
OOEMC
Abbreviation for O&O Enterprise Management Console, the graphical user interface. The term refers to a management program (“container“) in which computers, programs and reports are structurally integrated.
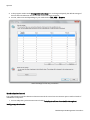
Start page of OOEMC
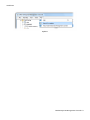
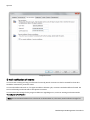
Module
A module is an O&O program integrated into OOEMC. This makes it possible to apply an O&O program across a
network. It is listed in the navigation tree of OOEMC as program folder, e.g., O&O DiskImage or O&O Defrag.
O&O Enterprise Management Console-3
Design and functionality
Module folder in the OOEMC
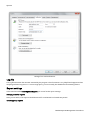
Control service
The OOEMC Control Service has the function of transferring or allocating jobs and installation instructions to the
desired computer, i.e., the gateway agents, across a network. It controls communication between the database
and the gateway agent of the network computer, allocates jobs and is responsible for remote installation. In doing
so, it synchronizes with the Gateway agent on the computers in the network in cyclical intervals, to retrieve the newest reports on all Jobs.
Gateway agent
The gateway agent is installed on the target computer during the remote installation of an O&O program. It communicates with the OOEMC Control Service and arranges for jobs to be run using the respective product agent
(e.g., from O&O DiskImage).It also collects reports, on request, from the product agents and passes them onto the
OOEMC Control Service.
Product agent
The product agent is a service of any O&O product, e.g., O&O DiskImage, which is responsible for running a job on
the respective client.
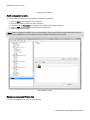
General communication model
Using O&O Enterprise Management Console (OOEMC), you’ll be able to allocate and manage jobs for O&O programs across a network from a central location. OOEMC itself doesn’t perform any managing functions but with it
you can integrate network capable O&O programs, e.g., DiskImage, which are able to assume this function. The
integrated O&O programs are called modules.
To put it simply, communication from your workstation computer to the network computer is carried out using your
SQL Server and the Control Service. The Control Service communicates with the respective network computers
(clients) on which jobs can be run (see the chart “General Communication Model”).
Note: the chart shows only one possible application of OOEMC. The Control Service (CCS) can also be installed
on a separate computer. Also, the graphical interface of the OOEMC can also be located on the Server, where
the control service is located.
O&O Enterprise Management Console-4
Design and functionality
General communication model
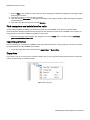
Functional principle
Communication from your workstation computer to the network computers is carried out over your SQL database
and the OOEMC Control Service. The Control Service communicates between the SQL Server and the gateway
agents of the respective network computer (clients). The gateway agent is automatically installed on the client during the remote installation of an O&O product and receives jobs from the Control Service. The gateway agent then
passes these jobs onto the product agent, e.g. O&O DiskImage, which is responsible for running a job, and in turn
collects reports about how the job was run (see chart “Functional principle of OOEMC”.
Note: the chart shows only one possible application of OOEMC. The Control Service can also be installed on a
separate computer. OOEMC can also be installed on the server in a similar way.
O&O Enterprise Management Console-5
Design and functionality
Functional principle of OOEMC across a network
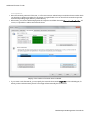
Design of OOEMC
The design of OOEMC is very clearly laid out and provides quick access to both the module and the program features.
Module directories and more sub directories are located in the left navigation zone of the O&O Enterprise Management Console:
l
l
l
l
l
l
l
l
l
l
l
l
Job monitor- displays all created Jobs.
Jobs calendar - displays all jobs in a calendar overview.
Status monitor- displays the Jobs processed by the control service and their status.
O&O module folder, e.g. O&O Defrag, O&O DiskImage or O&O DiskStat, include more sub folder
Jobs – includes a Job Assistant for planning the time-controlled running of a job on selected computers or
sites.
Reports – the folder contains all status reports about the jobs.
Computer – includes all the computers you’ve added to a network in order to install an O&O program like
O&O DiskImage.
Sites - includes all the sites you’ve added to a network in order to install a program like O&O DiskImage
onto all the site’s computers.
Menu bar- includes more menus like folder, view, Tools and Help.
File - Using the File menu, you can create new jobs and add a new computer or site.
Under View you can customize the program interface and run updates.
Under Tools you can choose further options and module options.In addition, you have access to maintenance and repair options and database imagings.
O&O Enterprise Management Console-6
Design and functionality
Overview of the program interface
1.
2.
3.
4.
5.
Navigation structure with module folder
Menu bar
Program window in the upper right side, here you can see created Jobs.
Status window, offers information on the Job processing.
Right lower program window, here displayed with the computer, where the Job is to be run.
O&O Enterprise Management Console-7
System requirements
System requirements
Note: Please pay attention as well to the system requirements of the Microsoft SQL Server 2005 Express (SQL
Server Express).
Note: The O&O Enterprise Management Console tested and developed with the most current and available
Microsoft operating system and each corresponding Service Pack (with reference to the publishing date of O&O
EMC).
l
l
l
The system requirement of each operating system have to be fulfilled
Ca. 1 GB free hard disk space for the whole package (SQL Server Express and OOEMC)
Windows® 7, Vista®, XP, Server 2003, Server 2008 and Server 2008 R2 (all Editions*, from Windows®
XP/Server 2003 respectively supports 32-Bit/64-Bit)
* Core installations are excluded
The O&O Enterprise Management Console requires the installation of the .Net Framework 3.5 on the computer,
and the .Net 2.0 Framework on the target computer. If the target computer do not have a connection to the Internet, you will need at least .Net 2.0 Framework with the Service Pack 1 installed.
The O&O Enterprise Management Console supports only SQL Server 2005 and SQL Server Express 2005 with the
installed Service Pack 2.
Note: For Windows 2008 R2 the Dot Net Framework needs to be enabled through a command in the command
line :servermanagercmd -i NET-Framework-Core
Permissions
To install and register OOEMC, you must be a member of a local administrator group or possess comparable permissions. Domain Administrators normally already possess these permissions. You do not need any administrator
permissions to start OOEMC.
O&O Enterprise Management Console-8
Installation
Installation
In order to work with O&O Enterprise Management Console (OOEMC) across a network, you’ll have to install all
the components included in delivery and possess the respective O&O product licenses. Otherwise, you will have
access to the test versions of the modules for up to 30 days.
You can either install the program by using the CD included in your package:
The installation contains the following components:
OOEMC - The graphical user interface can be installed on either your workstation computer or your server. Select
Control service in the selection dialogue and then follow the installation dialogues.
OOEMC control service - The OOEMC control service may only be installed once. It should be installed preferably
on a Server because it is designed to be continuously active.If installed on a workstation computer, jobs might not
be allocated or remote installations performed.
SQL Server Express - can be installed optionally when no Microsoft SQL Server is available. We recommend to
install the SQL Server Express on a server so that it can be contacted at any time by the Control Service and
OOEMC.
Note: If you are installing the Control Service on a computer without the graphical user interface, you will be
prompted to enter the connection to the database when the installation is completed. This step is absolutely necessary in order for the Control Service to function correctly.
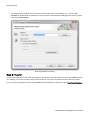
Starting installation
1. Start the computer on which you want to install the SQL Server Express.
2. Login as local administrator or as a user possessing comparable permissions.
3. Click the installation file containing O&O Enterprise Management Console and follow the steps in the installation dialogue. Depending on whether or not you already have the Microsoft SQL Server 2005 available,
you can choose between installing with or without the Microsoft SQL Server 2005 Express.
If you are choosing to install with the SQL Server Express, you will have to enter the name of the computer on which
it should be installed.
Once the installation of the SQL Server Express is completed, you can choose between Complete and Customized
installation.
O&O Enterprise Management Console-9
Installation
You can retrieve information over the installation components
Customized installation
The installation of individual components (Customized installation) is recommended when you wish to install the
SQL Server Express and OOEMC on separate systems. This might be, if you install OOEMC on your workstations
and the SQL Server Express on the Server.
Installing OOEMC
l
l
Select O&O Enterprise Management Console in the selection dialogue and then follow the installation dialogues. When prompted, enter the server name and the instance name of the SQL Server.
When prompted, restart your computer.
Note: O&O Enterprise Management Console can be installed on either your workstation computer or your
server. Multiple installation of the user interface is also possible, for example, on a number of workstations and
your server.
Installing the OOEMC Control Service
l
l
Select Control service in the selection dialogue and then follow the installation dialogues. When prompted,
enter the Server name and the instance name of the SQL Server.
When prompted, restart your computer.
Note: The OOEMC Control Service may only be installed once. It should be installed preferably on a Server
because it is designed to be continuously active. If installed on a workstation computer, jobs might not be allocated or remote installations performed.
O&O Enterprise Management Console-10
Installation
Complete installation
All the components (OOEMC and OOEMC Control Service) will now be installed consecutively. Follow the dialogues and when prompted, enter the server name and the instance name of the SQL Server.
When prompted, restart your computer.
Note: O&O Enterprise Management Console can be installed on either your workstation computer or your
server. Multiple installation of the user interface is also possible, for example, on a number of workstations and
your server.
Notes on the application of one's own SQL Server
If you do not use the included SQL Server, but use your own SQL Server, then you have to consider the following:
l
l
l
Only SQL Server 2005 may be used for the OOEMC.
The SQL Server has to run with mixed authentication modes (Mixed Mode). You can modify the settings
while installing the SQL Servers or in the SQL Management Studio.
If the SQL Server is running on another computer than where the OOEMC is installed, you will have to modify
the Firewall of the SQL computer so that a connection (e.g. network connection) can be established. You
could for instance activate TCP/IP as a means of communication. To do that you have to normally define the
TCP Port 1433 as an exception.
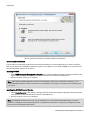
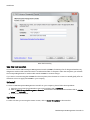
Enter license
Note: In order to activate the O&O Enterprise Management Console after installation or at a later time, you
must possess a valid license key. This license key is also called a registration code, serial number, or product ID.
The dialogue for registration always appears automatically at the start to guide you if you are using an unregistered
version or have entered the registration code incorrectly.
The registration wizard allows for a simple registration process.
When you select the option I want to enter my license, a dialog box will appear where you can enter the registration code you received when purchasing the software.
l
l
If you have purchased the software as download, please enter the license information ("Name", "Company"
and License key), just as they are written in the confirmation E-Mail you received.
If you have purchased the software as Box version, please enter the license key as it is written on the license
card included. In addition, please enter your name and if needed your company.
1. Please make sure that you do not confuse the digit “1” with “I” or enter any empty spaces where they don’t
belong.
2. Press Next to save the registration data or Cancel to leave the dialog window without saving the data.
3. When you have correctly entered the license code you will receive a confirmation in the dialog window.
Should you run into any problems when entering your registration code, please contact our Support Team.
O&O Enterprise Management Console-11
Installation
Enter the license key
Use the test version
You can now test the O&O Enterprise Management Console (OOEMC) for 30 days free of charge and without any
obligations. Each module can be allocated to an unlimited number of computers. After the test phase you will need
the corresponding licenses for each module and the OOEMC to continue using it.
If you want to continue using the OOEMC after the test phase, don't hesitate to contact us. We will gladly offer our
assistance on how to apply the OOEMC in your company.
Uninstall
To remove O&O Enterprise Management Console from your computer, please follow the steps below:
1. Open the Control Panel in the Windows start menu and then click on Software.
2. Click on O&O Enterprise Management Console from the list of installed software and then click on Add/Remove or on Uninstall.
3. Confirm the uninstallation.
Updates
To make sure that you are using the newest version, click on Search for updates in the menu bar.
O&O Enterprise Management Console-12
Installation
Updates
O&O Enterprise Management Console-13
Getting started
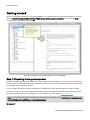
Getting started
After it’s successfully installed, you can open OOEMC on your workstation from either the desktop icon or using
the path Start/All Programs/O&O Software/O&O Enterprise Management Console .You can access Help by
using either the Help button or pushing F1.
Start page of O&O Enterprise Management Console (OOEMC)
Step 1: Preparing the target computers
Before you begin assigning jobs in the network or performing remote installations, you have to open certain ports
or port ranges of the firewall on the target computers (clients). Otherwise the computers will not be contacted and
you will receive error notices in reports.
If you’re using a firewall from another manufacturer than Microsoft, check with the respective program’s Help.
You have to open (or allow these exceptions) the following ports through the Windows Firewall settings to allow
the remote installation and for assigning jobs. For more information read chapter Allow exceptions.
Hint: you can find the settings for the Windows Firewall on your computer under: Start/Control Panel/Security
Center/Windows Firewall/Change settings/Exceptions.
Windows XP
O&O Enterprise Management Console-14
Getting started
For Remote Installation
Port/Port
Range
(Exceptions)
For Connection/Allocating Jobs/
Reports
File and Printer Sharing (TCP 139, TCP 445,
UDP 137, UDP 138)
50400
Remote Management*
50401 (Optional, only necessary when using
SSL Encryption)
Windows Management Instrumentation - WMI
(TCP/135)
50300 (Optional for O&O Defrag)
* Note: If you are using Windows XP Service Pack 2, you have to enter the following command in the command
line to enable the Remote Installation, since there are some security restrictions imposed by the operating system:
netsh firewall set service type = remoteadmin mode = enable
More information can be retrieved from the Internet under Microsoft TechNet. Specifically, if you look for the
article „Enable or Disable the Remote Administration Exception“.
Windows Vista und Windows 7
For Remote Installation
Port/Port
Range
(Exceptions)
For Connection/Allocating Jobs/
Reports
File and Printer Sharing (TCP 139, TCP 445,
UDP 137, UDP 138)
50400
Remote Management
50401 (Optional, only necessary when using
SSL Encryption)
Windows Management Instrumentation - WMI
(TCP/135)
50300 (Optional for O&O Defrag)
O&O Enterprise Management Console-15
Getting started
Firewall settings
Allow exceptions
Before being able to run activities in the network with the OOEMC, you need to specify certain settings on the Firewall on the target computer. If you haven't made any changes to the firewall settings, please bear the following
steps in mind while defining exceptions and opening ports. Here are the examples for Windows 7 as well as Windows Server 2008:
1. Open the Windows Firewall in the Control Panel.
2. On the left, click on Allow a program or feature through Windows Firewall.
3. Place the following control checks in the column Domain. The computer needs to be in a domain for it to display the column: File and printer sharing, Remote Service Management and Windows Management
Instrumentation (WMI).
In addition, you need to create and share further ports.
O&O Enterprise Management Console-16
Getting started
1.
2.
3.
4.
5.
6.
7.
8.
9.
Open the Windows Firewall in the Control Panel and click on Advanced settings.
To create the needed ports for the OOEMC, click on Inbound rules on the left of the dialogue.
Afterwards, click on Activities on the left and then on New Rule.
Then select Port and follow the dialogue with Continue.
In the text field Specific local ports enter <50400, 50401>, and confirm with Continue. If you will use
O&O Defrag, create the additional port <50300>.
Please leave the default setting Allow the connection in the next dialogue enabled and click on Continue.
Enable all three checks in the next dialogues (Domain, Private, Public), if these are not checked by default
and click on Continue.
Now enter a fitting name, e.g. OOEMC, and optionally a description.
Save the settings with Finish.
Windows Firewall: Define exceptions
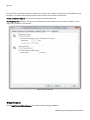
Step 2: First start after the installation
The Database Wizard will appear at the initial start of O&O Enterprise Management Console or following deletion
of the database from the user interface. Here you’ll be able to construct a new database or select one that is
already available. If you’re using an older version of OOEMC, it will be automatically updated to the latest version
without any loss of data.
O&O Enterprise Management Console-17
Getting started
l
For designing the database, enter the server name and the name of the database, e.g., Server1\SQLEXPRESS. If the database is located on the same computer as the Enterprise Management Console, please
enter (local)\SQLEXPRESS.
Entering database connection
Step 3: Tutorial
You can now follow the tutorial, which will guide you through the most important functions of the OOEMC.As soon
as it finishes, you can start another tutorial on the module of your choice to facilitate the work with this module.
You can also go through the tutorials of the OOEMC and the modules at a later time under Tools/Tutorial options.
O&O Enterprise Management Console-18
Getting started
Tutorial options menu
End tutorial
Under Tools/Tutorial options you can end the currently running tutorial with Stop tutorial.
Step 4: Setting up computer permissions/remote installation
From your own workstation, you can conveniently install O&O programs remotely on any number of computers
across a network.
To execute a remote installation on the Clients, you must still enter the name of the user whose account is being
used for remote installation.
If you have your own solution to distribute the software package or want to continue with the installation manually,
please disable the function Remote installation/run remote installation.
In this case, the OOEMC will not allow changes in the software of the Clients.
Note: Make sure you have the required administrator permissions on the target computer! Otherwise the
remote installation will fail.
l
To do this, under Tools/Options click Computer permissions and enter the user account for the computer
permissions in the format Domain\User name.
O&O Enterprise Management Console-19
Getting started
Entering the user account
Note: If the target computer has an active Windows Firewall, you have to open the Port ranges “File and Printer
Sharing” (TCP 139, TCP 445, UDP 137, UDP 138) and „WMI“ (TCP/135) for remote installation. You can read
more about this in the chapter “Preparing the target computer.”If you’re using a firewall from another manufacturer, consult the program’s own Help site.
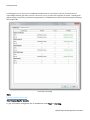
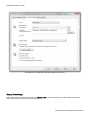
Step 5: Manage licenses
If you want to install an O&O program in the network you must have access to the corresponding license key or possess a valid test version. You received the license key upon purchase of the OOEMC. If all licenses are used up, you
can buy more from us or our partners. Special license agreements allow for the unlimited use on any computer
within the company. If you need additional licenses, or have questions concerning our license program do not hesitate to contact us: [email protected]
O&O Enterprise Management Console-20
Getting started
Licensing gives you an overview of available and used licenses. For Pro Client or Server you will need a corresponding license key per client or Server. As soon as you try to add a new computer to the list, a message will
appear letting you know if you still have enough licenses. It would be best to enter the license key before creating
the computer list.
Overview of licensing
More:
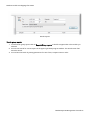
Entering license key for module
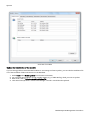
Enter license key for module
To get to the license management click on the Menu Bar under Tools on Licensing.
O&O Enterprise Management Console-21
Getting started
1. Click on New, to enter a new license.
2. The OOEMC recognizes the module automatically based on the license information.
3. You can now enter the license information in the license dialogue. Make sure to not mix up the number “1”
with the letter “I” and to not enter any empty spaces.
4. If you select the option Apply to computer the licensing will automatically be transferred to the target computer and you do not have to enter it manually on each computer.
5. If you have purchased an Enterprise License with a limited amount of licenses the number will be noted automatically below.
6. After entering your license data successfully you can add new computers to your list. The remote installation
and the licensing (if specified) will be executes automatically on the target computer.
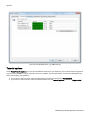
Alternatively, you can request a license file (*.xml) with all your acquired licenses and enter them comfortably
through the OOEMC. Please follow the steps below:
1. Store the license file (*.xml) on your computer, e.g. on your Desktop.
2. In the licensing dialogue click on license file and open the XML file. Afterwards, all available licenses will be
displayed (Workstation and Server Editions).
3. Select the license from the list by enabling the control check and confirming with OK.
4. If you have purchased an Enterprise License with a limited amount of licenses, please enter the number of
licenses in the form. Confirm your selection with OK.
5. If you select the option Apply to computer the licensing will automatically be transferred to the target computer and you do not have to enter it manually on each computer.
6. After entering your license data successfully you can add new computers to your list. The remote installation
and the licensing (if specified) will be executes automatically on the target computer.
O&O Enterprise Management Console-22
Getting started
Entering license key for module
Step 6: Add new computer
If the data for accessing the computer are entered, the computers should be added to the OOEMC. You can add an
unlimited amount of computers to the OOEMC in the network, if your network includes an Active Directory
(AD).You will find the appropriate functions by right-clicking. When doing so, please observe the terms of your
license. In the menu list under Tools/Licensing you’ll be able to enter your license key. You could, for example, add
up to 25 computers to the computer list if you have a 25-seat license.
O&O Enterprise Management Console-23
Getting started
Right-click: computer
1. To integrate a new computer into OOEMC, right-click in each module folder on computer then on New computer.
2. Enter either the computer name and the DNS name, or just the computer name, if the computer name is
clear, and click readout computer information. At that point, the DNS name will be automatically entered.
3. Confirm your entries with OK.After that the computer will be added to the computer list.
4. The OOEMC will now try to run an installation of the computers. You recognize this in the lower section of
the OOEMC (transmission window).If you want, you can also click on the status monitor in the navigation
tree.
5. You will be informed on the success of your Job under Reports and in the computer view. For this select the
desired computer and click on Reports. In addition, you can inform yourself on the current state of the Job
execution through the status monitor.
Note: when you click Readout computer information OOEMC attempts to contact your domain controller and
to map the computer along with its organizational unit structure. While doing so, a connection will be made to
the domain controller, and the DNS and full computer name will be read out.
O&O Enterprise Management Console-24
Getting started
Enter computer information
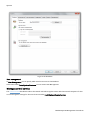
Step 7: Create new Job
A job specifies various parameters for using an O&O product across a network. Jobs can be allocated to particular
computers or sites.
The Job Assistant is responsible for running time-controlled functions of selected O&O programs.
You can use the various settings in the Job Assistant to specify the frequency of a job or program specific methods.
These settings are designed identically for every O&O program. The differences can be seen in the individual settings, which you will find in the Job Assistant for each particular program (e.g., in O&O Defrag).
O&O Enterprise Management Console-25
Getting started
Create a new job
1. To create a new job, open the Job Assistant by right-clicking on Jobs in the left navigation tree.
2. Under Job-ID you can specify the name of the job. This name will later be used for creating reports and will
provide information about the action the job runs. The name has only symbolic value and can also be used
for other jobs.
3. Then, click on all tabs (e.g. Schedule, General, O&O Defrag - Drives, O&O Defrag - Tuning) and there specify
further settings.
l
l
If you click on Apply, all previously specified settings will be saved and the Job Assistant will remain open for
further setting specification.
By clicking on OK you store all the settings. Afterwards, the Job Assistant will be closed.
O&O Enterprise Management Console-26
Getting started
Create new job
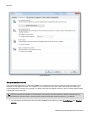
Create schedule for new job
Under Schedule in the Job Assistant, you can specify if the job should be run only once or repeatedly (e.g., once a
week).
O&O Enterprise Management Console-27
Getting started
Create schedule for job
Step 8: Assign Job to computer
Note: before you assign a job to a computer, you can perform a remote installation check. The check provides
information about whether the remote installation needed for running a job is possible, or what can be preventing it. This function can be found by right-clicking the relevant computer.
Once you’ve created a job, you can select the computer on which the job should be run.
1. In the navigation tree on the left, click on the corresponding module folder on Job.
2. Select the Job in the upper right program window, which you want to assign to a computer.
3. In the tab Computer, you can assign the selected Job to one or more computers by clicking on Add. Multiple
selection is possible with the help of the Ctrl key. Make sure that the activation check is placed behind the corresponding computers.
4. The Job will now be transferred over to the selected computer and run at the specified time.
O&O Enterprise Management Console-28
Getting started
Assign job to computer
Assign Job to computer site
Once you’ve created a job, you can select the site on which the job should be run. You will not have to select every
individual computer in the site.
1. Click on Site in the navigation structure on the left.
2. In the list of sites you can click the site for which you want to assign a job.
3. In the Jobs field below, you can assign a job to the selected site by clicking Add. Make sure that the activation check is placed behind the corresponding job.
4. Select the job you want to assign and click OK. The job will now be run on the selected site.
O&O Enterprise Management Console-29
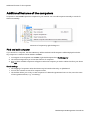
Additional features of the computers
Additional features of the computers
Computers in the OOEMC represent computers in your network. You can add computers manually or search for
them automatically.
Functions of computer by right-clicking on it.
Find and add computer
If you search for a computer, the Active Directory will be searched and all computers will be displayed in the list.
Any computer in a network can be added to OOEMC.
1. To integrate a new computer into OOEMC, right-click Computer then Find Computer.
2. The search settings allow you to limit the selection of computers.
3. A list of all the available computers will appear. Select the computer you wish to add and confirm your choice
with OK.
Search settings
l
l
l
The mapping of computers within the domain may be based on hierarchy or alphabetical.
You can also continue to search for computer names.
The OU filter allows you to only to view computers of a desired organizational unit. For this, enter the name
of the organizational unit, e.g. "accounting".
O&O Enterprise Management Console-30
Additional features of the computers
Settings for searching for new computers
Import/export site list
The lists of new computers you’ve created in OOEMC can be exported and saved for security purposes. The lists
can always be imported back into the OOEMC when needed.
l
Right-click Computer, then click Import or Export Computer List in the navigation overview.
Remove computer or site
If you don't need a computer anymore, you can remove it from the OOEMC. Removing a computer needs to be
done in each module individually. If you delete a computer in the module folder O&O Defrag, then O&O Defrag will
be uninstalled on the target computer, and all O&O-Defrag Jobs will also be deleted, whether they were added
locally on the target computer or via the OOEMC.
l
For this right-click on the computer or the site on Remove.
Remove computer
O&O Enterprise Management Console-31
Additional features of the computers
Update computer information
If you have changed the computer structure in the Active Directory you can command a synchronization with the
domain controller. The computer arrangement within the OOEMC is adapted to the computer structure in the
Active Directory, and if necessary will be newly organized.
1. To update the computer information, click on Computer in the selected module directory.
2. Select Update Active Directory either by right-clicking or under Activities/Computer information.
Remote installation check
Before assigning a job to a computer, you can check if all the communication settings with the OOEMC are correct.
l
For doing this, right-click a computer in the computer list, and click Remote installation check in the list of
actions.
Remote installation check
Remote control
Note: This function is only available in O&O Defrag!
Note: Please bear in mind that for this function Port 50300 is open in the Windows-Firewall of the target computer. Otherwise it is not possible to exchange O&O Defrag relevant data between computers. If you’re using a
firewall from another manufacturer, check with the respective program’s Help.
You can control O&O Defrag on a network server using the user interface over a remote control connection.
To do this, O&O Defrag must already be installed on the target computer. The installation can be performed manually or occurs automatically, when you add the computer to the O&O-Defrag computer list. The message on the
success of the remote installation can be read in the corresponding report.
O&O Enterprise Management Console-32
Additional features of the computers
l
l
To activate the remote operation, you have to select the computer that you want to connect to from the list.
Please click on the taskbar or right-click on the corresponding computer in the list on Computer Control.
Afterwards, you can execute jobs or modify settings from the interface of O&O Defrag.
Remote control
Display computer properties
Double clicking on a computer in the computer list opens the Properties dialogue. There you can:
General
Under general you can see the DNS name of the computer. In addition, you can specify, if the Agent or also the user
interface should be installed on the computer.
You will also see the information (Version and computer type - Client or Server) of each corresponding operating
system.
Computer status
Access the computer status to restart the computer, to continue with the installation, or finish it.
If a computer is not available whenever the jobs are distributed, e.g. because it is turned off, the control service of
the OOEMC will try to contact it again and again after certain time intervals. The interval will become less frequent,
the longer the computer cannot be reached. The function Reset status you can order the control service, to reach
the computer whenever it is turned on again - and to wait for the next interval.
Agents
Shows the status of the installation of the Agents on the computer. Agents can be started or stopped individually.
O&O Enterprise Management Console-33
Additional features of the computers
Computer properties
Execute Job on a computer
After assigning a Job to a computer, it will be run automatically on the computer.
To assign a Job to a computer, you need to have created the Job before. If you haven't created a Job yet, proceed
as described in chapter Create new Job.
1. In the navigation tree, click on the corresponding module folder on Computer.
2. Only the available computers, which have the Agent of the module installed are listed in the upper right program window.
3. Select the computer you want and click on Add under Job in the lower right window.
4. Select the Job from the list by enabling the control check and confirming with OK.
5. The job will now be run on the scheduled time.
Tip: To stop the execution of the Job, you can delete the connection with the computer by clicking on Remove.
O&O Enterprise Management Console-34
Additional features of the computers
Execute job on a computer
O&O Enterprise Management Console-35
Additional features of sites
Additional features of sites
Jobs can be run on either individual computers or on a site (a group of computers).You can define sites regardless
of their domain structure and, for example, divide workstations and servers into two different sites. You can then
allocate certain jobs to each site and avoid the danger of using settings for servers on workstations and vice versa.
Site: right-click
Create site
In the OOEMC you can add existing sites or create new ones. You can, of course, also change and delete them.
To create a new site, follow the steps below:
1.
2.
3.
4.
Right-click on site in the left navigation zone and select the folder Site/New Site.
Enter a symbolic name for the site in the dialogue, and as the case may be, assign it to a superior site.
Confirm your selection with OK.
You can now add computers to the site and assign jobs to it.
O&O Enterprise Management Console-36
Additional features of sites
Settings for the new site
Add computer to site
In order to add a computer to an existing site, please do the following:
1.
2.
3.
4.
5.
Click on Sites in the navigation view to the left.
Click the site where you want to add a computer.
Then click the tab Computer to the right in the middle of the program window.
Click on Add. All the available computers will now be listed.
Select the desired computer.
Note: When a computer is added to a site, it automatically receives all jobs that have been allocated to this site.
When a job is added to a site, all computers of this site will automatically receive this job.
Add computer to site
Remove computer from site
To remove a computer from a site, do the following:
O&O Enterprise Management Console-37
Additional features of sites
1. Click on Sites in the navigation view to the left. All the existing sites will then be displayed in the upper righthand program window.
2. Click the site where you want to add a computer.
3. Then click the tab Computer to the right in the middle of the program window. Select the desired computer
and click Remove.
4. Then select the desired computer and click Remove.
Find computers and administrative units
You have the possibility to display your domain structure over the OOEMC. Your domain controller will be
accessed and the complete organizational unit structure is transferred as sites into the OOEMC. The computer of
the organization units will be added as computer to these sites.
l
This can be done by right-clicking in the navigation tree on the Sites folder, and then selecting Find computers and administration units.
Import/export sites
Lists of sites that you’ve created in OOEMC can be exported and saved for security purposes. The lists can always
be imported back into the OOEMC when needed.
l
To do this, right-click on Sites and then click Import sites or Export Sites.
Copy sites
If you want to use on or more sites for another module, then you can copy the existing sites with all the computers
in them and paste then in a different folder.
Right-click: copy site
O&O Enterprise Management Console-38
Additional features of Jobs
Additional features of Jobs
You can change already existing jobs at any time. The changes will then be automatically applied to any computer
that was assigned that particular job.
Note: If the target computer is turned off when the change is made, the running of the changed job can be
delayed. A longer interval setting can also result in delays.
Create new Job
1.
2.
3.
4.
To create a Job, click on the desired module folder on Jobs in the navigation tree.
Now, click on Add in the upper right program window, to start the Job Assistant.
Optionally, you can also enter a name and some notes for the Job under General.
Under Schedule you can specify the time of execution and the interval, if the Job is supposed to be executed
regularly.
5. Now, make more specific entries in the Job Assistant of each corresponding tab of a module (e.g. O&O
Defrag), such as the drive or the storage path needed for the its execution.
6. Optionally, you can make further specifications under General/Pre Job/Post Job.
7. Confirm your entries with OK, to save the Job.
O&O Enterprise Management Console-39
Additional features of Jobs
New Job - example taken from O&O Defrag
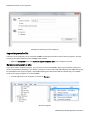
Specific features for Jobs with O&O DiskImage
When creating jobs across a network using O&O DiskImage, you’ll have to manually enter the storage path (target
file the for the image file in the Job Assistant under Image. f you don’t enter any information, the image file will be
stored locally on the system partition, usually under C:\Windows\System32.
If you want to store you images on network drives, please continue reading in chapter Connect network drives.
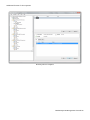
Map network drive
Note: this chapter is only relevant when planning Jobs with O&O DiskImage.
O&O Enterprise Management Console-40
Additional features of Jobs
To run O&O DiskImage Jobs successfully in the network, you must make sure to hold sufficient permissions to
access network drives. You need the permissions to authorize storing images on network drives. You only have to
authenticate yourself within the network. Enter the following settings under Tools/Module options/O&O DiskImage:
l
l
Click on Add authentication data.
Enter a password of your choice and confirm your entry. The entered number combination encrypts the network drive sharing. The entry as such will also be encrypted. The key for this password is composed of a public key and a private key, so that the password file will only be opened and read by you or O&O DiskImage.
l
Under Computer/Folder enter the path under which the image is to be saved, or from where it is supposed
to be loaded from: \\Computer name\Folder name or Domain name\Folder name\User name.
Alternatively, you can also enter the computer name only, if all the sharing options can be opened by the
selected user.
l
You have to enter a qualified name of a user account while entering the user name. For example, the corresponding domain for the specific domain account has to be entered and covered, e.g. domain\user1 or
O&O Enterprise Management Console-41
Additional features of Jobs
l
l
User1@domain.
Enter the network password of the user, or of his user account. Please keep in mind that the user under which
you login has to hold access rights for the target or original folder. You can check for them under Properties
in the corresponding target directory under Security.
Afterwards, your entries will be displayed in the computer and folder list under Network authentication. Of
course, it is possible to add several network drives.
Display of the number of network drives available.
l
If you create a Job afterwards, you can specify the network drives under target file in the Job dialogue, for
which you have authenticated yourself. The image will automatically be stored there.
O&O Enterprise Management Console-42
Additional features of Jobs
Job Assistant for O&O DiskImage with target folder entries.
Change Job settings
Right-clicking the job in the job list will let you change a job. Enter the changes in the Job Assistant and confirm
your entries. After that the Job will be transferred.
O&O Enterprise Management Console-43
Additional features of Jobs
Assign Job to computer
Note: before you assign a job to a computer, you can perform a remote installation check. The check provides
information about whether the remote installation needed for running a job is possible, or what can be preventing it. This function can be found by right-clicking the relevant computer.
Once you’ve created a job, you can select the computer on which the job should be run. After assigning a Job to a
computer, it will be run automatically on the computer.
1. In the navigation tree on the left, click on the corresponding module folder on Job.
2. Select the Job in the upper right program window, which you want to assign to a computer.
3. In the tab Computer, you can assign the selected Job to one or more computers by clicking on Add. Multiple
selection is possible with the help of the Ctrl key. Make sure that the activation check is placed behind the corresponding computers.
4. The Job will now be transferred over to the selected computer and run at the specified time.
Delete Job
Right-clicking a job in the job list will allow you to remove it. If the job is running, it will be automatically aborted.
O&O Enterprise Management Console-44
Readout module overlapping information
Readout module overlapping information
The navigation tree allows you to view the sub-folders of the O&O Enterprise Management Console and thus
retrieve a general overview of all Jobs and processes.
View all Jobs (Job monitor)
The job monitor shows all created Jobs, independently from the modules.
Job calendar
The Job calendar of the OOEMC offers you an overview on the moment of time of the execution of all created Jobs.
The Job calendars in the module folders only show the selected Job of the module.
Calendar view of all created Job
Read transfer status (status monitor)
The status monitor displays information on current processes, so that you can read the Jobs run by the control service and their status.
In the Tab Current waiting list you can read, when which process will start.
Under Completed jobs you will find all successfully completed processes displayed in list form.
O&O Enterprise Management Console-45
Readout module overlapping information
Reports
A report will be created for every action performed by OOEMC and the clients. This will be filed in the SQL database and can be accessed as an HTML document.
You can find all the created reports in their respective module directory in OOEMC, filed according to date. In the
report, you’ll find all the information about the running of an installation or job, for example, status, computer
name, action, and date.
l
To view the report, click in the corresponding module folder (e.g. O&O Defrag) on reports and select the
one you want to see from the list.
Status report
Search reports
1. To find certain reports click on Reports in the left navigation bar in the module you selected.
2. You can now search for certain reports in the upper right-hand program window. The search screen facilitates the search.
3. You can limit the search by setting parameters for time frame, computer name or Jobs. In addition, you can
also filter reports for successful or unsuccessful notifications.
O&O Enterprise Management Console-46
Readout module overlapping information
Search reports
Search group reports
1. To find certain group reports click on Reports/Group reports in the left navigation bar in the module you
selected.
2. You can now search for certain reports in the upper right-hand program window. The search screen facilitates the search.
3. You can limit the search by setting parameters for time frame, computer name or Jobs.
O&O Enterprise Management Console-47
Options
Options
Under Tools/Options in the menu bar, you can change your settings for working across a network with OOEMC.
Login to the database
In order to work with OOEMC across a network, you’ll have to login to the database.
To do so, in the menu under Tools/Options click Database.
Server Name:
Name of the Server on which the SQL database is installed.
Login to Server
Windows Authentication: user and password of the Windows user will be needed.
SQL Server Authentication:
User data and password that you supplied will be used.
O&O Enterprise Management Console-48
Options
Login to the database
User management
In User Management you can specify which users have access to the database.
In the menu under Tools/Options/Database you can access User Management.
Manage control service
The Control service distributes Jobs in the network and makes regular contact with the network computers for this.
You can change the settings for the control service under Tools/Options/Control service.
O&O Enterprise Management Console-49
Options
Control service
Retry-connection interval
The interval controller sees to it that the OOEMC Control Service tries to pass on jobs to target computers automatically and at regular intervals. If a computer is not in operation at the time a job needs to be run or during a
remote installation, because, for example, it’s simply turned off, this will be noted in a report and the request will be
repeated at certain intervals.
Tip: The lines stand for the number of transmission tries, also the first line stands for the first transmissions try,
the second line for the second etc. the time window will increase after each transmission try as default.
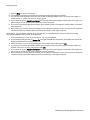
1. To customize the performance interval of the OOEMC Control Service, under Tools/Options click Control
service.
O&O Enterprise Management Console-50
Options
2. In the program window under Change interval settings you can change and specify the default settings of
the time intervals whenever the service shall contact the target computer.
3. For this, select a line and depending on your needs click on Edit, Add or Remove
Interval settings for the retry-connection
Synchronization interval
The synchronization interval indicates in what time interval the control service retrieves reports and local tasks of
individual the computers.
l
You can adapt the synchronization interval under Tools/Options/Control service/Service options.
Intelligent synchronization
O&O Enterprise Management Console-51
Options
The option intelligent synchronization adapts the synchronization interval automatically to the number of clients in
the network. The contact frequency of computers influences the number of automatic synchronization. The more
contact there is, the less it will be synchronized. This occurs to minimize data transfer volume.
Constant synchronization
If you wish for a regular synchronization, then you can set a permanent time interval under Constant synchronization.
SSL encryption
The SSL encryption guarantees that data will not be able to be read or manipulated during its transfer from computer to service.
l
You can enable SSL encryption in the menu under Tools/Options/Control Service.
Note: If you use an SSL encryption, Port 50401 must also be opened on the target computer. If you’re using a
firewall from another manufacturer, check with the respective program’s Help.
Pause service activities
Enable this function, if you want to pause the control service, so that no job is transferred or no computer is
installed.
Computer access
Please enter here, under which user name and password contact shall be made to the target computer. The account
needs to hold administrator rights on the target computer.
l
If you already own an installation solution, you can disable the Remote installation/Run remote installation
through OOEMC.
O&O Enterprise Management Console-52
Options
Computer access
E-mail notification of events
You can create a setting to keep you informed of events by E-mail. Contacts can also be created for those who
should be contacted for particular events.
You can also define rules such as, if an agent is unable to allocate a job, contacts A and B should be informed. The
service will thereby send an E-mail to the respective contacts.
You can access the settings for the program’s behavior regarding errors, events or warnings in the menu under
Tools/Options/Notification.
Note: the entered Email address has to be known to the Email Server, otherwise, Email notifications might fail.
O&O Enterprise Management Console-53
Options
Settings for E-mail notifications
Log file
The log file documents the activities executed by the program. This information is very helpful and supportive when
analyzing and removing errors. To save storage space, you can normally also disable the documenting feature.
Report settings
In the menu bar under Tools/Options/Reports you can set further report settings.
Storage period for reports
Here you can select, if the reports should be stored for an unlimited or a limited time period.
Creating group reports
O&O Enterprise Management Console-54
Options
Group reports are summarized reports. Reports on all actions are created, e.g. installation, de-installation or job
execution. You will thus always be informed on what activities are executed on which client.
Do not summarize reports: You will receive a report per Client and activity.
Summary interval: By default, old reports are updated every 60 seconds (time frame can be modified), or new
reports are created for new activities.
Options report settings
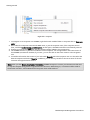
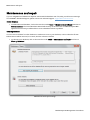
Miscellaneous
Under Tools/Options/Miscellaneous you will find further settings possibilities.
O&O Enterprise Management Console-55
Options
Automatic update of views
Here you can specify the settings for the user interface. Please specify here, in what time intervals the views such as
the computer view or the Job view should be updated automatically. Higher time intervals lead to a performance
increase of the graphical surface. The views are updated every 30 seconds by default.
Hide synchronization of computers
If you want to hide the synchronization of computers in the transmissions overview, enable this function.
Load product start page from the Internet
Here you can enter, if you want to load the product start page from the Internet at all times. By loading the start
page from the Internet, you will be up to date on the latest news and notes for the day to day work with the product.
Module options
The OOEMC informs you as soon as a new module or update is available. The overview lists all integrated modules
as well as non integrated modules and updates of modules, which are available for download. If you download a
new module, it will be automatically installed after you the restart the OOEMC. Because of this dynamic loading of
modules the OOEMC does not have to be installed anew when module updates become available.
O&O Enterprise Management Console-56
Options
Overview of modules
Update the installation of the module
If you’re having problems with individual modules or are running a software update, you can take the installation file
out of the installation folder and restore it to the database.
1.
2.
3.
4.
Under Tools select Modul options from the items in the menu.
You can select the installation of each module register, e.g. of O&O Defrag, which you want to update.
Afterwards, click on Select and add installation file.
Then select the equivalent *.msi file in the dialogue. The old *.msi will then be replaced.
O&O Enterprise Management Console-57
Options
Overview of installation files, e.g. O&O Defrag
Tutorial options
Under Tools/Tutorial options you have several different tutorials at your disposal. You can either select the general
tutorial on the OOEMC or select a specific tutorial of a module. The tutorials consist of continuous dialogue boxes,
which offer step-by-step guidance.
1. If you want to start a tutorial, select the desired topic from the list and click on Start tutorial.
2. If you want to end a tutorial, retrieve the desired topic from the tutorial options and click on Stop tutorial.
O&O Enterprise Management Console-58
Imaging the database
Imaging the database
The OOEMC offers you the possibility to image your database, and if needed, to restore it once again. An image
lets you create a copy of your database and is then stored at a location of your choice.
1. If you want to create an image of your database, click under Tools on Database imaging.
2. First, enter the storage location for the image, then click on Create database image.
If you want to restore an image, select Import database image and confirm with OK.
Run database imaging
O&O Enterprise Management Console-59
Maintenance and repair
Maintenance and repair
If you’re using Microsoft SQL Server Express and exceed the database size of 3,5 GB, you will receive warnings
from OOEMC. Should this happen, please contact our technical support: [email protected].
Delete database
l
To delete the used database, click on the menu bar under Tools on Maintenance and Repair and then on
Delete database. The Create Database Wizard will show up on the next start of O&O Enterprise Management Console and you will be able to create a database without a problem.
Clean up database
You can remove old data from the database to make more room in your database, and to reduce the file size.
Deletes entries will be removed, as a result, the data volume is reduced.
l
To clean up your database, click on the menu bar under Tools on Maintenance and repair and then on
Clean up database.
Maintenance and repair settings
O&O Enterprise Management Console-60
Apply O&O EventViewer
Apply O&O EventViewer
As a rule, the module "O&O EventViewer" is included in the OOEMC. You can use this module unlimited times and
assign it to unlimited computers. The O&O Event Viewer retrieves events from the Windows Event Viewer and logs
hardware and software errors in a report. In the Job Assistant, you can define search criteria so that the collection
of Windows events from the target computer occurs in accordance with established rules.
Events that were recorded by applications or programs may, for example, be file errors, valid and invalid logon
attempts and events for use of resources such as creating, opening, or deleting files.At system startup, the failed
loading of a device driver or other system component is also recorded.
Log about events
O&O Enterprise Management Console-61
Frequently asked questions
Frequently asked questions
1. It’s noted in a report that a computer has not been contacted.
There are a number of reasons why the OOEMC Control Agent for allocating a job or remote installation reports
that a computer is not available:
1. Target computer is turned off.
2. You don’t have the required administrator permissions on the target computer.
3. A firewall on the target computer is blocking access. Open Port 50400 in the Windows Firewall for job allocation. The Ports for “File and Print Sharing” (TCP 139, TCP 445, UDP 137, UDP 138) and the WMI
(TCP/135) must be opened for remote installation. See also chapter “Firewalls“.
If you’re using a firewall from another manufacturer, consult the program’s own Help site.
2. I can’t add a computer to the computer list.
If you’re unable to add a computer to the selection, please check the terms of your license. You have possibly
reached the maximum number of “clients” available to you. If this is the case, you should either purchase additional
licenses or replace some of the computers that you possibly no longer need to manage in the list.
l
Under Tools/Licensing, you have an overview of all licenses, both available and already in use.
3. How can I create a job for a site?
Example: Create a job for site using O&O DiskImage.
1. Select a site in the tree structure on the left side of the window. In the window above on the right you can see
the folder Sites.
2. Select the site you want and click on Add under Job in the lower right window.
3. If no job is selected, you’ll have to create a new one in the file menu under New.
4. How can I remove a job?
When you no longer need a job, you can remove it by right-clicking the job and then clicking Remove. The job will
then no longer be run on any computer.
5. How can I see a report?
In every module folder you can find all the reports listed according to date. In the reports themselves you can find
information such as status, computer name, action, and date. To see the report, click on the one you wish to see on
the list. It will then appear in a separate program window.
6. No computer in the network is found during the computer search.
If no computer appears under Find Computer, you might not be registered in the domain or possess the required
permissions for reading any domain information.
O&O Enterprise Management Console-62
Support and Contact
Support and Contact
To receive more information about O&O Enterprise Management Console, please visit our website http://www.oosoftware.com and get the latest information about product developments and support.Also included on our website are regularly updated FAQs and Knowledge Bases that address the most common issues regarding our products.
All registered customers receive installation support, free of charge, for the first 30 days after registration. When
contacting our support team, please remember to have your registration code available.
In addition, it may be helpful to read the frequently asked questions (FAQ) section of the website before contacting
our Support Team. It's always possible that your specific question or problem has already been addressed.
O&O Software
Address:
Am Borsigturm 48
13507 Berlin
Germany
Telephone:
+49(0)30 4303 4303
Fax:
+49(0)30 4303 4399
Web:
http://www.oo-software.com
e-mail
[email protected]
[email protected]
Authorized resellers
Our authorized reseller partners in over 30 countries stand ready to assist you with answers to all questions regarding the licensing and purchase of our software products. Their names and addresses may be found on our website,
under the heading “Partner – Find Resellers”. We would also be more than happy to assist you in finding the partner closest to you.
O&O Enterprise Management Console-63
End user license agreement 2.6 (EULA)
End user license agreement 2.6 (EULA)
O&O Software
General and Specialized Section
General Section
IMPORTANT – PLEASE READ CAREFULLY
This End User License Agreement (EULA) is organized into 2 sections: a general part, which is valid for all O&O products, and a specialized part, which includes the particular terms of each corresponding product. By accepting both
parts of the license terms they automatically form part of your contract with O&O Software, Am Borsigturm 48,
13507 Berlin. If you have any questions regarding this contract and the license terms, our Service Team is available
to help you under [email protected].
The software product is protected by copyright laws and international copyright contracts as well as other laws and
agreements concerning intellectual property.
1. Object and form of delivery
(1) You receive the software covered by the contract in executable form (Binary code) together with the relevant
documentation released by O&O according to Section (6).
(2) The software provides the range of functions described in the given documentation. The documentation regarding functionality may be consulted prior to concluding the contract in the Internet presentation on the following site
http://www.oo-software.com/ .
(3) Delivery will be made according to the way in which you have purchased the software, either by having a disk
directly handed over or sent by mail to an address you have supplied or through the forwarding of license as well as
any required download information to a given E-mail address.
(4) If you are currently receiving updates as part of a maintenance agreement, these will continue to be supplied in
the same way as the initial software delivery, i.e., for a disk sent by mail, a disk containing the update will be sent to
the given address: for electronically delivered keys, a key for downloading updates will be sent to the given E-mail
address.
(5) Changes to the delivery or E-mail address can only be taken into consideration when they are supplied in writing
or by E-mail to the address or E-mail address indicated on http://www.oo-software.com at least two weeks before
delivery of the update.
(6) A printed copy of the documentation will not be included in delivery. The documentation consists primarily of
electronic aids.
2. Requirements for application (system requirements)
(1) Installation of the software is not part of the agreement.
(2) Depending on the software, there are certain system requirements that must be met in order to use the software
according to the terms of this contract. These will be defined according to each product in the specialized section of
this contract.
3. Rights of use, including test versions, unauthorized transfer, and application
(1) O&O grants you, upon payment of the agreed one-time fee, a permanent, spatially unlimited and non-exclusive
right to use the software.
O&O Enterprise Management Console-64
End user license agreement 2.6 (EULA)
(2) Test versions – if you have installed a test version of one of our products taken from the O&O Website
http://www.oo-software.com/, the right of use will be, according to the program, for a limited time only and/or
technically restricted.
(3) One copy of the software is entitled to be used on a maximum of one (1) output device/workstation simultaneously.
(4) If you want to use the software on more than one output device/workstation, the rights of use must be extended
accordingly. To find out which O&O products are also available as volume licenses, please consult (http://www.oosoftware.com/).The separate price list concerning O&O Volume Licenses will apply to extending the rights of use
without redelivery.
(5) Any use beyond that agreed upon in the contract is one in violation of the contract. In such a case, you are
required to report this use that exceeds the rights of use to the supplier without any delay. The parties will then try
to bring about an agreement for extending the rights of use. For the duration of the excessive usage, i.e., until the
conclusion of such an agreement or the cessation of the excessive usage, you are required to pay compensation for
this excessive usage according to the amount indicated in our price lists. The amount of compensation will be calculated on the basis of a four year, straight-line depreciation. If we are not informed of the excessive usage, a contract penalty in the amount three times the price of the usage indicated in the price list will be due O&O.
(6) You are entitled to create a backup copy of the software and to conduct ordinary data backups. The creation of
more copies than the amount needed for the backing up of any future usage (including the backup copies and data
backups) is not allowed.
(7) Copyrights and other trademarks within the software may not be altered or removed. They must be transferred
onto every copy of the software.
(8) Unauthorized transfer – only when you have purchased the software with an accompanying disk are you permitted to transfer it and then, only under the following conditions: a resale of the software is only permitted when it
involves an entire software copy, i.e., by surrendering your own usage of the purchased copy, you are entitled to
transfer these rights of use of the disk onto a third party according to the terms of the agreement existing between
you and O&O. When making such a transfer, you are required to hand over to the third party all materials related
to the software that are covered in the contract and to delete the software from any storage volumes (e.g., hard
disks) remaining in your possession.
(9) Unauthorized rental and service – The purchase of this contract does not entitle you to any public transfer or
rental of the software. You are also not entitled to include the software as part of your providing services for and in
the presence of any third parties. You may purchase an appropriate license from O&O for doing this.
4. Payment
(1) The prices are given with the corresponding sales taxes included, unless otherwise indicated.
(2) Test versions – Downloads of test versions offered by O&O are provided free of charge, unless otherwise indicated.
(3) If you receive updates of your programs as part of a Maintenance Agreement, the terms of payment in these contracts will apply to these Maintenance Agreements.
(4) O&O is entitled to forward any data it has received onto third parties requiring it for purposes of collection.
(5) Until payment is made in full, O&O retains possession of all rights, particularly those concerning copyrighted
rights of use, on the materials included in this contract. O&O is specifically entitled to cancel a contract, for example, when your payment is delayed, it prohibits the further using of the software and demands the surrendering of
O&O Enterprise Management Console-65
End user license agreement 2.6 (EULA)
all copies or this being impossible, to demand their deletion. Should a third party have access to the object of purchase before payment is completed for the contractual software, you are required to inform this third party about
the object being the property of O&O and to inform O&O, in writing, about the third party’s access.
5.Material defect and defect of title
(1) The software package or download you receive is free of any material defect or defect of title.
(2) A material defect exists when the software is unable to be used as described in the documentation appearing on
the website and included in delivery or available for downloading.
O&O is constantly checking to make sure that other sources are not misrepresenting the functions and properties
of the software as described in the documentation. You can therefore assume that any descriptions beyond those
found in the software documentation have not originated with O&O and are also unknown to it. Please inform O&
O if you learn of any software descriptions that include functions and properties not mentioned in the documentation.
(3) Please inform O&O if you learn of any software descriptions that include functions and properties not mentioned
in the documentation.
(4) Any claims concerning defects of material and/or title related to the software have a limitation period of two
years subsequent to delivery of the program or transmission of the serial number needed for downloading. If you
are not a private individual, the warranty period is shortened to one year.
If O&O has fraudulently concealed a material defect, a three year limitation period will cover claims related to this
defect.
Payment for compensation that you might have been entitled to as a result of cancelation or an abatement can be
refused upon expiration of the limitation period.
(5) You are required to inform O&O, in writing if possible, of any defects that arise immediately upon their discovery. While doing so you should also describe, as well as possible, how the defect is communicated, the effect it
has on the program, and under which circumstances it occurs.
(6) Should defects be reported to O&O within the limitation period, it will undertake a cure free of charge.
(7) As part of the cure, the corrected software will be redelivered as agreed. An on-site analysis and correction of
the error on your system will not take place.
O&O assumes the ensuing expenses for the cure, in particular the costs for transport, labor, and material. You are
personally responsible for installation. O&O specifically does not assume on-site installation as part of its obligation
with regard to defects of material or title.
Should a change of the program be required as part of the cure, O&O will make the necessary changes in the documentation without any charges.
(8) After the unsuccessful expiration of a deadline you set for cure, you can cancel the contract or reduce the purchase price and demand compensation instead of service or the replacement of any futile expenditures.
(9) A deadline is not required when
a) O&O refuses both kinds of cure, even if it is entitled to do so as a result of the arising expenses or
b) the cure is impossible or
c) the cure is unacceptable to you or
O&O Enterprise Management Console-66
End user license agreement 2.6 (EULA)
d) the cure is unsuccessful.
A subsequent improvement is considered a failure after the second unsuccessful attempt unless there is something
particular about the type of software or the defect itself or the surrounding circumstances that would indicate otherwise.
(10) You are not entitled to cancel the contract if the defect is negligible, nor may you, in this event, demand compensation instead of full service.
(11) In the event of cancellation, compensation is due for any uses made. The compensation for use will be based on
a four year, straight-line depreciation of the purchase price.
(12) As a result of the abatement, the purchase price will be reduced by the amount which is calculated for deducting
the defect from the value of the software. The standard used will be its value at the time the contract was concluded. The amount, when necessary, is to be calculated by estimation. As a result of this reduction, any amount
larger than that paid for the reduced purchase price will be refunded.
If it turns out that a reported problem did not arise as a result of a defect in the software and if you can be accused
of malice or gross negligence, then O&O is entitled to invoice you for: 1) services; 2) the expenses for analysis and;
3) correction of the problem, according to the amount stated in the price list.
(14) The seller’s warranty is canceled when changes are made on the software without expressed written consent or
when the software is not used as intended or used in an improper software environment, unless you can prove that
these facts had nothing to do with the problems that occurred.
6. Limitation of compensation
(1) O&O is liable for compensation for every legal ground to the extent described in the following provisions.
(2) The extent of liability of O&O for damages caused by malice or gross negligence arising from O&O itself or one
of its vicarious or legal agents is unlimited.
(3) There is no limit to the extent of liability of O&O or any of its legal or vicarious agents for damages involving
injury to life, physical well-being or health, or for simple breach of duty.
(4) There is unlimited liability for damages caused by serious organizational fault on the part of O&O as well as for
damages arising from a missing guaranteed characteristic.
(5) For the breach of an essential contractual duty, O&O is liable for damages normally foreseen in a contract when
none of the instances in provisions (2) – (4) applies.
(6) Any further liability for compensation is excluded, specifically excluded is liability without fault.
(7) Liability as defined by the product liability law remains untouched.
(8) If damage can be traced to have arisen through a fault on the part of O&O as well as on the part of yourself, you
must have your share of the fault evaluated.
You are responsible for making a standard backup of your data at least once a day. For data loss caused by O&O,
O&O is only liable for the expense of duplicating the data on your backup copies that need to be created and for
the restoration of data which would have also been lost during a standard backup procedure.
7. Final provisions
(1) You may only balance claims from O&O with indisputable or legally valid claims.
O&O Enterprise Management Console-67
End user license agreement 2.6 (EULA)
(2) Changes and amendments to this contract must be made in writing. This also applies to changes to this provision.
(3) The contract is subject to German law. The uniform UN purchasing law (CISG) as well as the UNIDROIT Factoring Agreement of Ottawa do not apply.
(4) Any general terms and conditions on your part will not be applied.
In the event you are not a private individual or a resident of the Federal Republic of Germany, we agree that the district court in Berlin will be the competent court for litigation arising from this contract.
8. Contact
If you have any questions concerning the O&O Software License Agreement or wish to speak with O&O, please get
in touch with us.
O&O Software GmbH, Am Borsigturm 48, 13507 Berlin, Germany.
Telephone: +49 (0)30 4303 4303, Fax: +49 (0)30 4303 4399
E-Mail [email protected] / [email protected], Web www.oo-software.com
Special section
O&O BlueCon
Important note on the Windows PE Start CD
The Microsoft® Windows™ Preinstallation Environment contained in this hardware or this software may only be
used for starting, diagnosing, setup, restoration, installation, configuration, testing or disaster recovery.
NOTE: THIS SOFTWARE CONTAINS A SECURITY FEATURE THAT WILL CAUSE END USER’S SYSTEM TO
REBOOT WITHOUT PRIOR NOTIFICATION TO THE END USER AFTER 72 HOURS OF CONTINUOUS USE.
Amendment to: 2. Requirements for application (system requirements)
The software requires the Windows 2000 (all Editions), Windows Server 2003 (all Editions), Windows XP (all Editions), Windows Vista (all Editions) or Windows Server 2008 (all Editions) operating systems. Usage within the
terms of this contract is not achieved without the application of these operating systems.
The product at hand can only be employed according to the acquired license. The following license types exist for
O&O BlueCon:
O&O BlueCon Admin Edition
You are authorized to install and use the software product on all computers a) in the possession of the company
(legal person or natural person(s) in the case of corporations) owning the license and b) all located at a single site.
This license is bound to a single natural person and is non-transferable.
O&O BlueCon Tech Edition
You are authorized to install and use the software product on all computers. This includes computers that do not
belong to the company owning the license (also known as Service Technician's License).This license is bound to a single natural person and is non-transferable.
O&O CleverCache
O&O Enterprise Management Console-68
End user license agreement 2.6 (EULA)
Amendment to: 2. Requirements for application (system requirements)
O&O CleverCache Professional Edition
The software requires the Windows XP (all Editions), Windows Vista (all Editions) or Windows 7 (all editions) operating systems. Usage within the terms of this contract is not achieved without the application of these operating systems.
O&O CleverCache Server Edition
The software requires Windows Server 2003 (all Editions), Windows XP (all Editions), Windows Vista (all Editions),
Windows Server 2008 (all Editions), Windows 7 (all Editions) or Windows Server 2008 R2 (all Editions) operating systems. Usage within the terms of this contract is not achieved without the application of these operating systems.
O&O Defrag
Amendment to: 2. Requirements for application (system requirements)
O&O Defrag Professional Edition
The software requires the Windows 2000 Professional, Windows XP (all Editions), Windows Vista (all Editions) or
Windows 7 (all editions) operating systems. Usage within the terms of this contract is not achieved without the application of these operating systems. Control of the program through a network management is not possible.
O&O Defrag Workstation Edition
The software requires the Windows 2000 Professional, Windows XP (all Editions), Windows Vista (all Editions) or
Windows 7 (all editions) operating systems. Usage within the terms of this contract is not achieved without the application of these operating systems. The O&O Defrag Workstation Edition may be used on computers with or without the user interface. You are entitled to control this program over the separately obtainable network manager.
O&O Defrag Server Edition
The software requires Windows 2000 (all Editions), Windows Server 2003 (all Editions), Windows XP (all Editions),
Windows Vista (all Editions), Windows Server 2008 (all Editions), Windows 7 (all Editions) or Windows Server 2008
R2 (all Editions) operating systems. Usage within the terms of this contract is not achieved without the application
of these operating systems. The O&O Defrag Server Edition may be used on computers with or without the user
interface. You are entitled to control this program over the separately obtainable network manager.
O&O Defrag Virtual Machine Edition
The software may only be used on the appropriate operating system in accordance with the previously mentioned
conditions for the Workstation and Server Editions. You must own a minimum of one Server Edition to use a Virtual
Machine Edition.
O&O DiskImage
Important note on the Windows PE Start CD
This note is only valid for the O&O DiskImage Professional and the Server Edition Start CD. The Microsoft® Windows™ Preinstallation Environment (Windows PE) is not a part of O&O DiskImage Express, Special and the Workstation Edition!
The Microsoft® Windows™ Preinstallation Environment contained in this hardware or this software may only be
used for starting, diagnosing, setup, restoration, installation, configuration, testing or disaster recovery.
O&O Enterprise Management Console-69
End user license agreement 2.6 (EULA)
NOTE: THIS SOFTWARE CONTAINS A SECURITY FEATURE THAT WILL CAUSE END USER’S SYSTEM TO
REBOOT WITHOUT PRIOR NOTIFICATION TO THE END USER AFTER 72 HOURS OF CONTINUOUS USE.
Amendment to: 2. Requirements for application (system requirements)
O&O DiskImage Express Edition
The software requires the Windows 2000 Professional, Windows XP (all Editions), Windows Vista (all Editions) or
Windows 7 (all editions) operating systems. Usage within the terms of this contract is not achieved without the application of these operating systems. Control of the program through a network management is not possible.
O&O DiskImage Professional Edition and Special Edition
The software requires the Windows 2000 Professional, Windows XP (all Editions), Windows Vista (all Editions) or
Windows 7 (all editions) operating systems. Usage within the terms of this contract is not achieved without the application of these operating systems. Control of the program through a network management is not possible.
O&O DiskImage Workstation Edition
The software requires the Windows 2000 Professional, Windows XP (all Editions), Windows Vista (all Editions) or
Windows 7 (all editions) operating systems. Usage within the terms of this contract is not achieved without the application of these operating systems. The O&O DiskImage Workstation Edition may be used on computers with or
without the user interface. You are entitled to control this program over the separately obtainable network manager.
O&O DiskImage Server Edition
The software requires Windows 2000 (all Editions), Windows Server 2003 (all Editions), Windows XP (all Editions),
Windows Vista (all Editions), Windows Server 2008 (all Editions), Windows 7 (all Editions) or Windows Server 2008
R2 (all Editions) operating systems. Usage within the terms of this contract is not achieved without the application
of these operating systems. The O&O DiskImage Server Edition may be used on computers with or without the
user interface. You are entitled to control this program over the separately obtainable network manager.
O&O DiskImage Virtual Machine Edition
The software may only be used on the appropriate operating system in accordance with the previously mentioned
conditions for the Workstation and Server Editions. You must own a minimum of one Server Edition to use a Virtual
Machine Edition.
Amendment to: 3. Rights of use, including test versions, unauthorized transfer, and application
Creation and restoration of images
The source computer and each target computer are required to hold licenses, to create and restore images using
O&O DiskImage. One license is sufficient under the previously mentioned terms, if the source and the target computer is one non-virtual workstation. Each virtual machine is seen as an independent computer; in other words, each
virtual machine needs its own license.
O&O DiskRecovery
Amendment to: 2. Requirements for application (system requirements)
The software requires Windows 2000 (all Editions), Windows Server 2003 (all Editions), Windows XP (all Editions),
Windows Vista (all Editions), Windows Server 2008 (all Editions), Windows 7 (all Editions) or Windows Server 2008
R2 (all Editions) operating systems. Usage within the terms of this contract is not achieved without the application
of these operating systems.
O&O Enterprise Management Console-70
End user license agreement 2.6 (EULA)
The product at hand can only be employed according to the acquired license. The following license types exist for
O&O DiskRecovery:
O&O DiskRecovery Personal Edition
You are authorized to install and use the software product on only one computer. This should be used wholly in conjunction with all hardware in your possession, i.e. this license may not be used to provide a service to a third party.
Other limitations may apply in the software itself. Please consult the software documentation for more information
on these limitations.
O&O DiskRecovery Admin Edition
You are authorized to install and use the software product on all computers
a) in the possession of the company (legal person or natural person(s) in the case of corporations) owning the
license and b) all located at a single site. This should be used wholly in conjunction with all hardware in your possession, i.e. this license may not be used to provide a service to a third party. This license is bound to a single natural person and is non-transferable.
O&O DiskRecovery Tech Edition
You are authorized to install and use the software product on all computers. This includes computers that do not
belong to the company owning the license (also known as Service Technician's License).This license is bound to a single natural person and is non-transferable.
O&O DiskStat
Amendment to: 2. Requirements for application (system requirements)
O&O DiskStat Professional Edition
The software requires the Windows 2000 Professional, Windows XP (all Editions), Windows Vista (all Editions) or
Windows 7 (all editions) operating systems. Usage within the terms of this contract is not achieved without the application of these operating systems.
O&O DiskStat Workstation Edition
The software requires the Windows 2000 Professional, Windows XP (all Editions), Windows Vista (all Editions) or
Windows 7 (all editions) operating systems. Usage within the terms of this contract is not achieved without the application of these operating systems. The O&O DiskStat Workstation Edition may be used on computers with or without the user interface. You are entitled to control this program over the separately obtainable network manager.
O&O DiskStat Server Edition
The software requires Windows 2000 (all Editions), Windows Server 2003 (all Editions), Windows XP (all Editions),
Windows Vista (all Editions), Windows Server 2008 (all Editions), Windows 7 (all Editions) or Windows Server 2008
R2 (all Editions) operating systems. Usage within the terms of this contract is not achieved without the application
of these operating systems.
O&O DiskStat Virtual Machine Edition
The software may only be used on the appropriate operating system in accordance with the previously mentioned
conditions for the Workstation and Server Editions. You must own a minimum of one Server Edition to use a Virtual
Machine Edition.
O&O DriveLED
O&O Enterprise Management Console-71
End user license agreement 2.6 (EULA)
Amendment to: 2. Requirements for application (system requirements)
O&O DriveLED Professional Edition
The software requires the Windows XP (all Editions), Windows Vista (all Editions) or Windows 7 (all editions) operating systems. Usage within the terms of this contract is not achieved without the application of these operating systems. Control of the program through a network management is not possible.
O&O DriveLED Workstation Edition
The software requires the Windows XP (all Editions), Windows Vista (all Editions) or Windows 7 (all editions) operating systems. Usage within the terms of this contract is not achieved without the application of these operating systems. The O&O DriveLED Workstation Edition may be used on computers with or without the user interface. You
are entitled to control this program over the separately obtainable network manager.
O&O DriveLED Server Edition
The software requires Windows Server 2003 (all Editions), Windows XP (all Editions), Windows Vista (all Editions),
Windows Server 2008 (all Editions), Windows 7 (all Editions) or Windows Server 2008 R2 (all Editions) operating systems. Usage within the terms of this contract is not achieved without the application of these operating systems.
The O&O DriveLED Server Edition may be used on computers with or without the user interface. You are entitled
to control this program over the separately obtainable network manager.
O&O DriveLED Virtual Machine Edition
The software may only be used on the appropriate operating system in accordance with the previously mentioned
conditions for the Workstation and Server Editions. You must own a minimum of one Server Edition to use a Virtual
Machine Edition.
O&O Enterprise Management Console
Important note on the Microsoft SQL Server
This product uses the Microsoft SQL Server or Microsoft SQL Server Express Edition. To the extent that these programs are part of the installation of this product, the terms of their licensing related to the use of this software will
also apply to the terms of this agreement.
The use of Microsoft SQL Server Express Edition is free of charge in conjunction with this product. The purchase of
licenses for O&O Enterprise Management Console and related products is separate from any possible purchase of
SQL Server products.
Amendment to: 2. Requirements for application (system requirements)
The software requires Windows Server 2003 (all Editions), Windows XP (all Editions), Windows Vista (all Editions),
Windows Server 2008 (all Editions), Windows 7 (all Editions) or Windows Server 2008 R2 (all Editions) operating systems. Usage within the terms of this contract is not achieved without the application of these operating systems.
O&O EventViewer
Amendment to: 2. Requirements for application (system requirements)
O&O EventViewer Workstation Edition
The software requires the Windows 2000 Professional, Windows XP (all Editions), Windows Vista (all Editions) or
Windows 7 (all editions) operating systems. Usage within the terms of this contract is not achieved without the application of these operating systems. The O&O EventViewer Workstation Edition may be used on computers with or
O&O Enterprise Management Console-72
End user license agreement 2.6 (EULA)
without the user interface. You are entitled to control this program over the separately obtainable network manager.
O&O EventViewer Server Edition
The software requires Windows 2000 (all Editions), Windows Server 2003 (all Editions), Windows XP (all Editions),
Windows Vista (all Editions), Windows Server 2008 (all Editions), Windows 7 (all Editions) or Windows Server 2008
R2 (all Editions) operating systems. Usage within the terms of this contract is not achieved without the application
of these operating systems.
O&O EventViewer Virtual Machine Edition
The software may only be used on the appropriate operating system in accordance with the previously mentioned
conditions for the Workstation and Server Editions. You must own a minimum of one Server Edition to use a Virtual
Machine Edition.
O&O ISOBoot
Important note on the use of O&O ISOBoot
The program overwrites the target data volume (these include among other things rewritable CDs or USB sticks).
Please make sure that no data you need is left on the target data volume. Overwriting data cannot be reversed!
O&O formally declares that it is not responsible for damages arising from the improper use of O&O ISOBoot.
Amendment to: 2. Requirements for application (system requirements)
The software requires the Windows 2000 (all editions), Windows Server 2003 (all editions), Windows XP (all editions), Windows Vista (all editions), Windows 7 (all editions) or Windows Server 2008 (all editions) operating systems. Usage within the terms of this contract is not achieved without the application of these operating systems.
Amendment to: 4. Payment
O&O demands no fee for the use of O&O ISOBoot. In addition, a fee for this license and this program may not be
demanded by any Third Parties, unless this is done with the expressed approval of O&O. When in doubt, please
get in touch with us.
O&O MediaRecovery
Amendment to: 2. Requirements for application (system requirements)
The software requires Windows 2000 (all Editions), Windows Server 2003 (all Editions), Windows XP (all Editions),
Windows Vista (all Editions), Windows Server 2008 (all Editions), Windows 7 (all Editions) or Windows Server 2008
R2 (all Editions) operating systems. Usage within the terms of this contract is not achieved without the application
of these operating systems.
O&O PartitionManager
Important note on the Windows PE Start CD
The Microsoft® Windows™ Preinstallation Environment contained in this hardware or this software may only be
used for starting, diagnosing, setup, restoration, installation, configuration, testing or disaster recovery.
NOTE: THIS SOFTWARE CONTAINS A SECURITY FEATURE THAT WILL CAUSE END USER’S SYSTEM TO
REBOOT WITHOUT PRIOR NOTIFICATION TO THE END USER AFTER 72 HOURS OF CONTINUOUS USE.
Amendment to: 2. Requirements for application (system requirements)
O&O Enterprise Management Console-73
End user license agreement 2.6 (EULA)
O&O PartitionManager Professional Edition
The software requires the Windows 2000 Professional, Windows XP (all Editions), Windows Vista (all Editions) or
Windows 7 (all editions) operating systems. Usage within the terms of this contract is not achieved without the application of these operating systems.
O&O PartitionManager Server Edition
The software requires Windows 2000 (all Editions), Windows Server 2003 (all Editions), Windows XP (all Editions),
Windows Vista (all Editions), Windows Server 2008 (all Editions), Windows 7 (all Editions) or Windows Server 2008
R2 (all Editions) operating systems. Usage within the terms of this contract is not achieved without the application
of these operating systems.
O&O RegEditor
Important note for working with the Microsoft Windows Registry
Before making changes to the Microsoft Windows Registry (in the following Registry), you should prepare a backup
copy of the Registry and ensure that you’ll be able to restore the Registry if a problem should arise.
O&O formally declares that it is not responsible for damages arising from the improper use of O&O RegEdit.
Changes to the Registry should only be made by experienced users who are aware of the consequences of such
changes. A defective Registry can influence the entire stability of the system and lead to a crash of the computer or
make it unable to start. This can further lead to loss of data.
Amendment to: 2. Requirements for application (system requirements)
The software requires the Windows 2000 (all Editions), Windows Server 2003 (all Editions), Windows XP (all Editions), Windows Vista (all Editions) or Windows Server 2008 (all Editions) operating systems. Usage within the
terms of this contract is not achieved without the application of these operating systems.
Amendment to: 4. Payment
O&O demands no fee for the use of this license. In addition, a fee for this license and this program may not be
demanded by any Third Parties, unless this is done with the expressed approval of O&O. When in doubt, please
get in touch with us.
O&O RescueBox
Important note on the Windows PE Start CD
The Microsoft® Windows™ Preinstallation Environment contained in this hardware or this software may only be
used for starting, diagnosing, setup, restoration, installation, configuration, testing or disaster recovery.
NOTE: THIS SOFTWARE CONTAINS A SECURITY FEATURE THAT WILL CAUSE END USER’S SYSTEM TO
REBOOT WITHOUT PRIOR NOTIFICATION TO THE END USER AFTER 72 HOURS OF CONTINUOUS USE.
Amendment to: 2. Requirements for application (system requirements)
In addition, a fee for this license and this program may not be demanded by any Third Parties, unless this is done
with the expressed approval of O&O. Usage within the terms of this contract is not achieved without the application of these operating systems.
The product at hand can only be employed according to the acquired license. The following license types exist for
O&O RescueBox:
O&O RescueBox Personal Edition
O&O Enterprise Management Console-74
End user license agreement 2.6 (EULA)
You are authorized to install and use the software product on only one computer. This should be used wholly in conjunction with all hardware in your possession, i.e. this license may not be used to provide a service to a third party.
Other limitations may apply in the software itself. Please consult the software documentation for more information
on these limitations.
O&O RescueBox Admin Edition
You are authorized to install and use the software product on all computers a) in the possession of the company
(legal person or natural person(s) in the case of corporations) owning the license and b) all located at a single site.
This should be used wholly in conjunction with all hardware in your possession, i.e. this license may not be used to
provide a service to a third party. This license is bound to a single natural person and is non-transferable.
O&O RescueBox Tech Edition
You are authorized to install and use the software product on all computers. This includes computers that do not
belong to the company owning the license (also known as Service Technician's License). This license is bound to a single natural person and is non-transferable.
O&O SafeErase
Amendment to: 2. Requirements for application (system requirements)
The software requires Windows 2000 (all Editions), Windows Server 2003 (all Editions), Windows XP (all Editions),
Windows Vista (all Editions), Windows Server 2008 (all Editions), Windows 7 (all Editions) or Windows Server 2008
R2 (all Editions) operating systems. Usage within the terms of this contract is not achieved without the application
of these operating systems.
O&O UnErase
Amendment to: 2. Requirements for application (system requirements)
The software requires Windows Server 2003 (all Editions), Windows XP (all Editions), Windows Vista (all Editions),
Windows Server 2008 (all Editions), Windows 7 (all Editions) or Windows Server 2008 R2 (all Editions) operating systems. Usage within the terms of this contract is not achieved without the application of these operating systems.
The product at hand can only be employed according to the acquired license. The following license types exist for
O&O UnErase:
O&O UnErase Personal Edition
You are authorized to install and use the software product on all computers a) in the possession of the company
(legal person or natural person(s) in the case of corporations) owning the license and b) all located at a single site.
This should be used wholly in conjunction with all hardware in your possession, i.e. this license may not be used to
provide a service to a third party. This license is bound to a single natural person and is non-transferable.
O&O UnErase Admin Edition
You are authorized to install and use the software product on all computers a) in the possession of the company
(legal person or natural person(s) in the case of corporations) owning the license and b) all located at a single site.
This should be used wholly in conjunction with all hardware in your possession, i.e. this license may not be used to
provide a service to a third party. This license is bound to a single natural person and is non-transferable.
O&O UnErase Tech Edition
O&O Enterprise Management Console-75
End user license agreement 2.6 (EULA)
You are authorized to install and use the software product on all computers. This includes computers that do not
belong to the company owning the license (also known as Service Technician's License). This license is bound to a single natural person and is non-transferable.
O&O Enterprise Management Console-76