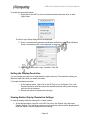
1
USB Virtual Desktop Kit (Model U170) with vSpace User Manual ncomputing.com USB Virtual Desktop (Model U170) User Manual Important Notices Please note that reproduction of this user manual in whole or in part, without express written permission from NComputing, is not permitted. NComputing reserves the right to make improvements and/or changes to this user manual and to the products, programs and/or specifications described herein at anytime without notice. Information contained in this document may have been obtained from internal testing or from a third party. NComputing shall not be liable for any direct, indirect, special, incidental or consequential damages in connection with the use of this material. The latest version of this user manual can be downloaded from the “Documentation” area in the Support section of the NComputing website at: http://www.ncomputing.com/documentation Refer to the Limited Hardware Warranty applicable to your region for information on what is and what is not covered by the warranty, your responsibilities and exclusions and how to obtain service. It is your responsibility to download a copy of the warranty at the time of purchase to keep for your records. The warranty can be downloaded from the “Documentation” area in the Support section of the NComputing website. Please refer to the End User License Agreement (EULA) and Terms of Use (TOU) that are presented for your review during the software installation process. The information contained in these documents is very important. The EULA and TOU constitute agreements between you and NComputing and are accepted by you by installing and using the product. It is your responsibility to print a copy of the EULA and TOU directly from the installer in order to keep for your records. This product gives users shared access to computer resources. It is not a computer, and may not support all software applications, especially high-resolution graphics applications or 3D games that are designed to be supported by stand-alone computers. Similarly, it may not support all hardware peripherals that are designed to be supported by stand-alone computers. Refer to your computer operating system and application software vendors’ license agreements for information on using these products with NComputing systems. Additional software licenses may be required. Microsoft Windows Licenses. You are licensed by NComputing to use the vSpace software under the terms of the EULA. You must also acquire the appropriate number of Windows Server licenses and Client Access Licenses for each device or user accessing Windows Server software. You cannot use the vSpace software with Windows Client software (i.e., Windows XP, Windows 7) unless a single user and no other user accesses the same Windows Client software at any one time, or you are authorized to do so under an applicable license from Microsoft or as expressly set forth in the “Microsoft Windows Server to Windows XP License Rights” section of the NComputing EULA. In all cases, your rights and obligations with respect to the use of vSpace software with Windows Server software and Windows Client software are defined by both the NComputing vSpace software EULA and the applicable Microsoft Software License Agreement or EULA. For more information on licensing with Microsoft operating systems see: http://www.ncomputing.com/mslicensing The NComputing hardware and software products described in this user manual are protected by numerous granted and pending U.S. and international patents. © 2003-2011 by NComputing Inc. All rights reserved. NComputing is a registered Trademark of NComputing Inc. – USA. Microsoft and Windows are registered trademarks of Microsoft Corporation. All trademarks are the property of their respective owners. Page 2 USB Virtual Desktop (Model U170) User Manual Contents IMPORTANT NOTICES ............................................................................................................................................ 2 CONTENTS ............................................................................................................................................................. 3 SAFETY INFORMATION .......................................................................................................................................... 4 REGULATORY COMPLIANCE ................................................................................................................................... 5 FCC INFORMATION ........................................................................................................................................................5 KCC CERTIFICATION INFORMATION ...................................................................................................................................5 PRODUCT OVERVIEW ............................................................................................................................................. 6 MINIMUM SYSTEM REQUIREMENTS ...................................................................................................................... 7 HOST PC ......................................................................................................................................................................7 ACCESS DEVICES..................................................................................................................................................... 8 INSTALLING THE HARDWARE ................................................................................................................................. 9 CONNECTING PERIPHERAL DEVICES ...................................................................................................................................9 CONNECTION OPTIONS .................................................................................................................................................10 MOUNTING AND SECURITY ............................................................................................................................................11 NCOMPUTING VSPACE SOFTWARE INSTALLATION .............................................................................................. 12 USER SETUP................................................................................................................................................................14 PRODUCT REGISTRATION..................................................................................................................................... 15 ONLINE REGISTRATION .................................................................................................................................................15 OFFLINE REGISTRATION.................................................................................................................................................16 CHECKING STATION REGISTRATION STATUS.......................................................................................................................16 UPGRADING THE VSPACE SOFTWARE ...............................................................................................................................16 DISPLAYING INFORMATION ABOUT THE VSPACE SOFTWARE .................................................................................................17 UPGRADING THE HOST PC OR MIGRATING VSPACE TO A DIFFERENT HOST PC .........................................................................17 UNINSTALLING VSPACE .................................................................................................................................................18 CLIENT ACCESS LICENSE (CAL) INSTALLATION ...................................................................................................... 18 ADDITIONAL FEATURES ....................................................................................................................................... 18 AUTO-LOGIN ..............................................................................................................................................................18 SETTING THE DISPLAY RESOLUTION .................................................................................................................................19 VIEWING STATION DISPLAY RESOLUTION SETTINGS ............................................................................................................19 SENDING MESSAGES.....................................................................................................................................................20 TROUBLESHOOTING............................................................................................................................................. 21 GLOSSARY ............................................................................................................................................................ 21 Page 3 USB Virtual Desktop (Model U170) User Manual Safety Information Refer to the following information to prevent any physical injury or loss of assets caused by damage to the product. A user must read this user manual carefully before use and properly follow the instructions. Make sure that the place of installation is not too hot (above 35˚C), too cold (below 0˚C) or too wet (above 85% relative humidity). Avoid any severe impacts to the product. Make sure that the product is not exposed to direct sunlight or any hot machinery. Keep the product away from any items that have strong magnetic properties. Do not disassemble, repair or rebuild the product. Note: Please properly route all cables and power cords to avoid a tripping hazard. An electric shock, fire, damage to the product or physical injury may occur as a result of tripping over the cable. Page 4 USB Virtual Desktop (Model U170) User Manual Regulatory Compliance FCC Information This equipment has been tested and found to comply with the limits for a class B digital device, pursuant to part 15 of the FCC Rules. These limits are designed to provide reasonable protection against harmful interference in a residential installation. This equipment generates, uses and can radiate radio frequency energy, and if not installed and used in accordance with the instructions, may cause harmful interference to radio communications. However, there is no guarantee that interference will not occur in a particular installation. If this equipment does cause harmful interference to radio or television reception, which can be determined by turning the equipment off and on, the user is encouraged to try and correct the interference by one or the following measures: Reorient or relocate the receiving antenna. Increase the separation between the equipment and the receiver. Connect the equipment to a power outlet on a circuit different from which the receiver is connected. Consult your dealer or an experienced radio TV technician for help. Changes or modifications not expressly approved by the party responsible for compliance could void the user’s authority to operate the equipment. This device complies with part 15 of the FCC Rules. Operation is subject to the following two conditions: (1) This device may not cause harmful interference, and (2) This device must accept any interference received, including interference that may cause undesired operation. KCC Certification Information NComputing U170 1.기기의명칭(모델명): USB-based Expansion kit (U170) 2.인증받은 자의 상호: 엔컴퓨팅 주식회사 3.제조자/제조국가: Magic Control Technology Corporation/대만 4.제조년월: 제품 참조 Page 5 USB Virtual Desktop (Model U170) User Manual Product Overview The NComputing U170 kit enables users to dramatically cut computing costs by sharing the untapped power of existing computers. The U170 access device and NComputing vSpace software work together to efficiently harness excess computing capacity and enable multiple users to share a single computer. Each user gets the full performance and capability of a PC, including multimedia and video. Best of all, IT staff and end users do not need special training because the solution is easy to setup and is compatible with standard PC software. Connect one user per kit or a total of 10 users per host PC With the NComputing U170, each user has a monitor, keyboard, mouse and speakers (sold separately), just like in a conventional computing environment. However, instead of connecting directly to the PC, these peripherals connect to the U170 access device. These very small, solid-state devices connect with USB cables and optional USB 2.0 hubs to the shared PC (host PC). The distance between the access device and the shared computer can be a maximum of 20 meters (66 feet) in compliance with standard USB 2.0 specifications on cables and hubs. The U170 can also be easily attached and secured to the back of a monitor using the built-in VESA mounting points. The NComputing vSpace desktop virtualization software (included) divides the PC’s resources into independent virtual workspaces that give each user their own full PC experience. vSpace simplifies configuration by automatically assigning the keyboard, mouse, audio and any USB devices attached to each workstation. In addition, you can take advantage of the auto-login feature to automatically log in a user, thereby making the U170 a great product for kiosks, schools, kids and digital-signage applications. Page 6 USB Virtual Desktop (Model U170) User Manual Minimum System Requirements Host PC Refer to the “vSpace Operating System Support Matrix” in the NComputing Knowledge Base for the latest information on supported operating system versions (note that unless specifically listed in the OS support matrix document, a new OS service pack may not be supported by then-current vSpace software). For more information regarding Microsoft licensing, please see the Important Notices section at the beginning of this document. Almost any modern PC can be used to host NComputing vSpace software. The guidelines below are a good rule of thumb for determining how many users you can provision on a host PC and expect to have a native experience running general productivity software applications. U-Series Minimum Recommended Hardware 1 Users CPU Memory 1-3 Any dual-core 2 GB 4-7 2 Dual- or quad-core 3 3 GB 8-10 Dual- or quad-core 3 4+ GB 4 Note: The U170 requires USB 2.0 controller(s) for operation. In addition, some older PCs may have difficulty booting with U170 devices (or other high-speed USB audio devices) attached. In these cases, you may need to boot the host PC first, and then attach the USB cable. This problem can sometimes be resolved by installing a separate USB 2.0 PCI card into the host PC. The table below describes the maximum bandwidth of the USB bus for modern PC motherboards. Some PCs may contain multiple Enhanced Host Controller Interface (EHCI) controllers that can double or triple the available bandwidth. These systems will have better video performance when running more than four U170 devices on a host PC. To take advantage of multiple controllers, connect any downstream hubs back to the host PC directly rather than connecting all U170s downstream of one USB connection. Installing an additional USB controller card in the host PC is also an option for large deployments. 1 These are general guidelines. Always test your applications first before deploying. When installed on Windows XP, only five U170 devices can be supported. See www.ncomputing.com/mslicensing for specific use cases. 3 Deployments with more than four users require dual Enhanced USB controllers. 4 For 64-bit operating systems, 6+ GB of memory recommended. 2 Page 7 USB Virtual Desktop (Model U170) User Manual Vendor Chipset USB or EHCI Controllers AMD SB710 2 Broadcom HT1100 3 Intel ICH8 2 Intel ICH9 2 Intel ICH10 2 nVIDIA ION Series 2 * Note: This is NOT a comprehensive list of chipsets that have more than one USB bus. Maximum Bandwidth 120 MB/s 180 MB/s 120 MB/s 120 MB/s 120 MB/s 120 MB/s Access Devices For each U170 station, you will need: USB keyboard and mouse Monitor (resolution support is described later in this manual) Optional: speakers, headphones and/or microphone with mini-stereo connector Page 8 USB Virtual Desktop (Model U170) User Manual Installing the Hardware This section shows how to connect a U170 device to peripheral equipment and to a host PC. Connecting Peripheral Devices Refer to the illustrations below for information on the ports used to connect the U170 to peripherals and to a host PC. The U170 has two USB 2.0 connectors to support USB devices. These ports may be used to connect to the following devices: USB keyboard and mouse Wireless keyboard adapter and an accessory port A separate USB hub to support additional USB accessories Note: USB devices (for example, flash memory drives) connected downstream of a U170 will be assigned to the session logged in to that U170. device. Page 9 USB Virtual Desktop (Model U170) User Manual Note: The U170 device is powered by the USB bus and a single USB port can provide power for only one U170 device with a mouse and keyboard. Adding additional USB devices immediately downstream of the U170 that draw too much power is likely to cause errors. Using a powered USB hub downstream from a U170 for high power peripherals is recommended. Connection Options The U170 may be attached to a host PC through any USB 2.0-compliant connection method. This includes the use of USB 2.0 hubs, USB 2.0 extension cables and USB 2.0 active extenders. Each segment of a USB connection, from device to host PC, device to hub, or hub to hub, must be no longer than 5 meters. The USB 2.0 specification states that a total of four hubs may be used downstream of the host PC before the U170 device itself. Because the U170 is dependent on USB bus power, you should always use a powered hub directly upstream of a U170 when a U170 is not directly attached to a host PC. See the illustrations below for reference. Page 10 USB Virtual Desktop (Model U170) User Manual Note: Performance may be impacted by poor quality cables or hubs. We recommend using USB 2.0-certified cables with minimum wires sizes of AWG 24 (power) and 28 AWG (signal). (Note: the higher the number, the smaller the wire.) Mounting and Security Using two screws (provided) you can attach the U170 to the back of an LCD monitor that has VESA-compliant mounting holes, as shown below. To secure the U170 device, you can attach a security cable using the provided slot (between the mounting screw holes). Page 11 USB Virtual Desktop (Model U170) User Manual NComputing vSpace Software Installation This user manual applies to vSpace 4, 5 and 6 for Windows. Note that screen shots included below for reference may vary slightly depending on the version of vSpace and the operating system you are installing. IMPORTANT! Per the instructions below, always check the NComputing website for the latest vSpace software. The software on the CD in your package may not be the latest version. You can view a chart specifying which version of vSpace is the latest for which operating system in the NComputing Knowledge Base (http://www.ncomputing.com/kb/) by searching on “vSpace Operating System Support Matrix.” Or click directly on this link: vSpace Operating System Support Matrix You can download the appropriate version by visiting the Software Download Center (http://www.ncomputing.com/softwaredownload) – note that the software download center will include Release Notes specific to that release – it is very important to read these release notes prior to installation. In addition, the latest version of this user manual is posted on the Documentation page in the Support section of the website (http://www.ncomputing.com/documentation) Perform the simple steps below to install the vSpace software on the host PC. 1. Run the installation software that you downloaded from the NComputing Software Download center. (Use the CD installer, only if you do not have internet access). 2. Follow the directions in the install wizard to complete the software installation. 3. Reboot the system. 4. Connect U170 devices to the PC. 5. The Windows operating system will discover the new devices and display the prompt “Can Windows connect to Windows Update to search for software?” Select “No, not this time.” (Note: USB discovery can take some time. During the FIRST install only you will be asked to repeat this discovery for each U170 connected to the host PC. If installing multiple devices, please be patient during the discovery process.) Page 12 USB Virtual Desktop (Model U170) User Manual 6. The next screen in the hardware wizard will show that the operating system has identified the U170 device and will display the prompt “What would you like the wizard to do?” Click “Install the software automatically [Recommended].” 7. The next screen of the hardware installation wizard is a warning message. Click “Continue Anyway.” 8. You have now completed the hardware installation wizard, click Finish to continue. Page 13 USB Virtual Desktop (Model U170) User Manual 9. Repeat these steps for each U170 device connected to the system. Note: The monitor on the host PC will flash on and off during the video driver installation. This will occur for each new U170 being installed. User Setup There are two options for setting up users on a multi-user system: 1. Local Users: for small installations, you can use the user management tool in Windows to add local users. 2. Workgroups or Domains: If there is already a workgroup or domain in use on the network, simply add the station to that workgroup or domain; any existing users may use the new station. Note: Users must be added to the “Remote Access” group in a multi-user system. The screen shots below show where to find the user-management and group-management tools to set up new users. To add new users, go to StartControl PanelUser Accounts. You can also search on “To add a new user to the computer” in the Windows Help and Support Center for more information. Windows Server 2008 user account management screen Page 14 USB Virtual Desktop (Model U170) User Manual Windows Server 2003 user account management screen Product Registration The U170 USB virtual desktop and vSpace software that you install on the host PC must be registered with NComputing. Prior to registration, user sessions will be limited to 60 minutes before timing out and requiring a reboot of the system. Registration is fast, easy and can be accomplished two ways: 1. Online Registration 2. Offline Registration You can start the License wizard from either the System Tray or the Start menu under “NComputing vSpace Software.” Online Registration If the host PC on which you installed the vSpace software has a connection to the Internet for http and https communication, simply follow the prompts in the License wizard to: 1. Fill out your registration information. 2. Automatically discover the device serial numbers connected. 3. When prompted, fill out all the requested contact information for your organization. Page 15 USB Virtual Desktop (Model U170) User Manual 4. If you select the option to use the online registration option, you will connect to the NComputing registration service. You may select the “Register future devices in the background” option so that any time you install a new U170 to the system, the License wizard will discover and register the product with your information without any user intervention. Offline Registration If the host PC on which you installed the U170 does not have access to the Internet, you can still register the product. To register offline: 1. Run the License wizard and select the “Create offline registration file” option. The system will still automatically discover the connected devices, but will then allow you to save a registration file. 2. Save this file in a location where you can access it with an email client. This can be on a flash drive, if required. 3. When you have an Internet connection, email the registration file to [email protected] . Once received, the registration request will be processed and a registration file will be sent back to you via email. 4. Once you have received the returned file, restart the License wizard and select the “Complete Offline Registration” option. Checking Station Registration Status You can check the registration status of the U170 devices. To check registration status: Right-click on the NCTray icon in the System Tray and select “U170 Devices.” The U170 Devices dialog box will be displayed. Upgrading the vSpace Software Once you have successfully completed the registration process, you can check for new releases of the vSpace software. If a new version is available and you are entitled to an upgrade, you can install the new version on the host PC. To search for a new version of vSpace and update the software on the host PC: 1. At the host PC, right-click on the NCTray icon in the System Tray and select “Update vSpace SW.” The NComputing vSpace Update wizard will be displayed. Page 16 USB Virtual Desktop (Model U170) User Manual 2. Click the “Connect” button. A message will be displayed to inform you if an update is available. If an update is available, follow the on-screen prompts to update the vSpace software. Displaying Information About the vSpace Software You can display information about the vSpace software installed on the host PC. The information includes the following: Software build date Software version number (for example, 6.4.3.7) To display the vSpace software information: At the host PC, right-click on the NCTray icon in the System Tray and select “About vSpace SW.” the About vSpace dialog box will be displayed. Upgrading the Host PC or Migrating vSpace to a Different Host PC The registration process assigns your vSpace software license and U170 virtual desktop to the specific host PC in which they are installed. If you change or upgrade multiple components or software on the host PC, such as the hard drive or operating system, or if you move to different host PC, you will need to re-assign your license to the new host PC configuration. When making such a change, simply repeat the online or offline registration process. You can reassign your Page 17 USB Virtual Desktop (Model U170) User Manual license a limited number of times after the initial registration. If you exceed this limit you will need to contact NComputing technical support for assistance. Uninstalling vSpace To uninstall the vSpace software, select Start>All Programs>NComputing vSpace>Uninstall. Follow the prompts and the vSpace software will be removed from the host PC. You will be prompted to restart the host PC to complete the process. Client Access License (CAL) Installation For multi-user applications, in addition to installing and activating the Windows Server operating system license on the host PC, you need to acquire two types of client access licenses. First, you need a standard Windows Server CAL for each user or device. You also need to install a: Remote Desktop Services CAL (RDS-CAL) when running on Windows Server or Windows MultiPoint Server CAL (WMS-CAL) when running on Windows MultiPoint Server for each user or device accessing the system. For Windows Server operating systems, you will need to add the Remote Desktop Licensing Server role (provided with the operating system) to at least one host in your environment. After you install the licensing server on a particular host: You will use the Remote Desktop Licensing Manager application to activate the server and add RDS CALs. Other hosts in your environment can then point to this license server. For Windows MultiPoint Server, the licensing server component is pre-installed and you can simply use the MultiPoint Manager application to enter in your WMS CAL (instead of using the Remote Desktop Licensing Manager, which does not accept WMS CALs). For further details on setting up the license server and installing CALs, please refer to your respective operating system documentation or refer to the article entitled: “How to Configure a Remote Desktop Licensing Server for vSpace 6” in the NComputing Knowledge Base. Additional Features Auto-Login NComputing vSpace software has a convenient auto-login feature popular in schools, kiosks or digital-signage applications. When this option is enabled, once the host PC boots, each U170 station will automatically log in using the username and password defined for users under Windows Server. Additionally, a launch application or script may be specified to run at login. Page 18 USB Virtual Desktop (Model U170) User Manual To enable the auto-login feature: 1. Right-click on the NCTray icon on the desired station and then click on AutoLogin Setup. The Auto Logon Setup dialog box will be displayed. 2. Enter a username and password combination defined for users under Windows Server; the password will not be displayed in clear text. Click OK. 3. Check the “Enable Auto Logon” checkbox. Click OK. Setting the Display Resolution You can change the resolution for each station’s display (monitor). The resolution setting you define will take effect after you restart the station. To change the display resolution: 1. At the desired station, right-click on the NCTray icon in the System Tray, click Display Resolution, and then select the desired resolution setting from the popup menu that is displayed. 2. Restart the station to implement the change. Viewing Station Display Resolution Settings To view the display resolution settings for a certain station: At the desired station, right-click on the NCTray icon in the System Tray and select Display Settings. The operating system’s screen resolution window will be displayed and show the station’s current display resolution setting. Page 19 USB Virtual Desktop (Model U170) User Manual Sending Messages You can send messages from one station to other stations or from the host PC to the stations connected to it. To send a message: 1. At either a station or at the host PC, right-click on the NCTray icon in the System Tray and select Send Message. The Send Message dialog box will be displayed. 2. Type the desired message into the Message field and then click Send. Page 20 USB Virtual Desktop (Model U170) User Manual Troubleshooting No graphics are displayed on a U170 station. If there is nothing being displayed on a U170, station check the following: 1. Is the blue light on the U170 on? If not, the device has not yet been enumerated to the host PC. This could take up to 10-20 seconds if this is the first time connecting. 2. If the blue light is not on, check to make sure the unit is plugged in to a USB 2.0 port. If connecting to a hub, make sure the hub is powered. 3. If the display is “gray” it is possible that you have not registered the device and it has timed out. Run the License wizard. See the section on product registration that appears earlier in this manual for information. PC will not boot after attaching U170 virtual desktop. Some older PCs have difficulty with USB 2.0-composite devices. There are two potential ways to solve this 1) attach the U170 after booting, 2) try a separate USB PCI card 3) disable legacy USB support in the BIOS. U170 will not register. Run the License wizard, when the system scans and lists all of the connected U170 devices make sure the serial number of each device is displayed. If not, try unplugging and re-plugging the U170 device, wait for enumeration and press refresh. In some rare cases, it may be necessary to unplug the monitor connected to the U170 when registering devices. Sound does not play. When setting up multiple U170 devices for the first time, there are MANY items for the host PC to discover and the host PC may not enumerate all devices correctly the first time. Therefore a second reboot is advised to ensure that all devices are enumerated properly (this second reboot is only necessary after new devices are added). Extended boot time for the OS When multiple U170 devices are connected to the host PC, the host PC’s normal boot time will be extended for each unit added. Remember that the OS and host PC are supporting more users and additional boot time is required. For more troubleshooting information, visit the NComputing Knowledge Base in the Support section of the NComputing website, at www.ncomputing.com. Glossary Administrator: a person who is responsible for managing a multi-user computing environment, such as a local area network (LAN). Administrator responsibilities typically include: installing and Page 21 USB Virtual Desktop (Model U170) User Manual configuring system hardware and software, establishing and managing user accounts, upgrading software and performing backup and recovery tasks. Download: the network transmission of a file from one computer system to another. Firewall: a set of related programs that protect the resources of a private network from users on other networks and control what outside resources local users have access to. Host PC: a computer in which the vSpace software has been installed Internet: a worldwide system of computer networks in which users at any one computer can, if they have permission, get information from other connected computers (and sometimes talk directly with users connected to other computers). Logon: the procedure by which an entity (person, program or system) exchanges credentials with an operating system or application in order to be allowed access to the OS or application. Almost always, a logon requires that the user have (1) a user ID and (2) a password. Often, the user ID must conform to a length requirement, such as eight characters or more, and the password must contain at least one digit and not match a natural language word. User: a person who uses a computer system. Users need to identify themselves to be able to access the computer system. In order to ensure unique identities, the system administrator usually assigns each user a username associated with a defined set of computer resources. USB: (Universal Serial Bus) is a standard designed to allow peripherals to connect and identify themselves to a computer via a standardized interface socket. USB allows devices to connect and disconnect from a computer without forcing the computer to be restarted. © 2003-2011 NComputing Inc. All rights reserved. NComputing and vSpace are registered trademarks of NComputing Inc. – USA. Microsoft and Windows are registered trademarks of Microsoft Corporation. All trademarks are the property of their respective owners. U170 User Manual Rev. G Page 22