1
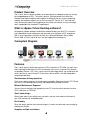
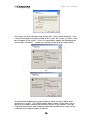
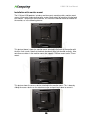
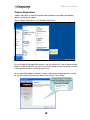
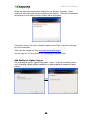
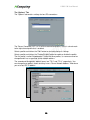
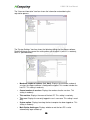
L230 and L130
Access Devices
with vSpace
TM
User Guide
This guide applies to both Windows Server 2003 R2 SP2 and Server 2008 R1 SP2. Except for the vSpace
Version numbers at the top of the installer window frames, the installation screens are generally identical for
both products. Unless specifically noted, all screen shots shown were captured from a Windows Server
2003 installation
www.ncomputing.com
Important Notices
Please note that reproduction of this User Guide in whole or in part, without express written
permission from NComputing, is not permitted.
NComputing reserves the right to make improvements and/or changes to this User Guide and to
the products, programs and/or specifications described herein at anytime without notice.
Information contained in this document may have been obtained from internal testing or from a
third party. NComputing shall not be liable for any direct, indirect, special, incidental or
consequential damages in connection with the use of this material. The latest version of this User
Guide can be downloaded from the “Download center” in the support section of the NComputing
website at: www.ncomputing.com
Refer to the Limited Hardware Warranty applicable to your region for information on what is and
what is not covered by the warranty, your responsibilities, exclusions, and how to obtain service.
It is your responsibility to download a copy of the warranty at the time of purchase to keep for
your records. The warranty can be downloaded from the “Download center” in the support
section of the NComputing website.
Please refer to the End User License Agreement (EULA) and Terms of Use (TOU) that are
presented for your review during the software installation process. The information contained in
these documents is very important. The EULA and TOU constitute agreements between you
and NComputing and are accepted by you by installing and using the product. It is your
responsibility to print a copy of the EULA and TOU directly from the installer in order to keep for
your records.
This product gives users shared access to computer resources. It is not a computer, and may
not support all software applications, especially high-resolution graphics applications or 3D
games that are designed to be supported by stand-alone computers. Similarly, it may not
support all hardware peripherals that are designed to be supported by stand-alone computers.
Refer to your computer operating system and application software vendors’ license agreements
for information on using these products with NComputing systems. Additional software licenses
may be required.
Microsoft Windows Licenses. You are licensed by NComputing to use the vSpace software
under the terms of the EULA. You must also acquire the appropriate number of Windows Server
licenses and Client Access Licenses for each device or user accessing Windows Server software.
You cannot use the vSpace software with Windows Client software (i.e., Windows Vista,
Windows 7) unless a single user and no other user accesses the same Windows Client software
at any one time, or you are authorized to do so under an applicable license from Microsoft or as
expressly set forth in the “Microsoft Windows Server to Windows XP License Rights” section of
the NComputing EULA. In all cases, your rights and obligations with respect to the use of
vSpace software with Windows Server software and Windows Client software are defined by both
the NComputing vSpace software EULA and the applicable Microsoft Software License
Agreement or EULA. For more information on licensing with Microsoft operating systems see:
www.ncomputing.com/mslicensing
The NComputing hardware and software products described in this user manual are protected by
numerous granted and pending U.S. and international patents.
© 2009 by NComputing Inc. All rights reserved. NComputing is a registered Trademark of
NComputing Inc. – USA. Microsoft and Windows are registered trademarks of Microsoft
Corporation. All trademarks are the property of their respective owners.
이 기기는 가정용으로 전자파
적합 등록을 한 기기로서 주거지역에서는 물론 모든 지역에서
www.ncomputing.com
사용할 수 있습니다.
L230/L130 User Manual
TABLE OF CONTENTS
Safety Information ........................................................................................................3
Regulatory Compliance ................................................................................................4
Product Overview .........................................................................................................5
What is vSpace Virtual Desktop software? ...................................................................5
Conceptual Diagram.....................................................................................................5
Features.......................................................................................................................5
Minimum System Requirements...................................................................................6
Host Computer ............................................................................................................6
Installation ....................................................................................................................7
Install the vSpace software...........................................................................................7
Connect the Access Device........................................................................................13
Network connection ...............................................................................................13
Installation with monitor mount (L130 and L230 only) ............................................15
Product Registration ..................................................................................................17
Online Registration ................................................................................................18
Offline Registration ................................................................................................21
Add Additional vSpace License .............................................................................23
Completing the Offline Registration Process..........................................................24
Uninstallation.............................................................................................................25
Updating the vSpace Software ...................................................................................25
Using the access device.............................................................................................26
Configure the Access Device.....................................................................................26
The access device screen .....................................................................................26
Using the vSpace Management Console....................................................................30
Software Settings (local)............................................................................................32
Sessions................................................................................................................32
Information & Settings ...........................................................................................34
USB-Device Assignment(s) ...................................................................................37
Software Settings (LAN) ............................................................................................38
Hardware Settings (LAN/local)...................................................................................39
Troubleshooting error messages ................................................................................41
Error messages on the access device .......................................................................42
DHCP server was not found ......................................................................................42
No Terminal Server found message ............................................................................42
Host unreachable…...............................................................................................42
TS ERROR – INVALID OR NO SERIAL NUMBER! ...............................................43
Connection was closed Message...........................................................................43
Authorization error .................................................................................................43
TS ERROR – Stations Limit Exceeded! .................................................................44
Troubleshooting error messages on the Host PC ......................................................44
Glossary.....................................................................................................................45
FAQ............................................................................................................................47
2
L230/L130 User Manual
Safety Information
Refer to the following to prevent any physical injury or loss of assets caused by
damage to the product.
A user must read this User Guide carefully before use and properly follow the
instructions.
•
Make sure that the place of installation is not too hot (above 35˚C), too
cold (below 0˚C), or too wet (above 85% relative humidity).
•
Avoid any severe impacts to the product
•
Make sure that the product is not exposed to direct sunlight or any hot
machinery.
•
Please keep the product away from any items which have strong magnetic
properties.
•
Do not disassemble, repair or rebuild the product.
•
Please properly route all cables and power cords to avoid a tripping
hazard. An electric shock, fire, damage to the product or physical injury
may occur as a result of tripping over the cable.
3
L230/L130 User Manual
Regulatory Compliance
FCC Information
This equipment has been tested and found to comply with the limits for a class B digital device,
pursuant to part 15 of the FCC Rules.
These limits are designed to provide reasonable protection against harmful interference in a
residential installation. This equipment generates, uses, and can radiate radio frequency energy,
and if not installed and used in accordance with the instructions, may cause harmful interference
to radio communications. However, there is no guarantee that interference will not occur in a
particular installation. If this equipment does cause harmful interference to radio or television
reception, which can be determined by turning the equipment off and on, the user is encouraged
to try and correct the interference by one or the following measures:
• Reorient or relocate the receiving antenna
• Increase the separation between the equipment and the receiver
• Connect the equipment to a power outlet on a circuit different from which the receiver is
connected
• Consult your dealer or an experienced radio TV technician for help
Changes or modifications not expressly approved by the party responsible for compliance could
void the user’s authority to operate the equipment.
This device complies with part 15 of the FCC Rules.
Operation is subject to the following two conditions:
(1) This device may not cause harmful interference, and
(2) This device must accept any interference received, including interference that
may cause undesired operation.
MIC 인증사항
•
•
•
NCC-L230 (B)
•
•
•
•
•
NCC-L130 (B)
•
•
기기의 명칭(모델명) : Multi-User Computing Access Device (L230)
인증 번호 : NCC-L230 (B)
인증 받은 자의 상호 : 엔컴퓨팅 주식회사
제조자/제조국가 : 엔컴퓨팅 주식회사/한국
제조년월 : 제품 뒷면 참고
기기의 명칭(모델명) : Multi-User Computing Access Device (L130)
인증 번호 : NCC-L130 (B)
인증 받은 자의 상호 : 엔컴퓨팅 주식회사
제조자/제조국가 : 엔컴퓨팅 주식회사/한국
제조년월 : 제품 뒷면 참고
이 기기는 가정용으로 전자파 적합 등록을 한 기기로서 주거지역에서는 물론 모든 지역에서
사용할 수 있습니다.
있습니다.
4
L230/L130 User Manual
Product Overview
The L-series access devices enable you to dramatically cut computing costs by sharing
the untapped power of PCs. The access devices, Ethernet-based User eXtension
Protocol, and vSpace software work together to efficiently harness excess computing
capacity and enable multiple users to share a single PC. Best of all, IT staff and end
users do not need special training because this end-to-end solution is easy to manage
and is compatible with standard PC applications.
What is vSpace Virtual Desktop software?
NComputing vSpace desktop virtualization software divides your host PC's resources
into independent virtual workspaces that give each user their own full PC experience.
With a server operating system on the host (e.g., Microsoft Windows Server 2003,
Server 2008, or Linux), up to 30 users can be supported simultaneously.
Conceptual Diagram
Features
The L-series access devices do not have a CPU, hard drive or CD-ROM, yet most users
find it indistinguishable from a full PC environment since it runs a normal User Account
assigned by the host’s OS. The L-series exclusive technology allows you to add up to 30
access devices to your existing PC. Each access device offers a full and independent
computing experience.
Simultaneous desktop operation
Each access device connects to a workspace created by vSpace on the host PC OS and
can run its virtual desktop concurrently and independently through Ethernet.
Minimal Maintenance Required
You only have to maintain and upgrade the host PC since the access devices have no
CPU, hard drive, or CD-ROM.
Small sleek design
Allows more room in your office or on your desk, and can even mount on the back of
your LCD monitor with included bracket.
Eco-friendly
Since the access devices have no moving parts, it makes no noise and saves energy by
drawing only 5 watts.
Supports multiple resolutions
5
L230/L130 User Manual
640x480, 800x600, 1024x768 and 1280x1024, by 16-bit colors.
Additionally, the L130 supports 1440x900 by 16-bit colors and the L230 supports
1440x900 by 24-bit colors.
Microphone
The L230 includes a microphone port.
Minimum System Requirements
Host Computer
For multiuser applications the host computer operating system can be Windows Server
2003 R2 SP2 (Standard or Enterprise Edition, 32-bit), Windows Server 2008 SP2
(Standard or Enterprise, 32-bit), or supported Linux distributions.
Microsoft Windows Licenses. You are licensed by NComputing to use the vSpace
software under the terms of the End-User License Agreement (EULA). You must also
acquire the appropriate number of Windows Server licenses and Client Access Licenses
for each device or user accessing Windows Server software. You cannot use the
vSpace software with Windows Client software (i.e., Windows Vista, Windows 7) unless
a single user and no other user accesses the same Windows Client software at any one
time, or you are authorized to do so under an applicable license from Microsoft or as
expressly set forth in the “Microsoft Windows Server to Windows XP License Rights”
section of the NComputing EULA.1 In all cases, your rights and obligations with respect
to the use of vSpace software with Windows Server software and Windows Client
software are defined by both the NComputing vSpace software EULA and the applicable
Microsoft Software License Agreement or EULA. For more information on licensing
with Microsoft operating systems see: www.ncomputing.com/mslicensing
The host PC must have at least:
•
A 2.4 GHz single core processor or any dual core processor
•
1 GB RAM (Configurations vary by the number of users; for more info, please
see Product Selection Guide at:
http://ncomputing.com/Portals/0/docs/guides/en/guide_productselection.pdf)
•
60 GB hard disk drive
•
Ethernet port
Do not use a notebook PC as the host. Notebooks use power-saving features and
technologies different than a typical desktop PC. This causes power management and
memory incompatibilities.
1
Microsoft Windows Server to Windows XP License Rights. If you have licensed the appropriate number of Windows
Server operating system and associated Client Access Licenses for simultaneous access by multiple users to the host
computer, you may install and run vSpace on a separately licensed Windows XP operating system for simultaneous
access by multiple users in lieu of the Windows Server operating system. You may only install and use either the
Windows Server operating system software or the Windows XP Client operating system software but not both. Microsoft
does not provide any support for vSpace or for the Windows XP operating system in this configuration; you should seek
support from NComputing for issues relating to vSpace and its use with the Windows XP Client operating system.
6
L230/L130 User Manual
Installation
Install the vSpace software
Insert the Software Installation CD into the host PC's CD drive.
In most cases, a window will automatically appear after a few seconds with installation
options. If it doesn't appear after 2 minutes, go to "My Computer", open the CD drive's
icon, and start the "Setup" application.
At the installation screen, click on the "Install Program" button.
Before the installation starts, the installation software attempts to connect via the Internet
to compare the software version on the CD with the latest software version on the
NComputing server. This check for the latest software version should work if either of
TCP ports 80 or 3630 is open. If a later version is available on the NComputing server,
the following prompt will appear to ask if you want to use the version on the CD or if you
want to install the latest version. NComputing recommends you install the latest version.
Note: The following message will appear if the computer is not connected to the Internet
or a program such as a firewall blocks the TCP ports used for the update check..
.
7
L230/L130 User Manual
At the installer’s "Welcome" screen, click on the "Next" button.
At the antivirus and firewall warning screen, click on the "Next" button.
Note: - When dealing with firewall applications, you may need to make sure that our .exe
files have proper access permission to the network. These .exe files include:
KMSERVC.EXE, BOOTSRV.EXE, KMMSG.EXE, KMUPDATE.EXE,
KMREGWIZ.EXE
- Within the Exceptions tab of the Windows Firewall the ports that need to be opened
are:
TCP-Protocol: 27605, 27615, 3581, 3597, 3645, 3646, 3725
UDP-Protocol: 1027, 1283, 3581, 3725
Please see our Knowledge Base at http://www.ncomputing.com/support.aspx for more
details.
At the software End User License Agreement screen, you may view the software license
and print it out. When you are finished, click on the "I agree" checkbox, and then click on
the "Next" button.
8
L230/L130 User Manual
At the software terms of use screen, you may read the software terms of use document
and print it out. When you are finished, click on the "I agree" checkbox, and then click on
the "Next" button.
At the "Choose destination location" screen, you can install to the default location, or you
can choose a different location. When you are finished, click on the "Next" button.
At the "Choose Password for Administrator" screen, select whether or not to use an
administrator password, If you choose to use an administrator password, enter it and
retype it. Click on the "Next" button.
9
L230/L130 User Manual
At this point, one of the following “ready to copy files” screens will be displayed. If this
is the first time vSpace has been installed on this system, the “Create sys info file” check
box will appear on the screen. Unless it is requested by support, we recommend you
leave the box unchecked.
Review your selections and click on the "Next" button.
or
You then have the opportunity to select whether or not to install the vSpace admin
console on this system The vSpace Network Administration Console allows you to
administer the vSpace software and the access devices in your network. It must be
installed at least once on each network to enable administration tasks, and it may be
installed on every vSpace software installation.
10
L230/L130 User Manual
Click “Next” and the vSpace software will then be installed.
At the "Add new users" pop-up, select whether or not you would like to add new users to
the system. If you click on the "Yes" button, the installation program will launch a screen
to administer user accounts on the host PC. If you click the "No" button, the installation
process will continue without bringing up the user administration screen.
Note: It is recommended that all users have their own user accounts to enable control of
their own settings. If you click on the “Yes” button, the “Local Users and Groups”
Windows utility (screen shot shown below) will be displayed on an otherwise blank
overlay screen. You can right click and select “New User…” to add each desired
individual user account. When you are finished adding users, close the “Local Users
and Groups” utility and you will be brought back to finish the vSpace installation process.
11
L230/L130 User Manual
At the "vSpace successfully installed" screen, you have the opportunity to display and
read/print the latest “readme” file. This file normally contains notes specific to the
version of vSpace you have just installed. Then select whether or not to immediately
restart the computer.
Note:
The computer must be rebooted before the vSpace software can be used.
12
L230/L130 User Manual
Connect the Access Device
The access device must be connected via Ethernet to the host PC. This can be done
using an Ethernet switch, a router, or some other network connection method.
When registering the software, all the access devices must be connected to the host PC
using Ethernet
Network connection
Note: If the network is configured to use DHCP to get dynamic IP addresses, you can
setup the access device to use it.
Go to the access device and select the "Options" button, and then select the “Setup”
button.
13
L230/L130 User Manual
In the "Network" tab, select whether to use a dynamic IP address or a static IP
address.
If you setup the access device to use a dynamic IP address, you don't need to enter
anything as the IP address. Click on the "Save" button.
If you setup the access device to use a static IP address, you must enter the IP address
and the default gateway. Click on the "Save" button.
14
L230/L130 User Manual
Installation with monitor mount
The L130 and L230 products include a monitor mount, mounting collar, monitor mount
screws (silver color) and mounting collar screws (black color) for mounting it to the back
of a monitor. To mount the access device, first secure the monitor mount to the back of
the monitor, as in the following pictures.
This picture (above) shows the monitor mount attached to the back of the monitor with
the four silver screws. Note that the black attachment clips are oriented vertically. Also,
note there are holes in the monitor mount that support a 100 mm mount and a 75 mm
mount.
This picture shows the access device attached to the monitor mount. This is done by
sliding the access device on the attachment clips and pushing it down to secure it.
15
L230/L130 User Manual
The above picture shows the mounting collar holding the access device in place with the
four black screws.
The above picture shows the L130 on the mounting bracket, secured with the mounting
collar, and all cables connected.
This picture shows the L230.
16
L230/L130 User Manual
Product Registration
Product registration is required to enable normal product use enables downloading
updates and technical support.
Select "vSpace Registration" in the Windows Start menu.
At any time during the registration process, you can click on the "Cancel" button and the
process will be cancelled, or you can use the "Back" button to return to previous screens
in the registration process to change your entries.
At the registration program “welcome” screen, if vSpace password protection is turned
on, you will need to enter your password. Then Click the "Next" button.
17
L230/L130 User Manual
Next, you are presented with the vSpace End User License Agreement (EULA).
in the “I agree” check box, and then click the “Next” button.
Click
Online Registration
In the case of Online Registration, follow the instructions below. Otherwise skip to the
section titled “Offline Registration”.
If you want to online register your software and L-series access devices, leave the
“Register” radio button selected, and click “Next.”
At the "Customer Data" screen, if the data fields are not already populated, enter the
registered user's relevant information. Each field in this window must be filled in. Once
all data has been entered, click on the "Next" button.
18
L230/L130 User Manual
Select the “Register online, using your internet connection” and click “Next.”
The registration wizard will then show you a list of all unregistered L-series access
devices that are currently connected to this vSpace host. You cannot select which
devices will be registered – all devices shown in this list will be registered.
Before the registration wizard communicates with the registration server, you will get the
following “Summary” screen showing all user information that will be registered with the
vSpace software. Also, any connected but unregistered L-series access devices will be
listed for registration. If the data is correct, click on the “Register” button or click “Back”
if you wish to change any of the information.
19
L230/L130 User Manual
You then get a registration progress screen followed by “Registration results.”
When your registration is complete, you see the “Registration results” screen. Be sure
to click the check box for the “Register future L-series devices in the background” option,
if you want vSpace to automatically register any unregistered L-series access devices
that connect to this system in the future. Use of this “background registration” feature
requires standard internet connectivity.
20
L230/L130 User Manual
Offline Registration
In the case of Offline Registration, follow the instructions below. If you have completed
the online registration section, skip to “Using the access device”.
If you don’t have standard internet connectivity, you can use standard email to register
your vSpace software and L-series access devices.
To use offline registration, you again select the “Register” option, and click “Next.”
At the "Customer Data" screen, if the data fields are not already populated, enter the
registered user's relevant information. Each field in this window must be filled in. Once
all data has been entered, click on the "Next" button.
The registration wizard will then show you a list of all unregistered L-series access
devices that are currently connected to this vSpace host. You cannot select which
devices will be registered – all devices shown in this list will be registered.
21
L230/L130 User Manual
On the next screen you then select the “Create off line registration file” option and click
“Next.”
You’ll need to select the location where you wish to store the registration data file that
you’ll later email to NComputing. Note that you cannot type directly into the “Create
activation file” field, but you must click on the “Select” button to navigate to the directory
where you wish to store the offline registration data file.
The window below shows the navigation screen that allows you to place the data file in
the desired location. Feel free to change the “File name” to something other than
“activation” – but don’t change the “Save as type” field. The registration file must be of
type “txt” – even though the data inside is encrypted and must not be modified.
22
L230/L130 User Manual
Before the registration wizard writes the data file, you will get a “Summary” screen
showing all user information that will be written to the data file. Also, any connected but
unregistered L-series access devices will be listed for registration.
If the data is correct, click on the “Register” button or click “Back” if you wish to change
any of the information.
Then email the created “txt” file to [email protected].
You can copy the “txt” file to another PC, if necessary to send the email.
Add Additional vSpace License
The second option on the “Type of Registration” screen is a feature reserved for future
use in extending vSpace software capabilities by adding additional or optional vSpace
licenses.
23
L230/L130 User Manual
Completing the Offline Registration Process
You will normally receive an immediate email that your registration file has been
received, and the vSpace license file should be returned within another 5 to 10 minutes.
When you receive the host system’s license files, save it in a convenient disk location,
and restart the “Registration Wizard,”
Select “Complete offline registration by using activation file” option and click “Next” and
navigate to the disk directory where you have stored the returned license/activation file.
Click “Select” to do the navigation, and click “Open” once you have located the correct
license file. Then click “Next” to load the license file and apply it to the vSpace host
system.
After the offline file is loaded, you see the “Registration results” screen. You may want
to click the check box for the “Register future L-series devices in the background” option,
to have vSpace to automatically register any unregistered L-series access devices that
connect to this system in the future. Note that this “background registration” feature
requires standard Internet connectivity.
24
L230/L130 User Manual
Uninstallation
To uninstall the vSpace program, select “Uninstall vSpace” in the “Start” menu. Follow
the prompts and the programs are removed from the host PC. After the programs are
uninstalled, you must restart the host PC to complete the process.
Updating the vSpace Software
Once you have successfully completed the registration process, you can update the
vSpace software directly over the Internet by selecting “VSPACE Internet Update” from
the “Start” menu.
Note: If the “Enter Password” window appears, enter the vSpace administrator password
you selected during vSpace installation.
Click the “Connect” button to check for a software update. If there is a new version
available, click on the “Download” button to start the update process. If there is no new
version available, click on the “Exit” button. When the download is complete, the
installation of the new version will begin.
25
L230/L130 User Manual
Using the access device
Configure the Access Device
The access device screen
The available connection list shows the vSpace hosts to which the device can connect.
Select a host from the list and click on the "Connect" button to start.
The "Refresh" button refreshes the available connection list.
The Options Menu
The "Options" button brings up a menu where you can view and change the access
device's settings.
Within the “Options” screen, the "Reset" button resets the access device
The "Info" button brings up a window to view the following information about the access
device:
•
Version: the version of firmware running on the access device
•
Build: The build number of the firmware running on the access device
•
Date: The date of the firmware running on the access device
•
Device Model: The model number of the access device
•
Loaded Schema Version: The schema version running on the access device
•
IP Address: The IP address the access device is configured to use
•
Gateway: The IP gateway the access device is configured to use
•
MAC Address: The MAC address of the access device
•
Serial Number: The serial number of the access device
•
Alias: The alias of the access device, defined using the vSpace admin console
26
L230/L130 User Manual
•
"Loaded from . . .": How the access device loaded its latest firmware update.
The "Close" button closes the options menu.
The “Setup” Menu
Within the “Options” screen, the "Setup" button brings up a set of tabs for viewing and
changing the access device settings. Note that this is an optional step to be used for
more control of the device.
The "Save" button saves all the changes made in the tabs and closes the window. This
brings the user back to the host PC list.
The "Cancel" button discards all the changes made in the tabs and closes the window.
This brings the user back to the host PC list.
The “Network” Tab
The "Network" tab contains settings for network connectivity.
If you have an IP Address, click on the "Use Static IP Address" radio button to set an IP
address and gateway address for the access device to use.
Otherwise, click on the "Get Dynamic IP Address" radio button to configure the access
device to use DHCP to get its IP address.
The MAC address is shown here for reference.
27
L230/L130 User Manual
The “Options” Tab
The "Options" tab contains settings for host PC connections.
The "Server Connection List" is a list of three connection profiles. There is a check mark
to the right of each profile that is enabled.
Select a profile and click on the "Edit" button to view and change its settings.
Select a profile and click on the "Enable/Disable" button to enable or disable the profile.
The first profile is called "Autodetection." Unlike the other profiles, its name can never be
changed and it has no specified server network address.
The second and third profiles' default names are "TS 2" and "TS 3," respectively. You
can change these profile's names and they have a "Server Network Address" field where
you set a host PC IP address.
28
L230/L130 User Manual
In each profile, there are the following settings:
•
The “Autoconnect Enabled” radio button, when activated, sets the access device
to automatically connect to the selected server when the device is turned on.
•
In the “User name” field, you can enter the user name that you want to be
entered into the Windows login dialog box upon access device connection.
•
In the “Domain” field (only accessible from the vSpace admin console), you can
enter the domain that you want input to the Windows login dialog box upon
connection.
•
In the "Programs" section, you can define the application that launches when the
access device connects to a host PC using that profile. You can make the
desktop come up, or a define a program to be run that’s specified by program
name and the folder where it exists on the host PC.
•
In the "Desktop Size" section, you can set the video behavior when the access
device connects to a host PC using that profile. You can set the resolution, color
depth, and frequency. For example, you can choose a resolution of 1024x768 at
a color depth of 16 bits.
•
The "Mode Test" button allows you to choose a desktop setting and do a basic
test to see if it works with your monitor. Click on the button and the video output
will change to the specified resolution, color depth and frequency. To exit the
video mode test, press the "Esc" key on the keyboard.
•
Click on the "OK" button to save the changes and close the window.
•
Click on the "Cancel" button to discard the changes and close the window.
* Note: Some monitors may not properly display certain video modes.
The “Password” Tab
The "Password" tab contains settings for protecting the access device options with a
password.
If you select "Do not use Password", there will be no password required to view or
change the access device's settings.
If you select "Protect device Setup Options with Password, a dialog box will pop up
where you will be required to enter a password twice. Then, when users click on the
29
L230/L130 User Manual
"Setup" button in the "Options" sub-menu, they will be asked to enter the password. No
other menus are affected by this password.
NComputing recommends setting the password to improve security.
The “Update” Tab
Your NComputing L-Series access device may at times require a firmware update. To do
this, select the "Update" tab and click on the "Update" button. When the access device
asks you for a password, enter "updateme" (without the quotes). Your access device will
walk you through the process of updating the firmware.
It is crucially important that you follow the instructions. If you turn off the access device
during the firmware update process, it may become non-functional.
After the firmware update process is complete, reset the access device by turning it off
and on.
Certain changes in the vSpace software require a firmware update in each access
device connecting to it. NComputing notifies customers when a firmware update is
required by a given vSpace software update.
Using the vSpace Management Console
Start the admin console from the Windows Start menu. The application is called,
"vSpace Console."
You can also start the management console by right-clicking on the NComputing icon in
the system tray and selecting "vSpace Management Console" or by simply doubleclicking on the NComputing icon in the system tray.
The current color of the NComputing system tray icon displayed on the administrator’s
host station provides vSpace services status information.
vSpace is enabled and
running normally.
vSpace is enabled and running,
but a minor system module
inconsistency has been noted.
Please check NComputing online
Knowledge Base for any
recommended software update.
30
vSpace has been
disabled on this
system.
L230/L130 User Manual
If a module conflict is detected, vSpace changes the color of the administrator’s
system tray “console icon” from green to either yellow or red depending on the
severity of the problem that could be caused by the conflict. (See above table of
screen shots.) At the same time, a “Warning” message will be shown on the
administrator’s console session recommending a software update be applied to
the NComputing vSpace software. (The administrator warning message will be
shown every time the system reboots until the MS update is removed or until an
NComputing update for the module has been applied. – See screen shot below.)
If a Microsoft update has created one of these conflicts, a new software version
will be distributed very quickly through the vSpace automatic software update
feature.
31
L230/L130 User Manual
Software Settings (local)
The "Software Settings (local)" tree allows you to see and change settings for the
host PC.
Sessions
The "Sessions" item shows information about all the sessions currently active on the
vSpace software. By clicking on a session in the left window pane, you will see two tabs
of available information.
The "Application loaded" tab shows all the applications running on the selected session.
32
L230/L130 User Manual
The "Information" tab shows the following information about the selected session:
•
The "Station name" field shows the access device's name that was defined via
the vSpace admin console.
•
The "Logged in user" field shows the username that is currently logged in.
•
The "Default user" field shows the default username for the vSpace user session.
If one is not configured, it shows the last user that logged in.
•
The "Status" field shows the session connection status.
•
The "Client connection" field shows the UTMA session and the IP address of the
access device used.
•
The "Display Id" field shows the access device’s display ID.
•
The "Hardware Id" field shows the access device’s virtual hardware ID.
•
The "Keyboard Id" field shows what type of keyboard interface is used.
•
The "Pointer Id" field shows what type of pointer interface is used.
In the toolbar, there are three buttons: “Send Message,” “View Station” and “Stop
Station.
33
L230/L130 User Manual
Note: The “View Station” button may not be present if this function is disabled. The “View
Station” button is not present when you select the session that you are currently using.
To send a message to a session, select the session and click on the “Send Message”
button in the toolbar. The “Broadcast” tab allows you to select an access device to send
the message to, a “From” entry, and a message. The access device must be connected
to the same host PC. The “Network Broadcast” tab allows you to send a message to an
access devicel that is connected to the same host PC or a different host PC on the same
network.
To view a session’s screen, select the session and click on the “View Station” button.
When viewing a session’s screen, you may select whether or not to control the mouse
and keyboard remotely and whether or not to allow the user to control the mouse and
keyboard. To see and change these settings, right-click on the title bar of the session
view to bring up a menu. There are two settings, “Controlled by TS Admin” and “User
Input Allowed.”
To stop a session, select the session and click on the “Stop Station” button
Information & Settings
The "Product Information" tree item shows information about the host’s vSpace software.
34
L230/L130 User Manual
The "Licensee information" tree item shows the information entered during the
registration process.
The "System Settings" tree item shows the following settings for the vSpace software.
Double-clicking on the name of the setting allows you to adjust it (unless it is read-only,
which is specified below).
•
Maximum number of stations (incl. Host): Displays the maximum number of
sessions the vSpace software is configured to support. This number includes the
host PC. This setting is read-only.
•
Current number of sessions: Displays the number of active sessions. This
setting is read-only.
•
This machine: Displays the name of the host PC. This setting is read-only.
•
This user: Displays the currently logged-in user’s username. This setting is readonly.
•
System uptime: Displays how long the host computer has been logged on. This
setting is read-only.
•
Main Station AutoLogon: Displays whether or not the host PC is set to
automatically logon at boot-up.
35
L230/L130 User Manual
•
Delay until shutdown (seconds): Displays the default amount of time after a
shutdown command is issued on the host until the shutdown occurs. After the
shutdown command is issued on the host, the shutdown timer starts. Then, a
window pops up on each access device that tells the users they must logoff since
the host is shutting down. Each user must save their work. Also, a window pops
up on the host that enables the administrator to abort the shutdown timer and
start the shutdown immediately, or cancel the shutdown. When the shutdown
timer expires, the shutdown occurs.
•
Disable Send Broadcast Message: Displays whether or not the administrator
has disabled broadcast messages. See the description of the “Sessions” tree
item for more information about how broadcast messages work.
•
Disable Console in Context Menu: Displays whether or not the administrator
has disabled the Console Icon from showing up in the Windows system tray of a
user’s virtual desktop session.
•
Prevent access of the USB-storage devices to the attached terminal:
Displays whether or not the administrator has globally prevented access to USB
devices on access devices.
•
Remote View/Control allowed: Displays whether or not the administrator has
configured the vSpace software to allow administrators to remotely view user and
control user sessions.
•
Clean up disconnected sessions not in use: Displays whether the vSpace
software automatically looks for disconnected sessions that are not in use and
logs them out after a defined period of time. If this feature is turned off (set to
“No” or “0”), when any access device drops its connection, the connection
remains active on the host. When the user reconnects, their disconnected
session is reconnected to their new session and all their open files and
applications are available again. Also, in this case, the only way to end a
disconnected session is for an administrator to stop the session from the console
software. If this feature is turned on (set to any whole number up to 999), the
same behavior applies, but when a session is disconnected, a timer starts. If the
user reconnects before the timer is up, their disconnected session is reconnected
to their new session and all their open files and applications are available again.
If the timer runs out and the session is still disconnected, the vSpace software
will end the session by itself. This makes sure that disconnected sessions do not
reserve resources for an indefinite period. By default, this is set to “5.”
•
Support WTSAPI32 Interface: Displays whether or not the vSpace software has
turned on support for the WTSAPI32 interface. (This feature is currently
disabled.)
•
Disable background-bitmaps under Windows XP: Displays whether or not the
user is able to set their own background bitmap for their Windows desktop.
•
Do not display last user name: Displays whether or not the vSpace software
displays the last user name that logged on using a particular access device. This
is sometimes enabled as a security measure.
•
UTMA/UTSA USB port support: Displays whether the administrator has set the
vSpace software to allow using the USB port on L230 access devices.
•
Administrator Password: Displays whether an administrator password is set.
36
L230/L130 User Manual
•
Autologon on the Host Station: Displays whether the host PC is set to boot up
without the Windows logon screen showing on the host PC.
The "Serial Numbers" item shows a list of serial numbers of access devices that have
connected to the vSpace software. For each serial number, it shows the number of
licenses required for that device, the station number (if available), whether or not it is
registered, and a description of the device.
USB-Device Assignment(s)
Note: This feature is only available on the L200 & L230.
In the "USB-Device Assignment(s)" tree item, you can control connections between USB
ports on the host and vSpace sessions. To use this function, navigate the tree to select a
USB port. When you right-click on an entry under “USB-Device Assignment(s)”, you can
de-select the “Hide the ports that are not connected” item to see all ports. After selecting
a port, the following information is displayed:
•
The port number.
•
If a device is connected, the device's simple name.
•
The device's longer name, usually including the manufacturer and model.
•
A check box for "Allow all users access to every USB port". When this is
selected, all USB ports are connected, as if in one hub. When the box is not
37
L230/L130 User Manual
checked, a list of available USB ports is displayed where you can select which
one(s) is/are to be connected to the selected device. This list shows each access
device's MAC address and its serial number along with a checkbox.
When you click on the "Apply" button, changes to the USB-Device assignments are
saved. To discard changes, simply navigate to another tree item or close the console
without clicking on the "Apply" button.
Software Settings (LAN)
The "Software Settings (LAN)" tree allows you to see and change settings for the host
PC and all other PCs on the network that are running the vSpace software. Once you
select a server in the tree, the same settings are present as are in the "Software Settings
(local)" tree item.
38
L230/L130 User Manual
Hardware Settings (LAN/local)
The "Hardware Settings (LAN/local)" tree allows you to see and change settings for all
access devices on the network.
When you select the "UTMA/UTSA Devices" tree item, there is a table in the right side of
the window that contains information about each access device. There is a very wide
variety of information available for each access device. Clicking on the "Columns" button
enables you to select what columns are displayed. You can select a preconfigured group
of columns or you can click on the "Advanced" button to select individual columns to
display.
39
L230/L130 User Manual
Double-clicking on an entry in the table brings up the "Device Properties" window that
shows a list of properties and buttons for changing the device's settings.
The settings you can change are all the same settings you can change when you use
the "Options" window on the access device itself. See the access device setup section
for details on these settings.
Note: There are four settings you can change in the "Device Properties" window that you
can't change in the access device's "Options" window.
•
One is the device's name. You can configure it on the management console by
clicking on the "Connection Settings" button.
•
The second is the access device's group membership. You can add the access
device to a group or multiple groups by clicking the "Member of Groups" button
and adding the groups to the list.
•
The third is enabling and disabling USB on the selected device. In the "Device
Properties" window, there is a checkbox labeled, "Enable USB on this device".
•
The fourth is the “Auto-Connect” feature. It is available under the “Connection
Settings” button in device configuration. This feature enables configuring the
access device to automatically connect using a specific profile when it is
restarted or logged off.
You can print the access devices's information by clicking on the "Print" button.
For L230 devices, a check box appears on the Device Properties screen that allows the
administrator to specify whether or not the USB port can be used on that access device.
40
L230/L130 User Manual
In the "UTMA/UTSA Device Group(s)" tree item, you can create groups of access
devices for administrative purposes. You can use groups to organize your access device
records by any criteria. Access devices can belong to as many groups as necessary.
Right-clicking on the "UTMA/UTSA Device Group(s)" tree item will bring up a context
menu where you can create a group.
In the “Enter UTMA Device group name” window, enter the group name and description.
41
L230/L130 User Manual
Troubleshooting error messages
Error messages on the access device
DHCP server was not found
If the access device cannot find a DHCP server, this error message appears.
Make sure there is a DHCP server on the current network.
Make sure a LAN cable is connected to the access device.
Make sure the LAN cable connected to the access device is not a cross-over cable.
Make sure the LAN cable is properly connected to the networking equipment.
If there is no DHCP server on the current network, change to using a static IP address.
See the section on installing the access device for instructions.
No Terminal Server found message
This occurs when the access device is set to find the host PC and it does not find the
host PC where the vSpace software is installed.
Make sure the vSpace program is installed on the host computer.
Make sure the LAN cable is properly connected to the host computer.
Make sure the host computer and access device are in the same subnet/local area
network.
Make sure any firewall or anti-virus programs installed in the host computer or network
equipment are compatible with the vSpace software.
Host unreachable…
When the access device cannot connect to the host PC, this message appears.
Make sure the server connection list is configured correctly. See the section about
configuring the access device.
Make sure the vSpace software is installed on the host PC.
42
L230/L130 User Manual
Make sure the host computer and access device are in the same subnet/local area
network.
Make sure any firewall or anti-virus programs installed in the host computer or network
equipment are compatible with the vSpace software.
TS ERROR – INVALID OR NO SERIAL NUMBER!
This message appears when no serial number exists in the host computer. This
message does not indicate an error regarding the serial number of the access device.
Please see the section about product registration to register the vSpace software and
the access devices.
Connection was closed Message
Connection was closed but your data is not lost and application is
still running on the server. Please connect to the terminal server
later.
This message appears when the connection stops due to abnormalities occurring on the
host PC or network equipment.
Check the Host PC or the network equipment when this message appears and restart
the Host PC and access device. Unless the Host PC is rebooted, existing data in the
Host PC may be used as is.
Check to see if the host PC is overloaded.
Check to see if the network traffic is overloaded.
Check to see if the host PC is unstable.
There is a feature in the vSpace software that keeps disconnected sessions running and
available. If the user reconnects while a disconnected session for that username is
present, the software will connect the disconnected session to the new session. The
user will see the desktop as it was when the disconnection occurred.
The administrator can configure the software to keep disconnected sessions running and
available indefinitely or to close them automatically after being disconnected for a
specified period of time. The setting is in the administrative console’s system settings
and is called, “Clean up disconnected sessions not in use.”
Authorization error
43
L230/L130 User Manual
When two access devices use the same serial number simultaneously, the error
message appears.
Check all serial numbers in the vSpace software admin console.
TS ERROR – Stations Limit Exceeded!
When an access device attempts to connect to the host PC and the number of allowed
connections is exceeded, this message appears.
Check how many access devices are connected to the host PC.
Check what operating system is installed on the host PC.
Troubleshooting error messages on the Host PC
As Microsoft distributes Windows updates, some security updates may cause module
conflicts with the NComputing vSpace software.
The current color of the NComputing system tray icon displayed on the administrator’s
host station provides vSpace status information.
vSpace is enabled and
running normally.
vSpace is enabled and running,
but a minor system module
inconsistency has been noted.
Please check NComputing online
Knowledge Base for any
recommended software update.
vSpace has been
disabled on this
system.
If a module conflict is detected, vSpace changes the color of the administrator’s system
tray “console icon” from green to either yellow or red depending on the severity of the
problem that could be caused by the conflict. (See above table of screen shots.) At the
same time, a “Warning” message will be shown on the administrator’s console session
recommending a software update be applied to the NComputing vSpace software. (The
administrator warning message will be shown every time the system reboots until the
MS update is removed or until an NComputing update for the module has been applied.
– See screen shot below.) If a Microsoft update has created one of these conflicts, a
new software version will be distributed very quickly through the vSpace automatic
software update feature.
44
L230/L130 User Manual
Glossary
•
Access device: a network computing device using NComputing patented
technology. It doesn't use CPU, VGA, and PC chipsets; it only uses a
programmable SoC to connect to a Host PC. An access device using
NComputing User eXtension Protocol (UXP) can be connected to Host PCs by
using the LAN cable. Also, it can be connected to remote PCs through the
Internet using TCP/IP.
•
Administrator: a person who is responsible for managing a multi-user computing
environment, such as a local area network (LAN). The responsibilities of the
system administrator typically include: installing and configuring system hardware
and software; establishing and managing user accounts; upgrading software; and
backup and recovery tasks.
•
Alias: a fictitious name used by an individual as an alternative to her or his true
name.
•
Client/Server: describes the relationship between two computer programs in
which one program, the client, makes a service request from another program,
the server, which fulfills the request.
•
Console: the text entry and display device for system administration messages,
particularly those from the BIOS or boot loader, the kernel, the init system and
the system logger.
•
DHCP: (Dynamic Host Configuration Protocol) is a communications protocol that
lets network administrators centrally manage and automate the assignment of
Internet Protocol (IP) addresses in an organization's network. Without DHCP, the
IP address must be entered manually at each computer in an organization and a
new IP address must be entered each time a computer moves to a new location
on the network.
•
Download: the transmission of a file from one computer system to another.
•
Ethernet: the most widely-installed local area network (LAN) technology specified in a standard, IEEE 802.3.
•
Firewall: a set of related programs (located at a network gateway server) that
protect the resources of a private network from users on other networks and
control what outside resources its own users have access to. (The term also
implies the security policy that is used with the programs.)
•
Gateway: a network point that acts as an entrance to another network. On the
Internet, a node or stopping point can be either a gateway node or a host (endpoint) node.
•
Host Computer: a computer in which the vSpace program has been installed
•
Internet: a worldwide system of computer networks in which users at any one
computer can, if they have permission, get information from any other computer
(and sometimes talk directly to users at other computers).
•
IP Address: the Internet Protocol (IP) is basically the set of rules for one network
communicating with any other (or occasionally, for broadcast messages, all other
networks). Each network must know its own address on the Internet and that of
any other networks with which it communicates. To be part of the Internet, an
organization needs an Internet network number, which it can request from the
45
L230/L130 User Manual
Network Information Center (NIC). This unique network number is included in
any packet sent out of the network onto the Internet.
•
LAN: local area network (LAN) is a group of computers and associated devices
that share a common communications line or wireless link and typically share the
resources of a single processor or server within a small geographic area (for
example, within an office building). Usually, the server has applications and data
storage that are shared in common by multiple computer users. A local area
network may serve as few as two or three users (for example, in a home
network) or as many as thousands of users (for example, in an FDDI network).
•
Log on: in general computer usage, logon is the procedure used to get access to
an operating system or application. Almost always, a logon requires that the user
have (1) a user ID and (2) a password. Often, the user ID must conform to a
limited length such as eight characters and the password must contain at least
one digit and not match a natural language word
•
MAC Address: in a LAN or other network, the MAC (Media Access Control)
address is your computer's unique hardware number. (On an Ethernet LAN, it's
the same as your Ethernet address.) When you're connected to the Internet from
your computer, a correspondence table relates your IP address to your
computer's physical (MAC) address on the LAN.
•
vSpace: NComputing Desktop Virtualization software
•
PC: Personal Computer
•
Router: in packet-switched networks such as the Internet, a router is a device or,
in some cases, software in a computer, that determines the next network point to
which a packet should be forwarded toward its destination. The router is
connected to at least two networks and decides which way to send each
information packet based on its current understanding of the state of the
networks it is connected to.
•
User: one who uses a computer system. Users may need to identify themselves
for the purposes of accounting, security, logging and resource management. In
order to identify oneself, a user has an account and a username.
•
USB: (Universal Serial Bus) is a standard designed to allow peripherals to be
connected to a computer using a standardized interface socket and to improve
plug-and-play capabilities by allowing devices to be connected and disconnected
without rebooting the computer.
•
UTMA: Ultra Thin Multi Access
46
L230/L130 User Manual
FAQ
Q: Must the versions of the vSpace software in a network be the same?
A: Yes, different versions can cause data communication problems. Please keep all
vSpace software updated with the latest version.
Q: When I start my access device, why is the server connection list blank? I have
the vSpace software on a host PC in my network. I can connect to the host PC if I
provision its IP address in the access device.
A: This condition occurs when the host and access devices are on independent subnets.
The access device can run in this mode, but will never see the host PC in its server
connection list.
Q: When I go to the device list in the administration console, why do some of my
access devices never show up in the list?
A: This condition occurs when the host and access devices are on independent subnets.
The access device can run in this mode, but its record will never appear in the
administration console’s device list.
Q: When I try to do a manual firmware update on the access device, why does it
not connect to the host PC and download the firmware?
A: This condition occurs when the host and access devices are on independent subnets.
An access device can run in this mode, but it can only download firmware updates when
it is on the same subnet as the host PC.
Q: When I start my access device, why does it not automatically update its
firmware from the host PC like my other access devices do?
A: This condition occurs when the host and access devices are on independent subnets.
The access device can run in this mode, but it can only download firmware updates
when it is on the same subnet as the host PC.
Q: I can't download any vSpace software updates.
A: Make sure that the software is registered and the correct TCP/IP ports are open (see
“Product Registration” section).
Q: Why does a warning message appear when I install the vSpace software?
A: Windows provides a firewall that displays a security warning message when a new
network port is used (see below). If you click the “Keep Blocking” button, you will not be
able to find NComputing servers. If you select the “Unlock” button, the port will be open
unless you block it manually. If you select the “Ask Me Later” button, the port will be
open temporarily and the security message will continue to appear whenever the port is
accessed.
Q: Can the product support 10Mbps or 1Gbps?
A: No, only 100Mbps is supported.
Note: Go to http://www.ncomputing.com/support.aspx to see the latest FAQs.
163-0045 Rev.F
47