1
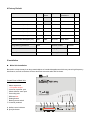
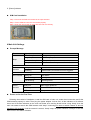
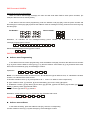
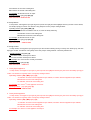
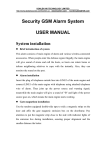
KONLEN TECHNOLOGY LIMITED Website: www.konlen.com
Add: , 3/F, Building5, Kaijieda Industry Zone, Huachang Road, Longhua, Shenzhen China
Tel: +86-(0)755-29709632 E-mail: [email protected] [email protected]
Security GSM Alarm System
USER MANUAL
1 System Introduction
Wireless GSM intelligent anti-theft electronic alarm system is an innovative wireless mobile intelligent
warner integrating GSM digital signal processing techniques and imported STC microprocessor, and a variety
of technologies including digital voice announcer, English SMS, learning code, etc.
In addition, this alarm system is highly automatic, giving automatic voice or SMS alert in the event of
emergency without intensive manual settings required. Features of stability, reliability, safety, and humanizing
control enable it to be widely used for alert in shops, convenience stores, offices, villa as well as residential
communities.
2 Function Introduction
4 wired & 6 wireless defence zones; each wireless zone can code with 10 wireless sensors, total 60pcs
Can preset and store 6 voice phones and 3 message phones;
Remote two-way intercom;
Telephone (mobile phone) remote control programming;
SMS remote control preset & arm/disarm the main panel;
SMS alarm content can be changed;
3 groups of timely arm and disarm;
2 groups reply to timely control the home appliances open or close;
Can connect wireless siren(Option)
10-second automatic message recording;
Built-in intelligent English message;
Alarm locking memory and information clear for easy checking;
One-key-control function: Out Arm, Home Arm, Remote Arm;
Wireless intelligent learning encoding and comply additional accessories;
Arm, disarm, monitor and intercom by remote calling the alarm unit;
Real-time, delay, 24 hours, bypass defense zones programming function;
Built in NI-HI rechargeable battery is available to provide power supply nearly 5hours automatically after
power off;
AC and DC dual use are available for 24-hours-a-day normal guard;
Main unit anti-tamper and low-voltage detecting function.
3 Technical Parameter
Input Voltage:
DC9V~12V
Standby Current:
<55mA
Alarm Current:
<450mA
Wireless Frequency:
315/433.92MHz, 2262/4.7MΩ
GSM Frequency:
900/1800/1900MHz
Backup Battery:
NI-HI AAA*6 DC7.4V
Alarm Loudness:
110dB
4 Factory Default
defence zone
Arm
defence zone 1
At
Home
Type
Alarm
Conditions
Siren
Valid
Real-time
Door lock alarm
On
defence zone 2
Valid
Real-time
Hall alarm
On
defence zone 3 (wired)
Valid
Valid
Real-time
Window alarm
On
defence zone 4 (wired)
Valid
Valid
Real-time
Balcony alarm
On
defence zone 5 (wired)
Valid
Valid
24 hours
Fire alarm
On
defence zone 6 (wired)
Valid
Valid
24 hours
Gas alarm
On
Remote control emergency key
Valid
Valid
24 hours
Help alarm
Programming password:
8888
Remote Control:
Enabled
Operation Password:
1234
Ringing Times:
Once
Siren Duration:
180 seconds
Warning Siren:
Disabled
5 Installation
Main Unit Installation
Be careful to keep it away from large metal objects or household appliances which may cause high frequency
interference, as well as barriers such as reinforced concrete walls and fire doors.
A. defence zone indicator
B. [Arm] lindicator
Z5
Z4
Z3
Z2
A. SIR
Z1
Control Panel of Main Unit:
① Power hole
② Alarm output end
③ +12V power output
④ Intercom speaker port
⑤ Wired defence zone input
⑥ Grounding wire
⑦ SIM card slot
⑧ Setting button
⑨ Backup power switch
⑩ Antenna pedestal
A
1
2
电源
警号
3
NO NC
4
Z3
地
Z4
5
地
Z5
地
6
7
设置
Z6
SIM卡
Z6
D
布
防
电
源
B C
8
9
开 /关
天线
C. [Power] indicator
SIM Card Installation
Step 1: Push out the SIM card socket as the open direction.
Step 2: Fit the GSM card into the card socket properly.
Step 3: Push the card socket as close direction until it is fit firmly.
6 Main Unit Settings
Prompt Message
Function
Beep
Notes
Short “beep”
Key-press prompt
Long “beep”
Confirm prompt
Four short “beep”
Error prompt
“Beep” continue
SIM card is not fit or power on for the first time
Defence zone
indicator
Always on
Alarm lock
Flickering
Disarm status, this defence zone is triggered
Arm indicator
Always on
Arm status
Slow flickering
Settings status/At home status
Fast flickering
Alarming status
Power
indicator
Operation Instructions
Always on
Main supply power-on
Flickering
Weak GSM signal or no signal
OFF
Not power on
Power-on for the First Time
Following the method of installation, install the SIM card of main unit, make wired connection and fit the
GSM antenna properly in order. Then plug the power adapter. At that time, all the indicators of 6 defence
zones and 2 function indicators on the main unit flicker once and the buzzer emits a long “beep”; then the
main unit starts to search the GSM network with “beep” continuing(The time to search network is about 8
seconds to 55 seconds). Until the network is normal, “beep” stops, the power indicator is always on and the
main unit is in the status of disarm.
At last, slide the switch of backup battery to [ON] with nippers or a small screwdriver.
Factory Reset
First switch off the backup battery and cut off the power supply, press and hold the button [Set] on the top
of unit,then turn on the power adapter; 3 seconds later, the buzzer emits a long “beep” and all the LED
indicators go on but go off instantly; at last you can release the button. That's mean all its settings cleared and
return to its factory settings successfully.
Voice Record
In the status of disarm, press [Set] for 3 times, the main unit emits a long “beep”, and [Arm] indicator
flickers (once a second), then recording starts: recording at 30cm away from the main unit, with standard of
moderate voice; 10 seconds later, recording stops automatically and [Arm] indicator goes out.
Enter Setting
In the status of disarm, press and hold [Set]; 3 seconds later, the main unit emits a long “beep”, [Arm]
indicator flickers and the main unit enters the setting status.
In the status of settings, as long as keeping the status of setting ([Arm] indicator flickers), you can program
different settings repeatedly. During setting, however, if you stop setting operation for over 30 seconds, the
main unit will exit from setting mode automatically and return to the status of disarm.
Exit Setting
After setting is finished, all the indicators of the defence zones is off but only [Arm] indicator flickers; press
[Set] for 3 seconds,the main unit exits from setting. [Arm] indicator goes off, the main unit returns to the status
of disarm.
Code Pairing by Remote Control
Code Pairing of Remote Control
In the status of disarm, enter settings and press [Set] once again, the main unit emits a short “beep” and all the
indicators of the defence zone are always on, which indicate that the unit enters remote control code pairing status;
take a remote control required for code pairing and press any key on it to emit a wireless signal to main unit; after
the main unit receive the signal, it emit a beep and all the indicators of defence zone go out, which indicate the
remote control succeeds in code pairing.
Cautions: the main unit can provide code pairing for at most 8 remote controls. Code pairing for all remote
controls is the same.
Delete Remote Control
In the status of disarm, enter settings and press [Set] once again, the main unit emits a long “beep” and all the
indicators of the defence zone are always on, and then it enters remote control code pairing status; press and hold
[Set] for 3 seconds, the main unit emits a long “beep” and all the indicators of the defence zone go out. Remote
control paired successfully.
Cautions: when deleting remote control, all the remote controls would be deleted.
Code Pairing of defence zone
Code Pairing of defence zone
In the status of disarm, enter settings, press [Set] once again to enter the remote control code pairing status;
press [Set] once again and the indicator of defence zone 1 goes on; then, take a sensor required for code pairing
and trigger an alarm to emit a wireless signal to the main unit; after the main unit receives this signal, it emits a long
“beep” and the indicator of defence zone 1 goes out, which indicate code pairing in defence zone 1 is paired
successfully.
Cautions: in the status of disarm, enter settings, skip code pairing of remote control and continue to press [Set],
and then the indicators of the defence zone go on one by one; select a defence zone to perform code pairing and
the indicator of this defence zone goes on. Repeat the code pairing operation in the paragraph above for all other
defence zone.
Code pairing for the defence zone on main unit can be overwrote automatically, which means only the last code
pairing is valid. Therefore, code pairing can only be performed for one sensor in a defence zone; in case the
number of sensors required is more than that of the defence zone, you can edit the address code and digital code
of the sensors of same type to be the same exactly. By doing so, you just need to perform code pairing for one
sensor, and then other sensors with the same codes can work normally. In alarm, it will indicate the same defence
zone.
Delete Code Pairing
In the status of disarm, enter settings and skip code pairing of the remote control; press [Set] once again, then
the indicator for defence zone 1 goes on; then, long press [Set], three seconds later the main unit emits a long
“beep”, and the indicator of defence zone 1 goes out. Code pairing for defence zone 1 is deleted successfully.
7 Remote Control Programming
All the programming of the main unit are completed by key operations on a phone or send SMS
commands, which shall dial GSM card number of main unit first.
In the status of disarm, after GSM network is checked to be normal, dial the SIM card number by mobile phone
(or fixed phone), the main unit will answer automatically and give a voice prompt “Please enter the password”; then
you can enter the correct programming password (factory default: 8888); after that, the main unit emits a long
“beep”, and the [Arm] indicator flickers, indicating that the main unit enters remote control programming.
Function Instructions
Function
Operation Instructions
Notes
Enter Programming
Enter [password]
Long “beep”
Exit Settings
Operation Password
Programming Password
(modified)
[31] + [new password] + [#]
(modified)
Factory default: 1234
Factory default: 8888
[51] + [phone number] + [#]
[51]~[56] 6 groups
Delete Phone Number
[51] + [#]
[51]~[56] 6 groups
[57] + [phone number] + [#]
[57]~[59] 3 groups
Delete Message
[57] + [#]
[57]~[59] 3 groups
defence zone Programming
[60]+[01~08]+[1~4]+[1~8]+[0/1]+[#]
Factory default: 1/1/0
Stay in defence zone
[61] + [01~08] + [0/1] + [#]
Factory default: 0
Remote Control
[password] + [1/2/3]
Voice prompt
Appliance Open
[password] +5# or [password] +7#
Appliance Close
[password] +6# or [password] +8#
Number
SMS Instructions
Function
Operation Password
Programming Password
Set Phone
Operation Instructions
[Program password] + [30] + [new
password] + [#]
[Program password] + [31] + [new
password] + [#]
[Program password] + [51] +
[phone number] + [#]
Delete Phone Number
[Program password] + [51] + [#]
Message Receiving Phone
[Program password] + [57] +
Number
[phone number] + [#]
Delete Message
[Program password] + [57] + [#]
Defence zone Programming
Stay in defence zone
[Program password] +
[60]+[01~08]+[1~4]+[1~8]+[0/1]+[#]
[Program password] +
[61] + [01~08] + [0/1] + [#]
Remote Arm
[Operation password] + [1] + [#]
Remote Disarm
[Operation password] + [2] + [#]
Appliance Open
Appliance Close
[30] + [new password] + [#]
Short “Beep”
Set Phone
Message Receiving Phone
Hang up directly
Notes
Factory default: 1234
Factory default: 8888
[51]~[56] 6 groups
[51]~[56] 6 groups
[57]~[59] 3 groups
[57]~[59] 3 groups
Factory default: 1/1/0
Factory default: 0
[Operation password] +5# or
[Operation password] +7#
[Operation password] +6# or
[Operation password] +8#
Change Password
In the status of remote control programming, directly enter the address code [30]/[31] by phone keys, enter the
4-digit new password, at last add [#] to confirm. The main unit emits a long “beep” tone, indicating the operations
are successful.
Operation password:
3
0
X X X X
#
Programming password:
3
1
X X X X
#
Illustration: “X” indicates the new password; for example, change the factory default (8888) of programming
password into the new password: 0000.
3
1
0
0
0
#
0
SMS Command: 8888310000#
Operation Password: after dialing the SIM card number by mobile phone (or fixed phone), if you enter the
operation password (factory default: 1234), you can only perform the operations including arm, disarm and
monitoring by remote control.
Programming Password: after dialing the SIM card number by mobile phone (or fixed phone), if you enter
programming password (factory default: 8888), you can only perform the following settings including voice call,
SMS receiving phone number and functions.
Cautions: the operation password and the programming password can not be set to the same number.
Phone Setting
Voice Call
When it is set to alert through voice call, the main unit can send warning voice message to 6 phone numbers,
(for example: defence zone 5, balcony alarm, this is……) .
In the status of remote control programming, enter the address code [51]~[56], enter the phone (fixed phone)
number and then enter [#] to confirm. [51]~[56] represent the address codes corresponding to voice
alarm-receiving phone numbers from the first group the sixth group.
Phone Number Settings:
#
5
1
X
X ... X X
#
5
2
X
X ... X X
#
5
2
#
5
3
X
X ... X X
#
5
3
#
5
4
X
X ... X X
#
5
4
#
5
5
X
X ... X X
#
5
5
#
5
6
X
X ... X X
#
5
6
#
Delete Phone Number: 5 1
Illustration: “X” indicates the set voice alarm-receiving phone number; set 0755-88824002 to be the second voice
call number.
5
2
0
7
5
5
8
8
8
SMS Command: 888852075512345678#
Delete the third group of voice call number.
5
3
#
2
4
0
0
2
#
SMS Command: 888853#
Message Receiving Phone Number
When it is set to alert through message, the main unit will send alarm SMS to three phone numbers, (for
example: defence zone 5, balcony alarm).
In the status of remote control programming, enter the address code [57]~[59], enter the phone number and
then add [#] to confirm.[57]~[59] represent the address codes of message-receiving numbers from the first group
the third group.
Set Number:
5
7
X
X
#
5
8
X X . .. X X
5
9
X
X . .. X
X . .. X
X
Delete number:
5
7
#
#
5
8
#
#
5
9
#
Illustration: “X” indicates the set message-receiving phone number; set 13811111111 to be the first
message-receiving phone number.
5
1
7
3
8
1
1
1
1
1
1
1
1
#
Delete the first message-receiving phone number.
5
#
7
SMS Command: 888857#
defence zone Programming
In the status of remote control programming, enter the address code [60], first enter the defence zone number
by [1~6], then enter the defence zone type by [1~4], then the defence zone location by [1~6], and then select if the
alarm sound is enabled by [0/1], at last add [#] to confirm.
Operations:
6
0
A
B
C
#
D
Notes: “A” indicates the number of defence zone; “B” indicates the type of defence zone; “C” indicates the location
of alarm; “D” indicates if the siren sounds.
8
A: Number of defence zone: [1~6] corresponds to defence
zone 1 to defence zone 6 respectively.
B: Type of defence zone: [1] real-time, [2] 40 seconds delay, [3] 24 hours a day, [4] bypass.
C: Installation Location: [1] help alarm, [2] fire alarm, [3] gas leak, [4] door lock alarm, [5] hall alarm, [6] window
alarm, [7] balcony alarm, [8] perimeter alarm.
D: Type of siren: [0] sound-off, [1] sound-on
Illustration: set the defence zone 1 to 24 hours a day, fire alarm with sound.
6
0
1
3
2
1
#
SMS Command: 8888601321#
defence zone at Home
In the status of setting, press the address code [61], enter the corresponding
number of defence zone by [1~6] and select [0/1], at last add [#] to confirm.
6
1
A
B
#
Operations:
“A” number of defence zone: [1~6] corresponds to defence zone 1 to defence zone 6 respectively.
“B” arm at home (stay-at-home): [0] indicates invalid (no alarm), [1] indicates valid (enable alarm).
Illustration: “A” indicates the number of defence zone; “B” indicates arm at home is valid/invalid; set the defence
zone 1 to arm at home.
6
1
1
1
#
SMS Command: 88886111#
Operating Siren
In the status of remote control programming, enter the address code [75]; in the operation of arm/disarm by
remote control, select if the siren sounds or not by [0/1], then add [#] to confirm. [1]: sounds on; [0]: sound off; the
factory default is [0], indicating that it doesn’t emit a prompt tone.
7 5
#
A
Notes: “A” indicates if the siren emits a prompt when enabling and disarm by remote control: [0] sound on, [1]
Operations:
sound-off.
SMS Command: 8888751#
■ Custom the content of Zone Alarm Message
Custom SMS format: [Program password] + [9] + [1-6 zone] + # + [within 40 characters] + #
For example: Change the SMS that come from Zone 5 Alarm to : a thief in home quickly alarm
SMS content is : 888895#a thief in home quickly alarm#
After zone 5 alarm, the sending message will be "a thief in home quickly alarm".
Delete custom message: [9] + [1-6 zone] + #
SMS Command: 888891-6#
■
Clock Setting
In setup status, use keypad to input [32], then input the two digits [AA] of the present hour (24-hour system), the two
digits [BB] of the present minute, and finally enter [#] to confirm. You will hear a long beep and a voice prompt “setting
finished”.
Operating method: [32][AA][BB][#]
AA indicates: the 2 digits of the present hour.
BB indicates: the 2 digits of the present minute.
For example: set the time as 3:35
Operating method: [32][03][35][#]
SMS Command: 8888320335#
■
Timing Setting
1. Timely Arm
In setup status, use keypad to input [33~35], then input the hour [AA] and minute [BB] of the time you want to set to arm,
and finally input [#] to confirm. You will hear a long beep and a voice prompt “setting finished”.
Operating method: [XX][AA][BB][#]
XX indicates: the address code 33, 34, 35 of the timely arming
AA indicates: the hour of the setting time
BB indicates: the minute of the setting time
For example: set the arm time as 45’ 10pm
Operating method: [33][22][45][#]
SMS Command: 8888332245#
2. Timely Disarm
In setup status, use keypad to input [36~38], then input the hour [AA] and minute [BB] of the time you want to set to disarm,
and finally input [#] to confirm. You will hear a long beep and a voice prompt “setting finished”.
Operating method: [XX][AA][BB][#]
XX indicates: the address code 36, 37, 38 of the timely disarming
AA indicates: the hour of the setting time
BB indicates: the minute of the setting time
For example: set the arm time as 55’ 7pm
Operating method: [33][19][55][#]
SMS Command:
8888361955#
3. Timing Control
In setup status, use keypad to input [39], then input the number indicating turning on timely arm/ disarm [1/0], and then
input [#] to confirm. You will hear a long beep and a voice prompt “setting finished”. The factory default is off.
Operating method: [39][0/1][#]
0: turn off the function of timely arm/ disarm
1: turn on the function of timely arm/ disarm
For example: turn on the function of timely arm/ disarm
Operating method: [39][1][#]
SMS Command:
4
8888391#
Timely Open Appliance
In setup status, use keypad to input [45,47 ],then input the hour [BB] and minute [CC] of the time and finally input [#] to
confirm. You will hear a long beep and a voice prompt “setting finished”.
Operating method: [AA][BB][CC][#]
AA indicates: 45 means 1st home appliance open address, 47 means 2nd home appliance open address,
BB indicates: the hour of the setting time
CC indicates: the minute of the setting time
For example: turn on the 2
5
nd
home appliance at 3:35a.m.
Operating method:
[47][03][35][#]
SMS Command:
8888450335#
Timely Close Appliance
In setup status, use keypad to input [46,48 ],then input the hour [BB] and minute [CC] of the time and finally input [#] to
confirm. You will hear a long beep and a voice prompt “setting finished”.
Operating method: [AA][BB][CC][#]
AA indicates: 46 means 1st home appliance open address, 48 means 2nd home appliance open address,
BB indicates: the hour of the setting time
CC indicates: the minute of the setting time
For example: turn off the 2
nd
home appliance at 23:35p.m.
Operating method:
[48][23][35][#]
SMS Command:
8888482335#
8 Operation Instruction
Arm while outside
It means to guard all around your house while all are out; all the sensors of alerters are always working; when
the sensor is triggered by door, fire, gas leak, etc., the alarm system will sound the alarm. After you have done
these operations, the indicator of [Arm] on the main unit is always on.
Remote Control Operations: press [ ] on the remote control.
SMS Command: 12341#
Arm at Home
It means, for the safety, while somebody is at home, you need to enable the peripheral door, window, balcony
and perimeter sensors of the alarm system for fear of triggering the indoor sensors, which may cause improper
warning; then, you shall select Arm at Home, let just part of the sensors work and disable the other parts. Only if
you have set arm at home, can it work normally and at that time the [Arm ] indicator on the main unit is Slow
flickering.
Remote Control Operations: press [
] on the remote control.
Disarm
It means to stop the alarm when the main unit sounds the alarm or make the alarm system in the status of
non-warning. After disarm the guard, even if you trigger the sensor, the main unit would not sound alarm (excluding
24-hour defence zone and emergency button on the remote control) and the [Arm] indicator goes out.
Remote control operations: press [
SMS Command:
] on the remote control.
12342#
Cancel Alarm
It means to clear the memory of alarm. After the main unit sounds alarm, all the indicators of the triggered
defence zone will be on and locked. In the status of disarm, only repeating the operations to disarm the guard can
eliminate the lock display of the alarmed defence zone; after the alarm is canceled, all the indicators of [Arm ] will
go out.
Remote control operations: press [
Emergency Alarm
Remote control operations: press [
] on the remote control.
] on the remote control.
Receiving Alarm by Phone
After the main unit sounds alarm, it will automatically dial the preset numbers (mobile phone number) in order.
After the user answers: he or she will hear the alarm recording. Meanwhile, users can also do remote control on
the alarming main unit by pressing the phone (mobile phone) keys:
[1] Key: main unit stops the alarm and arranges guard; it does not dial the number any more.
[2] Key: main unit stops the alarm and disarms guard; it does n0t dial the number any more.
[3] key: main unit stops the alarm, monitors the scene for 30 seconds and does not dial the number any more;
for continuing, press [3] again to monitor for another 30 seconds.
[4] key: main unit stops the alarm, intercom the scene for 30 seconds and does not dial the number any more;
for continuing, press [3] again to intercom for another 30 seconds.
st
home appliance.
st
home appliance.
[5] key: Open 1
[6] key: Close 1
[7] key: Open 2nd
home appliance.
[8] key: Close 2nd
home appliance.
[9] key: Open mini siren or wireless siren. If need to close siren, press any one of 1/2/3/4 keys.
SMS command: 1234 [1-9] #
After receiving the alarm by phone, if the user just listens to the voice alarm and hangs up without any remote
control, the main unit will continue to dial the next number until somebody answers it. If no body answers, after the
main unit dials all the numbers for three times in turn, it will hang up automatically.
Remote Control
Dial the number associated to the alarm main unit by phone (mobile phone), and after one ringing cycle, you
can hear a voice prompt “Please enter the password”; enter the password by phone keys (factory default of remote
control password: 1234). If the password is correct, you will hear a prompt “Press ① for arm , ② for disarm, ③ for
monitor, ④ for Intercom ”.
The specific operations are shown as below:
[1] Key: arm, if finished successfully, you will hear a voice prompt “guard has been arranged in the system”.
[2] Key: disarm, if finished successfully, you will hear a voice prompt “guard has been disabled in this system”.
[3] Key: monitoring for 30 seconds, to continue monitoring, press [3] again to monitor for another 30 seconds.
[4] Key: onsite intercom for 30 seconds, to continue intercom, press [4] again to monitor for another 30
seconds.
st
home appliance.
st
home appliance.
[5] key: Open 1
[6] key: Close 1
[7] key: Open 2nd
home appliance.
[8] key: Close 2nd
home appliance.
[9] key: Open mini siren or wireless siren. If need to close siren, press any one of 1/2/3/4 keys.
SMS command: 1234 [1-9] #
■
Home Appliance Control
Home Appliance Switch Pairing:Home appliance switch can only accept the alarm unit signal control after
paired.
Pairing method: Refer to household appliance switch manaul, make the appliance into the code-pair state,.
Then enter into the remote control setting, press 5-8 key operating the alarm unit send out on or off signals to the
appliance, paired them is ok.
Signal encryption:Encrypted wireless signals,can reduce the home appliance mis-operate frequency that
caused by other signals interference.
Encryption method: Enter into system setting, input 73 + XX (2-bit encryption of data) + #
SMS operation: 888873XX #
(Home appliance control settings have a certain complexity, recommend that users complete purchase
directly from the manufacturer).
■
Connect Wireless Siren (Option Function)
This alarm unit can connect wireless siren, to avoid big sound noise to disturb the owner when the siren install
near the alarm unit and make a alarm.
Pair the Siren : Wireless siren can only accept the alarm unit signal control after paired.
Pairing method: According to the wireless siren manual, make the siren stay the code-pair state,then
continue to press 4 times of set button on the alarm unit, sending "open wireless siren" signal to siren,then to pair
them.
Paired wireless siren, will sound when the alarm unit alarming, and stop to sound when the alarm unit
disarm. (Due to wireless control, there may be some time delay)
Signal Encryption:Encrypted wireless signals,can reduce the wireless siren mis-alarm frequency that
caused by other signals interference.
Encryption method: Enter into system setting, input 74 + XX (2-bit encryption of data) + #
SMS operation: 888874XX #
(Wireless siren control settings have a certain complexity, recommend that users complete purchase
directly from the manufacturer).
Remote Control Programming
Dial the number associated to the alarm main unit by phone (mobile phone), and after one ringing cycle, you
can hear a voice prompt “Please enter the password”; enter the password by phone keys (factory default of remote
control password: 8888). If the password are correct, you will hear a long “beep” prompt tone; if it is wrong, you will
hear a prompt “the password is invalid, please enter it again”.
9 Maintenance
System Test
Although the alarm system is used everyday, periodical maintenance and test are required to assure that it can
run stably, reliably and safely. Usually thorough test must
be performed on the alarm main unit every three months. You’d better check the sensor once a month; if not
permitted by conditions, you shall check it at least every three months.
Main Unit Test:
1. Check if it can enable/disable guard normally.
2. Check if it can normally dial the number for alarm.
3. Check if it can receive the signal from sensors normally or if the backup battery is normal.
Sensor Test:
1. Trigger a sensor manually to check if it can sound alarm normally.
2. Check the batteries of all the sensors to check if they are under voltage.
3. Check the emission of wireless sensors to see if it can communicate with the main unit normally.
Trouble Shooting
If any trouble, perform trouble shooting shown as below:
Always buzzing: Is the SIM card fit properly? Install again
Is the PIN code of SIM card set? Cancel it.
Power indicator always flickering: Is the network signal strong enough? Change place
The signal of Unicom card is weaker than that of China Mobile.
Alarm failure: Is the code normal or is code pairing finished successfully? Confirm the right code and perform code
pairing again
Is the sensor under-voltage and is its transmitting distance not long enough? Replace battery
Dialing failure: Is the signal of China Mobile strong enough? Change place
Is there enough balance on the GSM card for call? Recharge it
Siren failure: Are the positive and negative poles of siren right or in fine contact? Check
Are the defence zone set to mute alarm? Reset
Voice disorder: have you made recording? Record again
Failure in setting by remote control: do you enter the correct setting password (factory default: 8888)?
Remote control failure: do you enter the correct remote control password (factory default: 1234)
Cautions
For any consult or maintenance service, please contact our professional engineers or service providers.
Please do not disassemble, repair and alter the products without permission, or it may cause accidents and
faults.
Do not drop this product on the ground or on hard objects, as it may lead to massive impact to cause faults and
damage.
Without approval and consent of relevant authorities, please do not set “999”, “110” or the alarm phone number
of police station for this main unit.
10 Standard Package
Main Panel
1pcs
Wireless Infrared Detector
1pcs
Wireless Magnetic Door Detector
1pcs
Remote Control
2pcs
AC/DC Adaptor
1pcs
Mini Siren
1pcs
Outside Speaker
1pcs
English User Manual
1pcs