1
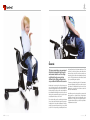
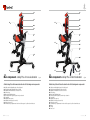
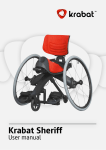
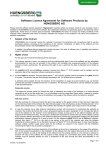
Jockey & Jockey Plus
User manual
Safety
Never leave a child in the chair without adult supervision.
Check the hip belt on a regular basis and make sure there is no malfunction.
The hip belt prevents the child falling out of the chair.
Always use the chair as advised by your physiotherapist or occupational therapist.
Krabat Jockey is not a toy. Never let a child play with the chair,
as it can harm both the child and the product.
Jockey & Jockey Plus
General......................................................................................s. 05
Main components.......................................................s. 06
03.0. Use...................................................................................................s. 10
04.0. Accessories..............................................................................s. 16
05.0. Maintenance......................................................................s. 19
06.0. Adjustment/adaption............................................s. 19
07.0. Warranty..................................................................................s. 20
01.0.
02.0.
01
General
This user manual gives an overview of
the Krabat Jockey with both electric
and manual elevation of the sitting
unit. Krabat jockey comes in two
different sizes. Many configurations
are possible with different accessories.
Krabat Jockey is an active chair for children between the
age 2 – 14 years (2 sizes). The chair is height adjustable
and can be adjusted from floor level to the height of a
kitchen worktop. The sitting position can be adapted to
the individual child. All angles and positions can be set
infinitely. An occupational therapist or a physiotherapist
should determine the use of this chair.
The excellent sitting position provided by the Krabat
jockey is due to both the saddle seat, which promotes a
neutral position in the pelvis and abduction in the hips,
and the footrests that support the feet in an optimal
position. The chair promotes good stability in the lower
4
Krabat Jockey
body and gives the spinal column natural curves. This
provides a good base for balance and activity in the
trunk and upper body. The saddle seat enhances an
active sitting position rather than a slumped and passive
position. The upright and active position will also benefit
speech, swallowing and respiration.
To ensure an optimal sitting position it is important to
try out and adjust the chair before use. Do not use the
chair unless an individual trial has been carried out.
Furthermore, do not let other children use the chair
without an individual trial.
As children grow they change their movement and
sitting pattern on a regular basis. It is likely that the
child will need another size of the sitting unit or other
adjustments. Contact your local physiotherapist or
occupational therapist if the product is not optimal or
if adjustments are needed.
Krabat Jockey
5
01
02
02
01
06
06
07
03
03
07
08
04
04
05
05
10
09
02.0
Main components -Jockey w/ manual elevation
02.1
Fig. 01
Main components -Jockey w/ electric elevation
Fig. 02
Krabat Jockey with manual elevation has the following main components:
Krabat Jockey with electric elevation has the following main components:
01 Saddle seat with adjustable angle of the sitting unit
02 Adjustable backrest
03 Adjustable individual footrests or footrest-in-one
04Undercarriage
05 Wheels with individual brakes
06 Push handle with integrated operation key for elevation
07 Central bail
01 Saddle seat with adjustable angle of the sitting unit
02 Adjustable backrest
03 Adjustable individual footrests or footrest-in-one
04 Undercarriage
05 Wheels with individual brakes
06 Remote control
07 Central bail
08 Battery
09 Charger
10 Power cord
6
Krabat Jockey
Krabat Jockey
7
09
09
02
02
01
01
08
08
10
10
06
06
11
11
03
03
07
07
12
04
04
05
05
02.2
Main components -Jockey Plus w/ manual elevation
02.3
Fig. 03
14
13
Main components -Jockey Plus w/ electric elevation
Fig. 04
Krabat Jockey Plus with manual elevation has the following main components:
Krabat Jockey Plus with electric elevation has the following main components:
01 Saddle seat with adjustable angle of the sitting unit
02 High backrest with adjustable angle and height
03 Adjustable individual footrests or footrest-in-one
04 Undercarriage
05 Wheels with individual brakes
06 Push handle with integrated operation key for elevation
07 Central bail
08 Adjustable side supports
09 Adjustable head support (accessories)
10 Harness (accessories)
11 4 mm Allen key for adjustments of head- and side supports is positioned under the seat
12 Battery
13 Charger
14 Power cord
8
Krabat Jockey
Krabat Jockey
9
03.1
Individual footrests
Place the feet on the footrests and tighten the belts.
Children who use ankle-foot orthotics should wear
these, together with their shoes, whilst sitting in the
Krabat Jockey. The height of the footrests is adjusted
by sliding them up or down the tracks, or simply by
adjusting the length of the strap which is attached
underneath the seat. It is also possible to attach ankle
straps on the footrests. These will need adjustment
to ensure the child’s foot is in the correct position.
Fig. 05
Adjustment of individual footrests
03.2
03.0
Use
Footrest-in-one
To obtain the optimal sitting position the angles of the seat, backrest and footrest
need to be adjusted. This should be done by a therapist who has received training
from Krabat AS, or a representative for Krabat AS.
The height of the footrests is adjusted by sliding them
up or down the tracks, or simply by adjusting the
length of the strap which is attached underneath the
seat. It is also possible to attach ankle straps on the
footrest. These will need adjustment to ensure the
child’s foot is in the correct position.
All angles can be adjusted infinitely. The individual footrests can be adjusted using the 4 locking levers shown
in fig. 5. The footrest-in-one can be adjusted using two locking levers shown in fig. 6. The sitting unit can be
adjusted using the revolving tube shown in fig. 7. The angle of the backrest can be fixed in different positions
using the locking lever shown in fig. 8.
Fig. 06
Adjustment of footrest-in-one
The use of the chair should be discussed with your therapist or someone who knows the child well. It is important
to establish in which situations the child should use the chair, how long they should use it and when to progress
the time spell. This needs to be evaluated continuously as the child gets familiar with the chair.
10
Krabat Jockey
Krabat Jockey
11
03.6
03.3
Angle of the sitting unit
Adjustment of the head support -Jockey Plus
Place the child on the saddle seat and tighten the belt.
Make sure the child is placed well into the seat in the
midline position with symmetry in the legs / lower
body. Use the hip belt to both maintain the position
in the saddle seat and to reduce the risk of falling out
of the chair. It should be used at all times.
The angle of the sitting unit can be adjusted using the
revolving tube underneath the seat. The angle is self
locking and does not need to be fixed.
The head support can be adjusted up or down by loosening the screw shown in figure 10. Use the accompanying
4mm Allen key shown in figure 03 and 04. It is enough
to loosen the screw, dismantling is not required. Tighten
the screw after adjustment.
Fig. 07
Adjustment of the seat angle
03.4
Angle and height of backrest
The angle of the backrest can be adjusted and fixed
using the locking lever. If the locking lever does not
fix the backrest properly, it can be tighten using the
plastic ring under the lever. The height of the backrest can be adjusted by loosening the locking lever
before sliding the backrest up or down in 5 different
position, each with 1 cm interval. Remember to fix
or tighten the locking lever when you have achieved
the correct height.
The head support can be adjusted in or out by loosening the screw shown in figure 11. The head support
can now be rotated as well. It is enough to loosen the
screw, dismantling is not required. Tighten the screw
after adjustment.
Fig. 10 Adjustment of the head support, up or down
The angle of the head support can be adjusted by
loosening the screws shown in figure 12. Sideways
adjustment of the head support is also possible in this
operation. It is enough to loosen the screw, dismantling
is not required. Tighten the screw after adjustment.
The head support can be adjusted along the track shown
in figure 13, in order to support the side of the head if
needed. Simply loosen the screws shown in figure 13
before sliding along the track. It is enough to loosen the
screws, dismantling is not required. Tighten the screws
after adjustment.
Fig. 11 Adjustment of the head support, in or out
Fig. 08
Adjustment of the angle and height of the backrest
03.5
Adjustment of the side supports - Jockey Plus
Fig. 12 Angle of the head support
The side supports can be adjusted up or down by
loosening the screws shown in figure 09. It is enough
to loosen the screws, dismantling is not required.
Tighten the screws after adjustment.
The side supports can be adjusted in or out in the
same way.
Fig. 09
Adjustment of the side supports
12
Krabat Jockey
Fig. 13 Lateral adjustment of the head support
Krabat Jockey
13
03.7
03.8
Adjustment of the height -Manual elevation
Adjustment of the height -Electric elevation
The height of the sitting unit can be adjusted by
pressing down the integrated operation key on the push
handle. See figure 14. When elevating the child you
need to press down the operation key with one hand,
whilst assisting the elevation with the other hand.
Assistance is also needed when lowering the sitting
unit. The spherical handle shown in figure 15, is
designed for this purpose.
The elevation mechanism moves slowly. Any attempt
to elevate or lower quickly will cause resistance. When
adjusting the height of the sitting unit, both seat and
handle move at the same time. Always use both hands
when adjusting the height. One hand on the push
handle and one hand on the spherical handle (fig 15).
The adjustment of the height is controlled by the
remote control. The remote control, shown in figure
16, has one button for elevation and one for lowering.
As soon as you let go of the button, the movement
will stop. A beeping sound will be heard when the
sitting unit is in the highest or lowest position, to let
us know the sitting unit has reached the end position.
If a beeping sound is heard whilst the sitting unit
is moving up or down, the battery needs charging.
Fig. 14
Adjustment of the height
Fig. 15
Handle for height adjustment
Fig. 16
Electrical adjustment of height
03.9
Battery and charging unit
The battery is placed in the holder under the undercarriage shown in figure 2. There are magnets in the
battery to ensure the correct position in both holder
and charger. When a fully charged battery is placed
in the holder it will orientate itself to the correct
position. An audible beep indicates good connection
and a system ready for use.
If a beeping sound is heard whilst the chair is not in
use, the battery needs charging. The same applies
if a beeping sound is heard whilst the sitting unit is
moving up or down.
When charging the battery, remove it from the holder.
When connecting the charger to a socket using the
power cord, a yellow light will indicate power. Place
the battery in the charger and it will orientate itself
to the correct position. See figure 17. A flashing green
light will indicate the battery being charged. When
the battery is fully charged the green light will come
on continuously. Charging an empty battery will take
approximately 5-8 hours. This type of battery (NiMH)
tolerates charging even if it is not totally empty.
Fig. 17
Charging of the battery
14
Krabat Jockey
Yellow led
(power)
Green led
(charging/fully charged)
Charger
Battery
Krabat Jockey
15
04.2
04.0
Accessories
There is a Wide range of accessories for the Krabat Jockey such as table, different harnesses, ankle cuffs, bag, etc. See
www.krabat.com for an updated list of accessories. User manual for the different accessories follows the product.
Mounting of bracket for table and support handle
(if not pre-mounted)
Unscrew the three screws in the cup holder and throw them away (figure 19). Attach the bracket in the cup
holder as shown in figure 20, using the accompanying three screws. Fix the three screws using a 3 mm Allen key
(not included). Make sure the button locking the table is pointing to the left, for the child in the chair (figure 21).
04.1
Bag
The Krabat Jockey is foldable making transport, in a specially designed bag, easier. Fold the backrest and put
the sitting unit in the lowest position. Swing the rear part of the undercarriage to the front. It is advisable to lift
the chair into the bag by holding on to the part of the undercarriage closest to the floor. Make sure the push
handle is fitted in the intended end of the bag. The bag has an adjustable shoulder strap to make transport easier.
Fig. 18
Folding into transport bag
Fig. 19
Fig. 20
16
Krabat Jockey
Fig. 21
Krabat Jockey
17
04.3
04.4
Table
Support handle
Pull out the button shown in figure 22, and keep it out. Place the table in the bracket and let go of the button
when the table is at the desired height. As shown in figure 23, there are three different positions for the height.
Make sure the table is locked (figure 24).
Pull out the button shown in figure 27, and keep it out. Place the support handle in the bracket and let go of
the button when the handle is in the desired height. As shown in figure 28, there are three different positions
for the height. Make sure the support handle is locked (figure 29).
Loosen the screw shown on figure 25, using the accompanying 4 mm Allen key. Rotate the table to the desired
position (angle), and tighten the screw.
The depth of the table can be adjusted in three different positions, by loosening the 4 screws on the top surface
(figure 26). Use the accompanying 4 mm Allen key. Place the table in the desired depth and tighten the screws.
Fig. 27
Fig. 28
Fig. 29
05.0
Maintenance
Fig. 22
Fig. 23
All metal and plastic parts can be cleaned using mild soapy water. The seat and backrest is covered with upholstery,
and can be cleaned using either a cloth and soapy water or machine washed at 40 degrees Celsius.
The textile is fastened to the chair with Velcro. Advice about spot removal is given at www.krabat.com.
Bearings and other movable parts are maintenance free and should not be lubricated.
06.0
Individual adjustments and adaptations
Fig. 24
Fig. 25
If the sitting unit for some reason needs adjustment please contact a physiotherapist or an occupational therapist.
Adaptations of the sitting unit must be made by qualified personnel or Krabat AS
Do not under any circumstances make any modifications by yourself.
Fig. 26
18
Krabat Jockey
Krabat Jockey
19
07.0
Warranty
Manufacturer of the Krabat products, Krabat AS – hereinafter referred to as KRABAT - having its place of business
at Ravnsborgveien 56, 1395 Hvalstad, Asker, Norway – gives the purchaser of a KRABAT product the following
product warranty, hereinafter referred to as the “WARRANTY”:
1. This WARRANTY is given upon the strict condition that the purchaser and any person that the purchaser
gives access to the KRABAT product observe and adhere to the following SAFETY PRECAUTIONS:
I Always make sure to have read and understood the relevant user manual for the actual KRABAT product
before taking into it use.
II The KRABAT product is only meant to be used for its intended purpose in accordance with the KRABAT
user manual for the relevant KRABAT product.
III Never leave a child, or any other user, using the KRABAT product without proper adult supervision.
IV Always make sure that safety belts are properly fit and fastened and do not malfunction, as well as
recheck the foresaid at regular intervals when the KRABAT product is in use.
4. In the event where a defect has not been successfully remedied,
I The purchaser shall be entitled to a reduction of the purchase price in proportion to the reduced value
of the KRABAT product, provided that under no circumstances shall such reduction exceed fifteen per
cent (15 %) of the purchase price for the said KRABAT product, or
II
Where the defect is so material as to significantly deprive the purchaser of the benefit of the purpose of
the purchase, the purchaser may terminate the purchase in respect of the defective KRABAT product. The
purchaser shall then be entitled to actual loss suffered, if any, however, limited to a maximum of fifteen
per cent (15 %) of the purchase price for the said KRABAT product.
5. This WARRANTY does not give any guarantees apart from those expressly given under this WARRANTY.
6. For avoidance of doubt This WARRANTY does not extend to any liability of KRABAT or its authorized
representatives in respect of any indirect or consequential loss or damage suffered by the purchaser or any
person the purchaser, either deliberately or undeliberately, gives access to the KRABAT product.
V Always use the KRABAT product with due regard to the advice of your physiotherapist or
occupational therapist.
7. This WARRANTY does not apply in so far that the KRABAT product is supplemented with or there are changed
parts of the KRABAT product with parts not manufactured by KRABAT or with parts manufactured or provided
by others and the use thereof is of not authorized in writing by KRABAT.
VI Always remember that the KRABAT product is NOT a toy, and hence, never let a child, or any one else,
play with the KRABAT product, as it can harm both persons and the product as well as causing damage.
8. KRABAT shall only be liable for defects which appear under conditions of operation or use provided for in
the relevant user manual following the KRABAT product.
VII Always – when not in use - store the KRABAT product in a safe manner in order for it not to be misused
by anyone, and furthermore for the purpose of not exposing the KRABAT product to conditions that
may harm it and/or its functions.
9. KRABAT shall not be liable for defects which are caused by faulty maintenance, incorrect adjustments or
faulty repair by any other person than KRABAT or representative authorized by KRABAT, or any alterations
to the KRABAT product carried out without the prior written consent from KRABAT.
2.
Subject to the terms and conditions of the WARRANTY, KRABAT warrants that the KRABAT product for a
periodof one (1) year (“the Warranty Period”) from the purchase of the KRABAT product, shall function in
accordance with its intended purpose as set out in the KRABAT user manual following the actual KRABAT
product purchased.
10. This WARRANTY does not cover normal wear and tear.
3.
KRABAT will at its own cost either itself, or by assistance of a third party, within reasonable time offer
assistance in order to remedy any defect of substance to the KRABAT product which occurs within the said
Warranty Period, either by taking the unit in question for repair or by forwarding spares for replacement,
provided, however, the purchaser of the KRABAT product without undue delay after having become aware
of the defect(s), in writing has notified KRABAT or a representative authorized by KRABAT of the discovered
defect(s). However, KRABAT retains the right at its sole discretion in lieu of performing remedial work
to forward a new unit in lieu of the unit having defects or being defective. In respect of forwarding spare or
replacement parts, or a new unit, KRABAT or its authorized representative, shall be deemed to have fulfilled
its obligation in so far the part(s) or unit(s) in question are made available for collection at the offices from
where the initial KRABAT product was sold.
20
Krabat Jockey
11. KRABAT shall not under any circumstances be liable for defects in any part of a KRABAT product for more
than two (2) years from delivery.
12. Save as set out above under this WARRANTY, KRABAT, as well as its authorized representatives, shall not be
liable for any defects of the KRABAT product. This applies to any loss the defect may cause including loss of
production, loss of profit and other indirect loss.
Krabat Jockey
21