1
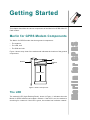
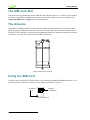
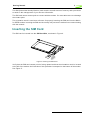
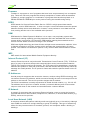
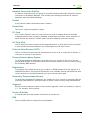
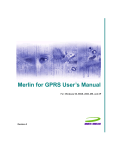
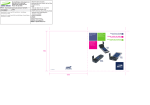
Merlin for GPRS User’s Manual
For Pocket PC 2000 and 2002
Revision 4.0 P/N 90023361
Notice: Restricted Proprietary Information
© Copyright Novatel Wireless Technologies Ltd. (2001-2002)
The information contained in this document is the exclusive property of Novatel Wireless Technologies Ltd. All rights
reserved. Unauthorized reproduction of this manual in any form without the expressed written approval of Novatel Wireless
Technologies Ltd is strictly prohibited. This manual may not, in whole or in part, be copied, reproduced, translated, or
reduced to any electronic or magnetic storage medium without the written consent of a duly authorized officer of Novatel
Wireless Technologies Ltd.
The information contained in this document is subject to change without notice and should not be construed as a
commitment by Novatel Wireless Technologies Ltd. unless such commitment is expressly given in a covering document.
Novatel Wireless Technologies Ltd makes no warranties, either expressed or implied, regarding this document, its
merchantability, or its fitness, for any particular purpose.
Microsoft®, Windows®, Microsoft® Pocket Internet Explorer, Microsoft® Pocket Outlook, and Microsoft® ActiveSync® are
either registered trademarks or trademarks of Microsoft Corporation in the United States and/or other countries. All other
brand names and product names used in this document are trade names, service marks, trademarks, or registered
trademarks of their respective owners.
Printed and produced in Canada.
Table of Contents
Table of Contents....................................................................1
Getting Started ........................................................................1
The LED ............................................................................................................................1
The SIM Card Slot.............................................................................................................2
The Antenna......................................................................................................................2
Using the SIM Card ...........................................................................................................2
Inserting the SIM Card ......................................................................................................3
Removing the SIM Card ....................................................................................................4
Installing the Modem Software ..............................................5
Using Connection Profiles .....................................................9
Using a Single Pre-Defined Connection Profile.................................................................9
Using Multiple Pre-Defined Connection Profiles ...............................................................9
Creating a User-defined Connection Profile....................................................................10
Creating a GPRS Connection Profile ..............................................................................11
Creating a GSM Connection Profile ................................................................................13
Using the Modem Manager ..................................................17
Launching the Modem Manager.............................................................. 17
Entering Your Account PIN ..................................................................... 18
Entering a PUK........................................................................................ 20
Enabling or Disabling Your PIN............................................................... 20
Changing Your PIN ................................................................................. 21
Connecting to the Network ...................................................................... 22
Using Multiple Connection Profiles.......................................................... 24
Disconnecting from the Network ............................................................. 25
Creating a New Connection Profile ......................................................... 26
Editing a Connection Profile .................................................................... 27
Deleting a Connection Profile.................................................................. 28
Setting a Connection Profile as Default................................................... 29
Merlin for GPRS
Merlin for GPRS Modem Components...................................................... 1
2
Viewing a Connection Profile’s Properties .................................................. .................. 30
Using the Automatic Network Search Feature ............................................................... 30
Using the Manual Network Search Feature ................................................................... 31
Viewing New Text (SMS) Messages.............................................................................. 32
Viewing the Network Connection History ....................................................................... 33
Accessing the Modem Manager Online Help................................................................. 33
Modem Manager Reference .....................................................................35
The Modem Manager Main Window .............................................................................. 35
System Tray Icons ......................................................................................................... 37
Connection Manager Window ........................................................................................ 38
Detailed Status Report Window ..................................................................................... 38
Modem Properties Window ............................................................................................ 40
About GPRS Modem Manager Window......................................................................... 41
GPRS Connection Profile Properties Window ............................................................... 42
GSM Connection Profile Properties Window ................................................................. 44
The Options Window...................................................................................................... 45
The Add Connection Wizard .......................................................................................... 45
Technical Support ....................................................................................47
Technical Support .......................................................................................................... 47
Safety and Regulatory Notices....................................................................................... 47
Regulatory Notices .....................................................................................................................................47
Glossary ....................................................................................................49
Manual Revision 4.0 P/N 90023361
Getting Started
This chapter describes the various components of the Merlin for GPRS G201 PC
Card modem.
Merlin for GPRS Modem Components
•
The antenna,
•
The LED, and
•
The SIM card slot.
Figure 1 shows a top view of the modem and indicates the location of the general
components.
LED
Antenna
SIM Card
Slot
Modem Face
Figure 1 Modem Components
The LED
The modem’s LED (Light Emitting Diode), shown in Figure 1, indicates when the
Merlin for GPRS modem has located a network. If the LED is red, the modem is
searching for a network. If the LED is green, the modem has located a network.
Merlin for GPRS
The Merlin for GPRS modem has three general components:
2
Getting Started
The SIM Card Slot
You must insert your SIM card into the SIM card slot, shown in Figure 1, in order for your modem
to access your GPRS or GSM network account information and connect to the network. See
“Using the SIM card” on page 2 for more information.
The Antenna
The Merlin for GPRS modem’s antenna can be rotated in many directions to receive the best
signal reception. Rotate the antenna up and out of the way when you insert the modem into your
Pocket PC’s PC Card slot. Fold the antenna against the back of the modem for storage, as shown
in Figure 2, once you have removed it from the PC Card slot.
Figure 2 Storing the Antenna
Using the SIM Card
In order to use your Merlin for GPRS modem, you must have a GSM/GPRS network account. Your
network account information is stored on the SIM card, shown in Figure 3.
Orientation
Notch
SIM Card
Contact Point
Figure 3 SIM Card
Manual Revision 4.0 P/N 90023361
Getting Started
3
The SIM (Subscriber Identity Module) card contains a small amount of memory and a processor
to assist in the management of your account information.
The SIM card uses a contact point to connect with the modem. You must take care not to damage
the contact point.
The orientation notch is used as a reference for properly inserting the SIM card into the Merlin
for GPRS modem. Inserting the SIM card incorrectly will prevent the modem from communicating
with the network.
Inserting the SIM Card
The SIM card is inserted into the SIM Card Slot, as shown in Figure 4.
Figure 4 Inserting the SIM Card
Verify that the SIM card contact point is facing upward and that the orientation notch is located
to the left of the modem. An illustration of this procedure is stamped on the bottom of the modem.
See Figure 5.
Manual Revision 4.0 P/N 90023361
4
Getting Started
Removing the SIM Card
Remove the SIM card using the SIM Card Removal Slot, located on the bottom of the modem,
shown in Figure 5.
SIM Card
Removal Slot
SIM Orientation
Illustration
Figure 5 Removing the SIM Card
To remove your SIM card, insert a pointed device, such as the tip of a stylus, in the SIM Card
Removal Slot, and gently move the SIM card to the left and out of the slot.
Note:
Make certain you use a blunt, thin, plastic object to remove the SIM card. Do not use
a sharp object as you could damage the modem’s circuitry. Do not use a pencil, as pencil
leads can break off in the SIM Card Removal Slot and damage the modem.
Manual Revision 4.0 P/N 90023361
Installing the
Modem Software
In order to install the Merlin for GPRS Modem Manager software onto your Pocket
PC, you must first establish an Activesync connection between your computer
and Pocket PC. Refer to your Pocket PC User Manual for more instructions on
using the Microsoft Activesync program.
1.
Insert the Installation CD into the CD drive of your computer. The Installation
program will automatically launch, and display the Welcome window, shown
in Figure 6.
Figure 6 Welcome window
Merlin for GPRS
To install the GPRS Modem Manager software:
6
2.
Installing the Modem Software
Read the contents of the window, and click Next to continue. The License Agreement will
be displayed, shown in Figure 7.
Figure 7 License Agreement window
3.
Read the agreement and click I have read and agree to the above terms if you are satisfied
with the agreement.
4.
Click Next to continue. The Start Installation window will be displayed, shown in Figure 8.
Figure 8 Start Installation window
Manual Revision 4.0 P/N 90023361
Installing the Modem Software
5.
7
Click Next to begin installing the application files. The Installing window will appear, shown in Figure
9, and the Modem Manager files will be copied to your computer.
Figure 9 Installing Applications window
6.
Once the Modem Manager files have been copied to your Pocket PC’s desired directory, the
Application Downloading Complete window will appear, shown in Figure 10. Check your Pocket
PC’s screen to verify no additional steps are required to complete the Modem Manager installation.
Figure 10 Application Downloading Complete window
7.
Click OK to exit the installation program.
Manual Revision 4.0 P/N 90023361
8
Installing the Modem Software
This Page Intentionally Left Blank
Manual Revision 4.0 P/N 90023361
Using Connection
Profiles
The Modem Manager software you have installed with your Merlin for GPRS PC
Card modem may be preconfigured with one or more Connection Profiles.
Depending on your service provider’s requirements, your modem will use a single
pre-defined connection profile or multiple pre-defined connection profiles. You
can also create your own (user-defined) connection profiles using the Add
Connection Wizard.
Using a Single Pre-Defined Connection
Profile
If your service provider requires you to use a single pre-defined connection
profile, once you have successfully installed the Modem Manager software, no
further modem configuration will be necessary. When launched, the Modem
Manager will automatically use the single pre-defined connection profile
(previously installed by your service provider) to connect to the GSM or GPRS
network.
Using Multiple Pre-Defined Connection
Profiles
If your service provider has installed a number of pre-defined connection profiles,
once you have successfully installed the Modem Manager software, you must
select the connection profile you wish to use from the Connection Selection
window. See Figure 11.
Figure 11 Connection Selection window
Highlight the specified connection profile and tap Connect.
Merlin for GPRS
A Connection Profile consists of connection information stored by the Modem
Manager software. It contains all of the necessary data to identify your modem to
your service provider in order to access your GSM or GPRS network account.
10
Using Connection Profiles
Creating a User-defined Connection Profile
You can create your own (user-defined) connection profile to connect to the GPRS or GSM
network (you must obtain the connection information from you service provider). The Add
Connection Wizard will assist you in creating either a GPRS or GSM connection profile.
If you have not created a connection profile previously, or the Modem Manager did not come with
a pre-defined connection profile, the Setup dialog box will appear when you open the GPRS
Modem Manager, shown in Figure 12.
Figure 12 Setup dialog box
You must create a connection profile before you can connect to the Internet. If you choose to
create the connection profile now (tap Create Connection Now), the Add Connection Wizard will
launch in order to guide you through this procedure. If you choose to delay creating a connection
profile, you must access the Add Connection Wizard through the Connection Manager window.
The Add Connection Wizard allows you to create either a GSM or GPRS network connection
profile. Your service provider will indicate which network type to use when creating the
connection profile.
If your service provider uses a GPRS network type, see the section below. If your service provider
uses a GSM network type, see Creating a GSM Connection Profile on page 13.
Manual Revision 4.0 P/N 90023361
Using Connection Profiles
11
Creating a GPRS Connection Profile
To create a GPRS connection profile:
1.
Select Connection Manager from the Tools menu. The Connection Manager window will
be displayed, shown in Figure 13.
Note:
If you chose Create Connection Now from the Setup window, shown in Figure 12, the Add
Connection Wizard will automatically launch (you will not see the Connection Manager window).
Figure 13 Connection Manager window
2.
Tap Add. The Add Connection Wizard will launch, and display the Connection Name dialog
box, shown in Figure 14.
Figure 14 Connection Name dialog box
3.
Type the name of your connection profile in the Connection Name text field (any name of
your choice).
Manual Revision 4.0 P/N 90023361
12
4.
Using Connection Profiles
Tap Next to continue. The Connection Type dialog box will be displayed, shown in Figure
15.
Figure 15 Connection Type dialog box
5.
Tap the GPRS radio button (as indicated by your service provider).
6.
Tap Next to continue. The GPRS Protocol dialog box will be displayed, shown in Figure 16.
Figure 16 GPRS Protocol dialog box
7.
Type the APN (Access Point Name), obtained from your service provider, into the APN field.
8.
Enter the Primary and Secondary DNS addresses (obtained from your service provider)
into the appropriate fields, or if you have been instructed by your service provider to have
the Modem Manager automatically search for the DNS addresses, select the Obtain DNS
server addresses automatically check box.
9.
Tap Next to continue. The Enter User Information dialog box will be displayed, shown
Figure 17.
Figure 17 Enter User Information dialog box
Manual Revision 4.0 P/N 90023361
Using Connection Profiles
13
10. If your service provider requires you to enter a user name and password, select A user
name and password are required by my carrier, and enter the user information (obtained
from your service provider) into the appropriate fields.
If your service provider does not require a user name or password, leave all fields empty.
11. Tap Next to continue. The Default Connection dialog box will be displayed, shown in Figure
18.
Figure 18 Default Connection dialog box
12. Tap Yes to make the new network connection profile your default connection, or No to keep
the existing default connection profile settings.
13. Tap Finish to add the new network connection profile to the Connection Profile list pane.
Creating a GSM Connection Profile
To create a GSM connection profile:
1.
Select Connection Manager from the Tools menu. The Connection Manager window will
be displayed, shown in Figure 19.
Note:
If you chose Create Connection Now from the Setup window, shown in Figure 12, the Add
Connection Wizard will automatically launch (you will not see the Connection Manager window).
Figure 19 Connection Manager window
Manual Revision 4.0 P/N 90023361
14
2.
Using Connection Profiles
Tap Add. The Add Connection Wizard will launch, and display the Connection Name dialog
box, shown in Figure 20.
Figure 20 Connection Name dialog box
3.
Type the name of your connection profile in the Connection Name text field (any name of
your choice).
4.
Tap Next to continue. The Connection Type dialog box will be displayed, shown in Figure
21.
Figure 21 Connection Type dialog box
5.
Tap the GSM-Data radio button (as indicated by your service provider).
6.
Tap Next to continue. The GSM Protocol dialog box will be displayed, as shown in Figure
22.
Figure 22 GSM Protocol dialog box
7.
Type your User Name, Password, and Phone Number (these items are obtained from your
service provider) into the appropriate fields.
Manual Revision 4.0 P/N 90023361
Using Connection Profiles
8.
15
Tap Next to continue. The Default Connection dialog box will be displayed, shown in Figure
23.
Figure 23 Default Connection dialog box
9.
Tap Yes to make the new network connection profile your default connection, or No to leave
the existing default connection profile settings.
10. Tap Finish to add the new network connection profile to the Connection Profile list pane.
Manual Revision 4.0 P/N 90023361
16
Using Connection Profiles
This Page Intentionally Left Blank
Manual Revision 4.0 P/N 90023361
Using the Modem
Manager
The GPRS Modem Manager software allows you to configure and control your
Merlin for GPRS modem. The following sections will instruct you on using the
Modem Manager and its various features.
To launch the GPRS Modem Manager, verify that the SIM card is properly
inserted into your Merlin for GPRS modem, and insert the modem into your
Pocket PC’s PC Card slot.
Select Programs from the Start menu, and tap the GPRS Modem Manager icon,
shown in Figure 24.
Figure 24 Modem Manager icon
The Modem Manager main window will open, shown in Figure 25, and attempt to
initialize and connect with the Merlin for GPRS modem through the PC Card port.
Figure 25 Modem Manager window
If your service provider requires you to enter a PIN (Personal Identification
Number) before the Modem Manager can register and connect to your modem,
see Entering Your Account PIN on page 18 for more information.
Merlin for GPRS
Launching the Modem Manager
18
Using the Modem Manager
Once the Modem Manager has successfully connected to the Merlin for GPRS modem, the
application will attempt to register the modem to the GPRS/GSM network as indicated by your
default connection profile.
Note:
If the Modem Manager is unable to connect to your Merlin for GPRS modem, verify that both
the SIM card and your modem are properly installed. The Current Status field will indicate if
the SIM card or modem are missing.
When the modem has successfully registered to the network, the Current Status field will display
Ready to connect, home network and the Carrier field will display the name of your service
provider, shown in Figure 26.
Figure 26 Successful Registration
Entering Your Account PIN
If your service provider requires you to enter a PIN (Personal Identification Number) before you
can use your network account, the Modem Manager will display the Enter PIN dialog box, shown
in Figure 27, before registering to the network.
Figure 27 Enter PIN dialog box
Manual Revision 4.0 P/N 90023361
Using the Modem Manager
19
Enter your PIN, obtained from your service provider, into the text field and tap OK. If you would
like the Modem Manager software to remember your PIN, select the Remember PIN check box.
See Figure 28.
Figure 28 Remember PIN check box
Once you have selected the Remember PIN check box, you will not be required to enter your PIN
when you launch the Modem Manager application.
If you have entered an incorrect PIN, an error message will be displayed. Tap OK to close the
error message, verify you have the correct PIN and carefully reenter it in the Enter PIN dialog
box.
If you enter a PIN three times incorrectly, your SIM card will be blocked, shown in Figure 29, and
you must obtain a PUK (PIN Unblocking Key) from your service provider. See Entering a PUK
on page 20 for more information.
Figure 29 SIM Blocked message
If you have forgotten your PIN, tap Forgot PIN... from the Enter PIN dialog box, and contact your
service provider to obtain a PUK (PIN Unblocking Key). See Entering a PUK on page 20 for more
information.
Manual Revision 4.0 P/N 90023361
20
Using the Modem Manager
Entering a PUK
If you have forgotten your PIN or have entered an incorrect PIN three or more times, you are
required to enter a PUK (PIN Unblocking Key), in order to unblock your SIM card. See Figure 30.
Figure 30 Enter PUK dialog box
Your service provider will give you the PUK and a new PIN. Carefully enter these values into their
respective fields, and tap OK to save the values. Once the values have been accepted, the SIM
card will no longer be blocked and the PIN has been changed. The Modem Manager will now be
able to access your network account information.
Note:
If you enter a PUK incorrectly three times, the SIM card will again be blocked. You must contact your service provider to obtain a new PUK and PIN.
Enabling or Disabling Your PIN
You may enable or disable your PIN through the SIM tab (select Properties from the Modem
menu), shown in Figure 31.
Figure 31 SIM Tab
Manual Revision 4.0 P/N 90023361
Using the Modem Manager
21
The Enable/Disable button, located at the bottom of the tab, will toggle between Disable PIN or
Enable PIN, depending on your current PIN settings.
In order to change the setting, you will be required to enter your PIN in the Enter PIN dialog box,
shown in Figure 32.
Figure 32 Enter PIN dialog box
Once you have entered the correct PIN, the desired PIN setting (either enabled or disabled) will
be saved.
Note:
If you select Enable PIN, the Enter PIN dialog box will be reactivated, regardless of whether
you had previously directed the Modem Manager to remember your PIN (selecting the
Remember PIN check box).
Changing Your PIN
To change your PIN, select Properties from the Modem menu. Tap the SIM tab,
shown in Figure 33.
Figure 33 SIM tab
Manual Revision 4.0 P/N 90023361
22
Using the Modem Manager
Tap Change PIN. The Change PIN dialog box will be displayed, shown in Figure 34.
Figure 34 Change PIN dialog box
Enter the current PIN into the Current PIN field, enter the new PIN into the New PIN field, and
enter the new PIN again into the Confirm New PIN field. Tap OK. The new PIN will be saved and
a confirmation window will be displayed indicating the change has been accepted.
Connecting to the Network
Note:
The Modem Manager must have access to a connection profile in order to connect to the
network. If you have not been provided with a pre-defined connection profile, or have not
created one previously, see Creating a New Connection Profile on page 26 for more information.
To connect to the network, open the Modem Manager main window, and tap Connect. See
Figure 35.
Figure 35 Modem Manager window
The message changes to Searching for network to connect to... as the modem attempts to
register and connect to a network using the information provided in the default connection profile.
Manual Revision 4.0 P/N 90023361
Using the Modem Manager
23
Once the Modem Manager has successfully registered and connected to the network, the
Current Status field will display the message Connected to network, shown in Figure 36. The
Connect button changes to Disconnect.
Figure 36 Current Status field
If you have not specified a connection profile as your default setting, the Modem Manager
requires you to indicate the desired profile from the Connection Selection window, shown in
Figure 37.
Figure 37 Connection Selection window
For more information on connecting to the network using an alternate connection profile, see
Using Multiple Connection Profiles on page 24.
Manual Revision 4.0 P/N 90023361
24
Using the Modem Manager
You may also direct your modem to automatically connect to the network when the Modem
Manager is launched by selecting Options from the Tools menu, and selecting the
Automatically connect when GPRS Modem Manager is launched check box (the option is
selected by default), shown in Figure 38.
Figure 38 Options Window
Using Multiple Connection Profiles
To use an alternate connection profile (without changing your default settings) to connect to the
network, select Connect from the Modem menu. The Connection Selection window will appear,
shown in Figure 39.
Figure 39 Connection Selection window
Highlight the desired profile and tap Connect. The Modem Manager will attempt to use the
specified connection profile to connect to the network.
Manual Revision 4.0 P/N 90023361
Using the Modem Manager
25
Disconnecting from the Network
To disconnect from the network, close all Internet applications, such as e-mail and web browsers,
and from the Modem Manager main window, tap Disconnect. See Figure 40.
Figure 40 Disconnect button
Alternately, you can select Disconnect from the Modem menu, shown in Figure 41.
Figure 41 Disconnect command
Manual Revision 4.0 P/N 90023361
26
Using the Modem Manager
To quit the Modem Manager application, select Exit from the Modem menu, as shown in Figure
42.
Figure 42 Exit command
Creating a New Connection Profile
If you have arranged to have more than one network account, you need to create a new
connection profile. Your service provider will provide you with all of the necessary information
such as, APN (Access Point Name), DNS addresses, Connection type, and a user name and
password, if necessary. Once you have obtained the necessary information, you can begin
creating a new connection profile.
If your service provider uses a GPRS network, please see Creating a GPRS Connection Profile
on page 11 for further instructions. If your service provider uses a GSM network, please see
Creating a GSM Connection Profile on page 13.
Manual Revision 4.0 P/N 90023361
Using the Modem Manager
27
Editing a Connection Profile
Note:
Do not change your connection profile properties unless requested to do so by your service
provider. Changing your network information without consulting your service provider may
disable your modem’s ability to register and connect with the network.
To edit a connection profile:
1.
Select Connection Manager from the Tools menu. The Connection Manager window will
be displayed, shown in Figure 43.
Figure 43 Connection Manager window
2.
Highlight the connection profile you wish to edit from the Connection Profile list pane.
3.
Tap Properties. The GPRS or GSM Properties window will be displayed, depending on the
network type of the connection profile. See Figure 44.
GPRS Properties
GSM Properties
Figure 44 Connection Profile Properties windows
4.
Move to the desired fields and edit the values (use the tabs in the GPRS Properties window
to navigate to the desired fields).
5.
Tap OK to save the changes and close the Properties window.
Manual Revision 4.0 P/N 90023361
28
Using the Modem Manager
Deleting a Connection Profile
Note:
When you delete a connection profile, all network account information is erased. Your
modem will be unable to connect to the specified network without access to this information.
Delete a connection profile only if the specified network account is no longer valid, or if the
information contained in the connection profile is incorrect.
To delete a connection profile:
1.
Select Connection Manager from the Tools menu. The Connection Manager window will
be displayed, shown in Figure 45.
Figure 45 Connection Manager window
2.
Highlight the desired profile from the Connection Profile list pane.
3.
Tap Delete. The Delete Connection dialog box will appear, shown in Figure 46.
Figure 46 Delete Connection dialog box
4.
Tap Yes to delete the connection profile. The specified connection profile will be removed
form the Connection Profile list pane.
Manual Revision 4.0 P/N 90023361
Using the Modem Manager
29
Setting a Connection Profile as Default
The Modem Manager will automatically use the information contained in the default connection
profile when connecting to the network.
To change the current default setting:
1.
Select Connection Manager from the Tools menu. The Connection Manager window will
be displayed, shown in Figure 47.
Figure 47 Connection Manager window
2.
Highlight the connection profile you wish to use as your default setting.
3.
Tap Set as Default.
The Modem Manager will now use the newly specified connection profile as your default setting.
Tap OK to exit this window.
Manual Revision 4.0 P/N 90023361
30
Using the Modem Manager
Viewing a Connection Profile’s Properties
To view a connection profile’s properties:
1.
Select Connection Manager from the Tools menu. The Connection Manager window will
be displayed, shown in Figure 48.
Figure 48 Connection Manager window
2.
Highlight the desired connection profile and tap Properties. The GPRS or GSM Properties
window will be displayed (depending on network type of the connection profile).
Using the Automatic Network Search Feature
An automatic network search directs the modem to automatically search for a valid network to
connect to when roaming.
To use this feature:
1.
Select Properties from the Modem menu.
2.
Tap the Roaming tab. The Roaming window will be displayed, shown in Figure 49.
Figure 49 Roaming tab
Manual Revision 4.0 P/N 90023361
Using the Modem Manager
31
3.
Select the Automatic network selection radio button (see the figure above).
4.
Tap OK to accept the new setting and close the window.
Using the Manual Network Search Feature
A manual network search will allow you to specify which network your modem connects to when
roaming.
To use this feature:
1.
Select Properties from the Modem menu.
2.
Tap the Roaming tab. The Roaming window will be displayed shown in Figure 50.
Figure 50 Roaming tab
3.
Tap the Manual network selection radio button.
4.
Tap Search. The modem will scan for all available networks in the area and list them in the
drop-down list box, located at the bottom of the Roaming window.
5.
Select the desired network from the drop-down list box, and tap OK to save the settings.
The modem will now connect with the specified network when directed.
Manual Revision 4.0 P/N 90023361
32
Using the Modem Manager
Viewing New Text (SMS) Messages
If your modem is configured to support text (SMS) messaging, any new text messages you have
received will be visible from the Modem Manager main window, shown in Figure 51, and the
Detailed Status Report.
Figure 51 Text Messages field
In order to view your message, you must shut down the Modem Manager application, and open
your third-party, SMS client.
The Text Messages line displays number of messages received and the total number of message
“slots” available in SMS memory. For example, 1 / 25 indicates that there is one message and
the total number of available message slots is 25. Usually one message uses up one message
slot, so the number indicates how full SMS memory is.
Manual Revision 4.0 P/N 90023361
Using the Modem Manager
33
Viewing the Network Connection History
The modem’s connection history is useful for diagnosing problems you may be experiencing with
your modem or network connection.
To view the modem’s network connection history, select Detailed Status Report from the Tools
menu, and tap the History tab. See Figure 52.
Figure 52 History tab
Accessing the Modem Manager Online Help
To access the GPRS Modem Manager online help, select Help from the Start menu, and tap
Merlin GPRS by Novatel Wireless. The Modem Manager help file will open. Tap the topic you
wish to view, or use the Forward or Back arrows to navigate through the various topics. See
Figure 53.
Figure 53 Modem Manager help
Manual Revision 4.0 P/N 90023361
34
Manual Revision 4.0 P/N 90023361
Using the Modem Manager
Modem Manager
Reference
This chapter describes the components of the GPRS Modem Manager. See
Using the Modem Manager on page 17 for further instructions on configuring
and controlling the Modem Manager and its features.
The Modem Manager main window has both a Detailed and Brief view.
Figure 54 Detailed View
The Detailed view, shown in Figure 54, contains the following items.
Current Status Bar
This bar displays the current status of the modem and the
network connection. The Current Status bar is located at
the top of the Modem Manager window.
Connect/Disconnect
Button
Use this button to direct the modem to connect or disconnect from the network .
Default Connection
Field
This field displays the name of the connection profile you
have designated as the default connection setting.
Available Service
Field
This field displays the type of network you are currently
using (GPRS or GSM-Data).
Carrier Field
This field displays the name of the carrier currently providing your service. The name displayed in this field may
change, depending on your geographical location and
your service provider's roaming agreements.
Merlin for GPRS
The Modem Manager Main Window
36
Modem Manager Reference
Signal Strength Field
This field displays the modem's signal strength as a percentage of the total available signal strength range. The
values of this range lie between -51 dBm and -113 dBm
(decibals below 1 milliwatt).
Text Messages Field
This field displays the number of messages and the total
number of memory “slots” available in SMS memory. For
example, 1 / 25 indicates that there is one message
and the total number of available message slots is
25. This field will be visible only if your modem is configured to support text (SMS) messaging.You must shut
down the Modem Manager application and open your
third-party phone tools application (i.e. BVRP Phone
Tools) in order to view your text messages.
Less Info Button
This button allows you to change the Modem Manager
main window to the Brief view.
Novatel URL
Tap www.novatelwireless.com, located at the bottom of
the Modem Manager main window, to open the Novatel
Wireless Website.
The Brief view of the Modem Manager, shown in Figure 55, contains the following items:
Figure 55 Brief View
Manual Revision 4.0 P/N 90023361
— Modem Manager Reference
37
Current Status Bar
This bar displays the current status of the modem and the
network connection. The Current Status bar is located at
the top of the Modem Manager window.
Connect/Disconnect
Button
Use this button to direct the modem to connect or disconnect from the network .
Signal Strength Status
Bar
This status bar indicates the modem's signal strength. If
adequate signal strength is present, a number of the five
bars will be shaded black. The greater number of bars
filled, the stronger the modem's signal.
More Info Button
This button allows you to change the Modem Manager
window to the Detailed view.
Novatel URL
Tap www.novatelwireless.com, located at the bottom of
the Modem Manager main window, to open the Novatel
Wireless Website.
System Tray Icons
When you launch the Modem Manager application, a system tray icon will appear in the bottomright corner of your Pocket PC desktop (Today screen). The tray icon provides easy access to
the Modem Manager main window and the modem's connection status.
The following icons indicate the modem's connection status:
- If this icon is visible, the modem is currently connected to the network.
- If this icon is visible, the modem is not connected to the network.
If the Modem Manager window is not visible, tap
to open it.
Manual Revision 4.0 P/N 90023361
38
Modem Manager Reference
Connection Manager Window
The Connection Manager window, shown in Figure 56, allows you to create and maintain your
network connection profiles.
Network connection profiles contain all of the required information to identify the user to the
network.
To access this window, select Connection Manager from the Tools menu.
Figure 56 Connection Manager window
Detailed Status Report Window
The Detailed Status Report window contains information that is useful when troubleshooting any
problems you may be experiencing with your modem or network connection.
To view this window, select Detailed Status Report from the Tools menu.
The Detailed Status Report window consists of the General and History tabs.
The General tab is displayed by default, and contains current information about your modem and
the network connection. See Figure 57.
Figure 57 General tab
Manual Revision 4.0 P/N 90023361
— Modem Manager Reference
39
The General tab contains the following items:
Current Status Bar
This bar, located at the top of the window, displays the current status of the modem and the network connection.
Default Connection
Field
This field displays the name of the connection profile you
have designated as the default connection setting.
Available Service Field
This field displays the type of network you are currently
using.
Carrier Field
This field displays the name of the carrier currently providing your service. The name displayed in this field may
change, depending on your geographical location and
your service provider's roaming agreements.
Signal Strength Field
This field displays the modem's signal strength in dBm
(decibels below 1 milliwatt).
Bit Error Rate
This field is only visible after your modem has established
a network connection, and displays the percentage of bits
that have been received in error compared to the total
number of bits received.
Text Messages
This field displays the number of messages and the total
number of memory “slots” available in SMS memory. For
example, 1 / 25 indicates that there is one message
and the total number of available message slots is
25. This field will be visible only if your modem is configured to support text (SMS) messaging.You must shut
down the Modem Manager application and open your
third-party phone tools application (i.e. BVRP Phone
Tools) in order to view your text messages.
The History tab, shown in Figure 58, displays the date, time, and current modem and network
session activities. This tab is useful when attempting to diagnose problems with your modem or
your network connection.
Figure 58 History tab
Manual Revision 4.0 P/N 90023361
40
Modem Manager Reference
Modem Properties Window
The modem Properties window consists of the General, Roaming, and SIM tabs. To view this
window, select Properties from the Modem menu.
The General tab, shown in Figure 59, is displayed by default and contains detailed information
regarding your modem's type and manufacturer. This information is helpful for customer support
in diagnosing problems you may be experiencing with your modem.
Figure 59 Properties General tab
Tap the Roaming tab, shown in Figure 60, to access and configure your roaming settings.
Figure 60 Properties Roaming tab
Manual Revision 4.0 P/N 90023361
— Modem Manager Reference
41
Tap the SIM tab, shown in Figure 61, to view or modify your PIN settings.
Figure 61 SIM tab
About GPRS Modem Manager Window
Select About Modem Manager from the Help menu to see the About GPRS Modem Manager
window, shown in Figure 62.
Figure 62 About Modem Manager window
This window contains information about the Modem Manager application, including:
• The software version,
• The release date, and
• The copyright information.
Manual Revision 4.0 P/N 90023361
42
Modem Manager Reference
GPRS Connection Profile Properties Window
The GPRS connection profile Properties window allows you to view and edit a specific GPRS
profile's network information.
Note:
Do not change your connection profile properties unless requested to do so by your
service provider. Changing your network information without consulting your service
provider may disable your modem's ability to register and connect with the network.
To access this window, highlight the desired GPRS connection profile and tap Properties from
the Connection Manager window. See Figure 63.
Figure 63 Connection Manager window
The GPRS connection profile Properties window consists of the General, Address, and User
Info tabs.
The General tab, shown in Figure 64, is displayed by default, and contains the name of the
connection profile, as well as the APN (Access Point Name).
Figure 64 General tab
Manual Revision 4.0 P/N 90023361
— Modem Manager Reference
43
The Address tab, shown in Figure 65, contains the Primary DNS, Secondary DNS, Primary
WINS, and Secondary WINS fields (obtained from your service provider.
The Primary and Secondary WINS (Windows Internet Naming Service) fields are not required
by all service providers. If you were not given any values for these fields, leave them blank.
Figure 65 Address tab
The User Info tab, shown in Figure 66, contains the connection profile's User name and
Password fields. Your service provider will inform you if a user name and password are required
to use their network. If these values are not necessary, leave the fields blank.
Figure 66 User Info tab
Note:
If you did not enter the DNS Addresses or the User Name and Password (if required by
your service provider) when you created the connection profile, you may enter the values in
the GPRS Properties window. Tap OK to save the new settings and close the window.
Manual Revision 4.0 P/N 90023361
44
Modem Manager Reference
GSM Connection Profile Properties Window
The GSM connection profile Properties window allows you to view and edit a specific profile's
network information.
Note:
Do not change your connection profile properties unless requested to do so by your
service provider. Changing your network information without consulting your service
provider may disable your modem's ability to register and connect with their network.
To access this window, highlight the desired GSM connection profile and tap Properties from the
Connection Manager window. See Figure 67.
Figure 67 Connection Manager window
The GSM Properties window will open, shown in Figure 68. This window contains the connection
profile's Connection name, User name, Password, and Phone number fields (obtained from
your service provider). Tap OK to save any changes you have made and to close the Properties
window.
Figure 68 GSM Properties window
Manual Revision 4.0 P/N 90023361
— Modem Manager Reference
45
The Options Window
The Options window contains the Automatically connect when GPRS Modem Manager is
launched check box. See Figure 69.
Figure 69 Options window
When this check box is selected, the Modem Manager will automatically attempt to register and
connect to the network specified in your default connection profile. You must clear this check box
if you wish to use an alternate connection profile without changing your default settings.
To access this feature, select Options from the Tools menu.
The Add Connection Wizard
The Add Connection Wizard will guide you through the process of creating either a GPRS or GSM
connection profile. Your service provider will indicate what type of network to use, and provide
any additional mandatory information.
When creating a GPRS connection profile, you are required to enter the connection profile's
Connection Name, APN (access point name), and the Primary and Secondary DNS (Domain
Name Server) Addresses. You must also specify the connection type as GPRS, and define
whether the connection profile will be used as your default setting.
You may also be required to enter a Primary and Secondary WINS (Windows Internet Naming
Service), User Name, and a Password. Your service provider will supply you with all the above
information.
When creating a GSM connection profile, you are required to enter the connection profile's
Connection Name, User Name, Password, and Phone Number. You must also specify the
connection type as GSM, and define whether the connection profile will be used as your default
setting. Your service provider will supply you with all the above information.
Manual Revision 4.0 P/N 90023361
46
Modem Manager Reference
This Page Intentionally Left Blank
Manual Revision 4.0 P/N 90023361
Technical Support
Technical Support
If you have any questions or comments about your Merlin for GPRS, please
contact your Wireless Technical Support Team.
www.nvtl.com
[email protected]
1-888-888-9231
Safety and Regulatory Notices
This product is not to be used in any environment where radio frequency
equipment is prohibited or restricted in its use. This includes aircraft, airports,
hospitals, and other sensitive electronic areas. To ensure that your modem is
deactivated you should remove it from your computer under the above conditions.
Under extended operation the Merlin for GPRS modem will generate a noticeable
amount of heat. Like all PC Cards, the modem generates heat during normal
operations and is also heated by the host computer. For this reason it is
recommended that you allow the modem to cool down after extensive operation
so that it is cool to the touch when you remove it from your computer.
Regulatory Notices
Federal Communications Commission Radio Frequency Interference
Statement
This equipment has been certified to comply within the limits of a class B digital
device pursuant to part 15 of the FCC Rules. These limits are designed to provide
reasonable protection against harmful interference in residential situations. This
equipment generates, uses, and can radiate radio frequency energy, and, if not
properly installed and used in accordance with the instructions, may cause
harmful interference to radio or television reception, which can be determined by
turning the equipment on and off. You are encouraged to try to correct the
interference by one or more of the following measures:
•
•
•
•
Reorient or relocate the receiving antenna of the television, radio or cordless
telephone.
Increase the separation between the equipment and the receiver.
Connect the equipment to an outlet on a circuit different from that to which the
receiver is connected.
Consult the dealer or an experienced radio/television technician for additional
suggestions.
FCC ID: NBZNRM-G2000
Merlin for GPRS
WWW:
Email:
Phone:
48
Technical Support
This Page Intentionally Blank
Manual Revision 4.0 P/N 90023361
Glossary
Access Point Name (APN)
The IP domain name (eg; novatelwireless.com) of the network device that
acts as a gateway by connecting a GPRS wireless radio network to a wired
local or wide area network.
An active network session allows you to send and receive data across the
Internet using point-to-point protocol through current your network
connection.
AT Commands
AT commands are a modem-specific language type that enables PC
communications software control the modems directly. The term AT comes
from the command terminology which always begins with attention, or AT.
dBm
dBm stands for decibels below 1 milliwatt. It is a measurement of a device’s
signal output power compared against a standard input signal strength of 1
milliwatt. This number represents a ratio and is expressed as a negative
number (eg; -60dBm). The valid range for your Merlin for GPRS is -113 dBm
to -51 dBm. Values closer to zero indicate a better reception. The value -51
dBm indicates a better reception than -113dBm.
Default Network Connection Profile
The default network connection profile is the connection profile, chosen by
the user, that the Modem Manager will use to connect to the network. The
default network connection profile can be thought of as the active network
connection profile.
Domain Name
The name assigned to a computer or group of computers that constitute an IP
network domain. In general, a domain name is comprised of its local host
name and its top-level domain. The top-level domain can be made up of
several names, each separated by a period (.).
An example of a domain name is novaltelwireless.com.
Domain Name System (DNS)
This is a network server used on IP networks, such as the Internet, for
translating network hostnames and Universal Resource Locators (URL’s) into
IP addresses.
Domain Name System (DNS) Address
The IP (internet protocol) address of the Domain Name System (DNS).
Merlin for GPRS
Active Network Session
50
Glossary
Firmware
Firmware is a program or set of programs that have been set permanently into a computer
chip. These are low-level programs that directly manipulate or interact with the hardware.
Firmware is a single program or a combination of programs that have been placed on a
PROM, EPROM or EEPROM prior to the product leaving the manufacturing facility.
GPRS
GPRS stands for General Packet Radio Service. GPRS is a high-speed data transfer
technique, used on GSM networks. It does not require a continuous data stream be opened
between the data source and destination. Instead, it uses packets to move data back and
forth, making efficient use of the available radio spectrum.
GSM
GSM stands for Global System for Mobiles. It is an open, non-proprietary system with
international roaming capability providing seamless and same standardized same number
contact ability in more than 170 countries. GSM satellite roaming has extended service
access to areas where terrestrial coverage is not available.
GSM uses digital technology and time division multiple access transmission methods. Voice
is digitally encoded via a unique encoder, which emulates the characteristics of human
speech. This method of transmission permits a very efficient data rate/information content
ratio.
IMEI
IMEI stands for International Mobile Station Equipment Identity.
Internet Protocol (IP)
Internet Protocol works in conjunction with Transmission Control Protocol (TCP). TCP/IP are
part of a group of protocols that provide communication across interconnected networks.
TCP/IP is the protocol used on the Internet. The TCP protocol first establishes a connection
between two systems to send and receive data, and then breaks and sequentially marks the
message into small packets. The IP protocol routes and sends the packets based on the IP
address.
IP Addresses
As with personal computers that access the Internet, modems using GPRS technology also
use Internet Protocol (IP) address, which are used to identify the node or access point for the
modem on the Internet. The service provider assigns this IP address.
The 32-bit host address is usually represented in dotted decimal notation, e.g. 128.121.4.5.
The address can be split into a network number (or network address) and a host number
unique to each host on the network and sometimes also a subnet address.
IP Network
A network of computers that use Internet Protocol allowing a user to access the Internet,
provided that the user has a modem; telephone line, cable line, or wireless data network (e.g.
GPRS); and a service provider.
Local Area Network (LAN)
A computer network that spans a relatively small area (typically up to a 1 km radius), although
most LANS are confined to a single building or group of buildings. This type of networking
allows for easy interconnection of terminals, printers, and computers within a building or
buildings.
Manual Revision 4.0 P/N 90023361
Glossary
51
Network Connection Profiles
A network connection profile is a group of connection settings that define a specific network
connection to the Modem Manager. This includes such settings as network ID, network
password, APN, and DNS addresses.
Packet
A short block of data transmitted across a network.
Packet Size
The size of a packet expressed in bytes.
PC Card
A PC Card is similar in size to a credit card and is used for adding devices to portable
computing devices such as laptop, handheld, and palmtop computers. Some examples of
these devices are modems, network cards, disk drive adapters, and extra memory.
PC Card Slots
The PC Card slots are the sockets in the computing device, in which the PC Card is inserted.
It is the hardware interface between the computing device and the PC Card.
Point-to-Point Protocol (PPP)
PPP is an interconnection protocol which allows a device such as a wireless IP modem, to
connect to a network or the Internet.
Primary Domain Name System
To retrieve translated IP addresses, the modem will try to connect to the server with the
primary DNS address. If the modem cannot connect to this address, it will try to connect using
the secondary DNS address.
Registration
To send and receive data across a given network, a GPRS modem must first register on a
GSM/GPRS network. This involves the selection of an available channel and interaction with
various systems on the GPRS network to set up a communication path.
Secondary Domain Name System
To retrieve the translated IP addresses, the modem will try to connect to the server with the
secondary DNS address in instances where it cannot connect to the primary DNS address.
Segment
Each IP network address consists of four numeric segments, which are divided by a period
("."). For example, 204.119.63.40.
Service Provider
A company that provides network connections to the Internet.
SIM
The term SIM stands for Subscriber Identity Module.
Manual Revision 4.0 P/N 90023361
52
Glossary
SIM Card
A SIM card is a type of smart card that contains all of your account information for your GSM and
GPRS account. It is also used to encrypt the data and voice that is sent across the network during a
session.
SIM Card Contact Points
These are the small gold- or aluminum-coloured contacts, visible on one side of the SIM card.
Type II PC Card
A Type II PC Card is identical to the Type I PC Card in all ways except that it is thicker than
the Type I card. The Type II PC Card is in general use now.
Wireless IP Network
A wireless network (e.g. GPRS) that uses Internet Protocol (IP).
Manual Revision 4.0 P/N 90023361