1
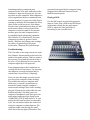
Guide to Using the Okanagan College
Theatre at KLO Campus.
Pick up the following items from the
Information Desk:
•
•
•
Keys to theatre and backstage audio
cabinet (inside 3‐ring binder)
Remote for NEC LCD projector (in
drawer)
Podium microphone and TOA
wireless lapel microphone &
transmitter (in mic case)
Use one of the keys to unlock the theatre.
Note: both doors must be unlocked when
people are inside.
Worklights & other lighting:
Walk backstage right to turn on light
switches for stage worklights and apron
lights. To the right of those switches there is
a small dimmer panel that controls audience
lighting and a pair of 1000watt PAR64 stage
lights. See instructions above panel for
which slider controls what.
Audio cabinet backstage right:
Turn on the worklight above the front door
of the rack. Use the smaller key to open the
front door of the audio cabinet.
There is a power bar mounted about knee
level. This should stay on at all times.
Turn on power to the equipment in the
audio rack by using the switch at the far
right of the Middle Atlantic rack‐mounted
power supply at the top.
*note: if the two dials on the Crown power
amp at the top of the rack are not all the way
down, then turn them down before you turn
on the power – this will prevent the speaker‐
damaging pop that occurs when the system
powers up.
When you turn on the audio cabinet power
both the audio mixer and the Crown power
amp should light up. If the power amp does
not light up, press the power button on the
front at the far right side. The power switch
for the mixer is on the back beside where the
AC cable plugs in. It should be left on.
Default levels for the Crown power amp
should be about 12 o’clock – maybe 2 o’clock
if you have a really noisy audience.
Default levels for the audio mixer:
Yellow MASTER VOLUME sliders at far right:
set at ‘0’
Channels 1 – 12 and STE1 & STE 2 sliders:
set the sound sources you want to use at ‘0’,
pull all others all the way down.
Channel Gain (red knob at top of each row):
adjust until you have a suitable volume.
Microphones and Computer input can
generally run at about 12 o’clock. DVD input
has to turn down to about 9 o’clock.
You can use the HF, MF and LF to adjust the
amount of high frequency, middle frequency
and low frequency in the signal. The top dial
in the MF section selects what part of the
middle frequency you are adjusting (higher
or lower middle frequency).
For stereo inputs you can use the PAN
controls to send one channel to the left and
the other to the right.
Check to make sure none of the red MUTE
buttons have been pressed in.
Microphones:
Computer connection & projection:
Locate the microphone cable hanging on the
wall backstage right and run it to the podium
where you can plug in the podium mic. On
the audio mixer look for the channel labeled
‘PODIUM’ (CH 12) and bring the slider up to
‘0’. Adjust the gain for that channel until you
get a reasonable level.
Look for a long bundle of cables hanging on
the backstage right wall. This bundle
includes:
•
•
•
If you are using the TOA wireless lapel
microphone clip the microphone to your
clothing about 3 inches below your chin.
Press the power button on the front of the
beltpack transmitter. It should light up. If it
doesn’t try replacing the 9Volt battery with a
spare one from the audio cabinet. The
wireless receiver is in the audio cabinet
beside the mixer and is already plugged into
a channel labeled ‘LAPEL’ (CH 11). Set the
slider for this channel to ‘0’ and adjust the
gain until you get a reasonable signal. Be
careful not to stand in front of the speakers
when wearing the lapel mic or you will get a
nasty feedback squeal.
Projection screen:
On the wall backstage right you’ll find a
toggle switch to lower the projection screen.
Hold it down until the screen is as low as it
can go. Note: the screen will automatically
retract after about 3 hours. If you’re about to
start a long presentation or movie viewing,
raise and lower the screen a few inches just
before you start. This will keep it from going
up in the middle of your show.
VGA cable with 3.5mm stereo audio
cable – to connect to your computer’s
video output port and headphone
jack
Power cord (note: 2 prong only – you
can’t connect a grounded 3‐prong
cable to it)
Network cable ‐ plug in for internet
access. The theatre also has excellent
Okanagan College wireless network
connectivity – but you need a
myOkanagan account to access it.
Connect your computer to the VGA cable
(and 3.5mm stereo audio cable if you need
sound).
Use the small white NEC remote
control to turn on the projector
hanging from the ceiling in the
middle of the theatre. You usually
have to stand in the middle of the
stage and point the remote at the
projector – it doesn’t work from
an angle. You should hear a beep
and see a blue light as the
projector comes on.
There are 2 different inputs on
the projector. You can select the one you
want using buttons on the remote. The
Computer 1 input is connected to the long
VGA cable you dragged out from backstage
right. Video is connected to the DVD player
in the audio cabinet.
Assuming you have connected your
computer to the VGA cable, and selected the
Computer 1 input on the projector, you can
now turn on your computer. Most computers
will recognize that they are connected to an
external monitor (or projector) while they’re
starting up and they will automatically show
their screen on the projector. If the image
doesn’t come up automatically then you will
need to know how to tell your particular
computer to send its signal to its external
monitor port. On some computers this is
accomplished with a keyboard command
like Function‐F7 or Function‐F5. On some
computers you have to go into Control
Panels / Displays and change some settings.
On a Mac you generally go to System
Preferences / Displays and click Arrange.
Troubleshooting:
The VGA cable on the stage runs into a small
blue ‘Kramer’ box mounted on the lower left
inside of the audio cabinet. This box needs to
have power (lit up) and the switch needs to
be set to ‘A’ (out position) for it to pass the
computer signal up to the projector.
Some computers have their resolution set
too high for the LCD projector. Try lowering
the computer’s screen resolution and/or
refresh rate (Control Panel / Displays).
Once you have the image up on the screen
you can get the computer audio working.
Play some audio on your computer and
make sure you haven’t turned down or
muted the sound using the computer’s
various audio settings. Once that’s working
plug the 3.5mm stereo audio cable (the one
bundled with the VGA cable) into your
computer’s headphone jack. Next, go to the
audio mixer backstage right, bring up the
‘COMPUTER’ (STE 2) audio slider to ‘0’ and
adjust the Gain until you have a reasonable
level. You can further adjust the audio level
using the computers volume buttons. The
computer audio runs through the small
silver box at the top right of the mixer. This
prevents hum caused by the computer being
plugged into a different electrical circuit
than the sound system.
Playing a DVD:
Use the NEC remote to switch the projector
input to Video. Play a DVD in the DVD Player
in the audio cabinet. On the audio mixer
(STE 1) adjust the Gain (and slider if
necessary) to set a suitable level.
Shutting down & packing up:
Turn off the LCD projector by pointing the
NEC remote at the projector and pressing
OFF. A message will appear on the screen
asking you to confirm. Press OFF again. Note:
once you’ve turned off the projector you
can’t turn it on again for about 90 seconds –
the bulb has to cool down before it will
accept a new ON command.
Raise the projection screen using the switch
on the wall backstage right.
Disconnect cables from computer and
microphone and hang them up on the wall
backstage right.
Turn off the wireless lapel mic transmitter
and put it back in the microphone case
(along with the podium mic).
Turn the two dials on the Crown power amp
at the top of the rack all the way down
before turning off the audio system using the
power switch on the Middle Atlantic power
supply unit. (*this prevents the speaker‐
damaging pop when the power goes off)
Use the key to close and lock the audio
cabinet.
Press the off button on the wall‐mounted
audience and stage lighting dimmer
backstage right.
Turn off any stage, backstage and apron
worklights. There are 2 lights that stay on to
light the stairs to the stage. These are
controlled by a wall switch backstage left.
Lock the theatre doors (both sides).
Return the following items to the
Information Desk. If no one is present,
contact OC Security and return the items to
them.
•
•
•
Keys to theatre and backstage audio
cabinet
Remote for NEC LCD projector
Podium microphone and TOA
wireless lapel mic and transmitter (in
mic case)
Additional Notes:
For recording you can take an audio feed off
the mixer’s 2‐track RCA jacks, the
headphone jack, monitor out, etc. The mixer
is a Soundcraft EFX12. The user manual can
be found online.
There is some minimal audio equipment up
in the booth and a pair of XLR lines that run
down to the backstage right mixer.
If you need any lighting more sophisticated
than the pair of PAR64s blasting at the stage
you need to book the on‐call theatre
technician through the OC Facilities
Department. There’s an ETC board up in the
booth and an ancient Control Lighting patch
panel.
Controls for the main drape are backstage
right.
(revised 18 November 2010)