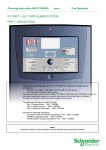
1
User Manual
66571741GB2
04/2011
Fire Detection
WinFXNet Configuration Tool (version 4.0)
For Fire Alarm System FXNet
User Manual
66571741GB2
04/2011
Fire Detection
2
CONTENT
General...................................................................................................................................................................... 3
WinFXNet Installation .............................................................................................................................................. 3
Distribution ............................................................................................................................................................. 3
Installation.............................................................................................................................................................. 4
License file ............................................................................................................................................................. 4
Main Window ............................................................................................................................................................ 6
To start a new project.............................................................................................................................................. 8
FXNet Data form....................................................................................................................................................... 8
The Panels page.................................................................................................................................................... 9
The Panel visibility page ...................................................................................................................................... 10
The Loops and Zones page................................................................................................................................. 11
Configuring the panels.......................................................................................................................................... 12
General Panel Data ................................................................................................................................................ 12
Panel Info page.................................................................................................................................................... 13
Communication page........................................................................................................................................... 14
Identifications page .............................................................................................................................................. 16
Loop Controllers page ......................................................................................................................................... 17
Control Outputs page........................................................................................................................................... 18
MCIO Setup page ................................................................................................................................................ 19
IO controllers page .............................................................................................................................................. 20
MC and IOC Clean Contact Input functions ........................................................................................................ 23
MC, IOC and OCA Clean Contact Output functions............................................................................................ 23
MC and IOC Monitored Relay Output functions .................................................................................................. 24
Delayed outputs page.......................................................................................................................................... 24
Print and Log page .............................................................................................................................................. 26
Miscellaneous page ............................................................................................................................................. 27
Address and Text data .......................................................................................................................................... 29
Address table columns ........................................................................................................................................ 30
Changing the detection zone ............................................................................................................................... 33
Type selection...................................................................................................................................................... 33
Changing sensitivity and detection parameters................................................................................................... 39
Selecting control groups for outputs .................................................................................................................... 44
Editing texts ......................................................................................................................................................... 44
Closing the Address Data window ....................................................................................................................... 44
Summary of addresses ......................................................................................................................................... 45
Address reports ..................................................................................................................................................... 46
Printing ................................................................................................................................................................... 50
Printer setup......................................................................................................................................................... 50
Printing the data................................................................................................................................................... 51
To send/receive data to/from the panel............................................................................................................... 53
Sending data to a panel....................................................................................................................................... 53
Reading data from a panel .................................................................................................................................. 53
Communication handler dialog ............................................................................................................................ 53
To EXIT the program ............................................................................................................................................. 55
Schneider Electric
Pelco Finland Oy Kalkkipellontie 6, 02601 Espoo, Finland
www.pelco.com/nordic
Document Number 66571741GB2
Telephone: +358 10 446 511
Fax: +358 10 446 5103
04/2011
© 2011 Schneider Electric. All rights reserved.
File Opening, Merging and Saving....................................................................................................................... 47
Opening an existing file ....................................................................................................................................... 47
Merging an existing FX file .................................................................................................................................. 47
Merging an existing ESA file................................................................................................................................ 48
Saving data to a file ............................................................................................................................................. 48
User Manual
66571741GB2
04/2011
Fire Detection
3
General
The WinFXNet program enables you to configure a system of up to 32 panels of the FX family with any type
of loop controllers; LC, CLC, ALC or SLC.
The program is written for the following 32-bit Windows versions: Windows 2000, Windows XP, Windows
Vista and Windows 7.
The general procedure for working through the configuration is the following:
Collect all necessary documentation for the project
o Detector location plans
o Cabling drawings
o List of texts to be displayed by the panel in alarm conditions
o etc.
Start the program
Select File - New from the main menu
Add panels to the system
For each panel, select it in the left pane of the window
Activate the General Panel Data form
Go through all pages on the General Panel Data form modifying the settings as appropriate
Close the General Panel Data form and activate the Address and Text Data form
Select device types for each address to be installed and write the text that the panel should display in
alarm condition.
Close the Address and Text Data form and save the file.
Prepare the panel for configuration and send the configuration data to the panel.
Restart the panel and check that it recognizes all addresses correctly and that the texts displayed for the
addresses are correct.
The general procedure for doing a modification of an existing configuration is the following:
Either open a file or read the current configuration from the panel.
Make any necessary modifications, first to General Panel Data and then to Address and Text Data.
Save the file on disk.
Send the new configuration data to the panel.
All of the above items will be explained in detail in this manual.
WinFXNet Installation
Distribution
© 2011 Schneider Electric. All rights reserved.
WinFXNet is distributed as an installation package in a file named WinFXNet_x.y.z_Setup.exe, where x is
the major version, y is the minor version of the program and z is the release number, for example
WinFXNet_4.0.1_Setup.exe.
The installation package does not include a license file since the license is personal. See 'License file' for
more information.
Schneider Electric
Pelco Finland Oy Kalkkipellontie 6, 02601 Espoo, Finland
www.pelco.com/nordic
Document Number 66571741GB2
Telephone: +358 10 446 511
Fax: +358 10 446 5103
04/2011
User Manual
66571741GB2
04/2011
Fire Detection
4
Installation
The installation has to be run under an administrators account
The installation package contains the following files:
File name
Comment
WinFXNet.exe
The executable program file
EsSDL32.dll
Communication library
winfxnetdk.txt
Translation files for the user interface of the program
winfxnetfi.txt
winfxnetgb.txt
winfxnetno.txt
winfxnetse.txt
ReadMe-DK.rtf
ReadMe files that are shown at the end of the installation
ReadMe-.FIrtf
ReadMe-GB.rtf
ReadMe-NO.rtf
ReadMe-SE.rtf
HASPUserSetup.exe
License key installation package
In addition, the installation program creates two files to support uninstallation:
unins000.dat
unins000.exe
All files, except HASPUserSetup.exe are installed by the installation program to the following directory:
C:\Program Files\Pelco\WinFXNet\4.0\
HaspUserSetup.exe is installed in a subdirectory:
C:\Program Files\Pelco\WinFXNet\4.0\HASP\
During the installation process, the user (installer) is presented options to select if the License key
installation should be run or not. Running the HASP license key driver setup requires a restart of the
computer.
The installation program creates icons (links) in the Start menu
- to launch WinFXNet
- to review the ReadMe file (in the language that was selected for installation)
- to launch installation of the HASP license key drivers
- to uninstall the WinFXNet package
Optionally the installation program also creates an icon (link) on the desktop
- to launch WinFXNet
A license information file, named "winfxnet.lic" is required for running the WinFXNet program. It is looked for
in the following directory:
If the Operating System (OS) is Windows 2000 or Windows XP:
C:\
C:\Documents and Settings\
Settings\<username>\
<username>\Local
Local Settings\
Settings\Application Data\
Data\Pelco\
Pelco\WinFXNet\
WinFXNet\
If the OS is Windows Vista:
C:\
C:\Users\
Users\<username>\
<username>\AppData\
AppData\Local\
Local\Pelco\
Pelco\WinFXNet\
WinFXNet\
These directories are, however, by default OS settings, hidden and therefore not easily accessible to many
users. The WinFXNet software is therefore programmed to assist the user to place the file in the correct
location. The user must have obtained a valid license file and have it available when (s)he starts the program
for the first time or when the license is about to expire or has already expired.
The first time start up of WinFXNet should be performed by the end user, not the person who installed the
program because the above mentioned directories are user specific.
When the program is started it looks for the license file in the above mentioned directory and
Schneider Electric
Pelco Finland Oy Kalkkipellontie 6, 02601 Espoo, Finland
www.pelco.com/nordic
Document Number 66571741GB2
Telephone: +358 10 446 511
Fax: +358 10 446 5103
04/2011
© 2011 Schneider Electric. All rights reserved.
License file
User Manual
-
66571741GB2
04/2011
Fire Detection
5
If the file is not found, this dialog will be shown:
Answering "No" will terminate the program!
-
If the file is corrupted or has expired a similar dialog will be shown indicating the error and asking if a
valid license file should be located.
-
If the file is found but there's less than 60 days remaining of the license time, this dialog will be shown:
Answering "No" will not terminate the program, the existing license file will be used.
-
If the user answers "Yes" to any of the above dialogs, an ordinary file open dialog will be displayed and
the user can now navigate to the valid license file and select it.
Note! The license file that the user selects does not have to be named "winfxnet.lic". The license files
may be distributed with a name like "winfxnet[1].lic - company - user" and it is perfectly OK to select a file
with such a name. Whatever name the file has, it must of course be a valid WinFXNet license file.
Answering "Yes" will make a copy of the license file in the proper directory and with the correct name
and then use that file.
Answering "No" will terminate the program if the existing license file is not found, if it is corrupted or if it
has expired, or, use the existing file if it is valid but about to expire.
Answering "Retry" will open the ordinary file selection dialog again, to navigate to another file.
Schneider Electric
Pelco Finland Oy Kalkkipellontie 6, 02601 Espoo, Finland
www.pelco.com/nordic
Document Number 66571741GB2
Telephone: +358 10 446 511
Fax: +358 10 446 5103
04/2011
© 2011 Schneider Electric. All rights reserved.
The program will then ask for a confirmation:
User Manual
66571741GB2
Fire Detection
04/2011
6
Main Window
The main window contains the main menu and a toolbar. You may notice that initially some menu items and
toolbar buttons are grayed which means that they are not selectable. They will be selectable as soon as you
create a new file or open an existing one.
The menu has the following items:
Data
Network Data
General Panel Data
Address and Text
Summary of Addresses
Address reports ...
Configuration Info ...
Tools
Receive from panel
Send to panel
Schneider Electric
Pelco Finland Oy Kalkkipellontie 6, 02601 Espoo, Finland
www.pelco.com/nordic
Document Number 66571741GB2
Settings
Language
Display Font
Default Data Folder
Special settings
© 2011 Schneider Electric. All rights reserved.
File
New
Open …
Merge FX file...
Merge ESA file ...
Save
Save As …
Import …
Export …
Print ...
Print Setup ...
Exit
Telephone: +358 10 446 511
Fax: +358 10 446 5103
04/2011
User Manual
66571741GB2
Fire Detection
04/2011
7
The toolbar has the following items:
Button
Corresponding menu selection
Purpose
File – New
Prepares the program for a new configuration
File – Open ...
Opens an existing configuration file
File – Merge FX file ...
Merges an FX file into the current configuration
File – Merge ESA file ...
File – Import ...
Merges an ESA file into the current configuration
Saves the current configuration data in a file using the
current filename
Saves the current configuration data in a file using a new
filename
Imports data from an Excel file
File – Export ...
Exports data to an Excel file
File – Print ...
Prints the current configuration data
File – Print Setup ...
Opens a printer settings dialog
Data – Network Data
Opens the FXNet form for defining the panels that make
up the network
Data – General Panel Data
Opens the General panel data form
Data – Address and Text Data
Opens the Address and text data form
File – Save
File – Save As ...
Settings – Display font ...
Opens a form with a summary of currently configured
addresses
Opens a form for listing and sorting addresses and to
print the listing
Opens a form with information (last modifications by who
and when) about the current configuration
Opens a dialog for receiving configuration data from an
FX panel
Opens a dialog for transmitting configuration data to the
selected FX panel
To select the language for the program. A file named
winfxnetxx.txt (where xx is the selected language code)
has to reside in the directory of the WinFXNet.exe.
To select a display font for the program
File – Exit
Terminates the program
Data – Summary of Addresses
Data – Address reports
Data – Configuration info
Tools – Receive From Panel ...
Tools – Send To Panel ...
© 2011 Schneider Electric. All rights reserved.
Settings – Language ...
Schneider Electric
Pelco Finland Oy Kalkkipellontie 6, 02601 Espoo, Finland
www.pelco.com/nordic
Document Number 66571741GB2
Telephone: +358 10 446 511
Fax: +358 10 446 5103
04/2011
User Manual
66571741GB2
Fire Detection
04/2011
8
To start a new project
Select File – New from the menu or press the
button on the Toolbar.
The left pane shows the root of the system with the text 'New FXNet'.
The right pane has the FXNet Data form that consists of three tabbed pages and two buttons, 'OK' and
'Cancel'.
The 'OK' and 'Cancel' buttons are visible on all three pages and have the following functions:
Actuates the changes you have made and saves the panel list to FXNet system data.
Cancels the changes you have made.
Select File – New from the menu or press the
button on the Toolbar
or, if you already have visited this form earlier select the root item in the left pane and then Data – Network
data from the menu or press the
button on the Toolbar
The FXNet Data form has three tabbed pages, 'Panels', 'Panel visibility' and 'Loops and zones'.
The default page is the 'Panels' page. However, the last used page is remembered and shown again when
you return to this view.
Schneider Electric
Pelco Finland Oy Kalkkipellontie 6, 02601 Espoo, Finland
www.pelco.com/nordic
Document Number 66571741GB2
Telephone: +358 10 446 511
Fax: +358 10 446 5103
04/2011
© 2011 Schneider Electric. All rights reserved.
FXNet Data form
User Manual
66571741GB2
04/2011
Fire Detection
9
The Panels page
In the edit control 'FXNet system name' you can change the name of the system. The change is reflected in
the left pane root item also.
With the 'System kind' control you can define whether the system will consist of only one, standalone panel
or of 1 ... 32 FX networked panels. If you attempt to change the setting after you have defined a panel
(standalone) or several panels (multipanel), you will be notified that the erroneous panel(s) will be deleted
from the list. You then have the option to cancel the change or proceed with it. Warning! If you, after a
change of the system kind and deletion of erroneous panels in the list press OK, all General Panel
Data, Address Data and Text Data belonging to the deleted panels are lost!
Note! The 'System kind' selection might be locked to 'Standalone' and disabled due to license restrictions.
The 'Type' control defines the type of panel. Available values are 'FX', 'FXL', 'FXM' and 'FXS'. This is only for
documentation purposes and has no effect on the configuration of the panel.
In the 'Panel name' field you can write whatever you want to call the panel.
Adds an entry to the panel table, with the ID, Type and Name you have defined
Modifies the panel Type and Name for the panel you have selected with 'Panel id'
Deletes the selected panel (defined by the ID) from the table
Schneider Electric
Pelco Finland Oy Kalkkipellontie 6, 02601 Espoo, Finland
www.pelco.com/nordic
Document Number 66571741GB2
Telephone: +358 10 446 511
Fax: +358 10 446 5103
04/2011
© 2011 Schneider Electric. All rights reserved.
With the 'Panel ID' control you give an individual number for each panel. The panel ID's do not have to be
consecutive. If system kind is standalone, you can define only one panel, and its ID has to be 0. If system
kind is multipanel, you can define 1 ... 32 panels and none of them can have an ID of 0.
User Manual
66571741GB2
Fire Detection
04/2011
10
The Panel visibility page
The 'Panel visibility' page shows the 'Seeing - Visible' relation between the panels. For each panel you can
define which panels it sees, in other words monitors and controls. It also calculates the number of logical
connections. The FXNet system is designed for a maximum of 256 logical connections between the panels.
To enter / change visibility definitions, right-click on a row in the table. A popup menu is displayed with three
items 'Select ...', 'Copy' and 'Paste'. With the 'Copy' (Ctrl-C) and 'Paste' (Ctrl-V) items you can copy the
definition of visible panels of one panel to another. The 'Select ...' item will open a dialog where you can
select the visible panels
You select the visible panels by checking the boxes
for the panels that should be visible to the panel you
have selected in the table.
Selects all checkboxes
Deselects all checkboxes
© 2011 Schneider Electric. All rights reserved.
By definition a panel always sees itself. It doesn't
matter if you select or deselect it here. It makes it
easier to copy a definition among several panels if
you select all that are mutually visible.
If you checkmark a panel that is not part of the
installation, it will create a constant fault warning
when the system is running.
Schneider Electric
Pelco Finland Oy Kalkkipellontie 6, 02601 Espoo, Finland
www.pelco.com/nordic
Document Number 66571741GB2
Telephone: +358 10 446 511
Fax: +358 10 446 5103
04/2011
User Manual
66571741GB2
04/2011
Fire Detection
11
The Loops and Zones page
The 'Loops and zones' page shows the loops and zones defined for each panel. This form is only
informative; you can not change the definitions here. You define the loop controllers and the loop
identifications as well as zone ranges in the individual panel's configuration.
© 2011 Schneider Electric. All rights reserved.
Initially, when you define the panels and go to this page before you press the 'OK' button, the table will show
'NA' for 'not available' since the panels are not yet configured with that information.
Schneider Electric
Pelco Finland Oy Kalkkipellontie 6, 02601 Espoo, Finland
www.pelco.com/nordic
Document Number 66571741GB2
Telephone: +358 10 446 511
Fax: +358 10 446 5103
04/2011
User Manual
66571741GB2
Fire Detection
04/2011
12
Configuring the panels
In the left pane, select the panel you want to configure. This will change the toolbar to disable the 'Net' and
the 'Receive From Panel' buttons and enable the 'General Panel Data', 'Address and Text Data', 'Address
Summary' and 'Send to Panel' buttons, as well as the corresponding main menu items.
It will also change the meaning of the 'Print' button and corresponding main menu item to print the
configuration of the selected panel.
General Panel Data
Select Data – General Panel Data from the menu or press the
General Panel Data form.
button on the Toolbar to open the
The General Panel Data form is shown. The form has ten pages which are selected by clicking on the tab.
Initially the ‘Panel info’ page is shown.
Schneider Electric
Pelco Finland Oy Kalkkipellontie 6, 02601 Espoo, Finland
www.pelco.com/nordic
Document Number 66571741GB2
Telephone: +358 10 446 511
Fax: +358 10 446 5103
04/2011
© 2011 Schneider Electric. All rights reserved.
It is important to start with the General Panel Data before proceeding to the Address and Text data dialog,
because many entries in the General Panel Data affect entries in the Address Data form.
User Manual
66571741GB2
04/2011
Fire Detection
13
Panel Info page
On the ‘Panel info’ page you can enter 250 characters in the description field. Typical entries could be the
name and/or address of the building.
© 2011 Schneider Electric. All rights reserved.
The system name, given in the network definition, becomes the first line in the panel description and is
enclosed in a pair of asterisks. The panel name becomes the second line in the panel description enclosed
in left and right angle brackets (< and >). Leave these as such on the first and second line; otherwise the
network view will not be able to extract the system name and the panel name from the description.
Schneider Electric
Pelco Finland Oy Kalkkipellontie 6, 02601 Espoo, Finland
www.pelco.com/nordic
Document Number 66571741GB2
Telephone: +358 10 446 511
Fax: +358 10 446 5103
04/2011
User Manual
66571741GB2
04/2011
Fire Detection
14
Communication page
On this page you select communication protocol for each communication port
Available protocol options for the RS232 port (on the MC board) are:
‘Not in use’
No communication will take place on the port
‘Printer protocol (ASCII)’
For connecting a printer
‘INFO protocol’
The INFO protocol is a proprietary communication protocol for point-to-point
communication between compatible devices. The protocol sends alarms,
fault warnings, disablement and re-enablement messages to an external
device.
© 2011 Schneider Electric. All rights reserved.
Other options for the RS232 port are:
INFO monitored
When this is checked, the panel issues a fault alarm if the communication
is interrupted.
Baud rate
Available options are 1200, 2400, 4800, 9600 and 19200
Schneider Electric
Pelco Finland Oy Kalkkipellontie 6, 02601 Espoo, Finland
www.pelco.com/nordic
Document Number 66571741GB2
Telephone: +358 10 446 511
Fax: +358 10 446 5103
04/2011
User Manual
66571741GB2
04/2011
Fire Detection
15
Available options for the RS485 port (on the optional SAA or SAB boards) are:
‘Not used’
No communication will take place on the port
‘INFO protocol’
The INFO protocol is a proprietary communication protocol for point-topoint communication between compatible devices. The protocol sends
alarms, fault warnings, disablement and re-enablement messages to an
external device.
Other options for the RS485 port are:
INFO monitored
When this is checked, the panel issues a fault alarm if the
communication is interrupted.
Baud rate
Available options are 1200, 2400, 4800, 9600 and 19200
Available options for the SYSTEM-1 port (on the optional SAB boards) are:
‘Not used’
No communication will take place on the port
‘FX protocol’
For communication in a networked FX system
Other options for the SYSTEM-1 port are:
Baud rate
Available options are 1200, 2400, 4800, 9600 and 19200
For 'FX protocol' the baud rate is fixed at 19200
© 2011 Schneider Electric. All rights reserved.
Available options for the SYSTEM-2 port (on the optional SAB boards) are:
‘Not used’
No communication will take place on the port
‘FX protocol’
For communication in a networked FX system
Schneider Electric
Pelco Finland Oy Kalkkipellontie 6, 02601 Espoo, Finland
www.pelco.com/nordic
Document Number 66571741GB2
Telephone: +358 10 446 511
Fax: +358 10 446 5103
04/2011
User Manual
66571741GB2
Fire Detection
04/2011
16
Identifications page
Field
System ID of this panel
System ID of first zone
Number of zones
System ID of last zone
Last Local Control
group
Purpose
Indicates what ID (identification) the panel is assigned in communication with
other panels/devices. This is 0 by definition in standalone FX panels.
The first zone of the panel. By default it is 1, and you can increase it to
whatever value until 9999 – number of zones. The zones of a panel have to
be consecutive.
This is by default 80, and you can change it to anything in the range 1 … 250
The last zone of the panel. This is calculated on basis of first zone and
number of zones.
defines the split point for local and shared control groups. The default is 100
which means that control groups 1 ... 100 are local and can only be used by
this panel itself. Control groups 101 ... 250 are shared over the network and
can be used as control activation criteria in all seeing panels
Note!
It is an error to define the same Panel ID for two or more panels.
It is an error to define overlapping zones for two or more panels.
Schneider Electric
Pelco Finland Oy Kalkkipellontie 6, 02601 Espoo, Finland
www.pelco.com/nordic
Document Number 66571741GB2
Telephone: +358 10 446 511
Fax: +358 10 446 5103
04/2011
© 2011 Schneider Electric. All rights reserved.
On the Identifications page you specify the Panel ID, Detection Zones, Split point for Local / Shared Control
Groups and Panels Visible to this panel.
User Manual
66571741GB2
04/2011
Fire Detection
17
Loop Controllers page
On the ‘Loop controllers’ page you define the Loop Controller boards in the panel and the loop numbers.
NOTE! The loop controllers have to be defined in order and the loop numbers (identifications) have
to be consecutive.
It is an error to define overlapping loop identifications for two or more panels.
Field
Type
First loop
© 2011 Schneider Electric. All rights reserved.
Number of loops
Last loop
Purpose
Available options are ‘Not in use’, ‘LC System Sensor 2-loop’, 'CLC
Conventional 16 Line', ALCB Intellia 2-loop', ALCA Intellia 1-loop and SLCB
Advanced 2-loop.
The identification of the first loop. This can only be set for the first LC and is
restricted to a value so that the last loop of the panel is at most 255.
This is automatically set depending on the type of LC
This is automatically set based on the ‘First loop’ and ‘Number of loops’
fields
Schneider Electric
Pelco Finland Oy Kalkkipellontie 6, 02601 Espoo, Finland
www.pelco.com/nordic
Document Number 66571741GB2
Telephone: +358 10 446 511
Fax: +358 10 446 5103
04/2011
User Manual
66571741GB2
04/2011
Fire Detection
18
Control Outputs page
On the Control outputs page you define which alarms and events in this panel affects fire door controls.
Fire door activation
Automatic fire doors, that are kept open by an electromagnet, should close when there is a fire alarm. In
many applications it is also required that the fire doors should close if it can not be guaranteed that a fire will
be detected, e.g. a detector is in fault condition or is disabled.
It may also be desired that the fire doors close on a main power supply failure, to preserve battery power if
the door holding magnets are supplied by the FX panel.
Select with a check mark the events that should trigger a fire door control.
© 2011 Schneider Electric. All rights reserved.
Activation of silenced alarm devices
Select whether or not a new fire alarm shall re-activate alarm devices that already have been silenced
before.
Schneider Electric
Pelco Finland Oy Kalkkipellontie 6, 02601 Espoo, Finland
www.pelco.com/nordic
Document Number 66571741GB2
Telephone: +358 10 446 511
Fax: +358 10 446 5103
04/2011
User Manual
66571741GB2
04/2011
Fire Detection
19
MCIO Setup page
On the ‘MCIO Setup’ page you define the function of input signals, relay outputs and alarm device outputs
located on the MC board.
The MC board has two clean contact inputs (monitoring of voltage free contacts).
Field
Purpose
Input
Identifies the input
Function
Defines the kind of event that will be triggered by the input when activated.
See chapter 0 for a list of available options.
Contact
Defines the kind of contact, either Normally Open (NO) or Normally Closed
(NC)
Control A
The first control group that the input will activate. See the FX Design
Manual for a discussion on control groups and control functions.
Control B
The second control group that the input will activate. See the FX Design
Manual for a discussion on control groups and control functions.
Description
Any text that describes the input.
Schneider Electric
Pelco Finland Oy Kalkkipellontie 6, 02601 Espoo, Finland
www.pelco.com/nordic
Document Number 66571741GB2
Telephone: +358 10 446 511
© 2011 Schneider Electric. All rights reserved.
The MC board has two clean contact outputs (relay outputs)
Field
Purpose
Output
Identifies the output
Function
Defines the kind of event that will trigger the output. See chapter 0 for a list
of available options.
Control groups
The control groups that will activate this output. See the FX Design Manual
for a discussion on control groups and control functions.
Description
Any text that describes the output.
Fax: +358 10 446 5103
04/2011
User Manual
66571741GB2
04/2011
Fire Detection
20
The MC board has one output for alarm devices
Field
Purpose
Output
Identifies the output
Function
Defines the kind of event that will trigger the output. See chapter 0 for a list
of available options.
Mode
Defines how the output control is controlled. Available options are 'Jumper
defines', 'Continuous', 'Pulsed' and 'Phased evacuation'.
Monitored
Defines whether or not the output should be monitored for breaks or short
circuits in the cable. It should generally be set to ‘Monitored’.
Control groups
The control groups that will activate this output. See the FX Design Manual
for a discussion on control groups and control functions.
Description
Any text that describes the output.
IO controllers page
Field
IO controller
Type
© 2011 Schneider Electric. All rights reserved.
On the IO Controllers page you define the IO Controllers. Up to 4 controllers can be defined.
Purpose
Selects and identifies the controller board
Defines the controller type. Available options are: 'Not configured', IOC
Input and Output Controller' and 'OCA Relay Output Controller'
Schneider Electric
Pelco Finland Oy Kalkkipellontie 6, 02601 Espoo, Finland
www.pelco.com/nordic
Document Number 66571741GB2
Telephone: +358 10 446 511
Fax: +358 10 446 5103
04/2011
User Manual
66571741GB2
04/2011
Fire Detection
21
IOC Input and Output Controller
For IO controller of type 'IOC Input and Output Controller' you define the function of input signals, relay
outputs and alarm device outputs located on an IOC board.
Each IOC board has four Clean Contact Inputs, two Clean Contact Outputs and four Alarm Devices Outputs
© 2011 Schneider Electric. All rights reserved.
The IOC board has four clean contact inputs (monitoring of voltage free contacts).
Field
Purpose
Input
Identifies the input
Function
Defines the kind of event that will be triggered by the input when activated.
See chapter 0 for a list of available options.
Contact
Defines the kind of contact, either Normally Open (NO) or Normally Closed
(NC)
Control A
The first control group that the input will activate. See the FX Design Manual
for a discussion on control groups and control functions.
Control B
The second control group that the input will activate. See the FX Design
Manual for a discussion on control groups and control functions.
Description
Any text that describes the input.
The IOC board has two clean contact outputs (relay outputs)
Field
Purpose
Output
Identifies the output
Function
Defines the kind of event that will trigger the output. See chapter 0 for a list of
available options.
Control groups
The control groups that will activate this output. See the FX Design Manual for
a discussion on control groups and control functions.
Description
Any text that describes the output.
Schneider Electric
Pelco Finland Oy Kalkkipellontie 6, 02601 Espoo, Finland
www.pelco.com/nordic
Document Number 66571741GB2
Telephone: +358 10 446 511
Fax: +358 10 446 5103
04/2011
User Manual
66571741GB2
04/2011
Fire Detection
22
The IOC board has four outputs for alarm devices
Field
Purpose
Output
Identifies the output
Function
Defines the kind of event that will trigger the output. See chapter 0 for a list of
available options.
Mode
Defines how the output control is controlled. Available options are 'Jumper
defines', 'Continuous', 'Pulsed' and 'Phased evacuation'
Monitored
Defines whether or not the output should be monitored for breaks or short
circuits in the cable. It should generally be set to ‘Monitored’.
Control groups
The control groups that will activate this output. See the FX Design Manual for
a discussion on control groups and control functions.
Description
Any text that describes the output.
OCA Relay Output Controller
For IO controller of type 'OCA Relay Output Controller' you define the function of relay outputs located on an
OCA board.
Each OCA board has sixteen Clean Contact Outputs.
Schneider Electric
Pelco Finland Oy Kalkkipellontie 6, 02601 Espoo, Finland
www.pelco.com/nordic
Document Number 66571741GB2
Telephone: +358 10 446 511
© 2011 Schneider Electric. All rights reserved.
The OCA board has sixteen clean contact outputs (relay outputs)
Field
Purpose
Output
Identifies the output
Function
Defines the kind of event that will be triggered by the input when activated.
See chapter 0 for a list below for available options.
Control groups
The control groups that will activate this output. See the FX Design Manual
for a discussion on control groups and control functions.
Description
Any text that describes the output.
Fax: +358 10 446 5103
04/2011
User Manual
66571741GB2
04/2011
Fire Detection
23
MC and IOC Clean Contact Input functions
'Not in use'
'Fault warning input'
'Fault in fire alarm router'
'Fault in fault warning router'
'Maintenance warning input'
'Technical alarm input'
'Silent technical alarm input'
'Local Evacuation input'
'Evacuation input'
'Local Day Mode activation
input'
'Local Delayed Alarm enable
input'
'Local Day Mode and Delayed
Alarm enable'
'Day Mode activation input'
'Delayed Alarm enable input'
'Day Mode and Delayed Alarm
enable'
'Start delay T2 for delayed
alarm'
'Delayed alarm reset input'
'General Silence input'
'General Reset input'
'Local fire alarm device mute
input'
'Fire alarm device mute input'
'Voice evacuation fault input'
'Extinguisher fault input'
'Extinguisher activated input'
'Smoke ventilation activated
input'
'Activation of customer LED 1'
'Activation of customer LED 2'
'Internal logic input'
'External logic input'
The input is not in use and has no effect
Activates a fault warning condition
Activates a fault warning condition indicating ‘Fault in fire alarm
router’
Activates a fault warning condition indicating ‘Fault in fault warning
router’
Activates a maintenance warning indication
Activates a technical alarm indication, including the buzzer
Activates a technical alarm indication, excluding the buzzer
Activates all fire alarm devices of this panel
Activates all fire alarm devices of this panel and all visible panels
Activates the day mode function for this panel
Activates the delayed alarm function for this panel
Activates both day mode and delayed alarm for this panel
Activates the day mode function for this panel and all visible panels
Activates the delayed alarm function for this panel and all visible
panels
Activates both day mode and delayed alarm for this panel and all
visible panels
Starts the delay time T2 in delayed alarm condition
Resets the delayed alarm condition
Silences the currently highest priority alarm condition
Resets the currently highest priority alarm condition
Mutes (disables) temporarily fire alarm devices of this panel for the
time of a Voice Evacuation message being announced
Mutes (disables) temporarily fire alarm devices of all visible panels
for the time of a Voice Evacuation message being announced
Activates a fault warning condition indicating 'Fault in voice
evacuation system'
Activates a fault warning condition indicating ‘Fault in extinguisher’
Activates the indication ‘Extinguisher activated’
Activates the indication ‘Smoke ventilation activated’
Activates the auxiliary led marked as ‘Customer LED 1’
Activates the auxiliary led marked as ‘Customer LED 2’
Provides a signal to the built-in control logic
Provides a signal to an external control logic
MC, IOC and OCA Clean Contact Output functions
'Fire alarm devices Lev.1 Sil.'
'Fault warning devices'
'Fire alarm output'
'Voice evacuation activate
output'
'Voice evacuation test output'
'Fire alarm output'
'Delayed fire alarm output'
The output is not in use
Is activated in fire alarm condition
Is activated in fire alarm condition, but is not deactivated at a press
of the ‘Silence’ button. Use this option for e.g. beacons
Is activated in fire alarm condition, and can be silenced with the
'Silence' button on access level 1.
Is activated by a fault warning condition
Is activated in fire alarm condition
Is activated in fire alarm condition
© 2011 Schneider Electric. All rights reserved.
'Not in use'
'Fire alarm devices'
'Fire alarm devices Non-Sil.'
Is activated by fire alarm when the panel is in test condition
Is activated in fire alarm condition
Is activated when the panel is in a delayed fire alarm condition
Schneider Electric
Pelco Finland Oy Kalkkipellontie 6, 02601 Espoo, Finland
www.pelco.com/nordic
Document Number 66571741GB2
Telephone: +358 10 446 511
Fax: +358 10 446 5103
04/2011
User Manual
66571741GB2
'Delayed fire alarm T2 output'
'Fire door output'
'Extinguisher control output'
'Fire alarm router output'
'Fire alarm router LED output'
'Fault warning router output'
'Prewarning output'
'Fault warning output'
'Maintenance warning output'
'Technical alarm output'
'General reset output'
'Disablement output'
'Access level output'
'Internal logic output'
'External logic output'
Fire Detection
04/2011
24
Is activated when timer T2 in the delayed alarm function is running
Is activated when any of the selected conditions for fire door control
is active
Is activated in fire alarm condition
Is activated in fire alarm condition
Is activated when the indicator ‘Fire alarm router activated’ in the
panel is lit
Is activated in fault warning condition
Is activated in Prewarning condition
Is activated in fault warning condition
Is activated in maintenance warning condition
Is activated in technical alarm condition
Is activated for 30 seconds when a reset sequence (of any alarm
type) is started
Is activated if anything in the panel is disabled
Is activated when the panel is in access level 2
Is activated by a command from the internal control logic
Is activated by a command from the external control logic
MC and IOC Monitored Relay Output functions
These were previously called Alarm Device Outputs (ADO) but are renamed to Monitored Relay Outputs
since version 3.4 of WinFXNet.
The selectable functions are the same as for Clean Contact Outputs.
Delayed outputs page
On the ‘Delayed outputs’ page you define the delay times, what control outputs to delay and termination of
the delay as well as how the conditions should be displayed.
© 2011 Schneider Electric. All rights reserved.
The term 'Delayed alarm' refers to an alarm from a detector for which its alarm mode is configured to be
'Delayed output'. The purpose is to give personnel at the site time to investigate whether the alarm condition
is real and not a false alarm signal. If the personnel realize that the alarm condition is due to a false alarm
signal, they can reset the panel before fire brigade is called to the site and / or bells and whistles are
activated
Schneider Electric
Pelco Finland Oy Kalkkipellontie 6, 02601 Espoo, Finland
www.pelco.com/nordic
Document Number 66571741GB2
Telephone: +358 10 446 511
Fax: +358 10 446 5103
04/2011
User Manual
66571741GB2
04/2011
Fire Detection
25
In ‘Delay times for delayed alarm outputs’ you define the two delay times involved in the function.
T1 defines the ‘reaction time’ within which the operator must react to the alarm condition.
T2 defines the investigation time within which the operator must investigate the cause of the alarm and
reset the alarm if it is not a real fire.
T1 can be set in 10 second increments up to a maximum of 300 seconds (five minutes).
T2 can be set in 10 second increments up to a maximum of 600 seconds (ten minutes)
The sum of T1 and T2 can not exceed 600 seconds (ten minutes)
Delays can be terminated if the system recognizes another alarm signal (from another detector). Delay
termination can be separately defined for situations
where the second alarm is from a detector with alarm mode set to delayed output
where the second alarm is from a detector with alarm mode not set to delayed output
In ‘Delay termination for a delayed second alarm’ you define whether the delay should not be terminated
or that it should be terminated by another delayed alarm initiated
in the same zone as the first one
in any zone of the same panel as the first one
in any visible panel
In ‘Delay termination for a non-delayed second alarm’ you define whether the delay should not be
terminated or that it should be terminated by a non-delayed alarm initiated
in the same zone as the first one
in any zone of the same panel as the first one
in any visible panel
Schneider Electric
Pelco Finland Oy Kalkkipellontie 6, 02601 Espoo, Finland
www.pelco.com/nordic
Document Number 66571741GB2
Telephone: +358 10 446 511
Fax: +358 10 446 5103
04/2011
© 2011 Schneider Electric. All rights reserved.
In ‘Delayed alarm outputs’ you define which outputs are affected by the delay. There are three main items
that can be delayed: Fire alarm transmitter, Fire alarm devices and Fire control outputs
The Fire alarm transmitter is usually connected to the fire brigade or an alarm receiving station and is the
most obvious to delay, therefore it is selected as default.
For fire alarm devices there are two options: ‘Controlled by Ctrl A, Ctrl B and as General’, meaning
effectively that all alarm devices are delayed, and ‘Controlled by Ctrl B and as General’, meaning effectively
that alarm devices controlled by Ctrl A are not delayed, while all others are.
Fire control outputs includes all other control outputs that are activated by a fire alarm condition.
User Manual
66571741GB2
04/2011
Fire Detection
26
In ‘Delay indication’ you define whether or not the activation of the delayed alarm function should be
displayed as a disablement or not. The EN54 standard requires that the delay function should be indicted as
a ‘Disablement of the immediate activation of outputs’, but this may not be desirable in some applications.
This requirement in the EN54 standard may be cancelled in the next publication.
Print and Log page
On the ‘Print and log’ page you define what events should be printed in real time (if a printer is connected)
and what events should be recorded in the event log
© 2011 Schneider Electric. All rights reserved.
Note that an event group has to be marked for logging to be able to select it for printing
Schneider Electric
Pelco Finland Oy Kalkkipellontie 6, 02601 Espoo, Finland
www.pelco.com/nordic
Document Number 66571741GB2
Telephone: +358 10 446 511
Fax: +358 10 446 5103
04/2011
User Manual
66571741GB2
04/2011
Fire Detection
27
Miscellaneous page
On the ‘Miscellaneous’ page you define the language to display, service codes, maximum time of zone
disablement, whether to use daylight saving time (summer time) and how to display the alarms.
The ‘Primary language’ and ‘Secondary language’ define which languages should be used by the panel. If
the selection is different for these two, the operator may switch between the languages via the menu. If the
selections are the same, then the language switching menu item is not displayed in the panel. Separately
from this language switching, the panel menu enables to select any of the built-in languages, but this
selection reverts to the configured primary language if the panel is restarted.
In the 'Single coincidence alarm after 3 minutes' field you can choose what should happen if a single
coincidence detector is constantly in alarm for longer than three minutes. The EN54 standard requires that a
normal alarm condition is raised, and that is the default function of the FXNet panel since September 2009.
If, for some reason, a constant coincidence prewarning should not raise a normal fire alarm condition after
three minutes, you can checkmark this option.
In the 'Change a coincidence alarm to normal alarm' field you can select when the prewarning indicated
by an alarm from a detector set with 'Coincidence' shall be changed into a normal fire alarm. Available
options are by a second coincidence alarm in the same zone or the same panel.
In the ‘Max. time of zone disablement’ field you define for how long a zone disablement, activated by an
addressable monitor module configured as ‘Zone disablement, at most should be active. This definition is a
safety precaution for an eventual failure of the device connected to the monitor module. If this time elapses a
fault indication will be shown on the panel and the zone will be re-enabled.
In the 'Max. time of alarm device muting' field you define for how long muting of alarm devices at most can
be activated. This definition is a safety precaution for an eventual failure of the Voice Evacuation system that
Schneider Electric
Pelco Finland Oy Kalkkipellontie 6, 02601 Espoo, Finland
www.pelco.com/nordic
Document Number 66571741GB2
Telephone: +358 10 446 511
Fax: +358 10 446 5103
04/2011
© 2011 Schneider Electric. All rights reserved.
In the ‘Access level codes’ field you can define the password code for
access level three, which enables setting the panel in configuration mode and some maintenance
information to be displayed
access level four, which enables resetting the alarm counter
User Manual
66571741GB2
04/2011
Fire Detection
28
controls muting of alarm devices. If time elapses a fault indication will be shown on the panel and the muting
of alarm devices will be cancelled.
The 'Alarm display' field is disabled by default and the alarm display setting is 'Detection zone + address'.
'Detection zone only' is a reservation for future and is permanently disabled. Selection of 'No zone display'
can be activated from main menu item 'Settings - Special settings' by entering a password. Please ask
technical support for the password if you think you need it.
In the 'Main supply fault delay' field you can change the default delay time for the fault indication of a mains
fault. The EN54 standard allows a delay of 30 minutes to prevent unnecessary fault alarms for short power
outages.
In the 'Automatic summertime' field you can select whether or not automatic summertime shall be used by
the panel. Currently only the European summertime scheme is selectable.
In the 'Maintenance interval and message' field you can define how often (in months) the panel should
indicate a maintenance warning, and the message that the panel will display in this warning. 0 means no
indication and other valid values are 1 ... 36 months. The message can be up to 60 characters long.
Press the OK button to keep any changes you have made to the General Panel
Data.
© 2011 Schneider Electric. All rights reserved.
Press the Cancel button to cancel any changes you have made.
Schneider Electric
Pelco Finland Oy Kalkkipellontie 6, 02601 Espoo, Finland
www.pelco.com/nordic
Document Number 66571741GB2
Telephone: +358 10 446 511
Fax: +358 10 446 5103
04/2011
User Manual
66571741GB2
Fire Detection
04/2011
29
Address and Text data
There are four main types of loop controller boards for the FXNet panels: ALC, SLC, LC and CLC. They are
available in following versions and provide address capacities as follows:
Type
Number of loops
Address ranges
ALCA
1
001 ... 126
ALCB
2
001 ... 126
SLCB
2
LC
2
CLC
Note1.
Note2.
Note3.
(1)
001 ... 159
201 ... 359
001 ... 099
101 ... 199
001 ... 016
Device families
Intellia
Discovery
XP95
S60
Advanced series
200 series
Notes
(note1)
(note1)
(note1)
200 series
(note2)
Conventional detectors
and manual call points
(note3)
(note2)
Configuration may be restricted by licensing policy.
The same addresses in the low range and the high range (e.g. 005 and 205) can not be both
detectors or both IO modules.
The CLC loop is a logical (not real) loop. The 1 ... 16 addresses are the actual detection circuits, to
which the detectors and manual call points are connected.
There are more information regarding limitations of number of devices totally per panel and per loop in the
FXNet Planning Instructions.
Select ‘Data’ – ‘Address and Text Data’ from the menu or press the
‘Address and Text Data’ form.
button on the tool bar to open the
The address table shows the addresses of one loop at a time. The height of the table and the available
columns changes according to the type of the selected loop.
The controls above the address table are:
Loop selection control. All changes you make to a loop will be preserved in
temporary memory when you switch from one loop to another.
To reset column widths. Note that this does not change non-visible columns to
visible
To select the visible columns. Column selection is not possible for the CLC table
To fill in or to change settings for a range of addresses in a loop.
To accept the changes made and to close the address data table
© 2011 Schneider Electric. All rights reserved.
To cancel all changes made and to close the address data table
Schneider Electric
Pelco Finland Oy Kalkkipellontie 6, 02601 Espoo, Finland
www.pelco.com/nordic
Document Number 66571741GB2
Telephone: +358 10 446 511
Fax: +358 10 446 5103
04/2011
User Manual
66571741GB2
04/2011
Fire Detection
30
Address table columns
The table is different depending on the type of loop controller (ALC, SLC, LC or CLC) that handles the
selected loop. The setup of the table changes with the loop type when you change the loop.
The ‘Address and Text Data’ window is initially opened in a contracted format with the most important
columns visible. The visible fields allow you to change the zone assignment, the physical type and the text of
an address. The ALC, SLC and LC address tables show also the columns for Input function and Output
function by default
Selecting columns in the ALC, SLC and the LC address tables
Press OK to accept the current selection
Press Cancel to cancel the changes
Press Select All to select all columns
© 2011 Schneider Electric. All rights reserved.
Press Clear All to deselect all columns.
Note! 'Address', 'Detection Zone' and 'Type' can not be deselected.
Note! 'Inp. Short circuit monitoring' can be selected only for SLC
address tables.
Schneider Electric
Pelco Finland Oy Kalkkipellontie 6, 02601 Espoo, Finland
www.pelco.com/nordic
Document Number 66571741GB2
Telephone: +358 10 446 511
Fax: +358 10 446 5103
04/2011
User Manual
66571741GB2
04/2011
Fire Detection
31
ALC, SLC and LC loops: Address table
Schneider Electric
Pelco Finland Oy Kalkkipellontie 6, 02601 Espoo, Finland
www.pelco.com/nordic
Document Number 66571741GB2
Telephone: +358 10 446 511
© 2011 Schneider Electric. All rights reserved.
The column headers are abbreviated to conserve space and have the following meanings:
Address
The address of a device connected to the loop
D-Zone
Detection zone. All addresses must belong to one, and only one, detection zone. The
range of available detection zones for the panel is defined in the general panel data
– identifications section.
Ctrl A
Control A. The first control group to be activated by an event in this address
Ctrl B
Control B. The second control group to be activated by an event in this address
Type
The type of the device
Input funct.
To define which function to activate for switch monitors and IO modules.
ScMon
Short circuit monitoring of input modules. Note! Only for SLC loop input modules.
Fire
Fire alarm threshold
Prew
Prewarning threshold
D-Fire
Daytime Fire alarm threshold
D-Prew
Daytime Prewarning threshold
Mode
Alarm mode, or sounder mode for alarm device outputs
InDel
Input delay
InFilt
Input filter
DayM
Day mode effect on the address
ZDis
Whether or not the address will be disabled by a zone disablement
Ctrl Groups
Control groups that will affect the output of the address
Output funct.
To define which function the output of the address has.
Text
The text that is associated with the address and displayed in the different alarm
conditions as well as when scrolling through the addresses
Fax: +358 10 446 5103
04/2011
User Manual
66571741GB2
04/2011
Fire Detection
32
CLC loops: Address table
Ctrl A
Ctrl B
Type
EOL
NC
SC-A
BM
Exi
Mode
Ver.
InFilt
DayM
ZDis
Text
Comments
Conventional line. Values 1 .. 16, denotes the conventional line (or loop)
Detection zone. All conventional lines must belong to one, and only one, detection
zone. The range of available detection zones for the panel is defined in the general
panel data – identifications section
Control A. The first control group to be activated by an event in this address
Control B. The second control group to be activated by an event in this address
Values: Not in use, Conventional line
EOL resistor, values: 4k7, 2k7
Normally closed circuit, values: No, Yes
Short Circuit is alarm, values: No, Yes
Break monitored, values: No, Yes
Ex area, values: No, Yes
Alarm mode
Alarm verification, values: No, Yes
Input filter, default is 2
Values: No effect, Disabled
Whether or not the conventional line will be disabled by a zone disablement
The text that is associated with the conventional line and displayed in the different
alarm conditions as well as when scrolling through the addresses
Schneider Electric
Pelco Finland Oy Kalkkipellontie 6, 02601 Espoo, Finland
www.pelco.com/nordic
Document Number 66571741GB2
Telephone: +358 10 446 511
© 2011 Schneider Electric. All rights reserved.
Column
Address
D-Zone
Fax: +358 10 446 5103
04/2011
User Manual
66571741GB2
Fire Detection
04/2011
33
Changing the detection zone
The D-Zone column shows the zone to which the address is assigned. The default zone numbers are
depending on the entries for ‘First Zone’ and ‘Last Zone’ (see 0).
To change the zone assignment, simply type in a new number in the field. A number which is not in the
range First Zone ... Last Zone will not be accepted when you press the OK button to exit the window.
Type selection
When you right-click with the mouse in the Type column, a menu of available types is displayed. You can
select a type with the mouse pointer and a left-click, or you can select the type by typing the short-cut key.
You can also use the short-cut keys even if the menu is not visible.
Some menu entries have submenus. In this case the short-cut keys are used in succession: first to select the
main type and then to select the subtype.
For example, to specify a manual call point in a LC loop, you would press 5 and 1.
ALC loops: Device types
Device type popup menu
0 – Not in use
1 – Ionisation sensor
2 – Optical sensor
3 – Thermal sensor
4 – High temperature sensor
5 – Multicriteria
6 – CO sensor
7 – Beam detector
8 – Flame detector
9 – Any Type
O – Any Type (virtual)
Comments
Some device has to be installed.
Nothing has to be installed. Can be set in alarm condition
only through alarm test or through the INFO
communication protocol.
A – Conventional Zone Module
B – Manual call point
C – Switch mon. w. Interrupt
D – Switch monitor
J – IO module
L – Addressable sounder
M – Sounder controller module
N – Beacon
Note! Some items have a protocol selection submenu if your license file allows this.
ALC loops: Conventional zone module input functions
Comments
© 2011 Schneider Electric. All rights reserved.
Conventional zone module input functions
0 – Conventional Zone
1 – Conventional beam detector
ALC loops: Input functions
Input function popup menu
0 – Not In Use
1 – Manual Call Point
2 – Reserved
3 – Conv. Heat Detector
4 – Fire Alarm Input
5 – Prealarm Input
6 – Fault warning Input
Action
Action on activation
None
Fire alarm
Fire alarm
Fire alarm
Prewarning
Fault warning
Schneider Electric
Pelco Finland Oy Kalkkipellontie 6, 02601 Espoo, Finland
www.pelco.com/nordic
Document Number 66571741GB2
Telephone: +358 10 446 511
Fax: +358 10 446 5103
04/2011
User Manual
66571741GB2
7 – Maintenance Input
8 – Technical Alarm Input
9 – Silent Tech Alarm Input
Q – Local Evacuation Input
A – Evacuation Input
B – Zone Disablement Input
R – Local Day Mode Activation Input
S – Local Delayed Alarm Enable Input
T – Local Day Mode and Delayed Alarm
Enable Input
C – Day Mode Activation Input
D – Delayed Alarm Enable Input
E – Day Mode and Delayed Alarm Enable
Input
F – Delayed Alarm Zonal Silence
G – Delayed Alarm Zonal Reset
H – General Silence Input
I – General Reset Input
U – Local Fire Alarm Devices Mute Input
V – Fire Alarm Devices Mute Input
W – Voice Evacuation Fault Input
J – Extinguisher Fault Input
K – Extinguisher Activated Input
L – Smoke ventilation Activated Input
M – Customer LED 1 Activation
N – Customer LED 2 Activation
O – Internal Logic Input
P – External Logic Input
04/2011
Fire Detection
34
Maintenance warning
Technical alarm
Technical alarm
Activates all alarm devices of this panel
Activates all alarm devices of all visible panels
Disables the zone to which the module is configured
Sets this panel in day mode
Enables the delayed alarm function of this panel
Sets this panel in day mode and enables the delayed
alarm function
Sets all visible panels in day mode
Enables the delayed alarm function of all visible panels
Sets all visible panels in day mode and enables the
delayed alarm function
Silences a delayed alarm in the same zone as the monitor
module
Resets a delayed alarm in the same zone as the monitor
module
Silences the alarm condition of all visible panels
Resets the alarm condition of all visible panels
Mutes alarm devices of this panel for the time a Voice
evacuation message is announced
Mutes alarm devices of all visible panels for the time a
Voice evacuation message is announced
Activates a fault condition with the indication 'Voice
Evacuation Fault'
Activates a fault condition with the indication
‘Extinguisher Fault’
Lights up the ‘Extinguisher Activated’ indicator
Lights up the ‘Smoke ventilation Activated’ indicator
Lights up the ‘Customer LED 1’ indicator
Lights up the ‘Customer LED 2’ indicator
Signals the internal control logic of the activation
Signals an external control logic of the activation
ALC loops: Output functions
2 – Fire Alarm Devices Non-Silenceable
J – Fire Alarm Devices, Level 1 Silenceable
3 – Fault Warning Alarm Devices
H – Voice Evacuation Activate Output
I – Voice Evacuation Test Output
4 – Fire Alarm Output
5 – Prewarning Output
6 – Fault Warning Output
7 – Maintenance Warning Output
K - General Reset Output
8 – Fire Door Output
9 – Extinguisher Output
A – Disablement Output
B – Access Level Output
C – Technical Alarm Output
Activated ...
if fire alarm condition is active and alarm devices are not
disabled nor silenced (at access level 2)
if fire alarm condition is active and alarm devices are not
disabled
if fire alarm condition is active and alarm devices are not
disabled nor silenced (at access level 1 or access level 2)
if fault warning condition is active and alarm devices are
not disabled nor silenced
if fire alarm condition is active
if fire alarm is initiated in test condition
if fire alarm condition is active
if prewarning condition is active
if fault warning condition is active
if maintenance warning condition is active
for 30 sec. when any alarm condition is reset
if any of the conditions set in ‘General panel data’ –
‘Control outputs’ – ‘Fire door control’ is active
if fire alarm condition is active
if anything is disabled in the panel
if the key is turned to the operating position
if technical alarm
Schneider Electric
Pelco Finland Oy Kalkkipellontie 6, 02601 Espoo, Finland
www.pelco.com/nordic
Document Number 66571741GB2
Telephone: +358 10 446 511
© 2011 Schneider Electric. All rights reserved.
Output function popup menu
0 – Not in use
1 – Fire Alarm Devices
Fax: +358 10 446 5103
04/2011
User Manual
66571741GB2
D – Internal Logic Output
E – External Logic Output
F – Delayed Fire Alarm Output
G – Fire Alarm Transmitter Activated LED
Output
Fire Detection
04/2011
35
by command from the internal control logic
by command from an external control logic
if delayed fire alarm condition is active
If the ‘Fire Alarm Transmitter Activated’ LED is lit
SLC loops: Device types
3 – Static thermal sensor
G – ROR thermal sensor
H – High temp. thermal sensor
9 – Laser LZR-1
A – Laser 7251
B – Multicriteria
D – Three criteria sensor
E – Four criteria sensor
F – Beam sensor
I - Manual Call Point indoor
J - Manual Call Point outdoor
5 - Single Input module
K - Single Input micro module
L - Dual Input module
M - Dual Input, Single Output module
6 - Single Output module
N - Single Output 240V module
7 - Conventional Zone module
Sub menu items
Comments
1 - 200 series
0 - Advanced series
1 - 200 series
0 - Advanced series
1 - 200 series
0 - Advanced series
1 - 200 series
0 - Advanced series
1 - 200 series
1 - 200 series
1 - 200 series
0 - Advanced series
1 - 200 series
0 - Advanced series
1 - 200 series
0 - Advanced series
1 - 200 series
1 - 200 series
0 - Advanced series
1 - 200 series
0 - Advanced series
1 - 200 series
0 - Advanced series
1 - 200 series
X - Conv. Zone module CZR
S - Wall Mount Sounder
T - Wall Mount Sounder Strobe
U - Wall Mount Strobe
V - Detector Base Sounder
W - Detector Base Sounder Strobe
C - Any Type (virtual)
Nothing has to be installed. Can be set
in alarm condition only through alarm
test or through the INFO
communication protocol.
Some device has to be installed.
8 - Any Type
© 2011 Schneider Electric. All rights reserved.
Device type popup menu
0 – Not in use
1 – Ionization sensor
2 – Optical sensor
SLC loops: Conventional zone module input functions
Conventional zone module input functions
0 – Conventional Zone
1 – Conventional beam detector
Comments
Schneider Electric
Pelco Finland Oy Kalkkipellontie 6, 02601 Espoo, Finland
www.pelco.com/nordic
Document Number 66571741GB2
Telephone: +358 10 446 511
Fax: +358 10 446 5103
04/2011
User Manual
66571741GB2
Fire Detection
04/2011
36
SLC loops: Input functions
Input function popup menu
0 – Not In Use
1 – Manual Call Point
2 – Reserved
3 – Conv. Heat Detector
4 – Fire Alarm Input
5 – Prealarm Input
6 – Fault warning Input
7 – Maintenance Input
8 – Technical Alarm Input
9 – Silent Tech Alarm Input
Q – Local Evacuation Input
A – Evacuation Input
B – Zone Disablement Input
R – Local Day Mode Activation Input
S – Local Delayed Alarm Enable Input
T – Local Day Mode and Delayed Alarm Enable Input
C – Day Mode Activation Input
D – Delayed Alarm Enable Input
E – Day Mode and Delayed Alarm Enable Input
F – Delayed Alarm Zonal Silence
G – Delayed Alarm Zonal Reset
H – General Silence Input
I – General Reset Input
U – Local Fire Alarm Devices Mute Input
V – Fire Alarm Devices Mute Input
W – Voice Evacuation Fault Input
J – Extinguisher Fault Input
K – Extinguisher Activated Input
L – Smoke ventilation Activated Input
M – Customer LED 1 Activation
N – Customer LED 2 Activation
O – Internal Logic Input
P – External Logic Input
Action on activation
None
Fire alarm
Fire alarm
Fire alarm
Prewarning
Fault warning
Maintenance warning
Technical alarm
Technical alarm
Activates all alarm devices of this panel
Activates all alarm devices of all visible panels
Disables the zone to which the module is
configured
Sets this panel in day mode
Enables the delayed alarm function of this panel
Sets this panel in day mode and enables the
delayed alarm function
Sets all visible panels in day mode
Enables the delayed alarm function of all visible
panels
Sets all visible panels in day mode and enables
the delayed alarm function
Silences a delayed alarm in the same zone as the
monitor module
Resets a delayed alarm in the same zone as the
monitor module
Silences the alarm condition of all visible panels
Resets the alarm condition of all visible panels
Mutes alarm devices of this panel for the time a
Voice evacuation message is announced
Mutes alarm devices of all visible panels for the
time a Voice evacuation message is announced
Activates a fault condition with the indication
'Voice Evacuation Fault'
Activates a fault condition with the indication
‘Extinguisher Fault’
Lights up the ‘Extinguisher Activated’ indicator
Lights up the ‘Smoke ventilation Activated’
indicator
Lights up the ‘Customer LED 1’ indicator
Lights up the ‘Customer LED 2’ indicator
Signals the internal control logic of the activation
Signals an external control logic of the activation
Output function popup menu
0 – Not in use
1 – Fire Alarm Devices
2 – Fire Alarm Devices Non-Silenceable
J – Fire Alarm Devices, Level 1 Silenceable
3 – Fault Warning Alarm Devices
© 2011 Schneider Electric. All rights reserved.
SLC loops: Output functions
Activated ...
if fire alarm condition is active and alarm devices
are not disabled nor silenced (at access level 2)
if fire alarm condition is active and alarm devices
are not disabled
if fire alarm condition is active and alarm devices
are not disabled nor silenced (at access level 1
or access level 2)
if fault warning condition is active and alarm
Schneider Electric
Pelco Finland Oy Kalkkipellontie 6, 02601 Espoo, Finland
www.pelco.com/nordic
Document Number 66571741GB2
Telephone: +358 10 446 511
Fax: +358 10 446 5103
04/2011
User Manual
66571741GB2
Fire Detection
04/2011
H – Voice Evacuation Activate Output
I – Voice Evacuation Test Output
4 – Fire Alarm Output
5 – Prewarning Output
6 – Fault Warning Output
7 – Maintenance Warning Output
K - General Reset Output
8 – Fire Door Output
9 – Extinguisher Output
A – Disablement Output
B – Access Level Output
C – Technical Alarm Output
D – Internal Logic Output
E – External Logic Output
F – Delayed Fire Alarm Output
G – Fire Alarm Transmitter Activated LED Output
37
devices are not disabled nor silenced
if fire alarm condition is active
if fire alarm is initiated in test condition
if fire alarm condition is active
if prewarning condition is active
if fault warning condition is active
if maintenance warning condition is active
for 30 sec. when any alarm condition is reset
if any of the conditions set in ‘General panel
data’ – ‘Control outputs’ – ‘Fire door control’ is
active
if fire alarm condition is active
if anything is disabled in the panel
if the key is turned to the operating position
if technical alarm
by command from the internal control logic
by command from an external control logic
if delayed fire alarm condition is active
If the ‘Fire Alarm Transmitter Activated’ LED is lit
LC loops: Device types
Selection
0 – None
1 – Analog ion
2 – Analog opt
3 – Analog heat
4 – OMNI
9 – Laser LZR-1
A – Laser 7251
B – Multisensor
D – Three criteria sensor
E – Four criteria sensor
F – Beam sensor
5 – Monitor Module
6 – Control Module
7 – Conventional Zone Module
8 – Any Type
C – Any Type (virtual)
Actual type
Comment
1251E, 1551E
2251E, 2551E
5251EM, 5251REM and 5251HTEM
3251E
LZR – 1E
7251
2251TEM
PTIR
COPTIR
6200, 6500
M210ME, M220ME, M221ME
See functional types below
M201ME, M221ME
See functional types below
M512ME, M210CZ
See functional types below
Any of the above
Nothing has to be installed. Can be
set in alarm condition only through
alarm test or through the INFO
communication protocol
LC loops: Conventional zone module input functions
Selection
0 – Conventional Zone
1 – Beam Detector
Used when ...
a conventional zone is connected to the M512ME
a conventional beam detector is connected to the M512ME
NOTE! There’s no difference in the operation of the address for these selections, except the text displayed in
the LCD of the panel when looking at address data.
Schneider Electric
Pelco Finland Oy Kalkkipellontie 6, 02601 Espoo, Finland
www.pelco.com/nordic
Document Number 66571741GB2
Telephone: +358 10 446 511
Fax: +358 10 446 5103
04/2011
© 2011 Schneider Electric. All rights reserved.
Note! The items ‘9 – Laser LZR-1’ and ‘Laser – 7251’ are enabled only if allowed by your license file.
User Manual
66571741GB2
04/2011
Fire Detection
38
LC loops: Monitor module input functions
Selection
0 – Manual Call Point / Al’m Switch
1 – Manual Call Point
2 – Beam Detector (See Note below)
3 – Conv. Heat Detector
4 – Fire Alarm Input
5 – Prewarning Input
6 – Fault Warning Input
7 – Maintenance Input
8 – Technical Alarm Input
9 – Silent Tech Alarm Input
Q – Local Evacuation Input
A – Evacuation Input
B – Zone Disablement Input
R – Local Day Mode Activation Input
S – Local Delayed Alarm Enable Input
T – Local Day Mode and Delayed
Alarm Enable Input
C – Day Mode Activation Input
D – Delayed Alarm Enable Input
E – Day Mode and Delayed Alarm
Enable Input
F – Delayed Alarm Zonal Silence
G – Delayed Alarm Zonal Reset
H – General Silence Input
I – General Reset Input
U – Local Fire Alarm Devices Mute
Input
V – Fire Alarm Devices Mute Input
W – Voice Evacuation Fault Input
J – Extinguisher Fault Input
K – Extinguisher Activated Input
L – Smoke ventilation Activated Input
M – Customer LED 1 Activation
N – Customer LED 2 Activation
O – Internal Logic Input
P – External Logic Input
Action on activation
Fire alarm
Fire alarm
Fire alarm
Fire alarm
Fire alarm
Prewarning
Fault warning
Maintenance warning
Technical alarm
Technical alarm
Activates all alarm devices of the same panel
Activates all alarm devices of all visible panels
Disables the zone to which the module is configured
Sets this panel in day mode
Enables the delayed alarm function of this panel
Sets this panel in day mode and enables the delayed alarm
function
Sets all visible panels in day mode.
Enables the delayed alarm function of all visible panels
Sets all visible panels in day mode and enables the delayed
alarm function
Silences a delayed alarm in the same zone as the monitor
module and starts delay timer T2
Resets a delayed alarm in the same zone as the monitor module
Silences the alarm condition of all visible panel
Resets the alarm condition of all visible panel
Mutes alarm devices of this panel for the time a Voice evacuation
message is announced
Mutes alarm devices of all visible panels for the time a Voice
evacuation message is announced
Activates a fault condition with the indication 'Voice Evacuation
Fault'
Activates a fault condition with the indication ‘Extinguisher Fault’
Lights up the ‘Extinguisher Activated’ indicator
Lights up the ‘Smoke ventilation Activated’ indicator
Lights up the ‘Customer LED 1’ indicator
Lights up the ‘Customer LED 2’ indicator
Signals the internal control logic of the activation
Signals an external control logic of the activation
© 2011 Schneider Electric. All rights reserved.
Note!
Item ‘2 – Beam Detector’ is obsolete and can not be selected. Conventional beam detectors should be
connected to a Conventional Zone Module (M512ME)
Schneider Electric
Pelco Finland Oy Kalkkipellontie 6, 02601 Espoo, Finland
www.pelco.com/nordic
Document Number 66571741GB2
Telephone: +358 10 446 511
Fax: +358 10 446 5103
04/2011
User Manual
66571741GB2
04/2011
Fire Detection
39
LC loops: Control Module output functions
Selection
0 – Fire Alarm Devices
1 – Fire Alarm Devices Non-Silence-able
I – Fire Alarm Devices, Lev. 1 Silence-able
2 – Fault Warning Alarm Devices
G – Voice Evacuation Activate Output
H – Voice Evacuation Test Output
3 – Fire Alarm Output
4 – Prewarning Output
5 – Fault Warning Output
6 – Maintenance Warning Output
J – General Reset Output
7 – Fire Door Output
8 – Extinguisher Output
9 – Disablement Output
A – Access Level Output
B – Technical Alarm Output
C – Internal Logic Output
D – External Logic Output
E – Delayed Fire Alarm output
F – Fire alarm transmitter activated LED
output
Activated ...
if fire alarm condition is active and alarm devices are
not disabled nor silenced (at access level 2)
if fire alarm condition is active and alarm devices are
not disabled
if fire alarm condition is active and alarm devices are
not disabled nor silenced (at access level 1 or access
level 2)
if fault warning condition is active and alarm devices are
not disabled nor silenced
if fire alarm condition is active
if fire alarm is initiated in test condition
if fire alarm condition is active
if prewarning condition is active
if fault warning condition is active
if maintenance warning condition is active
for 30 sec. when any alarm condition is reset
if any of the conditions set in ‘General panel data’ –
‘Control outputs’ – ‘Fire door control’ is active
if fire alarm condition is active
if anything is disabled in the panel
if the key is turned to the operating position
if technical alarm
by command from the internal control logic
by command from an external control logic
if delayed fire alarm condition is active
If the ‘Fire Alarm Transmitter Activated’ LED is lit
Changing sensitivity and detection parameters
Please be aware that the parameters should only be changed if really needed, and that relevant
persons, including fire authorities, insurance company and owner of the building should agree upon
the modifications. The person doing the modification has full responsibility that such an agreement
exists in writing.
Schneider Electric
Pelco Finland Oy Kalkkipellontie 6, 02601 Espoo, Finland
www.pelco.com/nordic
Document Number 66571741GB2
Telephone: +358 10 446 511
Fax: +358 10 446 5103
04/2011
© 2011 Schneider Electric. All rights reserved.
When you enter any of the detection parameters fields for the first time, the following warning will be
displayed:
User Manual
66571741GB2
04/2011
Fire Detection
40
ALC loops and SLC loops (Adv. protocol devices): Fire and prealarm thresholds
Selectable for all intelligent detectors
LC loops and SLC loops (200 protocol devices): Fire and prewarning thresholds
Selectable for the Laser LZR-1 detector
Selectable for the Laser 7251 detector
Selectable for the 2251TEM detector
Selectable for all other detectors
The Laser LZR-1 detectors in a FX detection zone form a ‘laser group’. This means that all laser detectors in
a zone contribute to a common evaluation to issue a fire alarm or prewarning according to the following:
The values from the laser detectors are scaled to the range 0.00 to 1.00. 1.00 corresponds to the
selected prewarning or fire alarm threshold
The scaled values are squared and added
If the result is 1.00 or above the group issues a fire alarm.
Since this ‘group alarm’ is issued before any of the individual detectors are above the alarm threshold,
the detector with the highest value will be reported as the alarming address
Note! The Laser 7251 detector does not have the ‘Laser group’ feature.
Schneider Electric
Pelco Finland Oy Kalkkipellontie 6, 02601 Espoo, Finland
www.pelco.com/nordic
Document Number 66571741GB2
Telephone: +358 10 446 511
Fax: +358 10 446 5103
04/2011
© 2011 Schneider Electric. All rights reserved.
To change the alarm threshold for an address, right-click in the field and the level selection menu will be
displayed. You can also select a level with the numeric keys without having the level menu displayed.
User Manual
66571741GB2
04/2011
Fire Detection
41
Functional mode
To select the functional mode of an address, right-click with the mouse pointer in the mode field. A menu
with available selections will be displayed. You can also select an item with the numeric keys without having
the menu displayed.
Selection
0 – Normal
1 – Delayed Output
2 – Coincidence
3 – Prewarning
4 – Local Alarm
Meaning
No special functional mode
The alarm transmitter output is delayed according to the times T1 and T2
configured in the ‘General Panel Data – Delayed outputs’
The address will not alone issue a fire alarm condition. There has to be another
address in alarm condition in the same zone before the alarm will be displayed. If
the address is detecting a fire alone, it will be displayed as a prewarning.
The address will not issue a fire alarm condition. It will only display prewarning.
The alarm transmitter is not activated by an alarm from the address. All other local
control functions will take place.
Sounder mode
Selection
Continuous
Pulsed
Phased evacuation
Switch setting
© 2011 Schneider Electric. All rights reserved.
If the address is an alarm device (sounder), the mode field is used to change the functional mode of
sounders. To select the functional mode of an address, right-click with the mouse pointer in the mode field. A
menu with available selections will be displayed.
Meaning
Continuous mode
Pulsed, or intermittent mode
The sounder gives an Alert signal if CtrlGroups includes the alarming detectors
CtrlA group and an Evacuate signal if CtrlGroups includes the alarming detectors
CtrlB group
Tone and character of sound follows the switch settings in the sounder. Only
available for Advanced protocol sounders (in a SLC loop)
Schneider Electric
Pelco Finland Oy Kalkkipellontie 6, 02601 Espoo, Finland
www.pelco.com/nordic
Document Number 66571741GB2
Telephone: +358 10 446 511
Fax: +358 10 446 5103
04/2011
User Manual
66571741GB2
04/2011
Fire Detection
42
Input delay
To select ‘Input Delay for an address, right-click with your mouse pointer in the ‘InD’ field. A menu with the
available options will be displayed. You can also select the delay times with the numeric keys 0 to 6 without
having the menu displayed.
The detector has to remain in fire alarm condition for the time specified before an alarm condition will be
issued.
The purpose of the delay is to avoid false alarms caused by disturbances in the environment of the detector
or detection circuit (loop).
Input filter
© 2011 Schneider Electric. All rights reserved.
Note! Input filter setting is not needed and thus not available for Advanced protocol devices.
Schneider Electric
Pelco Finland Oy Kalkkipellontie 6, 02601 Espoo, Finland
www.pelco.com/nordic
Document Number 66571741GB2
Telephone: +358 10 446 511
Fax: +358 10 446 5103
04/2011
User Manual
66571741GB2
04/2011
Fire Detection
43
Effect of day mode activation
You can define different sensitivities for the detectors in day mode than for normal (night) mode. In this
column you can specify whether the address should be affected by day mode at all, and if so whether it
should use the day mode sensitivity settings or be disabled.
Selection
0 – Not affected by day mode
1 – Uses day mode thresholds
2 – Disabled during day mode
3 – Input only disabled during day
mode
Meaning
The address is not affected by day mode
The address uses thresholds set in the D-Fire and D-Prew columns
during day mode
The address is disabled during day mode. The disablement
concerns all functionality of the address. Sensor input, fault
monitoring and output control are all disabled.
The address is partly disabled during day mode. The disablement
concerns the sensor input, or if the address is an IO module the
configured input function. Fault monitoring and output function are
not disabled.
Effect of zonal disablement
Selection
0 – Not disabled by zone
disablement
1 – Disabled by zone disablement
© 2011 Schneider Electric. All rights reserved.
In the ZDis column you can select how a disablement of the zone, to which the address belongs, should
affect the address.
Meaning
The address will not be disabled when the zone to which it belongs,
is disabled.
The address will be disabled when the zone to which it belongs, is
Schneider Electric
Pelco Finland Oy Kalkkipellontie 6, 02601 Espoo, Finland
www.pelco.com/nordic
Document Number 66571741GB2
Telephone: +358 10 446 511
Fax: +358 10 446 5103
04/2011
User Manual
66571741GB2
2 – Input only disabled by zone
disablement
04/2011
Fire Detection
44
disabled. The disablement concerns all functionality of the address.
Sensor input, fault monitoring and output control are all disabled.
The address will be partly disabled when the zone to which it
belongs, is disabled. The disablement concerns the sensor input, or
if the address is an IO module the configured input function. Fault
monitoring and output function are not disabled.
It is common practice not to have e.g. manual call points disabled even if smoke detectors are disabled to
prevent unwanted alarms.
Selecting control groups for outputs
Editing texts
In the 'Text' column you a write a text, that will be displayed in the LCD of the panel in conjunction with an
alarming address. The text could for example indicate the room number or the location of the detector.
All changes you have made during the editing of Address Data are stored in a temporary memory, so that
you can select whether you want to keep the changes or if you want to return to the data you had before
opening of the Address Data window. (Still you have to separately save the data in a file for later retrieval).
When you have entered data for selected addresses and you want to keep the data
you can press the OK-button.
If you want to cancel any changes you have made you can press the Cancel-button.
Schneider Electric
Pelco Finland Oy Kalkkipellontie 6, 02601 Espoo, Finland
www.pelco.com/nordic
Document Number 66571741GB2
Telephone: +358 10 446 511
Fax: +358 10 446 5103
04/2011
© 2011 Schneider Electric. All rights reserved.
Closing the Address Data window
User Manual
66571741GB2
Fire Detection
04/2011
45
Summary of addresses
Select ‘Data – Summary Of Addresses’ from the menu or press the
the number of addresses in the loops.
speed button to view a summary of
A table with the number of each type in each loop will be displayed separately for devices connected to ALC,
SLC and LC loop controllers as well as number of CLC conventional lines.
button.
© 2011 Schneider Electric. All rights reserved.
To close the window, press the
Schneider Electric
Pelco Finland Oy Kalkkipellontie 6, 02601 Espoo, Finland
www.pelco.com/nordic
Document Number 66571741GB2
Telephone: +358 10 446 511
Fax: +358 10 446 5103
04/2011
User Manual
66571741GB2
04/2011
Fire Detection
46
Address reports
Select 'Data - Address reports' from the menu to create and print sorted and filtered address reports.
Select addresses from
Whole system
Addresses are selected from the whole system. The report will include all adresses in the
FXNet system that fullfill the selection criteria (see below).
Panels
Addresses are selected from selected panels. The report will include all adresses in the
selected panel(s) that fullfill the selection criteria (see below).
Loops
Addresses are selected from selected loops. Any one or more loops can be selected and
the report will include addresses in these loops that fullfill the selection criteria.
Zones
Addresses are selected from selected zones. Up to 250 (consecutive) zones can be
selected and the report will include addresses in these zones that fullfill the selection
criteria.
Sort on item
Loop/address
Zone Id
Device type
Sort order
Ascending
Descending
The report is sorted in address order.
The report is sorted in zone order. Within a zone the addresses are sorted in address order.
The report is sorted in device type order. Within a device type the addresses are sorted in
address order. Note that sorting is not done on the textual representation of the device type
but on the internal encoding.
Sorting order is ascending.
Sorting order is descending
Schneider Electric
Pelco Finland Oy Kalkkipellontie 6, 02601 Espoo, Finland
www.pelco.com/nordic
Document Number 66571741GB2
Telephone: +358 10 446 511
Fax: +358 10 446 5103
04/2011
© 2011 Schneider Electric. All rights reserved.
Selection criteria
Device family
Addresses that are configured for the selected loop controller type are included in the report.
Note that S200 devices in a SLC loop are included with the AP200 series devices.
Device kind
Addresses that belong to the selected kind are included in the report. Selectable kinds are
'Any kind', 'Detectors' and 'IO modules'.
User Manual
Include in report
Panel
Address
Zone
Device type
Input function
Output function
Text
Tested checkbox
66571741GB2
04/2011
Fire Detection
47
The panel number column is included in the report.
The address column is included in the report. This is allways selected.
The zone column is included in the report.
The device type column is included in the report.
Currently not selectable.
Currently not selectable.
The text column is included in the report.
The 'Tested' checkbox column is included in the report. The purpose is to enable
documentation of tested addresses as a final step in a commssioning. The installer prints
out a report and marks the tested addresses as the testing proceeds.
Navigating between pages
Navigation buttons The buttons provide stepping to the first page, -10 pages, -1 page, +1 page +10 pages and to
the last page.
Font selection
Font button
The button opens a font selection dialog to select font type and size.
Line height selection
Line height list
The dropdown list offers selection of line heights in the range 100% .. 200%.
Printing to printer
Print button
The button opens a dialog for selection of printer and the pages to be printed.
File Opening, Merging and Saving
Opening an existing file
Select 'File - Open' from the menu or press the
button to open a file. The file is verified to be an FX file
and is then read into memory and you can work with the data.
Merging an existing FX file
Select 'File - Merge FX file ...' from the menu (this function has no toolbar button). The file may be a file for a
standalone panel or contain data for several panels. The data of the panels in the file are merged with
configuration data already in memory.
© 2011 Schneider Electric. All rights reserved.
If configuration data already in memory contains a panel with the same ID as any of the panels in the file,
you will be prompted to resolve the ID conflict.
If you select to Overwrite, the data of the panel in memory with the same ID will be
overwritten with the data of the panel in the file.
If you select a new ID with the up-down buttons and press 'New ID' the data of the
panel in the file will be merged with the new panel ID.
If you select 'Cancel' the data of the panel in the file will not be merged into
memory.
Schneider Electric
Pelco Finland Oy Kalkkipellontie 6, 02601 Espoo, Finland
www.pelco.com/nordic
Document Number 66571741GB2
Telephone: +358 10 446 511
Fax: +358 10 446 5103
04/2011
User Manual
66571741GB2
04/2011
Fire Detection
48
Merging an existing ESA file
Select 'File - Merge ESA file ...' from the menu (this function has no toolbar button).
The "Merge ESA file" dialog has an edit field for the ESA file name. Type the name of the file (including path)
or click "Browse ..." to select a file from the standard file open dialog.
Click the "Read file" button to read the file. The "File has been saved by" field will show the licensee who has
saved the file and the field "Using version" will show the version of the ESA configuration tool with which the
file was made. Additional information about the file will be shown in the large edit field. Verify that the file
indeed appears to contain the configuration data you want to merge.
Click the "OK" button to perform the conversion into an FX configuration. Since some data items in the ESA
configuration do not have a direct correspondence in the FXNet data items, a list of data items that might
need the user's attention is produced and shown in a separate window. Do not close this window before you
have verified and/or changed the listed data items.
ESA IO settings
Seeing - Visible
panel relations
Control groups
Input functions
Output functions
The ESA-2 panel inputs and outputs are setup with switches and jumpers and can
therefore not be determined from the configuration file.
ESA-1 input and output functions are set in the configuration, so could be
converted.
However, there's no direct correspondence between the physical inputs and outputs
(MC IO or IOC or OCA) so the IO settings are left to the user
Since the ESA-MESA or ESA-MAXI systems do not have the concept of seeing visible panel relations, these have to be set by the user
The ESA panels do not have the concept of control groups. Therefore the CtrlA and
CtrlB settings of inputs and Control Groups settings of outputs need to be set
manually, if the default settings are not suitable.
The default setting of the conversion leaves the "CtrlA" and "CtrlB" fields of inputs
empty and "Control Groups" field of outputs as "Local" if the output function was a
"Zonal" function or "General" if the output function was a "General" function.
Some ESA input address settings do not have a corresponding input function for the
FX addresses. These addresses are removed from the configuration.
Some ESA output address settings do not have a corresponding output function for
the FX addresses. These addresses are removed from the configuration.
Saving data to a file
Schneider Electric
Pelco Finland Oy Kalkkipellontie 6, 02601 Espoo, Finland
www.pelco.com/nordic
Document Number 66571741GB2
Telephone: +358 10 446 511
Fax: +358 10 446 5103
04/2011
© 2011 Schneider Electric. All rights reserved.
The "Cancel" button will cancel the operation if clicked before the "OK" button.
Settings that needs to be set manually:
User Manual
66571741GB2
Fire Detection
04/2011
Select ‘File – Save’ from the menu or press the
when you opened the file.
49
button to save the data in a file with the same name as
Select ‘File – Save As ...’ from the menu or press the
a new file.
button if you want to change the filename or if it is
© 2011 Schneider Electric. All rights reserved.
The program creates a backup file of an existing file that has the same name as you attempt to save. The
existing file is renamed by adding an extra extension in the format "~xx~" where xx is a numeric value from
00 to 99. The number of backup files is fixed to 10 and if the number of backup files increases over 10, the
oldest file is deleted. E.g. when backup file ~10~ is created, the backup file ~00~ is deleted.
Schneider Electric
Pelco Finland Oy Kalkkipellontie 6, 02601 Espoo, Finland
www.pelco.com/nordic
Document Number 66571741GB2
Telephone: +358 10 446 511
Fax: +358 10 446 5103
04/2011
User Manual
66571741GB2
04/2011
Fire Detection
50
Printing
Printer setup
Select ‘File – Printer setup ...’ from the menu or press the
speed button to setup your printer.
The printer set up dialog may look different in your computer because it is provided by your printer driver or
by your operating system
© 2011 Schneider Electric. All rights reserved.
Recommended setting for the orientation is ‘Portrait’.
Schneider Electric
Pelco Finland Oy Kalkkipellontie 6, 02601 Espoo, Finland
www.pelco.com/nordic
Document Number 66571741GB2
Telephone: +358 10 446 511
Fax: +358 10 446 5103
04/2011
User Manual
66571741GB2
Fire Detection
04/2011
51
Printing the data
To print the configuration data, select in the left pane whether you want to print the network data or data of
an individual panel.
Then select ‘File – Print’ from the menu or press the
speed button to print the data.
You will be presented a preview of the selected data.
The Preview window has the following buttons:
To scroll to the previous page
To scroll to the next page
To print the data on a printer
To close the preview window
© 2011 Schneider Electric. All rights reserved.
If you selected FXNet data to be printed, you will be presented a preview of the data to be printed:
Schneider Electric
Pelco Finland Oy Kalkkipellontie 6, 02601 Espoo, Finland
www.pelco.com/nordic
Document Number 66571741GB2
Telephone: +358 10 446 511
Fax: +358 10 446 5103
04/2011
User Manual
66571741GB2
04/2011
Fire Detection
52
© 2011 Schneider Electric. All rights reserved.
If you selected a panel's data to be printed the following preview window will be shown:
Schneider Electric
Pelco Finland Oy Kalkkipellontie 6, 02601 Espoo, Finland
www.pelco.com/nordic
Document Number 66571741GB2
Telephone: +358 10 446 511
Fax: +358 10 446 5103
04/2011
User Manual
66571741GB2
Fire Detection
04/2011
53
To send/receive data to/from the panel
Sending data to a panel
Select the panel to which you want to send data in the left pane.
The select ‘Tools – Send To Panel ...’ from the menu or press the
data to the panel.
speed button to send configuration
Reading data from a panel
Reading data from a panel can be considered similar to merging a file. You have to select the FXNet level
(root level) in the left pane.
Then select ‘Tools – Receive From Panel ...’ from the menu or press the
existing configuration data from the panel.
speed button to receive
If a panel with the same ID as the one you are attempting to read from already exist, you will be prompted to
resolve the Panel ID Conflict, just as with merging files. See chapter 0 for details on options.
Communication handler dialog
© 2011 Schneider Electric. All rights reserved.
The sending and receiving dialogs (Communication handler) are identical except for the ‘Send’ and ‘Receive’
buttons that are enabled or disabled depending on if you are sending or receiving.
The ‘Show ESA configuration info at receival’ checkbox, if checked, will display information about the
configuration data currently existing in the ESA and you will have the option of cancel the data transfer.
Schneider Electric
Pelco Finland Oy Kalkkipellontie 6, 02601 Espoo, Finland
www.pelco.com/nordic
Document Number 66571741GB2
Telephone: +358 10 446 511
Fax: +358 10 446 5103
04/2011
User Manual
66571741GB2
Fire Detection
04/2011
54
The buttons in the dialog have the following functions:
Button
Meaning
Prepare the
To prepare the panel to send or receive data. The panel indicates that it is
panel
ready for configuration in its LCD.
Send
To send configuration data from the PC to the panel
Receive
To receive existing configuration data from the panel to the PC
Restart the panel To restart the panel after the transmission of configuration data.
Close
To close the communication handler dialog.
When you select to send or receive a communication setup dialog will be shown:
Select the communication port in your PC which is connected to the panel.
Leave the communication baud rate as ‘9600’.
The ‘RxD’ and ‘TxD’ led imitators will flash green when data is received or transmitted.
If the communications seems to stop for longer than a minute make exact notes about the messages in the
‘Current link action’, ‘Current link status’ and ‘Current server status’ fields.
When data transmission is ready the communication server window will close and focus will be returned to
the Communication handler for further actions by you.
Schneider Electric
Pelco Finland Oy Kalkkipellontie 6, 02601 Espoo, Finland
www.pelco.com/nordic
Document Number 66571741GB2
Telephone: +358 10 446 511
Fax: +358 10 446 5103
04/2011
© 2011 Schneider Electric. All rights reserved.
When you select OK to proceed, a communication server window will be shown:
User Manual
66571741GB2
04/2011
Fire Detection
55
To EXIT the program
© 2011 Schneider Electric. All rights reserved.
Click the Terminate button,
, or select ‘File – Exit’ from the menu or click the
button to terminate the
program. If you have made modifications that are not yet saved, you will be prompted whether you want to
save before termination.
Schneider Electric
Pelco Finland Oy Kalkkipellontie 6, 02601 Espoo, Finland
www.pelco.com/nordic
Document Number 66571741GB2
Telephone: +358 10 446 511
Fax: +358 10 446 5103
04/2011