1
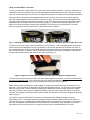
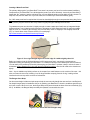
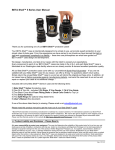
Beta Shell™ 3.0 / 4.0 Series Lens Case User Manual Thank you for purchasing one of our Beta Shell™ lens cases! Your Beta Shell™ lens case is intentionally designed to be simple to use, yet provide superb protection to the stored optical lens. From the experiences we photograph in our travels both far and near we have learned that light is right and unnecessary complexity is a liability – these two core philosophies are what have guided our Beta Shell™ lens case design. We design, manufacture, and test our lens cases with the intent to exceed your expectations. If you are not satisfied with your Beta Shell™ lens case, we offer a 30 day “no questions asked” return policy. Simply return the unused Beta Shell™ lens case to us and we will refund the original purchase price. In addition, all our Beta Shell™ lens cases come with our unconditional Bomb-Proof Guarantee – If any part of your lens case wears out, breaks, or fails under intend use conditions we will replace or repair your Beta Shell™ at no cost – just get the lens case back to us and we will take care of the rest! * Included in with every Beta Shell™ lens case are the following items: 1) Beta Shell™ Lens Case 2) Extra foam disk insert(s) (series 4.0 only) 3) One small indicating Silica Gel Pack 4) User’s Manual (this document) 5) One extra split ring (for strap attachement) If one of the above listed items is missing. Please email us at [email protected] Please read this product manual to get the most out of your Beta Shell™ case! * Bomb-Proof Guarantee applies only to individual U.S. based customers (lower 48 states). We reserve the right to charge for return shipping costs in some situatutions. We reserve the right to waive repairs if product was misused or damaged beyond reasonable repair. Product Liability and Disclaimer – Please Read It is your responsibility to protect your photographic equipment. The user shall determine the suitability of this product for his or her use, and shall assume all risk of liability in connection with that use. Under no circumstance will Mogomoto Prototype LLC be held responsible for damage to photo equipment arising from the use of this product. Neither Mogomoto Prototype LLC, it’s suppliers, subcontractors, dealers or agents are liable for any loss, injury, or damage whatsoever arising from the use of this product. Modifications to your Beta Shell™ lens case will void the warranty. Never expose to excessive heat or petroleum based solvents. Never use this lens case to carry or protect objects other than photographic equipment. Beta Shell™ cases are designed to be water-proof under test conditions. Water penetration will occur if lid is not properly closed, set, worn, or is damaged. Normal wear and tear will compromise the function of this product. Beta Shell™ lens cases are protected under U.S. patent right laws. Beta Shell™ lens cases are Patent Pending. Rev. 0410-2 Using Your Beta Shell™ Lens Case To open your lens case simply rotate the Top Lid in the counter-clockwise direction – just as you would open a water bottle. Note the machined icons on the lid indicating the rotational directions to open and close your lens case. For a secure seal there is no need to over-tighten the lid closed. For a water-proof seal please read below. Place your SLR or rangefinder interchangeable lens into the lens case. The front of the lens (lens cap end) should be rested against the foam found at the bottom of the case. The back end of the interchangeable lens (mounting end) should point up and have a storage end cap. The back end cap should not significantly extend beyond the plane of the top surface of the open lens case (Fig. 1). If back of lens extends more than ½ inch past rim of case we recommend using a larger Beta Shell™ lens case size. If your Beta Shell™ lens case seems overly large for the lens to be stored – read below to create a better fit. Fig. 1 – Checking the fit of lens inside Beta Shell™ case. End cap should be about flush with top of case. To close your lens case, gently press the lens down to “set” its location – then immediately gather the end cap with the memory foam attached to the Top Lid assembly. The lens end cap should be aligned to the center of the Lid assembly foam. Press the Lid assembly down to compress the foam and simultaneously rotate the Lid in the clock-wise direction to close the case. The lid should close with relative ease, as rotating the lid closed will compress the internal memory foam and lock the lens into place (Fig. 2). Figure 2: Align to lens end cap to center of Lid foam and press-down to compress foam. To check the lens is properly secured in the lens case, gently wiggle the lens case. You should not feel the lens move around inside the case. If you can feel the lens move around significantly inside the lens case, please remove the lens from the case and use the extra 90mm foam disk(s) to create a tighter fit. When using the extra foam disk(s) to create a tighter fit, carefully remove the lower foam at the bottom of the lens case – the lower foam is not attached to the case and should pull right out. You should now see the plastic bottom of the lens case. Place the extra foam disk(s) at the bottom of the case, and then replace the original foam disk such that is sits on top of the added foam disk(s). The lower foam surface will now be closer to the Lid foam, thus a tighter fit to the stored lens will be achieved. Re-insert the lens and check fit again as described above in figure 1. If you plan on using your Beta Shell™ lens case in environments where dramatic changes in ambient temperatures occur – we strongly recommend placing a moisture absorbing Silica Gel Pack at the bottom of your case. Silica Gel is a simple material that will absorb moisture generated from condensation on the inside of your lens case (additional silica gel packs can be purchased on our web site). Also, remember any moisture that enters your lens case (such as rain or snow) will remain inside a sealed Beta Shell™ lens case. Rev. 0410-2 Creating a Water-Proof Seal The primary design goal of your Beta Shell™ lens case is to protect your lens from environmental conditions. Components of your Beta Shell™ are all designed to protect your lens. Ultimately - how well your Beta Shell™ keeps dust, dirt, moisture, and the cold away from you lens depends purely on how tightly the Lid is closed. To keep dirt, dust, and rain water out of you lens case, the Lid need only to be closed relatively gently. If a 100% water-proof seal is required the Lid must be closed tightly enough to compress the heavy-duty O-ring seal. In general, an average male user can close the Lid tightly enough by hand to create a water-proof seal. It is very unlikely anyone can close the Lid by hand too tightly enough to damage the lens case. To guarantee anyone can close the Lid tightly enough to create a water-proof seal have we integrated simple leverage points in our Lid design to allow anyone to guarantee a 100% water-proof seal. By using the straight edge of a tool, ski, or table to gain leverage, any one can easily close a Lid tightly or free a tightly closed Lid (Fig. 3). View a demo video of how to do this on our web page http://www.betashell.com/SearchResults.asp?Cat=28 . Figure 3: Use a rigid straight edge such as the edge of a table to tightly close Lid. Before you head out into the field and demand a 100% water-proof seal – we strongly recommend you experiment closing and opening your Beta Shell™ in a manner such that a 100% water-proof seal in achieved. You can easily verify a water-proof seal by submerging your Beta Shell™ (without a lens) in a buck of water. If air bubbles escape between the O-ring seal and the matting flat surface, then the Lid needs to be closed more tightly! Note – tiny air bubbles may initially surface as air escapes from small features on the outside of the case – this does not mean the lens case is leaking. Look for larger bubbles escaping from the O-ring / sealing surface interface that do not stop within a minute of submersion. The Bungee Case Strap Our lens case design includes a simple strap to help the user securely handle the case out from a stuffed pack. Our simple bungee strap is intended to aid you in grabbing your Beta Shell™ when the conditions get slick such as in rain or snow. When not in use, the bungee strap can by stored around the base of the lens case body (Fig. 4 & 5). In addition, the Bungee Strap can easily be replaced or removed by the user. Figures 4 & 5: Stored and used bungee strap. Rev. 0410-2 A Few More Comments Regarding Use As designed, your Beta Shell™ will provide a lifetime of protection to your SLR or rangefinder lenses. We expect users to take our suggestions above on how to use their Beta Shell™ cases as a starting point. We encourage users to be creative in adapting their Beta Shell™ lens cases to best meet their lens storage and transport needs. As an example, some users may elect to use their own straps or store other photographic equipment in their cases. Please visit our web page to see how other Beta Shell™ owners are using their lens cases. Care and Maintenance Your Beta Shell™ lens case is design to be essentially maintenance free. There are only two things to do to keep your lens case functioning like new – 1) keep the inside clean, and 2) keep the O-ring seal clean. Remember that any dirt, dust, or substance that gets inside your Beta Shell™ case can end up on or inside your lens! If moisture collects inside your case, leave it open to dry out. Also, keep your lens case closed when not in use in the field. To clean the outside of your lens case simply wipe off with a damp cloth and let dry. Never use solvents (such as gasoline or acetone) on any part of your lens case – ABS plastic and solvents do not mix well! To clean the internal foam gently wipe down the foam surfaces with a wet towel or mild soap. Natural yellowing of the memory foam over time is normal and this will not damage the foam or your lens. Remember, the lower foam disk can be removed while the lid foam and neoprene liner are not removable. All memory foam can be replaced if it is re-glued to the ABS shell (email us for how to replace memory foam). Compressed air also works well to remove dust and dirt imbedded in the Neoprene liner or memory foam. Leave the lens case open and let the inside of your Beta Shell™ dry completely before restoring a lens inside. Finally, keep the surface of the O-ring seal clean. Using the corner of a wet towel, gently wipe dirt and dust off the O-ring seal surface – remember this seal is what keeps water and dust out. Once a year, use a Q-Tip style cotton swab to apply a Teflon or Silicon based lubricant (such as bike chain lube) to the surface of the O-ring seal. If you plan to keep a lens stored inside a Beta Shell™ lens case for a long time make sure there is not any excessive moisture trapped inside the case and use a silica gel pack inside the lens case. This product manual is not intended to cover all your questions regarding our Beta Shell™ lens cases. We encourage product feedback, questions, and comments – just e-mail, call, or write to us. Happy shooting and good luck in your photo assignments! Mogomoto Prototype LLC 8415 NE 8th Avenue Vancouver, Washington 98665 USA Ph. 503-208-2284 www.betashell.com [email protected] Rev. 0410-2