1
Introduction
Unpacking and Inspection
The ArgoKee is an extremely user-friendly and powerful Keyboard
Display Unit (KDU), which supports ARGOX label printers and
performs the “standalone operation”. ArgoKee’s high compatibility
with other printer programming languages makes it so versatile and
economic substantially. Bundled with it is the powerful label design
software - ArgoBar, which allows any of Windows users download
desired form from PC within minutes.
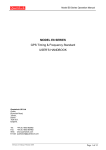
a. ArgoKee KDU
b. User’s manual
c. RS-232 serial cable(To connect Argokee & PC)
d. RS-232 serial cable (To connect Argokee & Argox Printer)(black)
e. Scanner adapter
f. Power adapter
With its ergonomically designed Notebook PC keypad, ArgoKee
makes your work of data key-in become easy and delightful. To
facilitate the standalone operation, it can also be connected to a
barcode scanner for data input.
a
c
b
d
e
f
Notes:
1. Black serial cable (Item g) is only for connecting ARGOX
printers and Argokee. It is NOT for other applications.
2. In standalone operation, it is not necessary to plug with
power adapter as Argokee can be powered by ARGOX
barcode printers through black serial cable (item g)
directly.
1
2
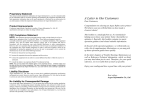
Keyboard Overview
RS232 pin assignment
P1 (port 1) – connect to printer
LCD Display
Caps LED
Ins LED
Pin number
2
3
5
9
Definition
RD
TD
GND
VCC
Direction
Input
Output
Signal ground
+5V (input)
P2 (port 2) – connect to host (PC) or barcode scanner
Pin number
2
3
5
9
Definition
RD
TD
GND
VCC
Direction
Input
Output
Signal ground
+5V (output)
Notes:
1. ArgoKee can be powered by other devices(like Argox
Printer) through the pin 9 of P1 without Power Adapter.
On the other hand the pin 9 of P2 could power other devices
too(like Argox Barcode scanner).
2. Both P1 and P2 are designed with same flow controlXon/Xoff.
Power Jack
P2 ( Port 2 )
3
P1 ( Port 1 )
4
ArgoKee Set-up
d. If the password was recognized as error,LCD will show:
1. Connecting to the power adapter
PASSWORD REJECTED!
1.1 After ArgoKee is powered by external adapter,
will be shown on LCD and
STAND-ALONE KEYBOARD
accompanied by beep-beep
Ver. X.XX
sound.
1.2 After few seconds, the ArgoKee will enter “standby mode”
and LCD will display:
PPLB MODE SELECTION:
P: PRINT, D:DL, S:SET
Note:
Password verification will be bypassed if password was
not set.
e. Press “Pg Dn” or “Pg Up” till
PASSWORD SETTING?
[ENTER]/[YES]
PPLA MODE SELECTION:
P: PRINT, D:DL, S:SET
Then Press “Enter” for setting password.
NEW PASSWORD SETTING
_
BASIC MODE CHOICE:
P: PRINT, D:DL, S:SET
OR
Press “P” to print out a FORM or BASIC program.
Press “D” to download a FORM or BASIC program to printer.
Press “S” to enter Configuration Setting mode.
2. Set up configuration
2.1 Password setting –
a. Press “S” to enter Configuration Setting mode. If
password has been set, LCD will display:
PLS. ENTER PASSWORD
b. Enter the password ( MAX. 10 char. ) set before then
press “Enter“.
c. If the password was input correctly, LCD will show:
f.
Edit your password in the above screen. Then press
“Enter” to confirm your setting.
g. Continue to perform other settings or press “Esc” for
returning standby mode.
2.2 PC port baud rate setting –
a. Press “S” to enter Configuration Setting mode(enter
password if necessary).
BAUD(P2, PC PORT)
9600
*
b. Press “ Up arrow “ or “ Down arrow “ key to select the
proper baud rate.
c. Press “ Enter “ key to confirm your selection (There will
be sign * to show your selection).
PASSWORD ACCEPTED!
5
is shown on LCD.
6
d. Continue to perform other settings or press “Esc” for
returning standby mode.
2.3 Printer port baud rate setting –
a. In Configuration Setting mode, press “Pg Up” or “Pg
Dn” till .
BAUD(P1, PRINTER)
is
9600
*
is shown on LCD.
b. Press “ Up arrow “ or “ Down arrow “ key to select the
proper baud rate. Then press “ Enter “ key to confirm
your selection.
c. Continue to perform other settings or press “Esc”
for returning standby mode.
2.4 Key Tone setting a. In Configuration Setting mode, press “Pg Dn” or “Pg
Up” till.
Key Tone :
Enable
*
is shown on LCD.
b. Press “Up arrow” and “Down arrow” key to select key
tone options.
c. Press “ Enter “ key to confirm your selection.
d. Continue to perform other settings or press “Esc” for
returning standby mode.
2.5 Scan Option setting –
Scan Option :
Overwrite
b. Press “Up arrow” and “Down arrow” key to select either
“Overwrite” or “Clear & Overwrite” while data is entered
by barcode scanner.
c. Press “ Enter “ key to confirm your selection.
d. Continue to perform other settings or press “Esc” for
returning standby mode.
2.6 Print Code setting –
Refer to the section 2 in Appendix I.
2.7 Emulation setting –
There are three emulations – PPLA, PPLB and BASIC you
can select.
a. In Configuration Setting mode, press “Pg Up” or “Pg Dn”
key till.
EMULATION :
PPLB
*
is shown on LCD.
b. Press “Up arrow” and “Down arrow” key to select the
emulation modes,PPLA, PPLB or BASIC.
c. Press “ Enter “ key to confirm your selection.
d. Continue to perform other settings or press “Esc” for
returning standby mode.
Note: The emulation mode ( PPLA, PPLB ) of ArgoKee
must be consistent with the emulation in your printer,
or your printer will not follow the form sent from
ArgoKee.
a. In Configuration Setting mode, press “Pg Up” or “Pg Dn”
till.
7
is shown on LCD.
*
8
2.8 Flash memory setting –
a. In Configuration Setting mode, press “Pg Up” or “Pg Dn”
key till.
FLASH MEMORY :
KEEP IT
*
is shown on LCD.
b. Press “Up arrow” or “Down arrow” key to select either
“KEEP IT” or “ Clean It After Exit”.
c. Press “ Enter “ key to confirm your selection.
d. Continue to perform other settings or press “Esc” for
returning standby mode.
Note:
Once “ Clean it After Exit” selection has been choose
and “ ESC” has been pressed all stored forms will
be cleaned.
3. Connecting Host (PC) and ArgoKee
3.1 Before using ArgoKee to perform standalone operation,
firstly connect it with a host (PC) - just connect the male
end of RS-232 cable(item d, Gray) to P2 (port 2) of the
ArgoKee and the other end of the cable to the “Com port”
of your host (PC).
3.2 After the connection is completed, you may follow
paragraph OPERATION to generate a “form” on your host
(PC) and then download it to ArgoKee.
4. Connect to Printer (to get the labels printed out from
printer)
4.2 Link the female end of RS-232 cable(item g, Black) to P1
(port 1) of ArgoKee and the other end of the cable to the
printer.
4.3 Having completed the connection, refer to paragraph
OPERATION to get label output from printer.
5. Connect to Scanner
(input data by using Barcode Scanner)
5.1 The P2 (port 2) of ArgoKee enables data input through
Barcode Scanner then get label output from printer.
5.2 To use the barcode scanner for data input, just connect the
RS-232 cable of your barcode scanner to the P2 (port 2) of
ArgoKee. (Check your barcode scanner cable to see if you
need the “scanner adapter” to make proper connection.)
Note:
Normally, the RS-232 interface of barcode scanner can
be connected to ArgoKee with the “scanner adapter”;
however, if your barcode scanner has communication
problem (incorrect pin assignment) to ArgoKee, then
you might need a special converter to fit the interface of
P2 (port 2).
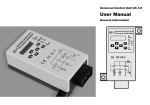
a. The converter needs 2 male 9-pin connectors.
b. The pin connection should be:
C1 pin
C2 pin
2 TD
2 RD
3 RD
3 TD
5 (GND)
5 (GND)
4.1 After the form is generated from host (PC) and stored into
ArgoKee, you could disconnect RS-232 cable from ArgoKee.
9
10
c. The barcode scanner should meet following configuration:
Baud Rate should be consistent with the setting in
Argokee( 9600 bps is recommended )
Non parity,8 data bit, 1 stop bit
Scan mode should set as “data” + <CR><LF>
Operation
1.Generate a form for “standalone operation”
Since the ArgoKee supports both PPLA and PPLB language,
you can generate a “printing command form” by sending either
of these two language commands. Or you can generate the
“printing command form” from bundled software- ArgoBar.
(Refer to ARGOX “Programming Manual” to prepare printing
commands)
1.1 Example by using PPLB emulation (the default setting)
FS"PRICE"
q812
Q600,24
N
V0,10,N,"MODEL ?"
V1,10,N,"PCS ?"
V2,10,N,"PRICE ?"
C0,12,N,+1,"PART NO. ?"
S6
D8
ZT
A60,300,0,4,1,1,N,"P/N:"
A410,300,0,4,1,1,N,"MODEL:"
A60,430,0,4,1,1,N,"PCS:"
A410,430,0,4,1,1,N,"PRICE: $"
A150,300,0,4,1,1,N,C0
A510,290,0,5,1,1,N,V0
A150,420,0,5,1,1,N,V1
A540,430,0,4,1,1,N,V2
X30,50,20,750,520
LO30,250,720,10
LO30,380,720,10
LO385,250,10,250
11
12
B220,90,0,1,3,5,100,B,C0
If the ^ and Q commands exist at the form, the keyboard will no talk with user about
FE
the label set and copy count. That is because they are fixed.
Example A - with ^ and Q command
1.2 Example by using PPLA emulation
Since the PPLA didn’t support standalone operation completely,
hereunder we provide some additional “definition”s, which may
be helpful for user to implement the new solution.
READER form format
-----------------------------^ c0100
a. Variable definition
^ L
"V__Message.."
"C00Counter ?"-01
Where __ is a two-digit number from 00 to 99 for the variable ID.
121100000200100@C00
The maximum character count is 20.
121100000200200@C00
121100000200300@C00This is fixed data
b. Variable reference
"V00Variable ?"
[ standard text or barcode command ]@V__
131100001200100@V00
Where __ is a two digit number variable ID
141100001200050@V00
e.g.
^02
131100001200100@V00
Q0004
E
c. Counter definition
sAREADER
"C__Message.."[+,-]val
Where __ is a two-digit number from 00 to 99 for the counter ID.
The maximum character count is 20.
Example B - without ^ and Q command
[+,-] stands for '+' or '-' symbol.
val is the step value for the counter.
General form format
------------------------------
d. Counter reference
[ standard text or barcode command ]@C__
^ c0100
Where __ is a two digit counter ID
^ L
e.g.
"C00Counter ?"+10
121100000200100@C00
121100000200100@C00
121100000200200@C00
f. Count-by-amount(^) and Quantity command(Q)
121100000200500This is fixed data1
"V00Variable ?"
13
14
2.3 If you are using the ArgoBar software, first prepare the desired
form (Refer to ArgoBar manual).
2.4 Same procedure as 2.1; first press the “D” key on ArgoKee,
then send the printing command from ArgoBar for “form
downloading”.(Refer to “Working with Standalone ArgoKee” of
ArgoBar manual)
2.5 You might store different forms into the ArgoKee by giving them
different “form names”, so that when you want to print out
those forms, they can be easily identified.
131100001200100@V00
141100001200050@V00
E
sAother_fm
1.3 Example by using ArgoBar
3.Select the form for printing
3.1 First press the “P” key, at the moment, the LCD will display:
FORM SELECTION:
(form name)
(Please refer to ArgoBar User’s manual to create the form you need.)
2.Download the form
2.1 Under PPLA or PPLB emulation – Press “D” key on ArgoKee
after the printing command form is well prepared on host (PC), ,
then the LCD will display:
LOADING FORM . . .
(HOST ==> K/BOARD)
2.2 Next send your “printing command form” from host(PC); after 10
seconds, the LCD will display next message to confirm that the
form has been saved.
3.2 There are two ways to select the desired form.
3.3 You can press “ space “ bar and then type the form name
directly to select the form.
3.4 Or you can press “Up arrow” key or “Down arrow” key to select
your desire form.
3.5 Press the “Enter” key and follow the LCD instruction to key in
various data you need then print out the labels.
3.6 Instead of key in the data through “keypad”,you can also
input the data by using the barcode scanner which is already
connected to the ArgoKee.
Note:
Once the keyboard is connected to printer, do not shut down
the printer as it may cause the graphics or forms lost.
SAVING DATA . . .
(INTO FLASH MEMORY)
15
16
Specifications
Appendix I: Special Characters
Keypad type
Keypad No.
Software support
Display
Interface
1. How to key in these special characters?
Standard Notebook PC keypad
85 keys
Windows labeling design software - Argobar
20x2 LCD display, 2x LED display
P1 (port 1), male Dsub, 4800~38400 baud rate
P2 (port 2), female Dsub, 4800~38400 baud rate
Memory
256K Flash, 128K available for form data
storage 256K Ram
Compatibility
PPLA
PPLB
Basic Program
Firmware control
PC downloadable
Power source
110/220V + 10% power adapter, 7.5V/400mA
Measurement
W 165 x D 301 x H 35 mm
Weight
490g
Operating temperature 40℉ ~ 104℉ (5℃~ 40℃)
Storage temperature –4℉ ~ 140℉ (-20℃ ~ 60℃)
Humidity
10% ~ 95% no-condensing
Special characters can be entered when the pre-loaded form (PPLA or
PPLB) or BASIC program invokes user to key in characters. For
entering a special character, firstly key in the character (e.g. L to £, a
to á, A to Ä ) similar to this special character, then simultaneously
press Alt key and the accessory symbol in the special character ( e.g.
^ to Â, - to £ , “ to Ä ..) to completely enter a special character. The
ways for entering all the individually special characters are:
Monetary sign €, £, ¥
There are 2 ways to enter the alternative monetary sign.
1. Press (ALT)+($)+(Shift) simultaneously for entering the
alternative monetary signs, cycled with $, €, ¥ and £.
2. € Enter C, then simultaneously press “ALT”&“=”
£ Enter L, then simultaneously press “ALT”&“-”
¥ Enter Y, then simultaneously press “ALT”&“=”
Other special characters
ã
â
à
ä
å
á
a
æ
ê
è
ë
é
ñ
ô
17
Enter (a),then simultaneously press (Alt) & (~ `) & (Shift)
Enter (a), then simultaneously press (Alt) & (^ 6) & (Shift)
Enter (a), then simultaneously press (Alt) & (~ `)
Enter (a), then simultaneously press (Alt) & (" ‘) & (Shift)
Enter (a), then simultaneously press (Alt) & (> .)
Enter (a), then simultaneously press (Alt) & (“ ‘) & (shift)
Enter (a), then simultaneously press (Alt) & (_ -) & (shift)
Enter (a), then simultaneously press (Alt) & (e)
Enter (e), then simultaneously press (Alt) & (^ 6) & (shift)
Enter (e), then simultaneously press (Alt) & (~ `)
Enter (e), then simultaneously press (Alt) & (“ ‘) & (shift)
Enter (e), then simultaneously press (Alt) & (“ ‘)
Enter (n), then simultaneously press (Alt) & (~ `)& (shift)
Enter (o), then simultaneously press (Alt) & (^ 6)& (shift)
18
ö
ò
ó
û
ù
ü
ú
Ã
Â
Ä
Æ
É
Ñ
Õ
Ö
Î
Ì
Ï
Ű
Enter (o), then simultaneously press (Alt) & (“ ‘)& (shift)
Enter (o), then simultaneously press (Alt) & (~ `)
Enter (o), then simultaneously press (Alt) & (“ ‘)
Enter (u), then simultaneously press (Alt) & (^ 6)& (shift)
Enter (u), then simultaneously press (Alt) & (~ `)
Enter (u), then simultaneously press (Alt) & (“ ‘ )& (shift)
Enter (u), then simultaneously press (Alt) & (“ ‘)
Enter (A), then simultaneously press (Alt) & (~ `)& (shift)
Enter (A), then simultaneously press (Alt) & (^ 6)& (shift)
Enter (A), then simultaneously press (Alt) & (“ ‘)& (shift)
Enter (A), then simultaneously press (Alt) & (E)
Enter (E), then simultaneously press (Alt) & (“ ’)
Enter (N), then simultaneously press (Alt) & (~ `)& (shift)
Enter (O), then simultaneously press (Alt) & (~ `)& (shift)
Enter (O), then simultaneously press (Alt) & (“ ‘ )& (shift)
Enter (I), then simultaneously press (Alt) & (^ 6)& (shift)
Enter (I), then simultaneously press (Alt) & (~ `)
Enter (I), then simultaneously press (Alt) & (“ ‘)& (shift)
Enter (U), then simultaneously press (Alt) & (“ ‘)& (shift)
2. How to set “Print-Code” of “special character”?
Since the Print-Code corresponding to the special character might vary
from printer to printer, ArgoKee allows user to redefine the Print-Code
for each special character. The procedure to redefine the “Print-Code”
of special character listed as followings,
7. Repeat procedure from item <4> to <6> till all the Print-Code for
special characters are set well as your expectations.
8. Once All the Print-Code for special Alphabet have been edited OK,
You should press “ESC” key to leave for the stand-by mode and
save all the Print-Code, which you edited, into NVRAM.
3. Default “Print-Code” for special characters
€ =0x24
£=0x9c
¥=0xbe
ã =0xc6
â=0x83
à=0x85
ä=0x84
a=0xa6
æ=0x91
ê=0x88
è=0x8a
ë=0x89
é=0x82
õ=0xe4
ô=0x93
ò=0x95
ö=0x94
û=0x96
ù=0x97
ü=0x81
ú=0xa3
Ã=0xc7
Å=0xb6
Ä=0x8e
Æ=0x92
É =0x90
Ñ=0xa5
á=0xa0
ó=0xa2
o=0xa7
ñ =0xa4
Õ =0xe5 Ö=0x99
Î=0x8c
Ì=0x8d
Ï=0x8b
Ű =0x9a
1. In standby mode, Press "S" to enter Configuration Setting mode
(enter password if necessary).
2. Scroll to "EDIT <PRINT CODE>?" with “Pg Up” or “Pg Dn” Key.
3. Press "Enter" key edit new “ Print-Code”.
4. Use the < Up Arrow > or < Down Arrow > to scroll the special
characters. In the other way, the ALT-combined key also can be
applied to select the special character for editing Print-Code.
5. If the special character shown on CHARACTER field is the
character you want to edit, please press "Enter" key. Then you can
edit any expected Hexadecimal (0x00~0xff) for the Print-Code
corresponding to this special character.
6. Press "Enter" key for confirming this Print-Code.
19
å =0x86
20
Appendix II: ARGOX BASIC
1. Commands of ARGOX BASIC
#Basic
#GRAPHIC
REM
PRINT(CHRTAB ;,)
END
PRINTF
LET
TABULATION
PRECISE
GOTO
INPUT
IF..THEN..ELSE
READ,DATA
FOR..TO..STEP
RESTORE
NEXT
TERMINAL
1.1
An individual BASIC size should not exceed 1024 * 20 bytes.
The total size of GRAPHIC data should not be more than 1024* 40
bytes.
The Max. Lines in a BASIC program shall not exceed 500 lines.
The Max. Var. numbers in a BASIC program shall not exceed 50.
1.2. #BASIC
The NAME statement must be the 1st statement in the BASIC program to
identify the name for this BASIC program.
Syntax:
#BASIC
“TEST BASIC”
“TEST BASIC” is the NAME of this program.
1.3 #GRAPHIC
#GRAPHIC “GRAPHIC NAME “ is the prefix for Graphic Object .
Syntax:
#GRAPHIC
Fundamental Rules of ARGOX BASIC
Each BASIC command must appear on a separate line.
( except “IF THEN ELSE ”, “FOR TO STEP” ) ( “ : ” mark for
separate command is not allowed )
A statement can’t exceed 100 characters (80 characters
after BASIC Command ).
A statement must start with a Line Number. It is a positive
integer.
Every Line Number must be unique in this Basic Program.
The Line number must be in an ascending order.
Each Line Number shall be followed by a BASIC command.
You may use blank space to increase the readability of the
program.
21
“GRAPHIC NAME”+ GRAPHIC data
The string within quotation marks is the object NAME for this subsequent
graphic data. And there should be no additional data between the
quotation mark ( right side) and the GRAPHIC data. In other word, the
control code such as CR or LF must NOT be inserted between the
quotation mark ( right side ) and GRAPHIC data.
1.4 REM
The content of the line following REM is not for execution and as such
should be ignored. REM is used purely to enhance the documentation
aspect of a program.
Syntax
Line Number
REM
?????????
22
1.5 END
Whenever END is used, it must be the last line. Any statement after the
END is irrelevant to the interpreter.
Syntax
Line Number END
1.6 LET
Syntax:
Line number LET (variable name)=(Constants or Variables or
expression).
Example:
100
110
120
130
LET
LET
LET
LET
PartsName$ = P-IV
UnitPrice = 200
Qty= 10
Total = UnitPrice * Qty
* ( 1 + 0.05 )
1.7 PRECISE
PRECISE statement is applied to specify the digit number after Decimal
Point while performing the Arithmetic calculation.
Syntax
Line Number PRECISE
N
The N in PRECISE statement is to define the digit number after Decimal
Point. The default value for N is 2.
1.8 INPUT Statement
INPUT statement will wait for the user to key in the Var. value. By the
way, while INPUT statement being executing, user can press “ ESC key
“ to abort running BASIC program.
Syntax
Line number
INPUT
“,Variable 2………
“PROMPT 1” ,Variable 1, “POMPT 2
23
Example
100 INPUT A,B
When this command is executed, ArgoxBasic will print "=?" on standard
output device ( In ArgoKee, this is LCD) and wait to read in a number
from the standard input device(In ArgoKee , this is ArgoKee itself). The
variable A will be set to this value. After the ENTER KEY ( on ArgoKee )
pressed , another " = ?" is printed and variable B is set to the value of the
next number read from the input device.
120 INPUT "WHAT IS THE WEIGHT", A, "AND SIZE", B
This is the same as the above command , except that the prompt "=?" is
replaced by "WHAT IS THE WEIGHT?" and the second "=?" is replaced
by "AND SIZE?".
1.9 READ-DATA Statement
The LET and INPUT statement have certain limitations. By a LET
statement we can assign one value for each variable and if we have to
get 10 values for 10 variables we have to use 10 statements with LET.
Also if a value is assigned through a LET statement its value can be
changed only by replacing that assignment statement with another
assignment statement. If there is a large amount of data to be processed,
it is inconvenient to key in the entire data during the execution of the
program. In such cases, READ statements are found useful. READ
statements will always have a DATA statement along with it.
Syntax
Line number
Line number
READ Variable, List....
DATA Constant, List....
Example of a READ....DATA Statement
1
REM PROGRAM EXPLAINING READ....DATA STATEMENT
5
READ X2,Y,Z1,K
9
READ A,B3, C4, L
22
DATA 8,9,13,15,16,51,30,92
30
END
24
When the machine encounters the line number 5 with the READ
statement followed by the variables X2,Y,Z1,K it will collect from the
DATA statements the values for these variables in the same order. A
one-on-one correspondence exists in the READ-DATA statement, i.e.
X2=8, Y=9, Z1=13, K=15.
In the next READ statement in line number 9 we have four more
variables A,B3,C4,L.These values will follow in the same order and oneon-one correspondence after the earlier READ variables values. They will
be A=16, B3=51, C4=30, L=92.
DATA BLOCK
Since all the values in the DATA here are exhausted, another i.e. third,
READ statement cannot be used until another DATA statement is
included or more DATA is included in the above DATA list in line number
22. A DATA statement can be anywhere in the program but must be
someplace before the END statement. It is a normal practice to keep all
DATA statements together at the end of the program before END
statement so that in case you want to alter any data at the end, it will be
very easy.
1.10 DATA BLOCK
The BASIC incorporates the contents of all the DATA statements into one
single data block. When the READ statement are executed a pointer
moves along with data block starting from the first element:
READ X1, Y1, Z1
READ N, M, L, K
READ A
READ X,Y
DATA 122
DATA-35,49, -101
DATA -691,81
DATA 8,10.-5,5
END
25
Pointer
Variable
122
<---
X1
-35
<---
Y1
49
<---
Z1
-101
<---
N
-691
<---
M
81
<---
L
8
<---
K
10
<---
A
-5
<---
X
5
<---
Y
Now look at the following examples wherein all the programs do exactly
the same work.
(a)
10
DATA "RAMA","DELHI",100,200,300
20
READ A$,B$,A, B, C
30
----40
-----------------80
END
(b)
10
20
30
40
60
70
100
Example
1
7
12
19
24
26
28
30
40
Value
READ A$,B$
READ A,B,C
----------DATA "RAMA","DELHI"
DATA 100,200,300
END
26
(c)
10
DATA "RAMA","DELHI"
20
DATA 100
30
DATA 200
40
DATA 300
50
READ A$,B$
60
READ A,B,C
-----------------100
END
30
40
50
When the statement number 10 is executed, the variables X and Y are
assigned the values of 10 and 12, the position of the pointer at this stage
is shown below:
10
(d)
-7
3.2 "PANKAJ"
↑ (Pointer)
(Position of pointer before the execution of RESTORE statement)
When the statement 30 RESTORE is executed, the pointer is brought
back to the first data value of data statement as shown below:
10
READ A$
20
READ B$,A,B,C
30
DATA "RAMA"
40
DATA "DELHI"
50
DATA 100,200,300
------------------100
END
In all the above cases, A$ is assigned the value RAMA and B$ is
assigned the value DELHI. All the numeric variables A,B,C are assigned
the values 100,200,300 respectively.
1.11 RESTORE
The RESTORE statement will reset the pointer to the first value of the
DATA statement regardless of the current position of the pointer.
Syntax
Line number RESTORE
Line number RESTORE $
Line number RESTORE *
RESTORE
READ A,B,C,D,N$
END
Reset the reading pointer for both numeric and
string Var.
Reset the reading pointer for string Var.
Reset the reading pointer for numeric Var.
Example
10 RESTORE
The RESTORE statements may be used anywhere in the program, of
course, before the END statement.The following example will clearly
illustrates the use of RESTORE statement
10
READ X,Y
20
DATA 10,12,-7,,3.2, "PANKAJ"
27
12
10
12
-7
3.2 "PANKAJ"
↑ ( Pointer)
Now, the execution of the statement number 40 against the value to
A,B,C,D and N$ will be as shown below:
A
10
B
12
C
-7
D
3.2
N$
PANKAJ
The RESTORE statement can be used in the following forms also:
Statement number RESTORE *
and
Statement number RESTORE $
If the key word RESTORE is followed by asterisk (*), then only numeric
pointer is reset as shown in the previous example. However, if the key
word RESTORE is followed by a dollar sign ($), then only string pointer is
reset to the first string data. The simultaneous use of both asterisk (*) and
dollar sign ($) will not be allowed.
For example, if a BASIC program contains the following statements,
10
20
READ A,B,N$,M$
-------
28
30
40
50
60
70
80
90
------RESTORE *
READ P,Q,A$,B$
------------DATA 5,8,"DINESH",UPMA",10,12,"RAJESH","SANJU"
END
When the statement 10 is executed, A, B are assigned values 5 and 8
whereas the variables N$ and M$ are assigned the values DINESH and
UPMA respectively. The execution of statement 40, restores the numeric
pointer to the first numeric value in the DATA statement i.e. to the value 5.
The execution of the statement 50, assigns the value 5,8, RAJESH and
SANJU respectively to the variable P,Q,A$ and B$. The values DINESH
and UPMA shall be ignored. Similarly, the execution of RESTORE$ can
also be shown by taking similar examples.
Consider another example
10
READ A,B,N$,M$
20
RESTORE $
30
READ P,Q,A$,B$
40
DATA 5,8, "DINESH", "UPMA", 10,12,"RAJESH",SANJU"
50
END
Here, the statement RESTORE$ is used. The values assigned to the
variable A,B,N$ and M$ are as same as the previous example. However,
when statement 20 is executed, the string pointer is reset to the first
string data namely “DINESH.” The execution of the statement 30 would
assign the values 10 and 12 to the variables P and Q and then the
pointer moves back-ward to assign the values DINESH and UPMA to the
variables A$ and B$
1.12 PRINT
PRINT Statement will pass all the information within the quotation (“) to
Printer via the serial port on ArgoKee. The Variables (content) in PRINT
statement are also transparently sent to Printer. In other word, it means
any information in the PRINT statement will be faithfully sent to Printer
without any modifications.
29
This strategy would maintain Argox Basic Interpreter to be independent of
any specific Printer Language. By the way, the BASIC Interpreter will not
append LF+CR automatically, after all the data in the PRINT statement
have been sent to PRINTER. If you want to append CR or LF in this
statement, the PRINT statement must manually tails with CHR$(10,13) .
Line number PRINT (Variable) separator (variable) separator or item......
The separation may be comma (,) or semicolon (;) (Refer to 1.12.1,
1.12.2 for the description about ; and ,)
Syntax1
Line number
PRINT
Variable
Syntax 2
Line number PRINT “Text 1” ,Var 1,“Text2 ”,Var 2…
Once this line executed,“Text 1”+ Var 1 + “Text2“ +Var 2 will be sent to
the printer port on ArgoKee one by one. Text1,2 are a text string
without appending CR & LF. Var1,2 are the variables defined in this
Basic Program.
Syntax 3
Line number PRINT
CHR$(2);”c0200”; CHR$(10,13)
Once this line executed, A
Where CHR$(2) will enforce ArgoxBasic to send the control code,0x02, to
printer. CHR$(10,13) is Line Feed (LF) and Carriage Return (CR).
1.12.1 The Semicolon (;) Control
Program
10
20
30
LET S =1175.50
PRINT "TOTAL SALARY =";S; " "
END
The output of the program 1 will be as
T O T A L
S A L A R Y = 1 1 7 5
.
5 0
R U P E E S
Using semicolon in a print statement, the items are close to each other,
30
and as a result more items can be printed in one line.
1.12.2 The Comma (,) Control
100
PRINT "NUM","TEMP","SIZE", REMARK"
110
PRINT 65,-15.56,36,34
If the comma,”,” ,is applied as the separators of the arguments in PRINT
command. These two lines will be printed as TABULATION COMANND
defined.
Since the default TABULATION are : 0,14,28,42,56,70,84,98,112,126 ,
the printed out message will be:
0
14
28
42
56
Zone 1
Zone 2
Zone 3
Zone 4
Zone 5
NUM
TEMP
SIZE
REMARK
65
-15.56
36
34
1.12.3 CHR$( )
This command is invoked in PRINT command for those printer codes can
not be presented within quotation marks. If the arguments in CHR$
function are the numeric between 0~255, this numeric string will be sent
to printer after it had been converted to one byte Hexadecimal Value.
Otherwise the arguments in CHR$ function will be sent to printer faithfully.
Max. 4 arguments are allowed in CHR$ (). The Arguments should be
separated with Comma mark.
e.g.:If you want to send LF & CR to printer, CHR$(10, 13 ) can be
appended in the PRINT statement. If you want to send the
QUOTATION MARK(“) to printer you can make the BASIC statement
as: PRINT CAR$(“),”1234566”,CHR$(“).
This Statement will send “1234567” to Printer included “.
1.12.4 TAB ( )
TAB (n) moves the printer head to the nth column and print out of any
data starts from that column.
e.g. Line number PRINT TAB (n ); X X is printed out from column n.
1.12.5 GRAPH( )
GRAPH (Graphic Object Name) in PRINT command will let the BASIC
Interpreter send out the GRAPHIC data which had been saved in
ArgoKee named as “Graphic Object Name”.
31
1.13 PRINTF
PRINTF Statement will show the information within the quotation (“) on
the LCD of ArgoKee. The Variables (content) in PRINTF statement will
be shown on LCD too. The BASIC INTERPRETER will stay at this
statement till “ ENTER” or “ESC” key on ArgoKee pressed by user. It
implies the message shown on LCD will be sustained before ENTER or
ESC pressed too.
Syntax:
Line number
PRINTF “xxxxxxxx” xxxxxx will be shown on LCD
faithfully.
Line number
PRINTF VAR NAME The content of VAR will be
shown on LCD.
Only a single Argument is allowed.
1.14 TABULATION
This Command is to define the tags of tabulation while the arguments in
PRINT statement being separated with Comma (,).
Syntax
Line number
TABULATION column 1 , column 2 ,……., column n
The max. column n is 10.
The default Tab Tags are: { 0,14,28,42,56,70,84,98,112,126 };
1.15 Unconditional Go To Statement; GOTO
GOTO statement is used to transfer control from a statement, say S1 to
another statement, say S2, generally, S2 does not follow S1 immediately
in sequence.
Syntax: Line number GO TO n
n is the line number of the statement where control will be transferred.
1.16 The Branching Statement ; IF... THEN
Syntax: Line number IF (EVALUATION ) THEN ( line number)
If ( EVALUATION) is TRUE , the Line number after THEN will be
executed. Otherwise the next line will be executed.
32
The IF...THEN is a decision making statement, depending upon the
decision, it can change the order of execution. The EVALUATIONs could
consist of several RELATIONAL EXPRESSION which are linked with OR
or AND . The Max. RELATIONAL EXPRESSIONs in one IF.. THEN ..
ELSE are 5.
Program
10
20
30
40
50
60
70
LET X = 1
LET Y = X*X
PRINT Y
LET X = X+1
IF X> = 31 THEN 70
GO TO 20
END
In Line 50, if the evaluation; ( X>= 31 ), is true , line 70 will be executed.
Otherwise Line 60 will be executed.
1.17 The Branching Statement ; IF...THEN...ELSE
Syntax:
Line number IF (EVALUATIONs) THEN (line number ) ELSE (line number)
The IF...THEN...ELSE statement is a decision-making statement as it
decides the path of the program. It helps in making comparisons and
testing whether a condition is true or false. IF always followed by a valid
BASIC condition or expression. If the condition is found true then the line
number after THEN is performed otherwise line number after ELSE is
performed. The EVALUATIONs could consist of several RELATIONAL
EXPRESSION which are linked with OR or AND. The Max.
RELATIONAL EXPRESSIONs in one IF.. THEN .. ELSE are 5.
Example:
Problem 1
Ages of different students appearing in the Board examination are taken.
If the age is below 17 the student is not eligible, otherwise he can appear
in the Board examination. We are asked to write a program for this
problem.
33
Program 1
10
INPUT “AGE”; A
20
IF A>= 17 THEN 30 ELSE 50
30
PRINT “WELCOME FOR BOARD EXAMINATION”
40
GO TO 60
50
PRINT “YOU ARE NOT ELIGIBLE FOR BOARD EXAM.”
60
INPUT “WANT TO INPUT AGAIN (Y/N)”; Y$
70
IF Y$ = “Y” THEN 10
80
END
The line number 10 will cause the message in screen AGE? We input the
age through the ArgoKee, say 18. Line number 20 tests whether A>17 or
not. Since A=18>17 line number 30 is executed.
Line number 30 prints WELCOME FOR BOARD
Line number 40 causes the control to pass to line number 60.
Line number 60 causes the message WANT TO INPUT AGAIN (Y/N)?
We input either Y or N. In line number 70 if input is Y then control goes to
line number 10. Otherwise if input is N then control goes to the line
number 80 i.e. END. Now if in line number 70 we input Y then control will
pass again line number 10, we give another age, say 13 In line number
20 value of A (i.e. 13) is not greater than 17, therefore ELSE part will be
executed and control will go to line number 50. Line number 50 will print
YOU ARE NOT ELIGIBLE FOR BOARD EXAM. Then line number 60 as
before will be executed. In this way a large number of students age can
be tested. When we want to stop we should input N in line 60 for Y$.
1.18 The Looping Statement; FOR-TO...NEXT
We have already seen that a loop can be built in BASIC by using the IFTHEN and GOTO statements. When it is known in advance how many
times the loop must be repeated the statement FOR-TO...NEXT is the
most effective statement.
A loop is built up by FOR-TO and ended by NEXT.
Syntax:
Line number FOR I = M TO N STEP J
Loop
- - - - - - - Loop
- - - - - - - Line number NEXT I
34
The numeric variable name following FOR is the control variable or
loop variable. M and N are numeric variable or constants ( immediate
value) where M gives the initial or starting value of the loop and N gives
the final value, J followed by keyword STEP gives the increment in M till
N is reached. The increment can be negative too.
When M,N,J are numeric variable names, their numeric values should
be assigned before the starting of the loop, i.e. before coming to FOR-TO
statement. The companied command, NEXT, should have the same
control variable followed by it. Thus one loop can be started with FORTO and ended with NEXT. Only 1 single character for the mnemonic
symbol of control Var. is allowed. The control Var. value should be
greater than “-32768” and less than “32767”.
Inside one FOR-TO ...NEXT loop there can be more FOR-TO...NEXT
loop. But once a FOR-TO...NEXT is inside another FOR-TO...NEXT, it
should remain completely inside the former loop. Such FOR-TO...NEXT
loops are called Nested loops. In the absence of the STEP clause, the
increment is assumed to be 1.
Example:
Problem 1
Suppose we want to print the output in the following format:
*****
****
***
**
*
This program contains two loops: the outer loop is from the line number
10 to 60 and inner loop from line numbers 20 to 40. In line number 10,
initially S is assigned a value 5. Since the value of S is greater than 1,
control is transferred to line number 20, which causes the inner loop to
execute 5 times resulting into printing of 5 stars (*) in one row. The
statement at line number 50 will transfer the printer control to the
beginning of the next line. When line 60 is encountered, the control goes
back to line number 10. Now the value of S becomes 4 and once again
the inner loop is executed 4 times resulting in printing of 4 (*) stars in
second row. This process will continue till the value of S becomes 1. After
that it will come to an end.
1.19 The Special Statement; TERMINAL
ArgoKee will become “ Dump Terminal “ when this statement, TERMINAL,
in a BASIC program is interpreted. In Dump Terminal, ArgoxKee can
perform interactive conversation with an intelligent device, for example
printer, via the printer port on ArgoKee. The data got from printer port will
be shown on the first row(upper) of LCD. The characters entered on
ArgoKee will be shown on the second row of LCD and faithfully sent to
printer port.
Syntax:
Line number
Example:
100
200
TERMINAL
TERMINAL
END
Program 1
10
20
30
40
50
60
70
FOR S=5 TO 1 STEP-1
FOR X=1 TO S
PRINT "*" ;
NEXT X
PRINT
NEXT S
END
35
36
2 How to run a “ArgoxBasic Program” on ArgoKee?
2.1 Edit a BASIC program
1. Choose a suitable TEXT editors, like NotePad, WordPad
( Pure Text*.txt mode only. Don’t choose WinWord Mode),
Visual C++, PEII … etc. Some popular word editors, like
WinWord , WordPerfect.. , are NOT suitable to be chosen as your
BASIC editor.
2. Then follow the ArgoBasic Syntax which have been described in
above to edit a BASIC program.
( #BASIC “Program Name “ must be prefixed on your BASIC
program )
3. Save it in the PC with the file name you like.
2.2 Download the BASIC program into ArgoKee
1. Press “S” on ArgoKee then scroll it “ Pg Up” or “ Pg Dn” to
EMULATION option. “BASIC” item should be selected as the
emulation Mode.
2. Set up the baud rate for ArgoKee to be consistent with what the
Hyper Terminal had been ( or will be ) set.
3. Press “D” on ArgoKee to let it enter “Download Mode“.
4. Employ “Hyper Terminal ( select “TEXT file” ) to download your
ArgoxBasic program into ArgoKee.
5. If any error is found in the ArgoxBasic file, an error message will
be shown on LCD. You can refer the Error Code listed below to
find out more information. Please press ENTER key to find out
more errors in the downloaded BASIC program. If all the
BASIC errors had been shown, the ArgoKee will return to
Stand-by mode.
2.3 Run the BASIC program on ArgoKee
1. Press “P” in standby mode (when “BASIC MODE CHOICE:” is
shown on LCD”).
2. Press DOWN/UP Arrow to find the BASIC program you want it
to be run. (The program name, shown on LCD is the name field
followed #BASIC command.)
3. When you get the desired BASIC program, Press “ ENTER” to
run it.
4. Then the BASIC program you selected will be run on ArgoKee
till the END command in the BASIC program is executed.
5. If there are any syntax errors being checked, the Line No &Error
code will be shown on LCD.
6. By the way, the running BASIC program can be unconditionally
aborted, if ESC key is entered when INPUT command in the
running BASIC program being executed.
2.4 How to Save a “GRAPHIC OBJECT ” in ArgoKee?
2.4.1 Edit a Prefix file
1. Employ a Text Editor to edit a simple statement as follows,
#GRAPHIC “ Graphic Object Name”. Then you might save it as
the file name,”G_Prefix.txt”.
Note: Any data or control word are NOT allowed to be appended
in the right quotation mark of Graphic Object Name following .
Therefore the “Text Editor” will automatically tail with “ end of
file mark” , “Carriage Return“ , “Line Feed” .. , are not suitable to
be employed to edit this Prefix File. Note Pad in Microsoft
Window are a suitable candidate for this requirement.
2.4.2 Download a “GARPHIC OBJECT” to ArgoKee
Note: In the download mode, the Syntax checking is simplified.
Most of the Syntaxs will be checked later when this program is
running.
37
1. Press “S” on ArgoKee then scroll it “ Pg Up” or “ Pg Dn” to
EMULATION option. “BASIC” item should be selected as the
emulation Mode.
2. Set up the baud rate for PC port in ArgoKee( 19200 bps is
recommended ) .
3. Issue “ MODE com port: baud rate , n,8,1” on MS DOS prompt to
38
have the baud rate be consistent with the baud rate you had set
on ArgoKee. ( e.g. mode com1:19200,n,8,1 set 19200 bps
on PC COM1 port )
4. Press “D” on ArgoKee to let it enter “Download Mode“.
5. Issue “ COPY G_Prefix.txt + graphic file COM1:/B” on PC MS
DOS prompt. The format of graphic file you downloaded to
ArgoKee should be able to be accepted by the printer connected
with ArgoKee, or some unexpected result and errors will be
encountered in printing.
6. After had been saved in ArgoKee, this Graphic Object will be
sent to printer while the BASIC statement, “PRINT GRAPH
(Graphic Object Name) “, being executed in the running BASIC
program.
2.5 Error code
Error
Description
code
The Prefix Command, #BASIC ,#GRAPHIC are not found .
01
Void after #BASIC
02
03 The Program Name is not specified. The name should be
companied by #BASIC command .
04 Illegal "BASIC Program Name",Maybe Left "or Right" missed
05 Unknown BASIC command found .
06 The SPACE between 2 field is too long.
07 Too many characters in 1 statement.
08 "line number" in the field of statement missed
09 Line number are not in ascending order
10 Unknown BASIC operator
Miss Line Number
11
12 Miss Command in this statement
13 Statements in this program are too much
14 Can not find END command till all data processe .
15 Line Number for GOTO command not found in this program or
Not specified.
39
16
17
18
19
20
21
22
23
24
25
26
27
28
29
30
32
33
34
35
36
37
38
39
40
41
42
43
44
45
46
47
This Label is too long
This Var. is too long
The Operand is too long
No Operand found in the command statement
There are too many Vars. in this BASIC
The Control Var. name is Illegal(over 1 Char )
Void Control Var., Initial Var missed
"TO" command is not found in FOR statement
Miss "End value" in For statement
There are Too many Control Var ( Too many NEST loop ) .
The Control Var. redefined
The End name for LOOP end value is void
Void Initial Value in For LOOP Control Var
Not "STEP" command in step field
STEP value followed with STEP are not found
Out of Control Var range, -32768~32767
Not defined Var.
The Evaluation Pairs in IF statement are too many
The Arguments in IF statement are not comparable
The Result of Arithmetic operation is overflow
The Arithmetic expression is illegal
Too many "Arithmetic arguments" in a statement
The parameter followed with PRECISE command is void
Too many Tabulation Tags defined in TAB command
Illegal argument defined in TAB function
Not all numeric when this Var. is for numeric only
Fail to read the data in READ command
Data in DATA statement are illegal
BAD syntax in READ statement
Syntax error in Restore statement
The Program size is overflow
40
3. The Sample Code ( Argox Basic)
3.1 Calculator
3.3 Print out Labels from PPLB Printer
3.3.1 Case I
#BASIC
"CACULATOR"
100 PRINTF "BASIC DEMO PROGRAM CALCULATOR "
The digit dots is 4
105 PRECISE 4
Wait for User to enter the first Argument
110 INPUT "Enter a numeric",First
120 INPUT "Enter + - x / ",OP$
Wait for the user to enter the Arith. Operation,
Wait for User to enter the second argument
130 INPUT "Enter a numeric",Second
160 IF OP$ = "x" THEN 220
If x Perform “ Multiply”
170 IF OP$ = "/" THEN 240
If / Perform Division
180 IF OP$ = "+" THEN 260
If + Perform Addition
If - Perform Subtraction
190 IF OP$ = "-" THEN 280
200 PRINTF "PLS.ENTER AGAIN! +-x/ for Arith.OP" Not +-x/ Aske user to enter again
210 GOTO 110
220 LET RESULT = First * Second
230 GOTO 290
240 LET RESULT = First / Second
250 GOTO 290
260 LET RESULT = First + Second
270 GOTO 290
280 LET RESULT = First - Second
290 PRINTF RESULT
Ask user if he or she would like to quit from this BASIC
300 INPUT "Press Q to Quit ", quit$
program or not
310 IF quit $ ="Q"OR quit $= "q" THEN 400 ELSE 110 If Q or q entered Quit
400 END
3.2 Print out Labels from PPLA Printer
#BASIC "PPLA"
110 INPUT "Label Count=?",cnt$
Input the label amount for one parts
120 LET times = 1000
How many kind of parts will you entered?
130 FOR I = times TO 1 STEP -1
Input the Parts name
140 INPUT "Parts Name=?";Parts$
The quantity for this pars ?
150 INPUT "PLS. Enter PCS",pcs
Date entry
160 INPUT "Date=? dd/mm/yy",date$
210 PRINT CHR$(2);"L";CHR$(13,10)
enter Label formatting command mode
Heat ratio for TPH
220 PRINT "H12";CHR$(13,10)
Print Speed
230 PRINT "PC";CHR$(13,10)
Width &Height Dot size
240 PRINT "D11";CHR$(13,10)
250 PRINT "131100000600046";pcs;" PCS";CHR$(13,10) send pcs to printer in Text form
send pcs to printer in BAR code form
260 PRINT "1A4202500500130";pcs;CHR$(13,10)
270 PRINT "121100000600240";date$;CHR$(13,10).
date
the Parts’ name in Text
280 PRINT "131100000200046";Parts$;CHR$(13,10)
the Parts’ name in Bar Code
290 PRINT "1A4202500100130"Parts$;CHR$(13,10)
300 PRINT "^01";CHR$(13,10)
Define the label amount to be printed out
310 PRINT "Q";cnt$;CHR$(13,10)
320 PRINT "E";CHR$(13,10)
Command PRINT
330 NEXT I
Go back 140 if I > = 1
340 END
41
#BASIC
"POS"
10 REM DATA BASE for product name & unit PRICE
100 DATA "GF100",100.23,"GF200",105.12,"GF300",200
110 DATA "X1000",300.12,"X2000",499.99,"X3000",799.99,"X4000",1200
120 DATA "OS-214ZIP",199.1,"A-200",399,"G-6000",550,"TP-180",99.9
130 DATA "PS-II", 299.99,"X-BOX",299.99
140 DATA "End$Flag",0
A Flag to identify there are no more dates
150 LET TRANS_I = 0
Reset Transaction number
160 INPUT "Enter Label count",Count
Input how many labels for each and every label
entry
170
180
190
270
280
290
300
310
330
340
350
REM PRINTF Count
LET Cnt = Count
Reset Data/String Index in this small Data Base
RESTORE
INPUT "Enter Product Name", PRODUCT$ Input the Product Name
INPUT "Enter Quantity", Qty
Input the quantity for this product
READ Match$
Read a Product name in data base
READ Price
And its corresponded PRICE
IF Match$ = "End$Flag" THEN 330 ELSE 350
If no more data in data base-> request to reenter
PRINTF "PRODUCT NOT found! Enter for Next"
GOTO 270
IF Match$ = PRODUCT$ THEN 360 ELSE 290 If Product entered by user is equal to any
one in data base
Print It out in PPLB language
Clear Image buffer in PPLB printer
"N",CHR$(13,10)
"q592";CHR$(13,10)
Label width to be 592 dots (3 inch)
"Q196,24";CHR$(13,10);"JB";CHR$(13,10) Form Length=192 dots,gapdots=24
Print Density = 9 ( Heat)
"D9";CHR$(13,10);"S2";CHR$(13,10)
"O";CHR$(13,10)
Disable all options
360
370
380
390
400
410
420
430
450
PRINT
PRINT
PRINT
PRINT
PRINT
PRINT
PRINT
PRINT
PRINT
460
465
470
480
490
500
PRINT "A155,180,3,4,1,1,N,";CHR$(");" Unit$=";CHR$(",13,10) Print “Unit$”
PRINT "A185,150,3,4,1,1,N,";CHR$(");"$";Price;CHR$(",13,10) Print the price
To get the total result
LET Total = Price * Qty
PRINT "A215,180,3,4,1,1,N,";CHR$(");"Total=";CHR$(",13,10) Print “Total=” text
PRINT "A245,180,3,4,1,1,R,";CHR$(");"$";Total;CHR$(",13,10) Print Total value
PRINT "B350,4,0,3,2,4,51,B,";CHR$(");TRANS_I;CHR$(",13,10) Print out the Bar code of
510
520
530
540
550
PRINT "P1,1";CHR$(13,10)
Print out the image buffer saved by the above PRINT commands
LET Cnt = Cnt -1
Decrease Count
LET TRANS_I = TRANS_I + 1 Increase Transaction Number
IF
Cnt = 0 THEN 180 ELSE 360 If Cnt ==0 Wait another input, otherwise Print it again
END
"A05,180,3,4,1,1,R,";CHR$(");"E-Mall";CHR$(",13,10) Print E-MALL ( reverse) on the Top
"A35,180,3,4,1,1,R,";CHR$(");"RECEIPT";CHR$(",13,10) Print “RECEIPT “
"A75,180,3,4,1,1,N,";CHR$(");Match$;CHR$(",13,10)
Print the Product Name
"A115,180,3,4,1,1,N,";CHR$(");" Q'ty= ";Qty;CHR$(",13,10) .. Print Q’ty text, and its
Value
Transaction number
42
3.3.2 Case II
3.4 Print out a Graphic Object to PPLB printer
#BASIC
"POS"
10 REM DATA BASE for product name & unit PRICE
100 DATA "GF100",100.23,"GF200",105.12,"GF300",200
105 DATA "X1000",300.12,"X2000",499.99,"X3000",799.99,"X4000",1200
110 DATA "OS-214ZIP",199.1,"A-200",399,"G-6000",550,"TP-180",99.9
120 DATA "PS-II", 299.99,"X-BOX",299.99
130 DATA "End$Flag",0
140 LET TRANS_I = 0
Reset Transaction number
160 LET Base = 0
Reset Base position to print
165 LET Total = 0
Reset Total Money required
170 INPUT "Enter Label count",Count Input how many labels for every label entry
180 REM PRINTF Count
Commented. PRINTF could help you debugging
Reset Data/String Index in this small Data Base
190 RESTORE
200 INPUT "Enter Product Name", PRODUCT$ Invoke& Wait user to enter Product name
Invoke& Wait user to enter the Q’ty for this product
210 INPUT "Enter Quantity", Qty
220 READ Match$
Read a Product name in data base
230 READ Price
And its companied Price
240 IF Match$ = "End$Flag" THEN 250 ELSE 270 A Flag to identify there are no more data
250 PRINTF "PRODUCT NOT found! Enter for Next"
260 GOTO 160
270 IF Match$ = PRODUCT$ THEN 280 ELSE 220 If not matched -> read next Product in data base
280 IF Base = 0 THEN 290 ELSE 380 If 1st time Send out the data in Line 290 ~370 to Printer
Clear Image buffer in PPLB printer
290 PRINT "N",CHR$(13,10)
300 PRINT "q592";CHR$(13,10)
310 PRINT "Q196,24";CHR$(13,10);"JB";CHR$(13,10)
320 PRINT "D9";CHR$(13,10);"S2";CHR$(13,10)
330 PRINT "O";CHR$(13,10)
To get the Row Position
340 LET Row = Base
350 PRINT "A";Row;",180,3,4,1,1,R,";CHR$(");"E-MART";CHR$(",13,10) Print E-MART as LOGO ( Rotate
270)
360 LET Row = Base + 25
370 PRINT "A";Row;",180,3,4,1,1,R,";CHR$(");"RECEIPT";CHR$(",13,10) Print RECEIPT
380 LET Row = Base +65
390 PRINT "A";Row;",180,3,4,1,1,N,";CHR$(");Match$;CHR$(",13,10) Current Product Name
400 LET Row = Base + 90
410 PRINT "A";Row;",172,3,4,1,1,N,";CHR$(");"Q'ty=";Qty;CHR$(",13,10) Print Q’ty Text & its
#BASIC
"PrnGraph"
100 PRINT "GK";CHR$(");"LOGO1";CHR$(",13,10) Delete the graphic object named by “LOGO1”
110 PRINT "GM";CHR$(");"LOGO1";CHR$(");"7838";CHR$(10) Store LOGO1 object ( file size
=7838 byte)
120
130
140
150
160
170
180
190
200
210
PRINT
PRINT
PRINT
PRINT
PRINT
PRINT
PRINT
PRINT
PRINT
END
Sent LOGO1 object in ArgoKee to Printer
GRAPH(LOGO1)
"N",CHR$(13,10)
Clear Image Buffer in Printer
Label Width , 592 pixel
"q592";CHR$(13,10)
Length = 200 pixel
"Q200,24";CHR$(13,10);"JB";CHR$(13,10)
"D9";CHR$(13,10);"S2";CHR$(13,10)
Dark level = 9
"O";CHR$(13,10)
Disable all options
"A100,200,0,2,1,1,N,";CHR$(");"TEST basic graphic";CHR$(",13,10)
Print out LOGO1 object
"GG100,200,";CHR$(");"LOGO1";CHR$(",13,10)
"P1,1";CHR$(13,10)
value
420
430
440
450
460
470
480
490
500
LET Row = Base + 115
PRINT "A";Row;",172,3,4,1,1,N,";CHR$(");"Unit$=";CHR$(",13,10) Print Unit$= Text
LET Row = Base + 140
. Print Price
PRINT "A";Row;",172,3,4,1,1,N,";CHR$("); Price;CHR$(",13,10)
INPUT "Press P to Print",Over$
Ask user to Print out or Not
LET Base = Row
LET Total = Price * Qty+ Total
If user Press “P” i -> Print It .
IF
Over$ = "P" OR Over$ ="p" THEN 500 ELSE 190
PRINT "B350,4,0,3,2,4,51,B,";CHR$(");TRANS_I;CHR$(",13,10)
Print out the BAR Code of
510
520
530
540
550
560
PRINT "A520,180,3,4,1,1,N,";CHR$(");"Total=";CHR$(",13,10)
Print Total text
PRINT "A560,180,3,4,1,1,R,";CHR$(");Total;CHR$(",13,10)
Print Total Value
PRINT "P";Count;CHR$(13,10) Command Printer to Print out data. Count is the Var set by user
LET TRANS_I = TRANS_I + 1
Increase Transaction number
GOTO 160
END
Transaction number
43
44