1
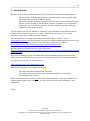
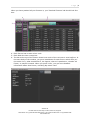
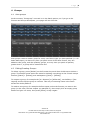
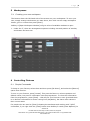
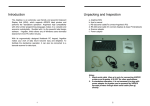
Page |1
Titan One Quick Start Guide
Avolites Ltd
184 Park Avenue, Park Royal, London, NW10 7XL, England.
Switchboard: +44 (0) 208 965 8522 Sales Direct: +44 (0) 208 955 9220 Fax: +44 (0) 208 965 0290
www.avolites.com
Page |2
Contents
1
Introduction
2
Layout
3
Getting Started – New Show and Patching
4
Groups
5
Workspaces
6
Controlling Fixtures
7
Palettes
8
Recording Cues
9
Basic Timings
10
Simple Effects – Shape Generator
11
Chases
12
Cue Lists
13
Pixel Mapper
14
Saving the Show
15
Have Fun!
Avolites Ltd
184 Park Avenue, Park Royal, London, NW10 7XL, England.
Switchboard: +44 (0) 208 965 8522 Sales Direct: +44 (0) 208 955 9220 Fax: +44 (0) 208 965 0290
www.avolites.com
Page |3
Useful Avolites phone numbers:Avolites England
Sales and service*
(+44) (0) 20 8965 8522
Service out of hours*(+44) (0) 78 3117 8888
Fax
(+44) (0) 20 8965 0290
Email
[email protected]
Website
http://www.avolites.com
*Before contacting Avolites for service enquiry please ensure that you have the product
serial number and the Software version.
The latest version of this manual and Console Software can be downloaded from the
website www.avolitesdownloads.com
The small print :
No Liability for Consequential Damages
Avolites has a policy of continuous product and documentation improvement. As such
the detail within this manual may not match the operation of the product this manual
describes.
In no event shall Avolites be liable for any direct, indirect, special, incidental, or
consequential damages or loss whatsoever (including, without limitation, damages for
loss of profits, business interruption, or other pecuniary loss) arising out of the use or
inability to use the product this manual describes even if Avolites Ltd. has been advised
of the possibility of such damages. Because some jurisdictions do not allow the exclusion
or limitation of liability for consequential or incidental damages, the above limitation may
not apply to you.
Reprint and revision history:
Quick Start Manual ET October 2012
Avolites Ltd
184 Park Avenue, Park Royal, London, NW10 7XL, England.
Switchboard: +44 (0) 208 965 8522 Sales Direct: +44 (0) 208 955 9220 Fax: +44 (0) 208 965 0290
www.avolites.com
Page |4
1
Introduction
Welcome to the Titan One Quick Start Guide! Titan One is intended for two purposes:
-
with the USB – DMX dongle plugged in as a full lighting control system that
will output one universe of DMX or Artnet
without the dongle connected it will become an easy to use Simulator that will
output 12 lines of DMX or Art-Net with a spoiler, enabling you to program or
edit a show on your laptop using any Art-Net visualiser, and then load this
straight into any Titan console.
This document will get you started on Titan One, but remember all the features of the
software are identical to those on our other consoles, so you can use the console
manuals to get more in depth with the features.
We also offer free of charge Titan training at Avolites HQ in London – email
[email protected] for more details, and we run regular Masterclasses around the UK.
If you’re international, then check out our distributor page on our website:
http://www.avolites.com/Distributors/Findyournearestdealer.aspx
We also have a dedicated forum for Titan One users:
http://www.avolitesshop.co.uk/phpBB2/viewforum.php?f=12&sid=f9dd22a15b364869cf5
9509f1f379cc3
This guide is designed to be used with the free downloadable Light Converse Theatre
called ‘Titan One Theatre’, but of course if you have real fixtures, do use those instead!
The Light Converse file can be found here:
http://lightconverse.net/lc/download-l.htm
What you will need to run through this tutorial:
-
A PC with Titan One installed and activated
The Light Converse Titan One demo theatre installed (or real lights!)
A beverage of your choice
Please remember that if you do not have the dongle plugged in, then the software will
output a DMX spoiler every minute or so. Once you have the dongle plugged in, this
disappears.
Enjoy!
Avolites Ltd
184 Park Avenue, Park Royal, London, NW10 7XL, England.
Switchboard: +44 (0) 208 965 8522 Sales Direct: +44 (0) 208 955 9220 Fax: +44 (0) 208 965 0290
www.avolites.com
Page |5
2
Layout
Titan One has been specially designed so that everything is available on a single touch
screen. All the functions of the regular consoles are available, plus a few extras to help
you move around the virtual console more easily, i.e. virtual faders and encoders.
Avolites Ltd
184 Park Avenue, Park Royal, London, NW10 7XL, England.
Switchboard: +44 (0) 208 965 8522 Sales Direct: +44 (0) 208 955 9220 Fax: +44 (0) 208 965 0290
www.avolites.com
Page |6
3
Getting Started – New Show and Patching
1. To start a new show, go to [Disk], then press [New Show] and hit [Ok]. You will now
have an empty showfile, with four default workspaces.
2. Now to start patching, press the [Patch] button. Press Softkey G [Patch View]. You
have two tabs – “Patched Fixtures” and “Personality List”. As we have no fixtures
patched into the desk yet, select “Personality List”.
3. Click on the search bar, and search for Generic Dimmer. Choose the personality with
one DMX channel from the list, and make sure you set the correct DMX Line and
Address. Once you have done this, press the ‘Patch Generic Dimmer’ option on the
softkeys.
The Patch List is as follows:
Quantity
DMX Start
Address
Manufacturer
Fixture
Mode
4
1
Generic
Dimmer
1
channel
8
5
Robe
Robin 600e
Spot
Mode 2
24
205
Generic
RGB
1 x RGB
cell
As with any other Titan console, make sure the modes and addresses match those of
the patch list, otherwise you are telling the console you are connected to the wrong
fixture for the demo theatre. Make sure you exit Patch before trying to select fixtures by
right clicking [Avo] and pressing [Exit]
Avolites Ltd
184 Park Avenue, Park Royal, London, NW10 7XL, England.
Switchboard: +44 (0) 208 965 8522 Sales Direct: +44 (0) 208 955 9220 Fax: +44 (0) 208 965 0290
www.avolites.com
Page |7
When you have patched all your fixtures in, your ‘Patched Fixtures’ tab should look like
this:
4. Each fixture has its own colour code
5. Each DMX line has a usage bar
6. The bar at the top of the screen shows how much of the universe is used up/free. In
the main body of the window, you get a breakdown for each fixture which tells you
the mode it’s in, what its address is, the legend, where it’s patched to, whether it’s
frozen, or pan/tilt inverted. When you press ‘View’, you get more detailed
information about that fixture, including dip switch view:
Avolites Ltd
184 Park Avenue, Park Royal, London, NW10 7XL, England.
Switchboard: +44 (0) 208 965 8522 Sales Direct: +44 (0) 208 955 9220 Fax: +44 (0) 208 965 0290
www.avolites.com
Page |8
4
4.1
Groups
Auto groups
At the moment, “Autogroup” is turned on in the Patch options, so if you go to the
Fixtures and Groups Workspace, your page will look like this:
Auto groups create a master group for every new fixture type you have patched (i.e. All
Robin 600e Spot), so that every time you patch more of the same fixture, they are
added to this group, and also quantity groups, so every time you patch a quantity
greater than 1, a group will be created for this.
4.2
Editing/Creating Groups:
To delete a group, press [Delete] on the Function keys and then double tap to delete a
group. This delete syntax works the same for deleting everything on the console except
fixtures ([Patch] + [Delete]) and workspaces ([View] + [Delete])
To rename a group, for example the [4 x Dimmer] to [All Par 64], use Softkey C [Set
Legend] and the tap the group to rename. This way of renaming items is the same
across the whole platform.
To make a new group, for example the floor spots, select the fixtures you want in the
group (in this case, the last 4 spots you patched in), then simply click an empty group
button and give it a name, then press [Enter] or tap it again.
Avolites Ltd
184 Park Avenue, Park Royal, London, NW10 7XL, England.
Switchboard: +44 (0) 208 965 8522 Sales Direct: +44 (0) 208 955 9220 Fax: +44 (0) 208 965 0290
www.avolites.com
Page |9
5
5.1
Workspaces
Creating your own workspace
The buttons down the left hand side of the screen are your workspaces. To save your
own, simply arrange windows as you want them, then click into an empty workspace
button, give it a name then press [Enter].
Softkey G [Open Workspace Window] will give a list of available windows to open.
1. Under the ‘I’, there are arrangement options including size and position of window,
and button and text size.
6
6.1
Controlling Fixtures
Simple Commands
To lamp on your fixtures, select them and then press [ML Menu], and select the [Macros]
option from this list.
To turn on your fixtures, press [Locate]. This puts the fixture to a home position and
default values, but puts no information into the programmer. To clear this information
from the programmer, press [Clear] – this will put your fixtures to zero (provided there
is no dimmer information for them coming from playbacks), but leave other values in
their current state.
For people who are used to [Clear] releasing the attributes and working with “@full”
commands, if you right click the [Clear] button then Softkey D reads [Clear Options]. In
Avolites Ltd
184 Park Avenue, Park Royal, London, NW10 7XL, England.
Switchboard: +44 (0) 208 965 8522 Sales Direct: +44 (0) 208 955 9220 Fax: +44 (0) 208 965 0290
www.avolites.com
P a g e | 10
this menu you can toggle Sofykey C between [Freeze Current Values] and [Release to
Playback Values]. If you want to always put dimmer information into the programmer
when you turn a fixture on, then press [@] twice to send the fixture to full.
Once your fixtures are on, you have two ways to control them – using the wheels or the
Attribute Control Window.
If you are using the wheels, then you can change attribute bank using the letters above
the virtual encoders. As soon as you change a value, it will have a cyan circle around the
letter, indicating that the value is now in the programmer. You can use the up/down
arrows on the attribute to send a percentage value to 100/0, or to jump between a
range, you can type a value in and then select where to assign it on the Softkeys, or you
can use the virtual encoder above the attribute.
6.2
Attribute Control Window
With the Attribute Control Window, this will list every attribute the fixture has on the left
hand side. This includes a full colour picker for CMY/RGB fixtures, visual keystoning and
blade control for media servers, fixtures with internal shutters or virtual barn doors, and
video thumbnail previews for media servers that talk CITP (Ai, Hippotizer, Arkaos,
Screen Monkey, Robe Digispot).
Avolites Ltd
184 Park Avenue, Park Royal, London, NW10 7XL, England.
Switchboard: +44 (0) 208 965 8522 Sales Direct: +44 (0) 208 955 9220 Fax: +44 (0) 208 965 0290
www.avolites.com
P a g e | 11
If you select a percentage value and hold down, a slide bar will appear.
As with using the encoders, as soon as you change a value it will highlight in cyan,
indicating it is in the programmer. If you then want to take this attribute out of the
programmer, click it again and it will go grey.
6.3
Highlight
Highlight will let you see fixtures one at a time, very useful for creating positions where
you want to be able to see where the rest of your fixtures are, but still be able to see
which one you are controlling.
Select the group of Spots, then press [Highlight] and use the [Fix +1] and [Fix -1] to
step through the fixtures.
7
7.1
Creating Palettes
Palette Types
A palette can be one of two types, either shared or normal.
A shared palette takes one piece of information, such as the colour mixing values for
red, and shares it across all fixtures of the same type. This means that if I save a shared
colour palette using one of the Spots then the rest of the Spots can use it, because they
are exactly the same fixture, in exactly the same mode. If I then selected an LED parcan
and tried to use that colour palette, as it is a different fixture then it will not be able to
use that colour information. So, to create a colour palette for blue for all my fixtures, I
would select at least one of each type of fixture, set them all to blue and then save it. As
long as the fixtures of the same type all have the same value, the console will
automatically save it as shared. As it is a shared palette, if I then add more fixtures of
the same type into the showfile, they will immediately be able to use the shared values.
A normal palette will save each light in the programmer’s individual value into the
palette. This is mainly used for position palettes. If I point 4 fixtures at the centre vocals
spot, they will all have different values for pan and tilt, and a normal palette will save
these individual values for you. However, this means that the palette will only work for
the fixtures that have values in the programmer when you save the palette. If you wish
to add more fixtures into the palette later on you will need to update it.
7.2
Creating a Shared Palette
To create a shared colour palette:
First, press [Clear], then select at least one Spot and at least one LED parcan, and press
[Locate]. Using the attribute editor, set the fixtures to red. See that the colour values
above the encoder wheels are highlighted, showing that it is in the programmer. Now,
open the Groups and Palettes workspace and double tap into an empty space in the
Colour palette window. Where the palette has been saved, there is a ‘C’ for colour
Avolites Ltd
184 Park Avenue, Park Royal, London, NW10 7XL, England.
Switchboard: +44 (0) 208 965 8522 Sales Direct: +44 (0) 208 955 9220 Fax: +44 (0) 208 965 0290
www.avolites.com
P a g e | 12
information under the legend, and the ‘S’ in the top right corner indicates a shared
palette. Auto legend has provided the colour picker information from the colour picker.
7.3
Creating a Normal Palette
To create a normal position palette:
Press [Clear], select just the 4 floor spots and press [Locate] and move them into a
drummer position. You can do this using [Fan] and [Highlight] to fine tune. Now click
into an empty palette in the Position window and call it ‘Drums’. The ‘P’ for position is lit
up, and the ‘N’ in the top right demonstrates that this is a Normal palette.
Now because you have only moved these 4 fixtures onto the drummer, only these 4
have values in the palette – select all spots, locate them and then apply the Drums
palette you just made – only those 4 floor spots will move. You will need to move all of
your lights individually onto each position and then save it.
7.4 Quick Sketch
If you want to create a custom legend for a palette, group or anything else on the
console, you can use Quick Sketch. To get to this, press [Set Legend] and then choose
the palette to name. Now choose the [Picture] option on Softkey B:
Avolites Ltd
184 Park Avenue, Park Royal, London, NW10 7XL, England.
Switchboard: +44 (0) 208 965 8522 Sales Direct: +44 (0) 208 955 9220 Fax: +44 (0) 208 965 0290
www.avolites.com
P a g e | 13
8
8.1
Recording Cues
Record Modes
There are three main recording modes to create a cue or memory:
Channel mode - records only the channels you have changed for the fixtures in the
programmer. Does not record values taken from [Locate]
Fixture mode - Stores all the channels for all the fixtures you have selected since last
clearing the programmer, regardless of whether you have changed all the attributes or
not
Stage mode - records all the channels for all patched fixtures which have a dimmer value
of more than 0, or which have been selected since the last clear, regardless of whether
that information comes from the programmer or from playbacks
Try this:
Press [Clear], then select the All Spots group and press [Locate]. Apply a band position
palette and a colour palette. On the display above the wheels only position and colour
information are in the programmer. Press [Record], choose [Create Memory] and on
Softkey A that you can choose between channel/fixture/stage mode. Now record this
information in both Channel and Fixture mode onto 2 separate playbacks.
Press [Clear] and repeat this process with the same group of fixtures, this time with an
audience position palette and a gobo palette. Press [Locate] and [Clear]. You should now
have ended up with 4 cues, 2 in Channel Mode and 2 in Fixture Mode.
Fire the first fixture mode cue by dragging up the virtual fader. You’ll see that that it’s
recorded a value for everything, even dimmer, even though dimmer wasn’t in the
programmer. With this still up, fire the second fixture mode cue. Now even though
colour wasn’t in the programmer, the console recorded its current value, which was open
white, so it has overridden it with open white. Fixture is the safest record mode, as the
lights that you have been using will always go to the state when you recorded them,
regardless of what they were doing before.
Select the fixtures, press [Locate] then [Clear]
Fire the first channel mode cue. The console is only being told to change position and
colour information, it has not saved anything else – even though locate puts dimmer at
full, it wasn’t in the programmer so wasn’t saved into the cue. Select the fixtures and
put dimmer to full using the dimmers channel, NOT [Locate], proving that the desk is
playing back the values that have been saved.
Select the fixtures, press [Locate] then [Clear]
Repeat this for the second record by channel playback.
Select the fixtures, press [Locate] then [Clear]
The console has not saved zero values for the other channels in the cue, it’s just
completely ignored them. Now, fire the first fixture mode cue, then with this up, fire the
Avolites Ltd
184 Park Avenue, Park Royal, London, NW10 7XL, England.
Switchboard: +44 (0) 208 965 8522 Sales Direct: +44 (0) 208 955 9220 Fax: +44 (0) 208 965 0290
www.avolites.com
P a g e | 14
second channel mode cue. Because the second cue only contains values for position and
gobo, it will carry the last value for colour through, as it has nothing to change it with.
Now, have a go at record by Stage by keeping these playbacks up, then adding blinders
information on top in the programmer and saving this first by Fixture, then the same
information in Stage.
Select the fixtures, press [Locate] then [Clear]
Now, fire the record by Fixture playback you just created – this has only saved the
information in the programmer – ie the blinders.
Kill this one, and fire the Stage playback – you’ll see that it has captured everything that
was above 0 intensity, regardless of whether the information came from the programmer
or playbacks.
8.2
Tips
-
-
-
To update a cue, simply make the changes you want to it, and then press
[Record] and double tap the cue you want to merge into. When you merge
information into a new cue, it will always merge in Record by Channel.
When you [Merge] a cue, the new information is added in on top of the
existing cue information. When you [Replace] a cue, you are effectively
deleting and creating a new cue with only the new information in.
To move an item, press [Move], select the item to move and then select the
new location.
To copy an item, press [Copy], select the item to copy and then select
another location
Playbacks also have the option to be [Link] copied, meaning if one playback is
updated then all the ones linked to it will be also.
Avolites Ltd
184 Park Avenue, Park Royal, London, NW10 7XL, England.
Switchboard: +44 (0) 208 965 8522 Sales Direct: +44 (0) 208 955 9220 Fax: +44 (0) 208 965 0290
www.avolites.com
P a g e | 15
9
Basic Timings
9.1 Timing Menu
By default, all LTP channels will snap to the final cue position as soon as you fire the
fader, and dimmer control is on the fader. To change this, press [Edit Times], then press
the playback you wish to edit.
9.2
Attribute Timings
You can also get to Attribute group timings (eg all colour channels) by pressing the
button above the encoders ( [C] in this case).
To get to a breakdown of every individual attribute for every fixture, press the [View]
button:
Avolites Ltd
184 Park Avenue, Park Royal, London, NW10 7XL, England.
Switchboard: +44 (0) 208 965 8522 Sales Direct: +44 (0) 208 955 9220 Fax: +44 (0) 208 965 0290
www.avolites.com
P a g e | 16
The dashes mean that channel is currently using global times.
When you have finished editing times, simply press exit – the console saves changes as
you make them.
Avolites Ltd
184 Park Avenue, Park Royal, London, NW10 7XL, England.
Switchboard: +44 (0) 208 965 8522 Sales Direct: +44 (0) 208 955 9220 Fax: +44 (0) 208 965 0290
www.avolites.com
P a g e | 17
10
10.1
Simple Effects – Shape Generator
Creating a Shape
Depending on what you want to achieve, we have two effects engines in Titan – a shape
generator for more simple effects, and a pixel mapper for more complex ones.
With shape generator, there are 3 parameters you can change for any shape – size,
speed and spread, and the shapes are arranged by category. Go to [Shapes and Effects]
and then choose [Shape Generator].
First, select some fixtures, [Locate] them and then select [Create].
10.2
Saving a Shape
Once you have an effect you are happy with, you can then use [Record] to save it into a
playback. If you use Record by Channel then you can overlay this effect onto whatever
playback is currently active.
Under [Playback Options] on Softkey B in the root menu, you can toggle whether a
shapes size and/or speed is being controlled on a fader.
You can also record shapes as palettes into the Shapes and Effects Window. For more
detail on this, please refer to a Titan manual.
Avolites Ltd
184 Park Avenue, Park Royal, London, NW10 7XL, England.
Switchboard: +44 (0) 208 965 8522 Sales Direct: +44 (0) 208 955 9220 Fax: +44 (0) 208 965 0290
www.avolites.com
P a g e | 18
11 Recording Chases
11.1
Starting Recording a Chase
Chases obey exactly the same rules of recording as normal cues do
(Channel/Fixture/Stage), you are just recording a series of cues to loop in sequence onto
a single handle. When you press [Record] and choose [Create Chase], then the first time
you press a playback button, you are only assigning a handle for a chase. In order to
record your first step, you must then press the button again.
11.2
Editing a Chase
A chase will not track like a cue list will, and the chase direction and link options can be
customised under [Playback Options].
To edit a chase, press [Unfold] and then choose the playback to edit – each step of the
chase will then be laid out on a fader for you to edit. When you have finished editing,
press [Unfold] again and this will put it back.
Avolites Ltd
184 Park Avenue, Park Royal, London, NW10 7XL, England.
Switchboard: +44 (0) 208 965 8522 Sales Direct: +44 (0) 208 955 9220 Fax: +44 (0) 208 965 0290
www.avolites.com
P a g e | 19
12
Cue Lists
12.1 Tracking
By default cue lists operate with tracking, this can be turned off under [Playback
Options]. Having tracking turned on means that the cue list only records the changes
you make, which is very useful for updating. For example, if in Cue 1, you set the colour
to red, and then change the colour again in Cue 5 to blue, the red information is only
actually saved in Cue 1, and is tracked through Cues 2 – 4. Therefore, if you change Cue
1 to yellow, this change will also track, so Cues 1 – 4 are now yellow, but Cue 5 remains
blue.
12.2 How to Record
There are two syntaxs that can be used to record cue lists – the same way as for
recording chases, and a more theatre style one. To use the theatre style one, the syntax
is as follows when in record mode for a cue list:
Set the look up first -> [Record] -> [Cue] # -> [Enter]
You can also use the [Append Step] button whilst in record mode.
12.3
Editing
When you have finished recording, press [Exit] to quit. There are a number of things to
customise under [Playback Options] including the fader mode, tracking and Move In
Dark Options.
Avolites Ltd
184 Park Avenue, Park Royal, London, NW10 7XL, England.
Switchboard: +44 (0) 208 965 8522 Sales Direct: +44 (0) 208 955 9220 Fax: +44 (0) 208 965 0290
www.avolites.com
P a g e | 20
If you press [View] and then choose the cue list, you will get the following display
appear:
When you have a cue list connected, to update a live step, press [Record] [Cue] then
choose from softkeys or [Cue] again to merge into current step.
To update a cue time, press [Live Time] to go into the current steps time. To edit a
different cue, specify on Softkey A. If you then press an attribute button such as [C] for
colour it will take you straight to colour timings.
Avolites Ltd
184 Park Avenue, Park Royal, London, NW10 7XL, England.
Switchboard: +44 (0) 208 965 8522 Sales Direct: +44 (0) 208 955 9220 Fax: +44 (0) 208 965 0290
www.avolites.com
P a g e | 21
12.4
Tips
-
-
Autoloads will not track, if they are to be used in consecutive cues they should
be autoloaded into all required cues
The default behaviour of a cue list is that when the fader is brought to zero, it
will remain connected in the current cue. To kill it, press [Off] then the cue
list. To make it always kill at zero, in [Playback Options] set [Fader Mode –
Kill at 0]
If you do not like working with tracking consoles, simply turn tracking to
[Tracking Off] under [Playback Options]
There is a global Move In Dark setting under [Playback Options]. If you want
a single cue to be a live move, set that particular cue to [MID – Disabled]
Right clicking [Avo] and pressing [Next Time] will snap back to the previous
cue
The blue and grey key functionality can be customised using the [Key Profiles]
option under [Playback Options]
Pressing [Cue] -> # -> [Enter] specifies the next cue to be fired
Pressing [Cue] -> # -> [Go] immediately fires that cue
To copy a cue from the active cue list, press: [Copy] -> [Cue] -> [#] -> [@]
-> new [#]
Avolites Ltd
184 Park Avenue, Park Royal, London, NW10 7XL, England.
Switchboard: +44 (0) 208 965 8522 Sales Direct: +44 (0) 208 955 9220 Fax: +44 (0) 208 965 0290
www.avolites.com
P a g e | 22
13
13.1
Advanced Effects - Pixelmapping
Creating a Layout
To create more complex and customisable effects, use Pixel Mapper. The layout is done
on a group basis, so you could have the same fixtures in multiple layouts for different
effects.
First create a group, and then go to [Shapes and Effects] -> [Pixel Mapper] -> [Edit
Group Layout]
Avolites Ltd
184 Park Avenue, Park Royal, London, NW10 7XL, England.
Switchboard: +44 (0) 208 965 8522 Sales Direct: +44 (0) 208 955 9220 Fax: +44 (0) 208 965 0290
www.avolites.com
P a g e | 23
13.2
Creating an Element
When you have done this, the next time you select the group it will always apply this
layout to it. Now locate them, and go to the workspace labelled [Effect Editor]:
Create an element, and you then have lots of modifiers, including XY for positioning,
width and height for stretching the element etc:
Avolites Ltd
184 Park Avenue, Park Royal, London, NW10 7XL, England.
Switchboard: +44 (0) 208 965 8522 Sales Direct: +44 (0) 208 955 9220 Fax: +44 (0) 208 965 0290
www.avolites.com
P a g e | 24
The colour of the layer is available under the master Layer controls (Layer 1, Layer 2
etc)
13.3
Adding Animation
Once you’ve made and adjusted your element, add an animation:
Have a go at layering up different animations with each other, different colours of the
same element moving in opposite directions, and especially the draw your own tab –
creating custom colour shapes is now incredibly easy.
13.4
Recording the Effect
Once you’re happy with your effect, you can save it into a cue, chase or cue list with the
same regular record modes. Remember, if you are using Channel, then dimmer will not
be saved unless it is in the programmer.
14
Saving your show
Don’t forget to regularly backup your show – press [Disk] then [Save Show]. You can
save to either USB or the internal hard drive of your PC. Showfiles can be transferred
between all consoles, so you could then load your show into the Tiger Touch.
There is also an Autosave feature which can be configured under [Disk]. We would
recommend turning this off whilst running a show for optimum performance.
15
Have Fun!
Remember, this is only a Quick Start Guide. It by no means details everything the Titan
Software is capable of (we have a manual for that), but it should hopefully have helped
you to find your feet if you’re new to the Titan platform.
Enjoy the software, and remember there are resources online to help you out – the
dedicated Titan One forum on our website being the main one. Don’t forget about
training – for a full day on a console, contact either [email protected] in the UK, or
your local distributor if you’re international.
Avolites Ltd
184 Park Avenue, Park Royal, London, NW10 7XL, England.
Switchboard: +44 (0) 208 965 8522 Sales Direct: +44 (0) 208 955 9220 Fax: +44 (0) 208 965 0290
www.avolites.com