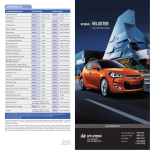
1
ENGLISH 2011 MODEL Car Navigation System OWNER’S MANUAL 2011 Veloster Please read this manual carefully before operating your set and retain it for future reference. Designs and specifications are subject to change without prior notice. Overall Navigation: 1-888-599-6284 XM Radio: 1-800-967-2346 (USA) XM Radio: 1-877-438-9677 (CANADA) Map & Map Updates: 1-888-757-0010 Web site: www.mapnsoft.com Table of contents General information 13 Safety notes . . . . . . . . . . . . . . . . . . . . . . . . . . . . . . . . . . . . . . . . . . . . . . . . . . . . . . 13 NOTES ON COPYRIGHTS . . . . . . . . . . . . . . . . . . . . . . . . . . . . . . . . . . . . . . . . . . . 15 FCC Information . . . . . . . . . . . . . . . . . . . . . . . . . . . . . . . . . . . . . . . . . . . . . . . . . . . 16 Types of Playable Discs . . . . . . . . . . . . . . . . . . . . . . . . . . . . . . . . . . . . . . . . . . . . . 16 Handling discs . . . . . . . . . . . . . . . . . . . . . . . . . . . . . . . . . . . . . . . . . . . . . . . . . . . . 17 Name of each component 18 Control Panel . . . . . . . . . . . . . . . . . . . . . . . . . . . . . . . . . . . . . . . . . . . . . . . . . . . . . 18 Steering wheel remote control . . . . . . . . . . . . . . . . . . . . . . . . . . . . . . . . . . . . . . 20 Basic operation 21 Start-up screen . . . . . . . . . . . . . . . . . . . . . . . . . . . . . . . . . . . . . . . . . . . . . . . . . . . 21 Turning the unit on . . . . . . . . . . . . . . . . . . . . . . . . . . . . . . . . . . . . . . . . . . . . . . . . . 21 Turning the unit off . . . . . . . . . . . . . . . . . . . . . . . . . . . . . . . . . . . . . . . . . . . . . . . . 21 Inserting a disc . . . . . . . . . . . . . . . . . . . . . . . . . . . . . . . . . . . . . . . . . . . . . . . . . . . . 21 Ejecting a disc . . . . . . . . . . . . . . . . . . . . . . . . . . . . . . . . . . . . . . . . . . . . . . . . . . . . 21 Adjusting the volume . . . . . . . . . . . . . . . . . . . . . . . . . . . . . . . . . . . . . . . . . . . . . . . 21 Rear view camera . . . . . . . . . . . . . . . . . . . . . . . . . . . . . . . . . . . . . . . . . . . . . . . . . . 21 2 Table of contents INFO/SETUP 22 INFO/SETUP menu overview. . . . . . . . . . . . . . . . . . . . . . . . . . . . . . . . . . . . . . . . 22 General operations of "INFO/SETUP" menu . . . . . . . . . . . . . . . . . . . . . . . . . . . 22 Sound . . . . . . . . . . . . . . . . . . . . . . . . . . . . . . . . . . . . . . . . . . . . . . . . . . . . . . . . . . 22 Fader/Balance................................................................................................................ 22 Bass/Mid (Middle)/Tre (Treble) ................................................................................. 23 Variable EQ ..................................................................................................................... 23 AVC (Auto Volume Control) ....................................................................................... 23 Beep ................................................................................................................................ 23 Welcome Sound ........................................................................................................... 23 Display . . . . . . . . . . . . . . . . . . . . . . . . . . . . . . . . . . . . . . . . . . . . . . . . . . . . . . . . . . 24 Display Setup ................................................................................................................. 24 Brightness Setup .......................................................................................................... 24 Screen Ratio .................................................................................................................. 24 Display Off ...................................................................................................................... 24 Navigation . . . . . . . . . . . . . . . . . . . . . . . . . . . . . . . . . . . . . . . . . . . . . . . . . . . . . . . 25 Main ................................................................................................................................ 25 Map Display.................................................................................................................... 25 Travel Time ..................................................................................................................... 26 Default ............................................................................................................................. 26 Aviod Area ...................................................................................................................... 26 Bluetooth. . . . . . . . . . . . . . . . . . . . . . . . . . . . . . . . . . . . . . . . . . . . . . . . . . . . . . . . 28 Auto Connection .......................................................................................................... 28 Auto Download .............................................................................................................. 28 Streaming Audio........................................................................................................... 29 Advanced Setup ........................................................................................................... 29 Voice Recognition. . . . . . . . . . . . . . . . . . . . . . . . . . . . . . . . . . . . . . . . . . . . . . . . . 30 Screensaver . . . . . . . . . . . . . . . . . . . . . . . . . . . . . . . . . . . . . . . . . . . . . . . . . . . . . 30 3 Table of contents Clock . . . . . . . . . . . . . . . . . . . . . . . . . . . . . . . . . . . . . . . . . . . . . . . . . . . . . . . . . . . . 31 Time Setup...................................................................................................................... 31 Date Setup ...................................................................................................................... 31 Clock Type ....................................................................................................................... 31 Language . . . . . . . . . . . . . . . . . . . . . . . . . . . . . . . . . . . . . . . . . . . . . . . . . . . . . . . . 31 Valet Mode . . . . . . . . . . . . . . . . . . . . . . . . . . . . . . . . . . . . . . . . . . . . . . . . . . . . . . 32 Temperature . . . . . . . . . . . . . . . . . . . . . . . . . . . . . . . . . . . . . . . . . . . . . . . . . . . . . 32 Theme . . . . . . . . . . . . . . . . . . . . . . . . . . . . . . . . . . . . . . . . . . . . . . . . . . . . . . . . . . 32 Gracenote . . . . . . . . . . . . . . . . . . . . . . . . . . . . . . . . . . . . . . . . . . . . . . . . . . . . . . . 32 XM Data . . . . . . . . . . . . . . . . . . . . . . . . . . . . . . . . . . . . . . . . . . . . . . . . . . . . . . . . 33 Stocks Data Service Information .............................................................................. 33 Sports Data Service Information .............................................................................. 34 Weather data Service Information ........................................................................... 34 Blue Link . . . . . . . . . . . . . . . . . . . . . . . . . . . . . . . . . . . . . . . . . . . . . . . . . . . . . . . . 35 Eco-Coach . . . . . . . . . . . . . . . . . . . . . . . . . . . . . . . . . . . . . . . . . . . . . . . . . . . . . . 36 Blue Max . . . . . . . . . . . . . . . . . . . . . . . . . . . . . . . . . . . . . . . . . . . . . . . . . . . . . . . . 36 Software Information . . . . . . . . . . . . . . . . . . . . . . . . . . . . . . . . . . . . . . . . . . . . . . .37 Help . . . . . . . . . . . . . . . . . . . . . . . . . . . . . . . . . . . . . . . . . . . . . . . . . . . . . . . . . . . . .37 Getting started with navigation 38 What is GPS? . . . . . . . . . . . . . . . . . . . . . . . . . . . . . . . . . . . . . . . . . . . . . . . . . . . . 38 About satellite signals . . . . . . . . . . . . . . . . . . . . . . . . . . . . . . . . . . . . . . . . . . . . . 38 Acquiring satellite signals . . . . . . . . . . . . . . . . . . . . . . . . . . . . . . . . . . . . . . . . . . 38 Initial navigation screen . . . . . . . . . . . . . . . . . . . . . . . . . . . . . . . . . . . . . . . . . . . . 38 Indicators of the map screen . . . . . . . . . . . . . . . . . . . . . . . . . . . . . . . . . . . . . . . 38 Route guidance screen . . . . . . . . . . . . . . . . . . . . . . . . . . . . . . . . . . . . . . . . . . . . 40 Registering the shortcut icon . . . . . . . . . . . . . . . . . . . . . . . . . . . . . . . . . . . . . . . . 41 Shortcut icons ................................................................................................................ 41 Deleting the registered shortcut icon . . . . . . . . . . . . . . . . . . . . . . . . . . . . . . . . . 42 Displaying the single/split map . . . . . . . . . . . . . . . . . . . . . . . . . . . . . . . . . . . . . . 42 4 Table of contents Changing the map scale . . . . . . . . . . . . . . . . . . . . . . . . . . . . . . . . . . . . . . . . . . . 42 Changing the route conditions . . . . . . . . . . . . . . . . . . . . . . . . . . . . . . . . . . . . . . 43 Adjusting the volume of the navigation voice guidance . . . . . . . . . . . . . . . . . . 43 Displaying/Hiding POI icons on the map screen . . . . . . . . . . . . . . . . . . . . . . . . 44 Editing POI icons .......................................................................................................... 44 Displaying/Hiding others POI icons on the map screen................................... 45 Finding the destination by searching for POI icons ........................................... 45 Displaying the XM traffic information . . . . . . . . . . . . . . . . . . . . . . . . . . . . . . . . . 46 Registering the current position in address book . . . . . . . . . . . . . . . . . . . . . . . 46 Scrolling map . . . . . . . . . . . . . . . . . . . . . . . . . . . . . . . . . . . . . . . . . . . . . . . . . . . . .47 Making a call to POI. . . . . . . . . . . . . . . . . . . . . . . . . . . . . . . . . . . . . . . . . . . . . . . .47 Destination input menu 48 Destination menu overview . . . . . . . . . . . . . . . . . . . . . . . . . . . . . . . . . . . . . . . . . 48 General operations of destination menu . . . . . . . . . . . . . . . . . . . . . . . . . . . . . . 48 Address Search . . . . . . . . . . . . . . . . . . . . . . . . . . . . . . . . . . . . . . . . . . . . . . . . . . 49 Previous destinations . . . . . . . . . . . . . . . . . . . . . . . . . . . . . . . . . . . . . . . . . . . . . . 50 Intersection . . . . . . . . . . . . . . . . . . . . . . . . . . . . . . . . . . . . . . . . . . . . . . . . . . . . . . 50 Coordinates. . . . . . . . . . . . . . . . . . . . . . . . . . . . . . . . . . . . . . . . . . . . . . . . . . . . . . . 51 POI Search . . . . . . . . . . . . . . . . . . . . . . . . . . . . . . . . . . . . . . . . . . . . . . . . . . . . . . . 51 Searching for POI by category or ZAGAT Restaurant Guide ........................... 51 Searching for POI by name ....................................................................................... 53 Address Book . . . . . . . . . . . . . . . . . . . . . . . . . . . . . . . . . . . . . . . . . . . . . . . . . . . . 53 Phone . . . . . . . . . . . . . . . . . . . . . . . . . . . . . . . . . . . . . . . . . . . . . . . . . . . . . . . . . . 54 Emergency . . . . . . . . . . . . . . . . . . . . . . . . . . . . . . . . . . . . . . . . . . . . . . . . . . . . . . 54 Home, Office, Favorite (User 1~4) places . . . . . . . . . . . . . . . . . . . . . . . . . . . . . 55 Finding your home ....................................................................................................... 55 Finding your office ....................................................................................................... 55 Finding your favorite (User 1~4) places ................................................................. 55 5 Table of contents Using the route menu 56 Route menu overview . . . . . . . . . . . . . . . . . . . . . . . . . . . . . . . . . . . . . . . . . . . . . . 56 General operations of route menu . . . . . . . . . . . . . . . . . . . . . . . . . . . . . . . . . . . 56 Cancel Route . . . . . . . . . . . . . . . . . . . . . . . . . . . . . . . . . . . . . . . . . . . . . . . . . . . . 56 Route Overview . . . . . . . . . . . . . . . . . . . . . . . . . . . . . . . . . . . . . . . . . . . . . . . . . . . 56 Starting Route Guidance ............................................................................................ 56 Editing waypoints ...........................................................................................................57 Route Info ....................................................................................................................... 58 Alternative Route .......................................................................................................... 58 Demo ............................................................................................................................... 59 Route Info . . . . . . . . . . . . . . . . . . . . . . . . . . . . . . . . . . . . . . . . . . . . . . . . . . . . . . . 59 Route Options . . . . . . . . . . . . . . . . . . . . . . . . . . . . . . . . . . . . . . . . . . . . . . . . . . . 59 Detour . . . . . . . . . . . . . . . . . . . . . . . . . . . . . . . . . . . . . . . . . . . . . . . . . . . . . . . . . . 60 Avoid streets . . . . . . . . . . . . . . . . . . . . . . . . . . . . . . . . . . . . . . . . . . . . . . . . . . . . . 60 Edit Waypoints . . . . . . . . . . . . . . . . . . . . . . . . . . . . . . . . . . . . . . . . . . . . . . . . . . . 60 Demo . . . . . . . . . . . . . . . . . . . . . . . . . . . . . . . . . . . . . . . . . . . . . . . . . . . . . . . . . . 60 My Places . . . . . . . . . . . . . . . . . . . . . . . . . . . . . . . . . . . . . . . . . . . . . . . . . . . . . . . . 61 Registering new address in address book...............................................................61 Editing an address of address book .........................................................................61 Deleting an address book .......................................................................................... 62 Registering home or office address ........................................................................ 62 Editing home or office address ................................................................................ 63 Deleting home or office address ............................................................................. 63 Registering favorite place ........................................................................................... 63 Editing favorite place ................................................................................................... 63 Deleting favorite place................................................................................................. 63 6 Table of contents Bluetooth handsfree 64 Understanding Bluetooth wireless technology . . . . . . . . . . . . . . . . . . . . . . . . . . 64 Pairing and connecting the unit and a bluetooth phone . . . . . . . . . . . . . . . . . 64 When there is no a paired phone on the unit ..................................................... 64 When there is a paired phone on the unit............................................................ 65 Converting Bluetooth Handsfree mode . . . . . . . . . . . . . . . . . . . . . . . . . . . . . . . 65 Viewing the connected device . . . . . . . . . . . . . . . . . . . . . . . . . . . . . . . . . . . . . . . 66 Disconnecting the bluetooth phone . . . . . . . . . . . . . . . . . . . . . . . . . . . . . . . . . . 66 Connecting the bluetooth phone . . . . . . . . . . . . . . . . . . . . . . . . . . . . . . . . . . . . 66 Deleting a connected phone . . . . . . . . . . . . . . . . . . . . . . . . . . . . . . . . . . . . . . . . .67 Making a call by entering phone number. . . . . . . . . . . . . . . . . . . . . . . . . . . . . . .67 Making a call by redialing . . . . . . . . . . . . . . . . . . . . . . . . . . . . . . . . . . . . . . . . . . .67 Answering/Rejecting a call . . . . . . . . . . . . . . . . . . . . . . . . . . . . . . . . . . . . . . . . . 68 Switching call to the mobile phone . . . . . . . . . . . . . . . . . . . . . . . . . . . . . . . . . . 68 Ending a call . . . . . . . . . . . . . . . . . . . . . . . . . . . . . . . . . . . . . . . . . . . . . . . . . . . . . 68 Using your Phone Book . . . . . . . . . . . . . . . . . . . . . . . . . . . . . . . . . . . . . . . . . . . . 69 Searching for phone book entries . . . . . . . . . . . . . . . . . . . . . . . . . . . . . . . . . . . . 69 Searching by name ...................................................................................................... 69 Searching by number .................................................................................................. 69 Call History List . . . . . . . . . . . . . . . . . . . . . . . . . . . . . . . . . . . . . . . . . . . . . . . . . . .70 Making a call from Call history ..................................................................................70 Making a call with speed dial numbers . . . . . . . . . . . . . . . . . . . . . . . . . . . . . . . .70 Saving phone number . . . . . . . . . . . . . . . . . . . . . . . . . . . . . . . . . . . . . . . . . . . . . .70 Adding phone number . . . . . . . . . . . . . . . . . . . . . . . . . . . . . . . . . . . . . . . . . . . . . 71 Editing phone book . . . . . . . . . . . . . . . . . . . . . . . . . . . . . . . . . . . . . . . . . . . . . . . .72 Deleting phone book . . . . . . . . . . . . . . . . . . . . . . . . . . . . . . . . . . . . . . . . . . . . . . .72 Downloading phone book . . . . . . . . . . . . . . . . . . . . . . . . . . . . . . . . . . . . . . . . . . .72 Phone Music . . . . . . . . . . . . . . . . . . . . . . . . . . . . . . . . . . . . . . . . . . . . . . . . . . . . . .73 Before playing Phone music ......................................................................................73 Starting Phone Music/ Selecting Phone music files ..........................................73 7 Table of contents Audio system (CD/MP3/WMA/USB/iPod/ Gracenote/Pandora) 74 Selecting a source . . . . . . . . . . . . . . . . . . . . . . . . . . . . . . . . . . . . . . . . . . . . . . . . .74 Playing an audio CD and MP3/WMA/USB/iPod files . . . . . . . . . . . . . . . . . . . . .74 Play/Pause.......................................................................................................................75 Skipping to the next track/file ...................................................................................75 Skipping to the previous track/file ...........................................................................75 Returning to the beginning of the current track/file...........................................75 Search ...............................................................................................................................75 Intro scanning . . . . . . . . . . . . . . . . . . . . . . . . . . . . . . . . . . . . . . . . . . . . . . . . . . . . .75 Repeat function . . . . . . . . . . . . . . . . . . . . . . . . . . . . . . . . . . . . . . . . . . . . . . . . . . .76 Random function . . . . . . . . . . . . . . . . . . . . . . . . . . . . . . . . . . . . . . . . . . . . . . . . . .76 Browsing through folders/files using (the) "List" menu. . . . . . . . . . . . . . . . . . . .76 Selecting an iPod song . . . . . . . . . . . . . . . . . . . . . . . . . . . . . . . . . . . . . . . . . . . . .77 Viewing detail information for MP3/WMA/iPod file. . . . . . . . . . . . . . . . . . . . . . .77 Using the Gracenote . . . . . . . . . . . . . . . . . . . . . . . . . . . . . . . . . . . . . . . . . . . . . . .78 Browsing the Gracenote using (the) "List" menu.................................................78 Auto Playlist ....................................................................................................................78 Using the Pandora . . . . . . . . . . . . . . . . . . . . . . . . . . . . . . . . . . . . . . . . . . . . . . . . 80 Thumbs up and thumbs down .................................................................................80 Bookmark ........................................................................................................................80 Browsing the Pandora using (the) "List" menu ...................................................80 8 Table of contents Radio operation 81 Listening to FM/AM radio . . . . . . . . . . . . . . . . . . . . . . . . . . . . . . . . . . . . . . . . . . . 81 Storing FM/AM broadcast frequency . . . . . . . . . . . . . . . . . . . . . . . . . . . . . . . . . . 81 Storing manually ............................................................................................................ 81 Auto store ........................................................................................................................ 81 Scanning FM/AM broadcast frequency . . . . . . . . . . . . . . . . . . . . . . . . . . . . . . . 82 Scanning all frequencies ............................................................................................ 82 Scanning preset frequencies..................................................................................... 82 Listening to XM radio. . . . . . . . . . . . . . . . . . . . . . . . . . . . . . . . . . . . . . . . . . . . . . 83 Selecting XM broadcast channel . . . . . . . . . . . . . . . . . . . . . . . . . . . . . . . . . . . . 83 Selecting a channel through preset ........................................................................ 83 Selecting with Channel Up/Down ............................................................................ 83 Selecting with Category Up/Down .......................................................................... 83 Selecting a channel through manual search ........................................................ 83 Selecting channel through channel/category list ................................................ 83 Selecting channel by directly inputting the channel number .......................... 84 Storing XM preset . . . . . . . . . . . . . . . . . . . . . . . . . . . . . . . . . . . . . . . . . . . . . . . . 84 Scanning XM broadcast channel . . . . . . . . . . . . . . . . . . . . . . . . . . . . . . . . . . . . 84 Photo system (USB) 85 Viewing a photo . . . . . . . . . . . . . . . . . . . . . . . . . . . . . . . . . . . . . . . . . . . . . . . . . . 85 Viewing slideshow . . . . . . . . . . . . . . . . . . . . . . . . . . . . . . . . . . . . . . . . . . . . . . . . . 85 Rotating a photo. . . . . . . . . . . . . . . . . . . . . . . . . . . . . . . . . . . . . . . . . . . . . . . . . . 85 Enlarging a photo . . . . . . . . . . . . . . . . . . . . . . . . . . . . . . . . . . . . . . . . . . . . . . . . . 86 Copying photo files to the storage device of the system . . . . . . . . . . . . . . . . . 86 Viewing the copyed photo files to the storage device of the system . . . . . . . . 86 Viewing photo file information . . . . . . . . . . . . . . . . . . . . . . . . . . . . . . . . . . . . . . . .87 Browsing through photo file using (the) "List" menu . . . . . . . . . . . . . . . . . . . . .87 9 Table of contents Auxiliary device operation 88 Using an AUX source . . . . . . . . . . . . . . . . . . . . . . . . . . . . . . . . . . . . . . . . . . . . . 88 Voice recognition system 89 Operating voice command . . . . . . . . . . . . . . . . . . . . . . . . . . . . . . . . . . . . . . . . . 89 Condition for voice command system.................................................................... 89 Basic operation for voice command control ......................................................... 89 Voice command Help .................................................................................................. 90 Searching destination by voice command ............................................................ 90 Making a call by voice command ............................................................................ 93 Using the Gracenote by voice command .............................................................. 94 Voice command list . . . . . . . . . . . . . . . . . . . . . . . . . . . . . . . . . . . . . . . . . . . . . . . 95 Command list of AV system ..................................................................................... 95 Command list of Gracenote .................................................................................... 100 Command list of Phone .............................................................................................101 Command list of XM data*...................................................................................... 102 Command list of Map* ............................................................................................. 102 Command list of Destination* ................................................................................ 104 Command list of Help............................................................................................... 105 Command list of Eco Coach* ................................................................................. 106 Common Command list........................................................................................... 106 Local Command list .................................................................................................. 106 POI Category list*........................................................................................................ 107 10 Table of contents Blue Link 108 Blue Link® . . . . . . . . . . . . . . . . . . . . . . . . . . . . . . . . . . . . . . . . . . . . . . . . . . . . . . .108 Using the Rearview Mirror Key . . . . . . . . . . . . . . . . . . . . . . . . . . . . . . . . . . . . . .108 Rearview mirror ........................................................................................................... 108 Safety and Security . . . . . . . . . . . . . . . . . . . . . . . . . . . . . . . . . . . . . . . . . . . . . . .109 Emergency Assistance (SOS) ..................................................................................109 Automatic Crash Notification (ACN) ......................................................................109 Stolen Vehicle Recovery.............................................................................................109 Vehicle Immobilization ...............................................................................................109 Vehicle Slowdown ........................................................................................................109 Downloading POI through the blueLink service center . . . . . . . . . . . . . . . . . . . 110 Sending your car position to a friend . . . . . . . . . . . . . . . . . . . . . . . . . . . . . . . . . 110 Car Management Information . . . . . . . . . . . . . . . . . . . . . . . . . . . . . . . . . . . . . . . .111 Eco-Coach ....................................................................................................................... 111 Automatic DTC (Diagnostic Trouble Code) Notification ....................................112 Recall and campaign advisor ....................................................................................112 Maintenance Alert Notification .................................................................................112 Blue Link Subscription . . . . . . . . . . . . . . . . . . . . . . . . . . . . . . . . . . . . . . . . . . . . . 112 Image encoder 113 Image conversion program . . . . . . . . . . . . . . . . . . . . . . . . . . . . . . . . . . . . . . . . . Installing the image conversion program . . . . . . . . . . . . . . . . . . . . . . . . . . . . . . GUI screen . . . . . . . . . . . . . . . . . . . . . . . . . . . . . . . . . . . . . . . . . . . . . . . . . . . . . . Using the image conversion program . . . . . . . . . . . . . . . . . . . . . . . . . . . . . . . . Checking the converted image . . . . . . . . . . . . . . . . . . . . . . . . . . . . . . . . . . . . . . 11 113 113 113 114 114 Table of contents Troubleshooting 115 Index 117 Trademarks and Licenses 119 12 General information Safety notes CAUTION RISK OF ELECTRIC SHOCK DO NOT OPEN CAUTION : TO REDUCE THE RISK OF ELECTRIC SHOCK, DO NOT REMOVE THE COVER (OR BACK). NO USER SERVICEABLE PARTS INSIDE. REFER SERVICING TO QUALIFIED SERVICE PERSONNEL. The lightning flash with the arrowhead symbol within an equilateral triangle is intended to alert the user about the presence of uninsulated dangerous voltage within the product’s enclosure that may be of sufficient magnitude to constitute a risk of electric shock. Always operate the vehicle in a safe manner. Do not become distracted by the vehicle while driving and always be fully aware of all driving conditions. Do not change settings or any functions. Pull over in a safe and legal manner before attempting such operations. When driving your vehicle, be sure to keep the volume of the unit low enough to allow you to hear sounds coming from the outside. To promote safety, certain functions are disabled unless the hand brake is on. Do not drop it and avoid heavy impacts at anytime. To reduce the risk of electric shock, do not remove the cover or back of this product. There are no user-serviceable parts inside. Refer servicing to qualified service personnel. The driver should not watch the monitor while driving. If the driver watches the monitor while driving, it may lead to carelessness and cause an accident. To reduce the risk of fire or electric shock, do not expose this product to dripping or splashing water, rain, or moisture. The exclamation point within an equilateral triangle is intended to alert the user to the presence of important operating and maintenance (servicing) instructions in the literature accompanying the appliance. 13 General information WARNING: Don't use a cellular phone when you are driving. You must stop at a safe place to use a cellular phone. The use of the navigation radio by no means relieves the driver of his/her responsibilities. The highway code must always be observed. Always observe the current traffic situation. The applicable traffic regulations and the prevailing traffic situation always take precedence over the instructions issued by the navigation system if they contradict one another. For traffic safety reasons, use the navigation system menus only before starting a journey or when the vehicle is stationary. In certain areas, one-way streets and turn off and entry prohibitions (e.g. pedestrian zones) are not recorded. In areas such as these the navigation system will issue a warning. Pay particular attention to one-way streets and turn off and entry restrictions. The current legal road traffic speed limit always takes priority over the values stored on the data CD. It is impossible to provide an assurance that the speed values of the navigation system will always match those of the current traffic regulations in every situation. Always observe the applicable legal speed limits the traffic regulations. The vehicle speedometer must always be given priority for display of the vehicle speed. Do not rely exclusively on the navigation system when attempting to locate an emergency service (hospital, fire service etc.). It cannot be guaranteed that all available emergency services in your vicinity are stored in the database. Use your own discretion and abilities to secure help in such situations. The navigation system does not take the relative safety of the suggested routes into consideration. Road blocks, building sites, height or weight restrictions, traffic or weather conditions or other influences which affect the route safety or travel time are not taken into consideration for the suggested routes. Use your own discretion in order to decide on the suitability of the suggested routes. 14 General information CAUTION: This product uses a Laser System. To ensure proper use of this product, please read this owner’s manual carefully and retain it for future reference. Should the unit require maintenance, contact an authorized service center. Performing controls, adjustments, or carrying out procedures other than those specified herein may result in hazardous radiation exposure. To prevent direct exposure to laser beam, do not try to open the enclosure. Visible laser radiation when open. DO NOT STARE INTO BEAM. CAUTION: CLASS 1M VISIBLE AND INVISIBLE LASER RADIATION WHEN OPEN DO NOT VIEW DIRECTLY WITH OPTICAL INSTRUMENTS. CAUTION: NOTES ON COPYRIGHTS Do not keep the navigation system running with the engine stopped. Doing so may discharge the vehicle battery. When you use the navigation system, always keep the engine running. When the driver wants to operate the navigation system, first park the vehicle in a safe location and set the parking brake. Operating the system while driving can distract the driver and may result in a serious accident. Do not disassemble or modify this system. If you do, it may result in accidents, fire, or electrical shock. Some states/provinces may have laws limiting the use of video screens while driving. Use the system only where it is legal to do so. Do not use your phone in private mode when you are driving. You must stop at a safe location to use it. 15 It is forbidden by law to copy, broadcast, show, broadcast via cable, play in public, or rent copyrighted material without permission. This product features the copy protection function developed by Macrovision. Copy protection signals are recorded on some discs. When playing the pictures of these discs on a unit, picture noise will appear. This product incorporates copyright protection technology that is protected by method claims of certain U.S. patents and other intellectual property rights owned by Macrovision Corporation and other rights owners. Use of this copyright protection technology must be authorized by Macrovision Corporation, and is intended for home and other limited viewing uses only unless otherwise authorized by Macrovision Corporation. Reverse engineering or disassembly is prohibited. General information FCC Information The Federal Communications Commission Radio Frequency Interference Statement includes the following warning: NOTE: This equipment has been tested and found to comply with the limits for a Class B digital device, pursuant to Part 15 of the FCC Rules. These limits are designed to provide reasonable protection against harmful interference in a residential installation. This equipment generates, uses, and can radiate radio frequency energy and, if not installed and used in accordance with the instructions, may cause harmful interference to radio communications. However, there is no guarantee that interference will not occur in a particular installation. If this equipment does cause harmful interference to radio or television recep-tion, which can be determined by turn-ing the equipment off and on, the user is encouraged to try to correct the interference by one or more of the following measures: Reorient or relocate the receiving antenna. Increase the separation between the equipment and receiver. Connect the equipment into an outlet on a circuit different from that to which the receiver is connected. Consult the dealer or an experienced radio/TV technician for help. This device complies with part 15 of the FCC Rules. Operation is subject to the following two conditions: (1) This device may not cause harmful interference, and (2) this device must accept any interference received, including interference that may cause undesired operation. Caution: Any changes or modifications in construction of this device which are not expressly approved by the party responsible for compliance could void the user’s authority to operate the equipment. This device complies with part 15 of the FCC Rules. Operation is subject to the following two conditions: (1) This device may not cause harmful interference, and (2) this device must accept any interference received, including interference that may cause undesired operation. 16 Types of Playable Discs This unit plays CD-R or CD-RW containing audio titles, MP3 or WMA files. Depending on the conditions of the recording equipment or the CD-R/RW disc itself, some CD-R/RW discs may not be able to play on the unit. Do not attach any seal or label to either side (the labeled side or the recorded side) of a disc. Do not use irregularly shaped CDs (e.g., heart-shaped or octagonal). It may result in malfunctions. General information Handling discs A defective or soiled disc inserted into the unit can cause sound to drop during playback. Handle the disc by holding its innerouter edges. Clean the disc before playback. Wipe the disc from the center outward with a cleaning cloth. Never use solvents such as benzine or alcohol to clean the disc. Do not touch the surface of the unlabeled side of the disc. Do not stick paper or tape etc. on the surface. Do not expose the disc to direct sunlight or excessive heat. This unit cannot play 8 cm disc (use 12 cm disc only). 17 Name of each component Control Panel 8. • POWER Button 1 17 2 3 4 16 15 5 14 6 13 Disc eject (Z) Button • Volume control knob (VOLUME) • Audio on/off Button 12 9 2. Press and hold this button for power ON status. Rotate to adjust the volume. 8 Disc slot Press this button for power OFF status. - Power off 7 1. - Power on 10 If you press this button on the Radio/ XM/ Media screen, the screen is changed into navigation screen. Press this button again to cancel it. 11 5. MEDIA Button Press to display the [Media] menu screen. Press to eject the inserted disc. 9. PHONE Button Press to operate Bluetooth Hands-Free function. 6. XM Button Selects the XM1/XM2/XM3 band. 3. RESET hole Press with thin object to reset the unit when it does not operate normally. Press this button to mute the sound in power on status. 7. LCD 4. FM/AM Button Selects the FM1/FM2/AM band. 18 Name of each component 10. ASEEK/TRACKD Button • Press: - FM/AM mode: automatically searches for the previous or next broadcast frequency and starts playing. - XM mode: receives the previous or next channel. - CD mode: plays the previous or next track. - MP3, USB mode : Plays the previous or next file. - iPod mode: plays the previous or next song. - Photo mode: plays the previous or next photo file. • Press and hold: - FM/AM mode: quickly moves through the frequencies while the button is pressed. Once released, automatically searches for broadcasts which can be received. - XM mode: quickly moves to the previous or next channel. - CD, MP3, USB, iPod mode: REW/FF playback. 11. INFO/SETUP Button Press to access the [Info/Setup] menu screen. 15. MAP/VOICE Button 12. TUNE Button - FM/AM mode: rotate to search for the desired frequency. • Press to display the map screen of the current location when in a different mode. - XM mode: rotate to search for the desired channel. • Press to repeat the voice guidance on the map screen. - CD mode: rotate to search for the desired track. Press the button to play the selected track. - MP3, USB mode : rotate to search for the desired file. Press the button to play the selected file. - iPod mode: rotate to search for the desired song. Press the button to play the selected song. - Photo mode: rotate to search for the desired photo file. Press the button to play the selected photo file. 13. DEST Button Press to enter destination menu. Various methods for entering a destination are available. 14. ROUTE Button You can modify the route conditions or confirm the route information from the vehicle location to the destination. 19 16. DISC IN indicator light (CD-IN) When a disc is inserted, the indicator is illuminated. 17. CLOCK Button • Press to display the clock, date and the outside temperature. • Press and hold to display to the [Clock Settings] menu. Name of each component Steering wheel remote control 3. 1 MODE VOL + 2 VOL - 3 4 5 6 Seek up/down (W/S) Button 4. • Press: Button Press to operate Bluetooth Hands-Free function. - FM/AM mode: receives the previous or next preset frequency. • Press to accept a call. - XM mode: receives the previous or next preset channel. • Press to make a call from last calls. - CD mode: plays the previous or next track. • Press and hold to switch the sound path during a call. - MP3, USB mode : Plays the previous or next file. (Hands free y phone) - iPod mode: plays the previous or next song. - Phone music: plays the previous or next music. 1. MODE Button Press to select a source. FM1 t FM2 t AM t DISC t USB or iPod t AUX t Phone Music t Pandora (USA only) t XM1 t XM2 t XM3 t FM1... If an unsupported DISC is inserted, if there is no disc, or if an external device (e.g. iPod, USB memory stick, etc.) has not been connected, the mode will not be recognized and automatically switch to the next mode. 5. Button Press to hang up a call. • Press and hold: - FM/AM mode: quickly moves through the frequencies while the key is pressed. Once released, automatically searches for broadcasts which can be received. - XM mode: quickly moves to the previous or next channel. - CD, MP3, USB, iPod mode: REW/FF playback. 2. Volume (VOL+/VOL-) Button Increases or decreases the volume level. 20 6. Button • Press to activate voice recognition mode. • Press and hold to cancel voice recognition. Basic operation Start-up screen Inserting a disc Rear view camera The unit starts after ignition switch is in ACC or ON position. Insert a disc into the disc slot and playback starts automatically. The rear view mode is displayed on the unit when the gearshift is moved to REVERSE (R) position. Ejecting a disc Rear view mode also allows you to check what is behind the vehicle. Press Z on the control panel. The disc is ejected from the loading slot. , Note Under certain conditions, the system start up time can be delayed (up to 20 seconds) after the ignition switch is placed in ACC or ON. Upon start-up, the system will default to the last previous mode used (e.g. AM/FM, XM, CD, etc.) prior to ignition off. Turning the unit on Press "POWER" on the control panel when the system is off. , Note When the unit is booted completely, the guide line is displayed on the screen. , Note , Note If the ejected disc is not removed in approximately 10 seconds, the disc is automatically inserted again into the loading slot. Adjusting the volume Rotate the volume knob (VOLUME) on the control panel. , Note When you turn the unit off, the current volume level is automatically memorized. Whenever you turn the unit back on, it operates at the memorized volume level. When you insert a disc into the disc slot, the unit is turned on automatically. Turning the unit off Press and hold "POWER" on the control panel when the system is on. 21 The rear view camera helps the driver when driving in reverse direction. Do not use this function for entertainment purposes. The object in rear view may appear closer or more distant than in reality. INFO/SETUP INFO/SETUP menu overview INFO/SETUP menu Setup Info Sound Display Navigation Bluetooth Voice Recognition Screensaver Clock Language Valet Mode Temperature Theme gracenote XM Data Blue Link (USA only) Eco-Coach (USA only) Blue Max Software Info Help General operations of "INFO/ SETUP" menu 4. Touch the desired settings then touch [Done] or [ ] to confirm your selection. , Note The system can be customized to make it easier for you to use. Touch 1. Turn the unit on. Press "MAP/VOICE" on the control panel to return to the current location map screen. 2. Press "INFO/SETUP" on the control panel. to return to the previous screen. Sound This menu describes sound settings. Fader/Balance 3. Touch the desired option. [Info] menu (USA) 1. Press [INFO/SETUP] > [Setup] > [Sound] > [Fader Balance]. 2. Select the desired options. [Setup] menu • Touch a or d to adjust the sound of the left and right speakers. • Touch w or s to adjust the sound of the front and rear speakers. [Info] menu (CANADA) • Touch [Default] to set it to the default settings. 22 INFO/SETUP Bass/Mid (Middle)/Tre (Treble) Variable EQ Beep 1. Press [INFO/SETUP] > [Setup] > [Sound] > [Bass/Mid/Tre]. 1. 1. Press [INFO/SETUP] > [Setup] > [Sound]. 2. Select the desired options. 2. Touch [Beep] to play a beep sound when you operate the touch screen. The indicator is illuminated. Touch [Beep] again to cancel it. 2. Press [INFO/SETUP] > [Setup] > [Sound] > [Variable EQ]. Select the desired options. • Touch a or d to adjust the Bass, Mid (Middle) or Tre (Treble). • [Normal]: Natural sound quality optimized for driver. • Touch [Default] to set it to the default settings. • [Dynamic]: Strong sound with enhanced bass and stereo. • [Concert]: Surround sound with concert hall ambience. AVC (Auto Volume Control) 1. Press [INFO/SETUP] > [Setup] > [Sound]. 2. Touch [AVC] to control automatically the audio volume according to the speed of the vehicle. The indicator is illuminated. Touch [AVC] again to cancel it. Welcome Sound 1. Press [INFO/SETUP] > [Setup] > [Sound] > [Welcome Sound]. 2. Touch [Modern], [Acoustic] or [Elegance] to play the welcome sound you set when the ignition switch is placed in the ACC ON position. Touch [Welcome Sound OFF] to cancel it. Touch [ 23 ] to hear the sound in advance. INFO/SETUP Display Brightness Setup Screen Ratio This menu describes display settings. 1. Press [INFO/SETUP] > [Setup] > [Display] > [Brightness Setup]. 1. Press [INFO/SETUP] > [Setup] > [Display] > [Screen Ratio]. Display Setup 2. Touch a or d to adjust the day and night brightness settings. 2. Select the desired options. 1. Press [INFO/SETUP] > [Setup] > [Display] > [Display Setup]. 2. Select the desired options. • [Full]: Displays the full screen. • [Automatic]: Adjusts the brightness according to the vehicle ambient light. • Set the [Display Setup] to [Daylight] to adjust the day brightness settings. • [16:9]: Displays the 16:9 screen with the black bar appeared at the top and bottom. • Set the [Display Setup] to [Night] to adjust the night brightness settings. • [4:3]: Displays the 4:3 screen with the black bar appeared at the left and right side. • [Daylight]: Keeps the screen brightness high regardless of the vehicle ambient light. Display Off • [Night]: Keeps the screen brightness low regardless of the vehicle ambient light. 24 1. Press [INFO/SETUP] > [Setup] > [Display]. 2. Touch [Display Off ] to turn off the screen. Touch the LCD to cancel it. INFO/SETUP Navigation This menu describes navigation settings. Main 1. Press [INFO/SETUP] > [Setup] > [Navigation] > [Main]. 2. Select the desired options. information on the map. - [Voice Prompt for traffic and flow warning]: Decides whether to provide voice guidance in front of Traffic Information. (On route - 5 mile) • [Distance and Time to]: - [DEST]: Displays the remaining or arrival time and distance to the destination. - [WPT]: Displays remaining or arrival time and distance to the waypoint. • [Estimated time of ]: - [Arrival Time]: Displays the arrival time to the destination or waypoint. - [Remain Time]: Displays remaining time to the destination or waypoint. • [Traffic Setup]: This allows you to set your XM traffic data service. 1. Press [INFO/SETUP] > [Setup] > [Navigation] > [Map Display]. 2. Select the desired options. - [Provide Traffic rerouting option]: Decides whether to provide rerouting option pop up in front of Traffic Information. (On route - 5 mile) • [Memory Point Alarm]: This allows a voice guidance announcement when you are near a registered point. Touch [On] or [Off ]. • [Unit]: Change the unit between the “mile” and “km”. Map Display • [Auto Zoom]: This allows automatic map scaling when a route is activated. Touch [On] or [Off ]. • [Keyboard]: - [ABC]: Arranges the keyboard in alphabet order. - [Qwerty]: Arranges the keyboard in qwerty order. • [Alternative Route]: Displays the alternative route when you search for a route. Touch [On] or [Off ]. • [Show Previous Dest. At Boot Time]: Displays the previous destination when the navigation system is turned on. Touch [On] or [Off ]. Touch [Setting] and set the desired items. - [Display traffic and flow data on map]: Select whether to display traffic 25 • [Route Color]: Changes the route color displayed on the map screen when a route is activated. • [Display One-Way]: Displays one-way streets on map screen. Touch [On] or [Off ]. INFO/SETUP Travel Time Default Aviod Area 1. Press [INFO/SETUP] > [Setup] > [Navigation] > [Travel Time]. 1. Press [INFO/SETUP] > [Setup] > [Navigation] > [Default]. 2. Touch a or d on the [Residential(MPH)], [Main street (MPH)], and [Freeway (MPH)] controls to adjust the speed. Touch [Reset] to set the speeds to the default settings. 2. Check the desired options, then touch [Reset]. This allows you to avoid the set area by setting a location on the map screen when a route is activated. Registering an area to avoid This allows you to register an area to avoid. You can register up to five areas to avoid. 1. Press [INFO/SETUP] > [Setup] > [Navigation] > [Avoid Area]. 2. Touch [Add New Avoid Area]. 3. Touch one of the items shown in “Area 1 ~ Area 5”. • [Setting]: Initializes all the settings related with navigation. (This will erase any customized settings.) • [Memory Point]: Initializes all the settings related with the registered destination. (This will erase any registered addresses.) 26 INFO/SETUP 4. Select and drag the area to avoid. Changing an area to avoid Deleting all the areas to avoid You can change/rename/delete an area to avoid. You can delete all registered areas to avoid. 1. Press [INFO/SETUP] > [Setup] > [Navigation] > [Avoid Area]. 1. Press [INFO/SETUP] > [Setup] > [Navigation] > [Avoid Area]. 2. Touch [Edit Avoid Area]. 2. Touch [Delete All Avoid area] and touch [Yes]. Touch [No] to cancel it. 3. Select the area you want to change. 4. Select the desired operation. • [Rename]: Change the name. Enter the new name and touch [Done]. • If you want to stop the area to avoid, touch . Depending on the setting of route search condition, you may not be able to avoid the specified areas. 5. Touch [Add]. • [Rename]: Change the name. Enter the new name and touch [Done]. • [Delete]: Deletes the selected area to avoid. • [On]/[Off ]: Activates or deactivates a registered avoid area. 27 INFO/SETUP • Touch [User Selected Phone] to connect a specific phone automatically by selecting the desired phone, then touch [Settings]. Select the desired phone on the [Select Phone] screen, then touch [Done]. Bluetooth This menu describes bluetooth settings. Press [INFO/SETUP] > [Setup] > [Bluetooth]. • Touch [Connect by Priority] to connect Bluetooth automatically by phone priority, then touch [Settings]. Select the phone priority by pressing [ Move]/[ Move] on the [Select Phone] screen, then touch [Done]. Auto Connection 3. Auto Download This allows you to transmit phonebook from phone automatically when connecting bluetooth. This function may not be supported in some mobile phone. 1. Press [INFO/SETUP] > [Setup] > [Bluetooth] > [Auto Download]. 2. Touch [On] or [Off ]. 3. Touch [Done]. Touch [Done]. This allows you to connect automatically the unit and a bluetooth device after ignition switch is in ACC or ON position. 1. Press [INFO/SETUP] > [Setup] > [Bluetooth] > [Auto Connection]. 2. Select the desired options. , Note After you set the [Auto Download] to [On], whenever connecting the bluetooth, the previous phone book is deleted and phone book of connected phone is downloaded. • Touch [Disable Auto Connection] to disable the auto connection. • Touch [Previously Connected Phone] to make the connection with the previous phone automatically. 28 INFO/SETUP Streaming Audio Advanced Setup Device Information This enables you to play the phone music through bluetooth streaming. This function may not be supported in some mobile phone. Press [INFO/SETUP] > [Setup] > [Bluetooth] > [Advanced Setup]. You can check and change the device information. 1. Press [INFO/SETUP] > [Setup] > [Bluetooth] > [Streaming Audio]. 2. Touch [On] or [Off ]. Change Passkey You can change the passkey. 3. 1. Press [INFO/SETUP] > [Setup] > [Bluetooth] > [Advanced Setup] > [Change Passkey]. 2. Input the passkey using the keypad, then touch [Done]. Touch [Done]. , Note The passkey is a 4-digit authentication code used for a Bluetooth connection between the mobile phone and car system. The default passkey is set to 0000. 29 1. Press [INFO/SETUP] > [Setup] > [Bluetooth] > [Advanced Setup] > [Device Information]. 2. Touch [Change Name] to change the device name. Input the desired name using the keypad, then touch [Done]. INFO/SETUP Delete Entire Car Contacts Voice Recognition Screensaver You can delete all the entries stored in the car phonebook. This menu describes voice recognition settings. This menu describes screensaver settings. 1. 1. Press [INFO/SETUP] > [Setup] > [Screensaver]. 2. Select the desired options. 1. 2. Press [INFO/SETUP] > [Setup] > [Bluetooth] > [Advanced Setup] > [Delete Entire Car Contacts]. 2. Press [INFO/SETUP] > [Setup] > [Voice Recognition]. Select the desired options. Touch [Yes] to delete the entire car phonebook and [No] to cancel. • [Clock]: The clock is displayed on the screen when the system is off. • [Novice]: The guide to the voice recognition function is fully activated. Restore Factory Settings You can set all the bluetooth settings back to the default values. 1. Press [INFO/SETUP] > [Setup] > [Bluetooth] > [Advanced Setup] > [Restore Factory Settings]. 2. Touch [Yes] to initialize all the bluetooth settings and [No] to cancel. • [Image]: The desired image is displayed on the screen when the system is off. Press [Search] to select the image, then press [Done] after selecting the desired image. Select [Original] or [Full] to set the screen ratio. You can only select the image stored in [My Photo] menu. Refer to the page 86. • [Expert]: The system will skip feedback of "Please say a command" when the voice recognition is started. 3. Touch [Done]. • [None]: No image is displayed on the screen when the system is off. 3. 30 Touch [Done]. INFO/SETUP , Note Clock Date Setup This menu describes clock settings. 1. Press [INFO/SETUP] > [Setup] > [Clock] > [Date Setup]. Time Setup 2. Touch w or s to set the date. 1. Press [INFO/SETUP] > [Setup] > [Clock] > [Time Setup]. 2. Select the desired options. Set the [Date] to [On] on the [Clock Type] menu to display the date on the screen. Language This allows you to change the system and voice recognition language. 1. Press [INFO/SETUP] > [Setup] > [Language]. 2. Select the desired language. 3. Touch [Done]. When you set the [GPS Time] to [Off ] on the [Time Setup] menu, you can set the date manually. • [GPS Time]: Turns the time received automatically from the GPS on or off. • [Daylight]: Turns the daylight time function on or off. • [Time Format]: This function is used to convert the time between 12 hour/24 hour systems. 3. Touch [Done]. Clock Type 1. Press [INFO/SETUP] > [Setup] > [Clock] > [Clock Type]. 2. Select the desired options. • When you set the [GPS Time] to [Off ], you can set the clock manually. Touch w or s to set the clock. 3. Touch [Done]. • [Clock Type]: Selects the clock type shown as the entire screen. • [Date]: Turns the date displayed on the screen on or off. 3. Touch [Done]. 31 INFO/SETUP Valet Mode Temperature Gracenote This allows you to protect users private information. This allows you to set the unit of temperature displayed. When this function is enabled, only the power can be turned on/off. To disable it, enter your password. 1. Press [INFO/SETUP] > [Setup] > [Temperature]. 2. Select the unit of temperature between [Celsius] and [Fahrenheit]. This function accesses the Gracenote Media Database and loads the music information for all of the music information for all of the music contents in the iPod/iPhone. 1. Press [INFO/SETUP] > [Setup] > [Valet Mode]. 2. Touch [Yes]. 3. 3. Enter a six-digit password, then touch [Save]. Theme 1. Press [INFO/SETUP] > [Setup] > [Theme]. 2. Select the desired theme among the three themes. 3. Touch [Done]. Enter the password again for confirmation, then touch [Save]. The valet mode is enabled. , Note When the system is turned on, The "Valet Mode" screen appears. To disable the valet mode, enter the password, then touch [Release]. Press [INFO/SETUP] > [Setup] > [gracenote]. 2. Touch [On] or [Off ]. 3. Touch [Done]. Touch [Done]. This allows you to set the theme displayed on the screen. 4. 1. If you forget the password, enter the "671229", then touch [Release]. The password is cleared. 32 , Note This setting is applied when the unit is connected to iPod/iPhone next time. INFO/SETUP XM Data Stocks Data Service Information The XM Data Service is a paid membership satellite radio service which provides users with stocks, sports, and weather information. However, weather information is not supported for vehicles purchased in Canada. For information on registration or related content, please visit the XM radio website (www. xmradio.com). XM Stock data Service is a service which provides real-time updated information on the NYSE, NASDAQ, and AMEX (approximately 15,000 symbols). 1. Input the name of the symbol you wish to search and press [Done] to show search results. 5. For symbols which you are interested in, press [ ] to save the symbol as a part of [My stocks]. 6. Press [My stocks] on the Stock Main screen to view the saved symbols. Press [INFO/SETUP] > [Info] > [XM Data] > [Stocks]. Press [INFO/SETUP] > [Info] > [XM Data]. <Stock Main screen> 2. 4. Press [Stocks] to display the stock list. <XM data menu for USA> If you want to save symbols which you are interested in, proceed to step 5 ~ 6. < XM data menu for CANADA> 3. Press [Search] to display the search screen where symbols can be searched. Or Press [Stocks Search] on the Stock Main screen. 33 • Touch [Add] to add symbols which you are interested in. • Touch [ ] to delete the desired symbol. • Touch [Delete All] to delete all the saved symbols. INFO/SETUP Sports Data Service Information Weather data Service Information Graphical Weather Service This service provides real-time updated information on scores and schedules for major sports, such as NFL, ,MLB, NBA, NHL, NASCAR and more. The Weather Service is a service which provides weather information updated every 5 minutes for your region. The Weather Service includes Tabular Weather, Graphical Weather, Warnings and Advisories Services. This service provides weather information, such as Cloud, Fog, Rain, Snow, and Road Conditions on the screen as symbols. Details can be viewed on specific regions by using the zoom in and zoom out features. Press [INFO/SETUP] > [Info] > [XM Data] > [Weather]. 1. Press [Map] on the XM Weather Main screen. <XM Weather Main screen> 2. Press the desired weather. 3. Press [+]/[-] to use the zoom in and zoom out features. 1. Press [INFO/SETUP] > [Info] > [XM Data] > [Sports] to view related sports information. 2. Press the desired sports button to view related sports information. 3. My Sports Tabular Weather Service You can save sports which you are interested in as part of <My Sports> to easily view related scores and schedules. Provides current weather information and weather information for the coming next three days for your region. Within the <My Sports> screen, teams can be added by pressing the [Add] button or deleted by pressing the [ ] button. 1. Press [Forecast] on the XM Weather Main screen. Select the map area on the screen to view specific regions. 2. To change the region, press [Other City] and select the desired region. To search the region, press [Search]. Input the name of the region you wish to search and press [Done] to show search results. 34 INFO/SETUP 1. Warnings and Advisories Service Blue Link This service provides weather warnings and advisories, such as Tornado, Storm, Flood, Winter, Wind etc. as symbols on the screen. Details can be viewed on specific regions by using the zoom in and zoom out features. The Blue Link® function is supported for vehicles purchased in USA. 1. 2. 3. Press [Warnings and Advisories] on the XM Weather Main screen. Press the desired item. Press [+]/[-] to use the zoom in and zoom out features. Select the map area on the screen to view specific regions. Hyundai aims to offer differentiated customer values through a `Connected Car Life,’ which is to provide consumers with fast and reliable IT technology. • [Download POI]: This allows you to check the Point of Interest data downloaded to the vehicle through the blueLink service center. As consumers’ lifestyles become more and more mobile in thanks to remarkable advances in smart phones, tablet PCs and overall wireless telecommunication, new lifestyle patterns demand seamless connection between one’s office, home, outdoors and automobiles. Automobile companies are now faced with the task of shifting their paradigm from vehiclecentered services to customer value-centered services, with the ultimate goal of securing global leadership in the field of vehicle IT and telematics. Hyundai Motor plans to achieve this by realizing a terminal platform flexible to changes in IT technology, cooperating with global IT companies, creating an eco-system and providing the latest contents & services based on an open environment. Please join in blueLink service to use the blueLink. For the details, refer to the Blue Link® Owner’s Guide. 35 Press [INFO/SETUP] > [Info] > [Blue Link]. • [Location Sharing]: This allows you to check the position transmitted between my car and friends cars through the blueLink service center. 2. For the details, refer to the Blue Link® Owner’s Guide. INFO/SETUP What does the bar graph and horizontal line mean? Eco-Coach The Blue Link® function is supported for vehicles purchased in USA. Every 2.5 minutes, Eco Coach compares your fuel economy against the government tested average (EPA) or other similar Hyundai models (community), based on your preference. Each month, or after every tank fill up, Eco Coach rates your extended average and gives you a reward star if you best the average. This handy feature can help you drive more efficiently by providing you with an automatic online report. Eco-Coach tracks your vehicle’s mileage and C02 emissions on a continual and historical basis and then offers recommendations to help promote better fuel efficiency. Blue Max This allows you to display information related to fuel economy for economic driving. The information is displayed into the cumulative score for ten minutes on the screeen. 1. Press [INFO/SETUP] > [Info] > [Blue Max]. 2. Touch [START] on the "Blue Max" screen. 3. Touch [STOP] to stop it. 4. Touch [Reset] to reset the score. See your MyHyundai web page for more information. What is Eco Coach? Every 2.5 minutes, Eco Coach compares your fuel economy against the government tested average (EPA) or other similar Hyundai models (community), based on your preference. Each month, or after every tank fill up, Eco Coach rates your extended average and gives you a reward star if you best the average. See your MyHyundai web page (www.myHyundai .com) for more information. 1. What is My Eco MPG? Your actual fuel economy average over 2.5 minutes. This value is also shown in bar graph as your “now” rating. What are Eco Rewards? Press [INFO/SETUP] > [Info] > [Eco-Coach]. If you beat the average (the EPA or community), you will receive an Eco Reward point. The [ECO Driving Information] menu appears on the screen. See your MyHyundai web page for more information. 2. For the details, press [Help]. , Note Eco-Coach will not operate if the vehicle ignition is not turned on. Please operate with the ignition turned on. 36 , Note The score may not be related to the real fuel economy of your vehicle. INFO/SETUP Software Information Help This menu option allows you to view the system information. This allows you to view the Help menu. 1. Press [INFO/SETUP] > [Info] > [Help]. 2. Select the desired options. Press [INFO/SETUP] > [Info] > [Software Info]. , Note The software information may differ from the actual information of the vehicle. , Note The full content of the help section can be viewed by using the top-down scroll buttons. 37 Getting started with navigation What is GPS? About satellite signals Indicators of the map screen The Global Positioning System (GPS) is a satellitebased navigation system made up of a network of 24 satellites placed into orbit by the U.S. Department of Defense. Your unit must acquire satellite signals to operate. If you are indoors, near tall buildings or trees, or in a parking garage, the unit cannot acquire satellite signal. The navigation system displays various information on the screen. GPS was originally intended for military applications, but in the 1980s, the government made the system available for civilian use. Acquiring satellite signals GPS works in any weather conditions, anywhere in the world, 24 hours a day. Before the unit can determine your current position and navigate a route, you must do the following steps: There are no subscription fees or setup charges to use GPS. 1. Go outside to an area free from tall obstructions. 2. Turn on the unit. GPS GPS GPS GPS a b c d p o n e f m g Acquiring satellite signals can take a few minutes. h i j k 1. Lane marking Initial navigation screen After the ignition switch is placed in the ACC or ON position, when you enter a navigation mode for the first time, the caution screen is displayed on the screen. Read the caution carefully and then touch [Agree]. • White: Available lane • Blue: Recommended lane • Gray: Impossible lane 2. Outside temperature display Displays the outside temperature. 3. Clock display Displays current clock. 38 l Getting started with navigation • Displays the single/split map. 4. Shortcut menu For details, refer to the "Registering the shortcut icon" and "Deleting the registered shortcut icon" on the pages 41-42. 7. 8. • Changes the route conditions when a route is active. • Displays the destination position on the map screen. Displays the state of GPS signal reception. / (active - red): GPS reception is satisfactory. • / (inactive - gray): GPS reception is unsatisfactory. Map display • Displays the direction of the map. - (north up): Displays always has north at the top of screen. - (heading up): Displays always shows the vehicle’s direction as proceeding towards the top of the screen. - (Bird view (3D)): The map displays always the basic outline and details of the surrounding roads and general area. 12. For details, refer to the "Changing the route conditions" on the page 43. button For details, refer to the "Registering the current position in address book" on the pages 46-47. 13. button button For details, refer to the "Displaying the XM traffic information" on the page 46. For details, refer to the "Changing the map scale" on the page 42. 6. GPS signal state display • Map scale display Displays the scale of the map. 5. Arriving time/ remaining distance display Displays the arriving time and remaining distance to the destination. 11. For details, refer to the "Displaying the single/split map" on the page 42. The shortcut menu allows you to customize a screen for up to [6] of your most commonly used functions. / button Displays or hides the menu icons. 14. Vehicle position display Displays current vehicle position and direction of travel. 15. Route guidance display 9. button For details, refer to the "Adjusting the volume of the navigation voice guidance" on the page 43. 10. POI button Some landmarks in the surrounding area can be displayed as icons on the map screen. This allows you to display or hide the landmark icons by type. For details, refer to the "Displaying/Hiding POI icons on the map screen" on the pages 44-45. 39 Displays the route guidance to the destinaton when a route is set. 16. Turn-by-turn display Appears on the upper right corner of the screen when a route is set. Displays the distance to the next guide point and the turning direction at that guide point. Getting started with navigation Route guidance screen or Symbol guidance mode : if the button is pressed, then the following route guidance screen will be displayed. button is pressed, Turn-List mode : if the then the following route guidance screen will be displayed. Intersection zoom mode : this route guidance screen is automatically displayed during guidance at an intersection. Once guidance at the intersection is complete, the screen will automatically disappear and the previous guidance screen will be restored. Highway junction mode : this route guidance screen is automatically displayed during guidance at highway junctions. Once guidance at a highway junction is complete, this screen will automatically disappear and the previous guidance screen will be restored. button is pressed, Highway mode : if the then the following route guidance screen will be displayed. 40 Getting started with navigation Or select your desired function icon from the right of the screen and drag it to the left of the screen. Registering the shortcut icon 1. 2. Touch on the map screen. Select your desired function icon and touch a. Shortcut icons : POI Search (Page 51, 52) : Previous Destinations (Page 50) : Address (Page 49) : Address Book (Page 53) : Phone (Page 54) : Coordinates (Page 51) : Emergency (Page 54, 55) : Intersection (Page 50, 51) 41 : Cancel Route (Page 56) : Route Overview (Page 56) : Route Info. (Page 58,59) : Route Options (Page 59) : Detour (Page 60) : Avoid Streets (Page 60) : Edit Waypoints (Page 60) : Demo (Page 59,60) : My Places (Page 61) : NAV Setup (Page 25) : Home (Page 55) : Office (Page 55) : User 1 (Page 55) : User 2 (Page 55) : User 3 (Page 55) : User 4 (Page 55) 3. : Nearest POI Touch [ , Note ] to confirm your selection. Touching a or d switches to the next or previous page in the shortcut menu. Getting started with navigation Deleting the registered shortcut icon Displaying the single/split map 1. 1. Touch on the map screen. Touch or Changing the map scale 1. Touch 2. Touch on the map screen. on the map screen. The single map is displayed. 2. Touch [Single map] or [Split map] to display the single/split map. 2. Select your desired function icon from the left of the screen and drag it to the right of the screen. / . Single map The map scale will be increased or decreased by one level. Split map 3. Touch the desired items. • : North up • : Heading up • / • • 3. Touch [ The scale can be changed by directly pressing the scale buttons ( / / / / ). : Displays the 2D/3D screen. / : Adjusts the angle of the map on the 3D screen. / , Note The scale can be changed by directly pressing the scale level on the scale bar. : Zoom in/out the right map screen. ] to confirm your selection. 42 / button for over 1 second. Press the The scale will continuously change. If the scale range limit is reached, the button will be disabled. If you want to set the auto zoom, touch / . Getting started with navigation Changing the route conditions 1. Touch when a route is active. Adjusting the volume of the navigation voice guidance 1. Touch on the map screen. , Note The volume can be changed by directly pressing the volume level on the scale bar. / button for over 1 second. Press the The volume will continuously change. 2. 3. Touch Touch to mute the voice guidance. The Press again to indicator is illuminated. Touch cancel it. . Touch 3. Touch . . , Note Touch to display the destination position on the map screen. 4. 2. / . The volume will be increased or decreased by one level. Touch the desired items. For details, refer to the "Route Options" on the page 59. 43 Getting started with navigation Displaying/Hiding POI icons on the map screen The POI icon allows you to customize a screen for up to [6] of your most commonly used POI. 1. 2. 3. 4. Touch the desired subcategory. 5. Touch [Done] to complete. You can edit POI icons displayed on the map screen. 1. Touch > > . when a route is active. Touch Touch Editing POI icons 2. Touch a POI icon to change. 3. Touch the desired main category. . Touch the desired icons. • Touch [All Categories] to display all subategories. • The icon display settings toggle on and off each time you touch the icon. The indicator of the selected icon is illuminated. • Touch [Input a Category Keyword] to input a subcategory name. • Touch [Todos] to display all POI icons. Touch [All Off ] to hide it. 44 Getting started with navigation Displaying/Hiding others POI icons on the map screen Finding the destination by searching for POI icons 1. 1. Touch > > . Touch > > . • Touch [On Route] to display the POI existing on route. • Touch [All] to display all POI icons. 4. Touch [Set as Destination] > [Start Guidance]. Drive in accordance with the screen and voice information. , Note 2. Touch the desired main category. 2. Touch [Local POI lists]. 3. Touch the desired subcategory. The POI you select is illuminated. 3. Touch the desired POI. To hide it, touch the POI you select again. 4. Touch [Show icons]. The POI icons you select are displayed on the map screen. • Touch [By Distance] to display them in the distance order. • Touch [By Name] to display them in the name order. • Touch [By Category] to display them in the category order. 45 You can find the destination by touching POI icons displayed on the map screen. Getting started with navigation • Touch [Category Select] to display the desired XM traffic category on the map screen. After selecting the desired menu among the six menus, touch [Done]. Displaying the XM traffic information 1. Touch on the map screen. 4. Registering the current position in address book 1. Touch on the map screen. 2. Touch 3. Select the desired address book (group). You can check points of accidents and traffic details. If you want to make a detour due to traffic conditions, touch [Detour]. 2. Touch . 5. 3. . Select the desired route. Touch the desired XM traffic information. - Blue: original route - Orange: detour route 6. Touch [Done]. 7. Touch [Start Guidance]. • Touch [On route] to display the XM traffic information existing on route. 4. Select the desired items to edit. For details, refer to the step 4 of "Editing an address of address book" on the page 61. • Touch [By Distance] to display them in the distance order. • Touch [Category] to display them in the category order. 46 Getting started with navigation 3. Touch [Start Guidance]. Making a call to POI After searching a POI, the POI phone number information can be used to make a call to the POI facility. 5. Scrolling map 1. 2. 1. Use the various search methods, such as the map scroll function, POI search function, and destination search function to search for a POI. 2. Touch 3. Bluetooth is used to make a call to the POI facility. 4. Once the call is ended, the map is restored to the current vehicle location. Touch [Done] to complete. Touch and drag the map area on the screen. The selected point will be centered on the screen and the scroll mark will be displayed. Information about the marked point and straight line distance from the current position will be displayed at the right of the screen. Drive in accordance with the screen and voice information. The destination is stored in the “Previous Destinations” menu automatically. (Page 50) , Note If a map area on the map screen is pressed, the map will continuously scroll in the corresponding direction until the pressing is released. on the map screen. , Note Making a call is not possible if there is no telephone information for a POI or if there is no mobile phone connected through Bluetooth. Touch [Set as Destination]. For more information of mobile phone authentication through Bluetooth or detailed information on conducting search, refer to [Pairing and connecting the unit and a bluetooth phone], page 64. 47 Destination input menu Destination menu overview Destination menu Address General operations of destination menu • Emergency: Finds a destination by searching for a police station, hospital or Hyundai dealership. (Page 54) 1. • Home /Office/User (1~4) places: Finds a destination by selecting your previously registered home address, office or any of your [4] previously registered favorite locations. (Page 55) Press [DEST] on the control panel. The destination menu appears on the screen. Previous Destinations Intersection Coordinates POI Search Address Book Phone Emergency Home Office User 1 User 2 User 3 User 4 2. Touch the preferred setting method. • Address: Finds a destination by setting an address. (Page 49) • Previous Destinations: Sets a destination to a location that you have previously entered. (Page 50) • Intersection: Sets an intersection as your destination. (Page 50) • Coordinates: Sets a latitude and a longitude as your destination. (Page 51) • POI Search: Searches for a destination from various categories of businesses or locations. (Page 51-53) • Address Book: Sets a destination to a location stored in the address book. (Page 53) • Phone: Sets a destination by phone number. (Page 54) 48 Destination input menu Address Search 5. Touch [City] to select the city. If you want to omit this step, proceed to step 8. You can find the destination by searching for an address. 9. Enter the house number and then touch [Done]. There are 2 ways to set the destination through address search - by street, by city. 1. Press [DEST] > Touch [Address]. 2. Touch [State] to select the state. If the state has already been set, proceed to step 5. 3. 4. 6. Enter the state name or enter the first few letters. Touch [Done]. Enter the city name or enter the first few letters. Touch [Done]. Touch s to display the previous searched city. 10. Enter the name of the Street or the first few letters. Touch [OK]. Touch s to display the previous searched street. 7. Touch the city in the list, follow the step 9. 11. Touch the street in the list. 8. Touch [Street] to select the street. 12. Touch [Set as Destination] > [Start Guidance]. Touch the state in the list. If you want to add a waypoint, touch [Add as Waypoint]. For details, refer to the "Adding waypoints" on the page 57. Drive in accordance with the screen and voice information. 49 Destination input menu • Touch [Start Points] to display the starting points recently. Previous destinations You can find the destination to a location that you have lastly set as the destination. Up to 50 last destinations are automatically stored. If the number of last destinations exceed 50, the oldest one is replaced by the new one. • Touch w/s to scroll up or down one page. 3. Touch [Set as Destination] > [Start Guidance]. 1. Press [DEST] > Touch [Previous Dest.]. If you want to add a waypoint, touch [Add as Waypoint]. For details, refer to the "Adding waypoints" on the page 57. 2. Touch the preferred previous destination from the list. Drive in accordance with the screen and voice information. • Touch [By Date] to display them in the date order. • Touch [By Name] to display them in the name order. • Touch [Delete Items] to delete the previous destinations. Press the check box ( > ), then touch [Delete]. (Touch [Cancel Delete] to cancel it.) • Touch [Delete All] to delete all memory points. • Touch [Destinations] to display the previous destination list. • Touch [Searches] to display the destination list searched recently. 50 Intersection You can find the destination by searching for the intersection. 1. Press [DEST] > Touch [Intersection]. 2. If you want to select the the state, follow the step 2~4 on the page 49. Then proceed to step 4. 3. If you want to select the city, follow the step 5~7 on the page 49. Then proceed to step 5. 4. Touch [Street]. 5. Enter the first street name or enter the first few letters. Touch [Done]. Destination input menu 6. Select the first street name from the list. Coordinates POI Search You can find a destination by inputting the coordinates of latitude and longitude. You can find a destination from various categories. 1. Press [DEST] > Touch [Coordinates]. 2. Touch the degree, minute and (or) second of the longitude and latitude, then input the desired coordinates. Touch w/s to scroll up or down one page. 7. Enter the second street name or enter the first few letters. Touch [Done]. • Touch [ ] to erase one digit. There are 3 ways to set the destination through POI search - by category, by ZAGAT Restaurant Guide, by name. Searching for POI by category or ZAGAT Restaurant Guide 1. Press [DEST] > Touch [POI Search]. 2. If you want to select the the state, follow the step 2~4 on the page 49. Then proceed to step 3. 3. Touch [Category] or [ZAGAT Restaurant Guide]. 4. Touch the desired position. • Touch [Clear] to erase all digits. 8. Select the second street name from the list. • Touch [Format] to change the unit of the longitude and latitude. 3. 4. Touch w/s to scroll up or down one page. 9. Touch [Set as Destination] > [Start Guidance]. If you want to add a waypoint, touch [Add as Waypoint]. For details, refer to the "Adding waypoints" on the page 57. Press [Done]. Touch [Set as Destination] > [Start Guidance]. If you want to add a waypoint, touch [Add as Waypoint]. For details, refer to the "Adding waypoints" on the page 57. Drive in accordance with the screen and voice information. • Touch [Near Current Position] to search for facilities nearby the current position. Drive in accordance with the screen and voice information. 51 Destination input menu • Touch [Near Destination] to search for facilities nearby the destination when the destination is set. 7. Touch the desired POI. 5. Touch the desired main category. Drive in accordance with the screen and voice information. • Touch [By Distance] to display them in the distance order. • Touch [By Name] to display them in the name order. • Touch [By Category] to display them in the category order. • Touch [On Route] to display the POI existing on route. • Touch [All] to display all POI icons. 6. • Touch [All Categories] to display all the categories. • Touch [Food] to display the food category depending on ZAGAT Restaurant Guide. • Touch [Input a Category Keyword] to select the category using the keypad. • Touch [Decor] to display them in the deco score order depending on ZAGAT Restaurant Guide. Touch the desired subcategory. (For example: Restaurants (All)) Touch [Set as Destination] > [Start Guidance]. If you want to add a waypoint, touch [Add as Waypoint]. For details, refer to the "Adding waypoints" on the page 57. • Touch [Near Home] to search for facilities nearby the registered home in the [Home] menu . • Touch [In Another City] to search for facilities in another city. Select the desired city using the keypad. 8. • Touch [Service] to display them in the service score order depending on ZAGAT Restaurant Guide. • Touch [Cost] to display them in the cost order depending on ZAGAT Restaurant Guide. 52 , Note If you want to check the information of the POI you set, touch [Detail]. Destination input menu Searching for POI by name 1. Press [DEST] > Touch [POI Search]. 2. If you want to select the the state, follow the step 2~4 on the page 49. Then proceed to step 3. 3. Touch [Name]. 6. 5. • Touch [By Icon] to display them in the icon order. 4. You can find the destination to a location stored in the Address Book. To utilize this function more effectively, destinations that you often travel to should be stored in advance. Input the name of the POI, touch [Done]. • Touch [By Name] to display them in the name order. Drive in accordance with the screen and voice information. Address Book 4. • Touch [By Date] to display them in the date order. Touch [Set as Destination] > [Start Guidance]. If you want to add a waypoint, touch [Add as Waypoint]. For details, refer to the "Adding waypoints" on the page 57. First of all, store in the Address Book by searching the address. Refer to the “Registering new address in address book” on the page 61. 1. Press [DEST] > Touch [Address Book]. 2. Select the desired address book (group). 3. Touch the preferred destination from the list. Touch the desired POI. Touch [Advanced] to select a category or a city. Select the desired category or city. 53 Touch [Set as Destination] > [Start Guidance]. If you want to add a waypoint, touch [Add as Waypoint]. For details, refer to the "Adding waypoints" on the page 57. Drive in accordance with the screen and voice information. Destination input menu Phone 5. Input the phone number, then touch [Done]. Emergency If you know the telephone number of the destination, you may use this function to find the destination. You can search for a destination by searching for a police station, hospital, or hyundai dealership. 1. Press [DEST] > Touch [Emergency]. 1. Press [DEST] > Touch [Phone]. 2. Touch one of the three options. 2. Touch [State]. (For example: Police Station) • Touch [Delete] to erase one digit. • Touch [Del All] to erase all digits. 6. 3. Enter the State name or enter the first few letters. Touch [Done]. 3. 7. 4. Select the desired phone number from the list. Touch the state in the list. Select the preferred destination from the list. Touch [Set as Destination] > [Start Guidance]. If you want to add a waypoint, touch [Add as Waypoint]. For details, refer to the "Adding waypoints" on the page 57. Drive in accordance with the screen and voice information. • Touch [By Distance] to display them in the distance order. • Touch [By Name] to display them in the name order. • Touch [On Route] to display the POI existing on route. • Touch [All] to display all POI icons. 54 Destination input menu 4. Touch [Set as Destination] > [Start Guidance]. If you want to add a waypoint, touch [Add as Waypoint]. For details, refer to the "Adding waypoints" on the page 57. Drive in accordance with the screen and voice information. Home, Office, Favorite (User 1~4) places Finding your office 1. Press [DEST] > Touch [Office]. If your home location, office location, and favorite locations have been already stored in the [My Places] menu, it can be easily retrieved to set the route to your home location, office location and favorite locations. First of all, store in the [My Places] menu by searching the address. Refer to the “[My Places] menu” on the page 61. 2. Finding your home 1. Touch [Set as Destination] > [Start Guidance]. If you want to add a waypoint, touch [Add as Waypoint]. For details, refer to the "Adding waypoints" on the page 57. Drive in accordance with the screen and voice information. Press [DEST] > Touch [Home]. Finding your favorite (User 1~4) places 2. 1. Press [DEST]. 2. Touch the desired button from [User 1~4]. Touch [Set as Destination] > [Start Guidance]. If you want to add a waypoint, touch [Add as Waypoint]. For details, refer to the "Adding waypoints" on the page 57. Drive in accordance with the screen and voice information. 3. Touch [Set as Destination] > [Start Guidance]. If you want to add a waypoint, touch [Add as Waypoint]. For details, refer to the "Adding waypoints" on the page 57. Drive in accordance with the screen and voice information. 55 Using the route menu Route menu overview This allows you to change the route conditions by using the route menu when the route is activated. General operations of route menu 1. Press [ROUTE] on the control panel. The route menu appears on the screen. 2. Touch the preferred setting method. Route menu Cancel Route If you no longer need to travel to your destination or if you want to change your destination, press [ROUTE] > touch [Cancel Route]. Cancel Route Route Overview Route Info Route Options Detour Avoid Streets For details, refer to the page 56-63. Then touch [Yes]. Edit Waypoints Route Overview Demo You can check the entire route between your current location and your destination. My Places Press [ROUTE] > Touch [Route Overview]. The route overview screen appears on the screen. Starting Route Guidance Touch [Start Guidance]. Route guidance will start. 56 Using the route menu Editing waypoints 5. Touch [Done]. Deleting waypoints This allows you to edit the waypoints when the waypoints are set. Waypoints can be added/ deleted and the order can be changed. 1. Press [ROUTE] > Touch [Route Overview] > [Edit waypoints]. 2. Select the waypoint and touch [Delete]. 3. Touch [Yes] > [Done]. 4. Touch [Start Guidance]. Adding waypoints 1. Press [ROUTE] > Touch [Route Overview] > [Edit waypoints]. 2. Touch [Add Waypoint]. If you need an additional waypoint, set it by touching [Add Waypoint] again. 6. Touch [Start Guidance]. Reordering waypoints 3. 1. Press [ROUTE] > Touch [Route Overview] > [Edit waypoints]. 2. Touch the waypoint from the list. Set the waypoint by touching / . Add the waypoint by using the [Destination] menu. For details, refer to the page 49-55. 4. Touch [Add as Waypoint], then touch [Yes] . Or select the waypoint and drag it to the desired position. 3. Touch [Done]. 4. Touch [Start Guidance]. 57 Viewing map 1. Press [ROUTE] > Touch [Route Overview] > [Edit waypoints]. 2. Select the waypoint and touch [Map]. 3. After viewing the map, touch [ ]. Using the route menu Route Info Alternative Route This allows you to view the distance to the next guide point and the turning direction at that guide point. This allows you to find the destination by selecting one of four routes. 1. Press [ROUTE] > Touch [Route Overview] > [Route Info]. 2. Touch w/s to scroll up or down one page. 3. Touch [Map] to display the map. 4. After viewing the map, touch [ ]. - [Minimize Toll Road]: Searches for a route that minimizes or avoids toll roads. - [Use Ferries]: Searches for a route that includes the use of ferries. 1. Press [ROUTE] > Touch [Route Overview] > [Alternative Route]. 3. Touch [Done]. 2. Select the desired route. 4. Touch [Start Guidance]. • [Recommended]: Searches for the recommended route. • [Shortest]: Searches for the shortest route. • [Traffic]: Searches for a route that minimizes or avoids the traffic event. • [More Settings]: Sets the route options. Select the desired options, then touch [Done]. - [Minimize Freeway]: Searches for a route that minimizes or avoids the freeway. - [First Freeway]: Searches for a route that prioritizes the freeway. 58 Using the route menu Demo Route Info Route Options After a route is set, a simulation of the route guidance to a destination is automatically displayed. This allows you to view the distance to the next guide point and the turning direction at that guide point. You can modify the route conditions or confirm the route information. Set the appropriate route condition according to your purpose. 1. 1. 1. Press [ROUTE] > Touch [Route Options]. 2. Touch the preferred setting item. 3. Press [ROUTE] > Touch [Route Overview] > [Demo]. Press [ROUTE] > [Route Info]. Touch the preferred setting method. 2. • [Pause]: Pauses the demo drive. Touch w/s to scroll up or down one page. 3. Touch [Map] to display the map. 4. After viewing, touch [ • [Recommended]: Searches for the recommended route. ]. • [Play]: Plays the demo drive. • [Shortest]: Searches for the shortest route. • [Stop]: Stops the demo drive. Returns to the previous screen. • [Traffic]: Searches for a route that minimizes or avoids the traffic event. • [X1]/[X2]/[X3]: Sets the demo drive speed. • [Minimize Freeway]: Searches for a route that minimizes or avoids the freeway. • [First Freeway]: Searches for a route that prioritizes the freeway. • [Minimize Toll Road]: Searches for a route that minimizes or avoids toll roads. • [Use Ferries]: Searches for a route that includes the use of ferries. 59 3. Touch [Done]. 4. Touch [Start Guidance]. Using the route menu Detour 3. Select the desired route. If you want to make a detour due to traffic conditions, you can use the detour function to calculate an alternative route from the current vehicle position to the destination. 1. Press [ROUTE] > Touch [Detour]. 2. Select the desired detour range. - Blue: original route - Orange: detour route - Blue: original route - Orange: detour route 5. 4. Touch [Done]. 6. 5. Touch [Start Guidance]. Touch [Done]. Touch [Start Guidance]. Edit Waypoints Avoid streets Touch [Avoid Area] to display the avoid area on the map screen. Select and drag the area you want to avoid on the map screen, then touch [Done]. This allows you to avoid certain streets due to traffic conditions. You can calculate an alternative route from the vehicle location to the destination. 1. Press [ROUTE] > Touch [Avoid Streets]. 2. Select the street you would like to avoid, then touch [Avoid]. This allows you to edit the waypoints when the waypoints are set. Waypoints can be added/ deleted and the order can be changed. 1. Press [ROUTE] > Touch [Edit Waypoints]. 2. For details, refer to the "Editing waypoints" on the page 57. Demo After a route is set, a simulation of the route guidance to a destination is automatically displayed. Touch w/s to scroll up or down one page. 3. Touch [Done]. To cancel it, touch [Unselect All]. 4. Select the desired route. 60 1. Press [ROUTE] > Touch [Demo]. 2. For details, refer to the "Demo" on the page 59. Using the route menu My Places 4. This allows you to store or edit new address in the Address Book. Set the desired address by using the [Destination] menu. (For details, refer to the pages 49~55.) Up to 500 address can be registered in each item folder. Editing an address of address book 1. Press [ROUTE] > Touch [My Places] > [Address Book]. 2. Select the desired address book (group). 3. Select the desired address to edit. Registering new address in address book 1. 2. Press [ROUTE] > Touch [My Places] > [Address Book]. 5. Touch [Done] on the map screen. 6. Touch [Done] to complete. Select the desired address book (group). Touch [Rename Group] to change the name of address book (group). Input new name, then Touch [Done]. 4. 3. Select the desired items to edit. Touch [Add]. • [Name]: Changes the registered name. Input the name > touch [Done]. Press the check box ( > ) to display the name on the map screen. 61 Using the route menu • [Address]: the desired address by using the [Destination] menu. (For details, refer to the pages 49~55.) • [Phone]: Registers or changes the telephone number. Input the number > touch [Done]. • [Symbol]: Touch [Symbol] to set the desired symbol. Deleting an address book Registering home or office address 1. Press [ROUTE] > Touch [My Places] > [Address Book]. 1. Press [ROUTE] > Touch [My Places] > [Home] or [Office]. 2. Select the desired address book (group). 2. 3. Touch [Delete Items] to delete. Touch [Select Home Location] or [Select Office Location]. 4. Press the check box ( desired address. Select the desired symbol, then touch [Done]. > Press the check box ( symbol on the map screen. ) to display the • [Sound]: Sets the voice guidance type of the registered points. Select the desired sound > touch [OK]. Touch [Play] to hear the sound in advance. 5. > ) to delete the , Note Press [Store Current Position] to register the current position as home or office. 3. Set the desired address by using the [Destination] menu. (For details, refer to the pages 49~55.) 4. Touch [Done] on the map screen. 5. Touch [Done] to complete. Touch [Delete]. • [View Map]: Displays the registered address on the map screen. After checking it on the map screen, touch . 5. Touch [Done] to complete. 62 Using the route menu Editing home or office address Registering favorite place 1. Press [ROUTE] > Touch [My Places] > [Home] or [Office]. 1. Press [ROUTE] > Touch [My Places] > [Favorite place]. 2. Touch [Edit Home] or [Edit Office]. 2. 3. For details, refer to the step 4 of "Editing an address of address book" on the page 61. Touch the number of the favorite place to register. 4. Set the desired address by using the [Destination] menu. (For details, refer to the pages 49~55.) 5. Touch [Done] on the map screen. 6. Touch [Done] to complete. Deleting home or office address 1. Press [ROUTE] > Touch [My Places] > [Home] or [Office]. 2. Touch [Delete Home] or [Delete Office]. 3. Touch [Yes] to delete it. 3. Touch [Select Favorite Location]. , Note Press [Store Current Position] to register the current position as a favorite place. 63 Editing favorite place 1. Press [ROUTE] > Touch [My Places] > [Favorite place]. 2. Touch [Edit Favorite Place]. 3. For details, refer to the step 4 of "Editing an address of address book" on the page 61. Deleting favorite place 1. Press [ROUTE] > Touch [My Places] > [Favorite place]. 2. Touch [Delete Favorite Place]. 3. Touch [Yes] to delete it. Bluetooth handsfree Understanding Bluetooth wireless technology Pairing and connecting the unit and a bluetooth phone Bluetooth wireless technology establishes a wireless link between two devices supported with Bluetooth. To use the Bluetooth feature, make sure the Bluetooth on your phone is turned on. Refer to your phone’s user guide. The first time you use two devices together you must pair them by establishing a connection using a Passkey. After the initial pairing, the two devices can connect automatically each time you turn them on. 5. When your phone is successfully connected, the "Phone" screen is displayed on the unit. When the connection fails, failure message is displayed on the unit. When there is no a paired phone on the unit 1. Press [PHONE] on the control panel or the steering wheel remote control. 2. Touch [Yes] to search for bluetooth phones. Due to the variety of Bluetooth devices and their firmware versions, your device may respond differently when performing over Bluetooth. 3. In your phone, initiate a search for Bluetooth devices. Any inquiries regrading your phone's Bluetooth functionality, refer to the device manual. 4. After search is completed in your phone, select "Veloster". Bluetooth allows wireless transmission of information between PC, mobile phones, headsets, PDAs, printers and other devices within close ranges by using 2.45Ghz frequency short-distance wireless telecommunication technologies. Input the passkey (presented by unit, default: 0000) to your phone. on Within this vehicle, users can make handsfree calls, transmit mobile phone data, and play audio streaming files by connecting a mobile phone with the system. , Note There may be restrictions on using Bluetooth technology in some locations. You can check the Bluetooth phone compatibility list on the web-site (http://www. mapnsoft.com). 64 Once Bluetooth connection is successful, the name of the connected mobile phone will become displayed on the PHONE screen and Bluetooth handsfree functions will operate. Bluetooth handsfree 7. When there is a paired phone on the unit 1. Press [PHONE] on the control panel or the steering wheel remote control. on 2. Touch [Connections] on the "Phone" screen. 3. Touch [Add To]. Input the passkey (presented by unit, default: 0000) to your phone. When your phone is successfully connected, the "Phone" screen is displayed on the unit. When the connection fails, failure message is displayed on the unit. Converting Bluetooth Handsfree mode 1. While in another mode, press [PHONE] on the on the steering wheel control panel or remote control. 2. The system will change to Bluetooth Handsfree mode and display the "PHONE" screen. , Note 4. In your phone, initiate a search for Bluetooth devices. 5. After search is completed in your phone, select "Veloster". For safety reasons, pairing a Bluetooth phone is not possible when the vehicle is in motion. Park the vehicle in a safe location to pair a bluetooth phone. It is possible to pair up to 5 mobile phones. In order to pair a new phone when there are already 5 mobile phones paired, you must first delete one of the previously paired phones. Some functions may not be supported due to limited Bluetooth compatibility between the car system and mobile phone. 65 , Note The following screen is displayed if no mobile phone has been connected. Bluetooth handsfree Viewing the connected device 1. 2. Touch [Connections] on the "Phone" screen. Check the connected device on the "Connections" screen. • The connected phone is highlighted by Disconnecting the bluetooth phone Connecting the bluetooth phone .1. Touch [Connections] on the "Phone" screen. 1. Touch [Connections] on the "Phone" screen. 2. 2. Select the phone you want to connect and touch [Connect]. Select the phone you want to disconnect and touch [Disconnect]. . • The mark indicates the handsfree and phone music function are enabled. mark indicates only handsfree function is enabled. Your phone is disconnected and the deactivated. mark is Your phone is connected and the activated. 66 mark is Bluetooth handsfree Deleting a connected phone If you no longer need to use a phone, you can delete it from [Connections] list. Making a call by entering phone number 1. Touch [Connections] on the "Phone" screen. Connect your unit and Bluetooth phone before making a call. 2. Select the phone you want to delete and touch [Delete]. 1. Making a call by redialing Press and hold [ Send] on the "Phone" screen or on the steering wheel remote control. Enter the phone number using the keypad on the "Phone" screen. Touch [Delete All] to delete all the phones. , Note 2. 3. Touch [Yes] on the pop-up screen. , Note A Bluetooth phone cannot be deleted if it is currently connected to the car system. To delete the phone, first disconnect the Bluetooth phone and try again. Redialing is not possible when there is no call history. Touch [ Send]. , Note If you press the wrong number, press [ Delete] to delete the inputted number one digit at a time. 67 Bluetooth handsfree Answering/Rejecting a call 1. 2. When you receive a call, your phone rings and the “Incoming Call” window is displayed on the unit. Switching call to the mobile phone 1. Touch [Accept] to answer the call. To reject a call, select [Reject]. If the Call-ID service is available, the caller’s phone number is displayed. If caller's phone number is stored in the phone book, the caller's name is displayed on the unit. Upon receiving a call, the [Reject] function may not be supported in some mobile phones. 2. 1. To end a call, press [ End] on the "Phone" on the steering wheel remote screen or control. 2. The call is ended. If you want to switch the call to the mobile phone while talking on the car handsfree, touch [Private]. As shown below, the call is switched to the mobile phone. , Note Ending a call If you want to switch the call to the car handsfree while talking on the mobile phone, touch [Use Handsfree]. The call is switched to the car handsfree. 68 Bluetooth handsfree Using your Phone Book The system may begin to slow down when downloading the phone book in some mobile phones. Upon connecting a mobile phone, the phone book lists saved in the mobile phone will automatically be downloaded. The phone book download function may not be supported in some mobile phones. 1. Touch [Contacts] on the "Phone" screen. 2. Select the phone book entry you want to call. Searching for phone book entries Searching by name 1. Touch [Search] on the “Contacts” screen. 3. Touch [Search by name]. Touch [Contacts] on the "Phone" screen. 2. Touch [Search] on the “Contacts” screen. 3. Touch [Search by number]. 4. Input the phone number you want to search, then touch [Search]. 5. Select the contact you want to call. Input the name you want to search, then touch [Search]. You can scroll over the phone book by selecting w or s. 3. 1. Touch [Contacts] on the "Phone" screen. 2. 4. Searching by number Touch [ Send] to make a call. 5. Select the contact you want to call. Touch w/s to scroll up or down one page. 6. 6. Touch [ Send] to make a call. 69 Touch [ Send] to make a call. Bluetooth handsfree Call History List Making a call from Call history 1. Touch [ Send] on the “Phone” screen. 2. Touch [ Making a call with speed dial numbers Saving phone number 1. Enter the phone number using the keypad on the “Phone” screen and select [ Save]. 2. Select the phone number category (Mobile, Office or Home). 3. Touch [Name]. 4. Input the name and select [Done]. Press and hold speed dial number using the keypad on the "Phone" screen. The call history list is displayed on the screen. ], [ ], or [ ]. Dialed Call Only speed dial numbers already stored on the mobile phone can be used for speed dial calls. Up to 2-digit speed dial numbers are supported. , Note For 2-digit speed dial numbers, press and hold the 2nd digit to make a call to the speed dial number. Touch [Cancel] to cancel it. Received Call Missed Call 3. Touch the entry you want to call. 4. Touch [ Send] to make a call. 70 Bluetooth handsfree 5. If all the phone number already been saved, proceed to step 8. Adding phone number If you want to add the phone number, touch [Number]. 1. Touch [Contacts] on the "Phone" screen. 2. Touch [Add to] on the "Contacts" screen. 6. Input the phone number. 3. Touch [Name]. 7. Select the phone number category (Mobile, Office or Home) and touch [Done]. 4. Input the name and select [Done]. 8. Touch [Done]. 5. Touch [Number] to add the phone number. 71 6. Input the phone number. 7. Select the phone number category (Mobile, Office or Home) and touch [Done]. 8. Touch [Done]. aaa Bluetooth handsfree Editing phone book Deleting phone book Downloading phone book 1. Touch [Contacts] on the "Phone" screen. 1. Touch [Contacts] on the "Phone" screen. 1. Touch [Contacts] on the "Phone" screen. 2. Touch the desired contact to edit the phone book. 2. Touch the desired contact to delete the phone book. 2. Touch [Download] to download the phone book. 3. Touch [Edit] on the "Detail Information" screen. 3. Touch [Delete] on the "Detail Information" screen. 3. Touch [Ok]. 4. Edit the phone book by touching the name or number on the "Edit Contact" screen. 4. Touch [Yes]. The present phone book is deleted and phone book of connected phone is duplicated. , Note You must set the [Auto Download] to [On] to download the phone book. For details, see "Auto Download" on the page 28. 5. After editing is complete, touch [Done]. The phone book is deleted. 72 Bluetooth handsfree Phone Music Before playing Phone music Starting Phone Music 1. Press [MEDIA] on the control panel. 2. Press [Phone Music] on the “Media” screen. Play/Pause Touch M/d to play/pause the musuc. Music saved in the mobile phone can be played in the car through Bluetooth audio streaming. Phone music can be played only when a Bluetooth phone has been connected. To play phone music, connect the Bluetooth phone to the car system. For more information on connecting Bluetooth, please refer to the user's manual [Pairing and connecting the unit and a bluetooth phone] on the page 64. Selecting Phone music files Skipping the music Touch "ASEEK/TRACKD" on the control panel to select the previous/next musuc. 3. The phone music screen is displayed. , Note The title may not be supported in some mobile phones. If the Bluetooth is disconnected while playing phone music, the music is discontinued. The audio streaming function may not be supported in some mobile phones. Only one function can be used at a time between the Bluetooth handsfree or Phone music function. For example, if you convert to the Bluetooth handsfree while playing Phone music, the music is discontinued. Playing music from the car is not possible when there are no music files stored in the mobile phone. 73 Audio system (CD/MP3/WMA/USB/iPod/Gracenote/Pandora) Selecting a source 1. Press "MEDIA" on the control panel. The [Media] menu appears on the screen. 2. Select the desired source. Playing an audio CD and MP3/WMA/USB/iPod files Disc Insert a disc into the disc slot and playback will start automatically. iPod You can play an iPod device on the unit by connecting the iPod to the USB port by using the iPod cable. Connect an iPod device to the USB port and playback starts automatically. For details about iPod, refer to the iPod User Guide. • [DISC]: Plays a disc. Audio CD • [USB]: Plays music and photo files contained in the USB device. Pandora • [iPod]: Plays music files contained in the iPod/ iPhone. The Pandora function is not supported for vehicles purchased in Canada. • [AUX]: Plays a source connected in the auxiliary device. 1. • [Phone Music]: Plays music files saved in the mobile phone. • [Pandora]: Listens to Pandora on your mobile phone. The Pandora function is not supported for vehicles purchased in Canada. • [My Photo]: Views the copied photo files to the system's storage device. , Note Download Pandora from the App Store on your mobile phone. For details, check the Pandora web site <http:// www.pandora.com>. MP3/WMA CD 2. USB Connect the unit and a bluetooth phone. For details, check the pages 64-65. You can play the files recorded in a USB memory device. Connect a USB device to the USB port and playback starts automatically. If a source is not connected to the unit, the source is not recognized. 74 3. Activate the Pandora on your mobile phone. 4. To play the Pandora from the unit, press "MEDIA" on the control panel, then touch [Pandora]. Audio system (CD/MP3/WMA/USB/iPod/Gracenote/Pandora) , Note You can play 12-cm audio CDs on your CD player. We strongly recommend only playing 12cm CDs. Please do not play 8-cm CDs (neither with nor without an adapter). On no account must designer (unusually shaped) CDs be inserted into the drives. If you ignore these recommendations, you risk damaging your unit. The system may not be able to play copyprotected audio CDs, which do not correspond to the audio CD standard or play them properly. We strongly recommend only using USB sticks (thumb drives) of well-known manufacturers. On no account must other USB devices such as hard discs or other digital equipment be connected to the USB hub. Connecting other devices can cause malfunction or even destroy the audio equipment. If the iPod or iPhone freezes, one way of remedying the situation is to reset the device. If iPod playback with your iPhone does not work with any sound, please switch the active audio path of your iPhone from Bluetooth to the dock connector. When the USB and AUX is connected simultaneously to the system, the system may make an error. Intro scanning Play/Pause The first 10 seconds of each tracks/files are played. ALL Touch "d" or "M" to play/pause the music. Disc - Audio CD USB Disc - MP3/WMA Touch [ Menu] during playback, then touch [ Scan] repeatedly. Skipping to the next track/file ALL Press "SEEK/TRACKD" on the control panel to select the next track/file. For example: audio CD Skipping to the previous track/file ALL Press "ASEEK/TRACK" on the control panel within 1 second of playback time. MEDIA Display Description Audio CD No display Cancels it. Plays the first 10 seconds of all tracks. Returning to the beginning of the current track/file ALL Press "ASEEK/TRACK" on the control panel after 1 second of playback time. Use only the retail iPod dock connector. The system may not be operated normally when connected to the composite cable. Search When the bluetooth and iPod is connected simultaneously to the system to same device, the system may make an error. Touch and hold "ASEEK/TRACKD" on the control panel during playback and then release at the point you want. MP3 CD/ USB No display Cancels it. Plays the first 10 seconds of all files. Plays the first 10 seconds of all files within folder. ALL 75 Audio system (CD/MP3/WMA/USB/iPod/Gracenote/Pandora) Repeat function Random function ALL ALL The current playing track/file or folder is played repeatedly. Touch [ Menu] during playback, then touch [ Repeat] repeatedly. Browsing through folders/files using (the) "List" menu All tracks/files are played randomly. Touch [ Menu] during playback, then touch Shuffle] repeatedly. [ Disc - Audio CD USB Disc - MP3/WMA You can listen to music by displaying the track/ folder/file list. 1. Touch [ 2. In case of Audio CD, touch the track you want. List] during playback. For example: audio CD For example: audio CD MEDIA Display Audio CD/ iPod No display MP3 CD/ USB No display Description MEDIA Display Description Audio CD No display Cancels it. Cancels it. Plays repeatedly the current track/file. Cancels it. Plays randomly all tracks. MP3 CD/ USB No display In case of MP3/WMA file, select the folder you want. If there is no folder, select the file. Cancels it. Plays randomly all files. Plays repeatedly the current file. Plays repeatedly all files within the current folder. For example: audio CD Plays randomly all files within current folder. iPod No display Cancels it. Plays randomly all songs. Plays randomly all songs within current album. 76 Audio CD MP3/WMA file • Touch w/s to scroll up or down one page. • In case of MP3/WMA file, touch the button to move to upper folder. • If you want to move to the playlist screen, touch [Now Playing]. Audio system (CD/MP3/WMA/USB/iPod/Gracenote/Pandora) 3. • Touch [Photo] to view photo files contained in the USB device. • [Composer]: plays the songs in the [Composer]. The selected track/file is played. • [Audiobook]: plays the songs/ chapters in the [Audiobook]. Selecting an iPod song Viewing detail information for MP3/WMA/iPod file 1. • [Podcast]: plays the songs/chapters in the [Podcast]. Touch [ [Info]. Menu] during playback, then touch iPod You can search within iPod for Playlist, Artist, Album, Genre, Track, Composer, Audiobook, and Podcast. , Note For details about iPod, refer to the iPod User Guide. If the search mode is accessed while playing a song, the most recent searched step is displayed. 1. If you want to move to upper folder, touch Touch [ List] during playback. Touch w or s to select the list you want to view. 2. Touch the button for the desired search method. • [Playlist]: plays the songs in the [Playlist]. • [Artist]: plays the songs in the [Artist]. • [Album]: plays the songs in the [Album]. • [Genre]: plays the songs in the [Genre]. • [Track]: plays the songs in the [Track]. 77 The detailed information (Artist, Album) is displayed. . 2. Touch [Info] again. The detailed information is turned off. Audio system (CD/MP3/WMA/USB/iPod/Gracenote/Pandora) Using the Gracenote iPod This function accesses the Gracenote Media Database and loads the music information for all of the music information for all of the music contents in the iPod/iPhone. First of all, Synchronize the unit and iPod/ iPhone to use the Gracenote. 1. If there is no cover art in your iPod/iPhone or communication is not smooth, it uses the cover art provided by Gracenote. Auto Playlist Browsing the Gracenote using (the) "List" menu Touch [Auto Playlist] during playback. 1. Touch [ List] during playback. Set the [gracenote] to [On]. For details, see "Gracenote" on the page 32. 2. This function plays similar songs to the current song randomly up to 30. , Note Connect the iPod/iPhone to the unit. The indexing time may take for a long time depending on the type and the iOS version of your iPod/iPhone. 2. Touch the Gracenote logo-marked list (Artist, Album or Genre). The synchronizing time may take for a long time depending on the number of songs and the configuration of songs of your iPod/ iPhone. After the synchronization is complete, the " Gracenote" logo is displayed on the screen. , Note Hyundai is a licensee of Gracenote technology and is not responsible or liable for information from the Gracenote Media Database. If the music information is not in the Gracenote Media Database, the [Auto Playlist] menu is deactivated. 3. Touch the desired subcategory list. 4. Touch the desired song. , Note After you change a language on the [Setup] menu and when you operate the Gracenote immediately, it may take time for the system to prepare the operation of Gracenote. If there are any problems in the Gracenote Media Database, message appears on the screen. 78 If there are no similar songs to the current song, message appears on the screen. After you change a language on the [Setup] menu and when you operate the Auto Playlist immediately, it may take time for the system to prepare the operation of Auto Playlist. Audio system (CD/MP3/WMA/USB/iPod/Gracenote/Pandora) USB device requirement This unit supports only USB Flash Drive and USB External HDD with FAT16 or FAT32 format. CD-R/CD-RW physical format should be “ISO 9660” Digital camera and mobile phone are not supported. If you record MP3/WMA files using software which cannot create a FILE SYSTEM, for example “Direct-CD” etc., it will not be possible to playback MP3/WMA files. We recommend that you use “Easy-CD Creator” which creates an ISO9660 file system. Customers should also note that permission is required in order to download MP3/WMA files and music from the Internet. Our company has no right to grant such permission. Permission should always be sought from the copyright owner. This unit is not supported when the total number of files is 10000 or more. iPod device requirement Do not extract the USB device during operation (play, etc.). Regular back up is recommended to prevent data loss. If you use an USB extension cable or USB HUB, the USB device may not be recognized. Some USB devices may not work with this unit. Compatible USB devices Devices which require additional program installation when you have connected it to a computer, are not supported. MP3 player: flash type MP3 player The MP3 player requiring installation of a driver is not supported. USB Flash Drive: devices that support USB2.0 or USB1.1. MP3/WMA file requirement Sampling Frequency / 16 - 48 kHz (MP3) 8 - 44.1 kHz (WMA) Bit rate / within 8 - 320 kbps (MP3) 5 -160 kbps (WMA) Compatibility with your iPod may vary depending on the type of your iPod. Depending on your iPod’s software version, it may not be possible to control your iPod from this unit. We recommend installing the latest software version. If you have a problem with your iPod, please visit www.apple.com/support/ ipod. This system can receive analog sound from the following iPod models. - iPod touch 1th generation - iPod mini (1st/2th generation) - iPod nano (1st/3th generation) - iPod classic (4st/5th/6th generation) - iPhone (3G/3GS/4) 79 If content on the iPod is not played back correctly, update your iPod software to the latest version. For details about updating the iPod, check the Apple web site <http://www.apple. com>. Apple is not responsible for the operation of this device or its compliance with safety and regulatory standards. Audio system (CD/MP3/WMA/USB/iPod/Gracenote/Pandora) Using the Pandora Pandora The Pandora function is not supported for vehicles purchased in Canada. Pandora is personalized internet radio that is designed to help you discover new music you'll love mixed in with music you already know. Thumbs up and thumbs down You can rate songs using thumbs up and thumbs down. Browsing the Pandora using (the) "List" menu 1. Touch [ List] during playback. 2. Select the desired station. Press [Menu] > [Thumbs up] or [Thumbs down] on the Pandora screen. You can listen to Pandora on your mobile phone. Enjoy all the stations you've created on the web. 1. Download Pandora from the App Store on your mobile phone. For details, check the Pandora web site <http:// www.pandora.com>. 2. Connect the unit and a bluetooth phone. Bookmark You can bookmark favorite artists and songs. Press [Menu] > [Bookmark Artist] or [Bookmark Track] on the Pandora screen. • Touch [By Date] to display them in the date order. For details, check the pages 64-65. 3. Activate the Pandora on your mobile phone. 4. To play the Pandora from the unit, press "MEDIA" on the control panel, then touch [Pandora]. • Touch [A-Z] to display them in alphabetical order. <Pandora screen> , Note Disconnect iPod cable when using Pandora. 80 Radio operation Listening to FM/AM radio 1. Press "FM" or "AM" on the control panel. Storing FM/AM broadcast frequency The FM/AM radio band of the most recent listened station is displayed. Storing manually Six preset frequencies each for FM1/ FM2/AM modes can be stored manually. 1. 2. Auto tuning: Press ASEEK/TRACKD on the control panel. Select the band (FM1, FM2, AM) you want to store a station into. 2. Select the desired frequency. 3. Touch and hold one of the preset buttons. Auto store The 6 frequencies with the most superior reception is stored automatically as preset buttons in corresponding order. 1. Select the band (FM1, FM2, AM) you want to store a station into. 2. Touch [ 3. Touch [ A Auto store] again to continue listening to a frequency. The scan is terminated and the current frequency is played. A Auto store] on the screen. Preset buttons - When a station is received, searching stops. Manual tuning: Turn the "TUNE" button on the control panel in clockwise or counter-clockwise direction. - The frequencies move up and down step by step. Preset tuning: Press the preset buttons of the desired broadcast frequency. Preset buttons The frequency is stored. , Note When the frequency is preset on a number of which another frequency has already been preset, the previously preset frequency is erased. , Note Radio data may not be displayed according to the station. 81 Radio operation Scanning FM/AM broadcast frequency Scanning all frequencies This function scans all frequencies and plays only frequencies with superior reception for 10 seconds each. 1. 2. Touch [ Scanning preset frequencies This function scans the 6 frequencies stored as preset frequencies in the current band for 10 seconds each. 1. Touch [ 2. Touch [ Scan Preset] again to continue listening to a frequency. The scan is terminated and the current frequency is played. Scan Preset]. Scan]. Touch [ Scan] again to continue listening to a frequency. The scan is terminated and the current frequency is played. 82 Radio operation Listening to XM radio 1. , Note Press "XM" on the control panel. There are 6 preset channels each for XM1, XM2, and XM3. The XM radio band screen of the most recent listened station will be displayed. Selecting with Channel Up/Down Press ASEEK/TRACKD on the control panel. - The previous or next channel will be selected. Selecting with Category Up/Down 2. Press "XM" on the control panel. Each press will change the bands in the following order: XM1 t XM2 t XM3 t XM1 ... 3. Select the desired broadcast frequency. For details, Refer to the [Selecting XM broadcast channel]. Selecting XM broadcast channel Selecting a channel through preset Press the preset button of the desired channel. Preset buttons Press / on the screen. - The previous or next category will be selected. , The channel list may be different according to the region. Selecting a channel through manual search Turn the "TUNE" button on the control panel in clockwise or counter-clockwise direction to display the previous or next channel information. Selecting channel through channel/ category list 1. Note Press [List] on the screen. • If in category mode, the all category list screen will be displayed. Select the desired category button to display the channel list screen for the corresponding category. If in Channel mode, the channel is selected from all channels. If in Category mode, the first channel of each category is selected. If there is no operation for about 5 seconds in Category mode, it will be changed to Channel mode. icon is highlighted, it is the channel If the icon is highlighted, it is the mode. If the category mode. • If in channel mode, the all channels list screen will be displayed. If you press ASEEK/TRACKD or turn "TUNE" button in Category mode, the channel is moved to up/down within the selected category. Press and hold ASEEK/TRACKD button on the control panel or / on the screen to move to the nearest desired channel. Once the button is released, the current channel will be selected. 83 2. Select the desired channel button. The previous screen will be restored and the selected channel will begin playing. Radio operation Selecting channel by directly inputting the channel number Storing XM preset 1. Select the desired channel. 1. 2. Press and hold the preset button . The frequency will be saved along with beep sound. Press [Menu] > [Search] on the XM radio screen. Scanning XM broadcast channel 1. Press [Menu] on the XM radio screen. 2. Preset Scan: Press [Preset Scan]. Preset buttons 2. Input desired channel number, and press [Search]. - scans the 6 preset channels within the current band for 10 seconds each. Six preset frequencies each for XM1/ XM2/ XM3 modes can be stored. Scan: Press [Scan]. - scans all channels for 10 seconds each if in channel mode. The previous screen will be restored and the selected channel will begin playing. 3. 84 Press [Preset Scan] or [Scan] again to stop playing the channel. The scan will be terminated and the current channel will continue to be played. Photo system (USB) Viewing a photo Viewing slideshow You can view photo files contained in the USB device. 1. Touch [ Menu] > [ menu buttons screen. 2. 1. Rotating a photo SlideShow] on the 1. Touch [ Menu] > [ menu buttons screen. Rotation] on the Touch the timer button to change the slideshow interval. 2. Touch [Rotation] repeatedly to rotate the photo clockwise. The slideshow is played according to the time interval. 3. Touch [Exit] to stop it. Connect a USB device to the USB port. The photo is displayed on the screen. 2. Touch the screen. The menu buttons are displayed on the screen. <Menu buttons screen> 3. 3. Touch the screen to stop the slideshow interval. Touch "A/D" to view the previous/next file. Photo file requirement Max pixel in width: 3000 x 4000 pixel File extensions: “*.jpg”, “*.bmp”, “*.gif” Maximum file capacity: 1.5 MB Some files may not operate due to a different recording format or the condition of file. CD-ROM file format : ISO 9660/ JOLIET 85 Photo system (USB) Enlarging a photo 1. 2. Touch [ Menu] > [ menu buttons screen. Imagescale] on the Copying photo files to the storage device of the system 1. Select the desired photo file on the menu buttons screen. 2. Menu] > [ Touch [ menu buttons screen. 1. Photoframe] on the Press "MEDIA" on the control panel. The [Media] menu appears on the screen. 2. Touch [My Photo]. 3. The photo file is displayed on the screen. Touch [+] repeatedly to enlarge the photo. To return to the normal photo size, touch [-]. 3. Viewing the copyed photo files to the storage device of the system Touch [Exit] to stop it. 86 Photo system (USB) Viewing photo file information Displays the title, resolution, and type of the photo file 1. 3. Menu] > [ Touch [ buttons screen. Browsing through photo file using (the) "List" menu 1. Touch [ List] on the menu buttons screen. 2. Touch the dedired photo file from the list. Info] on the menu The photo file information is displayed on the screen. Touch w/s to scroll up or down one page. • Touch the folder. button to move to upper • If you want to move to the playlist screen, touch [Now Playing]. • Touch [Music] to view music files contained in the USB device. 87 Auxiliary device operation Using an AUX source 1. Connect an auxiliary device to the AUX terminal. 2. Play the auxiliary device. , Note Some auxiliary devices that do not have the video source may not produce output to the video screen. Video is not available while driving. (Based on the traffic regulation, Aux Video is only available whenever vehicle is in stop condition with parking brake.) 88 Voice recognition system Operating voice command Condition for voice command system 1. Most of the function can be operated by voice. Please follow the following instructions for optimal voice recognition performance. 3. Press the voice recognition button and say the desired voice command after the sound of the beep. , The microphone is positioned above the driver so that voice commands can be spoken while maintaining a proper posture. Special symbols of phonebook name are not considered in voice recognition. Ex) James-Smith : "James Smith" Once the icon changes into the icon on the pop-up screen with a beep sound, say the desired voice command. House number or digits in Phonebook name should be spoken discretely. Ex) A12345 : "A 1 2 3 4 5" It may take time for the system to prepare voice recognition of phonebook name or Gracenote. Depending on the specifications, some commands may not be supported. The inputted command is fed back to the screen and voice system. If you want to return to the previous step, say "Back". Note The system voice comment "Please say a command" will not be provided when you set the voice recognition mode to [Expert]. For details, see "Voice Recognition" on the page 30. 2. Note Press the key shortly to input a voice command from among the system voice comments. The system voice instruction comment will immediately terminate. When icon changes into the icon the with a beep sound, input the desired voice command. Press the key on the steering wheel remote control. A voice command window will be displayed on the lower side of the screen followed by a "Please say a command" system voice comment. Close all windows and the sunroof. The performance of the voice recognition can be improved if the environment of the car interior is quiet. Pronounce the voice commands naturally and clearly as if in a normal conversation. , Basic operation for voice command control • [Voice command list], page 95~107. • If the exact command is not known, use the "Help" command to view the commands list in detail. 89 , Note The commands which can currently be inputted are displayed on the screen in green. To terminate the voice recognition system, either say "cancel" or press the key on the steering wheel remote control. If you press the hard keys during the operation of the voice recognition system , the screen will terminate the voice recognition system. Voice recognition system Voice command Help 1. 3. Press the key on the steering wheel remote control. A voice command window will be displayed on the lower side of the screen followed by a "Please say a command" system voice comment. Searching destination by voice command Find nearest POI Sets a POI near the current position as the destination for route guidance through POI category search. 4. 2. Say the name of the desired menu. (ex : "radio help") Say the desired voice command. 1. Press the key on the steering wheel remote control. 2. Once the icon changes into the icon on the pop-up screen with a beep sound, say "find nearest POI". 3. Select the desired main category. Once the icon changes into the icon on the pop-up screen with a beep sound, say "Help". If the proper Help menu is already known, voice commands, such as "radio help" can be inputted directly. 90 Voice recognition system 4. Select the desired subcategory. Destination POI by phone number 4. Say "Show List" to view the resulting search list. Sets the destination by searching the phone number of the facility. 5. Select the desired POI from the list and say the line number for the corresponding menu. Ex) "Line 1". 6. Say "Calculate Route" if guidance to the selected position is desired, or say "Show Map" to verify the location of the selected position on the map. 1. Press the key on the steering wheel remote control. 2. Once the icon changes into the icon on the pop-up screen with a beep sound, say "Destination POI by Phone number". 3. Input the 10 numbers for the phone number. , Note Continuous recognition of phone numbers is possible, and the recognized result will be displayed in block units. To correct a block unit, say "Correction". To delete the entire result, say "Delete". To have the input read back, say "Repeat". 91 5. Say "Calculate Route" if guidance to the selected position is desired, or say "Show Map" to verify the location of the selected position on the map. Voice recognition system Hospital/Police station/Dealership (Find emergency) Searches for an emergency facility which is nearby the current position and sets it as the destination for route guidance. Emergency facilities are police stations, hospitals, and dealerships. 1. Press the key on the steering wheel remote control. 2. icon changes into the Once the icon on the pop-up screen with a beep sound, say the voice command. ex) "Hospital" Destination by address book Select the desired location from the list and say the line command. 4. Say "Calculate Route" if guidance to the selected position is desired, or say "Show Map" to verify the location of the selected position on the map. Select the desired location from the list and say the line command. 5. Say "Calculate Route" if guidance to the selected position is desired, or say "Show Map" to verify the location of the selected position on the map. Sets one of the list of previously registered addresses in the address book for the user as the destination. 1. Press the key on the steering wheel remote control. 2. Once the icon changes into the icon on the pop-up screen with a beep sound, say "Destination by address book". 3. 3. 4. Select the desired user name (Address book name). 92 Voice recognition system Previous destination Go home Making a call by voice command Sets one of the previous destination as the current destination. Sets the previously registered home address as the destination for route guidance. Contacts 1. Press the key on the steering wheel remote control. 1. Press the key on the steering wheel remote control. Makes a call by searching the phone number. 2. Once the icon changes into the icon on the pop-up screen with a beep sound, say "Previous destination". 2. Once the icon changes into the icon on the pop-up screen with a beep sound, say "Go home". 1. Press the key on the steering wheel remote control. 2. Once the icon changes into the icon on the pop-up screen with a beep sound, say "Contacts". 3. Say the desired person name. (ex : "James Smith") 4. Say the line command. (ex : "Line 1") 5. Say the desired phone number type. (ex : "Mobile 1") Destination by memory point <1 to 4> Sets a previously registered memory point as the destination for route guidance. 3. 4. Select the desired location from the list and say the line command. (ex : "Line 4") 1. Press the key on the steering wheel remote control. 2. icon changes into the icon Once the on the pop-up screen with a beep sound, say "Destination by memory point 1". Say "Calculate route" if guidance to the selected position is desired, or say "Show map" to verify the location of the selected position on the map. 93 Voice recognition system Redial 4. Select the desired artist from the list and say the line command. (ex : "Line 4") 5. Say "Play" to play the artist or say "Show" to display the artist list. Makes a call by redialing. 1. Press the key on the steering wheel remote control. 2. Once the icon changes into the icon on the pop-up screen with a beep sound, say "Redial". 4. Select the desired phone number from the list and say the line command. (ex : "Line 1") Using the Gracenote by voice command , Note Search Artists Call History Makes a call by searching the Call History list. 1. Press the key on the steering wheel remote control. 2. Once the icon changes into the icon on the pop-up screen with a beep sound, say "Call History". 3. 1. Press the key on the steering wheel remote control. 2. Once the icon changes into the icon on the pop-up screen with a beep sound, say "Search artists". 3. Say the artist name command. Say the desired one of the Dialed Call, Received Call, or Missed Call. (ex : "Received Call") 94 The procedure to play the album and genre is similar as playing the artist. Gracenote commands will only work in the ipod mode. Voice recognition system Voice command list Command list of AV system Command Operation Mode Radio Plays the most recent frequency for the most recently operated band. All AM, AM Radio, Radio AM Plays the most recent frequency for the corresponding band. All FM, FM Radio, Radio FM Plays the most recent frequency for the corresponding band. In the case of FM, the most recent frequency within the most recently played FM1 or FM2 band is played. All FM 1 Plays the most recent frequency for FM1 band. All FM 2 Plays the most recent frequency for FM2 band. All iPod, Play iPod Plays the songs within the iPod if the iPod has been connected to the device. All CD, Compact Disc, Play CD, Play Compact Disc, Disc If the DISC inserted in the CDP is either a CD or MP3 DISC, then the CD or MP3 will be played. All USB, USB Drive, USB Stick, USB Player, USB Memory, Play USB, Play USB Drive, Play USB Stick, Play USB Player, Play USB Memory If the USB has been connected to the device, plays the MP3 or photo files within the USB. All Scan, Scan On Scans all frequencies/channels within the current band for 10 seconds each. Audio Mode : AM, FM, XM, CD MP3, USB MP3 Scans all files for 10 seconds each. Scan Off Cancels the scan function. Audio Mode : CD MP3, USB MP3 Preset Scan, Preset Scan On Scans the 6 preset frequencies/channels of the current band. Audio Mode : AM, FM, XM Seek Up Searches and plays the next frequency of the current band. Audio Mode : AM, FM, XM 95 Voice recognition system Seek Down Searches and plays the previous frequency of the current band. Audio Mode : AM, FM, XM Auto Store, Auto Preset Searches all frequencies within the current band and stores the 6 frequencies with the most superior reception as preset buttons. Audio Mode : AM, FM Info, Information, What's Playing Shows the information of current playing file/song. Audio Mode : iPod, CD MP3, USB MP3 Next Song Plays the next track/file/song. Audio Mode : iPod, CD, USB Next Track, Track Up Plays the next track/file/song. Audio Mode : iPod, CD, USB MP3, Pandora Previous Song Plays the previous track/file/song. Audio Mode : iPod, CD, USB MP3 Previous Track, Track Down Plays the previous track/file/song. Audio Mode : iPod, CD, USB MP3 Repeat, Repeat On Repeats the current playing track/file/song. Audio Mode : iPod, Disc, USB MP3 Repeat Off Cancels the repeat function. Audio Mode : iPod, CD, USB MP3 Shuffle, Shuffle On, Random, Random On Plays all tracks/files/songs in random order. Audio Mode : iPod, CD, USB MP3 Shuffle Off, Random Off Cancels the random playback. Audio Mode : iPod, CD, USB MP3 Next File Plays the next file. Audio Mode : CD MP3, USB MP3 Previous File Plays the previous file. Audio Mode : CD MP3, USB MP3 96 Voice recognition system Next Folder Plays the first file/chapter of the next folder. Audio Mode : CD MP3, USB MP3 Previous Folder Plays the first file/chapter of the previous folder. Audio Mode : CD MP3, USB MP3 Folder Repeat, Folder Repeat On, Repeat Folder, Repeat Folder On Repeats all filess within the current playing folder. Audio Mode : CD MP3, USB MP3 Play Starts playback. Audio Mode : iPod, CD, USB MP3, Pandora Stop, Pause Stops/pauses playback. Audio Mode : iPod, CD, USB MP3, Pandora Folder Scan, Folder Scan On, Scan Folder, Scan Folder On Plays all files in the folder in which the current playing file is located for 10 seconds each. Audio Mode : CD MP3, USB MP3 Folder Shuffle, Folder Shuffle On, Shuffle Folder, Shuffle Folder On Plays all files within the current playing folder in random order. Audio Mode : CD MP3, USB MP3 Playlist, Show Playlist, Browse Playlist, Explore Playlist, View Playlist, Search Playlist, Seek Playlist, Look for Playlist, Get Playlist Shows the playlist. Audio Mode : iPod Playlist <Playlist Name>, Show Playlist <Playlist Name>, Browse Playlist <Playlist Name>, Explore Playlist <Playlist Name>, View Playlist <Playlist Name>, Search Playlist <Playlist Name>, Seek Playlist <Playlist Name>, Look for Playlist <Playlist Name>, Get Playlist <Playlist Name> Shows the song of the playlist. Audio Mode : iPod Play Playlist <Playlist Name> Plays the song of the playlist. Audio Mode : iPod 97 Voice recognition system Play All Tracks, Play All Songs Plays all files/songs Audio Mode : iPod, CD MP3, USB MP3 Channel Up* Plays the next channel of the current band. Audio Mode : XM Channel Down* Plays the previous channel of the current band. Audio Mode : XM XM* Plays the last channel within the last band from XM1, XM2, and XM3. All XM 1* Plays the most recent channel for XM1 band. All XM 2* Plays the most recent channel for XM2 band. All XM 3* Plays the most recent channel for XM3 band. All AM <530 ~ 1710>, AM Frequency <530 ~ 1710>, <530 ~ 1710> AM Plays the desired AM band frequency. All <530 ~ 1710> Plays the desired AM band frequency. Audio Mode : AM FM <87.5 ~ 107.9>, FM Frequency <87.5 ~ 107.9>, <87.5 ~ 107.9> FM Plays the desired FM band frequency. All <87.5 ~ 107.9> Plays the desired FM band frequency. Audio Mode : FM AM Preset <1 ~ 6> Plays the desired AM band preset frequency. All FM 1 Preset <1 ~ 6> Plays the desired preset frequency of FM1 band. All FM 2 Preset <1 ~ 6> Plays the desired preset frequency of FM2 band. All XM 1 Preset <1 ~ 6>* Plays the desired preset channel for XM1 band. All XM 2 Preset <1 ~ 6>* Plays the desired preset channel for XM2 band. All XM 3 Preset <1 ~ 6>* Plays the desired preset channel for XM3 band. All Preset <1 ~ 6> Plays the desired preset frequency or channel of the current band. Audio Mode : AM, FM, XM 98 Voice recognition system Radio Preset <1 ~ 6> Plays the desired preset frequency of AM or FM band. Audio Mode : AM, FM XM Preset <1 ~ 6>* Plays the desired preset channel of XM1, XM2, or XM3 band. Audio Mode : XM XM Channel <0 ~ 255>* Plays the desired channel of the current band. Audio Mode : XM Channel <0 ~ 255>* Plays the desired channel of the current band. Audio Mode : XM CD Track <1~99>, Play CD Track <1~99> If the DISC inserted in the CDP is a CD, then CD Mode will start and plays the desired track. All Track <1 ~ 99> Plays the desired track. Audio Mode : CD CDDA My Photo If there is a photo file o the storage device of the system, shows the image files. All Pandora* Shows the pandora screen. All except Phone mode (iPod not connected) Stations* Shows the station list. Audio Mode : Pandora (iPod not connected) Thumbs Up* Displays the Thumbs Up. Audio Mode : Pandora (iPod not connected) Thumbs Down* Displays the Thumbs Down. Audio Mode : Pandora (iPod not connected) 99 Voice recognition system Command list of Gracenote Command Operation Mode Artists, Browse Artists, Explore Artists, View Artists, Search Artists, Seek Artists, Look for Artists, Get Artists Shows the artist list. Audio Mode : iPod Albums, Browse Albums, Explore Albums, View Albums, Search Albums, Seek Albums, Look for Albums, Get Albums Shows the album list. Audio Mode : iPod Genres, Browse Genres, Explore Genres, Shows the genre list. View Genres, Search Genres, Seek Genres, Look for Genres, Get Genres Audio Mode : iPod In gracenote mode, plays similar song to the current artist/album/genre randomly. <Artist/Album/Genre Name>, Browse <Artist/Album/Genre Name>, Explore <Artist/Album/Genre Name>, View <Artist/Album/Genre Name>, Search <Artist/Album/Genre Name>, Seek <Artist/Album/Genre Name>, Look for < Artist/Album/Genre Name>, Get <Artist/Album/Genre Name> Audio Mode : iPod Play <Artist/Album/Genre Name> In gracenote mode, plays similar song to the current artist/album/genre randomly. Audio Mode : iPod More Like This, Auto Playlist In gracenote mode, plays similar song to the current song randomly. Audio Mode : iPod 100 Voice recognition system Command list of Phone Command Operation Mode Phone, Hands Free Displays the phone screen. All Contacts, Phone Book, Call Name, Call by Name, Dial Name, Dial by Name Makes the call to the name. All Call Number, Call by Number, Dial Number, Dial by Number Makes the call to the number. All Redial, Last Call The recently called number is redialed. All Call History, Recent Calls The user can select a number from the dialed, received, and missed calls. All BT Audio, Bluetooth Audio, Phone Music, Play BT Audio, Play Bluetooth Audio, Play Phone Music Plays the phone music. All except Phone mode Call <3 ~ 13 digits>, Dial <3 ~ 13 digits> Makes the call to the number. All Dialed Calls Displays the list of the dialed calls. All Received Calls Displays the list of the received calls. All Missed Calls Displays the list of the missed calls. All Dial <Name>, Call <Name> Makes the call to the name. All Dial <Name> on Mobile/in Office/at Home, Call <Name> on Mobile/in Office/at Home Makes the call to the name. All 101 Voice recognition system Command list of XM data* Command Operation Mode XM Stocks Displays XM Stocks screen. All My Stocks Displays XM Stocks screen. All Sport Scores, XM Sports Displays XM Sports screen. All My Sports Displays XM Sports screen. All XM Weather Displays XM Weather screen. All XM Traffic, Traffic List, Traffic Report Displays XM Traffic Information screen. All Command list of Map* Command Operation Mode Show Map, Map, Current Location, Navigation Displays the current position of the vehicle. All Cancel Route Deletes the designated destination and terminates the route guidance. All Voice Guidance, Voice Guidance On Turns the Voice Guidance On. All Voice Guidance Off Turns the Voice Guidance Off. All Voice Guidance Louder Increases the Voice Guidance volume by 1 level. All Voice Guidance Softer Decrease the Voice Guidance volume by 1 level. All Repeat Voice Guidance Repeats the route guidance. All Distance to Destination Reports the remaining distance until destination by voice. All Time to Destination Reports the remaining time until destination by voice. All 102 Voice recognition system Route Overview If the destination has been set, displays the whole route screen until the destination. All Start Guidance Sets the scroll mark displayed on the map as the destination and starts route guidance. All Zoom In Decreases the map zoom by one level. Map Zoom Out Increases the map zoom by one level. Map 2D Displays the 2D screen. Map 3D Displays the 3D screen. Map North Up Displays the map in North Up mode. Map Heading Up Displays the map in Heading Up mode. Map Zoom Level <1 ~ 14> Displays the map in the zoom level selected from the 14 levels. Map Zoom In Minimum Displays the map screen in the maximum zoom level. Map Zoom Out Maximum Displays the map screen in the minimum zoom level. Map Route Info If the destination has been set, displays the route information. Map Show <POI Category Name> Displays a POI near the current position as the destination for route guidance through POI category search. Map Hide <POI Category Name> Cancels a POI near the current position as the destination for route guidance through POI category search. Map Hide All Hides all category points displayed on the map screen Map Detour Displays the detour route screen. All Detour 1, 2, 5, 10 Kilometer(s) Searches detour routes within a <1|2|5|10> kilometer radius. All Detour 1, 2, 5, 10 Mile(s) Searches detour routes within a <1|2|5|10> mile radius. All Re-route, Route Recalculates the route with the different route. All Re-route Recommended, Replan Recommended Route Recalculates the route with the recommended route. All 103 Voice recognition system Re-route Shortest, Replan Shortest Route Recalculates the route with the shortest route. All Re-route Minimize Freeway, Replan Minimize Freeway Recalculates the route that does not via to the freeway. All Re-route Minimize Toll Road, Replan Minimize Toll Road Recalculates the route that does not via to the toll road. All Command list of Destination* Command Operation Mode Destination Displays the [Destination] menu. All POI Search Sets a destination for route guidance through POI category search. All Previous Destination Sets one of the previous destination as the current destination. All Destination POI by Phone Number Sets the destination by searching the phone number of the facility. All Go Home, Navigate to Home Sets the previously registered home address as the destination for route guidance. All Go to Office, Navigate to Office, Navigate to Work Sets the previously registered office address as the destination for route guidance. All Find Address, Enter Address, Find Destination, Enter Destination Sets the destination through address search for route guidance. All Destination by Address Book Sets one of the list of previously registered addresses in the address book for the user as the destination. All Find Nearest POI Sets a POI near the current position as the destination for route guidance through POI category search. All Find Nearest <Category Name> Sets a POI near the current position as the destination by directly inputting the POI name for route guidance. All 104 Voice recognition system Find Emergency Sets a Police Station, Hospital, or Dealership near the current position as the destination All Police Station Sets a Police Station near the current position as the destination All Hospital Sets a Hospital near the current position as the destination All Dealership Sets a Hyundai Dealership near the current position as the destination All Navigate to <1 ~ 4>, User Favorite <1 ~ 4>, Destination by Memory Point <1 ~ 4> Sets a previously registered favorite place as the destination for route guidance. All Command list of Help Command Operation Mode Help Displays the main Help screen. All Radio Help Displays the FM/AM radio related command list. All iPod Help Displays the iPod related Command list. All USB Help Displays the USB related command list. All CD Help Displays the DISC mode related command list for the disc inserted in the CDP. All Phone Help Displays the Phone help screen. All My Photo Help Displays the Photo related command list. All Pandora Help* Displays the Pandora related command list. All Map Help* Displays the Map related command list. All Destination Help* Displays the Destination related command list. All XM Help* Displays the XM radio related command list. All Other Help Displays the Aux or Eco Coach related command list. All 105 Voice recognition system Command list of Eco Coach* Command Eco Coach Operation Mode Operation Mode Displays the Eco Coach screen. Common Command list Command Cancel, Exit, Quit Ends the Voice recognition system. All Audio On Turns on the Audio/Video. All Audio Off Turns off the Audio/Video. All Local Command list Command Operation Yes, Yeah, Yep, OK Say "Yes, Yeah, Yep, or OK" When the real command is equal to the command of the system. No, Nope Say "No or Nope" When the real command is different to the command of the system. Next Page, More Moves to the next page from the list. Previous Page Moves to the previous page from the list. Back, Undo, Return, Go Back Moves to the previous screen. Line <1 ~ 6> Selects the desired line. 106 Mode Voice recognition system POI Category list* All Restaurants All Automotive All Travel Bookstore Electronics Store Hardware Store All Shopping All Recreation All Financial Service Gifts Shop Home Specialty Store All Community All Services Fast Food Restaurant Sporting Goods Store American Restaurant French Restaurant Italian Restaurant Clothing Shop Shoe Store Pharmacy Amusement Park Museum Cinema Sports Activities Sports Complex Golf Course Winery Video & Game Rental Ski Resort Recreation Area Other Recreation Bank ATM Check Cashing Service Money Transfer Business Facility Police Station Post Office Library Court House Fire Department Convention Center City Hall Civic Center School Government Offices Waste & Sanitary Utilities Hospital Dentist Photography Tax Service Medical Service Attorney Funeral Director Hair & Beauty Cleaning & Laundry Social Service Physician Communication Services Tailor & Alteration Mover Services Continental Restaurant Mexican Restaurant Japanese Restaurant Chinese Restaurant Korean Restaurant Vegetarian Food Restaurant Seafood Restaurant Latin American Restaurant Asian Restaurant African Restaurant Coffee Shop Other Restaurants Hyundai Dealership Gas Station Parking Auto Service Road Assistance Automobile Dealership Auto Parts Rest Area Car Wash Motorcycle Dealership Airport Hotel Tourist Information Travel Agent Tourist Attraction City Center Rental Car Agency Campground Ferry Terminal Bus Station Local Transit Train Station Department Store Convenience Store Shopping Center Music Store Grocery Store The * marked command list may not be supported according to the specifications. 107 Blue Link The Blue Link® function is supported for vehicles purchased in USA. Blue Link® Hyundai aims to offer differentiated customer values through a `Connected Car Life,’ which is to provide consumers with fast and reliable IT technology. As consumers’ lifestyles become more and more mobile in thanks to remarkable advances in smart phones, tablet PCs and overall wireless telecommunication, new lifestyle patterns demand seamless connection between one’s office, home, outdoors and automobiles. Using the Rearview Mirror Key Rearview mirror Selecting the rearview mirror key will allow you to make service required inquiries, POI info searches, and emergency rescues by connecting to the Blue Link Center. Such features can be used only after subscribing to the Blue Link service. Automobile companies are now faced with the task of shifting their paradigm from vehiclecentered services to customer value-centered services, with the ultimate goal of securing global leadership in the field of vehicle IT and telematics. Hyundai Motor plans to achieve this by realizing a terminal platform flexible to changes in IT technology, cooperating with global IT companies, creating an eco-system and providing the latest contents & services based on an open environment. Please join in blueLink service to use the blueLink. 1 1. 2 3 (Blue Link) button Press the (Blue Link) button to request inquiries, consultation, POI download, Manual service, or Diagnostic service, etc related to blueLink service. Press the call. (Blue Link) button to finish the 108 2. (POI IVR) button (POI IVR) button for navigationPress the related services. Press the call. (POI IVR) button to finish the 3. SOS button In the case of an emergency, requests for help to the Blue Link center. Call is connected to the Blue Link emergency rescue center. Repressing the key will end the call. Blue Link Safety and Security Emergency Assistance (SOS) Customers request emergency 911 assistance by pressing the dedicated SOS button in the vehicle. This action transmits vehicle information and location to specially trained response specialists, who assist in coordinating the dispatch of appropriate emergency assistance to the customer. The response specialist remains on the line with the customer until advised assistance has arrived. Automatic Crash Notification (ACN) Vehicle Immobilization Provides immediate assistance when an accident occurs and an airbag is deployed. In this event, an ACN signal, containing customer and location information, will automatically be transmitted to the response center. Upon receipt of the signal, a response specialist will attempt to establish voice communications with the vehicle occupants and, forward any pertinent information to emergency services. Used with Stolen Vehicle Recovery, this enables law enforcement to send a signal to the vehicle which immobilizes the engine management system, thus preventing startup. This capability is only valid when the ignition is off, but can be saved for later immobilization if the vehicle is on or in motion at the time of signal transmission. Vehicle Slowdown Stolen Vehicle Recovery In the event a customer’s vehicle is reported stolen (and a stolen vehicle report has been filed with the appropriate police department), the response center can provide assistance to the police in an attempt to recover the vehicle. 109 Used with Stolen Vehicle Recovery, this enables law enforcement to gradually reduce the engine power of the vehicle, thus slowing it down to safe levels. A warning shall be transmitted to the driver prior to the slowdown procedure. Blue Link Downloading POI through the blueLink service center Sending your car position to a friend Enables Point of Interest searches using an automated voice system. Results can be downloaded to the vehicle system. Live Operators provide additional support, if needed. Through Blue Link, the locations of your vehicle and friend’s vehicle can be shared. When sending the location of your vehicle to a friend, the location is transmitted to a friend via a Blue Link center call. The POI List is managed in a way the 25 FIFO. 1. (POI IVR) button on the Press the rearview mirror. 2. Following order updates my location to friend. 3. The location information of your vehicle is transmitted to your friend’s vehicle. 4. You can check incoming friend position information. 1. Press the (POI IVR) button on the rearview mirror. 2. Download the desired POI (Point of Interest) from blueLink service center. 3. When the POI (Point of Interest) is downloaded from blueLink service center, you can check the downloaded POI (Point of Interest) to the vehicle system. 4. Press [INFO/SETUP] > [Info] > [Blue Link] > [Download POI]. 5. From Gas Station, POI, and Restaurant, select the desired POI category menu. You can check the received POI information within the Blue Link Center. Ex) POI • Information displayed in the list includes names of POIs and the distance from the current position to the POI destination. • Selecting [Distance] or [Date] button will sort the list according to the selected category. Press [INFO/SETUP] > [Info] > [Blue Link] > [Location Sharing]. • Press the [Delete All] button to delete the entire POI list. 6. The POI details information (POI name, address, and telephone number) is displayed. • Press [View Map] to display the POI position on the map screen. • Press [Call POI] to connect a call to the corresponding POI telephone number. This feature will not operate if the Bluetooth phone is not connected to the vehicle. • Press the [Delete] to delete the to delete the corresponding POI. 110 5. The [Location Sharing] screen is displayed. Select the desired list. • Information displayed in the list include friend's vehicle location and the distance from the current position to your friend’s vehicle. • Selecting [Distance] or [Date] button will sort the list according to the selected category. • Press the [Delete All] button to delete the entire POI list. Blue Link 6. The friend's vehicle location details information (POI name, address, and telephone number) is displayed. • Press [View Map] to display the POI position on the map screen. • Press [Call POI] to connect a call to the corresponding POI telephone number. This feature will not operate if the Bluetooth phone is not connected to the vehicle. • Press the [Delete] to delete the to delete the corresponding POI. Car Management Information What does the bar graph and horizontal line mean? Eco-Coach Every 2.5 minutes, Eco Coach compares your fuel economy against the government tested average (EPA) or other similar Hyundai models (community), based on your preference. Each month, or after every tank fill up, Eco Coach rates your extended average and gives you a reward star if you best the average. This handy feature can help you drive more efficiently by providing you with an automatic online report. Eco-Coach tracks your vehicle’s mileage and C02 emissions on a continual and historical basis and then offers recommendations to help promote better fuel efficiency. See your MyHyundai web page for more information. What is Eco Coach? Every 2.5 minutes, Eco Coach compares your fuel economy against the government tested average (EPA) or other similar Hyundai models (community), based on your preference. Each month, or after every tank fill up, Eco Coach rates your extended average and gives you a reward star if you best the average. See your MyHyundai web page (www.myHyundai .com) for more information. 1. What is My Eco MPG? Your actual fuel economy average over 2.5 minutes. This value is also shown in bar graph as your “now” rating. What are Eco Rewards? Press [INFO/SETUP] > [Info] > [Eco-Coach]. If you beat the average (the EPA or community), you will receive an Eco Reward point. The [ECO Driving Information] menu appears on the screen. See your MyHyundai web page for more information. 2. • Dark-brown: 20% less than Community level • Yellow: from 20% of Community level to less than Community level • Green: more than Community level 111 For the details, press [Help]. Blue Link , Note Eco-Coach will not operate if the vehicle ignition is not turned on. Please operate with the ignition turned on. Recall and campaign advisor Blue Link Subscription Upon receiving a recall or campaign notice, the following pop-up is displayed. If you have not subscribed to the Blue Link service, the following pop-up is displayed. For more information about the Blue Link service, press the <Recall message> Automatic DTC (Diagnostic Trouble Code) Notification Provides explanation and repair assistance using vehicle data and off-board diagnosis capabilities to better inform the customer of vehicle trouble alerts. A combination of invehicle display alerts and what to do next (this information is also sent to the customer’s preferred dealer to assist with the repair process). <Campaign message> Maintenance Alert Notification Before 250 miles from Service expiration, message should be shown. Notifies customers via website, email or SMS message that an upcoming service is due at various thresholds leading up to the event. Configured online, the alerts explain what is included in particular maintenance intervals. 112 (Blue Link) button. Image Encoder Image conversion program This program is a image conversion program. If you have a image (photo) file that can not view on the unit, convert the file by using the image conversion program. File extensions supported on the image conversion program are as follows. : “*.jpg”, “*.bmp”, “*.gif”, “*.png”, “*.pcx”, “*.tif” Installing the image conversion program 1. Insert the supplied CD into the CD-ROM. 2. Click [Image Encoder] on the screen. 3. Follow the displayed instructions. 4. After finishing the installation, click [Finish]. 12. Preview window GUI screen 13. Progress bar 16 15 14 13 1 2 3 4 5 6 7 12 11 8 9 1. 10 “Source directory change” button 2. Source directory path 3. Working directory path 4. “Working directory change” button 5. “Source directory” button (Source files are displayed in the list box.) 6. Selects or cancels all the items. 7. Selects the desired items. 8. The image files in the selected directory. 9. “Working directory” button (Converted files are displayed in the list box.) 10. Selects the GUI Language. 11. Information of the selected image file(Width X Height X Bit Per Pixel) 113 14. “Stop” button 15. “Exit” button 16. “Start” button Image Encoder Using the image conversion program 1. Double click the video conversion program icon on your desktop. 2. Click the “Source directory change” button. 3. Select the source directory. 4. Select the desired items and click the “Start” button. Checking the converted image 1. Click the “Working directory” button. 3. The converted image files are displayed. Select the file and make sure the converted files in the preview window. 114 Troubleshooting Cannot identify current location. (GPS not receiving) GPS cannot be used indoors and must be connected to a power source with ACC in a vehicle in a location where the signal from the satellite can be received easily. When initially connecting the GPS, it usually takes about 10 minutes to be working normally, but the connection speed can differ depending on the weather condition and surrounding obstacles. If the GPS connection is unstable for a long period of time, try the following. Cannot see the map. Map matching Perhaps you cannot see the map even when you have executed the navigation menu. As mentioned, the GPS systems used by this Navigation System are susceptible to certain errors. Their calculations may on occasion place you to a location on the map where no road exists. In this situation, the processing system understands that vehicles travel only on roads, and is able to correct your position by adjusting it to a nearby road. This is called map matching. This happens when the data within the memory is damaged. Delete all the data in the memory and install the data again. If the issue persists after installation, contact the A/S center. The path guide is different from the actual path (path guide error) When the road is closely parallel. Check if the product is connected to a power source. When the splitting road angle is very small. Check if your vehicle is in a location where the sky can be seen well. When driving on a road that is narrowing fast. If there are high buildings or if you are under a tree, move to a location where there are no obstacles. Cannot hear the voice guide. The volume is not set correctly or turned off. Adjust the volume of voice guidance. When there is an adjacent road when turning. When driving through mountains or where the road is too curvy. When the starting, passing and arriving locations are too close within 1km. When you have set the starting, passing, or arriving locations more than 1km away from the road. When driving through tunnels. There is a difference between the driving road and the road on the map in the product. Even though GPS is usually very accurate, there is a small margin for error. When the GPS receiver is installed, there can be an error of about 10m. But for newly built roads, the problem could come from the data update to the map. 115 With map matching. With no map matching. How to update the navigation map and software To update the navigation map and software, visit the site (http://www.mapnsoft.com). Troubleshooting Symptom Power does not turn on. Cause Correction The ignition switch is NOT turned ON. Turn the ignition switch to ON. The ignition switch is NOT set to ACC. Set the ignition switch to ACC. The power of the unit is turned OFF. Turn the unit on by pressing POWER on the control panel. Noise and other factors are causing the Turn the unit off and then on. The unit does not operate. built-in microprocessor to operate incorrectly. The unit does not operate normally. Playback is not possible. You can reset the unit. Press the RESET hole with a sharp object. The disc is dirty. Clean disc. The loaded disc is a type this unit Check the type of the disc. cannot play. The disc is inserted upside down. Insert the disc with the label upward. The files on the disc are an irregular Check the file format. file format. There is no sound. The volume level is low. Adjust the volume. The mute is on. Turn the mute off. 116 Index Adding phone number . . . . . . . . . . . . . . . . . . . . . . . . . . . . . 71 Advanced setup. . . . . . . . . . . . . . . . . . . . . . . . . . . . . . . . . . 29 Answering/Rejecting a call . . . . . . . . . . . . . . . . . . . . . . . . . 68 Auto Connection . . . . . . . . . . . . . . . . . . . . . . . . . . . . . . . . . 28 Auto Download . . . . . . . . . . . . . . . . . . . . . . . . . . . . . . . . . . 28 Auto Playlist . . . . . . . . . . . . . . . . . . . . . . . . . . . . . . . . . . . . . 78 Auto store . . . . . . . . . . . . . . . . . . . . . . . . . . . . . . . . . . . . . . . 81 Auxiliary device operation (Audio/Video). . . . . . . . . . . . . . 88 AVC (Auto Volume Control) . . . . . . . . . . . . . . . . . . . . . . . . 23 Aviod Area . . . . . . . . . . . . . . . . . . . . . . . . . . . . . . . . . . . . . . 26 Avoid streets . . . . . . . . . . . . . . . . . . . . . . . . . . . . . . . . . . . . 60 Eco-Coach . . . . . . . . . . . . . . . . . . . . . . . . . . . . . . . . . . . 36, 111 Edit Waypoints . . . . . . . . . . . . . . . . . . . . . . . . . . . . . . . . . . . 60 Editing an address of address book. . . . . . . . . . . . . . . . . . . 61 Editing favorite place. . . . . . . . . . . . . . . . . . . . . . . . . . . . . . 63 Editing home or office address . . . . . . . . . . . . . . . . . . . . . 63 Editing phone book . . . . . . . . . . . . . . . . . . . . . . . . . . . . . . . 72 Editing POI icons. . . . . . . . . . . . . . . . . . . . . . . . . . . . . . . . . 44 Editing waypoints. . . . . . . . . . . . . . . . . . . . . . . . . . . . . . . . . 57 Ending a call . . . . . . . . . . . . . . . . . . . . . . . . . . . . . . . . . . . . 68 Enlarging a photo . . . . . . . . . . . . . . . . . . . . . . . . . . . . . . . . 86 Gracenote. . . . . . . . . . . . . . . . . . . . . . . . . . . . . . . . . . . . . . . 32 Basic operation for voice command control . . . . . . . . . . . 89 Bass/Mid (Middle)/Tre (Treble). . . . . . . . . . . . . . . . . . . . . . 23 Beep . . . . . . . . . . . . . . . . . . . . . . . . . . . . . . . . . . . . . . . . . . . 23 Blue Link . . . . . . . . . . . . . . . . . . . . . . . . . . . . . . . . . . . 35, 108 Blue Max . . . . . . . . . . . . . . . . . . . . . . . . . . . . . . . . . . . . . . . 36 Bluetooth handsfree . . . . . . . . . . . . . . . . . . . . . . . . . . . . . . 64 Image conversion program. . . . . . . . . . . . . . . . . . . . . . . . . 113 Image encoder . . . . . . . . . . . . . . . . . . . . . . . . . . . . . . . . . . 113 Intersection . . . . . . . . . . . . . . . . . . . . . . . . . . . . . . . . . . . . . 50 Language . . . . . . . . . . . . . . . . . . . . . . . . . . . . . . . . . . . . . . . . 31 Listening to FM/AM radio. . . . . . . . . . . . . . . . . . . . . . . . . . 49 Listening to XM radio . . . . . . . . . . . . . . . . . . . . . . . . . . . . . 83 Call History List . . . . . . . . . . . . . . . . . . . . . . . . . . . . . . . . . . 70 Cancel Route . . . . . . . . . . . . . . . . . . . . . . . . . . . . . . . . . . . . 56 Changing the map scale . . . . . . . . . . . . . . . . . . . . . . . . . . 42 Changing the route conditions. . . . . . . . . . . . . . . . . . . . . . 43 Clock . . . . . . . . . . . . . . . . . . . . . . . . . . . . . . . . . . . . . . . . . . . 31 Clock Type . . . . . . . . . . . . . . . . . . . . . . . . . . . . . . . . . . . . . . . 31 Radio operation . . . . . . . . . . . . . . . . . . . . . . . . . . . . . . . . . . . 81 Random function. . . . . . . . . . . . . . . . . . . . . . . . . . . . . . . . . .76 Repeat function . . . . . . . . . . . . . . . . . . . . . . . . . . . . . . . . . . .76 Saving phone number . . . . . . . . . . . . . . . . . . . . . . . . . . . . 70 Scanning all frequencies. . . . . . . . . . . . . . . . . . . . . . . . . . . 82 Scanning FM/AM broadcast frequency . . . . . . . . . . . . . . 82 Scanning preset frequencies . . . . . . . . . . . . . . . . . . . . . . . 82 Date Setup. . . . . . . . . . . . . . . . . . . . . . . . . . . . . . . . . . . . . . . 31 Demo . . . . . . . . . . . . . . . . . . . . . . . . . . . . . . . . . . . . . . . 59, 60 Detour . . . . . . . . . . . . . . . . . . . . . . . . . . . . . . . . . . . . . . . . . 60 Display Setup. . . . . . . . . . . . . . . . . . . . . . . . . . . . . . . . . . . . . 21 Downloading phone book . . . . . . . . . . . . . . . . . . . . . . . . . . 72 Streamimg Audio . . . . . . . . . . . . . . . . . . . . . . . . . . . . . . . . 29 Switching call to the mobile phone . . . . . . . . . . . . . . . . . . 68 117 Index Temperature. . . . . . . . . . . . . . . . . . . . . . . . . . . . . . . . . . . . . 32 Theme . . . . . . . . . . . . . . . . . . . . . . . . . . . . . . . . . . . . . . . . . 32 Time Setup . . . . . . . . . . . . . . . . . . . . . . . . . . . . . . . . . . . . . . 31 Using the Gracenote . . . . . . . . . . . . . . . . . . . . . . . . . . . . . . 78 Using the Pandora . . . . . . . . . . . . . . . . . . . . . . . . . . . . . . . 80 Valet Mode. . . . . . . . . . . . . . . . . . . . . . . . . . . . . . . . . . . . . . 32 Variable EQ . . . . . . . . . . . . . . . . . . . . . . . . . . . . . . . . . . . . . 23 Viewing a photo . . . . . . . . . . . . . . . . . . . . . . . . . . . . . . . . . . 85 Viewing detail information for MP3/WMA/iPod file . . . . .77 Voice recognition system . . . . . . . . . . . . . . . . . . . . . . . . . . 89 Weather data Service Information . . . . . . . . . . . . . . . . . . . 34 Welcome Sound . . . . . . . . . . . . . . . . . . . . . . . . . . . . . . . . . 23 XM Data . . . . . . . . . . . . . . . . . . . . . . . . . . . . . . . . . . . . . . . . 33 118 Trademarks and Licenses YOU AGREE NOT TO USE OR EXPLOIT GRACENOTE DATA, THE GRACENOTE SOFTWARE, OR GRACENOTE SERVERS, EXCEPT AS EXPRESSLY PERMITTED HEREIN. Gracenote®, Gracenote logo and logotype, and the “Powered by Gracenote” logo are either registered trademarks or trademarks of Gracenote, Inc. in the United States and/or other countries. Music recognition technology and related data are provided by Gracenote®. Portions of the content is copyright © Gracenote or its providers. Gracenote® End User License Agreement This application or device contains software from Gracenote, Inc. of Emeryville, California (“Gracenote”). The software from Gracenote (the “Gracenote Software”) enables this application to perform disc and/or file identification and obtain music-related information, including name, artist, track, and title information (“Gracenote Data”) from online servers or embedded databases (collectively, “Gracenote Servers”) and to perform other functions. You may use Gracenote Data only by means of the intended End-User functions of this application or device. You agree that your non-exclusive license to use the Gracenote Data, the Gracenote Software, and Gracenote Servers will terminate if you violate these restrictions. If your license terminates, you agree to cease any and all use of the Gracenote Data, the Gracenote Software, and Gracenote Servers. Gracenote reserves all rights in Gracenote Data, the Gracenote Software, and the Gracenote Servers, including all ownership rights. Under no circumstances will Gracenote become liable for any payment to you for any information that you provide. You agree that Gracenote, Inc. may enforce its rights under this Agreement against you directly in its own name. The Gracenote service uses a unique identifier to track queries for statistical purposes. The purpose of a randomly assigned numeric identifier is to allow the Gracenote service to count queries without knowing anything about who you are. For more information, see the web page for the Gracenote Privacy Policy for the Gracenote service. You agree that you will use Gracenote Data, the Gracenote Software, and Gracenote Servers for your own personal non-commercial use only. You agree not to assign, copy, transfer or transmit the Gracenote Software or any Gracenote Data to any third party. The Gracenote Software and each item of Gracenote Data are licensed to you “AS IS.” Gracenote makes no representations or warranties, express or implied, regarding the accuracy of any Gracenote Data from in the Gracenote Servers. Gracenote reserves the right to delete data from the Gracenote Servers or to change data categories for any cause that Gracenote deems sufficient. No warranty is made that the Gracenote Software or Gracenote Servers are error-free or that functioning of Gracenote Software or Gracenote Servers will be uninterrupted. Gracenote is not obligated to provide you with new enhanced or additional data types or categories that Gracenote may provide in the future and is free to discontinue its services at any time. GRACENOTE DISCLAIMS ALL WARRANTIES EXPRESS OR IMPLIED, INCLUDING, BUT NOT LIMITED TO, IMPLIED WARRANTIES OF MERCHANTABILITY, FITNESS FOR A PARTICULAR PURPOSE, TITLE, AND NON-INFRINGEMENT. GRACENOTE DOES NOT WARRANT THE RESULTS THAT WILL BE OBTAINED BY YOUR USE OF THE GRACENOTE SOFTWARE OR ANY GRACENOTE SERVER. IN NO CASE WILL GRACENOTE BE LIABLE FOR ANY CONSEQUENTIAL OR INCIDENTAL DAMAGES OR FOR ANY LOST PROFITS OR LOST REVENUES. © Gracenote, Inc. 2009 119 Trademarks and Licenses iPod and iPhone is a trademark of Apple Inc., registered in the U.S. and other countries. “Made for iPod” means that an electronic accessory has been designed to connect specifically to iPod and has been certified by the developer to meet Apple performance standards. “Works with iPhone” means that an electronic accessory has been designed to connect specifically to iPhone and has been certified by the developer to meet Apple performance standards. Apple is not responsible for the operation of this device or its compliance with safety and regulatory standards. Bluetooth® is a trademark owned by Bluetooth SIG, Inc. XM Ready® is a registered trademark of XM Satellite Radio Inc. All rights reserved. 120