1
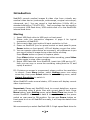
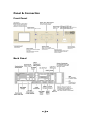
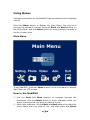
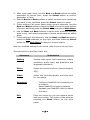
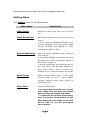
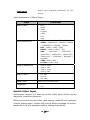
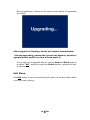
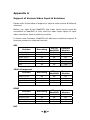
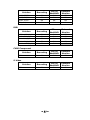
MediDVR High Definition Medical Video Recorder User Manual Revision Release Product Ver. 1.0.0 2014-03-10 30371 CAUTION RISK OF ELECTRICAL SHOCK DO NOT OPEN WARNING : To reduce the risk of fire or shock hazard, do not expose this equipment to rain or moisture. CAUTION : To reduce the risk of fire or shock hazard and annoying interference, use the recommended accessories only. CAUTION : Do not use the images for diagnosis or evaluation purposes. The compression reduces the information of the picture and is therefore not appropriate for diagnosis. CAUTION : These limits are designed to provide reasonable protection against harmful interference when the equipment is operated in a commercial environment. Like all similar equipment, this equipment generates, uses, and can radiate radio frequency energy; and if not installed and used in accordance with the operator manual, it may cause harmful interference to radio communications. Operation of this equipment in a residential area is likely to cause interference, in which case you will be required to correct the interference at your own expense. Important Safety Instructions 1 2 3 4 5 6 7 8 9 10 11 12 13 14 15 16 17 Read all of these instructions. Keep these instructions. Heed all warnings in these instructions. Follow all of these instructions. Do not misuse this apparatus. Clean only with a dry cloth. Do not block any of the ventilation openings. Install in accordance with the manufacturer’s instructions. Do not install near any heat source such as radiators, heat registers, stoves or other apparatus that produces heat. Do not tamper with the polarized or grounding-type plug. A polarized plug has two types of blades with one being wider than the other. A grounding-type plug has two blades and a third grounding prong. The wide blade or third prong is provided for your safety. When the provided plug does not fit into your outlet, consult an electrician for replacement of the obsolete outlet. Protect the power cord from being walked on or pinched especially near plugs, outlets, and the point where the cord exits from the apparatus. Only use attachments/accessories specified by the manufacturer. Use only with a cart, stand, tripod, bracket or table specified by the manufacturer, or sold with the apparatus. When a cart is used, use caution when moving the cart/apparatus combination to prevent the cart from tipping over and to avoid injury. Unplug this apparatus during lightning storms or when unused for long periods of time. Disconnection Method: Switch off AC power on the rear panel, disconnect power cord. Rocker switch on the rear panel is a single port switch. In switch OFF position, neutral wire is still connected to the unit. To make sure of the complete unit disconnection from the mains, please use disconnection method. Do not place vessels containing water or other liquids (such as vases, etc.) on top of the apparatus. Do not splash water on top of the apparatus. Refer all servicing to qualified service personnel. Servicing is required when the apparatus has been damaged in any way, such as when a power supply cord or plug has been damaged, liquid has been spilled on the apparatus, objects have fallen into the apparatus, the apparatus has been exposed to rain or moisture, or does not operate normally, or has been dropped. Contents Introduction ........................................................................... 1 Panel & Connection ................................................................. 3 Front Panel .......................................................................... 3 Back Panel........................................................................... 3 Typical Connection................................................................ 4 Connecting MediDVR HD Video Recorder .................................... 5 Insert USB Flash Drive .......................................................... 5 Capture Photo ...................................................................... 5 Recording Videos.................................................................. 6 Using Menus........................................................................... 7 Main Menu........................................................................... 7 How to Set MediDVR ............................................................. 7 Setting Menu ....................................................................... 9 Photo Menu ....................................................................... 11 Video Menu ....................................................................... 12 Advanced Menu.................................................................. 12 Exit Menu .......................................................................... 15 Location of Recordings ........................................................... 16 External USB Hard Drive...................................................... 16 Internal Hard Drive............................................................. 16 Review Videos & Photos ......................................................... 18 Replay Video on MediDVR .................................................... 18 Transferring images from a USB Drive to PC........................... 18 Viewing Photos on Computer................................................ 18 Replay Video Clips on Computer ........................................... 18 Built-in color LCD screen ..................................................... 19 Preview video via LAN ......................................................... 19 View video through Internet explorer .................................... 20 Other Features ..................................................................... 21 Capture photo while recording video ..................................... 21 Footswitches Triggers.......................................................... 21 Appendix A .......................................................................... 22 Support of Various Video Input & Solutions ............................ 22 Preview Problem................................................................. 24 Introduction MediDVR records medical images & video clips from virtually any medical video device (endoscope, arthroscope, surgical microscope, ultrasound, etc.). You can record in high-definition (1080p HD) or standard-definition (720x576 SD). Your recordings can be saved to a convenient USB flash drive, USB mobile disk or to the MediDVR’s internal hard drive. Starting 1. Insert USB flash drive to USB port on front panel. 2. Please refer the connection diagrams in page 4 for typical connection of MediDVR. 3. Set correct video input option & input resolution in first. 4. Power on MediDVR (turn on power switch on back panel & press Power button on front panel). LCD will display current live video. 5. You can operate video device as commonly, only difference is you can record video & image during video device working. Press Photo button on panel to capture photo. Press Video button on panel to start video recording, press Video button again to stop video recording. 6. Reject USB flash disk from MediDVR, insert into USB port on PC, then you can copy or move the recording video/photo to PC and replay & archive. PS: If picture on screen is compressed, please confirm the resolution is correct. Press Menu button, select Setting menu icon using arrow key, then press Select button to enter Setting menu, select Output Resolution to switch it. When MediDVR under normal status, LCD screen will display current video input source. Important: Please set MediDVR clock to correct date/time, ensure your recording video & photo files with correct date & time. Press Menu button, enter Setting menu, select Date/Time item to set. To ensure MediDVR with correct date & time, please keep the power switch on rear panel to ON position. You can use Power button on front panel to on or off MediDVR normally, it will keep the date & time correctly. We recommend you select SanDisk USB 3.0 high-speed flash drive for ~1~ your MediDVR. Before you start & use MediDVR, the video input source must be connected to MediDVR in first, and the video input option & input video resolution must to setting correctly. Please refer the manual of your video source device to get the correct information of video output signal that your video device supply. If the incorrect video input option & input resolution selected, device will can’t get video input signal or can’t judge video input signal correctly, so screen will display incorrectly, such as noise, blue screen, or with vertical stripe. If screen of device with incorrect display, please refer the table Appendix A: Preview & set correctly depend on your video input device. Video Input You can plug & unplug video source device to MediDVR at any time. The built-in LCD screen or external monitor of MediDVR will display noise or blue-screen if no video source input be connected, or MediDVR can’t decide video input signal correctly. If screen of device with incorrect display, please refer the table Appendix A: Preview & set correctly depend on your video input device. ~2~ Panel & Connection Front Panel Back Panel ~3~ Typical Connection ~4~ Connecting MediDVR HD Video Recorder To connect MediDVR, please see the diagram on page 4. MediDVR can connect external monitor & video source (for example, an endoscope, surgical camera, ultrasound, etc.). 1 If you are adding the MediDVR to imaging equipment that you are already using, please unplug the existing video cable that connects the monitor and the video source. 2 Connect a cable between the video output on the video source and the appropriate video input on the back panel of the MediDVR. Then connect another cable between the video output on the MediDVR and the video input on the monitor. Depending on your video equipment, you may need to use adapters to make the connections. 3 Plug in the power cord. 4 You can also connect standard footswitches to the back panel. A footswitch connected to the "Photo" connector performs the same function as the Photo button on the front panel. The "Video" connector performs the same function as the Video button. Insert USB Flash Drive It is recommended that new users begin by recording onto a USB flash drive. Later, after you have become familiar with the unit, you may wish to record to USB mobile drive or the internal hard drive. Capture Photo Recording photo is simple. When you see an image on your monitor that you would like to record, simply press the Photo button on the front panel. The image will be saved directly to the USB flash drive (later, you can transfer the images from the flash drive to your computer). As an alternative to a flash drive, you can record to the internal hard drive. Each time you press the Photo button, an image is recorded. Note that you can record images while recording video clips. Two things confirm that you have recorded an image: The ‘Record Light’ LED located between the Photo & Video buttons blinks once. ~5~ Recording Videos Recording video clips is just as easy as recording images. When you want to start recording video, simply press the Video button on the front panel. Press the button again to stop recording. The video clip will be saved directly to the USB flash drive (or to the internal hard drive if you have configured it). Two things confirm that you are recording a video clip: The ‘Record Light’ LED located between the Photo & Video buttons will blink during recording. LCD screen will display current free space of disk in using. Press Photo button to capture button during recording video. MediDVR will split long video to multi video files automatically during recording; every video file is 4GB. During recording, LCD screen will display current free space of storage media in using. The message format is “Free Space xx.xxG”. ※ When you press Video button to start recording, if the storage media doesn’t exist, LCD screen will display “NO DISK”, if the disk is full, LCD will display “DISK IS FULL”. ~6~ Using Menus Settings and options for the MediDVR can be accessed via the setting menus. Press the Menu button to display the Main Menu. You can scroll through the submenu choices using the Back and Next buttons on the front panel. Use the Select button to enter submenu & make a choice of menu item. Main Menu To set MediDVR, press the Menu button on the front panel to display Main Menu on LCD screen. How to Set MediDVR 1. Use the Next and Back buttons to navigate through the submenus. Use the Select button to enter submenu when you select submenu that you want to make a choice. 2. After enter submenu, use the Next and Back buttons to select the menu items that you want to set, and then press the Select ~7~ 3. After enter menu item, use the Next and Back buttons to switch parameter of current item, press the Select button to confirm parameter of item. 4. Use the Next and Back buttons to select the next menu items that you want to set, and then press the Select button to enter. 5. Finish setting of all menu items under current submenu, use the Next and Back buttons to select the Quit icon on the right bottom of screen, and then press the Select button to quit to Main Menu. 6. Use the Next and Back buttons to select next submenu that you want to set, and select parameter of menu items same as above steps. 7. Finish setting of all submenus, use the Next and Back buttons to select the Exit submenu on the right, and then press the Select button to exit Main Menu & return to normal status. Now you finished setting & can record video & photo at any time. The submenus to the Main Menu are: Submenu Instruction Setting Set the video input, input resolution, output resolution, audio input, and date/time and language preference. Photo Select the format of photo (current support JPG). Video Select the recording quality and time limit for recordings. Advanced - Exit Configure MediDVR for connection to a network. Reset MediDVR to factory defaults. Upgrade your MediDVR with the latest firmware. Exits the menus so you can capture photo and record video. This option is the same as pressing the Menu button on the front panel. ~8~ These submenus are described in the following sections. Setting Menu Use Setting menu to set follow items: Menu Item Instruction Video Input Select the video input type (DVI, HD SDI, etc.). Input Resolution Set correct resolution of current video input source. * If you select a standard definition input such as Composite or S-Video, please select correct resolution that depend on video system type (NTSC or PAL). Output Resolution Sets the output resolution that is sent to your monitor. * The 1400x1050p60 can’t output, all other resolution can output to external monitor if the monitor support it. * At high resolutions, the small monitor on the front panel may be black depend on input video source. This is normal. The images on your external monitor will be OK. Audio Input Select current audio input, if you select external audio or line in input, please connect external audio input device to MediDVR in first. Date/Time Set the internal clock. * It is important to set the clock so that your image files will have the proper date and time associated with them. * To maintain the current clock setting, leave the Master Power Switch on the back panel ON at all times; to turn the unit on and off, use the front panel Power button. ~9~ Language Select your language preference for the menus. Valid parameters of Menu Items: Item Parameter Video Input - SDI HDMI YPbPr S-Video CVBS DVI VGA Input Resolution - - SDI : 1080p / 1080i / 720p / 576i / 480i YPbPr : 1080p50/25 / 1080i50 / 720p50 / 1080p60/30 / 1080i60 / 720p60 DVI : 1080p / 1080i / 720p HDMI : 1080p / 1080i / 720p VGA : 1920x1200 / 1920x1080 / 1600x1200 / 1680x1050 / 1400x1050 / 1280x1024 / 1024x768 / 800x600 / 640x480 CVBS : 576i / 480i S-Video : 576i / 480i Output Resolution - 1920 1280 1280 1024 Audio Input - Int. MIC Line In Ext. MIC Date/Time Set to current Date/Time * Language - English - 中文 - x x x x 1080 720 1024 768 Switch Video Input Sometimes, maybe you need to switch video input device during diagnosis, treat and operation. When you switch current video input source, MediDVR will configure system setting again, system will prompt status message on screen, please don’t do any operation before setting successfully. ~ 10 ~ If your video input resolution is larger than 1920x1080, please set output resolution to 1920x1080, the system will adjust output resolution to actual automatically. Set correct Date/Time of MediDVR To set current clock of MediDVR, after enter Date/Time item, use Select button to select area that you want to set, use the Next and Back buttons to change value, then press the Select button to switch to next area. Photo Menu Use Photo menu to set how MediDVR records photos. Menu Item Format Instruction Select the image format you want to save your photos in. * JPG is the format most commonly used on computers. Valid parameters of Menu Items: Item Parameter ~ 11 ~ - Format JPG Video Menu Use Video menu to configure how MediDVR records videos. Menu Item Instruction Video Quality Select the quality of video that you record. * The higher the video quality, the larger the file size of video clips. Time Limit Set the maximum length of video clips. If you select any of the time limits other than Unlimited, then a video will automatically stop recording after the specified limit. * RESERVED currently. Valid parameters of Menu Items: Item Parameter Video Quality - High Medium Normal Time Limit - Unlimited Advanced Menu Use Advanced menu to configure advanced options such as network setup, restore setting to defaults, and performing a firmware upgrade. Menu Item Instruction Network Setup Set the device name, local IP address & enable/disable network function. * This option only applies if you connect the unit to a network. Reset to Defaults Select this option to restore all options to ~ 12 ~ their factory default settings. Upgrade This option is used to upgrade the firmware on your system. This allows you to add new features and options to your MediDVR. * To use the upgrade option, you must insert a USB flash drive or USB mobile drive that include new version firmware on root of disk to USB port on front panel. Valid parameters of Menu Items: Item Parameter Network Setup - Device Name Local IP Enable Reset to Defaults Restore device’s settings to default * Upgrade Upgrade device to new firmware * Network Setup To make choice of device’s network setup, use the Next and Back buttons to select the Network Setup menu item, and then press the Select button to enter. Valid parameters of Network Setup sub items: Sub Item Parameter Device Name - Device Name Local IP Enable Local IP Set local IP address of device * * The local IP address must suit the IP segment of your local LAN. Enable - Yes No To set name of device, select Device Name sub item & enter, label will locate the first character, use the Next and Back buttons to switch character, press the Select button confirm when you select feat character, then use the Next and Back buttons to switch label to next ~ 13 ~ character to set feat character, and so on. ※ The primary device name will be cleared when you press Select button for the first time. ※ The device name support maximum 12 characters. After you finish setting device name, press Select button twice to confirm & return to Network Setup item. To set local IP address of device, after enter Local IP item, use Select button to select IP segment that you want to set, use the Next and Back buttons to change value, then press the Select button to switch to next segment. Under Enable sub item, if you select “NO”, the network setting will be ignored. Reset to Defaults When you select Reset to Defaults item, system will prompt “YES” or “NO” on screen. - If you want to reset settings, use the Next and Back buttons to select “YES”, and then press the Select button to restore settings. - If you want not to reset settings, use the Next and Back buttons to select “NO”, and then press the Select button, system will quit to submenu & keep current settings of device. Upgrade We will release new firmware when we improve performance or add new features, you can upgrade MediDVR by yourselves if need. Before you upgrade MediDVR, please copy new firmware image file to the root of USB flash drive or SDHC card, insert storage media include new firmware into suit interface on MediDVR, then select Upgrade option in setting menu. When you select Upgrade item, system will prompt “YES” or “NO” options on screen. - If you want to upgrade device, use the Next and Back buttons to select “YES”, and then press the Select button to upgrade device, device will upgrade automatically when it detect new firmware image files on the root of USD flash drive. ~ 14 ~ During upgrading, system will prompt current status of upgrading on screen. After upgrade is finishing, device will restart automatically. * During upgrading, please don’t press any buttons, and don’t operate power switch on front & back panel !!! - If you want not to upgrade device, use the Next and Back buttons to select “NO”, and then press the Select button, system will quit to submenu. Exit Menu Use Exit menu to exit current setting & return to normal status after you finish your setting. ~ 15 ~ Location of Recordings You can record your videos and photos to one of the following locations: USB drive plugged into the unit - You can use the USB flash drive or a USB mobile hard drive. SDHC flash card Internal hard drive located within the unit. By default, videos and photos will be recorded to the USB flash drive or USB mobile hard disk that is plugged into the MediDVR. If your MediDVR include internal removable hard disk, you can record videos & photos to internal hard disk, please unplug any USB drive to MediDVR in first. Recordings are made to only one location - recordings cannot be made to the internal hard drive and a USB drive at the same time. External USB Hard Drive Instead of plugging in a USB flash drive or SDHC flash card, you can plug in a USB hard drive. You can plug the drive into the front or back panel. Note that you can only use one USB drive at a time. Using a USB hard drive is very similar to using a USB flash drive except that it has greater storage capacity. External USB hard drives are available from a wide variety of computer accessory suppliers. Before purchasing an external USB hard drive, please note the following: The hard drive must use the “FAT32” format, not the “NTFS” format. Delete any software that came pre-loaded on the drive (it may be incompatible with the MediDVR). To protect your videos and photos, it is important to back them up by transferring them from the external hard drive to your computer or network. Internal Hard Drive To record to the internal hard drive, you must confirm the internal ~ 16 ~ hard disk had been fixed to MediDVR. Before purchasing an external USB hard drive, please note the following: The hard drive must use the “FAT32” format, not the “NTFS” format. Delete any software that came pre-loaded on the drive (it may be incompatible with the MediDVR). To protect your videos and photos, it is important to back them up by transferring them from the external hard drive to your computer or network. The internal hard drive is not intended for use as a permanent video archive. The internal hard drive should be used only as temporary storage. You should transfer the videos to your permanent video archives via a network connection as soon as possible. This will ensure that the videos are backed up and protected against loss of patient data. ~ 17 ~ Review Videos & Photos Replay Video on MediDVR You can replay recording video in past on MediDVR directly, during normal status, press Select button to replay the newest recording video, press Next button to switch to previous recording video. Press Delete button to stop replay & quit to normal status. Existent recording video sort reverse order based on recording time. Transferring images from a USB Drive to PC 1 2 3 Insert the USB drive containing recorded images into a USB connector on your computer. The computer will manage the USB drive just like any other drive on your computer. Navigate to the drive and open it so you can see the folders it contains. You can click on the photos and videos to review them while they are on the drive, or you can move them to your computer's hard drive and review and store them there (recommended). Refer to Windows or Mac OS documentation for information on how to access drives on your computer and manage files. Viewing Photos on Computer To view photos in Windows or Mac OS, simply double-click on them and a viewer will open. You can also view and edit your photos using specialized medical image management programs available from many third-party vendors. Replay Video Clips on Computer The MediDVR records high definition video in the H.264 format, also known as MPEG-4 AVC. This widely used format is ideally suited to medical applications because it delivers the highest quality picture in a compact file size. Although high definition video in the H.264 format ~ 18 ~ has become the preferred standard, most computers still need additional software to play it. For example, on Windows XP and Windows Vista computers, playback is enabled by installing a simple “add-on” to Windows Media Player. For information on how to install the high definition H.264 “add-on” on your computer, please visit www.medicapture.com/support and see the section on video playback. Built-in color LCD screen The small built-in LCD on the front panel is intended as a navigational aid only, not for diagnosis. Use your large external monitor for diagnosis. Due to the small size of the internal monitor, you may notice the following: At some resolutions (configured in the Setup Menu), the image on the small internal monitor may appear “squeezed” or may show a black screen while the image on your large external monitor will be OK. This is normal and is due to the small size of the internal monitor. Always refer to your large external monitor for a clear view of your video images. When changing to the highest output resolutions in the Setup Menu (1920x1080 and 1280x1024), you will be asked to press a series of buttons to verify that you can see images on your external monitor. After you complete the change to the highest resolution, you will see images on your external monitor, but not on the internal monitor (it will show a black screen). This is because the small internal monitor does not display at the highest resolution, but your external HD monitor will display the images clearly. Preview video via LAN MediDVR include built-in Ethernet interface, you can preview video using VLC Media Player on PC via LAN connection. 1. Connect MediDVR to your LAN & set local IP address of MediDVR to same network segment with your LAN, then configure VLC Media Player software. ~ 19 ~ 2. Open VLC Media Player; click Media-> Open Network Stream… 3. On popup interface, click Network tab, then input: rtsp://192.168.1.168:8557/PSIA/Streaming/channels/2?videoCo decType=H.264 * 192.168.1.168 is the default IP address of the device; maybe you need modify it to same IP segment as your LAN. 4. Click Play button on the bottom of interface. View video through Internet explorer 1. Start IE, input the device’s IP address, such as 192.168.1.168. 2. Input Username & Password when IE prompt. * The default username & password of device as follow: Username : admin Password : 9999 3. Click Submit button to view video. ~ 20 ~ Other Features Capture photo while recording video While a video clip is being recorded, you can also capture photos simply press the Photo button as you normally would. Because more data is being saved when you are recording video and photos at the same time, you may notice that the “save time” (time between each image recording), may be longer than normal. Footswitches Triggers Standard footswitch connectors are located on the back panel. The two footswitch connectors serve the same function as the corresponding Photo and Video buttons on the front panel. Note that the footswitch connectors respond to a simple “closed contact”; they are not “programmable.” ~ 21 ~ Appendix A Support of Various Video Input & Solutions Please refer follow table of support of various video source & different solutions. Before you start & use MediDVR, the video input source must be connected to MediDVR in first, and the video input option & input video resolution must to setting correctly. In future new firmware, MediDVR will add more solutions support & improve preview on external monitor. SDI Recording LCD on MediDVR External Monitor 1080p 25/30 OK OK OK 1080p 50/60 OK OK OK 1080i 50/60 OK OK OK 720p 50/60 OK OK OK 576i OK OK NO 480i OK OK NO Recording LCD on MediDVR External Monitor 1080p 25/30 OK OK OK 1080p 50/60 OK OK OK 1080i 50/60 OK OK OK 720p 50/60 OK OK OK Recording LCD on MediDVR External Monitor 1080p 25/30 OK OK OK 1080p 50/60 OK OK OK 1080i 50/60 OK OK OK 720p 50/60 OK OK OK Solution YPbPr Component Solution HDMI Solution DVI ~ 22 ~ Recording LCD on MediDVR External Monitor 1080p 25/30 OK OK OK 1080p 50/60 OK OK OK 1080i 50/60 OK OK OK 720p 50/60 OK OK OK Recording LCD on MediDVR External Monitor 1280x1024 @p60 OK OK OK 1024x768 @p60 OK OK OK 800x600 @p60 OK OK OK 640x480 @p60 OK OK OK 1400x1050 @p60 OK OK NO Recording LCD on MediDVR External Monitor OK OK OK Recording LCD on MediDVR External Monitor OK OK OK Solution RGB Solution CVBS Component Solution 576i S-Video Solution 576i ~ 23 ~ Preview Problem Before you start & use MediDVR, the video input option & input video resolution must to setting correctly. Please refer the manual of your video source device to get the correct information of video output signal that your video device supply. You can plug & unplug video source device to MediDVR at any time. The built-in LCD screen or external monitor of MediDVR will display noise or blue-screen if no video source input be connected, or MediDVR can’t decide video input signal correctly. If the incorrect video input option & input resolution selected, device will can’t get video input signal or can’t judge video input signal correctly, so screen will display incorrectly, such as noise, blue screen, or with vertical stripe. Please refer the follow table & set correctly depend on your video input device. Video Source Screen Status SDI Noise DVI HDMI YPbPr VGA Blue Screen S-Video CVBS Blue Screen, with Vertical Stripe ~ 24 ~ Probable Reason - No signal input - Incorrectly setting - Disconnect