1
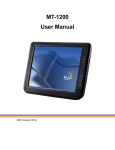
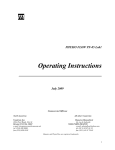
ColorMark Legacy Software Rip
Quick Start Guide
Professional Software RIP
Personal Software RIP
Legacy Software RIP
Part number 0706157 Rev D
Legal notices
© Copyright 2008 Hewlett-Packard Development Company, L.P.
Confidential computer software. Valid license from HP required for possession, use or copying. Consistent with
FAR 12.211 and 12.212, Commercial Computer Software, Computer Software Documentation, and Technical
Data for Commercial Items are licensed to the U.S. Government under vendor's standard commercial license.
The information contained herein is subject to change without notice. The only warranties for HP products and
services are set forth in the express warranty statements accompanying such products and services. Nothing
herein should be construed as constituting an additional warranty. HP shall not be liable for technical or editorial
errors or omissions contained herein.
Printed in the US
For additional technical support and user documentation please refer to: www.hp.com/go/graphicarts
Hardware and Operating System Requirements
The ColorMark® Software RIP requires a computer with these minimum specifications:
Processor
Professional Software RIP: 1.5 GHz Intel Pentium 4
Personal Software RIP: 866 MHz Intel Pentium III
Legacy Software RIP: 300 Mhz Intel Pentium II
RAM
256 Mb minimum – 1 Gb maximum
Operating system
Professional, Personal: Microsoft Windows XP, Windows 2000 w/Service Pack 4
Legacy: Windows NT 4.0 w/Service Pack 6
A “clean” install of the operating system with no other software installed is preferred. The
operating system CD-ROMs may be required during installation.
Available disk space
3 Gb on Drive C:
Monitor resolution
1024x768, 256 colors minimum. Lower resolutions will not display the entire Software RIP.
Network
Network interface card configured in operating system with the network protocols and
services to be used, required network cabling
PCI Expansion slot
One available PCI expansion slot is required to install the VideoNet interface card
Parallel port
One available parallel port is required to install the RIP Key
Other
◆
3-1/2 inch diskette drive, CD-ROM drive, keyboard, mouse
◆
Operating system account with “Administrator” privileges to install the ColorMark
Software RIP and related software, and “Guest” access for all printer users
◆
Category 5 Ethernet cable — If the computer is connected directly to the printer
(recommended), use a standard Category 5 Ethernet crossover cable with RJ45 connectors. If you are connecting the printer to the computer with a hub in between, use
a standard Category 5 Ethernet straight-through cable. These cables can be purchased at computer stores or from a computer networking specialist.
◆
Grounding strap — the computer, VideoNet card, and other electronic computer
components are susceptible to damage from electrostatic discharge. Always use an
anti-static grounding strap according to manufacturer’s directions, and follow antistatic precautions when installing computer components.
Be sure that all components are installed, and the system is properly configured to run with these components, before you
proceed.
-2-
ColorMark Software RIP Quick Start Guide
Parts List
The ColorMark Software RIP product kit consists of the following parts:
Hardware
Software
Documentation
◆
VideoNet Adapter Card (network interface card) — enables communication between
the Software RIP and the ColorSpan printer, installs in the computer’s PCI expansion slot
◆
RIP Key — enables the Software RIP, installs on the computer’s parallel port
◆
ColorMark Software RIP, Professional and Personal, OR Legacy — includes VideoNet
card driver software, VideoNet protocol, and printer driver software
◆
ColorMark Printing Tools — includes printer driver software
◆
Digital Typeface Corporation MasterWorks Fonts (varies with Software RIP version)
◆
ColorMark Color Management System, Disks 2, 3, 4 (Professional and Personal), OR
Disk 1 (Legacy)
◆
Embedded Software Update (varies with Software RIP version)
◆
Documentation set CD-ROM
◆
Software RIP Quick Start Guide (this document)
◆
System Control User Guide — describes how to use the System Control interface of the
Software RIP
◆
ColorSpan Printing Tools User Guide — describes how to use the Downloader Utility and other
ColorSpan Printing Tools for Macintosh OS and Microsoft Windows operating systems
◆
Printer Embedded Software Release Notes (varies with Software RIP version)
◆
Server Software Release Notes
◆
ColorMark Color Management System Release Notes
Contact ColorSpan Technical Services if any of these parts are missing (see the last page of this document for contact information).
Installation Overview
◆
Step 1. Install the Hardware (page 4)
◆
Step 2. Set Up and Connect the Printer (page 4)
◆
Step 3a. Install the Network Driver and Protocol Software for Windows XP/Windows 2000 (see the next section for Windows NT) (page 5) OR
◆
Step 3b. Install the Network Driver and Protocol Software for Windows NT 4 (see the previous section for Windows XP/
Windows 2000) (page 6)
◆
Step 4. Install the ColorMark Software RIP (page 7)
◆
Step 5. Add the Printer to System Control (page 8)
◆
Step 6. Install the ColorMark Color Management System (CMS) Software (page 8)
◆
Step 7a. Install the Printer in Windows XP/Windows 2000 (see the next section for Windows NT) (page 8) OR
◆
Step 7b. Install the Printer in Windows NT 4 (see the previous section for Windows XP/Windows 2000) (page 9)
◆
Step 8. Install the Printing Tools (page 9)
◆
Step 9. Print a Test File (page 9)
◆
Step 10. Print a Document from a Client (page 9)
-3-
ColorMark Software RIP Quick Start Guide
Step 1. Install the Hardware
Caution
The VideoNet card and your computer are susceptible to damage from electrostatic
discharge. Do not remove the card from its protective packaging until instructed to
do so in this procedure.
1. Start with the computer powered off and unplugged from the power outlet and all peripherals.
2. Install the VideoNet card into an available PCI expansion slot in the computer.
a. Place the computer on a sturdy table with ample clear space, preferably not on a carpeted floor.
b. Remove the cover from the computer case.
c. Touch the frame of the computer chassis to get rid of any static charge build-up from your body.
d. Select an available PCI expansion slot for the VideoNet card, and remove the slot cover if installed by removing the
screw.
e. Remove the VideoNet card from its protective packaging.
f. Press the VideoNet card carefully but firmly, straight down into the PCI expansion slot, as shown below. Ensure
that the card’s electrical contacts are seated firmly all the way to the bottom of the slot. Take care to avoid damaging any other components in the computer.
g. Secure the VideoNet card with the screw you removed from the slot cover.
h. Replace the computer case cover.
3. Install the RIP Key on the parallel port of the computer. Verify that the parallel port is enabled in the computer’s BIOS.
Do not “daisy chain” (connect in serial) the RIP Key with any other parallel port device.
Parallel port
PCI slots
PCI slots (typical; number, exact location and
appearance varies with motherboard used)
RIP Key installation (typical; arrangement
varies with motherboard used)
Step 2. Set Up and Connect the Printer
1. Unpack and set up the printer, according to its documentation.
2. Connect printer to the VideoNet card with the VideoNet cable supplied with printer.
-4-
ColorMark Software RIP Quick Start Guide
Step 3a. Install the Network Driver and Protocol Software for Windows XP/Windows 2000
(see the next section for Windows NT)
These instructions assume a familiarity with Windows XP/Windows 2000 administrative functions. If necessary, consult
your information systems administrator or consultant for assistance.
1. Restart Windows. Windows XP will detect the VideoNet card and install the driver software. Windows 2000 does not
include the necessary driver software. If you are using Windows 2000, install the driver software by running the
installer on the ColorMark Software RIP CD-ROM:
◆
Browse to the following folder on the ColorMark Software RIP CD-ROM: [d:]\drivers\netcard, where [d:] is the
drive letter of the CD-ROM drive
◆
Double-click the following file: PRO2KXPM.EXE
◆
Restart Windows.
2. Install the VideoNet protocol:
a. Load the ColorMark Software RIP CD-ROM into the CD-ROM drive.
b. Display the Local Area Connection icons. You should see two icons, one representing your office LAN, the other
representing the VideoNet connection to the ColorMark Software RIP.
◆
c.
On the Windows Start menu, click Control Panel. From the Control Panel, click Network & Internet Connections. From Network & Internet Connections, click Network Connections.
Right-click the Local Area Connection icon that corresponds to your office LAN.
Local Area Connection icons
Windows XP shown, Windows 2000 appears similar.
d.
e.
f.
g.
h.
i.
j.
Click Properties.
Click the Install button.
Select Protocol.
Click the Add button.
Click Have Disk...
Click Browse. Browse to the CD-ROM drive with the ColorMark Software RIP CD-ROM.
Open the \videonet\windows xp or \videonet\windows 2000 folder. This displays a file named videonet.inf in
the File Name field.
k. Select Open. The Install from disk dialog box reappears with the path to the windows xp or windows 2000 folder
on the CD-ROM.
l. Click OK. A window appears, listing the ColorSpan VideoNet Driver.
-5-
ColorMark Software RIP Quick Start Guide
m. Highlight ColorSpan VideoNet Driver, then click OK. Windows installs the VideoNet protocol. After the install has
completed, the Network Properties for chosen card will be displayed.
If Windows displays this error message while you are installing the VideoNet driver
or adding a ColorSpan printer, click the Continue Anyway button. ColorSpan software has been thoroughly tested with all supported Windows operating systems.
3. Un-bind protocols from the network cards:
a. Uncheck the VideoNet protocol from this card by clicking once on the check box. Use the identifying information
in this tab to verify that you are configuring your office LAN settings, not the VideoNet card settings.
b. Click OK to close the window.
c. Right-click on Local area connection 2, then click Properties. The window should now display all services and
protocols assigned to the second network card. This should be the Intel network card provided in the ColorMark
Software RIP product kit.
d. Uncheck all protocols except ColorSpan VideoNet by clicking on the boxes with check marks in them.
e. Tip: To avoid confusion in the future, rename the Local Area Connection icons to “LAN” and “VideoNet.”
4. Proceed to “Step 4. Install the ColorMark Software RIP” on page 7.
Step 3b. Install the Network Driver and Protocol Software for Windows NT 4
(see the previous section for Windows XP/Windows 2000)
These instructions assume a familiarity with Windows NT administrative functions. If necessary, consult your information systems administrator or consultant for assistance.
1. Restart Windows.
2. Install the driver software for the VideoNet network interface card by running the installer on the ColorMark Software
RIP CD-ROM:
◆
Browse to the following folder on the ColorMark Software RIP CD-ROM: [d:]\drivers\netcard, where [d:] is the
drive letter of the CD-ROM drive
◆
Double-click the following file: PRONT4.EXE
◆
Restart Windows.
3. Install the VideoNet protocol:
a. On the Windows desktop, right-click Network Neighborhood.
b. On the context menu, click Properties.
c. Click the Protocols tab.
d. Click Add, then click Have Disk.
-6-
ColorMark Software RIP Quick Start Guide
e.
In the box provided, type the path to the VideoNet driver: [d:]\videonet\windows nt, where [d:] is the drive letter
of your CD-ROM drive.
f. Highlight the VideoNet Driver and click OK.
g. When you see the Setup Message, click OK.
h. At the bottom of the Network dialog box, click OK.
4. Un-bind protocols from the network cards:
a. On the Windows desktop, right-click Network Neighborhood.
b. On the context menu, click Properties.
c. Click the Bindings tab. There will be a drop-down window that says “Show bindings for” next to it. Click on the
drop-down menu and select All adapters. The window now displays the adapters installed with “+” symbol to the
left.
d. Click the plus sign next to the first adapter.
e. Right-click the VideoNet protocol under this adapter.
f. Click Disable.
g. Click the plus sign next to the second adapter.
h. Disable all protocols under this adapter except the VideoNet using the method described above. As the protocols are
disabled there will be a red circle with a line through it along side each.
i. Click Close at the bottom of the Network dialog box.
j. Restart Windows.
Step 4. Install the ColorMark Software RIP
1. Turn on (or boot) the computer.
2. Load the ColorMark Software RIP CD-ROM into the CD-ROM drive.
3. The CD-ROM should start automatically. Run the program SETUP.EXE, located in:
◆
Professional version: the \Professional directory
◆
Personal version: the \Personal directory
◆
Legacy version: the root directory of the CD-ROM
4. Follow the prompts during installation. Install to drive C: and accept the default directory paths.
5. Remove the ColorMark Software RIP CD-ROM from the CD-ROM drive.
6. After installation is complete, reboot the computer.
If you install the ColorMark Software RIP onto a computer running Microsoft Windows XP with Service Pack 2, the
first time you start the Software RIP, the following message appears:
7. Click the Unblock button. This will prevent this error message from appearing every time the Software RIP starts.
-7-
ColorMark Software RIP Quick Start Guide
Step 5. Add the Printer to System Control
The printer must be connected and online to complete this step.
1.
2.
3.
4.
5.
Start the Software RIP by double-clicking the desktop shortcut or the Start menu.
A message appears asking you to be sure the hardware key is in place. Click OK to continue.
Add the printer to System Control, as prompted.
Route the input ports to the printer you added and click Route.
Refer to the System Control User Guide for detailed operating instructions.
Step 6. Install the ColorMark Color Management System (CMS) Software
Installation of CMS software is optional. However, if you choose not to install the software, the quality of your output
may not be satisfactory, and only CMYK printing is enabled.
1. Place ColorMark CMS CD-ROM into the CD-ROM drive of the ColorMark Software RIP computer.
2. Answer Yes when asked if you would like to install ColorMark.
3. Follow the on-screen prompts to complete the installation.
Step 7a. Install the Printer in Windows XP/Windows 2000 (see the next section for Windows NT)
During the following process, you must be logged in to Windows with Administrator rights assigned (at least temporarily)
to install the printer.
1. Load the Printing Tools CD-ROM into the CD-ROM drive. If the Printing Tools CD-ROM is not available, load the
ColorMark Software RIP CD-ROM instead.
2. On the Windows Start menu, click Settings - Printers and Faxes (Windows XP) or Printers (Windows 2000). The
Printers window opens.
3. Double click the Add Printer icon to start the Windows Add Printer Wizard.
4. Select Next, then click Local Printer but do not check “Automatically Detect and Install My Plug And Play Printer.”
5. Click Next.
6. Click the button next to Use the following port:
7. From the drop-down box, scroll to and select \..\pipe\winlink0000.
8. Click Next. You should now see a window listing various manufacturers and printers.
9. Click Have Disk. A window opens asking for the location of the files.
10. Click Browse, and navigate to the folder on the CD-ROM that corresponds to your language (for example, “english”)
and operating system version. This displays a file named ntprint.inf in the file name field.
11. Click Open. The Install from disk dialog box reappears.
12. Click OK. A dialog box appears with a list of ColorSpan printers.
13. Select a printer and click Next. A dialog box appears with a blank field for you to name the printer.
14. Enter a printer name if desired.
15. Click Next.
16. Select Share this printer.
-8-
ColorMark Software RIP Quick Start Guide
17.
18.
19.
20.
Click Next. A dialog box appears that asks if you'd like to print a test page.
Select No and click Next. A dialog box appears with a summary of the installation.
Click on the Finish button.
Proceed to “Step 8. Install the Printing Tools” on page 9.
Step 7b. Install the Printer in Windows NT 4 (see the previous section for Windows XP/Windows
2000)
During the following process, you must be logged in to Windows with Administrator rights assigned (at least temporarily)
to install the printer.
1. Load the Printing Tools CD-ROM into the CD-ROM drive. If the Printing Tools CD-ROM is not available, load the
ColorMark Software RIP CD-ROM instead.
2. On the Windows Start menu, click Settings - Printers. The Printers window opens.
3. Double click the Add Printer icon to start the Windows Add Printer Wizard.
4. Select My Computer.
5. Click Next, then under Available Ports: scroll to and select \..\pipe\winlink0000.
6. Click Next. A dialog box appears that lists various manufacturers and printers.
7. Click Have Disk... A dialog box opens, asking for the location of the files.
8. Click Browse, and navigate to the folder that corresponds to your language (for example, “english”) and operating system version. This displays a file named ntprint.inf in the file name field.
9. Click Open. The Install from disk dialog box reappears.
10. Click OK. A dialog box appears that displays a list of ColorSpan printers.
11. Select a printer and click Next. A dialog box appears with a blank field for you to name the printer.
12. Enter a printer name if desired.
13. Click Next.
14. Select Not Shared.
15. Click Next. You may be asked to install the Windows NT CD-ROM.
16. In the printer Properties dialog box, click the Sharing tab and share the printer to the rest of the network.
17. Close the Printers window.
Step 8. Install the Printing Tools
Install the Printing Tools on each client computer. Refer to the ColorSpan Printing Tools User Guide for instructions. The
printing tools are on the Software RIP CD-ROM.
Step 9. Print a Test File
1.
2.
3.
4.
Load media and ink as described in the printer’s User Manual.
Select DiskDirect from System Control.
Select Internal Disk Drive.
Highlight one of the test files and click OK.
Step 10. Print a Document from a Client
Print a simple document from a Macintosh or Windows client to the server over the network. Refer to the Print Server &
Driver Setup Guide for instructions.
-9-
ColorMark Software RIP Quick Start Guide
Post-Installation Issues You May Encounter
None of the issues listed below have been found to affect the functionality of the software. Some of these issues were
found only when the Software RIP was installed on a system that already had other software pre-installed by the computer
manufacturer. Those issues can be corrected by performing a clean install of the operating system only, before the install
of the ColorSpan server software.
◆
(Not applicable to installations on Microsoft Windows XP.) The AppleTalk Zone will not display properly when attempting to configure an AppleTalk port from System Control. The ports will, however, appear in the default AppleTalk zone of
the server and should be visible by any Macintosh on the network provided the AppleTalk protocol has been installed.
◆
Window sizing for the ColorMark Software RIP System Control starts at full screen. To change this, click and drag on one
side edge and then one top or bottom edge of the System Control window. You may want to adjust your taskbar properties to Always on Top. This will help to avoid it from being hidden by System Control.
Software RIP Features
The ColorMark Software RIP products provide the features described in the System Control User Guide, with the following
exceptions.
Feature
Professional
Personal
Legacy
Fonts included
235
35
35
PostScript-compatible PostScript 3 compatible
interpreter
PostScript 3 compatible
PostScript Level 2
compatible
Preview RIPed image
Yes
No
Yes
Media Saver
Yes
No
Yes
N-Up
Yes
Yes
Yes
DiskDirect file input
Yes
Yes
Yes
Pre-RIP size, rotate
Yes
No
Yes
Permanent RIP Saver
Queue
Yes
No
Yes
Temporary RIP Saver
Queue
Yes
Yes
Yes
Job Log
Yes
Limited (only logs server Yes
errors, does not log jobs
or track consumables
usage)
ColorMark+ Software
Optional
Optional
Optional
WinLink
8
1
8
TCP/IP
8
1
8
14
6
14
Number of ports
supported
AppleTalk
(AppleTalk is not natively supported by Microsoft Windows XP)
Novell NetWare
Printers supported
1
1
1
Any of the following:
(1) DisplayMaker 72S/72SR
(1) DisplayMaker® X-12
(1) DisplayMaker Mach 12
(2) DisplayMaker Series XII
(1) DisplayMaker FabriJet™
(1) DisplayMaker Esprit
Any of the following:
(1) DisplayMaker X-12
(1) DisplayMaker Mach 12
(1) DisplayMaker Series XII
(1) DisplayMaker FabriJet
(1) DisplayMaker Esprit
Any of the following:
(2) Giclée PrintMakerFA®
(2) PressMate-FS®
(2) DisplayMaker HiRes
(1) DesignWinder™
(1) DisplayMaker Express
- 10 -
ColorMark Software RIP Quick Start Guide
Caution
Running other applications while using the Software RIP, or altering Windows Networking or Registry settings, may degrade the performance or disable operation of
the Software RIP.
Related Documentation
Refer to the following documentation to learn how to use the ColorMark Software RIP:
◆
Print Server & Driver Setup Guide — in specific versions for each ColorSpan printer, describes how to configure printing
options using the Software RIP and printer driver software for Macintosh OS and Microsoft Windows operating systems.
Included with the printer.
All documentation is stored in Adobe Acrobat format on the ColorSpan software CD-ROMs. The Adobe Acrobat Reader software, available with Adobe products and as a free download at www.adobe.com, is required to read the files.
Service and Support
For service and support, contact your MacDermid ColorSpan authorized reseller, or MacDermid ColorSpan Technical
Services:
◆
World Wide Web: www.colorspan.com
◆
Internet E-mail: [email protected]
United States and Canada:
Europe/Middle East/Africa:
◆
◆
◆
◆
Telephone: (800) 925-0563 or (952) 944-4040
Fax: (952) 943-3611 or (952) 944-8509
Telephone: +31 (23) 562 20 00
Fax: +31 (23) 562 79 44
Latin America:
Asia/Pacific:
◆
◆
◆
◆
◆
Telephone: +1 (952) 943-3427 or +1 (952) 943-3627
Fax: +1 (952) 944-1244
- 11 -
Telephone: +1 (952) 943-3300
Fax: +1 (952) 943-3313
Telephone (South Korea): +82 (2) 3461 1532
ColorMark Software RIP Quick Start Guide
- 12 -
ColorMark Software RIP Quick Start Guide