1
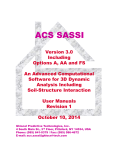
SASSI User Manual for Contractors SASSI User manual for Contractor Administrators Version 04-06-2014 Contractor Admin user Guide-040614.docx Page 1 of 22 SASSI User Manual for Contractors 1. Login to SASSI ...................................................................................................................................... 3 2. HOME .................................................................................................................................................. 4 3. COMPANY ........................................................................................................................................... 4 3.1. Company details .............................................................................................................................. 4 3.1.1. Details tab. ................................................................................................................................... 4 3.1.2. Services tab. ................................................................................................................................. 5 3.2. Insurances and licences ................................................................................................................... 5 4. WORKERS ............................................................................................................................................ 8 4.1. Search workers................................................................................................................................. 8 4.2. Add new worker ............................................................................................................................... 9 4.2.1. Workers’ Details ......................................................................................................................... 10 4.2.2. Workers Services ........................................................................................................................ 11 4.2.3. Workers Inductions..................................................................................................................... 11 4.3. Inductions/training ........................................................................................................................ 12 4.3.1. Complete induction or training .................................................................................................. 12 4.4. Manage SWMS ............................................................................................................................... 13 4.4.1. Create/edit generic SWMS ......................................................................................................... 13 4.4.1.1. Adding a PDF type SWMS ....................................................................................................... 14 4.4.1.2. Adding a TEXT type SWMS for Investa ................................................................................... 17 4.4.1.3. Submitting SWMS for after-hours work ................................................................................. 18 4.4.2. View SWMS ................................................................................................................................ 20 4.4.3. Amended SWMS requiring review.............................................................................................. 21 4.5. My details....................................................................................................................................... 21 4.5.1. Contact details............................................................................................................................ 21 4.5.2. Change password ....................................................................................................................... 21 5. REPORTS ............................................................................................................................................ 22 5.1. Attendance..................................................................................................................................... 22 6. SASSI SUPPORT ................................................................................................................................. 22 6.1. Contact SASSI support.................................................................................................................... 22 6.2. User manuals ................................................................................................................................. 22 6.3. Frequently asked questions ........................................................................................................... 22 6.4. Help videos..................................................................................................................................... 22 Contractor Admin user Guide-040614.docx Page 2 of 22 SASSI User Manual for Contractors 1. Login to SASSI To access the SASSI system, go to the following URL: http://sassi.audit.net.au/ The screen below will be displayed. Login by: 1. Entering your username 2. Entering your password. 3. Select the Login button or press Enter to proceed with login. Below is the first screen you will see after you log in. Contractor Admin user Guide-040614.docx Page 3 of 22 SASSI User Manual for Contractors 2. HOME This option will return you to the page shown above 3. COMPANY Within this menu item you can choose one of the following options. 3.1. Company details Within the company details form there are the following tabs. 3.1.1. Details tab. Contractor Admin user Guide-040614.docx Page 4 of 22 SASSI User Manual for Contractors In the Details tab you can view and update your company’s main details in SASSI. The information in the greyed text boxes is mandatory. To update the information on this page, click the save icon. 3.1.2. Services tab. In this screen you can view the services that your company provides at your clients’ properties You can search by client, discipline and property. Only the Client is mandatory. Click the button to search for the services. Search You can also display only the properties that you provide these services to, by clicking the “Only show properties linked” check box before you click “Search”. If you do not select a discipline or property all the services and all properties for that client will be displayed. This information can only be updated by a representative of the client or SASSI Web. 3.2. Insurances and licences This is the option that you will use to upload your companies compliance documents and enter the information about these documents, so that they can be matched to a client’s compliance requirements. This process requires you to complete the following steps: Contractor Admin user Guide-040614.docx Page 5 of 22 SASSI User Manual for Contractors Step 1: You can add a new compliance document by clicking on Add from the hover menu or edit an existing compliance by hovering over it and selecting the Edit hyperlink Step 2: After adding the main details of the new compliance, you may need to enter the amount of the insurance. Hover over the value amount, select Edit, enter the value and click Update. Step 3: Click Browse to browse for and upload the supporting document Step 4: Click on Verify button to declare the information you entered is true and correct. WARNING: Failure to Verify your compliance may suspend your Worker's rights sign-in at your Client's site. Step 5: You MUST now start linking your compliance details to Client's compliance requirements in order to be compliant at the clients’ sites and click the Submit button. Contractor Admin user Guide-040614.docx Page 6 of 22 SASSI User Manual for Contractors Contractor Admin user Guide-040614.docx Page 7 of 22 SASSI User Manual for Contractors 4. WORKERS 4.1. Search workers This function allows you to search for workers already on the system and then display their details. If a worker has forgotten their password, you can reset the password to “password” by clicking the Reset button. You can also send their username and password to their designated email address by clicking the Send button. To access the worker’s details click on their name. The screen below will be displayed. Contractor Admin user Guide-040614.docx Page 8 of 22 SASSI User Manual for Contractors 4.2. Add new worker This functionality enables you to add new workers onto the system. Before adding new workers to the system please search for an existing user account by selecting: Workers>Search workers, as above. This step is required prior to adding a new worker. So that duplicates are not created Contractor Admin user Guide-040614.docx Page 9 of 22 SASSI User Manual for Contractors If the worker not in the system click on to add the worker The screen below will be displayed. 4.2.1. Workers’ Details Contractor Admin user Guide-040614.docx Page 10 of 22 SASSI User Manual for Contractors The Workers Details tab contains the basic contact and identification details of the worker. You can add the details using this form. Mandatory fields are in grey background text boxes. You can specify three forms of password o A randomised system generated password o The default password, “password” or o You can enter a password of your own choice. Do not tick “Is Company Administrator?” if the person is a worker only. This option is only if you want someone to have the company administrator role. If you tick the “Send password?” box the username and password will be emailed to the user’s email address. You must also select the services that the worker will be providing. Otherwise, they will not be able to sign into SASSI and a building. The list of services that can be selected is taken from the services that your company provides to buildings on SASSI. Once you have filled in all the necessary details add the worker’s details to the system by clicking the plus symbol. You will now see a number of tabs in the workers’ form in which different details can be viewed and amended. 4.2.2. Workers Services In this tab you can add or delete services from a worker. Select services from the right hand pane and use the add button to add them. Hover over a service on the left hand pane and select Delete to remove it. 4.2.3. Workers Inductions In this tab you can view the inductions that this worker has completed or that are due for renewal. Contractor Admin user Guide-040614.docx Page 11 of 22 SASSI User Manual for Contractors 4.3. Inductions/training Within this option you complete any on-line inductions that your clients require. If you want any workers to complete their inductions they will have to log in to SASSI using their own username and password. They also have access to this option. 4.3.1. Complete induction or training When you select this option you will see a form showing all the inductions that you have completed and any that not completed or have expired. Click on the selected link and you can start your induction. You will be presented with a “scenario”, which can be text, a PDF document or a video. You must read or view this and then answer the questions that follow it. If you pass this on-line multi-choice test, you will automatically be inducted by SASSI to the relevant induction. If you cannot see the induction that you need to complete in this table select the option “Search other inductions/training”. You can then search for any induction requirement for all clients that your company is linked to, even if you have not worked there yet. Contractor Admin user Guide-040614.docx Page 12 of 22 SASSI User Manual for Contractors 4.4. Manage SWMS Within this menu option you can manage all your on-line Safe Work Method Statements (SWMS). These SWMS can then be selected by your workers when the sign into to a SASSI kiosk on-site. 4.4.1. Create/edit generic SWMS This option allows you to create or edit any of your SWMS for workers to use on site. You will be presented with a table of all your current SWMS. Most clients have an acceptance process. You can use the Notify Clients button to advise them of any new SWMS you have added that need to be accepted. If this button is greyed out, then all your SWMS have been accepted. Any rejected SWMS can be viewed by selecting Rejected SWMS. If SWMS have been accepted for use for a particular date and time in the future, they can be viewed by selecting Add/View status of SWMS/Permits submitted for after-hours work. To add a new SWMS click on plus . The following pop up will appear. Contractor Admin user Guide-040614.docx Page 13 of 22 SASSI User Manual for Contractors For Investa buildings you must choose the Text option. Other building owners use the PDF option. Enter a description for the SWMS and click the Add button to create a new SWMS. 4.4.1.1. Adding a PDF type SWMS If you select a PDF type SWMS the following will appear. You can then use that to upload a PDF document for this SWMS and to assign it to a specific site. Contractor Admin user Guide-040614.docx Page 14 of 22 SASSI User Manual for Contractors Browse for the document on your PC, enter a description of the document in the Description text box and then select Upload. If the upload is successful you will see the following. Next you need to select which specific property where this SWMS will be used. You do this by selecting the property and then clicking the Add sign. After that is completed click the Back button to return to the list of SWMS. If you want to view the SWMS details and review them or change anything click on the Work Process name. Contractor Admin user Guide-040614.docx Page 15 of 22 SASSI User Manual for Contractors Click the Notify Clients for selected SWMS button or Notify Clients for all SWMS. The relevant clients will be notified about the new SWMS that are waiting to be reviewed. If you want to check the SWMS status, i.e. has it been accepted by the client for use at their site, click on the View button under the SWMS Status heading. The following will appear. When it is just uploaded the SWMS will have a status of “To be reviewed”. If a SWMS has been rejected, you will receive an email to that effect. Contractor Admin user Guide-040614.docx Page 16 of 22 SASSI User Manual for Contractors You will see that the SWMS has been rejected by clicking the View button under the “SWMS Status” heading. If a SWMS has been rejected you should create a new SWMS and link it to the appropriate client and site. If you want to replace a SWMS, click the check box under Obsolete, then add a new SWMS. The link View rejected SWMS is part of the Investa SWMS process. It applies only if SWMS have been rejected by Investa. 4.4.1.2. Adding a TEXT type SWMS for Investa When you select the Text option to add a SWMS the following screen will appear. All the red-lined boxes are mandatory. Contractor Admin user Guide-040614.docx Page 17 of 22 SASSI User Manual for Contractors If you use PPE that are not listed enter them in the text box below the Add PPE: heading then click the plus symbol. Once you have finished entering all the information on this page click displayed. After you click the Next. The following will be Add symbol, your first line will be saved. To add the subsequent lines, hover the cursor over a line and then click the Add link. A new line of text boxes will appear. Once you have added all 5 lines click the back arrow 4.4.1.3. to return to your list of SWMS. Submitting SWMS for after-hours work To submit a SWMS and Permits for after-hours work follow the procedure below. Contractor Admin user Guide-040614.docx Page 18 of 22 SASSI User Manual for Contractors From the bottom of the “Create/edit SWMS” page click “Add/View status of SWMS/Permits submitted for after-hours work”. The following will be displayed. Click Add new record. Select the Client, the Property, the date and time of the work to be carried out, enter a description of the work and click Insert. You can now select the SWMS to be submitted by clicking Add SWMS. If you need to submit permits for high risk work, click on Attach Permits. Contractor Admin user Guide-040614.docx Page 19 of 22 SASSI User Manual for Contractors 4.4.2. View SWMS This option allows you to view any of your SWMS. Select the SWMS from the drop down list and click the View Report button. Contractor Admin user Guide-040614.docx Page 20 of 22 SASSI User Manual for Contractors 4.4.3. Amended SWMS requiring review In this option you can see any text SWMS that have been amended by a worker on-site and have been recommended for review. You can then review the SWMS and amend it as appropriate. 4.5. My details Within this option you can update your details and change your password. 4.5.1. Contact details Update your email address, mobile phone number and fixed phone number. By selecting the Submit button information is updated on the SASSI database. 4.5.2. Change password This functionality enables you to change your password. When a worker first log on to aSASSI kiosk, the system automatecally prompt to change password. To change your password, enter your current password in the first text field followed by your new password in the next two text fields. The coloured bar will indicate the password strength. Your password must contain eight characters varying with characters, numbers and upper case characters. When the password is strong, enough you can select the Submit button to update the SASSI database. Contractor Admin user Guide-040614.docx Page 21 of 22 SASSI User Manual for Contractors 5. REPORTS 5.1. Attendance You can get a report of the attendance of your staff at selected sites. 6. SASSI SUPPORT 6.1. Contact SASSI support If you have any problems or questions, you can contact SASSI Support using this option. You will be presented with the following input screen. Just fill in the details and click Send. Your feedback will be emailed to SASSI Support. 6.2. User manuals Within this option you can open, download or print this manual. 6.3. Frequently asked questions This is a quick reference to frequently asked questions. 6.4. Help videos Here there are a series of videos which will help you with most tasks. Contractor Admin user Guide-040614.docx Page 22 of 22