1
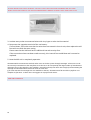
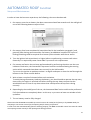
X46 GFB
B
User Guide
v1.8.3
http://www.fbc-electronics.com
2
TABLE OF CONTENTS
4.
5.
6.
7.
10.
13.
19.
20.
20.
20.
21.
21.
Welcome
Product Overview
X46 module versions
Functions Overview
Settings Menu
Installation
Automated Remote Roof function - Setup and maintenance
One Touch Roof function
Warranty Terms and Conditions
Technical Specifications
Troubleshooting
Contacts
3
WELCOME
Congratulations on becoming an owner of an X46 electronic module which has been
design and manufactured to the highest automotive standards utilizing the latest technology for total
reliability. You made an excellent choice and we hope you will enjoy all its capabilities.
Thorough familiarity with your X46 module will provide you with enhanced control and security in the
everyday use. Please take the time to read this manual and familiarize yourself with the information
that we have compiled for you before starting. The manual contains important data and instructions
intended to assist you in obtaining maximum satisfaction from your X46 module.
We are delighted to inform you that each X46 module is engineered to provide quality trouble-free
service for the user. As quality control is part of the production process, to assure that each unit lives
up to this standard quality, all modules are individually inspected before being released into
distribution. This means we do always our best to satisfy our customers.
This document is subject to changes without notice. The latest electronic version of this user manual
can be downloaded from the FBC Electronics website:
http://www.fbc-electronics.com
4
PRODUCT OVERVIEW
X46 modules are electronic devices made for being installed on BMW E46 3-series cars.
These modules can significantly increase the comfort in the everyday use by upgrading the car with
some newest technologies nowadays available in the most recent BMW 3-series models.
X46 modules work on every BMW 3-series E46 model, from 1998 to 2006, facelift and pre-facelift,
with petrol and diesel engines in all E46 body styles, Sedan, Coupé, Convertible, Touring, Compact.
They are suitable on the following 3-series models: 318i/Ci, 320i/Ci/Cd, 323i/Ci, 325i/Ci/Xi, 328i/Ci,
330i/Ci/Cd/Xi, M3.
The X46 modules will interact with some BMW electronics devices through the BMW bus system
without interfering in some way with them.
This means that no other electronics device will be influenced by the X46 modules at anytime.
Also they were designed looking always on the security requirements as they provide the following
protections:
•
•
•
•
Polarity inversion
Over Temperature
Over Current
Internal short circuits
WARRANTY DECADES IN CASE OF IMPROPER INSTALLATION OR BY OPENING THE UNIT BOX . SEE THE WARRANTY AND TERMS
CONDI TIONS PARAGRAPH.
5
X46 MODULE VERSIONS
X46 modules are available in various version, depending on the different functions they are able to
perform.
X46 B
One Touch Roof for convertible cars.
X46 C
Automated Remote Roof for convertible cars.
X46 CB
Automated Remote Roof for Convertible cars, One Touch Roof for convertible cars.
X46 D
Automated Remote Roof, Automated Remote Windows.
X46 E
Coming Home, Leaving Home, Automated Remote Windows, Automated Remote Roof, Welcome,
Opening Trunk Lights.
X46 F
Automated Outside Mirrors.
X46 G
Coming Home, Leaving Home, Automated Remote Windows, Automated Remote Roof, Welcome,
Opening Trunk Lights, Locking Car While Driving, Welcome On Board.
X46 GF
Coming Home, Leaving Home, Automated Remote Windows, Automated Remote Roof, Welcome,
Opening Trunk Lights, Locking Car While Driving, Welcome On Board, Automated Outside Mirrors.
X46 GFB
Coming Home, Leaving Home, Automated Remote Windows, Automated Remote Roof, Welcome,
Opening Trunk Lights, Locking Car While Driving, Welcome On Board, Automated Outside Mirrors,
One Touch Roof.
6
FUNCTIONS OVERVIEW
X46 products series can perform several functions, some of these involve the vehicle lighting
and some can perform physical actions such as the windows and roof remote closing/opening and
the doors locking/unlocking. The functions are the following:
Lighting functions
•
•
•
•
•
COMING HOME
LEAVING HOME
WELCOME ON BOARD
OPENING TRUNK LIGHTS
WELCOME
Moving functions
•
•
•
•
AUTOMATED WINDOWS
AUTOMATED ROOF
AUTOMATED OUTSIDE MIRRORS
ONE TOUCH ROOF
Securing function
•
LOCKING CAR WHILE DRIVING
Lighting functions can be instantly turned off by inserting the BMW key on the ignition lock.
Moving functions can be stopped at anytime by pressing the opposite button of the BMW remote
key. They can be also stopped by inserting the BMW key on the ignition lock (except for the One
Touch Roof function).
Every function can be easily enabled and disabled through the Settings Menu (except for the X46 B
and X46 F). See the Settings Menu paragraph.
COMING HOME
By locking the car via the BMW remote key, the parking lights (front, rear, side) and the front low
beam lights will light up.
The function can be easily enabled and disabled through the Settings Menu.
The lights that will light up and the activation time can be modified at any time by the Settings Menu.
Default settings are low beams lights for 15 seconds.
See the Settings Menu paragraph.
LEAVING HOME
By unlocking the car via the BMW remote key, the parking lights (front, rear. side) and the front low
beam lights will light up.
The function can be easily enabled and disabled through the Settings Menu.
The lights that will light up and the activation time can be modified at any time by the Settings Menu.
Default settings are low beams lights for 15 seconds.
See the Settings Menu paragraph.
7
AUTOMATED WINDOWS
By pressing two times within 5 seconds the close button of the BMW remote key all windows will be
closed (the module will unfold all).
By pressing two times within 5 seconds the open button of the BMW remote key all windows will be
opened (the module will fold all down).
If necessary the windows folding action can be stopped by pressing the lock button of the BMW
remote key and the unfolding action can be stopped by pressing the unlock button of the BMW
remote key. As acknowledgment a double flash of the turn indicators will be performed.
Leave at least a couple of minutes between each activation.
AUTOMATED ROOF
Due to the different car specifications around countries, the module has 3 roof modes : mode A,
mode B (the default mode) and mode C.
Each one of them can be set by means of the Settings Menu function. According to the roof mode
currently set, the activation of the convertible top operation changes as follows:
MODE A
By pressing 3 times within 5 seconds the unlock button of the BMW remote key the roof will be
opened. The windows will be raised.
By pressing 5 times within 5 seconds the unlock button of the BMW remote key the roof will be
closed. The windows will be raised.
MODE B (the default)
By pressing 3 times within 5 seconds the unlock button of the BMW remote key the roof will be
opened. The windows will be raised.
By pressing 3 times within 5 seconds the lock button of the BMW remote key the roof will be closed.
The windows will be raised.
MODE C
By pressing 3 times within 5 seconds the unlock button of the BMW remote key the roof will be
opened. The windows will be raised.
By pressing 4 times within 5 seconds the unlock button of the BMW remote key the roof will be
opened and the windows will be lowered.
By pressing 5 times within 5 seconds the unlock button of the BMW remote key the roof will be
closed. The windows will be raised.
If necessary the opening roof action can be stopped by pressing either the lock button or the unlock
button of the BMW remote key. A double flash of the turn indicators will be performed as
acknowledgment.
8
The Coming Home and Leaving Home functions will be turned off.
The convertible top compartment panel in the luggage compartment must be raised down.
Leave at least a couple of minutes between each activation.
AUTOMATED OUTSIDE MIRRORS
By locking the car via the BMW remote key, the outside mirrors (driver and passenger side) will be
folded. By unlocking the car via the BMW remote key, the outside mirrors will be unfolded.
WELCOME ON BOARD
Opening the driver's or passenger's door the parking lights and the cockpit lights will be turned on for
15 seconds. The Coming Home and Leaving Home functions, if active, will be turned off.
OPENING TRUNK LIGHTS
By pressing the BMW remote key to open the trunk the rear parking lights and the license plate lights
will be turned on for 15 seconds.
This functions will also turn the lights on by manually opening the trunk.
WELCOME
By pressing the unlock button of the BMW remote key when the car is unlocked and by pressing the
lock button when the car is locked the parking lights will be turned on for 15 seconds.
This function will help you in searching your car in weak light condition.
LOCKING CAR WHILE DRIVING
Automatic doors locking when the car goes over 8Mph (12Km/h).
Once the speed bound has been reached, the module locks both doors which will stay locked until
they are unlocked manually or by means of the lock/unlock button in the inside.
The doors cannot be opened from the outside using the doors handles.
To unlock the doors, the interior door handles or the lock/unlock button on the inside can be used.
In the first case the other doors still stay locked to maintain security. In the latter case, the other
doors will be unlocked allowing them to be opened from the outside.
The doors can still be unlocked and locked from the inside at anytime.
If a front door is manually unlocked and then opened, the other doors will be unlocked (only if the car
speed is lower than the speed bound).
If unlocked from the inside, the doors will not be re-locked, unless a front door would be opened.
In this last case, once the car re-goes over 8Mph, the doors will be re-locked.
WHENEVER CLOSING THE WINDOWS OR SLIDING/TILT SUNROOF OR OPENING/CLOSING THE
CONVERTIBLE TOP YOU SHOULD ALWAYS MONITOR THEIR PATH AND PROGRESS TO ENSURE THAT NO
ONE IS INJURED.
9
X46 GFB SETTINGS MENU
The Settings Menu allows you to enable/disable every available function in the module and to modify
some function parameters at any time. Basically the Settings Menu is navigable through the Turn
Signal Indicator/ Headlamp flasher lever. Also it displays the messages in to the BMW radio module.
A briefly signal must be performed through the Turn Signal Indicator / Headlamp flasher. Press the
lever up to but not beyond the detent. It then returns to the center position when released.
TURN SIGNAL INDICATOR / HEADLAMP FLASHER - POSITIONS AND SIGNALS
1. HIGH BEAMS
2. HEADLAMP FLASHER
3. TURN SIGNAL INDICATOR
Turn Signal Indicator / Headlamp flasher
ENTERING THE SETTINGS MENU
The following steps must be observed:
1. Turn the ignition key on position 2.
2. Wait about 10 seconds until the Low Beams lights will be turned off.
3. Turn the ignition key on position 0.
Each one of the following steps must be performed within 60 seconds from the previous one,
otherwise the Settings Menu will exit.
4. Turn the ignition key on position 2.
By now, starting the engine or turning the ignition key into position 0 will exit the Settings
Menu.
5. Perform one flash of the High Beams lights in order to enter the Settings Menu.
The message 'Menu: ON' will be shown into the BMW radio module display.
10
NAVIGATING INTO THE SETTINGS MENU
6. Perform one flash of the left turn indicator.
Every main element of the Settings Menu is now accessible by single flash of the left turn
indicator. The selected function name will be shown into the display of the BMW radio
module. Perform this action until the desired function will be selected.
7. Perform one flash of the right turn indicator.
Every sub element of the last selected main element is now accessible by single flash of the
right turn indicator. The parameter related to the selected function will be shown into the
display of the BMW radio module. Perform this action until the desired parameter related to
the selected function will be chosen.
SAVING INTO THE SETTINGS MENU
8. In order to save the selected sub element, perform one flash of the High Beams lights.
The message 'Saved!' will be shown into the display of the BMW radio module.
The turn indicator lights will be flashing few times.
Now you can exit the menu or continue on selecting a new main element (step 6).
EXIT SETTINGS MENU
9. In order to exit from the menu, turn the ignition key into position 0 or start the engine (by
turning the ignition key into position number 3). Also the menu will exit after 60 seconds from
the last action.
The message 'Menu: OFF' will be shown into the display of the BMW radio module.
11
X46 GFB SETTINGS MENU OVERVIEW
Menu Main element
Menu Sub element
1
Coming Home
ON / OFF
2
Leaving Home
ON / OFF
3
Windows
ON / OFF
4
Roof
ON / OFF
5
One Touch Roof
ON / OFF
6
Welcome On Board
ON / OFF
7
Opening Trunk Lights
ON / OFF
8
Welcome
ON / OFF
9
Locking Car While Driving
ON / OFF
10
Coming Home lights
LOW BEAMS / FOG / LOW BEAMS + FOG / PARKING
11
Leaving Home lights
LOW BEAMS / FOG / LOW BEAMS + FOG / PARKING
12
Coming Home time
from 5 to 60 seconds, step 5
13
Leaving Home time
from 5 to 60 seconds, step 5
14
Mirrors
ON / OFF
15
Roof Mode
Mode A / Mode B / Mode C
16
X46 Version
Show the module version name
12
INSTALLATION
If the car is equipped with the Memory Seats, the X46 GFB module can be installed by the following
installation types:
1. on the front using the cables located behind the glove compartment and the ones behind the
center console (7 wires to connect)
2. on the back using the cables located under the rear seat
Otherwise if the car does not have the Memory Seats but do has the Power Folding Mirrors,
the X46 GFB module must be installed only:
3. on the front using the cables located behind the glove compartment and the ones behind the
center console (8 wires to connect)
1. Remove the key from the ignition and disconnect the negative terminal of the car battery.
2. Choose the right installation type and make now the proper wire connection as follow described:
INSTALLATION #1 – FRONT SIDE BEHIND THE GLOVE COMPARTMENT (7 WIRES TO CONNECT)
o Remove the glove compartment. There are 6 screws once the compartment has been
opened. Pull out the compartment.
o Locate the head unit (A1) and the 54-pin plug connector (X253) connected to it. Connect
the module wires as follow:
X46 RED WIRE
The RED wire is the positive terminal of the unit. It must be connected to the BMW wire on pin
47 of the 54-pin plug connector X253 (typically a red/violet wire).
X46 BLACK WIRE
The BLACK wire is the negative terminal of the unit. It must be connected to the BMW wire on
pin 10 of the 54-pin plug connector X253 (typically a brown/black wire).
X46 YELLOW WIRE
The YELLOW wire must be connected with the BMW white/red/yellow wire (the wire is white
and red with yellow spots/dots) on pin 9 of the 54-pin plug connector X253.
X46 WHITE WIRE
The WHITE wire must not be connected to any BMW wire.
13
Behind the glove compartment
o Remove the unit or the front panel just above the buttons for operating the convertible
top. A small screwdriver can be helpful.
o Remove the two screws of the central console.
o Remove the gear knob shuffle and remove the two screws.
o Move the gear knob frame backwards and remove the two screws.
o Remove the central console, locate the connector on the back of its switching centre
module (it is the one with the buttons) and connect the module wires as follows:
X46 BROWN WIRE - X46 GREEN WIRE
o Cut the BMW brown/violet wire located on the back of the center console (pin
(p 9 of the
plug connector).
o Connect the terminal coming from the connector to the BROWN wire and the other one
terminal going to the back of the car to the GREEN wire.
X46 BLUE WIRE - X46 ORANGE WIRE
o Cut the BMW brown/red wire located on the back of the
the center console (pin 8 of the
plug connector).
o Connect the terminal coming from the connector to the BLUE wire and the other one
terminal going to the back of the car to the ORANGE wire.
14
INSTALLATION #2 – BACK SIDE
o Open the center lid on the ski opening in the back rest and unclip the cover from the metal
rod.
o Remove the entire back seat by first pulling up hard in the front, then pulling the whole
seat piece out to the front and up.
o On the left passenger side there are two bundles of wires. Locate the one with the
following ones and connect the module wires as follows:
BMW wires to be found: red/green, brown, white/red/yellow, brown/violet, brown/red .
X46 RED WIRE
The RED wire is the positive terminal of the unit. It must be connected to the BMW red/green
wire.
X46 BLACK WIRE
The BLACK wire must be connected to the BMW brown wire.
X46 YELLOW WIRE
The YELLOW wire must be connected to the BMW white/red/yellow wire.
X46 WHITE WIRE
The WHITE wire must not be connected to any BMW wire.
X46 BROWN WIRE - X46 GREEN WIRE
o Cut the BMW brown/violet wire.
o Connect the terminal coming from the front of the car to the BROWN wire and the
other one terminal going to the back of the car to the GREEN wire.
X46 BLUE WIRE - X46 ORANGE WIRE
o Cut the BMW brown/red wire.
o Connect the terminal coming from the front of the car to the BLUE wire and the other
one terminal going to the back of the car to the ORANGE wire.
15
The module box can easily now be fitted behind the left rear quarter panel. In order to remove
this one:
o Remove the two screws of the left armrest, usually an 8 mm socket. Then pull the rubber
seal out just a bit.
o Grab under the speaker grill in the bottom right corner and pull hard towards the center. In
the corner there is one locking peg that is just snapped in. Once this peg has been
disengaged, the panel will slide out easily.
INSTALLATION #3 – FRONT SIDE BEHIND THE GLOVE COMPARTMENT (8 WIRES TO CONNECT)
o Remove the glove compartment. There are 6 screws once the compartment has been
opened. Pull out the compartment.
o Locate the head unit (A1) and the 54-pin plug connector (X253) connected to it. Connect
the module wires as follow:
X46 RED WIRE
The RED wire is the positive terminal of the unit. It must be connected to the BMW wire on pin
47 of the 54-pin plug connector X253 (typically a red/violet wire).
X46 BLACK WIRE
The BLACK wire is the negative terminal of the unit. It must be connected to the BMW wire on
pin 10 of the 54-pin plug connector X253 (typically a brown/black wire).
X46 YELLOW WIRE
The YELLOW wire must be connected with the BMW white/red/yellow wire (the wire is white
and red with yellow spots/dots) on pin 9 of the 54-pin plug connector X253.
X46 WHITE WIRE
Locate the Power Folding Control unit (A208) usually on the bottom left corner of the plastic
box behind the glove compartment.
The White wire must be connected to the BMW wire on pin 12 of the 12-pin plug connector
X10313 (typically a blue/violet wire).
16
The Power Folding Control unit
o Remove the unit or the front panel just above the buttons for operating the convertible
top. A small screwdriver can be helpful.
o Remove the two screws of the central console.
o Remove the gear knob shuffle and remove the two screws.
o Move the gear knob frame backwards and remove the two screws.
o Remove the central console, locate the connector on the back of its switching centre
module (it is the one with the buttons) and connect the module wires as follows:
X46 BROWN WIRE - X46 GREEN WIRE
o Cut the BMW brown/violet wire located on the back of the center console (pin 9 of the
plug connector).
o Connect the terminal coming from the connector to the BROWN wire and the other one
terminal going to the back of the car to the GREEN wire.
X46 BLUE WIRE - X46 ORANGE WIRE
o Cut the BMW brown/red wire located on the back of the center console (pin 8 of the
plug connector).
o Connect the terminal coming from the connector to the BLUE wire
wire and the other one
terminal going to the back of the car to the ORANGE wire.
17
DEPENDING ON WHERE YOU CHOOSE TO CONNECT THE POSITIVE TERMINAL OF THE X46 MODULE, THE
RELATED MAIN FUSE COULD CHANGE. YOU WILL FIND THE FUSES AND INFORMATION ON THEIR
RESPECTIVE ALLOCATION IN THE GLOVE COMPARTMENT BEHIND A PANEL WITH TWO SNAP CLIPS.
Fuses location
3. Insulate every other unconnected wires with vinyl type or other similar material.
4. Reconnect the negative terminal of the car battery.
If a fuse blows, first make sure that the wires have not caused a short circuit, then replace the old
fuse with one with the same rating.
Please note that the X46 unit has an additional internal security fuse.
If the connections have not been made correctly, this internal fuse could blow and it cannot be
replaced.
5. Now the X46 unit is completely operative.
The X46 module communicates with the other units on the bus system through messages. These ones can be
not correctly received due to the interferences on the bus or be corrupted by the large number of simultaneous
messages sent on the same bus. This problem is normally solved by the other units simply by retransmitting the
message and the X46 module will do the same in some case.
If for some reasons the messages are not available on the bus, the X46 unit will be not able to perform or to
complete its functions. In these cases we suggest to re-perform the action.
WARRANTY DECADES IN CASE OF IMPROPER INSTALLATION OR BY OPENING THE UNIT BOX . SEE THE WARRANTY AND TERMS
CONDI TIONS PARAGRAPH.
18
AUTOMATED ROOF Function
Setup and Maintenance
In order to have the best user experience, the following rules must be observed:
1. On startup, once the car battery has been reconnected wait few seconds until the red light of
one of the following buttons stops to flash.
2. On startup, after have completed all steps described in the Installation paragraph (and
generally after having reconnected the car battery) an additional couple of full cycles of
locking/unlocking could be required for a better synchronization with the car status.
3. Turn the ignition lock to position 1 or higher before re-performing a remote roof action.
Generally it is required by some Convertible Top control unit requirements.
4. If a remote roof action has not been performed and by performing the other one the turn
indicators flash twice, the Convertible Top control unit has not been allowing the moving
action which commands have been sent correctly by the X46 module.
Try to turn the ignition to position number 1 or higher and open or close the roof through the
buttons in the center console before.
5. Wait at least a couple of minutes before each activation.
To avoid placing unnecessary loads on the battery, you should avoid to operate the top many
times when the engine is switched off. Before closing the top, always ensure that the
windshield frame is clear of any obstructions that could prevent the top from closing
correctly.
6. Depending by the model/year of the car, the Automated Roof action could not be performed
if all the windows are completely down. In this case, try to move at least one window a little
up before.
7. The car battery must be fully charged.
Please note that the BMW convertible top control unit can be coded (in the factory or by a BMW dealer) as
accepting or not remote control for the opening and/or closing roof actions.
In order to be the Automated Roof function working properly, the BMW convertible control unit must be coded
as accepting remote control for the opening and closing functions.
19
ONE TOUCH ROOF function
By pressing briefly the buttons located in the center console, the convertible top will be completely
opened or closed without having the need to keep the button pressed for operating the top until the
opening or closing process has ended.
The ignition lock must be on position 2 or higher.
During the opening or closing process, it is always possible to stop it by pressing the other one
button. Wait at least a couple of minutes before each activation.
WARRANTY TERMS AND CONDITIONS
The module comes with one year of warranty.
Defective items must be returned to us within the warranty period. You must specify what the defect
is and give your contact and product details, the same ones supplied by registering your products on
our company website.
FBC Electronics will also repair or replace, at its option, without charge any X46 module which failed
due to defect in material or workmanship within the period of time following the date of original
purchase (the user must register the purchased product on to company website within one week
from the original purchase).
We do not repair or replace items with an expired warranty.
The warranty excludes damage caused by improper operation, testing, repair, modification,
alteration, adjustment, installation, or maintenance.
Damage resulting from either accident or neglect is also excluded.
Moreover, in order to be the warranty considered as valid, the seal of warranty must not be broken
at anytime.
TECHNICAL SPECIFICATIONS
•
•
•
•
20
Operating Voltage: 7 – 21 V
Absorbed Current: < 10 mA
Temperature range: -25 °C to +85 °C
Protections against polarity voltage inversion, over temperature, over current, internal short
circuit.
TROUBLE SHOOTING
All functions of this control unit should only be used while exercising caution and responsibility. We
can not be held liable for any damage or injury by installing or using this product.
In order to avoid problems with diagnostic tools and to avoid confusion or injury by unexpected
features or functionality we urge you to always disable the module before taking the car to a shop or
lending it to anyone. If problems arise while the module is installed that might be related to our
product, always contact FBC electronics directly first. Please never take the car to a dealer without
getting support first.
CONTACTS
We always quickly reply on questions. If you have a question please get in touch with us by email or
send us a message through the website contact form page.
[email protected]
http://www.fbc-electronics.com/en/contactus.aspx
FBC Electronics
© 2012-2014 All rights reserved.
BMW is a registered trademark of BMW AG.
Other company and product names mentioned herein may be trademarks of their respective companies.
Mention of third-party products is for informational purposes only and constitutes neither an endorsement nor a recommendation.
FBC Electronics assumes no responsibility with regard to the performance or use of these products. All understandings, agreements, or
warranties, if any, take place directly between the vendors and the prospective users.
Every effort has been made to ensure that the information in this manual is accurate.
FBC Electronics is not responsible for printing or clerical error.
Rev. 05/2014
21
22