1
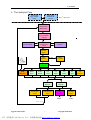
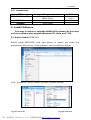
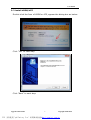
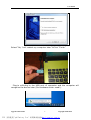
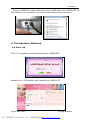
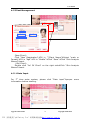
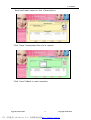
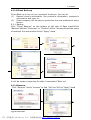
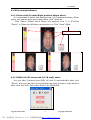
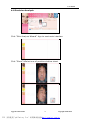
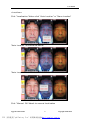
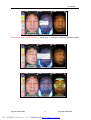
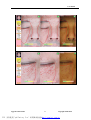
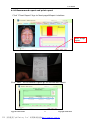
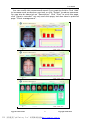
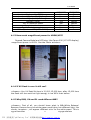
Table of Contents Introduction ........................................................................................2 1. The analysis Flow ........................................................................................................ 3 2. System connect ............................................................................................................. 4 3. Install Software ............................................................................................................. 5 3-1 before install 4RSM/4FS ...................................................................................... 5 4. The Operator Software........................................................................................... 9 4-4 Enter OS......................................................................................................................... 9 4-5 Client Management ............................................................................................... 10 4-5-1 Data Input.............................................................................................................. 10 4-5-2 User Information ....................................................................................... 11 4-5-3 Pro-Recorded and 9x3=27 Pro-set reports .............................. 12 4-5-4 Client Back-up ............................................................................................. 15 4-5-4 Recover ............................................................................................................ 15 4-6 Skin Analysis Wizard ............................................................................................ 17 4-6-1 Select Left/Frontal/Right position before shoot .................... 17 4-6-2 RGBàUVàPL shoot and L/F/R multi shoot .............................. 17 4-7 Sort & Select ............................................................................................................. 18 4-8 Precision Analysis................................................................................................... 19 4-9. Compare ..................................................................................................................... 24 4-10 Recommend report and print report....................................................... 26 4-11 How to get the upgrade version from internet ................................ 28 4-12 What is different 4RSM/4FS with 3RSM/3FS? .................................. 28 4-13 How much magnificent power for 4RSM/4FS? ................................. 29 4-14 If UV flash is over it still can? ..................................................................... 29 4-15 Why RGB, UV and PL used different WB? ........................................... 29 4-16 What is “Skin Age”?........................................................................................... 30 PDF 文件使用 "pdfFactory Pro" 试用版本创建 www.fineprint.com.cn User Guide Introduction 4RSM/4FS (include 3RSM/3FS) magic mirror system (also call the facial scan system) is one of the best professionals equipments for medical and skin treatment users. This guide is a basic manual for new user. Please see the “User Manual” inside CD-ROM for more detail new upgrade information. Upgrade 2012-09-09 2 Copyright 2009-2012 PDF 文件使用 "pdfFactory Pro" 试用版本创建 ÿwww.fineprint.com.cn User Guide 1. The analysis Flow Data input: Logo, Name… Code… Data input: Products & Service For 1st time enter Client Registration & Recorder Shoot images by 3 positions (L,F,R) Magnified & Measurement images Linear Meas. & Area Meas. Double Image compare Localize Select AutoLocalize Ok No Ok ManuLocalize Precision Analysis RGB Moisture RGB Pores RGB Wrinkl UV Acne Separated Reports Sep. Report Print Total Report Print UV Spots PL Roug PL Spot Total Reports A4 Printer Receipt Printer End End Click “Save” Upgrade 2012-09-09 3 Copyright 2009-2012 PDF 文件使用 "pdfFactory Pro" 试用版本创建 www.fineprint.com.cn PL Sensitiv User Guide 2. System connect 4RSM/4FS system using one USB 2.0 cable, connecting figure is as below: USB 2.0 3-1 LCD Resolution=1366x768 OS system and Model No. Model Camera RGB/UV/PL Windows OS Resolution FS-800 SP-350 1280x800 Windows XP only RSM9/FS12 Canon SX110/G9 Canon G9/G10 Canon G9/G10 1280x800 Windows XP/Windows Vista/7/8 RGB/UV RSM12/FS15 4RSM/4FS 3RSM/3FS RGB/UV 1280x800 1366x768 Windows XP/Windows Vista/7/8 RGB/UV/PL (Q) What is different 4RSM/4FS with 3RSM/3FS? (A) 3RSM/3FS used one fixed PL lens to set front of Camera’s Len. 4RSM/4FS used the program control X-Lens switch system to get very high-quality RGB/UV/PL images. 3-2 Minimum equipment for Hardware ITEM CPU Hard Driver RAM USB port Monitor OS Upgrade 2012-09-09 Minimum Core2 160 GB Recommend Itel i3/i5/i7 ≥360 GB 2 MB 3 1366x768 Windows XP ≥6 GB 4 1366x768 Windows XP/7 4 Note USB2.0 only Copyright 2009-2012 PDF 文件使用 "pdfFactory Pro" 试用版本创建 ÿwww.fineprint.com.cn User Guide 3-3 Accessories ITEM USB 2.0 Cable Blue AC Cable Softdog Purpose 1.8m High-Speed Cable (Blue Color) Power Cable Soft-locker Note USB 2.0cable only! 3. Install Software It is easy to install or upgrade 4RSM/4FS software by one step and the software also support Windows XP, Vista and 7 OS. 3-1 before install 4RSM/4FS Before install 4RSM/4FS, click right button of mouse àto check the background information of the software, see the dialog as below: Click “properties”àclick “Detail”àCheck “Product Version” Upgrade 2012-09-09 5 Copyright 2009-2012 PDF 文件使用 "pdfFactory Pro" 试用版本创建 ÿwww.fineprint.com.cn User Guide 3-2 install 4RSM/4FS Double click the Icon of 4RSM or 4FS, appear the dialog box as below: Click “Yes” to next step. Click “Next” to next step. Upgrade 2012-09-09 6 Copyright 2009-2012 PDF 文件使用 "pdfFactory Pro" 试用版本创建 ÿwww.fineprint.com.cn User Guide Keep the path C:\Vanton\4RSM_Enà Click “Next” to next step. Upgrade 2012-09-09 7 Copyright 2009-2012 PDF 文件使用 "pdfFactory Pro" 试用版本创建 ÿwww.fineprint.com.cn User Guide Select “No, I will restart my computer later”àClick “Finish” Plug-in soft-dog to the USB port of computer and the computer will recognize the device later (No hardware driver need!). Upgrade 2012-09-09 8 Copyright 2009-2012 PDF 文件使用 "pdfFactory Pro" 试用版本创建 ÿwww.fineprint.com.cn User Guide Turn on 4RSM/4FS power SW and connect USB cable from 4RSM/4FS to the USB port of computer. You can see the dialogue box as below: 4. The Operator Software 4-4 Enter OS Click X to closed this dialogue boxàenter 4RSM/4FS Password is 1234àenter main interface of 4RSM/4FS Upgrade 2012-09-09 9 Copyright 2009-2012 PDF 文件使用 "pdfFactory Pro" 试用版本创建 ÿwww.fineprint.com.cn User Guide 4-5 Client Management (New Client) Click “New Registration”àFill in “*Client Name”àSelect “male or Female”àFill in “Age”àFill in “Mobile”àClick “Save”àClick “Skin Analysis Wizard”ànext. (Old Client) Double click “Inf. Of Client” on the right sideàClick “Skin Analysis Wizard”ànext. 4-5-1 Data Input For 1st time enter system, please click “Date input”àproper some information before starting. Upgrade 2012-09-09 10 Copyright 2009-2012 PDF 文件使用 "pdfFactory Pro" 试用版本创建 ÿwww.fineprint.com.cn User Guide 4-5-2 User Information ① Input Company Information: Click “Bring image”àCompany’s LogoàFill in “User Name”, and TelephoneàClick “Save”àfinished! (This information will be appear at the final report) ② Operator: Click “Add”àinput “Op. name” à input Password and Re-input “password”àClick “Save”àClick next “Suggestion”. Client Back-Up: This function mode is for user to back up both client information and data storage. Recovery: Click “Recovery”àrestore the date from bock-up file automatically. Upgrade 2012-09-09 11 Copyright 2009-2012 PDF 文件使用 "pdfFactory Pro" 试用版本创建 ÿwww.fineprint.com.cn User Guide 4-5-3 Pro-Recorded and 9x3=27 Pro-set reports Attention: Please complete item “Pro-recorded” before making 29 sets reports!! Click “Add”àappear new interface (see as below)àinput the image by “Shooting/Save” or “Bring Images”àinput suggestion (Name)àInput “Function”àinput “Operation guide”àClick “Save”àClose Upgrade 2012-09-09 12 Copyright 2009-2012 PDF 文件使用 "pdfFactory Pro" 试用版本创建 ÿwww.fineprint.com.cn User Guide Then complete 9x3=27 reports, these reports could be automatically output by the result of analysis. Click “Add”à Select “Products” or “Service” Click “OK” on the right bottomàClick “Add” select next one. Upgrade 2012-09-09 13 Copyright 2009-2012 PDF 文件使用 "pdfFactory Pro" 试用版本创建 ÿwww.fineprint.com.cn User Guide Write and make report on the <Description> Click “Save”àcompleted the one of reports Click “close”àBack to main interface Upgrade 2012-09-09 14 Copyright 2009-2012 PDF 文件使用 "pdfFactory Pro" 试用版本创建 ÿwww.fineprint.com.cn User Guide 4-5-4 Client Back-up Client Back-up is one of very important functions. You can do: (1) Restore client’s information, like product’s information, customer’s information and soon on. (2) Chain company will be easy to promotion the new products to every branch. 5-3-1 Backup Click “Client Back-up” on the bottom of left side of Data inputàClick “Backup”àSelect “Customer” or “Product”àClick “browseàinput the name of backup’s file and positionàclick “Apply”àend It will be made a huge size file after it completed “Back up”. 4-5-4 Recover Click “Recover”àclick “browse” to find “XXX.rar”àClick “Apply”àend Upgrade 2012-09-09 15 Copyright 2009-2012 PDF 文件使用 "pdfFactory Pro" 试用版本创建 www.fineprint.com.cn User Guide Upgrade 2012-09-09 16 Copyright 2009-2012 PDF 文件使用 "pdfFactory Pro" 试用版本创建 www.fineprint.com.cn User Guide 4-6 Skin Analysis Wizard 4-6-1 Select Left/Frontal/Right position before shoot It is important to select one position from L/F/R before shooting. Other ways, you cannot got a good result after click “Analysis”. Click “Shoot” button firstà Select one position from “L, F, R”àClick “Shoot” or Space keyàSelect next position or Click “Save”àEnd. Keep same position. 4-6-2 RGBàUVàPL shoot and L/F/R multi shoot You can take 3 photos from RGB, UV and PL automatically after click “Shoot”, also you can take 3x3=9 photos from Left, frontal to right position after click out “Auto Save after Shoot” by 4RSM/4FS. Upgrade 2012-09-09 17 Copyright 2009-2012 PDF 文件使用 "pdfFactory Pro" 试用版本创建 ÿwww.fineprint.com.cn User Guide 4-7 Sort & Select This is one of very useful tools and let you to find the image quickly and easily. Move to right side small images of main menu and click the right button of mouse. You will see the small windows and you can sort & select the images you like. See the as below: No. 1 2 3 4 5 6 7 8 9 10 11 Button Obverse Reverse Left Frontal Right RGB-L RGB-F RGB-R UV-L UV-F UV-R Upgrade 2012-09-09 Describe Sort from last to Previous (Nowàbefore) Sort from 1st to next (BeforeàNow) All left side images (RGB +UV) All Frontal side images (RGB +UV) All Right side Images (RGB+UV) Only RGB Left side images Only RGB Frontal side images Only RGB Right side images Only UV Left side images Only UV Frontal side images Only UV Right side images 18 Copyright 2009-2012 PDF 文件使用 "pdfFactory Pro" 试用版本创建 ÿwww.fineprint.com.cn User Guide 4-8 Precision Analysis Click “Skin Analysis Wizard” àgo to next main interface Click “Shoot”àSelect one of positions before shoot Upgrade 2012-09-09 19 Copyright 2009-2012 PDF 文件使用 "pdfFactory Pro" 试用版本创建 ÿwww.fineprint.com.cn User Guide 2nd or more time shoot, the Tic-Tac-Line will help you precise position before shooting. Upgrade 2012-09-09 20 Copyright 2009-2012 PDF 文件使用 "pdfFactory Pro" 试用版本创建 ÿwww.fineprint.com.cn User Guide <Localizer> Click “Localization”àthen click “Auto Localize” or “Manu Localize” “Auto Localize” is success as below: “Auto Localize” is not success as below: Click “Manual: Ok”àback to manual localization Upgrade 2012-09-09 21 Copyright 2009-2012 PDF 文件使用 "pdfFactory Pro" 试用版本创建 ÿwww.fineprint.com.cn User Guide Then, select one node at the yellow line and move to right positionàClick “Localizer” againàfinish localization. <Analysis> Click “Analysis” after Localization, then the system will be called to do moisture test first by VM-10 Moisture Meter. Finish moisture test or one more click “RGB Moisture”, you can click “Yes” button as below continue to analysis RGB Pores/RGB Wrinkle/UV Acne/UV Spot/PL Roughness/PL Spot/PL sensitivity, see as below: Upgrade 2012-09-09 22 Copyright 2009-2012 PDF 文件使用 "pdfFactory Pro" 试用版本创建 ÿwww.fineprint.com.cn User Guide One more click “RGB Moisture” continue to analysis without Moisture test Upgrade 2012-09-09 23 Copyright 2009-2012 PDF 文件使用 "pdfFactory Pro" 试用版本创建 ÿwww.fineprint.com.cn User Guide Move button on left or right side. More detail information by the tool Zoom More detail information by the tool Zoom Move button on left or right side. < Client Report > Click “Client Report” after analysis. 4-9. Compare The “Compare” is one of useful tools in 4RSM/4FS, you can see the different results after skin care by “Compare”. Click “Compare”àSelect left or right main image and click one of themàyellow square=Selectedàchoose and click one of small images on left sideàDisplay the image you selected. Upgrade 2012-09-09 24 Copyright 2009-2012 PDF 文件使用 "pdfFactory Pro" 试用版本创建 ÿwww.fineprint.com.cn User Guide Upgrade 2012-09-09 25 Copyright 2009-2012 PDF 文件使用 "pdfFactory Pro" 试用版本创建 ÿwww.fineprint.com.cn User Guide 4-10 Recommend report and print report Click “Client Report”àgo to Next pageàReport interface Print receipt report. Click “Next” on the bottom rightà go to recommend report Upgrade 2012-09-09 26 Copyright 2009-2012 PDF 文件使用 "pdfFactory Pro" 试用版本创建 ÿwww.fineprint.com.cn User Guide You can modify this recommend report if you want to do this. Click “Add” to increase more products or services, or click “Delete” to reduce someone. You can also do same job on “Description”. Click “Print” to print this page, click “Save to recorder” not only save this page, but also save to previous page “Client management”. Upgrade 2012-09-09 27 Copyright 2009-2012 PDF 文件使用 "pdfFactory Pro" 试用版本创建 ÿwww.fineprint.com.cn User Guide 4-11 How to get the upgrade version from internet You can get latest version from our open email: [email protected], you can call us or email us to get password. 4-12 What is different 4RSM/4FS with 3RSM/3FS? (A) (B) 3RSM/3FS used one fixed PL lens to set front of Camera’s Len(See Photo1 as below). 4RSM/4FS used the program control X-Lens switch system to get very high-quality RGB/UV/PL images(See Photo2,3 as below). See table as below: Photo1 Photo2 Upgrade 2012-09-09 Photo3 28 Copyright 2009-2012 PDF 文件使用 "pdfFactory Pro" 试用版本创建 ÿwww.fineprint.com.cn User Guide Lossless High-quality RGB Image Lossless High-quality UV Image Lossless High-quality PL Image Receipt Printer VM-10 Moisture Meter Smart Localization Rapid Precision analysis Wide Spectrum LED (WB=6400K) 4RSM/4FS Yes Yes Yes Yes Yes Yes Yes Yes 3RSM/3FS No No Yes Option Option Option Yes No 4-13 How much magnificent power for 4RSM/4FS? Depend Camera Model and LCD size, Like Canon G10 (15’ LCD display) magnificent power is 600%. See the Photo as below: 4-14 If UV flash is over it still can? <Answer> Yes, UV flash life time is 12,000-15,000 time, after 15,000 time the flash still can work but light energy is low 60% than before. 4-15 Why RGB, UV and PL used different WB? <Answer> First of all, you should know what is WB=White Balance! Because Camera focus one white paper need lights, but different light, like cloudy, tungsten…, will appear different color on the white paper. This is Upgrade 2012-09-09 29 Copyright 2009-2012 PDF 文件使用 "pdfFactory Pro" 试用版本创建 ÿwww.fineprint.com.cn User Guide why the camera’s WB SW must be match with light source. We select the best WB for RGB ,PL and UV lights by our doctor experience and feedback from our clients. 4-16 What is “Skin Age”? The concept of skin age is different with true age. This is a description of the quality of your skin and your actual age of the concept of matching degree. For example, the 18-year-old girl's skin is usually better than the 40-year-old female skin. This does not mean that 40-year-old female skin healthy. So how to explain the 40-year-old female skin quality level? The answer is to use the concept of skin age to be easy to understand. If 40 years old female of her wrinkled skin age is only 38 years old and the spots skin age is 43 years old, you will be easy to “see” what is skin quality of this 40 years old female. That is why we need to know the client’s true age before shoot. Tips: the software is how to calculate the skin age? Our software can precision analysis the quantity of spots by limit zone, but also calculate the size of each spot and all to gain spot as follows: Spot density = sum of all spots / Limit zone X gain %à àget result and levelàget a △Valveà Skin age= True age +/- △Valve Upgrade 2012-09-09 30 Copyright 2009-2012 PDF 文件使用 "pdfFactory Pro" 试用版本创建 ÿwww.fineprint.com.cn