1
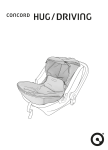
DEUTSCH
01
ENGLISH
21
FRANÇAIS
41
ESPAÑOL
61
ITALIANO
81
PORTUGUÊS
101
NEDERLANDS
121
NORSK
141
DANSK
161
SUOMI
181
Kindergewicht
child‘s weight
9 kg - 18 kg
ca. Alter
approx age
9 Monate - 4 Jahre
ECE Gruppen
ECE group
I
ISOFIX Größenklasse
ISOFIX size category
A
Norm ECE R44 04
standard ECE R44 04
norme ECE R44 04
norma ECE R44 04
szabvány ECE R44 04
01
02
03
04
05
06
07
08
09
10
11
17
13
14
15
16
18
12
_ENGLISH
THANK YOU
21
OVERVIEW22
INSTRUCTIONS24
GENERAL INFORMATION
26
USING THE CONCORD ABSORBER
26
MOUNTING THE CONCORD ABSORBER
WITH THE THREE-POINT SAFETY BELT
27
REMOVING THE CONCORD ABSORBER
WITH THE THREE-POINT SAFETY BELT
31
MOUNTING THE CONCORD ABSORBER WITH ISOFIX
32
REMOVING THE CONCORD ABSORBER WITH ISOFIX
34
VEHICLES SUITABLE FOR ISOFIX
35
SECURING YOUR CHILD IN THE CONCORD ABSORBER
36
USING THE TILT ADJUSTMENT
38
USING THE SUPPORT OF THE STEP-UP HELP
38
USING THE LEG SUPPORT
39
CARE TIPS
39
WARRANTY40
_THANK YOU
Thank you for purchasing a Concord quality product.
You will be amazed about the versatility and safety of this product.
We hope that you will enjoy using your new CONCORD ABSORBER.
21
_OVERVIEW
01 Headrest
02 Size
adjustment dial
13
Shoulder harness
belt guide
03 Harness padding
04 Harness lock
06 Leg support
08
Seat tilt operation
10
Harness for central
adjustment
17
Control knob ISOFIX
22
05
Harness clip
control knob
07
Harness tensioner
09
Step-up support
15
Storage compartment
for user manual
18
ISOFIX adapter
14
Shoulder
harness clip
16
Lap harness
belt guide
11
Support leg release
12
Support leg
23
_INSTRUCTIONS
CAUTION!
• Please read this user manual carefully before using the
CONCORD ABSORBER, and make sure to store it for later reference.
Non-compliance with the instructions in this manual may affect the safety
of your child!
Make sure to also observe relevant instructions contained in the user
manual of your vehicle before transporting children.
WARNING!
• Never leave your child unattended.
• Children often carry small objects (e.g. toys) in jacket or pants pockets,
and may also wear clothes with rigid components (e.g. belt buckle).
Make sure that these are not clamped between the child and the harness,
as this might cause unneccessary injuries in case of an accident.
The same hazards apply for adults as well!
• Naturally, kids are often lively. Make sure to explain the importance of
safety when in a vehicle. Your child will then understand that the harness
lock should not be opened or the harness moved, giving you more peace
of mind.
• Your child‘s safety can only be guaranteed if the safety system is attached
and used in accordance with the instruction manual.
• The system‘s harness straps must be worn taut and without any twists,
and must be protected against any damage.
• Protect any parts of the CONCORD ABSORBER not covered with fabric
against direct sunlight to prevent your child from suffering burns.
• The child restraint system must not be damaged or crushed by moving
parts in the vehicle or by the vehicle doors.
• Do not attempt any modifications on the CONCORD ABSORBER, as
these might infringe on your child‘s safety.
• After an accident, the CONCORD ABSORBER must be replaced or sent
to the manufacturer for testing, along with an accident report.
• Make sure to instruct your passenger on how to remove the child from its
safety seat in case of accident or danger.
• Never leave your child unsupervised in the car seat - whether harnessed or
not.
24
• Make sure to secure any luggage and loose items in the passenger
cabin to reduce the risk of injury in case of an accident.
• The manual must always be carried with the child safety seat.
• The use of any accessories or replacement parts is prohibited, and
non-compliance will result in a lapse of all warranty and liability claims.
Excepted are original accessories by CONCORD only.
• Suitable for vehicles with lap and diagonal seat belt, which have been
approved in compliance with ECE regulation 16 or similar standard.
Due to prolonged use of the CONCORD ABSORBER, seat covers and
other parts will wear depending on duration and intensity of use to varying
degrees, and will have to be replaced. We can therefore not provide any
blanket warranty beyond 6 months for wear parts.
Please contact your specialist shop for baby and children‘s products, the
relevant department in department stores, your car accessory specialist
shop or the catalog company, where you originally purchased the
CONCORD ABSORBER for replacement parts. These will have a complete
product portfolio for CONCORD child seat accessories to choose from.
The vehicle‘s seat belt lock must not be placed over the edge of the lap
harness belt guide. If in doubt or in case of difficulties with our product,
please contact CONCORD directly. The vehicle‘s seat belts must be placed
at the positions and contact points on the safety seat as shown in the user
manual. Any other seat belt placement is prohibited.
If the seat selected for mounting the child seat is equipped with an airbag,
we recommend moving the seat as far back as possible. The seat‘s lap and
diagonal seat belt must be run forward to the shoulder harness guide (13) of
the child seat. Adjust the vehicle‘s seat position where required.
For vehicles with front and lateral airbags, read the relevant instructions
provided in the vehicle manual.
25
_ GEnERal inFORMaTiOn
• Thisproductisa‚semiuniversal‘childrestraintsystem.Ithasbeen
approved in accordance with the ECE regulation 44, change series 04
for general use in vehicles, and will fit most but not all car seats.
• ThischildrestraintsystemofECEGroupIissuitableforchildrenbetween
the ages of 9 months and 4 years with a body weight between
9 and 18 kg.
• ThischildsafetyrestraintiscompliantwiththeISOFIXsizecategory:A.
• Properfitofthecarseatcanbeassumedifthevehiclemanufacturer
declaresthevehiclesuitableforthemountingofa‚semiuniversal‘child
safety restraint for the relevant age group in his vehicle manual.
• Thischildsafetyrestraintwasapprovedinaccordancewiththestricter
requirementsoftheclass‚semiuniversal‘thanpreviousmodels,whichdo
not bear this label.
• Ifyouhaveanyquestionsordoubts,pleasecontactthemanufacturerof
the child safety restraint or your retailer.
• Onlysuitableforuseinvehicleswithlapanddiagonalseatbelt,whichare
approved in accordance with ECE regulation 16 or similar standard.
_ USinG THE COnCORD aBSORBER
With the safety of your child in mind, you have decided to purchase our car
seat CONCORD ABSORBER. The product is manufactured under strict
quality control conditions. It will only be fully effective in terms of its safety
features if used according to specifications. Please ensure strict adherence
with the mounting and usage instructions.
The fabric cover is an important component and adds to the effectiveness
of the seat; the seat may therefore only be used with an original CONCORD
cover!
_ MOUnTinG THE COnCORD aBSORBER WiTH
THE THREE-POinT SaFETY BElT
Fold the support leg (12) at the bottom of the
CONCORD ABSORBER forwards until it engages.
Set down the CONCORD ABSORBER in drive
direction onto the seat or the seat bench.
The CONCORD ABSORBER should align with the
seat and backrest with as much direct contact
as possible. In vehicles with serial headrests, a
readjustment of the headrest or its removal will allow
for a better mounting position of the car seat.
Please remember to readjust or replace the headrest
in the correct position if an adult will be sitting in that
seat instead.
The car seat must be secured with the lap and
diagonal seat belt, even if no child iS traveling in it!
Press the size adjustment
control (02) upwards and move
the headrest of the CONCORD
ABSORBER into its top-most
position.
Push the seat tilt control (08) upwards.
Press and hold the control (08) and
move the seat part of the CONCORD
ABSORBER into its forward-most position.
The child seat can be used on any vehicle seats that are equipped with a lap
and diagonal seat belt. For reasons of results of accident statistics, however,
we recommend using the seat behind the front passenger seat.
26
27
Open the harness lock of the 5-point
harness system and fold the cover of the
belt tensioner (07) upwards.
The shoulder belt must run inside
the harness clip (14) and above the
latch pin of the belt tensioner (07).
Push the locker button on the belt
tensioner upwards and open the belt
tensioner (07) completely.
The lap strap must run on the lap strap guides marked
in red and below the latch pin of the belt tensioner (07).
The seat belt must not be laid out in any other way.
The seat belts must not be twisted!
Pull the lap and diagonal belt until
it lies flat and close the harness clip
(14) carefully.
Open the harness clip for the shoulder belt (14) on the
side of the lap and diagonal belt by pressing the control
button on the harness clip (05).
Now close the belt tensioner
and tighten the seat belt as
much as possible.
Run the lap and diagonal seat belt between
the seat part and the base of the CONCORD
ABSORBER and close the lock of the
three-point-harness.
Close the cover of the belt tensioner.
Hook the seat belt into the shoulder
harness guide (13).
Press the button (11) to unlock the
support leg, and move the support leg (12)
downwards, until it rests securely on the
floor and you can hear and feel it lock into
position!
28
29
CaUTiOn!
• Thelapanddiagonalseatbeltmust
be lying flat and fully tensioned along
the base of the CONCORD ABSORBER.
• Theseatbeltsmustnotbetwisted.
• Theshoulderstrapmustberunthrough
the shoulder harness guide, the harness
clip and the belt tensioner and must be
fully tightened.
• Theharnessclipmustbeengagedand
closed tightly.
• Thesupportlegmustrestsecurelyon
the floor and must be locked in place.
_ REMOVinG THE COnCORD aBSORBER WiTH
THE THREE-POinT SaFETY BElT
Press the size adjustment control (02)
upwards and move the headrest of the
CONCORD ABSORBER into its top-most
position.
Press and hold the seat tilt control (08)
upwards and move the seat part into its
front-most position.
Remove the shoulder strap from the
shoulder harness guide (13).
Push the support leg (12) into its
top-most position while keeping
the button for unlocking the
support leg (11) pressed.
Check the correct position of the seat belts before each use.
Please contact CONCORD directly if you have problems mounting the seat.
The seat belts must run through the belt guides marked in red on the seat.
The seat belt must not be laid out in any other way.
Open the harness lock of the
5-point harness system and fold
the cover of the belt tensioner (07)
upward. Push the locker button
on the belt tensioner upwards
and open the belt tensioner (07)
completely.
Open the harness clip for the shoulder belt (14) on the
side by pressing the control button on the harness clip
(05).
Open the belt lock of the lap and diagonal seat belt,
and pull it out between the seat part and the base of
the CONCORD ABSORBER.
30
31
_ MOUnTinG THE COnCORD aBSORBER WiTH iSOFiX
This child safety restraint is compliant with the iSOFiX weight
category: up to 18 kg and iSOFiX size category: a
Push the CONCORD ABSORBER backwards while
pushing down the ISOFIX control button (17) until it lies
as flush as possible along the back rest of the vehicle‘s
seat. Release the ISOFIX control button (17) once you
have the child seat in the desired position.
When the ISOFIX adapters has not been used for some time, they will be
locked in their current position.
To unlock the adapters, lay
the CONCORD ABSORBER
on its back on an even, clean
surface and push downwards
on the seat area.
In vehicles with serial
headrests, a readjustment of
the headrest or its removal
will allow for a better mounting
position of the car seat.
Fold the support leg (12) at
the bottom of the CONCORD
ABSORBER forwards until it
engages.
Please remember to readjust or replace the headrest in the correct position
if an adult will be sitting in that seat instead.
Press the ISOFIX control button (17)
at the underside of the front edge
upwards until the ISOFIX adapters
(18) at the back of the seat are fully
extended.
Set down the CONCORD ABSORBER in drive direction
onto the seat or the seat bench.
Push the child seat backwards onto the ISOFIX
receptacles until the locking mechanisms of both
ISOFIX adapters (18) audibly lock and the safety
displays on both adapters are green!
32
Press the button (11) to unlock the support leg, and
move the support leg (12) downwards, until it rests
securely on the floor and you can hear and feel it lock
into position!
CaUTiOn!
• ThecarseatmustbesecuredwiththeISOFIXsystem,
even if no child is traveling in it!
• BothISOFIXadaptersmustbe
locked securely in place and the
safety displays on both adapters
must show green.
• Thesupportlegmustrest
securely on the floor and must be
locked in place.
33
_REMOVING THE CONCORD ABSORBER WITH ISOFIX
_VEHICLES SUITABLE FOR ISOFIX
Move the support leg (12) upwards while keeping the
button for unlocking the support leg (11) pressed.
The CONCORD ABSORBER with ISOFIX system has been approved for
‚semi universal‘ use, and is suitable for mounting on specific vehicle seats.
Press and hold the ISOFIX control button (17) and pull
the CONCORD ABSORBER forward until the ISOFIX
adapters are fully extended.
Push the buttons to unlock the ISOFIX adapters (18)
forward until the safety displays are red and the seat is
released.
The appendix CAR FITTING LIST contains an overview of vehicles and
vehicle seats that have been approved for the use of the CONCORD
ABSORBER with lap and diagonal seat belt or ISOFIX system in connection
with a support leg.
Should your vehicle not be listed, please ensure that the CONCORD
ABSORBER can be properly mounted in your car/ on the desired seat before
you purchase the child seat!
Read the user manual provided by the manufacturer of your vehicle and the
mounting and security notices contained in this user manual.
For latest updates, please visit www.concord.de.
To retract the ISOFIX
adapters (18), lay the
CONCORD ABSORBER
on its back on an even,
clean surface and push
downwards on the seat area
while pressing and holding
the ISOFIX control button
(17).
34
35
_ SECURinG YOUR CHilD in THE COnCORD aBSORBER
CaUTiOn
Check the CONCORD ABSORBER for proper mounting and correct seat
belt tension, and for secure locking of all locking mechanisms before each
use.
Press the size adjustment control (02) and move the
headrest (01) of the CONCORD ABSORBER into its
top-most position.
Push the arrester of the
central adjuster upwards,
while at the same time pulling
the 5-point harness system
forward by the lap harnesses.
The CONCORD ABSORBER must be adjusted to the size of the child.
Press and hold the size adjustment control (02) and
move the headrest (01) of the CONCORD ABSORBER
into the desired position.
Releasing the control button (02) will lock the
headrest (01) in its current position.
The shoulder harness guide should be situated
slightly above the child‘s shoulder. The shoulder
harnesses should lie in the middle between the
child‘s neck and the outer edge of the shoulder.
Tighten the harness by pulling the strap of the
central adjuster (10) until it lies snug against the
child‘s body.
Open the harness lock
and place the harnesses
to the sides and forward.
CaUTiOn!
Place your child onto the seat as far back as possible.
Bring together the shoulder/ lap harnesses and the central harness in front of
the child and push the harness lock closed.
• Theseatbeltsmustnotbetwisted.
• Theharnesslockmustbelockedproperlyandtheharnessesmustlie
snug against the child‘s body.
• Theheadrest/harnessguidemustbeadjustedtothesizeofthechildand
latched securely in place.
Check that the harness lock has latched shut correctly.
Ensure that none of the harness straps are twisted.
36
37
_USING THE TILT ADJUSTMENT
_USING THE LEG SUPPORT
Press the seat tilt control
(08) at the front of the seat
part to tilt the CONCORD
ABSORBER.
The CONCORD ABSORBER is equipped with a
removable leg support (06). The leg support is located
at the front edge of the seat, and can easily be
removed by grabbing the openings on the left and right.
Hold the button down and move the seat into the
desired position.
_CARE TIPS
The CONCORD ABSORBER is locked in the
current tilted position when you release the seat
tilt control (08).
The cover can be removed for washing. Bring
the seat part forward into its front-most position
and the headrest (01) into its top-most position.
_USING THE SUPPORT OF THE STEP-UP HELP
You can remove the support of the step-up
help (09). To do so, tilt the CONCORD
ABSORBER into its front-most position
(see ‚Using the tilt adjustment‘).
Move the support backwards and then lift it
upwards and off its hooks.
Simply pull the cover straight out of its fixture!
Begin with removing the cover over the
headrest (01), then take off the cover over the
seat part.
When reattaching the cover, begin with the
seat area. Stretch the cover underneath the
headrest and push the attachments into the
surrounding groove.
Now attach the cover over the headrest (01).
Pull the cover upwards and over the cover plate
and then over the headrest.
To replace the support (09), hook it into the
base of the CONCORD ABSORBER and then
push the support (09) down and forwards.
Attach the cover by way of the snap fasteners
on the CONCORD ABSORBER.
• The cover material colour may run slightly
when wet, in particular during washing.
• Do not use solvents on the cover!
38
39
_WARRANTY
The guarantee begins on the day of purchase. The guarantee period
corresponds to the statutory warranty period in the end-user’s country
concerned. At the manufacturer’s discretion, the guarantee shall cover
rectification, replacement or a price reduction.
The guarantee is valid for the original purchaser only. In the event of any
defect, claims can not be considered unless the specialist dealer is notified
of the fault as soon as it occurs for the first time. If the specialist dealer
is unable to remedy the problem himself, he must return the product to
the manufacturers together with details of the complaint, official proof of
purchase and the purchase date. The manufacturers assume no liability for
faulty goods that they did not supply.
The guarantee does not apply where:
• the product has been modified;
• the product is not brought back to the specialist dealer complete with
proof of purchase within 14 days of the defect occurring;
• the defect was caused by improper usage or maintenance or due to
anything else deemed to be the fault of the user, in particular failure to
comply with the instructions for use;
• repairs have been carried out on the product by third parties;
• the defect was caused as the result of an accident.
• the serial number has been damaged or removed
The guarantee makes no provision for any alteration or deterioration to the
product that is incurred through normal usage (wear and tear). The period
of guarantee shall not be extended by any remedial measures carried out by
the manufacturers in the event of a claim.
40
D // Um die Funktionsfähigkeit und Sicherheit Ihres Kinderautositzes auch nach dem Austausch von Ersatz- und
Zubehörteilen zu gewährleisten, bitten wir Sie bei Bestellungen Ihrem Fachhändler nachstehende Angaben
mitzuteilen:
GB // To ensure the functionality and safety of your child’s car seat after replacing spare and accessory parts,
please provide your dealer with the following details when placing your order:
F // Dans le but d’assurer le bon fonctionnement et la sécurité de votre siège auto enfant, également en cas de
remplacement de pièces de rechange et accessoires, nous vous prions de bien vouloir, en cas de commande,
donner les renseignements suivants à votre revendeur :
E // Para seguir garantizando el correcto funcionamiento y la seguridad de su asiento para niños después del
cambio de piezas o accesorios, le rogamos que indique los siguientes datos al realizar pedidos a su comercio
especializado.
I // Quando trasmette un ordine al Suo rivenditore di fiducia, La preghiamo di comunicargli i dati seguenti per
garantire la funzionalità e la sicurezza del Suo seggiolino per bambini anche dopo la sostituzione di parti di
ricambio e di accessori.
P // Para garantir a funcionalidade e a segurança da cadeira de criança para automóvel depois da substituição
de peças sobressalentes e de acessórios, agradecemos o fornecimento dos dados seguintes à loja
especializada aquando de encomendas:
NL // Om de functionaliteit en de veiligheid van het door u gekochte autokinderzitje ook na vervanging
van onderdelen en accessoires te waarborgen, is het belangrijk dat u bij de bestelling in uw speciaalzaak
onderstaande gegevens vermeldt:
N // Bilbarnesetet som du kjøpte, skal fungere riktig og gi optimal sikring også etter at reservedeler eller
tilbehør er byttet ut. Ved eventuelle bestillinger ber vi deg derfor om å gi forhandleren følgende opplysninger:
DK // For at garantere at autostolen stadig er funktionsdygtig og sikker, også efter at der er blevet monteret
reservedele eller tilbehør, bedes De oplyse følgende til Deres forhandler ved bestillingen:
FIN // Lasten turvaistuimen toiminnan ja turvallisen käytön varmistamiseksi myös varaosien
tai lisävarusteiden asennuksen jälkeen anna jälleenmyyjälle seuraavat tiedot, kun tilaat osia:
CONCORD
Industriestraße 25
95346 Stadtsteinach
Made in Germany
1
ECE-Nr. / ECE No. / N° ECE / Número ECE / N° ECE
Nº. ECE / ECE-nr. / ECE-nr / ECE-nr. / ECE-nro
E1
2
Serien-Nr. / Serial No. / N° de série / Número de serie / N° di serie
Nº de série / Serie-nr. / Serienr. / Serienr. / Sarjanro
Ersatzteil / Spare part / Type de siège / Pieza de repuesto / Parte di ricambio
Peça / Type kinderzitje / Reservedel / Reservedel / Varaosa
Fachhändler / Dealer / Revendeur / Comercio especializado / Rivenditore specializzato
Loja especializada / Speciaalzaak / Forhandler / Forhandler / Jälleenmyyjä
Meine Anschrift / My address / Mon adresse / Mi dirección / Il mio indirizzo
Meu endereço / Mijn adres / Min adresse / Min adresse / Oma osoite
semi-universal
9-18 kg
1
04. . . . . .
2 0000000000
Concord GmbH
Industriestraße 25
95346 Stadtsteinach
Germany
Phone +49 (0)9225.9550-0
Fax +49 (0)9225.9550-55
[email protected]
www.concord.de
Einbau- und Bedienungsanleitung
Instructions for attachment and use
Directives d‘installation et mode d‘emploi
Instrucciones de montaje y de uso
Istruzioni per l‘uso e il montaggio
Manual de montagem e de utilização
Inbouw- en bedieningshandleiding
Bruksanvisning og monteringsveiledning
Monterings- og betjeningsvejledning
Kiinnitys- ja käyttöohjeet
ABTF 03/0111
_DEUTSCH
_ENGLISH
_FRANÇAIS
_ESPAÑOL
_ITALIANO
_PORTUGUÊS
_NEDERLANDS
_NORSK
_DANSK
_ SUOMI