1
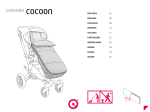
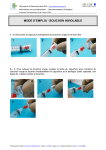
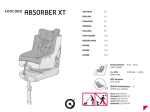
DEUTSCH01
ENGLISH07
FRANÇAIS13
ESPAÑOL19
ITALIANO25
PORTUGUÊS31
NEDERLANDS37
NORSK43
DANSK49
SUOMI55
_ENGLISH
OVERVIEW08
CLEANING INFORMATION
08
WARNINGS09
MOUNTING THE CONCORD HUG
10
OPENING THE HEAD AREA
11
OPENING THE FOOT AREA
11
WARRANTY12
_THANK YOU!
Thank you for purchasing a CONCORD quality product. You will be
amazed by the versatility and safety of this product. We hope that you
enjoy using your new CONCORD HUG.
7
_WARNINGS
_OVERVIEW
01 Zips in the
head area
CAUTION
02 Head area
04
Upper part of
the foot area
CAUTION
• Please read this user manual carefully before using the CONCORD
HUG and store this manual for later reference.
03
Zips in the
foot area
• Never leave your child unattended.
• Only one child may sit or lie in the CONCORD HUG at a time.
• Use the CONCORD HUG in conjunction with a group 0 / 0+ baby
carrier (e.g. CONCORD AIR).
• Always use the safety harness when your child is sitting or lying in the
CONCORD HUG.
• Dispose of the plastic packaging immediately. It may be dangerous for
children.
Non-compliance with the instructions in this manual may affect the safety
of your child.
_CLEANING INFORMATION
A soft brush or damp cloth may be used to clean light dirt from the
CONCORD HUG.
The CONCORD HUG can be washed separately in a washing machine
at 30°. Do not bleach, iron or dry-clean the CONCORD HUG and do not
use a dryer or spinning cycle.
8
9
_MOUNTING THE CONCORD HUG
To mount the CONCORD HUG, first
open the harness buckle of the baby
carrier.
(see the user manual for the baby
carrier / CONCORD AIR)
_OPENING THE HEAD AREA
Open the zip in the head area
(01) to the desired position and
fold the side parts and upper part
of the head area (02) outward.
Next, open the velcro fasteners on
the harness guides on the back of the
CONCORD HUG.
_OPENING THE FOOT AREA
Now place the CONCORD HUG into
the baby carrier and guide the harness
through the correct CONCORD
HUG harness guides. Close the
velcro fasteners on the back of the
CONCORD HUG:
To open the foot area, draw the zips (03) on the left and right sides of the
CONCORD HUG to the desired position and open the upper part of the
foot area (04).
Use the velcro fasteners to fix the
upper part of the foot area in two
positions.
Make sure that the harness system is
correctly installed and locked before
each use of the buggy.
10
11
_WARRANTY
The guarantee begins on the day of purchase. The guarantee period
corresponds to the statutory warranty period in the end-user’s country
concerned. At the manufacturer’s discretion, the guarantee shall cover
rectification, replacement or a price reduction.
The guarantee is valid for the original purchaser only. In the event of
any defect, claims can not be considered unless the specialist dealer is
notified of the fault as soon as it occurs for the first time. If the specialist
dealer is unable to remedy the problem himself, he must return the
product to the manufacturers together with details of the complaint,
official proof of purchase and the purchase date. The manufacturers
assume no liability for faulty goods that they did not supply.
The guarantee does not apply where:
• the product has been modified;
• the product is not brought back to the specialist dealer complete with
proof of purchase within 14 days of the defect occurring;
• the defect was caused by improper usage or maintenance or due to
anything else deemed to be the fault of the user, in particular failure to
comply with the instructions for use;
• repairs have been carried out on the product by third parties;
• the defect was caused as the result of an accident.
• the serial number has been damaged or removed
The guarantee makes no provision for any alteration or deterioration to
the product that is incurred through normal usage (wear and tear). The
period of guarantee shall not be extended by any remedial measures
carried out by the manufacturers in the event of a claim.
12
CONCORD GmbH
Industriestraße 25
95346 Stadtsteinach
Germany
Phone +49 (0)9225.9550-0
Fax +49 (0)9225.9550-55
[email protected]
www.CONCORD.de
Einbau- und Bedienungsanleitung
Instructions for attachment and use
Directives d‘installation et mode d‘emploi
Instrucciones de montaje y de uso
Istruzioni per l‘uso e il montaggio
Manual de montagem e de utilização
Inbouw- en bedieningshandleiding
Bruksanvisning og monteringsveiledning
Monterings- og betjeningsvejledning
Kiinnitys- ja käyttöohjeet
HDR 02/1012
_DEUTSCH
_ENGLISH
_FRANÇAIS
_ESPAÑOL
_ITALIANO
_PORTUGUÊS
_NEDERLANDS
_NORSK
_DANSK
_ SUOMI