1
Before using this unit
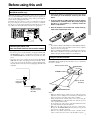
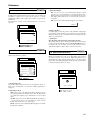
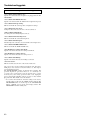
Setting the voltage selector
(Worldwide models only)
Installing the remote controller batteries
Worldwide models are equipped with a voltage selector so that you
can set your TX-NR900 to conform with local power supplies. Be
sure to set this switch to match the voltage of the power supply in
your area before plugging in the unit.
Determine the proper voltage for your area: 220-230 V or 120 V. If
the preset voltage is not correct for your area, insert a screwdriver
into the groove in the switch and slide the switch all the way to the
top (120 V) or bottom (220-230 V), whichever is appropriate.
DIGITAL
INPUT
COAX
PRE OUT
R
VIDEO
AUDIO
ANTENNA
L
FRONT
S VIDEO
MONITOR
OUT
1
COMPONENT
VIDEO
R
MODEL NO.
SURR SPEAKERS
FRONT SPEAKERS
OUTPUT
Y
R
L
TX-NR900E
L
L
R
SUB
CENTER
2
AM
OUT
FM
75
OUT
ZONE 2
PB
1. Remove the battery compartment cover by pressing it
and sliding it in the direction shown by the arrow
below.
2. Insert two AA (R6 or UM-3) batteries into the battery
compartment. Carefully follow the polarity diagram
(positive (+) and negative (–) symbols) inside the
battery compartment.
3. After the batteries are installed and seated correctly,
replace the compartment cover.
NETWORK
SURR
3
DVD
IN
OPT
SURR
BACK/
ZONE 2
R
PR
L
INPUT 1
1
FRONT
MULTI CH
INPUT
AUDIO
2
R
L
SUB
R
PB
IN
L
CENTER
3
PHONO
OUT
PR
VIDEO 2
SURR
4
CD
R
OPT
1
L
4 OHMS MIN. OR
6 OHMS MIN.
/SPEAKER
SEE
INSTRUCTION
MANUAL FOR
CORRECT
SETTINGS.
IR
VIDEO 3
PB
VIDEO 4
PR
L
R
AUDIO
L
VIDEO
AC 230-240 V 50 Hz
SWITCHED
TOTAL 100 W MAX.
AC INLET
3
VOLTAGE
SELECTOR
120V
220-230V
OUT
IN
AUDIO
2
AC OUTLETS
L
ZONE 2
RS232
TAPE
IN
R
SURR BACK/
R
ZONE 2 SPEAKERS
12V TRIGGER OUT
CENTER SPEAKER
IN
IN
GND
VOLTAGE
SELECTOR
CAUTION:
SPEAKER
IMPEDANCE
OUT
SURR
BACK
DIGITAL
OUTPUT
INPUT 2
Y
IN
2
1
Y
VIDEO 1
REMOTE
CONTROL
120V
S VIDEO
220-230V
Connecting the power cord
(Other than North American and Australian models)
Plug the supplied power cord into this AC INLET.
• Do not use a power cord other than the one supplied with the TXNR900/900E. The power cord supplied is designed for use with
the TX-NR900/900E and should not be used with any other
device.
• Never have the power cord disconnected from the TX-NR900/
900E while the other end is plugged into the wall outlet. Doing
so may cause an electric shock. Always connect by plugging into
the wall outlet last and disconnect by unplugging from the wall
outlet first.
Notes:
• Do not mix new batteries with old batteries or different kinds of batteries.
• To avoid corrosion, remove the batteries if the remote controller
will not be used for a long time.
• Remove dead batteries immediately to avoid damage from corrosion.
If the remote controller does not operate smoothly, remove the old
batteries and replace them both with two new AA batteries.
Using the remote controller
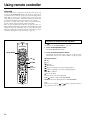
Point the remote controller toward the remote control sensor. The
STANDBY indicator lights up when the unit receives a signal from
the remote controller.
Remote control sensor
TX-NR900/900E
STANDBY indicator
AC INLET
30˚
30˚
Power cord
(supplied)
DO NOT connect
the power cord at
this time.
Approx. 16 feet
(5 meters)
SEND/LEARN indicator
Notes:
• Make sure that the remote control sensor is not subject to strong
light such as direct sunlight or inverted fluorescent light for it
may prevent proper operation of the remote controller.
• Using another remote controller in the same room or using the
TX-NR900/900E near equipment that uses infrared rays may
cause operational interference.
• Do not put objects on the remote controller. Its buttons may be
pressed by mistake and drain the batteries.
• Make sure the audio rack doors do not have colored glass.
Placing the TX-NR900/900E behind such doors may prevent
proper remote controller operation.
• If there is any obstacle between the remote controller and the
remote control sensor, the remote controller will not operate.
7