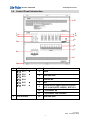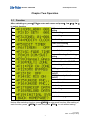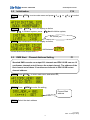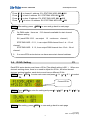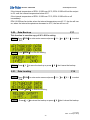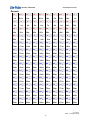
1
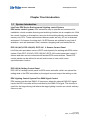
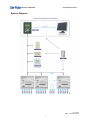
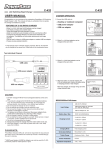
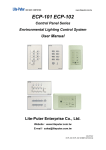
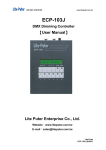
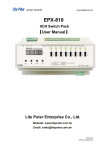
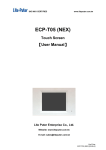
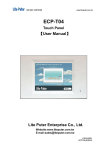
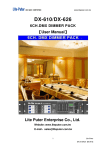
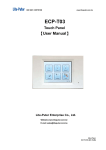
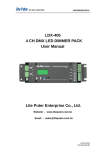
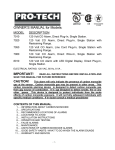
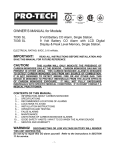
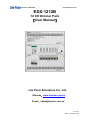
ISO 9001 CERTIFIED www.liteputer.com.tw EDX-1212B 12 CH Dimmer Pack 【User Manual】 Lite Puter Enterprise Co., Ltd. Webside:www.liteputer.com.tw E-mail:[email protected] Lite-Puter EDX-1212B [EUM-B] ISO 9001 CERTIFIED www.liteputer.com.tw INDEX Chapter One Introduction ........................................................................................... 1 1-1 System Introduction ....................................................................................... 1 1-2 Feature .......................................................................................................... 3 1-3 Specification................................................................................................... 3 1-4 Control Panel Introduction ............................................................................. 4 1-5 Dimension ...................................................................................................... 5 1-6 Definition of DMX Signal Connector............................................................... 5 1-7 Attention of Installation................................................................................... 6 1-8 Wiring Introduction ......................................................................................... 6 Chapter Two Operation .............................................................................................. 7 2-1 Function ......................................................................................................... 7 2-8 Timer ON/OFF ............................................................................................. 13 2-9 Scene Fade Time Setting............................................................................. 14 2-10 Channel Dimming & Switching Setting ......................................................... 14 2-11 Channel Current Sensor Function ................................................................ 15 2-12 Channel Multi Zone Function ON/OFF ......................................................... 16 2-13 Zone Setting of Each Channel...................................................................... 16 2-14 DMX Bypass Function .................................................................................. 17 2-15 IR Remote Control Function ON/OFF........................................................... 17 2-16 SC5/SC6 Overlap Function ON/OFF............................................................ 18 2-17 Save SC 1 ~ SC 6 ........................................................................................ 19 2-18 Recall SC 1 ~ SC 6 ...................................................................................... 19 2-19 Internal Temperature Display........................................................................ 19 2-20 Data Back up ................................................................................................ 20 2-21 Data Loading ................................................................................................ 20 2-22 Key Lock/Unlock Function ............................................................................ 21 Guarantee ................................................................................................................ 23 Lite-Puter EDX-1212B [EUM-B] ISO 9001 CERTIFIED www.liteputer.com.tw Chapter One Introduction 1-1 System Introduction Lite-Puter EDX Series Environmental Lighting control System EDX series control system: EDX series are easy to operate and convenient for installation, which combine dimming and switching function into a complete unit. With the control function on themselves, user can do the setting directly and save scenes memory into CPU. These wall-mounted dimmer packs are only 8.5 cm in thickness and spare 1/3 of space for wiring work. So EDX series are suitable for any kind of ambiance, such as restaurant, hotel, museum, shopping mall and residential etc. ECP-101(A/C)/ ECP-102(A/C) /ECP-106 6 Scenes Control Panel Lite-Puter also provides a series of ECP control panels for working with EDX series system. Each ECP-101(A/C)/ ECP-102(A/C) /ECP-106 control panel can control 6 scenes and also can be connected with several EDX series devices. These ECP control panels can be defined to control multi zones or have multi zones synchronization function. ECP-103(A) Setting Control Panel ECP-103 is a setting control panel for EDX series controller, which can upload the setting data to the EDX controllers by the signal wire and output the setting on site. EDX Lighting Control System Plus DMX Signal Control EDX series controller has DMX-512 connector, when the external DMX-512 signal inputs, the EDX controller will be controlled by the DMX-512 signal. This function is useful for the large dinning hall where the stage lighting console can control ordinary fixture on site. . Lite-Puter EDX-1212B [EUM-B] 1 ISO 9001 CERTIFIED www.liteputer.com.tw System Diagram Lite-Puter EDX-1212B [EUM-B] 2 ISO 9001 CERTIFIED 1-2 www.liteputer.com.tw Feature ● ● ● ● ● ● ● ● ● ● 12 channels, 10A max. for each channel. Accept standard DMX-512 signal. C3 dimming curve. The setting can be output by the control panel directly. Save & recall 6 scenes. Fade in / Fade out time setting of each scene. Timer automatic execution function. Switching & Dimming &Fluorescent Dimming mode setting for each channel. LCD display and easy operation. 99 zones (max) synchronization function and zone setting of each channel function. ● ● ● SC5, SC6 overlap function. Current sensor function/ Overheat protection function for each channel. IR remote control. 1-3 Specification ● ● ● ● ● Power Supply : Load : Protocol : Transmission rate: Signal Connector : AC 90 – 240V,45-63 HZ, 3Φ4W 10A max. for each channel DMX-512/ RS-485 250K bps 6P4C phone jack(external) 4PIN Green terminal (internal) ● Dimension : 470(W)X 536 (H) X106.5(D) mm ● Weight: 16Kg Lite-Puter EDX-1212B [EUM-B] 3 ISO 9001 CERTIFIED 1-4 www.liteputer.com.tw Control Panel Introduction 12 1 2 11 10 9 3 8 7 4 6 5 1 2 LCD display 4 Power switch 【1】 SC1 , 5 5 Stand 【3】 SC3 6 Heat sink hole 【4】 SC4 7 Channel No. 【2】 SC2 , u 3 【5】 SC5 4 8 NFB 【6】 SC6 3 9 Control Panel signal input to connect ECP-101(A/C),ECP-102(A/C), ECP-103 10 1-12 channel VR 11 1-12 channel LED indicator 12 Heat sink hole LED indicator Lite-Puter EDX-1212B [EUM-B] 4 ISO 9001 CERTIFIED 1-5 www.liteputer.com.tw Dimension Danger! High heat! 1-6 Danger! High heat! Definition of DMX Signal Connector ECP series control panel must use signal wire to connect with EDX controller. The signal port definition, please refer to the right graph. Lite-Puter EDX-1212B [EUM-B] 5 ISO 9001 CERTIFIED 1-7 www.liteputer.com.tw Attention of Installation 4 channels (can set any 4 channels out of the 12 channels as fluorescent dimming channel )DC 0~10V output for dimmable fluorescent and each channel can output 500mA max. It’s suitable for the trailing edge phase dimmable electronic transformer. 1-8 Wiring Introduction Lite-Puter EDX-1212B [EUM-B] 6 ISO 9001 CERTIFIED www.liteputer.com.tw Chapter Two Operation 2-1 Function After switching on, press【FCN】to enter main menu and press【 15 】or【 2u 】 to select function, F2 DMX start channel address setting ID No. setting F3 Zone setting F4 Clock setting F5 Timer scene setting F6 Timer ON/OFF F7 Scene fade time setting F8 F9 Channel dimming &switching setting Channel amps sensor function F10 Multi zone function ON/OFF F11 Zone setting of each channel F12 DMX bypass function F13 IR remote control function ON/OFF SC5/SC6 overlap function ON/OFF Unused function F1 F14 F15 F16 F17 F18 Unused function F19 Initialization Data back up Data loading Back to homepage Notice: After selecting function, press【MEM】to enter each function. After setting of each function, press 【MEM】to save and press【FCN】 to exit without saving. Lite-Puter EDX-1212B [EUM-B] 7 ISO 9001 CERTIFIED 2-2. www.liteputer.com.tw Initialization F19 STEP-1 Press【FCN】to enter main menu and press【 15 】 or 【 2u 】to select F19 , STEP-2 Press 【MEM】, LCD will display as below. Press 【1】 to initialize system, press 【2】don’t initialize system, EX: select yes STEP-3 After initialization, LCD will display as below, shift between current scene and temperature 2-3. DMX Start Channel Address Setting F1 Standard DMX console can output 512 channels and EDX-1212B can use 12 continuous channels out of them as the output channel. The address of the first channel out of these 12 continuous channels is EDX-1212B’s start channel address. STEP-1 Press【FCN】 to enter main menu and select F1, STEP-2 Press 【MEM】to enter the setting, Current Start address STEP-3 Select the start address Lite-Puter EDX-1212B [EUM-B] 8 ISO 9001 CERTIFIED www.liteputer.com.tw Press【4】to forward 1 address. EX: STAT DMX ADR: 002 Æ 001 Press【w】to back 1 address. EX: STAT DMX ADR: 001Æ 002 Press【5】to plus 12 address. EX: STAT DMX ADR: 001 Æ 013 Press 【u】to minus 12 address. EX: STAT DMX ADR: 013 Æ 001 STEP-4 After setting, press 【MEM】to save and go back to main page. 1. On DMX mode,there are 512 channels available for start channel address setting. EX: (each EDX-1212 can output 12 continuous channel ) STAT DMX ADR:0 0 1 , it can output DMX channel from 1 st ~ 12 nd channel. STAT DMX ADR:0 1 3, it can output DMX channel from 13 rd ~ 24 nd channel. 2. 2-4. 2 or more EDX series device can have same start channel address. ID NO. Setting F2 Each EDX series device must have a ID No.(The default setting is 001.). When one device’s working alone, there is no need to adjust the ID No., but when several devices’ working together, each device must have a different ID No.. STEP-1 Press 【FCN】 to enter main menu and press【 1 5 】or【 2 u 】to select F2, Current ID No. STEP-2 Press【MEM】to enter the setting and press【15】/【5 4】or【 2u】/【6w】 to adjust ID No., STEP-3 After setting, press【MEM】to save and go back to main page Lite-Puter EDX-1212B [EUM-B] 9 ISO 9001 CERTIFIED 2-5. www.liteputer.com.tw Zone Setting “ F3” Definition of zone: The device must set the Zone No. before use, which consists of two parts, one is the zone no. and another is the start address. For example: There are 4 EDX-1212B (48 channels in total) in the first zone, the zone no. of each device should be 01-01,01-13,01-25,01-37 separately. STEP-1 Press 【FCN】to enter main menu and press 【 1 5】or【 2 u】to select F3, Current Zone No. STEP-2 Press【MEM】to enter the setting. Blink STEP-3 Press【 1 5 】or【 2 u 】to adjust zone no., EX: set the zone no. as 8. Press【 1 5 】to change 01 to 08, STEP-4 Press 【5w】shift to start address setting, Blink Press 【6 4】shift back to zone no. setting. STEP-4 Press【1 5】 to adjust the start channel address from 001 to 020, STEP-5 After setting, press【MEM】to save and go back to main page. Lite-Puter EDX-1212B [EUM-B] 10 ISO 9001 CERTIFIED 2-6. www.liteputer.com.tw Clock Setting F4 STEP-1 Press 【FCN】to enter main menu and press 【 1 5 】or 【 2 u 】to select F4 , STEP-2 Press【MEM】to enter the setting. STEP-3 Press【 1 5 】or 【 2 u 】to adjust the value where the mark at . Press 【 5 4 】or 【 6 w 】to shift among the value settings, year, month, day, weekday, hour, minute , second. STEP-4 After setting, press【MEM】to save and go back to main page 2-7. Timer Setting F5 In order to execute the scenes periodically and automatically, we advise users to save daily-used scenes into “Timing scene”. STEP-1 Press 【FCN】to enter main menu and press【 1 5 】or 【 2 u 】to select F5 , STEP-2 Press 【MEM】 to enter the setting, LCD will display the timer already existed. If there is not preset timer, LCD will display as below, 2:Delete current TIMMER 3:Add new TIMMER 4:Edit current TIMMER Lite-Puter EDX-1212B [EUM-B] 11 ISO 9001 CERTIFIED www.liteputer.com.tw Press【 3 】or【 4 】to review the date. EX: set scene 6 will be executed at 8:08, FADE time is 6.0 second and Zone No. is 02. STEP-3 Press【 3 】to add a TIMMER. Blink STEP-4 Press【 1 5 】or 【 2 u 】 to adjust hour value. From 00 to 08 STEP-5 Press【 5 4 】shift to minute setting and press 【 1 5 】or【 2 u 】to adjust the value. From 00 to 08 STEP-6 Press 【 5 4 】shift to scene no. setting and press【 1 5 】or 【 2 u 】to adjust the value. From SC=00 to SC=06 STEP-7 Press 【5 4】shift to fade time setting and press【1 5】or【2 u】to adjust the value. From 0.1S to 6.0S STEP-8 Press【5 4】shift to zone no. setting and press【 1 5 】or【 2 u 】to adjust the value. Lite-Puter EDX-1212B [EUM-B] 12 ISO 9001 CERTIFIED www.liteputer.com.tw From 00 to 02 STEP-9 Press【 5 4】shift to weekday setting and press【1 5】or【2 u】to choose. From Monday to Sunday Notice: 1 means execute the timer on this weekday. X means don’t execute the timer on this weekday. STEP-10 After setting, press【MEM】to save and go back to main page STEP-11 If want to add more timer , please follow STEP-3 ~STEP-9to do the setting. Notice: If the hyphen between Lite and Puter is blinking, it means the Timer function is ON; if not, the function is OFF. 2-8. Timer ON/OFF F6 STEP-1 Press【FCN】 to enter main menu and press【 1 5 】or【 2 u 】to select F6 ON OFF STEP-2 Press【MEM】 to enter the setting and press【 5 4 】or【 6 3 】to select between ON and OFF. STEP-3 After setting, press【MEM】to save and go back to main page Lite-Puter EDX-1212B [EUM-B] 13 ISO 9001 CERTIFIED 2-9. www.liteputer.com.tw Scene Fade Time Setting F7 Notice: Please check remark 1 . STEP-1 Press【FCN】to enter main menu and press 【 1 5 】or 【 2 u 】to select F7 , STEP-2 Press【MEM】to enter the setting , The default setting is SC OFF, and fade time is 2.0 second. STEP-3 Press 【 5 4 】or 【 6 3 】to adjust the scene no. and press 【 1 5 】 or【 2 u 】 to adjust the fade time. EX: set scene 6’s fade time is 50 seconds. STEP-4 After setting, press【MEM】to save and go back to main page. 2-10. Channel Dimming & Switching Setting F8 Dimming & switching, Fluorescent mode setting Before using, please make sure that the fixture is dimmable or not, otherwise, the fixture will be damaged If a channel set as switching mode, the channel will turn off, when the level less than 20%; the channel will turn on, when the level over 51%. If a channel set as dimming mode, there is no output limit. STEP-1 Press【FCN】to enter main menu and press【 1 5 】or【 2 u 】to select F8, Lite-Puter EDX-1212B [EUM-B] 14 ISO 9001 CERTIFIED www.liteputer.com.tw STEP-2 Press【MEM】to enter the setting, Default setting: all channels are set as switching mode. When LCD display ????, it means all channels’ mode are different. STEP-3 Press 【 1 5 】or【 2 u 】to select between all channel and one channel. Press【 5 4 】or 【 6 w 】to select from dimming, switching and fluorescent mode. DIM---dimming mode SW----switching mode FLU—fluorescent mode STEP-4 After setting, press【MEM】to save and go back to main page 2-11. Channel Current Sensor Function F9 STEP-1 Press【FCN】to enter main menu and press【 1 5 】or 【 2 u 】to select F9. STEP-2 Press【MEM】to enter the setting, Channel’s amp value STEP-3 Press【 1 5 】/【 5 4】or【 2 u 】/【 6 w 】to check CH1~CH12’s amp value. STEP-4 After checking , press【MEM】 go back to main page Notice: when a channel‘s current over 12A, EDX-1212B will limit the output to 10A. when a channel‘s current over 15A, EDX-1212B will turn off. Press 【OFF】 to reset. Lite-Puter EDX-1212B [EUM-B] 15 ISO 9001 CERTIFIED 2-12. www.liteputer.com.tw Channel Multi Zone Function ON/OFF F10 Notice: The function is useful only when each channel has zone no. STEP-1 Press【FCN】to enter main menu and press【 1 5 】or 【 2 u 】to select F10 . STEP-2 Press 【MEM】to enter the setting. Blinking means the item is selected “ON” Channel multi zone function is on. “OFF” Channel multi zone function is off. STEP-3Press【 1 5 】/【 6 w 】or 【 2 u 】/【 5 4】to select between ON and OFF. STEP-4 After checking , press【MEM】 go back to main page 2-13. Zone Setting of Each Channel F11 Set each channel’s zone no.. STEP-1 Press 【FCN】 to enter main menu and press 【 1 5 】or【 2 u 】to select F11. STEP-2 Press 【MEM】 to enter the setting. Start channel address Zone No. Channel Lite-Puter EDX-1212B [EUM-B] 16 ISO 9001 CERTIFIED www.liteputer.com.tw STEP-3 Use CH1~CH12’s VR to select the 12 channels. STEP-4 After selecting channel, press 【 1 5 】or【 2 u 】to adjust zone no.. STEP-5 Press 【 5 4 】shift to start channel address setting. STEP-6 Press 【 1 5 】or【 2 u 】to adjust channel address. STEP-7 After checking , press【MEM】 go back to main page. Notice : when the LCD displays clock, push the channel VR to check its zone no and start channel address. 2-14. DMX Bypass Function F12 STEP-1 Press 【FCN】to enter main menu and press 【 1 5 】or【 2 u 】 to select F12 . STEP-2 Press【MEM】 to enter the setting. Press 【 1 5 】/【 6 w 】or 【 2 u 】 /【 5 4】to select between ON and OFF. Blinking means the item is selected STEP-3 After setting , press【MEM】 go back to main page. 2-15. IR Remote Control Function ON/OFF Notice: The IR remote controller can control EDX1212B function is set as ON. F13 only after this STEP-1 Press 【FCN】 to enter main menu and press【 1 5 】or【 2 u 】to select F13 , Lite-Puter EDX-1212B [EUM-B] 17 ISO 9001 CERTIFIED www.liteputer.com.tw STEP-2 Press【MEM】to enter the setting, Blinking means the item is selected STEP-3 Press 【MEM】and 【 1 5 】【 / 6 w 】or【 2 u 】【 / 5 4】to select between OFF and ON. STEP-4 After setting , press【MEM】 go back to main page. 2-16. SC5/SC6 Overlap Function ON/OFF F14 On usual, when user select a scene, the previous scene will be replaced. This function is for overlap SC5 or SC6 to another scene. If you recall one of SC1-4 first, then recall SC5 or SC6, the later one will overlap to the previous one, so user will see two scenes at the same time. If there is any channel that is in both scenes, it will be outputted at the higher dimming value. For example, when overlap SC5 to SC4, if CH1’s dimming value of SC4 is 40% and SC5 is 20%, it will remain 40%; if CH1’s dimming value of SC4 is 40% and SC5 is 85%, it will change to 85%. STEP-1 Press【FCN】to enter main menu and press【 1 5 】or 【 2 u 】 to select F14, STEP-2 Press 【MEM】to enter the setting, Blinking means the item is selected STEP-3 Press 【MEM】and 【 1 5 】【 / 6 w 】or【 2 u 】【 / 5 4】to select between OFF and ON. STEP-4 After setting , press【MEM】 go back to main page. Example: SC1: CH1=50%, CH2=80%, CH3=0%…. SC5: CH1=80%, CH2=0%, CH3=100%…. Lite-Puter EDX-1212B [EUM-B] 18 ISO 9001 CERTIFIED www.liteputer.com.tw SC6: CH1=100%, CH2=100%, CH3=100%…. When users recall SC1 first and then recall SC5, CH1 will output 80%, CH2 will output 80% and CH3 will output 100%. When users recall SC1 first, then SC5 and last SC6, CH1 will output 100%, CH2 will output 100% and CH3 will output 100%. 2-17. 【MEM】+【1…6】 Save SC 1 ~ SC 6 STEP-1 when the LCD display main page, STEP-2 Push【 CH1…CH6 】to set each channel’s dimming level. STEP-3 Press【 MEM 】+【 1…6 】to save the dimming level to the scene. EX, Press【 MEM 】+【 1 】to save the current dimming level to scene 1. 2-18. 【1…6】 Recall SC 1 ~ SC 6 Press【 1 】~【 6 】to recall the 6 scenes directly. EX, Recall scene 1: Press【 1 】to recall scene 1 and the LED beside the key will turn on. If SC1 ~ SC6 was preset with fade time (please check the remark): Press【 1 】~【 6 】once to recall the scene smoothly after the fade time. Press【 1 】~【 6 】twice to recall the scene directly without the delay time. 2-19. Internal Temperature Display The main page of EDX-1212B as below, shift between current scene and temperature Lite-Puter EDX-1212B [EUM-B] 19 ISO 9001 CERTIFIED www.liteputer.com.tw If the internal temperature of EDX-1212B over 65°C, EDX-1212B will limit the output to 0% until the internal temperature below 60°C. If the internal temperature of EDX-1212B over 70°C, EDX-1212B will turn off immediately. EDX-1212B has fan inside, when the internal temperature over 45 °C, the fan will turn on; when the internal temperature decrease to 40°C, the fan will turn off. 2-20. Data Back up F17 This function is save the copy of SC1~SC6’s setting. STEP-1 Press【FCN】to enter main menu and press【 1 5 】or 【 2 u 】 to select F17, STEP-2 Press【MEM】to enter the setting, STEP-3 Press【 1 】to save the backup or press【 2 】don’t save the backup. 2-21. Data Loading F18 STEP-1 Press【FCN】to enter main menu and press【 1 5 】or 【 2 u 】 to select F18, STEP-2:Press【MEM】to enter the setting, STEP-3:Press【 1 】to reload the backup or press【 2 】don’t reload the backup. Lite-Puter EDX-1212B [EUM-B] 20 ISO 9001 CERTIFIED 2-22. www.liteputer.com.tw 【MEM】+【OFF】 Key Lock/Unlock Function EDX-1212B can memory the function key‘s lock/unlock status. STEP-1 Press【MEM】+【OFF】at the same time, all function key is locked. STEP-2 Press【MEM】+【OFF】at the same time again to unlock the function key. Lite-Puter EDX-1212B [EUM-B] 21 ISO 9001 CERTIFIED www.liteputer.com.tw Remark: 0.1 0.2 0.3 0.4 0.5 0.6 0.7 0.8 0.9 1 0.1 s 0.2 s 0.3 s 0.4 s 0.5 s 0.6 s 0.7 s 0.8 s 0.9 s 1s 2 3 4 5 6 7 8 9 10 12 2s 3s 4s 5s 6s 7s 8s 9s 10 s 12 s 14 16 18 20 25 30 35 40 45 50 14 s 16 s 18 s 20 s 25 s 30 s 35 s 40 s 45 s 50 s 55 1﹒ 2﹒ 3﹒ 4﹒ 5﹒ 6﹒ 7﹒ 8﹒ 9﹒ 55 s 1m 2m 3m 4m 5m 6m 7m 8m 9m 10 ﹒ 11 ﹒ 12 ﹒ 13 ﹒ 14 ﹒ 15 ﹒ 16 ﹒ 17 ﹒ 18 ﹒ 19 ﹒ 10 m 11 m 12 m 13 m 14 m 15 m 16 m 17 m 18 m 19 m 20 ﹒ 21 ﹒ 22 ﹒ 23 ﹒ 24 ﹒ 25 ﹒ 26 ﹒ 27 ﹒ 28 ﹒ 29 ﹒ 20 m 21 m 22 m 23 m 24 m 25 m 26 m 27 m 28 m 29 m 30 ﹒ 31 ﹒ 32 ﹒ 33 ﹒ 34 ﹒ 35 ﹒ 36 ﹒ 37 ﹒ 38 ﹒ 39 ﹒ 30 m 31 m 32 m 33 m 34 m 35 m 36 m 37 m 38 m 39 m 40 ﹒ 41 ﹒ 42 ﹒ 43 ﹒ 44 ﹒ 45 ﹒ 46 ﹒ 47 ﹒ 48 ﹒ 49 ﹒ 40 m 41 m 42 m 43 m 44 m 45 m 46 m 47 m 48 m 49 m 50 ﹒ 51 ﹒ 52 ﹒ 53 ﹒ 54 ﹒ 55 ﹒ 56 ﹒ 57 ﹒ 58 ﹒ 59 ﹒ 50 m 51 m 52 m 53 m 54 m 55 m 56 m 57 m 58 m 59 m 60 ﹒ 61 ﹒ 62 ﹒ 63 ﹒ 64 ﹒ 65 ﹒ 66 ﹒ 67 ﹒ 68 ﹒ 69 ﹒ 60 m 61 m 62 m 63 m 64 m 65 m 66 m 67 m 68 m 69 m 70 ﹒ 71 ﹒ 72 ﹒ 73 ﹒ 74 ﹒ 75 ﹒ 76 ﹒ 77 ﹒ 78 ﹒ 79 ﹒ 70 m 71 m 72 m 73 m 74 m 75 m 76 m 77 m 78 m 79 m 80 ﹒ 81 ﹒ 82 ﹒ 83 ﹒ 84 ﹒ 85 ﹒ 86 ﹒ 87 ﹒ 88 ﹒ 89 ﹒ 80 m 81 m 82 m 83 m 84 m 85 m 86 m 87 m 88 m 89 m 90 ﹒ 91 ﹒ 92 ﹒ 93 ﹒ 94 ﹒ 95 ﹒ 96 ﹒ 97 ﹒ 98 ﹒ 99 ﹒ 90 m 91 m 92 m 93 m 94 m 95 m 96 m 97 m 98 m 99 m Lite-Puter EDX-1212B [EUM-B] 22 ISO 9001 CERTIFIED www.liteputer.com.tw Guarantee Lite-Puter promises to fulfill the following acceptances: 1. Lite-Puter is only responsible for EDX-1212B itself. 2. Lite-Puter guarantees to keep Lite-Puter’s fault products caused by techniques, materials and any other logical reasons in good repair for free within a year since the distributing date. 3. We do not offer door-visiting service. If the trouble appears in Lite-Puter’s products, please deliver the equipment to local distributors or Taipei headquarter. *** Special Statement*** Any fault caused by false usage, imprudence (collision or inadequate installation) or force majeure factors are not in Lite-Puter’s service. Revision Record Version A B Record First version 2-4,2-11,2-12,2-14,2-15,2-16 number button adjust Issued on: January 2010 Lite-Puter EDX-1212B [EUM-B] 23 ISO 9001 CERTIFIED www.liteputer.com.tw World Headquarter: Lite Puter Enterprise Co., Ltd. Address: 9F, No. 196, Sec. 3, Da Tung Rd., Shijr City, Taipei, Taiwan Zip Code: 22103 Tel: +886-2-86472828 Fax: +886-2-86472727 Website: www.liteputer.com.tw E-mail: [email protected] Shanghai Factory: Lite Puter Technology (Shanghai) Co., Ltd. Address: Building B5, No. 298, Lane 3509, Hongmei S. Road, Shanghai, China Zip Code: 201108 Tel: +86-21-54408210 Fax: +86-21-64978079 Shanghai Sales Center: Address: Room 701, Building Gem, No. 487, Tianlin Road, Shanghai, China Zip Code: 201103 Tel: +86-21-33674316/33674850 Fax: +86-21-33674013 Website: www.liteputer.com.cn E-mail: [email protected] Lite-Puter EDX-1212B [EUM-B] 24