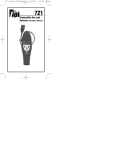
1
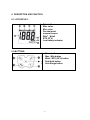
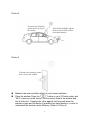
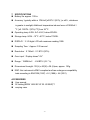
Test Products International, Inc. 9615 SW Allen Blvd. Suite 104 Beaverton, OR 97005 Ph. 503-520-9197 Fax. 503-520-1225 TPI 510 Solar Power Meter User’s Manual HB2TM2060001 CONTENTS 1. Foreword………………………………….………………………………………….2 2. 3. 4. 5. Safety Precautions and Procedures…….………………………………………...2 Caution..…………………….………………………………………………………..2 Applications………………….………………………………………………………3 Features…………………….……………………………………………………….3 6. 7. 8. 9. Description and Function………..………………………………………………...4 Specifications……………………………………………………………………….8 Safety and Maintenance…………………………………………………………..9 Battery Replacment………………………………………………………………..9 10. Warranty………………………….………………………………………………….9 11. End of Life Disposal………….…………………………………………………….9 -1- 1. FOREWORD Thank you for purchasing TPI brand products. The TPI Solar Meter is state of the art and easy to use. It is designed to measure solar power in W/m2 or BTU (ft2*h). 2. SAFETY PRECAUTIONS AND PROCEDURES This instrument conforms with safety Standard EN 61010-1 related to electronic measuring instruments. For your own safety and to avoid damaging the instrument follow the procedures described in this instruction manual and read carefully all notes preceded by this symbol . CAUTION For your own safety and to avoid damaging the instrument follow the procedures described in this instruction manual and read carefully all notes preceded by this symbol . When taking measurements: Avoid performing measurements in humid or wet places and in areas where explosive gas, combustible gas, steam or excessive dust is present. 3. CAUTION: CAUTION - refer to the instruction manual - improper use may damage the instrument or its components -2- 4. APPLICATIONS Suitable for measuring the effectiveness of solar film. Solar radiation measurement. Car windows light intensity measurement. Optimal incident angle for solar panels. Measurement of the sun’s transmission through transparent and film glass 5. FEATURES Convenient, no need to adjust, data displayed clearly. Measurable light sources, including all visible light. Overload display “OL” when measurement is out of range. Select either W/m2 or BTU / (ft2*h) units -3- 6. DESCRIPTION AND FUNCTION 6.1. LCD DISPLAY: 1. 2. 3. 4. 5. 6. 7. 8. Data hold . Max. value. Min. value. Decimal point. numeral screen. W/m2 W/m2 BTU (ft2*h) Low battery indicator 6.2. BUTTONS: 1. 2. 3. 4. 5. Power button Max. / Min button W/m2 / BTU (ft2*h) button Data Hold button Auto Range button -4- 6.2.1. Power button : Press the “ Press the “ ” button again to turn the power OFF and the meter will go into sleep mode. ” button to turn the power on. 6.2.2. Max. and Min button: Press the “ ” button to display the max. or min. reading. ” button for 1 second to read the max. value. Press and hold the “ Press the button one more time to read the min. value. Press and hold the “ ” button for more than 1 second, and max. and min. mode turns off and the 510 returns to normal operation. When the “ 6.2.3. ” button is active, the “ BTU (ft2*h) / W/m2 button Press the “ ” button is disabled. : ” button to turn power on. The screen displays BTU (ft2*h). Press the “ ” button to switch from BTU (ft2*h) to W/m2. Pressing the button again returns the unit to BTU. 6.2.4 Data hold button ” button to go into hold mode, and “ D-H ” appears Press the “ on the screen and the data on the display is frozen. Press this button once again to deactivate data hold and return to normal operation. 6.2.5 Auto Range button : : ” button allows the range to be changed from 199.9 to 1999 The and back again. If a measurement is being made and “OL” is displayed, press the button to switch to the higher range. -5- 6.3. TEST PROCEDURE Measuring your car headlights: Turn the car headlights on. Turn on the 510 solar meter, and “00.0” appears on the screen. Put the 510 down close to the headlights. Switch between high beam and low beam, and the light intensity values appear on the display. Test both the right and left headlights and write the values down for reference. (Refer to Picture 2) Measure the effect of solar insulation of your vehicle’s windows: ” button to turn the 510 solar meter on and “00.0” Press the “ appears on the screen. Aim the 510 at the sun holding it close to a window and the intensity value appears on the display. Open the window and aim the device at the sun. Compare the value against that acquired when the window is closed to understand the efficiency of the window’s solar film. (Refer to Picture 2) NOTE.:When the light sensor cover is not attached “CAP” is indicated. Make sure that it is attached. If performing the zero adjustment after powering on, several digits may not disappear. In this case, perform the zero adjustment again. -6- Picture 2: To test the sun’s intensity, put the device up close to the window Turn ON the headlights and put the device down close to them to test their intensity Picture 3 To test the sun’s intensity, put the device close to the window Measure the solar insulation effect of your house’s windows: ” button on your 510 solar meter, and Close the window. Press the “ “00.0” comes up on the screen. Put the device close to the window and aim it at the sun. Compare the value against that acquired when the window is open and the device is placed at the same position, in order to understand the window’s heat efficiency. (Refer to Picture 3) -7- 7. SPECIFICATIONS Battery life: approx. 100 hr. Accuracy:typically within ± 10W/m2[ ±3 BTU / (ft2*h) ] or ±5% , whichever is greater in sunlight; Additional temperature induced error ±0.38W/m2 / o C [ ±0.12 BTU / (ft2*h)/ oC] from 25 oC Operating temp. & RH: 5oC~40oC, below 80%RH. Storage temp. & RH: -10 oC ~60 oC, below 70%RH. DISPLAY:3-1/2 digits LCD with maximum reading 1999. Sampling Time:Approx. 0.25 second Resolution:0.1W/m2、0.1 BTU /(ft2*h). Over-input:Display shows" OL". Range:1999W/m 2 、634 BTU /(ft 2 * h). Dimensions & weight: 132(L) x 60(W) x 38 (H)mm, approx. 150g. EMC: this instrument is EMC-compliant and has undergone compatibility tests according to EN61326 (1997) + A1 (1998) + A2 (2001). ACCESSORIES User manual. 9V battery(NEDA 1604 IEC 6F 22 JIS 006P)*1 carrying case. -8- 8. SAFETY AND MAINTENANCE Operating altitude: below 2,000m. Operating environment: for indoor use, exposure to pollution level II. This is a precision device. Observe use and storage specifications to prevent possible damage. Do not store this device in direct sunlight or where it is hot and/or damp. Remember to turn the power off after use. For long term storage, remove the battery to prevent the battery from leaking and causing damage to the parts inside. Clean the device with a dry soft cloth. 9. BATTERY REPLACEMENT When the " " symbol is displayed the battery is in need of replacement. Unscrew the battery cover and remove the battery. Insert a new battery of the same type (9V NEDA1604, JIS006P, IEC6F22) observing the proper polarity, re-screw the battery cover and reposition the protective holster. 10. WARRANTY Your TPI instrument is guaranteed free from defects in materials and workmanship for 1 year from the date of purchase. This guarantee does not affect your statuary rights. For additional information please refer to the included warranty card. 11. END OF LIFE Caution: this symbol indicates that equipment and its accessories shall be subject to a separate collection and correct disposal -9- Test Products International, Inc. 9615 SW Allen Blvd., Ste. 104 Beaverton, OR 97005 Tel: 503-520-9197 Fax: 503-520-1225 www.tpi-thevalueleader.com Test Products International, Ltd. 342 Bronte Road South, Unit #9 Milton Ontario Canada L9T5B7 Tel: 905-693-8558 Fax: 905-693-0888 Test Products International Europe. Longley House International Drive Southgate Crawley West Sussex RH10 6AQ Tel: +44 (0) 1293 530196 Fax: 44 (0) 1293 531870 - 10 -