Transcript
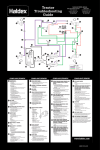
Truck
Troubleshooting
Guide
Commercial Vehicle Systems
Haldex Brake Products Corporation
10707 N.W. Airworld Drive
Kansas City, MO 64153 -1215
Phone: (816) 891- 2470
Fax: (816) 801-4198
22
Haldex Limited
525 Southgate Drive, Unit 1
Guelph, Ontario CANADA N1G 3W6
Phone: (519) 826- 7723
Fax: (519) 826-9497
22
21
21
17
18b
16
18a
16
21
21
22
22
20
COMPLAINT/REMEDY
1 COMPRESSOR
■
■
■
■
PUMPS BEYOND “CUT-OUT”
◆ Check gauge.
◆ Check governor.
◆ Be certain it pressurizes unloader port when above “cut-out”.
◆ Check unloader/plungers. Lube, kit or change head.
WON’T PUMP AIR
◆ Check gauge.
◆ Check compressor drive.
◆ Check inlet valves and plungers. If stuck, leak will be evident at intake
when unloaded. Install unloader kit, head kit or head assembly.
SLOW PRESSURE BUILD-UP
◆ Check gauge.
◆ Check compressor drive.
◆ Check intake for restriction.
◆ Check discharge line for restriction.
◆ Check unloader function. Lube or kit.
◆ Check inlet and exhaust valves. Leak will be evident at intake when
unloaded. Kit or exchange head.
PUMPS EXCESSIVE OIL
◆ Check oil return for restriction, kink or loop.
◆ Check for gasket sealant obstructing drain.
◆ Check for undersize return line (1/2” minimum).
◆ Check for fitting restricting drain.
◆ Check for intake vacuum (20” water maximum).
◆ Check for excessive engine crankcase pressure (poor engine ventilation).
◆ Check compressor ring wear. Exchange for service unit.
COMPLAINT/REMEDY
7 SINGLE CHECK VALVE
■
ALLOW BLEED BACK TO SUPPLY RESERVOIR
◆ Periodic Test: bleed supply reservoir and observe gauges. Check valves
should maintain rear and front reservoir pressure.
◆ Replace it if results are negative.
COMPLAINT/REMEDY
15 SPRING PARKING BRAKE (SERVICE ONLY
SERVICE CHAMBER SIDE OF SPRING
BRAKE)
■
8 PRIMARY & SECONDARY RESERVOIR
■
EXCESS OIL/WATER
◆ Drain as required.
◆ Check automatic drain valve on wet tank for proper operation (See #5).
9 AIR GAUGE
■
INCORRECT READING
◆ Calibrate or replace.
10 DUAL SYSTEM FOOT BRAKE VALVE
■
LEAKS AT EXHAUST WITH ALL BRAKES RELEASED
◆ Check anti-compound double check valve # 16.
◆ Check #18a and 18b for back flow into service control line.
■
CAUTION: CHOCK WHEELS - Repair and replace items as necessary.
■
LEAKS AT EXHAUST WITH FOOT BRAKE APPLIED
◆ Foot valve defective. Repair or replace.
■
LEAKS AT EXHAUST WITH ALL PARK BRAKES SET IN PARK POSITION
■
SLUGGISH PARK APPLICATION
◆ Check for: Diaphragm failure. Improper manual release. Broken power spring.
■
LEAKS WHEN PRESSURIZED FOR PARK BRAKE RELEASE
◆ Check for: Ruptured spring side diaphragm. Push rod seal leakage (may be
evident at # 14 relay valve).
■
SERVICE CHAMBER MALFUNCTION
◆ See #12 service brake chamber.
16 QUICK RELEASE AND DOUBLE CHECK
EXCESS OIL ACCUMULATION
◆ See PUMPS EXCESSIVE OIL (above).
■
EXCESS WATER ACCUMULATION
◆ Drain daily. Install automatic drain on wet tank.
■
AND FOOT BRAKE RELEASED
◆ Foot valve defective. Repair or replace.
■
DAMAGED WET TANK
◆ Replace.
3 LOW PRESSURE INDICATOR SWITCH
■
■
BUZZER OR LIGHT INOPERABLE.
◆ Check ground and wiring on switch and buzzer/light.
◆ Replace switch or buzzer/light.
WON’T OPERATE AT PRESSURES BELOW 60 P.S.I.
◆ Check dash gauge for accuracy.
◆ Replace switch or buzzer/light.
11 QUICK RELEASE VALVE
■
LEAKS
◆ Replace diaphragm.
◆ Cage park brake.
◆ Reset clamps.
◆ Adjust brakes.
■
WITH SERVICE BRAKES
APPLIED STROKE IS AT OR
BEYOND MAXIMUM LIMIT OF:
◆ Type 9
1 3/8”
◆ Type 12
1 3/8”
◆ Type 16
1 3/4”
◆ Type 20
1 3/4”
◆ Type 24
1 3/4”
◆ Type 30
2”
4 SAFETY VALVE
■
”POPS” OFF EXCESSIVELY.
◆ Check system pressure.
◆ Valve operating properly in venting at 140/150 P.S.I.
◆ Check unloader/governor.
■
”POPS” OFF AT LESS THAN 140 P.S.I.
◆ Replace.
■
LEAKS
◆ Replace.
■
WON’T FUNCTION
◆ Periodic Test: remove and test above 150 P.S.I. with shop air.
◆ Replace if non-functional.
■
5 DRAIN VALVES - MANUAL
■
LEAKS
◆ Replace.
5 DRAIN VALVES - AUTOMATIC
SLUGGISH APPLICATION OR
RELEASE
◆ Check basic brake.
◆ Check for air line restriction/leak.
◆ Align linkage.
◆ Check chamber return spring.
◆ Adjust brakes. Angle should approach 90° on application
◆ Check for improper chamber or obstruction.
SLEEVE WILL NOT DEPRESS
◆ Clean and lubricate or replace with unit dimensionally same.
■
WON’T DRAIN
◆ Repair or replace.
■
■
WON’T DRAIN IN COLD WEATHER
◆ Replace with heated unit.
ADJUSTING SHAFT WILL NOT TURN
◆ Replace with unit dimensionally same.
■
■
LEAKS - MALFUNCTIONS
◆ Repair or replace.
◆ Periodic Test: with system pressure stabilized (compressor unloaded)
no leak evident at discharge port - make several foot brake applications
to reduce wet tank pressure. Moisture should drain from discharge port.
CRACKED HOUSING
◆ Check spring brake anti-compound system.
◆ Check air chamber size. Replace if larger than original size.
◆ Check direction of travel for proper position of hex nut (Shown Under #12).
◆ Hex nut must face away from chamber for uni-directional brake adjuster.
6 GOVERNOR
■
■
FLUTTERS
◆ Check gauge.
◆ Check unloader line size (5/16” x 5’ maximum).
◆ Check air actuated accessory. Is the air volume requirement greater
than governor capacity?
◆ Check for plugged governor reservoir line.
◆ Repair, adjust or replace governor.
WON'T PASS AIR TO UNLOADER TO “CUT-OUT” COMPRESSOR
◆ Check governor reservoir line.
◆ Repair or replace.
■
WORN CLEVIS PIN BUSHING
◆ Replace bushing.
■
LEAKS AT EXHAUST PORT WITH ALL BRAKES RELEASED
◆ Check seal in spring brake for back flow of spring “hold-off” pressure
through service port to open exhaust on valve. Replace #15 Spring
Parking Brake.
◆ Check and replace #18b if back flow occurs into service delivery line.
◆ Check reservoir port for evidence of contamination, check supply lines
for rusty fittings or carbon deposits. Repair or replace.
22 ABS SENSORS & EXCITER RINGS
■
FOR COMPLETE TROUBLESHOOTING INFORMATION REFER TO LITERATURE
PIECES MODAL POWER TK-2 INSTALLATION & SERVICE MANUAL (L30022)
AND/OR ABS DIAGNOSTIC TROUBLESHOOTING GUIDE (L20293)
NOTE: FOR FURTHER TECHNICAL ASSISTANCE CONTACT YOUR
HALDEX DISTRIBUTOR, YOUR LOCAL HALDEX SALES
PROFESSIONAL, OR CALL (800) 643-2374 AND ASK FOR A
TECHNICAL ADVISOR.
◆ Replace.
18a
18b
FAILS TO SIGNAL A GOOD BULB THROUGH SOUND WIRING AT 3-6 P.S.I.
◆ Replace.
INVERSION RELAY VALVE WITH THE LOSS
OF REAR SERVICE BRAKES, APPLICATION
OF SPRING BRAKE BY USING THE
EMERGENCY SECTION SHOULD BE
AVAILABLE ALONG WITH FRONT
SERVICE BRAKE BY APPLYING FOOT
VALVE
■
Periodically test by bleeding rear service tank and observing front brake and
rear spring brake application upon depressing foot pedal. Repair or replace,
if after checking piping is not functioning properly.
■
LEAKS
◆ Repair or replace.
19 BARRIER WHEEL OIL SEALS
(NOT SHOWN IN SCHEMATIC)
■
OIL LEAK
◆ Check for proper glazing of the sealing lip.
◆ Check serrations on O.D. and I.D. to see that sealing surfaces are dry. If
wet, this could denote the leakage path.
◆ Check area between positioning pads. If wet, suspect seal leak.
◆ Check seal for possible damage incurred during installation.
◆ Check hub bore and spindle surfaces for imperfections or irregularities.
◆ Check to see that proper seal has been installed for the particular
axle application.
20 AIR DRYER
■
AIR LEAKING CONSTANTLY FROM PURGE VALVE
◆ Purge valve seal damaged. Replace.
◆ Purge valve frozen.
14 RELAY VALVE
■
AND/OR ABS DIAGNOSTIC TROUBLESHOOTING GUIDE (L20293)
LEAKS
■
13 BRAKE ADJUSTER
■
FOR COMPLETE TROUBLESHOOTING INFORMATION REFER TO LITERATURE
PIECES MODAL POWER TK-2 INSTALLATION & SERVICE MANUAL (L30022)
FOOT VALVE EXHAUST LEAK PARK BRAKES RELEASED YELLOW DASH
CONTROL VALVE EXHAUST LEAK IN PARK POSITION AND SERVICE
BRAKES APPLIED
◆ Check anti-compound double check valve portion for feedback to foot
or dash control valve. Repair or replace.
■
LEAKS WHEN SERVICE BRAKES ARE APPLIED
◆ Repair or replace.
BRAKE CHAMBER
12 SERVICE
■
■
17 STOP LIGHT SWITCH
LEAKS AT EXHAUST PORT WITH ALL BRAKES RELEASED
◆ Check and replace #18b if back flow occurs into service delivery line.
■
21 ABS INLINE VALVES
VALVE COMBINATION
2 WET TANK
■
PARK BRAKE DRAGS OR WON’T RELEASE
◆ Check for: Improper adjustment, restriction or broken line. Diaphragm
failure. System pressure too low. Improper manual release. Broken
return spring (spring side). Quick release of relay malfunction. Broken
power spring.
◆ Replace entire unit or piggy-back emergency section.
COMPLAINT/REMEDY
■
HEATER INOPERATIVE
◆ Blown fuse. Check fuse and replace with 8 - 10 amp fuse.
◆ Broken wires or poor connections. Repair or replace wiring to heater.
■
SLOW WET TANK BUILD-UP
◆ Filter and or desiccant plugged. Service air dryer.
www.haldex.com
LEAKS AT EXHAUST PORT WITH SERVICE BRAKES APPLIED
◆ Exhaust valve not seating properly. Repair or replace.
L60038 US Rev 10/08 5M CUT


![Web Only [L31123W] Nov-2001](http://vs1.manualzilla.com/store/data/006261811_1-4af033c8ff7f86bb4ac91ee243d7e1f2-150x150.png)