1
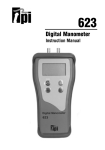
Digital Air Velocity/Flow Meter
556
Test Products International, Inc.
Headquarters:
9615 SW Allen Blvd.
Beaverton, OR 97005
USA
503-520-9197 • Fax: 503-520-1225
e-mail: [email protected]
Test Products International, Ltd.
342 Bronte St. South Unit #9
Milton, Ontario L9T 5B7
Canada
905-693-8558 • Fax: 905-693-0888
e-mail: [email protected]
Test Products International UK Ltd.
Longley House, East Park
Crawley, West Sussex RH10 6AP
England
Tel: +44 (0)1293 561212
Fax: +44 (0)1293 813465
e-mail: [email protected]
The Value Leader
TM
www.tpi-thevalueleader.com
556 Manual • 03/22/07 copyright © 2007 Test Products International.
Contents
Guarantee
11
Instrument Specifications
10
Operationg Instructions
5
Instrument Overview
4
Introduction
3
Calibration & Service
It is recommended that your instrument be calibrated every 12 months. Please
consult Test Products International for further details.
Guarantee
Your TPI 556 Digital Velocity/Air Flow Meter is guaranteed free from defects in
materials and workmanship for 3 Years from the date of purchase.
Covered by TPI: - Repair parts and labour; or replacement of the product at the
option of TPI. Normal transportation charges to the purchaser are also covered.
Not covered by TPI: - Damage to the product which are the result of abuse,
improper use or maintenance are not covered. Any other expenses, consequential
damages, incidental expenses including damages to property are not covered.
Transportation expenses to the customer are not covered.
To obtain warranty performance: - Include with the product your name, address,
phone number, written description of the problem and proof of purchase date.
Carefully package and return to TPI.
This guarantee does not affect your statuary rights.
2
11
SPECIFICATIONS
Introduction
Your TPI 556 Digital Air Velocity Meter comes complete with the
following items as standard:
Automatic Power off after 10 minutes
Switch Off
Rubber Boot as standard
Casing
This manual will guide you through the functions of the TPI 556
which will give you many years of reliable service.
148 x 73 x 30 mm (Main Instrument)
70 x 145 mm (Vane)
Dimensions
Dual LCD with function annuciators
Display
>30 hours Continuous use
Battery Life
9V Alkaline battery
Battery
Less than 80% non-condensing RH
Operating Humidity
0°C to 50°C (32°F to 122°F)
Operating Temperature Range
SENSORS
Measurement
m/s
km/h
mile/h
knots
ft/min
Accuracy
Range
Resolution
0.4 - 30.0
0.1
1.4 - 108.0
0.1
0.9 - 67.08
0.1
0.8 - 58.32
0.1
80 - 5916
1
±2% of reading, +3 digits
m/s = meters per second
km/h = kilometers per hour
mile/h = miles per hour
knots = nautical miles per hour
ft/min = feet per minute
-20°C to 80°C
0.1
-5°F to 175°F
0.1
±1% of reading, +3 digits
Temperature
0 - 999900
0.1
0.001 - 9999
0.001
CFM = cubic feet per minute
CMM= cubic meter per minute
CFM/CMM
Area
Accuracy
Thank you for purchasing TPI brand products. The 556 Digital Air
Velocity Meter is a state of the art, easy to use instrument designed
to provide temperature and air velocity readings as well as
calculating CFM. The instrument is ruggedly constructed and
comes with a 3 Year Guarantee.
TPI 556 Instrument
Rubber Boot
Soft Carrying Case
Batteries
Instruction Manual
Your TPI 556 Digital Air Velocity Meter has the following options
available:
Serial Computer Interface RS232
10
3
Instrument Overview
Dual LCD
RS232 Output
7.
Sensor
If you want to stop or disable the Logger function, press the LOGGER
button again and press the ENTER button again when “Log” and
“off” are displayed. If you want to download this stored data to
the PC again, connect them with the RS232. You can download
all of the measurements in the hyperterminal at one time.
If you pressed a button when you did not want to, press the ESC
button to cancel the operation ie. If logger button is pressed during
logger operation and “off” Mode is selected, press the ESC
button to continue logger fucntion without disabling the Logger
function.
9.
You can use this function by pressing the LOG SEND button.
8.
Rubber
Boot
Sample Rate Function
Keypad
Remote
Probe
Battery
Compartment
2 & Unit
Key
1 & Velocity / Flow
Key
Time setting is from 1 to 999 seconds.
2.
This function is to set the sampling time of the data to be
measured during the Logger function.
1.
Pressing the SAMPLE RATE button will display the old rate in
the last digit on the main display, the first digit will be flashing
and “rAtE will be flashing on the lower display.
4.
This function is used for both Air Velocity and Air Flow.
3.
5.
Press the numeric keys to enter the desired sampling time and
then press the ENTER button to complete the setting.
3 & ESC/HOLD
Key
6 & Logger Key
4 &Sample Area
Key
5 & C/F Key
7 & Record Key
9 & Sample
Rate Key
8 & Recall Key
Power Key
0 & Log / Send
Key
.
“ ”&Enter Key
4
9
If you press the RECORD button again, the unit will return to normal
operation mode.
17.
To recall the data after recording, press the RECALL button.
The “MAX”, “MIN”, “AVG”, “2/3V MAX”values will be recalled
sequentially.
16.
“2/3V MAX” indicates 2/3 of the maximum value of the measured flow
reading.
15.
If you want to record the reading changes, press the RECORD button
when the reading gets stable. The “REC” symbol will be displayed. The
meter will record the minimum, maximum and average readings and
2/3V MAX.
14.
The 556 has auto power off feature
on normal mode operation (10 minutes)
Auto power off is disabled in record mode.
Battery should be replaced when
“LBT” is displayed at the top left of the screen.
Logger Functions
Operating Instructions
Air Velocity Measurement
Press UNIT button to select the desired display units of air velocity.
4.
Press VEL/FLOW button to display “VEL”
3.
Pressing °C/°F button will toggle between °C and °F
2.
Push Power button to meter on.
1.
5 units: “m/s”, “km/h”, “knots” , “ft/min”, “mile/h”
If you want to record the reading changes, press the RECORD button
when the reading gets stable. The “REC” symbol will be displayed. The
meter will record the minimum, maximum and average readings.
9.
Press the ESC/HOLD button again to return to normal operation.
8.
Press the ESC/HOLD button to freeze the display after taking a
measurement is finished. “DH” will be displayed on the LCD.
7.
Read the velocity and temperature on the display.
6.
Position the probe at the desired location of measurement.
5.
10.
To recall the data after recording, press the RECALL button.
The “MAX”, “MIN”, “AVG” values will be recalled sequentially.
4.
If the meter is turned off, measurements will be lost.
6.
Press VEL/FLOW button to display “FLOW”
3.
The meter records 1000 readings automatically. If there are more
than a 1000 readings the meter will stop automatically.
5.
Pressing °C/°F button will toggle between °C and °F
2.
This function transfers and also records data at real-time.
4.
Push the POWER button to turn meter on.
1.
Pressing the LOGGER button will display “Log” on the main
display and “on” on the sub display. Pressing the ENTER button
will activate this function.
3.
You can download the real-time data to be measured if you
connect the meter and the PC through RS-232.
2.
This function logs the reading to be measured during Air Velocity
and Air Flow measurements.
1.
11.
If you press the RECORD button again, the unit will return to normal
operation mode.
Air Flow Measurement
5.
Press UNIT button to select the desired units of airflow: “CFM or CMM”
In order to get a correct Air Flow reading it is required to input the
sample area. The area is either measured by ft2 or m2
8
5
Air Flow Measurement Continued
6.
Measure the area to be measured and calculate the square
footage or square meters.
Area equation for Rectangular Ducts:
Area equation for Round Ducts:
AREA (A) = 3.14 X (Radius X Radius)
Radius
AREA (A) = Height (H) X Width (W)
Height (H)
Width (W)
Common Rectangular Duct Sizes with Area
DUCT SIZE
AREA
(Inches)
(sq.ft)
1.111
8” X 20”
1.000
8” X18”
0.889
8” X16”
0.833
8” X 15”
0.778
8” X 14”
0.667
8” X 12”
0.556
8” X 10”
0.444
8” X 10”
7.
8.
Common Round Duct Sizes with Area
DUCT SIZE
AREA
(Inches)
(sq.ft)
0.267
7”
0.196
6”
0.136
5”
0.087
4”
Press the SAMPLE AREA button, the earlier measured area will be
displayed. The left digit on the LCD will be flashing
If the calculated area is 1.00, press the numeric button 1 followed by the
decimal button followed by the numeric key for 0, 0, 0. Then press the
ENTER button.The enter button will only work when all four digits are
entered. “1.000” will be displayed on the lower part of the display after
the input has been completed.
If you want to record the reading changes, press the RECORD button
when the reading gets stable. The “REC” symbol will be displayed. The
meter will record the minimum, maximum and average readings.
13.
Press the ESC/HOLD button again to return to normal operation.
12.
Press the ESC/HOLD button to freeze the display after taking a
measurement is finished. “DH” will be displayed on the LCD.
11.
Read the flow on the display, it will take several minutes
until the readings get stable after the probe is positioned.
10.
Position the probe at the desired location for measurement.
9.
6
7