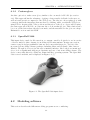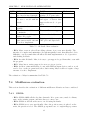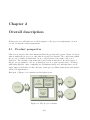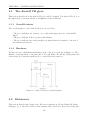
1
The intuitive way of modeling
- TDT4290 Customer Driven Project -
Lars Tangvald
Elisabeth Johansson
Jørgen Braseth
[email protected]
[email protected]
[email protected]
Margrethe Adde Kjeøy
Ola Haavik
Njaal Brøvig Andresen
[email protected]
[email protected]
[email protected]
Preface
This report documents the work of group three in TDT4290 Customer Driven Project, during
the autumn of 2005. The project group consisted of six fourth-year students at the Computer
Science department at the Norwegian University of Science and Technology.
The project’s customer was the Chemometrics and Bio-informatics Group at the Department
of Chemistry, Norwegian University of Science and Technology, through our contact person
Bjørn K. Alsberg. Their request was for a more intuitive way of modeling 3D-environments,
primarily using the equipment they already had in their VR-laboratory.
After performing a Preliminary Study, we decided to make our own glove, the Airwolf VR
glove, to be used with the 3D modeling application Blender. The requirements were then formulated by the project group and accepted by the customer. Some of the required functions
could not be implemented on time, but the ones that were implemented worked correctly
and passed all the tests done. Our final product, Glove3D, enables the user to move and
rotate objects in 3D space and reorient their view in 3D scenes to ease modeling. This gives
the user a more intuitive way of modeling.
During this project, our group gained valuable experience regarding both working in a project
setting and development for an actual customer. We also gained an insight into the world
of virtual reality and 3D modeling.
We would like to thank our supervisors Reidar Conradi and Berit Eleni Sirris for all of their
help during the course of the project, and also Bjørn K. Alsberg for his cooperation and the
motivating meetings. Furthermore, we would like to thank Jahn Otto Næsgaard Andersen
for letting us base parts of our project on his work, and for answering all our questions. Last,
but not least, we would like to thank all the people on the official Blender forums for their
help.
November 22, 2005
Lars Tangvald
Elisabeth Johansson
Jørgen Braseth
Njaal Brøvig Andresen
Ola Haavik
Margrethe Adde Kjeøy
Contents
I
Project Directive
II
1
Preliminary Study
41
III
Requirements Specification
IV
Construction
129
V
Implementation
151
VI
VII
VIII
IX
99
Test documentation
175
User Manuals
205
Evaluation
219
Glossary and References
247
i
Part I
Project Directive
1
2
CONTENTS
Contents
1
2
3
4
Introduction
11
1.1
Purpose . . . . . . . . . . . . . . . . . . . . . . . . . . . . . . . . . . . . . .
11
1.2
Scope . . . . . . . . . . . . . . . . . . . . . . . . . . . . . . . . . . . . . . .
11
1.3
Overview
11
. . . . . . . . . . . . . . . . . . . . . . . . . . . . . . . . . . . . .
Project mandate
13
2.1
Background information . . . . . . . . . . . . . . . . . . . . . . . . . . . . .
13
2.2
Project name . . . . . . . . . . . . . . . . . . . . . . . . . . . . . . . . . . .
13
Project sponsor
14
3.1
Contact information . . . . . . . . . . . . . . . . . . . . . . . . . . . . . . .
14
3.2
Background for the project . . . . . . . . . . . . . . . . . . . . . . . . . . . .
14
3.3
Goals . . . . . . . . . . . . . . . . . . . . . . . . . . . . . . . . . . . . . . . .
14
3.3.1
Effect goals . . . . . . . . . . . . . . . . . . . . . . . . . . . . . . . .
14
3.3.2
Result goals . . . . . . . . . . . . . . . . . . . . . . . . . . . . . . . .
15
3.4
Project scope . . . . . . . . . . . . . . . . . . . . . . . . . . . . . . . . . . .
15
3.5
Project limitations . . . . . . . . . . . . . . . . . . . . . . . . . . . . . . . .
15
3.5.1
Framework conditions . . . . . . . . . . . . . . . . . . . . . . . . . .
15
3.5.2
Economy . . . . . . . . . . . . . . . . . . . . . . . . . . . . . . . . . .
16
Project plan
17
4.1
Phases . . . . . . . . . . . . . . . . . . . . . . . . . . . . . . . . . . . . . . .
17
4.2
Description of each phase . . . . . . . . . . . . . . . . . . . . . . . . . . . . .
17
4.2.1
Planning . . . . . . . . . . . . . . . . . . . . . . . . . . . . . . . . . .
18
4.2.2
Preliminary Study . . . . . . . . . . . . . . . . . . . . . . . . . . . .
18
4.2.3
Requirements Specification . . . . . . . . . . . . . . . . . . . . . . . .
18
4.2.4
Construction . . . . . . . . . . . . . . . . . . . . . . . . . . . . . . .
18
4.2.5
Implementation . . . . . . . . . . . . . . . . . . . . . . . . . . . . . .
18
4.2.6
Testing . . . . . . . . . . . . . . . . . . . . . . . . . . . . . . . . . . .
18
4.2.7
Evaluation . . . . . . . . . . . . . . . . . . . . . . . . . . . . . . . . .
19
3
CONTENTS
4.2.8
Presentation and demonstration . . . . . . . . . . . . . . . . . . . . .
19
4.3
Milestones . . . . . . . . . . . . . . . . . . . . . . . . . . . . . . . . . . . . .
19
4.4
Person-hours
19
. . . . . . . . . . . . . . . . . . . . . . . . . . . . . . . . . . .
5
Organization
20
6
Templates and standards
22
6.1
Templates . . . . . . . . . . . . . . . . . . . . . . . . . . . . . . . . . . . . .
22
6.2
Folder structure and file naming . . . . . . . . . . . . . . . . . . . . . . . . .
22
6.3
Version control . . . . . . . . . . . . . . . . . . . . . . . . . . . . . . . . . .
24
6.3.1
24
7
8
Rules for use of CVS . . . . . . . . . . . . . . . . . . . . . . . . . . .
Project monitoring
25
7.1
Meetings . . . . . . . . . . . . . . . . . . . . . . . . . . . . . . . . . . . . . .
25
7.2
Group meeting . . . . . . . . . . . . . . . . . . . . . . . . . . . . . . . . . .
25
7.2.1
Supervisor meeting . . . . . . . . . . . . . . . . . . . . . . . . . . . .
25
7.2.2
Customer meeting . . . . . . . . . . . . . . . . . . . . . . . . . . . .
26
7.3
Reporting . . . . . . . . . . . . . . . . . . . . . . . . . . . . . . . . . . . . .
26
7.4
TRSCQ . . . . . . . . . . . . . . . . . . . . . . . . . . . . . . . . . . . . . .
26
Quality Assurance
28
8.1
Defining quality . . . . . . . . . . . . . . . . . . . . . . . . . . . . . . . . . .
28
8.2
Routines for approval of phase documents . . . . . . . . . . . . . . . . . . .
28
8.3
Response Times . . . . . . . . . . . . . . . . . . . . . . . . . . . . . . . . . .
28
8.4
Customer meetings . . . . . . . . . . . . . . . . . . . . . . . . . . . . . . . .
29
8.5
Supervisor meetings . . . . . . . . . . . . . . . . . . . . . . . . . . . . . . . .
29
A Stakeholders
30
B Meeting notice template
31
C Meeting minute template
32
D Status report template
34
4
CONTENTS
E CVS-manual
37
E.0.1 Oppsett . . . . . . . . . . . . . . . . . . . . . . . . . . . . . . . . . .
37
E.0.2 Bruk . . . . . . . . . . . . . . . . . . . . . . . . . . . . . . . . . . . .
37
E.0.3 Annet . . . . . . . . . . . . . . . . . . . . . . . . . . . . . . . . . . .
39
5
CONTENTS
6
FIGURES
Figures
4.1
Gantt diagram . . . . . . . . . . . . . . . . . . . . . . . . . . . . . . . . . .
19
E.1 CVS checkout . . . . . . . . . . . . . . . . . . . . . . . . . . . . . . . . . . .
38
7
FIGURES
8
TABLES
Tables
4.1
Estimated timeframe for each phase . . . . . . . . . . . . . . . . . . . . . . .
19
5.1
Organization of the project group . . . . . . . . . . . . . . . . . . . . . . . .
21
7.1
TRSCQ factors . . . . . . . . . . . . . . . . . . . . . . . . . . . . . . . . . .
27
8.1
Group response times . . . . . . . . . . . . . . . . . . . . . . . . . . . . . . .
28
8.2
Supervisor response times . . . . . . . . . . . . . . . . . . . . . . . . . . . .
29
8.3
Customer response times . . . . . . . . . . . . . . . . . . . . . . . . . . . . .
29
A.1 Contact information for the group . . . . . . . . . . . . . . . . . . . . . . . .
30
A.2 Contact information for the customer . . . . . . . . . . . . . . . . . . . . . .
30
A.3 Contact information for the customer . . . . . . . . . . . . . . . . . . . . . .
30
9
TABLES
10
Chapter 1
Introduction
This document describes the administrative part of our project.
1.1
Purpose
The purpose of the Project Directive is to set guidelines for the project execution.
1.2
Scope
This document contains all the information needed for the administration of the project. It
contains contact information for all members of the project group, the supervisors and the
customer. In addition it contains the project plan, templates and standards and a quality
assurance plan for the project.
1.3
Overview
The chapters of this document are structured in the following way:
•
•
•
•
•
•
Project mandate contains the background information and the goals for the project,
and the project scope and limitations.
Project plan contains a description of the different phases and milestones of the
project.
Organization contains the role responsibilities.
Templates and standards contains the templates and standards used in the project.
Version control contains a description of the what procedures we have for version
control.
Project monitoring contains a description of how the project is monitored with the
help of meetings, status reports and TRSCQ (time, risk, scope, cost and quality).
11
CHAPTER 1. INTRODUCTION
•
Quality Assurance contains a description of the guidelines we have regarding response times and meetings.
12
Chapter 2
Project mandate
This project mandate contains information about the project’s foundation, goals and scope.
2.1
Background information
This chapter contains information about the background of the project, who started it and
its stakeholders
2.2
Project name
Glove3D - 3 dimensional (3D) modeling with the help of a virtual reality (VR) glove
13
Chapter 3
Project sponsor
The project sponsor is the Department of Chemistry and our contact person is Bjørn K.
Alsberg.
3.1
Contact information
The supervisors will give feedback on the work we carry out. The customer will use the
product we produce. Contact information for each person involved in the development may
be found in Appendix A.
3.2
Background for the project
The people who work with visualizing chemical structures find the existing tools for 3D
modeling too complex and not very intuitive. Using a VR glove, instead of a mouse, for
modeling is more like the way one alter objects in the real world. It is required that we make
an interface between a VR glove and a 3D modeling tool.
3.3
Goals
This section specifies both the effect and result goals for the project.
3.3.1
Effect goals
Effect goals are the effects which the customer expects to gain from the project. The goal
of this project is to develop an intuitive method for modeling objects in 3D with a VR
glove, primarily to make it easier for the customer to make such models and use them in
demonstrations of their products.
14
CHAPTER 3. PROJECT SPONSOR
3.3.2
Result goals
The result goals describe how the end product of the project should be. We have defined
the following results goals that should make us able to achieve the effect goals:
•
•
•
We will use a glove, in conjunction with Flock of Birds (FoB) sensors to make a
hardware device for 3D modeling.
We will use this glove to create and modify objects in the open source 3D modeling
application Blender.
We will use passive stereoscopic projection to give a feeling of depth while creating the
models.
3.4
Project scope
Project scope is a more detailed description of the result goals. The following are to be done
in the project:
•
•
•
•
The interface of the VR glove and FoB to Blender will be programmed using C++ and
Python. Part of this work has already been done by Jahn Otto Næsgaard Andersen.
Our primary goal is to be able to move objects and part of objects in 3D space, using
the glove and FoB.
We will also add buttons to two of the fingers of the glove.
The 3D picture is shown by a passive stereo system. This is done by drawing two
pictures with different polarization and using polarized glasses to separate one picture
per eye. Each picture represents what one eye would see and this makes the 3D effect.
3.5
Project limitations
This section describes the limitations of the project regarding economy, software and hardware dependencies.
3.5.1
Framework conditions
The following are the framework conditions of the project. They are given by our customer:
•
•
•
The system shall run on a Debian Linux machine using X Windows, with a standard
GeForce graphics card.
The system shall work as an interface against the open source 3D modeler Blender.
Everything we develop must be open source.
If we are unable to alter the glove ourselves, we can hire external help for up to 150
NOK an hour.
15
CHAPTER 3. PROJECT SPONSOR
3.5.2
Economy
Each member of the group has an estimated workload of 310 person-hours. Since we are six
people in the group, this totals to 1860 hours or about 24 hours per member per week.
16
Chapter 4
Project plan
The project plan specifies all the phases of the project and their timeframes. The plan
contains information regarding the main activities of each phase as well as the person responsible.
4.1
Phases
The project is broken down into the following phases:
1. Planning
2. Preliminary study
3. Requirements Specification
4. Construction
5. Implementation
6. Testing
7. Evaluation
8. Presentation and demonstration
4.2
Description of each phase
This section describes more details about each phase as well as the main person responsible.
17
CHAPTER 4. PROJECT PLAN
4.2.1
Planning
Responsible: Ola Haavik
In this phase we divide the project into activities and make a Project Directive. The Project
Directive is a dynamic document in which many aspects of the project is described.
4.2.2
Preliminary Study
Responsible: Lars Tangvald
In this phase we study current solutions trying to find the best possible solution for our
project and get a better understanding of the problem to be solved.
4.2.3
Requirements Specification
Responsible: Margrethe Kjeøy
In this phase we specify the requirements for the solution we chose in the Preliminary
Study phase. We will make an overall description of the system and a specification of both
functional and non-functional requirements.
4.2.4
Construction
Responsible: Njaal Andresen
In this phase we will make all necessary models and descriptions needed for the implementation phase. These have to be detailed enough so that there are no ambiguities regarding
how and what to code. A test plan will also be drawn up, which needs to be very detailed
so that all parts of the program are tested.
4.2.5
Implementation
Responsible: Lars Tangvald
In this phase we start programming the system. There is also a possibility that we have to
make some adjustments to the VR gloves. We will also make a user- and installation manual
during this phase.
4.2.6
Testing
Responsible: Jørgen Braseth
In this phase we will test our program to see if it functions properly and according to the
Requirements Specification. All tests must be executed. There will also be an acceptance
test with the customer, to assure that we actually have made what he requested us to.
18
CHAPTER 4. PROJECT PLAN
4.2.7
Evaluation
Responsible: Elisabeth Johansson
In this phase we will evaluate different aspects of this project. The evaluation report shall
evaluate: the process, the final result, the customer, the given task, used tools and future
work.
4.2.8
Presentation and demonstration
Responsible: Ola Haavik
In this phase we will present and demonstrate what we have made for the customer, the supervisors and the external examiner. The presentation will take place the 24th of November.
4.3
Milestones
Each phase of the project is considered a milestone. The estimated time frame of each phase
is shown in Table 4.1.
Phase
Preliminary Study
Requirements Specification
Construction
Implementation
Testing
Evaluation
Presentation and demonstration
Start
15.08
27.09
04.10
25.10
09.11
18.11
22.11
End
04.10
11.10
25.10
15.11
23.11
20.11
24.11
Table 4.1: Estimated timeframe for each phase
4.4
Person-hours
The gantt diagram in Figure 4.1 shows the estimated person-hours for each phase each week
and its total is found to the right.
Figure 4.1: Gantt diagram
19
Chapter 5
Organization
This chapter describes different roles in the project and who is responsible for them.
20
CHAPTER 5. ORGANIZATION
Role
Project manager
Customer contact
Phase responsible
Document responsible
Quality
Assurance
(QA) responsible
Blender responsible
Technical responsible
Hardware responsible
Description
Lead all meetings and write status reports. Distribute tasks and
see to that everyone has something to do.
The person in the group to make
all contact with the customer.
This is the person the customer
shall contact if there are any questions.
Have a very good understanding
on what to do in that phase. Do
their best to motivate members of
the group so that milestones are
met.
Make sure that all of the members of the group use templates
in the appropriate way. Deliver
up to date project documents to
the supervisors.
Should make sure QA is done according to the QA plan in the
Project Directive.
Have very good understanding
of which functions Blender have,
and have the main responsibility
for the scripts and Blender API.
Should be responsible for fixing
technical problems with the computer on the VR lab.
Should make sure that the hardware on the VR lab functions
properly.
Responsible
Ola Haavik
Ola Haavik
See chapter 4
Elisabeth Johansson
Jørgen Braseth
Jørgen Braseth
Lars Tangvald
Njaal Andresen
Table 5.1: Organization of the project group
21
Chapter 6
Templates and standards
This chapter describes all templates and standards used in the project.
6.1
Templates
Every document used more than one time has its own template. This is to ensure that all
necessary information is provided.
The following documents have their own templates:
•
Notice of meeting, found in Appendix B
•
Minutes of meeting, found in Appendix C
•
Status reports, found in Appendix D
6.2
Folder structure and file naming
This section describes rules for folder structure and file naming in the Concurrent Versioning
System(CVS). The following is used as a placeholder for date, month and year respectively:
DD , MM , YY. Capital letters represent words that need to be changed appropriately.
Both LaTeX and Adobe Portable Document Format(PDF) files of all documents are to be
included on the CVS.
The following rules are used:
•
Phase
•
•
•
•
Folder naming: fase/ NAME OF PHASE
Master document naming: NAME OF PHASE
Section document naming: NAME OF SECTION
Meetings
22
CHAPTER 6. TEMPLATES AND STANDARDS
•
•
•
•
Status reports
•
•
•
Folder naming: møter/intern, møter/kunde or møter/veileder
Notice naming: referatDDMMYY.tex
Minute naming: innkallingDDMMYY.tex
Folder naming: statusrapporter
Status report naming: statusDDMMYY.tex
Templates
•
•
Folder naming: maler
Status report naming: TYPE OF DOCUMENT.tex
23
CHAPTER 6. TEMPLATES AND STANDARDS
6.3
Version control
Version control will be done by use of CVS. We have chosen TortoiseCVS as our main CVS
interface. A manual in norwegian for installation and use of TortoiseCVS can be found in
Appendix E.
6.3.1
Rules for use of CVS
Below are important rules for the group’s usage of CVS:
•
Always update before you commit
•
Only add files you feel the other group members need
•
Resolve all conflicts as they occur
•
Commit only error-free code
24
Chapter 7
Project monitoring
This chapter describes how the project is monitored with the help of meetings, status reports
and the use of TRSCQ.
7.1
Meetings
There are three different kinds of meetings held. Each type is described in more detail in
this chapter.
7.2
Group meeting
We have two group meetings each week, Tuesdays at 13:15-14:00 and Fridays at 09:15-10:00.
The meetings are held in D3-110 in Realfagsbygget.
Some fixed items on the agenda:
•
everyone informs about last periods work and the number of worked hours
•
delegate new work to everyone
7.2.1
Supervisor meeting
There is a supervisor meeting every Thursday at 10:00 at IT-Vest, room 242. Notice of
meeting and updated documents are to be sent to the supervisors Wednesday before 15:00.
Some fixed items on the agenda:
•
go through the minutes from the previous meeting
•
go through all updated documents
•
go through the status report
25
CHAPTER 7. PROJECT MONITORING
7.2.2
Customer meeting
Customer meetings will be held when needed. Time and place should whenever possible be
set more than 48 hours prior to the meeting. The notice with agenda should be e-mailed the
customer at least 24 hours prior to the meeting.
Some fixed items on the agenda:
•
tell customer about current status of the project
•
go through phase documents for approval, if needed
7.3
Reporting
We will have both internal and external reporting. External reporting is done by a status
report written to each supervisor meeting. Internal reports includes a list of person-hours
spent on each phase the past week.
7.4
TRSCQ
TRSCQ stands for Time, Risk, Scope, Cost and Quality. It is a technique for project
monitoring and managing, where you go through all these factors at a specific interval. We
will go through each of these items during our weekly meetings. The status of each is to be
included in the status report to the supervisors.
Table 7.1 describes each of the TRSCQ factors in more detail.
26
CHAPTER 7. PROJECT MONITORING
Factor
Time
Risk
Scope
Cost
Quality
Description
During each weekly group meeting we will evaluate how
far we are from the next milestone. If the ones who are
currently working to reach the milestone do not think
they will finnish on time, we will have to allocate more
people. Another solution is to postpone the milestone.
The latter is not a very good solution and should only
be used if we do not have members to allocate.
We use a risk table for easy risk management. Each risk
has one responsible person. During our weekly group
meeting we will go through this table to see if any risks
have become more or less likely to happen. This risk
table is included in the status report to the teaching
supervisors.
If we for some reason have had a very slow week we may
have to revise the scope of the project. The same applies
if we have had any major breakthroughs. If needed this
item is addressed on the weekly group meetings.
In this project cost is purely based on person-hours.
Each member is supposed to work on average 24 hours
a week. The project manager will sum the total personhours for each week and include them in the status report to the supervisors. If a member for some reason,
does not have time to work 24 hours one week, he should
be able to work more the next one-two weeks to gain an
average of 24 hours again, or if possible in advance.
In this project quality is very related to the scope. If
we for some reason have to narrow the scope we will see
which part of the project is most important in regards
to quality, and do our best not to touch that part.
Table 7.1: TRSCQ factors
27
Chapter 8
Quality Assurance
This chapter explains the routines we have for Quality Assurance in the project.
8.1
Defining quality
Defining quality is not a trivial task. Defining the word in itself has no meaning, therefore
we have set three very important factors for quality of the product.
1. The product must be more intuitive than normal use of Blender with a mouse
2. The product must be more efficient than normal use of Blender with a mouse
3. The product must have a good way to control and show 3D-models made with Blender
8.2
Routines for approval of phase documents
All documents, software and hardware will be reviewed jointly by the group in advance of
handing to the customer and/or supervisors.
8.3
Response Times
This section contains response times for the supervisors, customer and the group. They can
be respectably found in Table 8.1, 8.2, 8.3.
Activity
Answer to questions on e-mail.
Feedback on documents.
Response time
One work day.
One work days.
Table 8.1: Group response times
28
CHAPTER 8. QUALITY ASSURANCE
Activity
Approve minutes from supervisor
meetings.
Approve phase documents.
Answer queries.
Response time
At weekly meetings.
At weekly meetings.
One work day.
Table 8.2: Supervisor response times
Activity
Approve minutes from customer
meetings.
Feedback on phase documents.
Approval of phase documents.
Answer miscellaneous questions.
Answer to request for possible
meeting time.
Response time
As fast as possible, should
be able to do it within one
workday.
Two work days.
Two work days.
One work day.
One work day, meetings are
to be held Mondays, Tuesdays or Wednesdays.
Table 8.3: Customer response times
8.4
Customer meetings
To ensure that we are working toward the customer’s goal, we will have a customer meeting
whenever we feel it is necessary to make some part of the project more clear. The routines for
notices are described in section 7 about project monitoring. To ensure that we also have the
same understanding about what decisions were made on the meeting, the minute of meeting
is to be sent to the customer for approval no later that one work day after the meeting.
8.5
Supervisor meetings
Each week we have a supervisor meeting, where all new documents are reviewed as well
as changes to the current ones. This will ensure that we are producing correct and high
quality documents. The routines for meeting notices are describes in section 7 about project
monitoring. At the start of each meeting we go through the minutes from the previous
meeting. This is to ensure that we have the same understanding about what was to be
changed in the documents.
29
Appendix A
Stakeholders
The following three tables contain contact information for all persons involved in the project.
N ame :
Elisabeth Johansson
Ola Haavik
Jørgen Braseth
Njaal Andresen
Margrethe Kjeøy
Lars Tangvald
P hone
40455858
93004468
97704386
93265225
93872588
95872396
E − mail
[email protected]
[email protected]
[email protected]
[email protected]
[email protected]
[email protected]
Table A.1: Contact information for the group
N ame :
Reidar Conradi
Berit Eleni Sirris
P hone
73593444
93093445
E − mail
[email protected]
[email protected]
Table A.2: Contact information for the customer
N ame :
Bjørn K. Alsberg
P hone
92466021
E − mail
[email protected]
Table A.3: Contact information for the customer
30
Appendix B
Meeting notice template
This is the template we use for notice of meeting. Since all internal communication is in
done norwegian this template is also in norwegian.
Møteinnkalling - Gruppe 3
Møtetype: Intern, Veileder eller kunde
Dato: dd.mm.2005
Tid: tt:mm - tt:mm
Sted: bygg, rom
Innkalt: Ola Haavik, Jørgen Braseth, Margrethe Kjeøy, Njaal Andresen, Lars Tangvald,
Elisabeth Johansson
Referent:
Hensikt:
Agenda
1. godkjenning av agenda
2. godkjenning av møtereferat fra forrige møte
3. andre saker fortløpende
4. eventuelt
31
Appendix C
Meeting minute template
This is the template we use for meeting minutes. Since all internal communication is done
in norwegian this template is also in norwegian.
Møtereferat - Gruppe 3
Møtetype: Intern, Veileder eller kunde
Dato: dd.mm.2005
Tid: tt:mm - tt:mm
Sted: bygg, rom
Tilstede:
Referent:
Hensikt:
Agenda
1. godkjenning av agenda
referat fra dette punktet
2. godkjenning av møtereferat fra forrige møte
referat fra dette punktet
32
APPENDIX C. MEETING MINUTE TEMPLATE
3. andre saker fortløpende
referat fra disse punktet
4. eventuelt
referat fra dette punktet
33
Appendix D
Status report template
This is the template used on the status reports. It is in Norwegian because all internal
communication is in Norwegian.
Statusrapport for Gruppe 3
Dato: DD.MM
Oppsummering
Utført arbeid i perioden (DD.MM - DD.MM)
Dokumenter
Møter
.
Aktiviteter
•
Ola:
•
Lars:
•
Elisabeth:
•
Njaal:
•
Margrethe:
•
Jørgen:
34
APPENDIX D. STATUS REPORT TEMPLATE
Annet
TROKK
•
Tid -
•
Risiko -
•
Omfang -
•
Kostnad/timer -
•
Kvalitet -
Problemer
Planlagt arbeid til neste periode (DD.MM - DD.MM)
Dokumenter
Møter
Aktiviteter
•
Ola:
•
Lars:
•
Elisabeth:
•
Njaal:
•
Margrethe:
•
Jørgen:
Annet
Risikotabell
Her skal oppdatert riskikotabell ligge.
Timeoversikt
Her skal oppdatert timeoversikt ligge
35
APPENDIX D. STATUS REPORT TEMPLATE
36
Appendix E
CVS-manual
This is a manual for installation and use of TortoiseCVS. It is written in norwegian since it
is an internal document.
E.0.1
Oppsett
Her beskrives det hvordan du skal installere TortoiseCVS.
E.0.1.1
Installasjon
Last ned TortoiseCVS fra http://www.tortoisecvs.org og installér programmet. Reboot
maskinen når du blir bedt om det.
E.0.1.2
•
Checkout fra CVS
Gå til mappen du ønsker å ha KPro filene dine i (f.eks. ”Mine Dokumenter/Kpro”,
e.l.)
•
Høyreklikk, og velg ”CVS Checkout...”, du vil få opp bilde i Figur E.1
•
Fyll inn informasjon som på Figur E.1, men med eget brukernavn
•
•
Klikk på ”options”, og skriv inn hva du vil kalle katalogen under ”Name of folder to
create”
Klikk OK, og skriv inn passord når du blir bedt om det
Da er CVS installert og konfigurert!
E.0.2
Bruk
Her beskrives det hvordan du skal bruke TortoiseCVS.
37
APPENDIX E. CVS-MANUAL
Figure E.1: CVS checkout
E.0.2.1
Update
For å hente ned det de andre på gruppa har gjort, må du kjøre en update:
Høyreklikk på mappen din, og velg ”CVS Update”. TortoiseCVS henter nå inn alle nye filer
fra CVS’en
E.0.2.2
Add
Når du har opprettet nye filer/mapper som du vil at de andre på gruppa også skal ha, må
du legge dem til i CVS.
For å legge til en fil/mappe i CVS, må du høyreklikke på det du vil legge til, og velge ”CVS
Add...”. Etter å ha lagt til filen, må du også sende den til CVS, det gjøres med CVS
Commit.
38
APPENDIX E. CVS-MANUAL
E.0.2.3
Commit
Når du har lagt til en fil til CVS, eller har endret på en fil som allerede finnes i CVS, må
du sende inn endringen, dette gjøres med en kommando som heter commit.
Høyreklikk på det endrede elementet, evt. mappen det ligger i. Om du klikker på
rotmappen til CVS’en, vil du commite alle endringer. Klikk på ”CVS Commit”.
E.0.3
Annet
I tillegg til vanlig bruk av CVS (add, update og commit), hender det at det oppstår andre
ting som må håndteres. Nedenfor er noen av disse beskrevet.
E.0.3.1
Binær/ASCII koding
CVS skiller mellom binære og ascii filer.
•
•
Binær: Dette er filer som ikke kan editeres direkte med en teksteditor (f.eks. bilder,
lyder, osv). Slike filer blir ikke sjekket for forskjeller av CVS. Om en binær fil blir
commit’et til CVS og den er nyere enn den som ligger der, blir den gamle overskrevet.
ASCII: Alle filer som man kan endrer på med en vanlig teksteditor (f.eks. HTML,
cpp, tex osv) skal regnes som ascii filer. Filer med betegnelsen ascii, vil kontrolleres
for forskjeller av CVS. Dette betyr at om man gjør en endring i en slik fil samtidig
med at noen andre endrer på den, og man så oppdaterer, vil CVS se at begge har
gjort endringer, og vil prøve å sette sammen de to endringene til èn fil. Om CVS ikke
klarer å sette sammen filen selv, vil det oppstå en konflikt.
E.0.3.2
Konflikter
Konflikter får man når en ASCII fil er endret på av to forskjellige brukere, og CVS ikke
klarer å sette sammen filene selv. Da må brukerene selv inn i filen og fikse forskjellen.
CVS vil legge inn teksten fra begge versjonene av filene i samme fil, og det er så opp til
brukeren å fikse filen slik at den stemmer. Etter man har fikset konflikten, må man
commit’e filen til CVS, slik at de andre på gruppa får den riktige filen.
E.0.3.3
Huske passordet i Tortoise CVS
Det er mulig å få Tortoise CVS til å huske passordet ditt, så du slipper å skrive det inn
hver gang du oppdaterer/committer. Dette er regnet som en sikkerhetsrisiko, fordi du
lagrer passordet i klar tekst, men dette er fremgangsmåten:
•
Høyreklikk i en av mappene i CVS-mappen din, velg CVS ,Preferences.
•
Trykk på tab’en merket ”Tools”.
39
APPENDIX E. CVS-MANUAL
•
På linjen merket ”SSH Parameters”, legg til etter det som står der: ”-pw [passord]”
hvor [passord] er passordet ditt.
40
Part II
Preliminary Study
41
42
CONTENTS
Contents
1
2
Introduction
51
1.1
Purpose . . . . . . . . . . . . . . . . . . . . . . . . . . . . . . . . . . . . . .
51
1.2
Scope . . . . . . . . . . . . . . . . . . . . . . . . . . . . . . . . . . . . . . .
51
1.3
Overview
51
. . . . . . . . . . . . . . . . . . . . . . . . . . . . . . . . . . . . .
Description of the current situation
53
2.1
Customer background
. . . . . . . . . . . . . . . . . . . . . . . . . . . . . .
54
2.2
Open source and GNU . . . . . . . . . . . . . . . . . . . . . . . . . . . . . .
56
2.2.1
Open source . . . . . . . . . . . . . . . . . . . . . . . . . . . . . . . .
56
2.2.2
GNU and free software . . . . . . . . . . . . . . . . . . . . . . . . . .
57
Blender . . . . . . . . . . . . . . . . . . . . . . . . . . . . . . . . . . . . . .
58
2.3.1
History of Blender . . . . . . . . . . . . . . . . . . . . . . . . . . . .
58
2.3.2
Code distribution . . . . . . . . . . . . . . . . . . . . . . . . . . . . .
58
2.3.3
Program features . . . . . . . . . . . . . . . . . . . . . . . . . . . . .
58
2.3.4
User interface . . . . . . . . . . . . . . . . . . . . . . . . . . . . . . .
59
2.3.5
Using Blender to create a simple model . . . . . . . . . . . . . . . . .
59
2.3.6
Possible problems with Blender . . . . . . . . . . . . . . . . . . . . .
61
2.4
Flock of Birds . . . . . . . . . . . . . . . . . . . . . . . . . . . . . . . . . . .
63
2.5
Virtual Reality . . . . . . . . . . . . . . . . . . . . . . . . . . . . . . . . . .
65
2.6
5DT Data glove 5 . . . . . . . . . . . . . . . . . . . . . . . . . . . . . . . . .
66
2.6.1
5DT Data glove 5 hardware . . . . . . . . . . . . . . . . . . . . . . .
66
2.6.2
5DT Data glove 5 software . . . . . . . . . . . . . . . . . . . . . . . .
67
2.6.3
5DT Data glove 5 extra software . . . . . . . . . . . . . . . . . . . .
68
Description of last year’s project GLISA . . . . . . . . . . . . . . . . . . . .
69
2.7.1
The existing system . . . . . . . . . . . . . . . . . . . . . . . . . . . .
69
2.7.2
The given task for GLISA . . . . . . . . . . . . . . . . . . . . . . . .
69
2.7.3
The results from GLISA . . . . . . . . . . . . . . . . . . . . . . . . .
69
2.7.4
GLISA versus Glove3D . . . . . . . . . . . . . . . . . . . . . . . . . .
70
Hololib . . . . . . . . . . . . . . . . . . . . . . . . . . . . . . . . . . . . . . .
71
2.8.1
71
2.3
2.7
2.8
Introduction . . . . . . . . . . . . . . . . . . . . . . . . . . . . . . . .
43
CONTENTS
3
4
2.8.2
The glove . . . . . . . . . . . . . . . . . . . . . . . . . . . . . . . . .
71
2.8.3
The software . . . . . . . . . . . . . . . . . . . . . . . . . . . . . . .
71
Description of the requested solution
73
3.1
The traditional approach . . . . . . . . . . . . . . . . . . . . . . . . . . . . .
73
3.2
The suggested approach . . . . . . . . . . . . . . . . . . . . . . . . . . . . .
73
Customer demands
75
4.1
Priority values . . . . . . . . . . . . . . . . . . . . . . . . . . . . . . . . . . .
75
4.2
General demands . . . . . . . . . . . . . . . . . . . . . . . . . . . . . . . . .
75
4.3
Absolute demands
77
. . . . . . . . . . . . . . . . . . . . . . . . . . . . . . . .
5
Evaluation criteria
79
6
Alternative solutions
81
6.1
Input Device . . . . . . . . . . . . . . . . . . . . . . . . . . . . . . . . . . . .
81
6.1.1
Data Glove 5DT 5 . . . . . . . . . . . . . . . . . . . . . . . . . . . .
81
6.1.2
Custom glove . . . . . . . . . . . . . . . . . . . . . . . . . . . . . . .
82
6.1.3
SpaceBall 5000 . . . . . . . . . . . . . . . . . . . . . . . . . . . . . .
82
Modeling software . . . . . . . . . . . . . . . . . . . . . . . . . . . . . . . . .
82
6.2.1
Blender . . . . . . . . . . . . . . . . . . . . . . . . . . . . . . . . . .
83
6.2.2
3D Studio Max . . . . . . . . . . . . . . . . . . . . . . . . . . . . . .
83
6.2.3
Maya . . . . . . . . . . . . . . . . . . . . . . . . . . . . . . . . . . . .
83
Middleware . . . . . . . . . . . . . . . . . . . . . . . . . . . . . . . . . . . .
83
6.3.1
GLISA . . . . . . . . . . . . . . . . . . . . . . . . . . . . . . . . . . .
83
6.3.2
Hololib . . . . . . . . . . . . . . . . . . . . . . . . . . . . . . . . . . .
83
6.3.3
Custom made . . . . . . . . . . . . . . . . . . . . . . . . . . . . . . .
84
6.2
6.3
7
Evaluation of alternatives
85
7.1
Evaluation values . . . . . . . . . . . . . . . . . . . . . . . . . . . . . . . . .
85
7.2
Input device evaluation . . . . . . . . . . . . . . . . . . . . . . . . . . . . . .
85
7.2.1
5DT Data Glove 5 . . . . . . . . . . . . . . . . . . . . . . . . . . . .
85
7.2.2
Custom glove . . . . . . . . . . . . . . . . . . . . . . . . . . . . . . .
87
7.2.3
Spaceball 5000 . . . . . . . . . . . . . . . . . . . . . . . . . . . . . .
88
Modeling program evaluation . . . . . . . . . . . . . . . . . . . . . . . . . .
88
7.3.1
89
7.3
Blender . . . . . . . . . . . . . . . . . . . . . . . . . . . . . . . . . .
44
CONTENTS
7.4
8
7.3.2
3D Studio Max . . . . . . . . . . . . . . . . . . . . . . . . . . . . . .
89
7.3.3
Maya . . . . . . . . . . . . . . . . . . . . . . . . . . . . . . . . . . . .
90
Middleware evaluation . . . . . . . . . . . . . . . . . . . . . . . . . . . . . .
91
7.4.1
GLISA . . . . . . . . . . . . . . . . . . . . . . . . . . . . . . . . . . .
91
7.4.2
Hololib . . . . . . . . . . . . . . . . . . . . . . . . . . . . . . . . . . .
93
7.4.3
Custom made . . . . . . . . . . . . . . . . . . . . . . . . . . . . . . .
94
Chosen solution
96
45
CONTENTS
46
FIGURES
Figures
2.1
Chemometrics and Bioinformatics Group structure . . . . . . . . . . . . . .
55
2.2
A view of a possible UI configuration while in Object mode . . . . . . . . . .
60
2.3
A typical view in Blender while in edit mode . . . . . . . . . . . . . . . . . .
61
2.4
Model of an H2 O molecule . . . . . . . . . . . . . . . . . . . . . . . . . . . .
62
2.5
FoB used with several sensors . . . . . . . . . . . . . . . . . . . . . . . . . .
63
2.6
FoB used with one sensor
. . . . . . . . . . . . . . . . . . . . . . . . . . . .
64
2.7
Picture of the 5DT Data Glove 5 . . . . . . . . . . . . . . . . . . . . . . . .
66
2.8
Connections for data glove . . . . . . . . . . . . . . . . . . . . . . . . . . . .
67
2.9
Sensors on the data glove . . . . . . . . . . . . . . . . . . . . . . . . . . . . .
67
2.10 The grab posture . . . . . . . . . . . . . . . . . . . . . . . . . . . . . . . . .
70
2.11 Concept drawing of the Hololib glove . . . . . . . . . . . . . . . . . . . . . .
71
3.1
3.2
6.1
Example of the traditional way of modeling 3D environments, taken from the
program 3D Studio MAX . . . . . . . . . . . . . . . . . . . . . . . . . . . .
74
Concept drawing showing the user in front of a canvas, using the glove on his
hand to move the glove on-screen and using it to modify the 3D-model . . .
74
The SpaceBall 5000 input device
82
. . . . . . . . . . . . . . . . . . . . . . . .
47
FIGURES
48
TABLES
Tables
2.1
Available drivers for the 5DT Data Glove 5 . . . . . . . . . . . . . . . . . . .
68
4.1
The priority values and their meanings . . . . . . . . . . . . . . . . . . . . .
75
4.2
General demands . . . . . . . . . . . . . . . . . . . . . . . . . . . . . . . . .
77
4.3
Absolute demands which have to be satisfied for a solution to be acceptable .
78
5.1
Evaluation criteria . . . . . . . . . . . . . . . . . . . . . . . . . . . . . . . .
80
7.1
5DT Data Glove 5 evaluation . . . . . . . . . . . . . . . . . . . . . . . . . .
87
7.2
Custom glove evaluation . . . . . . . . . . . . . . . . . . . . . . . . . . . . .
88
7.3
Spaceball 5000 evaluation . . . . . . . . . . . . . . . . . . . . . . . . . . . .
89
7.4
Blender evaluation . . . . . . . . . . . . . . . . . . . . . . . . . . . . . . . .
90
7.5
3D Studio Max evaluation . . . . . . . . . . . . . . . . . . . . . . . . . . . .
91
7.6
Maya evaluation . . . . . . . . . . . . . . . . . . . . . . . . . . . . . . . . . .
92
7.7
GLISA evaluation . . . . . . . . . . . . . . . . . . . . . . . . . . . . . . . . .
92
7.8
Hololib evaluation . . . . . . . . . . . . . . . . . . . . . . . . . . . . . . . . .
94
7.9
Custom made evaluation . . . . . . . . . . . . . . . . . . . . . . . . . . . . .
95
8.1
Summary of evaluations, best alternative in each category bold in total-row.
97
49
TABLES
50
Chapter 1
Introduction
In this document we describe the process, from the situation as it is today, through
discussions about different possible solutions of the problem, to the conclusion, where we
select one alternative to implement.
1.1
Purpose
The purpose of this document is to study the current situation, and use that information
to assess the viability of different ways to satisfy the customer’s requirements.
1.2
Scope
This is the preliminary study for the project Glove3D. The preliminary study describes the
situation today; what tools are used, and which problems these tools create for the
customer. The goal of this project is to remedy those problems. The document describes
different alternatives for solving these problems, and finally shows the details of what
alternative we chose to implement, and the reasons for our choice.
1.3
Overview
The sections of this document are structured in the following way:
•
•
•
Description of the current situation contains a description of the software and
hardware that are in use today, as well as related work done previously.
Description of the requested solution contains what the customer wants from
the final solution
Customer demands contains a description of the customer’s demands for the final
solution.
51
CHAPTER 1. INTRODUCTION
•
•
•
•
Evaluation criteria contains the criteria used to evaluate the different alternatives.
Used to select a solution.
Alternative solutions contains different ways to solve the problem, beyond what
has been suggested by the customer.
Evaluation of alternatives contains a summarization of the pros and cons of the
different alternatives, using the aforementioned evaluation criteria.
Chosen solution contains what solution we have chosen to implement, based on
the evaluation of the alternatives.
52
Chapter 2
Description of the current situation
This chapter describes today’s situation. We start with a general description of the
background of the customer’s company. Then we give a description of what open source
and GNU’s Not Unix (GNU) is. We introduce the concept of Virtual Reality (VR), and
how it is used. After this, we give a description of the modeling program the customer uses,
Blender, with a short description of its history, features, and possible problems that may
occur. A description of the gloves used, the Data Glove 5DT 5, follows. We include a short
summary of a related project completed last year, Glove is in the air (GLISA). Finally, we
give a description of the Hololib system, which was created by Jahn Otto Andersen.
53
CHAPTER 2. DESCRIPTION OF THE CURRENT SITUATION
2.1
Customer background
The customer for this project is the Chemometrics and Bio-informatics Group (CBG) at
the Department of Chemistry, Norwegian University of Science and Technology (NTNU).
CBG is part of the Functional Genome research (FUGE) bio-informatics platform branch
in Trondheim. FUGE is one of the larger programs within functional genome research in
Norway. CBG’s primary focus is to develop new data analytical methods within the fields
of chemometrics and bio-informatics.
Their main interests in chemometrics are:
•
Efficient representations of spectra
•
Hyperspectral image analysis
•
Quantitative structure-activity relationships
•
Drug design
Their main interest in bio-informatics is:
•
Simulation of microarrays
•
Methods for gene selection
•
Gene ontology as background information
•
Finding comparable protein spots in gels
•
Whole cell fingerprinting
CBG is divided into two subgroups; Science and service, and the structure of the group is
shown in Figure 2.1.
In the science group there are five PhDs that are working with Quantitative
Structure-Activity Relationships (QSAR), hyper spectral analysis and functional genome
research.
The service group is split in two subgroups; SciCraft and Data analysis service. SciCraft [4]
is an open source software for interactive data analysis that CBG has developed. The data
analysis services analyse micro matrices for other companies/people and is thus CBG’s
main source of income.
Because of their work with multivariable methods, 3D-visualization is very important for
them. Multivariable methods demand multidimensional visualization when displayed.
Colors, shapes and animation make it easier to understand models and can help in
teaching and presentations.
Last year CBG had another student group working for them. Their project was called
Glove is in the air (GLISA), and the purpose of GLISA was to enable a pair of electronic
gloves to be used for control of VR applications, and it supported both movement and
rotation of either hand, as well as measurements of finger flexure. Their solution is not in
use today because of lack of intuition and positioning abilities. Therefore the customer is
still looking for an easy way to model 3D environments with the use of data gloves.
54
CHAPTER 2. DESCRIPTION OF THE CURRENT SITUATION
Figure 2.1: Chemometrics and Bioinformatics Group structure
55
CHAPTER 2. DESCRIPTION OF THE CURRENT SITUATION
2.2
Open source and GNU
This section gives an explanation of the terms open source and GNU.
2.2.1
Open source
The term open source has a multitude of different definitions, as it has become a buzz-word
in the IT industry, and is a very popular term. Most are fairly vague on what the term
actually means. The Open Source Initiative, which is a non-profit corporation with the
goal of maintaining the definition of the term for the good of the community, describes ten
prerequisites which need to be satisfied before a piece of software can be called open
source[9]:
1. The license shall not restrict any party from selling or giving away the software as a
component of an aggregate software distribution containing programs from several
different sources. The license shall not require a royalty or other fee for such sale.
2. The program must include source code, and must allow distribution in source code as
well as compiled form. Where some form of a product is not distributed with source
code, there must be a well-publicized means of obtaining the source code for no more
than a reasonable reproduction cost-preferably, downloading via the Internet without
charge. The source code must be the preferred form in which a programmer would
modify the program. Deliberately obfuscated source code is not allowed.
Intermediate forms such as the output of a preprocessor or translator are not allowed.
3. The license must allow modifications and derived works, and must allow them to be
distributed under the same terms as the license of the original software.
4. The license may restrict source-code from being distributed in modified form only if
the license allows the distribution of patch files with the source code for the purpose
of modifying the program at build time. The license must explicitly permit
distribution of software built from modified source code. The license may require
derived works to carry a different name or version number from the original software.
5. The license must not discriminate against any person or group of persons.
6. The license must not restrict anyone from making use of the program in a specific
field of endeavor. For example, it may not restrict the program from being used in a
business, or from being used for genetic research.
7. The rights attached to the program must apply to all to whom the program is
redistributed without the need for execution of an additional license by those parties.
8. The rights attached to the program must not depend on the program’s being part of
a particular software distribution. If the program is extracted from that distribution
and used or distributed within the terms of the program’s license, all parties to whom
the program is redistributed should have the same rights as those that are granted in
conjunction with the original software distribution.
56
CHAPTER 2. DESCRIPTION OF THE CURRENT SITUATION
9. The license must not place restrictions on other software that is distributed along
with the licensed software. For example, the license must not insist that all other
programs distributed on the same medium must be open-source software.
10. No provision of the license may be predicated on any individual technology or style of
interface.
2.2.2
GNU and free software
The concept of free software means that the user is free to use, study, modify, copy and
redistribute the program or parts of the program. It does not necessarily mean that the
software did not cost anything to acquire. It can be sold at whatever price the creator
demands, but once purchased, the buyer is free to do with it as he wishes, which is not the
norm for commercial software, most of which is proprietary. The open source definition is a
rewrite of the definition of free software. As a consequence of this, most, but not all, open
source software is also classified as free software.
The GNU project was officially started on September 27, 1983, by Richard Stallman. Its
primary goal was to create a UNIX-compatible operating system which was also free
software. It also includes having a complete program suite for this operating system, which
lies under the GNU GPL[3]. The details of the project manifesto are too verbose to include
here, but the manifesto can be found at the GNU homepage [2].
The GNU General Public License (GPL) is a license meant to ensure that any user of a
GNU program is given the benefit of the guidelines of free software, but is also bound by
the same guidelines. This means that if he makes use of his right to modify and redistribute
the program, the users of his program are also given the benefits of free software. Basically,
the license is meant to ensure that as the free software is improved and redistributed, it
will remain free, thus spreading the benefits of GNU and free software wider and wider as
time passes. The details of the license can be found at the GNU homepage [1].
57
CHAPTER 2. DESCRIPTION OF THE CURRENT SITUATION
2.3
Blender
This section contains background information concerning the program Blender; we give
descriptions of how to work with Blender, a list of program features, and what
modifications may be necessary to make for this project.
2.3.1
History of Blender
Blender is an open source 3D modeling program which is released under the GNU GPL.
The development of Blender startet in 1995, with the Dutch company NeoGeo, where it
had been decided that their 3D modeling tool was insufficient for their needs. In 1998 the
founder of NeoGeo, Ton Roosendaal, founded the company Not a Number (NaN) to
continue the development and marketing of Blender. The intention was to create and
distribute a compact, free, platform independent 3D toolset, thereby giving the general
public access to a professional modeling and animation tool. The business model of NaN
consisted of offering services and peripheral products for Blender. The program was a huge
success, and by the end of 2000 the company had amassed 4.5 million Euro in investments,
had 50 employees, and their product had more than a quarter of a million users.
After this, however, the company’s situation started deteriorating, mostly due to
unrealistic ambitions compared to the reality of the market. In April 2001 NaN was
restarted with new investors and fewer employees. Six months later Blender Publisher,
which targeted the increasing market for interactive web based 3D media was, released as a
commercial product. It sold poorly, causing the investors to back out, and all activity
surrounding NaN and Blender were put on hold.
In March 2002, Roosendaal started the Blender Foundation, with the stated purpose of
continuing the development and marketing of Blender as an open source project. In the
beginning, the foundation’s primary goal was to obtain the rights to Blender, the source
code of which belonged to NaN’s investors. Roosendaal managed to make a deal with the
investors that they could be bought out for 100,000 Euro. Surprisingly, the foundation
managed to collect this amount in a mere seven weeks. On Sunday October 13th, 2002,
Blender was released under the GNU license. The program is still under continued
development, led by Ton Roosendaal, [11].
2.3.2
Code distribution
The code base of Blender consists of about 200 000 lines of C, 100 000 lines of C++, and
about 10 000 lines of Python. External scripts and plugins are written in Python, [11].
2.3.3
Program features
This is a list of the features supported by Blender, [12]:
58
CHAPTER 2. DESCRIPTION OF THE CURRENT SITUATION
•
•
•
•
•
•
•
Blender has support for a number of geometric primitives, such as polygonal
primitives, curves, surfaces, meta balls and vector fonts.
Integrated support for Yet Another Free Raytracer (YafRay), which is an open
source ray tracer.
Support for a series of animation tools, such as inverse kinematics, skeleton
structures, key frames, weighted vertices, collision detection and particle systems.
Support for user created scripts, written in Python.
Game Blender, a sub-project of Blender, which lets the users make their own,
separate applications, which incorporates a scene into a sort of game engine, with
collision detection, programmable logic, and so on. It can be used for purposes such
as games and architectural demonstrations.
Blender uses an internal file system, allowing the user to package several scenes into
a single file using the .blend extension. The system also allows for storing every
resource for an animation (models, materials, sounds, images, and so on) into a single
file. Changes in the user interface (UI) are also stored, making it simple to change
between different UI setups. The .blend files are platform- and version-independent,
which makes it easy to transfer work between different machines.
An autosave feature makes program and system crashes less critical.
2.3.4
User interface
The UI is important for the project, as it has a large impact on the final solution.
The UI is split up into parts, as seen in Figure 2.2, which can again be split up into smaller
parts. The interface can be changed to suit the user’s needs, allowing for different setups
for different tasks, such as having one setup for modeling and another for animation. Most
operations, like zooming, that can be performed on the work viewports can also be applied
to the interface panels.
The UI has two main modes, object mode and edit mode; object mode is used to
manipulate an object’s relation with the environment by scaling, moving and rotating.
Edit mode is used to manipulate the components of a single object to alter its appearance
and characteristics. A view of edit mode can be seen in Figure 2.3.
Blender was made with focus on efficient modeling. Almost all functions have keyboard
shortcuts for fast access. This has led to the program’s reputation for being difficult to
learn, particularly the older versions, where some functions could only be reached with
keyboard commands. After the transition to open source, some effort has been made to
make the interface more user friendly and intuitive, with graphical elements added to make
the interface more intuitive and streamlined.
2.3.5
Using Blender to create a simple model
Here we will describe a possible scenario for using Blender to model a simple chemical
structure. The user wants to make a model of atoms using spheres of different sizes and
59
CHAPTER 2. DESCRIPTION OF THE CURRENT SITUATION
Figure 2.2: A view of a possible UI configuration while in Object mode
colors, and connect these to form a molecule. He wants to create a molecule of H2 O
(water). The model is created in the following way:
1. The user clicks on a location in the viewport where he wants the first hydrogen atom
to be placed.
2. The user uses the mouse to navigate the menus, and chooses to create a sphere.
3. Using a mouse gesture, the user scales the sphere down.
4. Using the materials menu, the user colors the sphere.
5. The user then clones the sphere with a keyboard shortcut, and uses the mouse to
move the clone away from the first sphere.
6. The user creates a third sphere, to represent the oxygen-atom.
7. The user moves the two hydrogen spheres next to the oxygen sphere to represent an
H2 O molecule.
8. The user clicks the button to render the scene. The result is shown in Figure 2.4.
60
CHAPTER 2. DESCRIPTION OF THE CURRENT SITUATION
Figure 2.3: A typical view in Blender while in edit mode
2.3.6
Possible problems with Blender
This section describes possible problems that may appear when connecting the glove and
Blender.
One problem that may appear has to do with the glove’s interaction with the UI. Our goal
is to have the glove fill the function of the mouse, so it is very important that all the
needed functions can be reached with a mouse.
As Blender is an open source project under fairly rapid development, it can be difficult to
find reliable and up-to-date documentation. We also run the risk of making a module, only
to find that a newer version of Blender invalidates our work. This risk is probably not very
high, as the development of Blender focuses on having compatibility with older versions.
The main purpose of the project is to make modeling easier and more intuitive. Having a
glove that mirrors the function of a mouse may not be sufficient to fulfill this goal, as the
menu system in Blender can be fairly complex, even without the keyboard shortcuts.
While it is possible to use the mouse for most, if not all, operations, it is tedious compared
to using keyboard shortcuts. The worst-case scenario, which is very unlikely to become a
reality, is that changes to Blender’s source code may be necessary. This is likely to be
difficult and time-consuming, and will make it difficult to upgrade to a newer version of
Blender at a later date.
Also, support for passive stereoscopic projection using polarized glasses to simulate a
61
CHAPTER 2. DESCRIPTION OF THE CURRENT SITUATION
Figure 2.4: Model of an H2 O molecule
3D-effect is only supported by Game Blender (described in section 2.3.3), and not by the
modeling program. If the customer wants to have support for 3D goggles when modeling as
well as when demonstrating, this could be a problem.
62
CHAPTER 2. DESCRIPTION OF THE CURRENT SITUATION
2.4
Flock of Birds
The Flock of Birds (FoB) is a six degrees-of-freedom measuring device that can be
configured to simultaneously track the position and orientation of multiple sensors by a
transmitter, that will be used to track the gloves movement. Each sensor is capable of
making from 20 to 144 measurements per second of its position and orientation when the
sensor is located within 1.2 meter of its transmitter. The FoB works by transmitting a
pulsed DC magnetic field that is simultaneously measured by all sensors in the Flock. In
our system we will only be using one glove so we do not need more than one sensor. Figure
2.5 shows how FoB will be connected if you are using several sensors (SNSR) and one
transmitter (XMTR) connected to the computer via the serial port (RS232). In Figure 2.6
you can see how we will use FoB, with just one sensor.
Figure 2.5: FoB used with several sensors
63
CHAPTER 2. DESCRIPTION OF THE CURRENT SITUATION
Figure 2.6: FoB used with one sensor
64
CHAPTER 2. DESCRIPTION OF THE CURRENT SITUATION
2.5
Virtual Reality
This section gives a short description of the concept of VR. The purpose of VR is to allow
a user to experience a virtual world as if he was really there. VR is most often used to give
better visualizations of objects, and is often used for medicine or research. Using VR, a
doctor could take a peek inside an enlarged, full 3D representation of someone’s heart.
There are many different tools that can be used to accomplish this, the most usual being
the 3D goggles. These can be goggles where each eye has its own monitor, which show
slightly different images. It can be goggles where shutters block out each eye alternately, or
it can be goggles which use polarized glasses to only allow some of the light through.
Another tool is the VR glove, which allows the user to manipulate the virtual world, by
using sensors to detect what the user is doing with his hand. There are countless
variations, from gloves which only detect position, to gloves which not only have detailed
sensors to detect what the user is doing, but which also give feedback to the user, such as
applying pressure to the fingertips when the glove is touching something in the virtual
world. There are countless different tools for manipulating and experiencing a virtual
world, even complete body suits which can be used to walk around in a virtual world as in
the real world.
65
CHAPTER 2. DESCRIPTION OF THE CURRENT SITUATION
2.6
5DT Data glove 5
This section contains a description of the 5DT Data glove 5. A picture of the glove can be
seen in Figure 2.7. We will describe the possibilities we have with today’s hardware and
possible solutions to problems we may encounter. Our customer wants a glove that
registers when two fingers are clenched, hereafter called a ”‘click”’, instead of today’s
solution, where a click is registered when the user bends the fingers.
Figure 2.7: Picture of the 5DT Data Glove 5
2.6.1
5DT Data glove 5 hardware
5DT Data glove 5 is made by Fifth Dimension Technologies (5DT), and version 5 is the
first that was made. The 5DT Data glove 5 comes bundled with:
•
A 5DT Data Glove 5 with fiber optic sensors, tilt sensor, ribbon cable and
processing unit
•
An interface cable
•
A power supply unit
•
Installation and user manual
•
A set of installation CDs
One connects the equipment as shown in Figure 2.8. In addition to this you will need FoB,
a sensor that tells you where the glove is in space. 5DT Data glove 5 has seven sensors, one
on each finger and two that take care of roll and pitch FoB. The sensors on the 5DT Data
Glove 5 are positioned as shown in Figure 2.9. The glove’s limitation is that it has no
66
CHAPTER 2. DESCRIPTION OF THE CURRENT SITUATION
Figure 2.8: Connections for data glove
Figure 2.9: Sensors on the data glove
sensors for checking if fingers are in contact. The newest version of the glove does not have
this limitation.
2.6.2
5DT Data glove 5 software
Most of the software that comes in the bundle with the gloves is for Windows. As the
customer uses Linux, much of the bundled software is not available for use in the VR lab.
Bundled software:
67
CHAPTER 2. DESCRIPTION OF THE CURRENT SITUATION
•
•
•
•
Glove Manager is a program you can use to check the gloves connection to the
computer, reprogram the glove’s Electrically Erasable Programmable Read Only
Memory (EEPROM). It also enables to calibrate them.
Glove Mouse is a program to make the glove act as a mouse for the computer, here
you can set what gestures that should act as click and much more.
Glove Driver is a driver for both Linux and Windows. This is what we should use
to communicate with the gloves. There is an appendix in the manual for the 5DT
Data glove, with some examples on how to write programs for the gloves.
Glove Demo is a collection of demos for the gloves, just for getting to know the
gloves better.
•
Glove Programming Examples
•
Glove Manual
2.6.3
5DT Data glove 5 extra software
There are some programs already written for the gloves. In Table 2.1 you can see examples
of some programs. These do not come with the gloves so they have to be bought seperatley.
Product Name
Alias | Kaydara MOCAP Driver
3D Studio Max 6.0 Driver
Maya Driver
SoftImage XSI Driver
UNIX SDK
Price
$495
$295
$295
$295
$495
Table 2.1: Available drivers for the 5DT Data Glove 5
As seen from Table 2.1 there are some finished products that can be used if the customer
allows us to use another 3D-modeling program than Blender. We take a closer look at this
alternative solution in chapter 6.
68
CHAPTER 2. DESCRIPTION OF THE CURRENT SITUATION
2.7
Description of last year’s project GLISA
In the course TDT 4290 Customer Driven Project last year, a group was also given a task
from Alsberg in CBG at the Department of Chemistry, NTNU. The group’s project name
was Glove Is In The Air, GLISA for short. A viable solution to our project may be to
continue the work that was done by GLISA, we give a short summary of it in this section.
2.7.1
The existing system
When GLISA started up, the VR lab at the Department of Chemistry had the following
existing system:
•
SciCraft, a software tool for manipulating and representing data.
•
Two 5DT Data Glove 5 gloves
•
FoB, a hardware system for motion and position tracking
•
Hololib, a small library made for basic communication between FoB and a
home-made glove.
At this point the system was mainly based on 2D graphics with keyboard and mouse as
input devices. The 5DT Data Glove 5 gloves were not integrated with the rest of the
system.
2.7.2
The given task for GLISA
The group’s main task was to create low level communication between the gloves and FoB.
Additionally, they were to develop a library in which to connect the 5DT gloves with
SciCraft. The gloves were then supposed to be used for control of VR applications instead
of the less intuitive use of mouse and keyboard. Since the 5DT Data Glove 5 has a built-in
hardware support for gestures, the goal was to base the system on the use of hand gestures.
A gesture is a physical movement that the user’s do with his hands, for instance making a
circle. A posture is one specific hand position. See Figure 2.10.
The 5DT gloves and FoB capture the gestures and postures that the users perform. In
GLISA, the posture in Figure 2.10 means that the user wants to grab an element.
2.7.3
The results from GLISA
The project was successful in the sense that they got the 5DT gloves to interact with the
existing system. Still the result was not satisfactory because the system did not work well
enough. There were three main problems:
•
The FoB-sensors were located on the wrist. This was not a very good idea, since the
sensors would not be able to track the position of the fingertips.
69
CHAPTER 2. DESCRIPTION OF THE CURRENT SITUATION
Figure 2.10: The grab posture
•
•
The system had a low rate of recognition on the gestures. This is because gestures
are motions that differ between individual users.
The right hand glove was partly defect.
2.7.4
GLISA versus Glove3D
GLISA made the 5DT gloves work with the use of gestures. Today, Alsberg wants to make
the use of the gloves better and more intuitive by removing the use of gestures and instead
make it possible to grab and move the objects as in real life. Then the system will not have
to recognize gestures and postures, which was a problem with GLISA. In addition, the
customer wants the system to be integrated with the 3D-modeling tool Blender.
70
CHAPTER 2. DESCRIPTION OF THE CURRENT SITUATION
2.8
Hololib
This section describes Hololib, a system made for the VR-lab, that has many of the
characteristics we want to have in Glove3D.
2.8.1
Introduction
The Hololib was made by Jahn Otto Andersen. The main reason was that the 5DT Data
glove did not recognize when the user performed a click, meaning that it was very difficult
for the user to know when he had performed a gesture. In his mini project he made a very
provisional glove with a simple way to record clicks trough the parallel port. In his code he
also added support for FoB, so it was a fully functional data glove.
2.8.2
The glove
The glove that Andersen made consisted of a work-glove, tape, tinfoil, a network cable, two
resistors and a 25pin D-sub. Some may call this simple, but it worked, and was more
intuitive to use than the $350 5DT Data glove. A sketch of the glove can be seen in Figure
2.11.
Figure 2.11: Concept drawing of the Hololib glove
2.8.3
The software
As mentioned earlier the software that was written for this home made glove includes
support for FoB. Andersen also made a program to interface the Hololib program, namely
Holomol. Holomol is no more than a very simple demo application to show that the glove
71
CHAPTER 2. DESCRIPTION OF THE CURRENT SITUATION
really works. It will be helpful for us to look at the code for Holomol, if we deside to
implement similar functionality in Blender.
72
Chapter 3
Description of the requested solution
This chapter contains a short description of the problem and an overview of the planned
product. The customer’s planned use of the product is also described here.
3.1
The traditional approach
As described in Section 2.3, the traditional way of creating 3D models and environments is
to use a modeling program that supports split screen views, showing the 3D-objects in
different views, traditionally top-down, left-right, front-back and a perspective view. Using
the mouse-cursor, different programming-tools and keyboard-shortcuts, one can manipulate
these objects in the top, left and front views, using the perspective mainly for reference to
how the final object will look. This solution, while time-honoured, has several
disadvantages. Mainly, this way of manipulating objects is unintuitive and therefore
requires a considerable amount of getting used to before one is able to produce even the
most crude shapes other than geometric primitives, like cubes, spheres, cylinders, etc.,
which are normally built into such programs. A screenshot of 3D Studio Max, a
well-known modeling program, can be seen in Figure 3.1.
3.2
The suggested approach
This project aims to develop the prototype of a solution for making 3D modeling more
intuitive. We propose to enable the user to more intuitively grab, move and modify objects
using mainly the perspective view in the modeling program for displaying the environment.
We also want to use stereoscopic projection to give the user a feeling of depth while
modeling. Figure 3.2 shows how the system is envisioned.
73
CHAPTER 3. DESCRIPTION OF THE REQUESTED SOLUTION
Figure 3.1: Example of the traditional way of modeling 3D environments, taken from the
program 3D Studio MAX
Figure 3.2: Concept drawing showing the user in front of a canvas, using the glove on his
hand to move the glove on-screen and using it to modify the 3D-model
74
Chapter 4
Customer demands
In this section we describe what is required of the new system, and which problems it
needs to solve.
4.1
Priority values
Each demand is given a value according to how important it is for the customer that it is
satisfied. These values are also used for the evaluation criteria in the next section. We have
used number values to make it easy to see the differences to the final solutions. The values
are described in Table 4.1
Value
50
3
2
1
Description
Absolute. This demand must be satisfied. If not, the
solution is unacceptable.
This demand is important to fulfill the primary goal of
the project. A good solution should ideally satisfy all
demands with high priority.
This demand is not directly connected with the primary
goal of the project, but is fairly important for the overall
user experience. A good solution should not have many
of these unsatisfied.
It would be nice if this demand was satisfied, but it is
not particularly important.
Table 4.1: The priority values and their meanings
4.2
General demands
General demands describe the other demands specified by the customer. The demands are
summed up in Table 4.2. The priorities listed use the scale explained in section 4.1
75
CHAPTER 4. CUSTOMER DEMANDS
•
•
•
•
•
•
•
•
OD1: The main goal of this project is to have a system that allows for a new way to
model 3D environments. Instead of using a mouse and a keyboard to model, which
the customer feels is unintuitive and needlessly complicated, the customer wants a
solution which allows the user to model using his hands. The idea is that the user
should be able to use his hands to move, rotate or scale objects or parts of objects,
and move, rotate or zoom the view in a scene. When the user moves his hand in
space, this should also be reflected in the software, so that the user can manipulate
the objects in 3D rather than 2D.
OD2: The solution should be intuitive to use. With the previous project, GLISA, in
addition to the motions of the hand, several different gestures were implemented to
incorporate different functions into the system. This did not work out well, as it was
very difficult to remember the gestures and what their meanings were. A user should
be able to, as far as possible, take one look at the interface and the tools he has to
work with, and know what he needs to do in order to achieve his goal. For instance,
if the user wants to move an object to a different location, this should be
accomplished in a way as close as possible to how the user would move an object in
the real world; reach for the object, grab the object, move the hand to the desired
location, and finally release the object.
OD3: Usage should be simple. The meaning of this is that manipulating the
environment should not require unnecessarily complex input from the user. Using the
example of moving an object, unnecessary input could be having to put the hand in
move mode before moving it, grab mode before grabbing an object, and release mode
to release and object. This would introduce extra steps to the operation which are
not necessary, thus creating an unneeded obfuscation of the usage. A solution should
avoid this wherever possible.
OD4: There should be a high degree of precision for the position of the marker in
Blender. With GLISA, precision was a problem, as the sensor for the gloves was
positioned at the wrist. This meant that when someone tried to grab an object by
pinching it, they were actually grabbing at the space where their wrist was positioned.
This inaccuracy needs to be fixed. The program should detect manipulations where
the manipulations appear to be taking effect. Summarized in demand OD4.
OD5: Another thing the customer wants to be improved from GLISA is that it was
hard for the user to know when he has performed an operation with the fingers of the
glove. The solution should therefore give clear feedback to the user when he has
grabbed an object with his fingers.
OD6: The customer wants to use passive 3D goggles to achieve a 3D-effect when
working with the system. This is primarily to be used for demonstrations and
teaching, and not necessarily for modeling.
OD7: As this project is done as a school course, it will probably be impractical or
even impossible for the customer to get support from the project members after the
project’s conclusion. Therefore, the solution should be as stable and durable as
possible, and if problems should occur, they should be fairly simple for the customer
to fix.
OD8: It should be possible to implement the solution within the time frame allotted
to this project.
76
CHAPTER 4. CUSTOMER DEMANDS
ID
OD1
OD2
OD3
OD4
OD5
OD6
OD7
OD8
Description
The solution should allow the user to model 3D environments, using one hand held up in the air, rather than
the traditional mouse and keyboard approach.
The solution should be intuitive to use, meaning that to
move an object one do what one would do in normal life
(reach out, grab/pinch, move, and let go). The solution
should not require extensive training to use.
Usage needs to be simple. Manipulating an object
should not require use of complex menu structures.
Precision should be high. The selection marker should
be at the location it appears to be at, so the user can be
confident that if he appears to be grabbing an object,
he is.
The solution should give clear feedback as to when the
user has grabbed an object.
The solution should incorporate support for use of passive 3D goggles for demonstrations and tutoring.
Solution should not require extensive support, durability
should be high, and it should be fairly simple for the
customer to fix problems that may appear.
Solution should not require unreasonable amount of
work to implement.
Priority
3
2
2
3
2
2
2
2
Table 4.2: General demands
4.3
Absolute demands
Absolute demands describe those of the customer demands that must be satisfied by any
solution chosen. Any alternative that fails to satisfy one or more of these is unacceptable.
Table 4.3 holds a list of these demands.
AD1: For a solution to be acceptable, all its code must be open source, so anyone
will be able to alter and improve the code as they wish. The customer has to be able
to make changes to the software, without having to call in the members of the
project team to do this.
• AD2: The computer at the VR lab runs Linux. Linux is also the operating system
used for development and general usage by the CBG. As such, the solution needs to
be fully compatible with Linux.
• AD3: The project has no monetary budget, although some money may be allotted
to pay for smaller expenses such as the purchase of electrical components. However,
the project solution cannot lead to expenses exceeding 4000 NOK.
• AD4: Replacing the existing system in the VR lab would be far too costly for this
project. Therefore, the solution chosen must be compatible with the current VR
hardware present in the lab.
•
77
CHAPTER 4. CUSTOMER DEMANDS
ID
AD1
AD2
AD3
AD4
Description
The solution must be open source.
The solution must run on Linux.
The solution cannot lead to large expenses. An upper
limit at around 4000 NOK.
The solution must work with the existing equipment in
the VR lab.
Priority
50
50
50
50
Table 4.3: Absolute demands which have to be satisfied for a solution to be acceptable
78
Chapter 5
Evaluation criteria
We will evaluate each alternative based on how well they conform to the criteria listed in
Table 5. The table lists a unique ID for the criteria, ID reference for the demands
connected to the criteria, a brief description, and how it is evaluated.
•
•
•
•
•
•
EC1: It is vital for any evaluated solution that it satisfies the four absolute
demands. A solution that does not satisfy these demands is unacceptable.
EC2: An evaluation should take into account how well a given solution fulfills the
primary goal of the project, which is to allow a user to model with Blender using his
hands rather than a mouse and keyboard.
EC3: User friendliness should be an important part of the evaluation, as another
important goal of the project is to make modeling easier and more intuitive.
EC4: As mentioned in the demands section, it is unlikely that any of the project
members will be available to perform maintenance on the solution after the project’s
conclusion. The maintenance demands of a solution should therefore be taken into
account.
EC5: Whether or not the demand to support passive 3D goggles is satisfied should
be taken into account.
EC6: The expected time needed to implement the solution needs to be taken into
account. It is not possible to exceed the deadline for the project. If the project is not
finished on time, it will not be finished at all.
Each alternative will have a table detailing how well each criteria is satisfied, and will get a
final evaluation based on the values the alternatives get on this scale combined with the
priority of the evaluation criteria.
79
CHAPTER 5. EVALUATION CRITERIA
EvID
EC1
EC2
EC3
EC4
EC5
EC6
ReqID Description
AD1 The solution must satisfy the four absolute
AD2 demands.
AD3
AD4
OD1 The solution should allow the user to model
with his hands.
OD2 The solution should be user friendly.
OD3
OD4
OD5
OD7 The solution should be easy to maintain.
OD6 The solution should support passive 3D goggles.
OD8 Solution should not require unreasonable
amount of work to implement.
Table 5.1: Evaluation criteria
80
Priority
50
3
3
2
2
3
Chapter 6
Alternative solutions
This section describes possible solutions to the problem, some of which go beyond what the
customer has envisioned, and consequences of choosing these alternatives. We divide the
alternatives in three categories, and give three alternatives for each category:
•
•
•
Input devices
These are possible alternatives for the user’s physical input device.
Modeling software
These are possible choices for modeling software.
Middleware
The middleware alternatives describes the ways in which we can make an interface
between the input devices and the modeling software.
6.1
Input Device
This section describes the different input devices we are considering.
6.1.1
Data Glove 5DT 5
These are the gloves that are currently used in the customer’s VR-lab. They use a FoB
sensor to pinpoint position and direction of the gloves in space, and fiber-optic sensors to
measure the curvature in the fingers, thereby enabling the recognition of postures and
gestures. See section 2.6 for more details. These gloves provide a natural way for a person
to manipulate objects using their hands. As these gloves have already been purchased,
using them will cause no extra expenses other than the cost of a possible purchase of
middleware for 3D Studio Max ($295) or Maya ($295).
81
CHAPTER 6. ALTERNATIVE SOLUTIONS
6.1.2
Custom glove
Another option is to make a new glove, similar to the one made for Hololib (see section
2.8). This approach has the advantage of giving a better tactile feedback for the user, as
well as better precision compared to the 5DT gloves. The idea is to fit a regular glove with
contact-points in the fingertips, then use these for clicking, while, as with the 5DT gloves,
using FoB for keeping track of the position and direction of the glove. As we will be using
the same approach as Hololib, we can reuse the code from that project. This solution has a
low cost, as the drivers have already been made, and the materials for the glove are cheap.
Estimated cost is around 300 NOK.
6.1.3
SpaceBall 5000
This input device, made by 3Dconnection, a company owned by Logitech, is one in a series
of devices made by this company for modeling in 3D-environments. It supports rotation,
camera controls and programmable buttons, and comes with drivers for over 100 of the
most used 3D modeling software packages, including Maya and 3D Studio Max, but not
Blender. Though it does not give the user a intuitive interface, like both gloves mentioned
above, it does significantly increase productivity and ease of use in modeling software. The
device comes with drivers for Windows, Linux and Mac operating systems. The SpaceBall
5000 costs about $200, and is displayed in Figure 6.1, [5].
Figure 6.1: The SpaceBall 5000 input device
6.2
Modeling software
This section describes the different modeling programs we are considering.
82
CHAPTER 6. ALTERNATIVE SOLUTIONS
6.2.1
Blender
Blender is an open source modeling program distributed under the GNU GPL license, for
Mac, Windows and Linux. There is no existing middleware for use with any of the listed
input devices, but as the program is open source, the solution is highly modifiable. Blender
is also free of cost. As this is the program the customer wants to use, it is described in
detail in section 2.3.
6.2.2
3D Studio Max
3D Studio Max, made by Discreet, is a professional modeling program for Windows only,
so using this program will mean that the operating system in the VR lab will need to be
changed. There is existing middleware for the 5DT Data Glove and the Spaceball 5000,
which will reduce the amount of work needed for the project, though the solution will be
harder to modify, as neither 3D Studio Max nor the middleware is open source. A 3D
Studio Max license costs $3,499.
6.2.3
Maya
Maya, made by Alias Wavefront, is a professional modeling program that is available for
Mac, Windows and Linux. There exists middleware for the 5DT Data Glove and the
Spaceball 5000. This will reduce the amount of work required, though it will make the
solution harder to modify. There are several different versions of the Maya license, costing
between $2,199 and $7,599.
6.3
Middleware
This section describes the different middleware libraries we are considering.
6.3.1
GLISA
GLISA is the system that was created last year to interface with the 5DT Data Glove 5. It
has no interface with Blender, but was meant to be a general tool to manipulate 3D
environments. GLISA is described in detail in section 2.7. This solution will take some
person-hours, but is free of charge.
6.3.2
Hololib
Hololib is the code library that was created together with the Hololib glove. The suite is
made for Linux, and has been tested with the hardware system in the VR lab. Hololib
incorporates support for a simple glove connected to the parallel port, and also supports
83
CHAPTER 6. ALTERNATIVE SOLUTIONS
FoB. Hololib is described in more detail in section 2.8. This solution is also free of charge,
but will take less time to alter than GLISA.
6.3.3
Custom made
An alternative to working on existing middleware, is creating our own from scratch. This
would mean writing our own code for communicating with the input device, and then
interfacing them with Blender. A solution like this will take many person-hours, but is as
the others free of charge.
84
Chapter 7
Evaluation of alternatives
In this section, we take a look at the alternatives, giving them an evaluation based on the
criteria given in the previous section.
7.1
Evaluation values
We use the values 0, 1 and 2 for each of the criteria:
•
•
•
0: This alternative does not, probably not, or only to a very limited extent fulfill the
given criterion.
1: This alternative will probably, or to some extent fulfill the given criterion.
2: This alternative satisfies the criterion with a high level of certainty, or to a very
high extent.
7.2
Input device evaluation
This section describes the evaluation of different input devices we have considered.
7.2.1
•
•
•
5DT Data Glove 5
EC1: These were used in last year’s project - GLISA, and so satisfy all of the
absolute requirements.
EC2: They also satisfy EC2, as using your hands is what they are made for.
EC3: Regarding user friendliness, the 5DT gloves is considered to fulfill the given
demands well, since there is no extensive conflict between the demands and the
gloves. OD5 is the only one of the demands under EC3 that is not satisfied by the
5DT datagloves.
85
CHAPTER 7. EVALUATION OF ALTERNATIVES
•
•
•
EC4: With EC4 - the need for ease of maintenance, there are some concerns about
this solution. The fact that the gloves are no longer in production might make it
harder to get support for them. Also, any breakage in the fiber optics in the fingers of
the gloves might turn out harder to fix than, say, if the solution used regular copper
wiring, and it might also be hard to get spare parts. On the other hand, since this is
an off the shelf product, the durability of the gloves can be expected to be quite high.
EC5: There is no link between the use of the gloves and 3D goggles, but they do
not conflict with this demand.
EC6: There already exist middleware for these gloves, and though this would
require some work, it would not be too much to handle.
The evaluation of the 5DT Data Glove 5 is summarized in Table 7.1.
86
CHAPTER 7. EVALUATION OF ALTERNATIVES
ECID
EC1
EC2
EC3
EC4
EC5
EC6
ECDescription
The solution must satisfy
the four absolute demands.
The solution should allow
the user to model with his
hands.
The solution should be user
friendly.
The solution should be easy
to maintain.
The solution should support
passive 3D goggles.
Solution should not require unreasonable amount
of work to implement.
Fulfillment
Fulfills all of the absolute
demands.
The glove satisfies this criterion.
Evaluation
2
No clicking feedback, but
otherwise fine.
Very difficult to fix problems.
No conflicts
1
Not much work required
2
2
1
2
Table 7.1: 5DT Data Glove 5 evaluation
7.2.2
Custom glove
•
EC1: The custom gloves will satisfy all the absolute requirements.
•
EC2: EC2 is naturally satisfied too.
•
•
•
•
EC3: OD2 to OD4 is satisfied in much the same way as for the 5DT gloves, but in
addition, this solution also satisfies OD5.
EC4: Since this solution only uses basic electronic components other than FoB, it
will be easy for the customer to fix basic hardware malfunctions.
EC5: This solution does not conflict with the use of 3D goggles, though it does
nothing to support it.
EC6: The solution requires only a minimum amount of time to implement
(hardware-wise) and so can be said to fulfill EC6.
The evaluation of the custom glove is summarized in Table 7.2.
87
CHAPTER 7. EVALUATION OF ALTERNATIVES
ECID
EC1
EC2
EC3
EC4
EC5
EC6
ECDescription
The solution must satisfy
the four absolute demands.
The solution should allow
the user to model with his
hands.
The solution should be user
friendly.
The solution should be easy
to maintain.
The solution should support
passive 3D goggles.
Solution should not require unreasonable amount
of work to implement.
Fulfillment
Satisfies all of the absolute
requirements
This is the object of the
glove
Evaluation
2
Very user friendly.
2
Easy to maintain.
2
No conflicts.
2
Should not be a problem.
2
2
Table 7.2: Custom glove evaluation
7.2.3
•
•
•
•
•
•
Spaceball 5000
EC1: Using the Spaceball 5000 will satisfy all of the absolute requirements, but
there is an expense of about $200 that is close to the limit, making this alternative
close to breaking AD3. Also, the drivers and middleware that exists are not open
source, this is conflicting with AD1, but they do supply an SDK, so one can make
one’s own.
EC2: As this device is closer to a mouse than to a set of gloves. It will not enable
the user to use his hands for modeling like in real life.
EC3: Since this is a product made by a major company (Logitech), it can be
expected to be intuitive, simple, and have good precision. Also, since it comes with
buttons, the tactile feedback of clicking is not a problem.
EC4: As a commercial product by a large company, support and durability are both
good. The customer cannot expect to be able to fix hardware problems with this
product by himself, but can instead rely on the warranty.
EC5: Again, this product does not directly support the use of 3D vision, but
neither does it conflict with this demand.
EC6: Since this is a finished product, no time will be spent making it, though it
may take some time to create the middleware.
The evaluation of the Spaceball 5000 is summarized in Table 7.3.
7.3
Modeling program evaluation
This section describes the evaluation of different modeling programs we have considered.
88
CHAPTER 7. EVALUATION OF ALTERNATIVES
ECID
EC1
ECDescription
The solution must satisfy
the four absolute demands.
EC2
The solution should allow
the user to model with his
hands.
The solution should be user
friendly.
The solution should be easy
to maintain.
The solution should support
passive 3D goggles.
Solution should not require unreasonable amount
of work to implement.
EC3
EC4
EC5
EC6
Fulfillment
Middleware
not
open
source,
but alternative
could be created. Also close
to breaking budget.
Functionality closer to ordinary mouse.
Evaluation
1
Not intuitive.
2
Fulfilled by the warranty.
2
No conflicts.
2
Requires no extra work.
2
0
Table 7.3: Spaceball 5000 evaluation
7.3.1
•
•
•
•
•
•
Blender
EC1: Using Blender will satisfy all of the absolute requirements - it is open source,
free of charge, runs on LINUX, and can be run on the VR-lab.
EC2: As Blender is open source and support scripting, we can make plugins for
using input devices that enable us to work with our hands.
EC3: As most other 3D modeling programs, Blender too is full of complex menu
structures and strange ways of modifying objects. OD4 and OD5 does not conflict
with this alternative.
EC4: Since Blender is open source, editing the code can be done by anyone, so the
customer can fix possible problems himself. As Blender also has a large community of
coders on the web, the customer can ask them too, should problems emerge and the
project group be unavailable.
EC5: Blender supports stereoscopic view, but only with active goggles, and not
while modeling. Enabling this would call for a complete coding of this option by the
group.
EC6: This solution should be implementable within the timeframe.
The evaluation of Blender is summarized in Table 7.4.
7.3.2
•
3D Studio Max
EC1: 3D Studio Max does not satisfy EC1. It will only run in Windows, is not open
source, and is very expensive. Therefore, using it is an unacceptable solution.
89
CHAPTER 7. EVALUATION OF ALTERNATIVES
ECID
EC1
EC2
EC3
EC4
ECDescription
The solution must satisfy
the four absolute demands.
The solution should allow
the user to model with his
hands.
The solution should be user
friendly.
The solution should be easy
to maintain.
EC5
The solution should support
passive 3D goggles.
EC6
Solution should not require unreasonable amount
of work to implement.
Fulfillment
Satisfies all demands.
Evaluation
2
Possible to implement.
2
Complex menus. Not very
intuitive.
No conflicts, as long as
Blender’s source is not altered.
Unknown. May not support
passive glasses at all, and no
support while modeling.
Need to implement interface
between Blender and input
device.
1
2
0
2
Table 7.4: Blender evaluation
•
•
•
•
•
EC2: There are existing middleware applications for use with the 5DT Data Glove
5 and the spaceball 5000, so the program allows for modeling with one’s hands.
EC3: The program is not particularly user friendly. Usage is not intuitive, and it
has pretty complex menu structures, albeit not as complex as those of Blender. Some
of these problems might be alleviated by our implementation of the glove. No
conflicts with precision and clicking feedback.
EC4: While the solution would not be possible to maintain by the user himself,
Discreet offers extensive support for the product. Maintainability is therefore unlikely
to present a problem.
EC5: We were unable to find any information about support for passive
stereoscopic view goggles.
EC6: The solution would not require large amounts of work to implement, as there
is existing middleware for different input devices.
The evaluation of 3D Studio Max is summarized in Table 7.5.
7.3.3
•
•
Maya
EC1: Using Maya would introduce large expenses to the project, and it is not open
source.
EC2: There are existing middleware applications for the 5DT Data Glove and the
Spaceball 5000, so the program allows for using other input methods than mouse and
keyboard.
90
CHAPTER 7. EVALUATION OF ALTERNATIVES
ECID
EC1
EC2
EC3
ECDescription
The solution must satisfy
the four absolute demands.
The solution should allow
the user to model with his
hands.
The solution should be user
friendly.
The solution should be easy
to maintain.
The solution should support
passive 3D goggles.
Solution should not require unreasonable amount
of work to implement.
EC4
EC5
EC6
Fulfillment
No Linux support. Very expensive. Not open source.
Already has support for several types of devices that
support this mode of operation.
Not intuitive or simple.
Evaluation
0
Discreet offers user support.
2
Unknown. Probably not.
0
Existing middleware for
5DT glove and Spaceball.
2
2
1
Table 7.5: 3D Studio Max evaluation
•
•
•
•
EC3: Maya, as most other 3D modeling software, is not very user friendly. The
interface is complex and unintuitive, though marginally better than Blender’s. It is
difficult to say how much this will affect the final implementation. Good precision
and clicking feedback.
EC4: As with 3D Studio Max, it is easy to get support for problems that occur with
the program.
EC5: Maya has no native support for stereoscopic projection.
EC6: As there exists middleware for use with different input devices, and no work
can be done on the program itself, the solution using Maya would not require a large
amount of work to implement.
The evaluation of Maya is summarized in Table 7.6.
7.4
Middleware evaluation
This section describes the evaluation of different middleware libraries we have considered.
7.4.1
•
•
•
GLISA
EC1: GLISA fulfills all the absolute demands. It is open source, made for Linux,
runs on the existing system, and introduces no extra costs.
EC2: GLISA would allow the user to model using his hands.
EC3: GLISA is not very user friendly. Since the position sensor is placed on the
wrist, the precision is low. The GLISA group made use of complex finger postures
91
CHAPTER 7. EVALUATION OF ALTERNATIVES
ECID
EC1
EC2
EC3
EC4
EC5
EC6
ECDescription
The solution must satisfy
the four absolute demands.
The solution should allow
the user to model with his
hands.
The solution should be user
friendly.
The solution should be easy
to maintain.
The solution should support
passive 3D goggles.
Solution should not require unreasonable amount
of work to implement.
Fulfillment
Very expensive. Not open
source.
Has drivers for several such
input devices.
Evaluation
0
Not intuitive or simple.
1
User support offered.
2
No native support.
0
Existing middleware for
5DT glove and Spaceball.
2
2
Table 7.6: Maya evaluation
and gestures that are difficult to remember, and it is difficult to know when one has
performed a clicking action.
•
•
•
EC4: Maintenance of GLISA is not a big problem, though one would have to
familiarize oneself with the system.
EC5: GLISA has support for passive stereoscopic view goggles.
EC6: As GLISA is already finished, we only need to familiarize ourselves with the
system and make a connection to Blender.
The evaluation of GLISA is summarized in Table 7.7.
ECID
EC1
EC2
EC3
EC4
EC5
EC6
ECDescription
The solution must satisfy
the four absolute demands.
The solution should allow
the user to model with his
hands.
The solution should be user
friendly.
The solution should be easy
to maintain.
The solution should support
passive 3D goggles.
Solution should not require unreasonable amount
of work to implement.
Fulfillment
Fully satisfied.
Evaluation
2
Supported.
2
Low precision. Complex.
No clicking feedback.
Familiarization with the
system required.
Supported.
0
Some time needed to familiarize ourselves with the system, but should be fine.
2
Table 7.7: GLISA evaluation
92
2
2
CHAPTER 7. EVALUATION OF ALTERNATIVES
7.4.2
•
•
•
Hololib
EC1: Hololib runs on Linux, does not introduce large costs, is open source, and
runs on the existing system.
EC2: Hololib will allow the user to model with his hands.
EC3: Hololib is precise, as it is meant to have the position sensor on the finger. It
detects contact between the fingers, so the user knows when a click is performed, and
it does not use complex controls.
•
EC4: Hololib is easy to maintain, as the code was made to be simple.
•
EC5: Hololib supports the use of passive stereoscopic view goggles.
•
EC6: As Hololib is completed, it does not require large amounts of work to
implement other than a small amount of modification for our use.
The evaluation of Hololib is summarized in Table 7.8.
93
CHAPTER 7. EVALUATION OF ALTERNATIVES
ECID
EC1
EC2
EC3
EC4
EC5
EC6
ECDescription
The solution must satisfy
the four absolute demands.
The solution should allow
the user to model with his
hands.
The solution should be user
friendly.
The solution should be easy
to maintain.
The solution should support
passive 3D goggles.
Solution should not require unreasonable amount
of work to implement.
Fulfillment
Fully satisfies all the demands.
Supports this functionality.
Evaluation
2
Precise and intuitive.
2
Simple and small amount of
code.
Supported.
2
Only requires small modifications.
2
2
2
Table 7.8: Hololib evaluation
7.4.3
•
•
•
•
•
•
Custom made
EC1: Our own solution would be implemented to satisfy all of the absolute
demands.
EC2: A custom made solution would allow the user to model with his hands.
EC3: It would be difficult to make a solution that is simple to use from scratch,
with the time we have available. It would likely require some quick solutions that
could make the application complicated to use.
EC4: A custom made solution would be made to be easy to maintain for the
customer.
EC5: A custom made solution would be made to have support for passive
steroscopic view goggles, though this might add a lot of time for the implementation.
EC6: As we would have to build the middleware solution from scratch, it might be
difficult to finish in time.
The evaluation of custom made middleware is summarized in Table 7.9.
94
CHAPTER 7. EVALUATION OF ALTERNATIVES
ECID
EC1
EC2
EC3
EC4
EC5
EC6
ECDescription
The solution must satisfy
the four absolute demands.
The solution should allow
the user to model with his
hands.
The solution should be user
friendly.
The solution should be easy
to maintain.
The solution should support
passive 3D goggles.
Solution should not require unreasonable amount
of work to implement.
Fulfillment
Satisfied.
Evaluation
2
Satisfied.
2
Difficult to make in time.
1
Satisfied.
2
Implementable, but might
take some time.
Need more time to implement from scratch.
2
Table 7.9: Custom made evaluation
95
1
Chapter 8
Chosen solution
The chosen solution is to make custom gloves for a user interface, hololib as middleware
and Blender as the 3D modeling software. This solution has been chosen for several
reasons. It is cheap to implement, it is open source and it works on the current system set
up in the VR-lab of the chemometrics group. One could argue that there are easier
solutions, like using the 5DT gloves with 3D Studio MAX on a Windows system, but these
alternatives are mostly too expensive and/or conflict with the other absolute demands
defined by the customer. We have also chosen custom-made gloves instead of using the
5DT gloves, to get a less complicated system with better tactile feedback. The main
disadvantages with the chosen solution is the absence of support for stereoscopic projection
using passive 3D goggles in Blender, and the fact that it requires quite a lot of work by the
group. We do, however, feel confident that the solution will be possible to implement in
time for the deadline. A total evaluation of all the alternatives can be found in Table 8.1.
96
CHAPTER 8. CHOSEN SOLUTION
Evaluated
EC1
EC2
EC3
EC4
EC5
EC6
Total
5DT Glove
100
6
3
2
4
6
121
Input device
Custom made
100
6
6
4
4
6
126
Spaceball
50
0
6
4
4
6
70
Modeling software
Blender 3D Studio Max
100
0
6
6
3
3
4
4
0
0
6
6
119
19
Maya
0
6
3
4
0
6
19
GLISA
100
6
0
4
4
6
120
Table 8.1: Summary of evaluations, best alternative in each category bold in total-row.
Middleware
Hololib Custom made
100
100
6
6
6
3
4
4
4
4
6
3
126
120
97
CHAPTER 8. CHOSEN SOLUTION
98
Part III
Requirements Specification
99
100
CONTENTS
Contents
1
2
Introduction
1.1
Purpose . . . . . . . . . . . . . . . . . . . . . . . . . . . . . . . . . . . . . . 107
1.2
Scope . . . . . . . . . . . . . . . . . . . . . . . . . . . . . . . . . . . . . . . 107
1.3
Overview
. . . . . . . . . . . . . . . . . . . . . . . . . . . . . . . . . . . . . 107
Overall description
2.1
3
107
109
Product perspective . . . . . . . . . . . . . . . . . . . . . . . . . . . . . . . . 109
2.1.1
Product architecture . . . . . . . . . . . . . . . . . . . . . . . . . . . 110
2.1.2
User interfaces . . . . . . . . . . . . . . . . . . . . . . . . . . . . . . 110
2.1.3
Hardware interfaces . . . . . . . . . . . . . . . . . . . . . . . . . . . . 111
2.1.4
Software interfaces . . . . . . . . . . . . . . . . . . . . . . . . . . . . 112
2.1.5
Communication interfaces . . . . . . . . . . . . . . . . . . . . . . . . 113
2.1.6
Memory constraints . . . . . . . . . . . . . . . . . . . . . . . . . . . . 113
2.2
Product functionality . . . . . . . . . . . . . . . . . . . . . . . . . . . . . . . 113
2.3
User characteristic . . . . . . . . . . . . . . . . . . . . . . . . . . . . . . . . 113
2.4
Assumptions and dependencies . . . . . . . . . . . . . . . . . . . . . . . . . 113
Specific requirements
115
3.1
Functional requirements . . . . . . . . . . . . . . . . . . . . . . . . . . . . . 115
3.2
Non-functional requirements . . . . . . . . . . . . . . . . . . . . . . . . . . . 116
3.3
3.2.1
Design constraints . . . . . . . . . . . . . . . . . . . . . . . . . . . . 116
3.2.2
Usability . . . . . . . . . . . . . . . . . . . . . . . . . . . . . . . . . . 117
3.2.3
Performance . . . . . . . . . . . . . . . . . . . . . . . . . . . . . . . . 118
3.2.4
Maintainability . . . . . . . . . . . . . . . . . . . . . . . . . . . . . . 118
3.2.5
Documentation . . . . . . . . . . . . . . . . . . . . . . . . . . . . . . 118
Use case diagrams . . . . . . . . . . . . . . . . . . . . . . . . . . . . . . . . . 119
3.3.1
Graphical use case . . . . . . . . . . . . . . . . . . . . . . . . . . . . 119
3.3.2
Textual use case diagrams . . . . . . . . . . . . . . . . . . . . . . . . 120
101
CONTENTS
4
Effort estimation
124
4.1
The Use Case Points Method . . . . . . . . . . . . . . . . . . . . . . . . . . 124
4.2
Estimated person-hours needed . . . . . . . . . . . . . . . . . . . . . . . . . 124
A Explanation of use cases
125
B Use case estimation
126
102
FIGURES
Figures
2.1
The project boundary . . . . . . . . . . . . . . . . . . . . . . . . . . . . . . 109
2.2
Overall system architecture . . . . . . . . . . . . . . . . . . . . . . . . . . . 110
2.3
Roll, Pitch and Yaw . . . . . . . . . . . . . . . . . . . . . . . . . . . . . . . 111
2.4
VR-laboratory layout . . . . . . . . . . . . . . . . . . . . . . . . . . . . . . . 112
3.1
Overall graphical use case diagram . . . . . . . . . . . . . . . . . . . . . . . 120
B.1 Use case estimation for Glove3D. . . . . . . . . . . . . . . . . . . . . . . . . 127
103
FIGURES
104
TABLES
Tables
2.1
VR-laboratory specific hardware . . . . . . . . . . . . . . . . . . . . . . . . . 111
2.2
Software products . . . . . . . . . . . . . . . . . . . . . . . . . . . . . . . . . 112
3.1
Functional requirements . . . . . . . . . . . . . . . . . . . . . . . . . . . . . 116
3.2
Software requirements . . . . . . . . . . . . . . . . . . . . . . . . . . . . . . 117
3.3
Hardware requirements . . . . . . . . . . . . . . . . . . . . . . . . . . . . . . 117
3.4
Implementation requirements . . . . . . . . . . . . . . . . . . . . . . . . . . 117
3.5
Usability requirements . . . . . . . . . . . . . . . . . . . . . . . . . . . . . . 117
3.6
Performance requirements . . . . . . . . . . . . . . . . . . . . . . . . . . . . 118
3.7
Maintainability requirements . . . . . . . . . . . . . . . . . . . . . . . . . . . 118
3.8
User documentation requirements . . . . . . . . . . . . . . . . . . . . . . . . 119
3.9
Installation documentation requirements . . . . . . . . . . . . . . . . . . . . 119
3.10 Code documentation requirements . . . . . . . . . . . . . . . . . . . . . . . . 119
3.11 Select item . . . . . . . . . . . . . . . . . . . . . . . . . . . . . . . . . . . . . 120
3.12 Deselect item . . . . . . . . . . . . . . . . . . . . . . . . . . . . . . . . . . . 121
3.13 Create object . . . . . . . . . . . . . . . . . . . . . . . . . . . . . . . . . . . 121
3.14 Add vertex
. . . . . . . . . . . . . . . . . . . . . . . . . . . . . . . . . . . . 121
3.15 Delete item . . . . . . . . . . . . . . . . . . . . . . . . . . . . . . . . . . . . 122
3.16 Move item . . . . . . . . . . . . . . . . . . . . . . . . . . . . . . . . . . . . . 122
3.17 Rotate items . . . . . . . . . . . . . . . . . . . . . . . . . . . . . . . . . . . . 122
3.18 Adding texture to object . . . . . . . . . . . . . . . . . . . . . . . . . . . . . 123
3.19 Move/reorient coordinate system . . . . . . . . . . . . . . . . . . . . . . . . 123
A.1 Explanation of textual use cases . . . . . . . . . . . . . . . . . . . . . . . . . 125
105
TABLES
106
Chapter 1
Introduction
This Requirements Specification is based on the IEEE Std.830-1998 - IEEE’s recommended
practice for software requirements specifications, [7]. We have only used the
recommendation as a guideline for the content of the document, and thus not followed it
exactly regarding the chapters.
1.1
Purpose
The goal of this document is to structure and simplify the work that is to be carried out in
the construction phase and the implementation phase of the project. This document
functions as a contract between the project group and the customer as it defines exactly
what will be implemented.
1.2
Scope
The product to be produced is a system for 3D-modeling with gloves. The glove, called
Airwolf1 , will be integrated with the 3D-modeling tool Blender, and the final product will
be called Glove3D. Glove3D will be used as a tool for teaching and presentations at the
Chemometrics and Bio-informatics Group (CBG) at NTNU.
The benefits of the Glove3D is that the user can 3D-model with the hand as one would do
in real life, instead of using a mouse which is not a very intuitive way to 3D-model.
1.3
Overview
The sections of this document are structured in the following way:
1
Called custom glove in the Preliminary document
107
CHAPTER 1. INTRODUCTION
•
•
•
Overall description contains the factors that affect the project requirements. This
section provides a background for the project requirements.
Specific requirements contains the functional and non-functional requirements for
the system. It also contains an overall graphical use case and textual use cases to
describe the functional requirements.
Estimation contains an estimation of person-hours needed for the construction,
implementation and testing of the requirements, based on the Use Case Points
Method.
108
Chapter 2
Overall description
In this section we will make an overall description of the project’s requirements. Section
3.1 and 3.2 lists the actual requirements.
2.1
Product perspective
This section describes the environment in which the product will operate. Figure 2.1 shows
what is within the project scope and what is regarded as external. The components within
the project boundary is either made by us or already made, but require some sort of
alteration. The external components will be used without alteration. In earlier stages of
this project we planned to use two polarized projectors to gain a passive stereo 3D image
while using Blender. After completing the Preliminary Study we found that there was no
native support in Blender for this. Because of this project’s limited time frame, this feature
will not be implemented.
Each part of Figure 2.1 is explained in later subsections.
Figure 2.1: The project boundary
109
CHAPTER 2. OVERALL DESCRIPTION
2.1.1
Product architecture
The interface between Hololib and the Blender Scripting Interface (BSI) will be decided in
the construction phase. At that point, we will have a deeper understanding of Python’s
capabilities. BSI will have to be written in Python because Blender uses Python as a
scripting language. Making a direct connection between Hololib, which is written in C++,
and BSI, which is written Python, will most likely be difficult. Figure 2.2 shows the overall
system architecture of the product.
Figure 2.2: Overall system architecture
2.1.2
User interfaces
The user interface will be identical to the standard Blender user interface, which is
described in the Preliminary Study. All the functionality in Blender will be available with
the use of a keyboard and the Airwolf VR glove. The glove is a replacement for a mouse
and the user will find the same possibilities with the glove as with a usual mouse, in
addition the glove will make 3D selection and movement possible. Modeling using a glove
instead of a mouse, will make Blender more intuitive and thus easier to use.
110
CHAPTER 2. OVERALL DESCRIPTION
Figure 2.3: Roll, Pitch and Yaw
2.1.3
Hardware interfaces
There will be made a single Airwolf VR glove for this project. It has two buttons and uses
a Flock of Birds (FoB) sensor to find its position, as well as roll, pitch and yaw. The
concept of roll, pitch and yaw is shown in Figure 2.3. The buttons are connected to the
parallel port and FoB uses the serial port as means of communication. Hololib is a C++
API for getting this information about the glove.
The system will run in Department of Chemistry’s VR-laboratory. An illustration of what
hardware can be found in this room beyond what a common workstation has, can be found
in Table 2.1 and their locations are shown in Figure 2.4. The person modeling in Blender
using the Airwolf VR glove will be standing behind Desk 2.
Type
Display card
VR-glove
Flock of Birds
Projectors
Polarized glass
Polarized glass
Canvas
Description
GeForce X6800 with 2 outputs
Airwolf VR glove
Positioning system
2 x Compaq R33
Horizontal polarized glass
Vertical polarized glass
Polarization reflecting canvas
Location
Inside PC 1
Desk 1
Desk 1
Projector 1 and 2
Polarized glass 1
Polarized glass 2
Canvas 1
Table 2.1: VR-laboratory specific hardware
111
CHAPTER 2. OVERALL DESCRIPTION
Figure 2.4: VR-laboratory layout
2.1.4
Software interfaces
This section describes the software products which this project depends on. In Table 2.2,
each product is described regarding version, type of software, source and usage
Product
Linux
Blender
Hololib
Version
Linux
kernel 2.4
running X
Window
System
Blender
2.37
Type
Operating
system
Source
Debian
Usage
Our system will have
to run on this operating system
3D modeling
software
Blender
Foundation
Hololib 1.0
Airwolf VR
glove interface
API
library
Made by Jahn
Otto Andersen
Our system will work
as a different way to
use this software
A library for getting
information from the
Airwolf VR gloves
Table 2.2: Software products
112
CHAPTER 2. OVERALL DESCRIPTION
2.1.5
Communication interfaces
The project will be using both Python and C++ as programming languages. The system
will rely on Transfer Control Protocol/Internet Protocol (TCP/IP) sockets for this
communication. Since only simple information will be sent, i.e American Standard Code
for Information Interchange (ASCII) text containing information about buttons being
pushed/released and glove movement, there is no need for a specific protocol.
2.1.6
Memory constraints
The system will need at least 512MB Random Access Memory (RAM) to function
properly, and to install the software you will need 40MB of free hard drive space. These
numbers are derived from the recommended memory requirements for Blender.
2.2
Product functionality
The product has two parts, the Airwolf VR glove and the BSI.
Airwolf will consist of a standard vendor bought glove with an FoB sensor and two finger
mounted buttons. The buttons are mounted on the index and middle finger. The Airwolf
VR glove will be used as a more intuitive way of controlling Blender than with a mouse.
We will not use the previous made glove that used Hololib, described in the Preliminary
Study, because that glove is falling to pieces and is not comfortable to wear. Even if we
will not use the previous made glove, we will use Hololib for getting information from the
new glove, Airwolf VR glove.
Inside Blender the user will control a pointer in 3D. It will allow him to do all what he can
do with a mouse, and this will allow him to make models faster.
2.3
User characteristic
The user will have to have prior knowledge of modeling in Blender to use this product
without a learning period. The user will not need any prior knowledge of C++ or Python
scripting for Blender, and the user does not need to know how to run scripts in Blender.
2.4
Assumptions and dependencies
The requirements in section 3.1 and 3.2 are made under the assumption that the following
statements are correct:
1. There are no restrictions on what Python scripts running under Blender can do. The
scripts are able to communicate with other processes using TCP/IP sockets.
113
CHAPTER 2. OVERALL DESCRIPTION
2. Hololib will function as expected.
3. Airwolf VR glove can be made without any advanced electronics.
4. The schematics for the previous made Hololib glove are correct, so the new Airwolf
VR glove can use Hololib.
These assumptions are critical for the completion of the project.
114
Chapter 3
Specific requirements
This section contains the system’s requirements. All the requirements are given a unique
identifier and a priority:
•
•
•
High priority - These requirements are important for the project to be considered
a success. If the project fails to satisfy these, it can not be considered completed.
Medium priority - These requirements are considered important, but not vital for
the project. These are requirements that should be implemented, though the project
will still be concidered a success if not all of them are satisfied.
Low priority - These requirements are mostly nice to have, and are considered a
good idea to satisfy, but are not critical for the project’s success.
In this document, there are several references to objects, vertices and items. A vertex is a
point in 3D space. An object in this context is a collection of vertices, connected by edges,
that form the basis of any 3D object. Examples of objects are cubes, cylinders, spheres, or
more complex shapes. We use the term item to describe both objects and vertices.
3.1
Functional requirements
We have prioritized the functional requirements (FREQ), and used the notation ”The
system shall” on the requirements that have high priority and ”The system may” on the
medium and low prioritized requirements. The requirements are in Table 3.1. Use cases for
each functional requirement are given in section 3.3.
115
CHAPTER 3. SPECIFIC REQUIREMENTS
ID
FREQ1
FREQ2
FREQ3
FREQ4
FREQ5
FREQ6
FREQ7
FREQ8
FREQ9
Requirement
The system shall allow the user to select items in Blender
with the help of glove and keyboard.
The system may allow the user to deselect items in
Blender with the help of glove and keyboard.
The system may allow the user to create objects in
Blender using the keyboard only.
The system shall allow the user to add vertices to objects
in Blender, with the help of keyboard and glove.
The system shall allow the user to delete selected items
in Blender with the help of keyboard.
The system shall allow the user to move selected items
in Blender using only the glove.
The system shall allow the user to rotate selected items
in Blender using only the glove.
The system may allow the user to add textures to selected objects in Blender, with the help of keyboard.
The system shall allow the user to move and reorient
coordinate system in Blender, with the help of keyboard
and glove.
Priority
H
L
M
H
H
H
H
M
H
Table 3.1: Functional requirements
3.2
Non-functional requirements
This section defines the system’s non-functional requirements. Non-functional requirements
focuses on other sides of the system besides the system’s functionality. We have chosen to
structure the non-functional requirements in the following subsections; design constraints,
performance, maintainability, reliability and documentation. The documentation
requirements is split into user documentation and code documentation.
3.2.1
Design constraints
In this section we explain the design constraints for this project. They are split into
software, hardware and implementation language.
Software
The software in use today is elaborated in software interfaces, section 2.1.4. The software
requirements are given in Table 3.2.
Hardware
We call the computer in use in the laboratory the ”VR-lab computer”. The functionality of
this computer is elaborated in hardware interfaces, section 2.1.3. Our constraint in this
116
CHAPTER 3. SPECIFIC REQUIREMENTS
ID
DCS1
Requirement
The system shall be able to run on a Linux platform,
using the 2.4 kernel or newer and the X Window System.
Priority
H
Table 3.2: Software requirements
project concerning hardware is that the system must be able to run on this computer.
Table 3.3 lists the hardware requirements.
ID
DCH1
DCH2
DCH3
DCH4
Requirement
The system shall be able to run on the VR-lab computer.
The system may have support for green-red goggles, for
work on a single screen.
The gloves shall have two buttons, one on the index
finger and one on the middle finger.
The gloves shall use FoB for position and attitude.
Priority
H
L
H
H
Table 3.3: Hardware requirements
Implementation language
The implementation languages for this project is Python and C++. When we are scripting
for Blender we will code in Python and when we are communicating with the glove and
FoB we will use C++. As mentioned earlier in section 2.1.1, one of the challenges for this
project is how to get the two implementation languages to communicate with each other.
The implementation language requirements are listed in Table 3.4.
ID
DCIL1
DCIL2
Requirement
The implementation language when scripting in Blender
shall be Python.
The implementation language when communicating
with the Airwolf VR glove and FoB shall be C++.
Priority
H
H
Table 3.4: Implementation requirements
3.2.2
Usability
The usability of the system is important for the user to find it appealing to use. The
requirements on usability are listed in Table 3.5.
ID
U1
U2
Requirement
The system shall give clear feedback as to when the user
has performed a click.
The system shall show a cone as a pointer to indicate
the glove’s position and orientation.
Table 3.5: Usability requirements
117
Priority
H
H
CHAPTER 3. SPECIFIC REQUIREMENTS
3.2.3
Performance
The performance is of high importance for a system. In our project the system will seem
less intuitive if the performance is poor and the users may not find it very appealing to use.
This is why we have set constraints on how slow the system can respond to user input. The
performance requirements are listed in Table 3.6.
ID
P1
P2
Requirement
The system shall respond within 50 ms when the user
grabs an object.
The cone in Blender shall follow the user’s glove movement with a maximum of 50 ms latency.
Priority
H
H
Table 3.6: Performance requirements
3.2.4
Maintainability
The code may be written in a way that supports further expansion. Table 3.7 lists the
maintainability requirements.
ID
M1
Requirement
The system may be designed modularly.
Priority
M
Table 3.7: Maintainability requirements
3.2.5
Documentation
In this section we shall discuss the requirements for documentation. First we will take a
look at the user documentation, then the installation documentation and finally the code
documentation. All documentation will be written in US English and delivered with the
final product.
User documentation
The user documentation will be the guideline for the user on how to use the system. The
documentation will not cover all functions in Blender, but rather how to use the glove in
Blender, and how to use the most basic functions. The user documentation will be
delivered to the customer on paper and on a CD. Table 3.8 lists the user documentation
requirements.
Installation documentation
The installation documentation will contain a detailed guide on how to install the system.
This will include installing packages like Python, Blender and our scripts. The installation
documentation will be delivered with the report at the end of the project. The installation
documentation requirements are listed in Table 3.9.
118
CHAPTER 3. SPECIFIC REQUIREMENTS
ID
UD1
UD2
UD3
UD4
Requirement
The user documentation shall be written in US English.
The user documentation may cover the most basic functions in Blender.
The user documentation may be delivered to the customer on both paper and on a CD.
The user documentation shall explain the use of the Airwolf VR glove in Blender.
Priority
H
L
L
H
Table 3.8: User documentation requirements
ID
ID1
ID2
ID3
Requirement
The installation documentation may be written in US
English.
The installation documentation shall give detailed information on how to install the system’s software components.
The installation documentation may contain information on how to alter the hardware.
Priority
M
H
L
Table 3.9: Installation documentation requirements
Code documentation
In this project code documentation is important in case of further expansion. The code
documentation will make it easier and faster for new developers to get a general view of
the programmed code. Table 3.10 lists the code documentation requirements.
ID
CD1
CD2
Requirement
The code documentation shall be written in English.
All code should be documented well enough that other
developers can reuse or expand it.
Priority
H
H
Table 3.10: Code documentation requirements
3.3
Use case diagrams
This section contains use cases to illustrate the functional requirements described in
section 3.1.
3.3.1
Graphical use case
The overall graphical use case in Figure 3.1 shows the main actor and major tasks to be
carried out in the system.
119
CHAPTER 3. SPECIFIC REQUIREMENTS
Figure 3.1: Overall graphical use case diagram
3.3.2
Textual use case diagrams
The textual use case diagrams are given in Table 3.11 to Table 3.19, describing sequences
of action for the system. An explanation of the syntax is given in Appendix A.
Use case:
ID:
Trigger:
Pre-condition:
Postcondition:
Steps:
FREQ1: Add item to selection
TUC1
User wants to add an item to the current selection.
There exists an item to select that is not already selected.
The item is selected to the current selection.
1: The user moves the hand until the tip of the cone is
close to the item to be selected.
2: The user closes index finger and thumb, and holds it
down for a moment.
3: The user releases index finger and thumb.
Table 3.11: Select item
120
CHAPTER 3. SPECIFIC REQUIREMENTS
Use case:
ID:
Trigger:
Pre-condition:
Postcondition:
Steps:
Alternative
action:
FREQ2: Remove item from selection
TUC2
User wants to remove an item from the current selection.
One or several items are selected.
The item is no longer selected.
1: The user moves the hand until the tip of the cone is
close to the item to be deselected.
2: The user closes index finger and thumb.
3: The user quickly releases index finger and thumb.
No alternative action.
Table 3.12: Deselect item
Use case:
ID:
Trigger:
Pre-condition:
Postcondition:
Steps:
Alternative
action:
FREQ3: Create object
TUC3
User wants to make a new object.
User wants to make a new object.
The new object is created at the position of Blender’s
3D marker.
1: The user clicks the hand on the position where the
new object is to be created.
3: User utilizes the predefined keyboard shortcut for
making a new object.
No alternative action.
Table 3.13: Create object
Use case:
ID:
Trigger:
Pre-condition:
Postcondition:
Steps:
Alternative
action:
FREQ4: Add vertex to object
TUC4
User wants to add vertices to an object.
The user has selected an object.
The vertex is added to the currently selected object.
1: User presses and holds the add-vertex key on the
keyboard.
2: User clicks with index-finger and thumb where he
wants to place a new vertex.
3: User depresses the add-vertex key on the keyboard.
No alternative action
Table 3.14: Add vertex
121
CHAPTER 3. SPECIFIC REQUIREMENTS
Use case:
ID:
Trigger:
Pre-condition:
Postcondition:
Steps:
Alternative
action:
FREQ5: Delete item
TUC5
User wants to delete an item
An item to be deleted is selected.
The item is deleted from the system.
1: User presses delete on keyboard.
2: User confirms the deletion with the enter key.
No alternative action.
Table 3.15: Delete item
Use case:
ID:
Trigger:
Pre-condition:
Postcondition:
Steps:
Alternative
action:
FREQ6: Move item
TUC6
User wants to move an item.
An item is selected.
The item is moved.
1: User closes index finger and thumb while the cone is
on the selected item.
2: User moves hand to wanted position.
3: User releases index finger and thumb.
No alternative action.
Table 3.16: Move item
Use case:
ID:
Trigger:
Pre-condition:
Postcondition:
Steps:
Alternative
action:
FREQ7: Rotate item
TUC7
User wants to reorient his currently selected item(s).
The user has selected an item.
The item(s) has been rotated.
1: The user closes his index finger and thumb while the
cone is on the selected item.
2: The user reorients his/her hand until the item(s) on
screen has the correct orientation.
3: The user releases the grip of his index finger and
thumb.
No alternative action.
Table 3.17: Rotate items
122
CHAPTER 3. SPECIFIC REQUIREMENTS
Use case:
ID:
Trigger:
Pre-condition:
Postcondition:
Steps:
FREQ8: Add texture to object
TUC8
The user wants to add a texture to the selected object.
There exists a texture for the user to use. And the
object(s) is selected.
The wanted texture has been applied to the object(s).
1: User utilizes predefined keyboard shortcut to cycle
through textures until the wanted texture is applied.
No alternative action.
Alternative
action:
Table 3.18: Adding texture to object
Use case:
ID:
Trigger:
Pre-condition:
Postcondition:
Steps:
Alternative
action:
FREQ9: Move/reorient coordinate system
TUC9
User wants to see the scene from another angle, or move
to another part of the scene.
User is not currently manipulating an item
The coordinate system has been moved and/or reoriented in relation to the user.
1: User closes middle finger and thumb
2: User moves and/or rotates his hand until the view is
manipulated satisfactory to the user’s need.
3: User releases the grip of his middle finger and thumb.
No alternative action
Table 3.19: Move/reorient coordinate system
123
Chapter 4
Effort estimation
Before we start with the construction, implementation and testing phases we will need an
estimation of person-hours required for each use case. If the estimated time exceeds the
time we have planned to use on these phases, we will have to remove some of the
requirements with the lowest priority.
4.1
The Use Case Points Method
The method we will use is under construction by Bente Anda and Reidar Conradi at The
Universtity in Oslo. It is called ”The Use Case Points Method” [6]. This method estimates
the time needed for the construction, implementation and testing phases based on the
complexity of the use cases. Each actor and each use case are categorized as simple,
average or complex. The use case points are then adjusted based on values assigned to
technical and environmental factors. For more details, see [6].
4.2
Estimated person-hours needed
Using the Use Case Points Method our project got an estimate of 59 use case points. At an
estimated 15 person-hours per use case point, this multiplies up to 883 person-hours
needed for the construction, implementation and testing. The estimation sheet is given in
Appendix B.
124
Appendix A
Explanation of use cases
Field name
Use case:
ID:
Trigger:
Pre-condition:
Post-condition:
Steps:
Alternative action:
Description
Gives the functional requirements number and name of
the use case.
Gives a unique ID to the use case.
This is what action starts the use case.
What condition must be fulfilled before the use case can
be executed.
What condition is fulfilled after the use has been executed.
This describes the normal course of execution.
This describes an alternative course of execution.
Table A.1: Explanation of textual use cases
125
Appendix B
Use case estimation
126
APPENDIX B. USE CASE ESTIMATION
Figure B.1: Use case estimation for Glove3D.
127
APPENDIX B. USE CASE ESTIMATION
128
Part IV
Construction
129
130
CONTENTS
Contents
1
2
Introduction
1.1
Purpose . . . . . . . . . . . . . . . . . . . . . . . . . . . . . . . . . . . . . . 135
1.2
Scope . . . . . . . . . . . . . . . . . . . . . . . . . . . . . . . . . . . . . . . 135
1.3
Overview
. . . . . . . . . . . . . . . . . . . . . . . . . . . . . . . . . . . . . 135
System description
2.1
2.2
2.3
3
135
The Airwolf VR glove
137
. . . . . . . . . . . . . . . . . . . . . . . . . . . . . . 137
2.1.1
Technology and purpose . . . . . . . . . . . . . . . . . . . . . . . . . 138
2.1.2
Functionality . . . . . . . . . . . . . . . . . . . . . . . . . . . . . . . 138
The Holoserver application . . . . . . . . . . . . . . . . . . . . . . . . . . . . 139
2.2.1
Technology and purpose . . . . . . . . . . . . . . . . . . . . . . . . . 139
2.2.2
Functionality . . . . . . . . . . . . . . . . . . . . . . . . . . . . . . . 139
The Blender Scripting Interface . . . . . . . . . . . . . . . . . . . . . . . . . 139
2.3.1
Technology and purpose . . . . . . . . . . . . . . . . . . . . . . . . . 139
2.3.2
Functionality . . . . . . . . . . . . . . . . . . . . . . . . . . . . . . . 140
System construction
3.1
3.2
3.3
3.4
The Airwolf VR glove
142
. . . . . . . . . . . . . . . . . . . . . . . . . . . . . . 143
3.1.1
Overall features . . . . . . . . . . . . . . . . . . . . . . . . . . . . . . 143
3.1.2
Hardware . . . . . . . . . . . . . . . . . . . . . . . . . . . . . . . . . 143
Holoserver . . . . . . . . . . . . . . . . . . . . . . . . . . . . . . . . . . . . . 143
3.2.1
Overall features . . . . . . . . . . . . . . . . . . . . . . . . . . . . . . 144
3.2.2
Class diagram . . . . . . . . . . . . . . . . . . . . . . . . . . . . . . . 144
3.2.3
Sequence diagram . . . . . . . . . . . . . . . . . . . . . . . . . . . . . 144
The Blender Scripting Interface . . . . . . . . . . . . . . . . . . . . . . . . . 147
3.3.1
Overall features . . . . . . . . . . . . . . . . . . . . . . . . . . . . . . 147
3.3.2
Class diagram . . . . . . . . . . . . . . . . . . . . . . . . . . . . . . . 147
Overall system sequence diagram . . . . . . . . . . . . . . . . . . . . . . . . 147
131
CONTENTS
132
FIGURES
Figures
2.1
Block diagram of the system . . . . . . . . . . . . . . . . . . . . . . . . . . . 137
2.2
The Airwolf VR glove
2.3
The Airwolf VR glove buttons . . . . . . . . . . . . . . . . . . . . . . . . . . 138
2.4
Red and green cursor . . . . . . . . . . . . . . . . . . . . . . . . . . . . . . . 140
2.5
Blue cursor . . . . . . . . . . . . . . . . . . . . . . . . . . . . . . . . . . . . 141
2.6
Yellow cursor . . . . . . . . . . . . . . . . . . . . . . . . . . . . . . . . . . . 141
3.1
System overall data flow diagram . . . . . . . . . . . . . . . . . . . . . . . . 142
3.2
Airwolf VR glove circuit diagram . . . . . . . . . . . . . . . . . . . . . . . . 143
3.3
Holoserver class diagram . . . . . . . . . . . . . . . . . . . . . . . . . . . . . 145
3.4
Holoserver sequence diagram . . . . . . . . . . . . . . . . . . . . . . . . . . . 146
3.5
BSI class diagram . . . . . . . . . . . . . . . . . . . . . . . . . . . . . . . . . 148
3.6
Overall system sequence diagram . . . . . . . . . . . . . . . . . . . . . . . . 149
. . . . . . . . . . . . . . . . . . . . . . . . . . . . . . 138
133
FIGURES
134
Chapter 1
Introduction
This document contains a detailed description of the system design. The design is based on
the Requirements Specification. The structure and meaning of the document will be
explained by the purpose, scope and overview sections below.
1.1
Purpose
This document’s main purpose is to describe the decisions that have been made regarding
how the system shall be implemented. The Construction is a translation of requirements
into a description of the hardware and software components necessary for the
implementation phase. The decisions taken in this document will be followed in the
implementation.
The description of the design should be detailed enough, that the there are no
unambiguities on how the system shall be implemented. In other words, the construction
phase makes the implementation job easier.
1.2
Scope
In this document we describe the final design of the system. We describe the technology
and functions of the different parts of the system, and give a detailed description of how
the system will be implemented, and how it will function when used.
1.3
Overview
This document contains the following chapters:
•
System description contains a description of each of the parts of our system and
which tasks are covered by which part.
135
CHAPTER 1. INTRODUCTION
•
System construction contains a description of how we will implement our system.
136
Chapter 2
System description
In this chapter we give an overall description of the complete system. The main
functionality will be described with diagrams to give the reader an overview of the entire
Glove3D system. A total overview of the system is given in Figure 2.1.
The system consists of three main parts. The Airwolf VR glove is described in section 2.1,
the Holoserver application in section 2.2, and the Blender Scripting Interface (BSI) in
section 2.3. Blender and Flock of Birds are described in the Preliminary Study and will not
be described here since we will not alter these parts of the system.
Figure 2.1: Block diagram of the system
2.1
The Airwolf VR glove
This section describes the technology and functionality of the Airwolf VR glove. The
Airwolf VR glove is a hardware part of the system that we will develop. On the glove we
will place two buttons that will be connected to the parallel port on the computer. The
Flock of Birds (FoB) sensor will be mounted on the glove. Pictures of the glove can be seen
in Figure 2.2 and Figure 2.3.
137
CHAPTER 2. SYSTEM DESCRIPTION
Figure 2.2: The Airwolf VR glove
Figure 2.3: The Airwolf VR glove buttons
2.1.1
Technology and purpose
The Airwolf VR glove is made of a leather glove, two small buttons, two wires, a 25-pin
D-sub and two resistors. The buttons are connected to the parallel port, from which
Holoserver will read their status. The FoB sensor, described in the Preliminary Study, is
attached to the glove, and gives information concerning position and attitude.
The purpose of the Airwolf VR glove is to be the tool the user uses to manipulate objects
in a scene in Blender. It needs to be comfortable to wear, and the user must feel that the
program responds appropriately to his actions with the glove.
2.1.2
Functionality
The Airwolf VR glove will pass data concerning the user’s actions on to Holoserver. Each
button on the glove corresponds to a pin on the parallel port, and when the button is
138
CHAPTER 2. SYSTEM DESCRIPTION
pushed, the voltage on the pin is set high, so Holoserver can detect that the button is
pushed. The FoB sensor attached to the glove will send its data through the serial port.
The data it sends contains information about the sensor’s position and attitude. This data
is interpreted by Holoserver, and then passed on to the rest of the system.
2.2
The Holoserver application
This section describes the technology and functionality of the Holoserver application. The
Holoserver application is the part of the system that communicates directly with the
Airwolf VR glove, and passes the information from the glove to the rest of the system.
2.2.1
Technology and purpose
Holoserver will be created using the C++ programming language in Linux. It will use
low-level commands to communicate with the parallel and serial ports, and sockets to
communicate with the BSI.
The purpose of Holoserver is to read information from the Airwolf VR glove concerning its
two buttons and the FoB server, interpret this information, and pass on the status of the
buttons and sensor to the BSI using sockets.
2.2.2
Functionality
Holoserver will communicate with the parallel port, and determine the status of the two
buttons by checking which bits are set. It will request information from the FoB server,
and format the data it receives so it is easier for the BSI to read it. When Holoserver has
the necessary information, it will create a socket, and listen on a set port for incoming
connections. When a connection is made, Holoserver will pass the information from the
hardware onto the socket.
2.3
The Blender Scripting Interface
This section describes the technology and functionality of the BSI. The BSI controls all the
functionality we use in Blender.
2.3.1
Technology and purpose
BSI will be created using the Python programming language. It will be written for the
scripting engine within Blender, and will be run from Blender. It will use sockets to
communicate with Holoserver to fetch the necessary information.
139
CHAPTER 2. SYSTEM DESCRIPTION
The purpose of BSI is to fetch the data from the Airwolf VR glove, through Holoserver,
and use this data to manipulate objects in Blender. Blender will continually start and stop
BSI, so the script will run quickly and frequently, giving the impression that it is running
all the time, without using all of Blender’s resources.
2.3.2
Functionality
The BSI plug-in regularly polls Holoserver to get the status of the glove. The plug-in then
checks the data received to see if there are any changes since the last polling. If any
changes have occurred, the plug-in executes certain functions, like manipulating, creating
and deleting objects, based on these changes.
The movement and direction of the glove are indicated by a cone shown in the 3D view in
Blender. This cone functions as a cursor in three dimensions, and moves and rotates in
accordance with the user’s movement of his hand. This 3D cursor will also change color
according to what mode the system is in. A description of the different modes follows.
•
Default mode
When none of the buttons on the glove are pushed, the system is in default mode. In
this mode, the 3D cursor is moving to indicate the position and orientation of the
user’s hand. While in default mode, the cursor is colored red when not inside an
object, and green when inside one, see Figure 2.4. This is to show the user when he
can manipulate the object, and also make it easier to see where the cursor is
positioned in space. If the user pushes the index finger button when inside an object,
the system enters object moving mode.
Figure 2.4: Red and green cursor
•
Object moving mode
While the index finger button is held, the system remains in object moving mode,
and will move any selected items according to the changes in positions reported by
the glove every time the plug-in polls for it’s status. The color of the pointer-cone
while in object moving mode is blue, see Figure 2.5
140
CHAPTER 2. SYSTEM DESCRIPTION
Figure 2.5: Blue cursor
•
Viewport moving mode
When the middle finger button is pushed, the system goes to viewport moving mode,
enabling the user to rotate and move the view of the 3D scene according to the
movement of the glove. While in view move mode, the pointer-cone is colored yellow,
see Figure 2.6.
Figure 2.6: Yellow cursor
These three modes are mutually exclusive, meaning the user will have to leave object
moving mode before entering viewport moving mode and vice versa, while the default
mode is of course only enabled when no buttons are pushed, as stated above.
141
Chapter 3
System construction
This chapter describes the system’s construction. It contains a description of the
functionality we will implement in the implementation phase. First, we describe the
Airwolf VR glove. Then the Holoserver application, and at last the BSI.
The data flow diagram in Figure 3.1 shows how the data is carried through the different
parts of the system.
Figure 3.1: System overall data flow diagram
142
CHAPTER 3. SYSTEM CONSTRUCTION
3.1
The Airwolf VR glove
This section describes how the Airwolf VR glove will be designed. The Airwolf VR glove is
the physical glove the user will use to manipulate scenes in Blender.
3.1.1
Overall features
The overall features for the Airwolf VR glove are as follows:
•
•
•
The glove shall have two buttons, one on the index finger and one on the middle
finger.
The glove shall use FoB for position and attitude.
The glove shall set bits on the parallel port when buttons are pushed so the rest of
the system can detect it.
3.1.2
Hardware
We have chosen to implement the hardware part of the glove as shown in Figure 3.2. The
number of each pin refers to the same pin on a 25-pin D-sub. We will use a little print card
between the glove and the parallel port to connect the wires/resistors.
Figure 3.2: Airwolf VR glove circuit diagram
3.2
Holoserver
This section describes the design of the Holoserver application. We use Unified Modeling
Language, [8], to show Holoserver’s class structure and control flow. Holoserver is the part
143
CHAPTER 3. SYSTEM CONSTRUCTION
of our application that will read data from the the glove and FoB, and make this data
available through a socket.
3.2.1
Overall features
The overall features for Holoserver are as follows:
•
Holoserver shall read data from FoB through the serial port.
•
Holoserver shall read bits of the parallel port set by the glove.
•
Holoserver shall make the data from FoB and the glove available through a socket.
3.2.2
Class diagram
Holoserver consists of five classes, which handle reading information from the system’s
hardware, and writing it to a socket so the ClientSocket can access it:
•
•
•
•
•
HoloPicker is a class for communication with the parallel port, which the glove’s
buttons will be connected to. HoloPicker is polled1 to discover if a button is pushed
or not.
SerialCom is a class for communication with the serial port, which FoB is connected
to. This class mostly sends information between the serial port and the Bird class.
Bird is a class for processing the information from FoB. Bird interprets the
information FoB sends concerning its position and attitude, and sends the
information in a simple format to the requesting process.
ServerSocket is a class for writing information to sockets. ServerSocket writes
information from HoloPicker and Bird to the socket.
SocketException is a class used for reporting errors with the ServerSocket, such as
the inability to open the socket, or write to it.
The class diagram is shown in Figure 3.3 and only includes the public methods that are
necessary for the understanding of how Holoserver will be implemented.
3.2.3
Sequence diagram
Holoserver’s sequence diagram shows the control flow for the Holoserver application. The
typical flow of the application is as follows:
1. initialize() is sent to Holopicker, to open up a connection with the parallel port.
2. configure(”/dev/ttyS0”, 1 is sent to Bird, to open up a connection with the serial
port and FoB, and specify that a single glove is to be used.
1
To poll means to request data
144
CHAPTER 3. SYSTEM CONSTRUCTION
Figure 3.3: Holoserver class diagram
3. ServerSocket(7000) Creates a socket server which listens to port 7000.
Next, Holoserver will loop infinitely, performing the following actions until the program is
shut down:
1. isPicking(i) asks Holopicker if button i on the glove is being pushed.
2. getData(1, matrix) will ask Bird for the sensor’s position information. The Bird
class passes this request over to SerialCom in a more low-level format, and receives
the information from there. Bird then stores the information in the variable matrix,
so it can be passed on to the BSI.
3. accept(ServerSocket) will hold until an incoming connection is detected on port
7000. The information about the connecting client is stored in the ServerSocket
reference.
4. (std::string) writes the information from the hardware, as a text-string, to the
socket.
The reason why Holoserver polls the hardware before accepting the incoming connections is
so Blender does not have to wait for the hardware response. As the frequency of requests
145
CHAPTER 3. SYSTEM CONSTRUCTION
from BSI is high, the delay should not be noticeable. The sequence diagram for Holoserver
is shown in Figure 3.4.
Figure 3.4: Holoserver sequence diagram
146
CHAPTER 3. SYSTEM CONSTRUCTION
3.3
The Blender Scripting Interface
This section describes the design decisions made for the BSI. The BSI is the part of the
system that analyzes the data from Holoserver. Based on the information from Holoserver,
the BSI will manipulate the scene in Blender.
3.3.1
Overall features
The overall features for the BSI are as follows:
•
BSI shall be able to read data from Holoserver’s socket.
•
BSI shall be able to move, rotate and select objects in Blender.
•
BSI shall be able to move and manipulate the view in Blender.
3.3.2
Class diagram
The BSI consists of two classes, which handle fetching information from Holoserver, and
manipulating the scene in Blender:
•
•
ClientSocket handles communication with Holoserver. It tries to connect to the
socket Holoserver has opened, reads the needed information from it, and passes this
information on to the GloveToBlender class.
GloveToBlender is instanced every time the redraw call is made in Blender.
GloveToBlender uses the ClientSocket class to fetch information from Holoserver.
Using this information, it manipulates the objects in the Blender scene, and then
adds a redraw request to the even queue, before being killed.
The class diagram for the BSI is shown in Figure 3.5.
3.4
Overall system sequence diagram
The sequence diagram for the system shows the control flow for the system as a whole.
The Holoserver application runs continuously, while new instances of the ClientSocket and
GloveToBlender classes are created each time the BSI is to poll Holoserver:
1. initialize() opens a connection between Holoserver and the parallel port.
2. configure(”/dev/ttyS0”, 1) opens a connection between Holoserver and FoB.
3. ServerSocket(7000) sets Holoserver to listen to port 7000.
4. isPicking(i) polls Holopicker to check if the button on finger i is pushed.
147
CHAPTER 3. SYSTEM CONSTRUCTION
Figure 3.5: BSI class diagram
5. getData(1, matrix) stores the data from FoB in the variable matrix.
6. accept(ServerSocket) waits for an incoming connection on port 7000.
7. New - Blender creates a new GloveToBlender object when Blender redraws the
currents scene.
8. New - GloveToBlender then creates a new ClientSocket object to prepare for
opening a connection to Holoserver.
9. getMatrix() tells ClientSocket to open a connection to Holoserver and fetch the
Airwolf VR glove’s data.
10. connect tries to connect to port 7000.
11. (std::string data) is run after Holoserver detects an incoming connection. It
writes the data from the glove to the socket. This response is then passed on to
GloveToBlender.
12. manipulate Objects is a variety of calls from GloveToBlender to Blender, which
use the data from the glove to manipulate the objects in the scene.
13. Queue redraw is called to put a redraw call on Blender’s event queue. This ensures
the script will be run as frequently as Blender can handle.
14. Kill is then called from Blender to delete the GloveToBlender object.
15. Kill is finally called from Blender to delete the ClientSocket object.
The sequence diagram for the whole system is shown in Figure 3.6.
148
CHAPTER 3. SYSTEM CONSTRUCTION
Figure 3.6: Overall system sequence diagram
149
CHAPTER 3. SYSTEM CONSTRUCTION
150
Part V
Implementation
151
152
CONTENTS
Contents
1
Introduction
159
1.1
Purpose . . . . . . . . . . . . . . . . . . . . . . . . . . . . . . . . . . . . . . 159
1.2
Scope . . . . . . . . . . . . . . . . . . . . . . . . . . . . . . . . . . . . . . . 159
1.3
Overview
. . . . . . . . . . . . . . . . . . . . . . . . . . . . . . . . . . . . . 159
2
Changes from the Requirements Specification
161
3
Coding standards
162
4
3.1
Code naming . . . . . . . . . . . . . . . . . . . . . . . . . . . . . . . . . . . 162
3.2
Code structure . . . . . . . . . . . . . . . . . . . . . . . . . . . . . . . . . . 162
3.3
Code commenting . . . . . . . . . . . . . . . . . . . . . . . . . . . . . . . . . 163
Requirement satisfaction
164
4.1
Functional requirements . . . . . . . . . . . . . . . . . . . . . . . . . . . . . 164
4.2
Non-functional requirements . . . . . . . . . . . . . . . . . . . . . . . . . . . 166
5
Possible improvements
170
6
Difficulties and solutions
172
6.1
Airwolf VR glove . . . . . . . . . . . . . . . . . . . . . . . . . . . . . . . . . 172
6.2
Holoserver . . . . . . . . . . . . . . . . . . . . . . . . . . . . . . . . . . . . . 172
6.3
Blender scripting interface . . . . . . . . . . . . . . . . . . . . . . . . . . . . 173
153
CONTENTS
154
FIGURES
Figures
3.1
Example of code used in system. . . . . . . . . . . . . . . . . . . . . . . . . . 163
155
FIGURES
156
TABLES
Tables
4.1
Satisfaction of functional requirements. . . . . . . . . . . . . . . . . . . . . . 165
4.2
Satisfaction of software requirements . . . . . . . . . . . . . . . . . . . . . . 166
4.3
Satisfaction of hardware requirements . . . . . . . . . . . . . . . . . . . . . . 167
4.4
Satisfaction of implementation language requirements . . . . . . . . . . . . . 167
4.5
Satisfaction of usability requirements . . . . . . . . . . . . . . . . . . . . . . 168
4.6
Satisfaction of performance requirements . . . . . . . . . . . . . . . . . . . . 168
4.7
Satisfaction of maintainability requirements . . . . . . . . . . . . . . . . . . 168
4.8
Satisfaction of documentation requirements . . . . . . . . . . . . . . . . . . . 169
157
TABLES
158
Chapter 1
Introduction
This document describes the standards used for the programming portion of this project,
our experiences during the implementation and the results of the implementation. The
three languages used are C++, Java, and Python.
1.1
Purpose
The purpose of this document is to give the reader an understanding of how the system is
implemented, and of the process of implementing the system.
1.2
Scope
The document contains descriptions of our programming methodology and of the final
result. All coding done in the project should follow the same standards, to make it easier
for other people to understand and modify the code. As the three languages we use are
fairly similar in structure, the same standards are applied to all. We describe our
experiences during the implementation, such as what difficulties we had and how we
overcame them. We describe what requirements have been satisfied, and why certain
requirements have not been satisfied. The document also contains a short discussion on
how the system can be improved.
1.3
Overview
The chapters of this document are structured in the following way:
•
Changes from the Requirements Specification contains a description of what
changes were made to the system design in comparison to the Requirements
Specification, and why those changes where made.
159
CHAPTER 1. INTRODUCTION
•
•
•
•
Coding standards contains a presentation of the coding standards used.
Requirement satisfaction contains a list of requirements that are satisfied, and a
discussion on why the unsatisfied requirements were not implemented.
Possible improvements contains a description on possible ways to implement the
unsatisfied requirements, and other measures that could improve the quality of the
system.
Difficulties and solutions contains a description of our experiences during the
implementation phase.
160
Chapter 2
Changes from the Requirements
Specification
In this chapter we discuss the differences between the original demands from the customer,
and what the final product will contain.
When this project was started, no one on the group had much knowledge of the systems we
would be working with. What was possible to do with Blender and the hardware we had
available was largely unknown to us. Some of the necessary knowledge was gained while
working on the Preliminary Study, and the Requirements Specification, but much
understanding of what is possible or not was not gained until the implementation had been
started. Because of this, the implementation and construction phases were for the most
part done in parallel. Also, because our prior knowledge of the technology and tools were
as limited as they were, a lot of time was spent finding and testing several different ways to
solve problems. As work progressed, solutions would be suggested, researched and tested,
and then discarded if it was not viable, or kept and refined if it was. For each requirement,
this process was then repeated until the best solution was found. The discarded
suggestions are not described in detail in this document, as they are not relevant for the
final product. For some requirements, we were not able to find solutions that were possible
to implement within the constraints given for this project.
161
Chapter 3
Coding standards
In this chapter we describe what standards are used for programming, meaning how we
label and structure our code. An example of the code present in BSI can be seen in Figure
3.1.
3.1
Code naming
Entity names should be relevant to the method the entity performs. Reading the name of
an entity should be enough to give the reader an understanding of what the entity is used
for. All labels are written in US English. The naming of variables, methods, and classes is
done in the following way:
•
•
•
3.2
Classes: The first letter of a class name is in upper case. If a class name consists of
more than one word, the first letters of the subsequent words are also in upper case.
Methods: The first letter of a method name is in lower case. The first letter of
subsequent words are in upper case.
Variables: The first letter of a variable name is in lower case. The first letter of
subsequent words in upper case.
Code structure
The system has an object-oriented structure. Methods are in separate classes based on
hardware nearness and functionality. If the functionality is significantly different, it is not
placed in the same class. In the same way, low-level functionality is not placed together
with high-level functionality. This makes the system easier to modify.
162
CHAPTER 3. CODING STANDARDS
3.3
Code commenting
It is important that the code is properly commented, as this greatly increases the ease of
reading and modifying it. First and foremost, comments are written on a method basis. If
a method is large, and contains complex code, comments are included inside the method as
well, to show what the subsections of that method do. Comments are written in US
English. A complete description of the conventions used for coding the system can be seen
in Appendix [10]. Unfortunately, the API for Python does not follow this standard.
Figure 3.1: Example of code used in system.
163
Chapter 4
Requirement satisfaction
This chapter lists each requirement from the Requirements Specification, and whether or
not the requirement has been satisfied. If a requirement is not satisfied, we describe why
we were not able to satisfy it. The tables give the name and a short description of each
requirement, specify if the requirement has been satisfied, and give a short description of
how it has been satisfied.
4.1
Functional requirements
This section describes to what degree the functional requirements have been satisfied.
These requirements specify what the user should be able to do using Glove3D. The results
of our implementation of the functional requirements is summarized in Table 4.1.
164
CHAPTER 4. REQUIREMENT SATISFACTION
ReqID
FC1
FC2
FC3
Description
Select objects using
the glove and keyboard.
Deselect objects using the glove and keyboard.
Create objects using
only the keyboard.
FC4
Add vertices with keyboard and glove.
FC5
Delete selected objects
with the keyboard.
FC6
Move selected objects
using glove only.
FC7
Rotate selected objects using glove only.
FC8
Add textures to selected objects using
keyboard only.
Move and rotate view
using the glove and
keyboard.
FC9
Satisfaction
The user can add objects to
the current selection using
only the glove.
The user can remove objects
from the current selection
using only the glove.
There was not time to implement shortcut keys in the
Python scripts. Both mouse
and keyboard are needed to
create items.
Blender handles sub-objects
very differently from full objects. Implementing operations on sub-objects would
therefore take much longer
than first anticipated, and
we were not able to add this
functionality.
This functionality is native
to Blender, and Glove3D
does not interfere with it.
This functionality has been
implemented. It is possible
to move all selected objects
using only the glove.
This works as requested.
Rotating the glove will rotate all selected objects accordingly.
Same as for FC3. There was
not enough time to implement this feature.
This works, but the feature
is not perfect. When moving and rotating the view,
the pointer cone does not remain in the same position in
the coordinate system.
Table 4.1: Satisfaction of functional requirements.
165
Summary
Satisfied
Satisfied
Not satisfied
Not satisfied
Satisfied
Satisfied
Satisfied
Not satisfied
Partially
satisfied
CHAPTER 4. REQUIREMENT SATISFACTION
4.2
Non-functional requirements
This section describes to what degree the non-functional requirements have been satisfied.
These requirements specify wishes that are not directly connected to functionality, such as
usability, hardware requirements, etc. The tables are arranged in the same way as in the
Requirements Specification.
•
Table 4.2 describes the satisfaction of software requirements.
•
Table 4.3 describes the satisfaction of hardware requirements.
•
Table 4.4 describes the satisfaction of implementation language requirements.
•
Table 4.5 describes the satisfaction of usability requirements.
•
Table 4.6 describes the satisfaction of performance requirements.
•
Table 4.7 describes the satisfaction of maintainability requirements.
•
Table 4.8 describes the satisfaction of documentation requirements.
ReqID
DCS1
Description
The system runs on
Linux.
Satisfaction
The system has been tested
on the Linux machine in the
VR lab, and works without
problems there. The complete system has not been
tested on other machines or
distributions other than Debian.
Table 4.2: Satisfaction of software requirements
166
Summary
Partially
satisfied
CHAPTER 4. REQUIREMENT SATISFACTION
ReqID
DCH1
Description
The system runs on
the VR lab workstation.
DCH2
The system supports
green-red 3D goggles,
for work on a single
screen.
DCH3
The glove has two buttons, one for the index
finger and one for the
middle finger.
The glove uses FoB to
read position and attitude.
DCH4
Satisfaction
The system has been fully
tested on the VR lab computer, and works there
without problems.
The customer believed that
this was a feature one could
simply turn on and off
within Blender. This turned
out to be incorrect, and the
group has not had the time
to implement it.
The glove has been created
according to the requirement specification.
Summary
Satisfied
An interface with FoB
has been implemented
in Holoserver, and works
according to the requirements.
Satisfied
Not satisfied
Satisfied
Table 4.3: Satisfaction of hardware requirements
ReqID
DCIL1
DCIL2
Description
The code language for
the Blender scripts is
Python.
The code language for
Holoserver is C++.
Satisfaction
All Blender scripting has
been done with Python.
Summary
Satisfied
Holosever has been created
using C++.
Satisfied
Table 4.4: Satisfaction of implementation language requirements
167
CHAPTER 4. REQUIREMENT SATISFACTION
ReqID
U1
Description
The system gives clear
feedback when the
user grabs something.
U2
The system displays
a cone to show the
glove’s position and
orientation.
Satisfaction
As the glove has been made
with physical buttons on the
fingertips, it is easy for the
user to know when an action
has been performed. The
color of the selection cone
also changes colour depending on the situation, making
it easier for the user to understand the situation.
This has been implemented.
The cone is the user’s point
of reference in Blender.
Summary
Satisfied
Satisfied
Table 4.5: Satisfaction of usability requirements
ReqID
P1
Description
The system responds
quickly when the user
grabs an object.
P2
The system responds
quickly when the user
moves an object. The
object does not lag behind the glove’s movement.
Satisfaction
The system is fast enough
that there is no noticeable
delay when selecting objects.
There is no noticeable lag
when moving or rotating objects.
Summary
Satisfied
Satisfied
Table 4.6: Satisfaction of performance requirements
ReqID
M1
Description
The system is modular.
Satisfaction
Modularity has not been
given a high priority during development.
However, extending the scripts
in Blender should not be
a problem given prior experience with scripting in
Python.
Summary
Partially
satisfied.
Table 4.7: Satisfaction of maintainability requirements
168
CHAPTER 4. REQUIREMENT SATISFACTION
ReqID
UD1
UD2
UD3
UD4
ID1
ID2
ID3
CD1
CD2
Description
The user documentation shall be in US
English.
The documentation
may cover the most
basic functions in
Blender.
The customer may receive the documentation on both paper
and cd.
The documentation
shall explain the usage of the Airwolf VR
glove in Blender.
The installation documentation may be
written in US English.
The documentation
shall give detailed
information on how to
install the system.
The documentation
may contain information on how to modify
the hardware.
Code documentation
shall be written in US
English.
Code documentation
should be written
detailed enough that
other developers can
reuse or expand the
system’s code.
Satisfaction
All user documentation for
the system is written in US
English.
The documentation contains information on how
to perform basic operations
such as creating and deleting objects.
The documentation will be
delievered both on cd and
paper.
Summary
Satisfied
The documentation explains how to use the glove
to perform the supported
functions.
All documentation for the
user is written in US English.
The documentation follows
the Requirements Specification.
Satisfied
There was not sufficient
time to write a good description on how to modify
the system’s hardware.
All documentation for the
code is in US English.
Not satisfied
Documentation for the code
is written so the code is
easy to understand, making
it easier to modify the system.
Satisfied
Satisfied
Satisfied
Satisfied
Satisfied
Satisfied
Table 4.8: Satisfaction of documentation requirements
169
Chapter 5
Possible improvements
This chapter describes various alterations that would improve the quality of the system.
•
•
•
•
Enabling operations on sub-objects: Being able to create, move and rotate
sub-objects such as vertices and faces would make it possible to model far more
complex objects using the glove. As Blender handles things very differently in edit
mode compared to object mode, this would probably require substantial work, and
possibly a complete rewrite of the Blender scripts.
Enabling stereoscopic view with polarized glasses: The customer’s original
wish was that the system would allow the user to see the scene inn full 3D using the
twin projectors in the 3D lab together with a pair of polarized glasses. This would
make the system far more intuitive to use, as it would be far easier for the user to see
how far away from the pointer cone an object is. It is difficult to say how much work
this would require, as it would either require editing Blender’s source code, or placing
an application between Blender and OpenGL.
Adding more of Blender’s functionality to the glove: As the system is now,
the user has to use the mouse for many of Blender’s important functions, such as
creating new objects or assigning materials to existing objects. This makes the
system harder and less intuitive to use, and so it could be beneficial if more
functionality was added to the glove. One way to do this is to add more buttons to
the glove, giving additional functionality to the extra buttons. A simpler and easier
way to achieve this, however, is to implement keyboard shortcuts in the Blender
scripts. This could eliminate the need for using the mouse while modeling, making
the system far more comfortable to use.
Resolving issues with vibrating pointer: Because the FoB sensor is sensitive to
noise from other electronic devices, and because of small inaccuracies in the sensor,
the values it sends to the system will have small changes even if the sensor is not
moving. This can result in the cone pointer in Blender seeming to vibrate, which
makes the system less comfortable to use. Fixing this issue so the movement of the
cone and other objects feels more smooth will improve the usability of the system.
One possible way to fix this is to cut away some of the digits of the values, to make
the variations less visible. Cutting of too many digits would probably do more harm
170
CHAPTER 5. POSSIBLE IMPROVEMENTS
than good, though, as the pointer would jump from point to point rather than move
smoothly between them.
171
Chapter 6
Difficulties and solutions
This chapter describes what problems occured while implementing the system, and how
these problems were solved. While the final amount of code is not particularly large, many
difficulties arose during the implementation of the system. We describe what difficulties we
had in completing the system, and how we responded to these difficulties.
6.1
Airwolf VR glove
During the implementation of the Airwolf VR glove, we encountered some problems. We
had to adjust the position of both the buttons and FoB sensor several times, because either
the customer or the group thought or felt wrong to have them in the current position. Our
conclusion was that different people wanted to have the buttons/sensor in different places,
it was a very individual thing. The position the buttons/sensor where placed was
instructed by the customer. We also had a problem with one of the buttons stop’ed
working. We finally had to swap this with a new button.
6.2
Holoserver
One of the difficulties we had was in determining which parts of Hololib were needed for
Holoserver. The application Jahn Otto Andersen created consisted of Hololib and Holomol,
where Holomol used Hololib to read data from the hardware. Because of this, we believed
at first that all of Hololib was necessary to read data from the hardware, and spent some
time trying to get all of it to work. It turned out that only a small portion of Hololib
actually had any significance for communicating with the hardware, so the problem was
not as big as we first assumed. At first, we attempted to use Hololib’s code to
communicate with the FoB sensor, but this did not work as expected, and it took some
time to get the documentation for the sensors. We found, however, that GLISA had
modified the code from Hololib slightly, so that it worked with the sensor. We therefore
used GLISA’s code as a basis for communicating with the FoB sensor.
172
CHAPTER 6. DIFFICULTIES AND SOLUTIONS
6.3
Blender scripting interface
During the implementation of BSI, a few problems occurred unexpectedly. One of these
where the Blender Python API’s widely different handling of complete objects like
cylinders, cones and so on, and the vertices these objects consist of. This resulted in the
project’s original goal of being able to manipulate not just objects, but also vertices, being
much harder to complete, and ultimately lead to our failing to do so because of a shortage
of time. A second major problem involved making Blender run the plug-in regularly to be
able to poll Holoserver for data. This was caused by, but also, in the end, solved using,
Blender’s event driven nature. Our solution consists of making the script run every time
Blender calls for a redraw of its viewport and also putting a redraw event in the
event-queue to ensure the script will be run again. This solution though it works, is not an
especially good solution, as it makes it impossible to guarantee a response time. The
Blender community is currently developing a timer-function for Blender’s Python API
that, when finished, could replace our current solution to make the response time easier to
guarantee. We also had some problems implementing both BSI and the Holoserver at the
same time, because BSI needs the data from Holoserver to work. We solved this problem
by making a Java file to socket application, that emulated the Holoserver. It only read the
data from a text file instead. By having multiple text files with different input data, we
could simulate different behavior from the glove.
173
CHAPTER 6. DIFFICULTIES AND SOLUTIONS
174
Part VI
Test documentation
175
176
CONTENTS
Contents
1
2
Introduction
181
1.1
Purpose . . . . . . . . . . . . . . . . . . . . . . . . . . . . . . . . . . . . . . 181
1.2
Scope . . . . . . . . . . . . . . . . . . . . . . . . . . . . . . . . . . . . . . . 181
1.3
Overview
. . . . . . . . . . . . . . . . . . . . . . . . . . . . . . . . . . . . . 181
Test procedures
183
2.1
Test plan
. . . . . . . . . . . . . . . . . . . . . . . . . . . . . . . . . . . . . 183
2.2
Test problems . . . . . . . . . . . . . . . . . . . . . . . . . . . . . . . . . . . 183
2.3
Test requirements . . . . . . . . . . . . . . . . . . . . . . . . . . . . . . . . . 183
2.4
Error classification . . . . . . . . . . . . . . . . . . . . . . . . . . . . . . . . 184
3
Unit test specification
186
4
Module test specification
187
5
4.1
Holoserver test case . . . . . . . . . . . . . . . . . . . . . . . . . . . . . . . . 187
4.2
BSI test case . . . . . . . . . . . . . . . . . . . . . . . . . . . . . . . . . . . 188
System test specification
189
5.1
Functional requirement test cases . . . . . . . . . . . . . . . . . . . . . . . . 189
5.2
Usability test cases . . . . . . . . . . . . . . . . . . . . . . . . . . . . . . . . 194
6
Acceptance test
196
7
Test log
198
8
Test summary
202
8.1
Unit review summary . . . . . . . . . . . . . . . . . . . . . . . . . . . . . . . 202
8.2
Module test summary . . . . . . . . . . . . . . . . . . . . . . . . . . . . . . . 202
8.3
System test summary . . . . . . . . . . . . . . . . . . . . . . . . . . . . . . . 202
8.4
Acceptance test summary . . . . . . . . . . . . . . . . . . . . . . . . . . . . 202
A.5 Test case template . . . . . . . . . . . . . . . . . . . . . . . . . . . . . . . . 204
177
CONTENTS
178
TABLES
Tables
2.1
Possible problems and solutions when testing . . . . . . . . . . . . . . . . . . 184
2.2
Test requirements . . . . . . . . . . . . . . . . . . . . . . . . . . . . . . . . . 184
2.3
Error classification . . . . . . . . . . . . . . . . . . . . . . . . . . . . . . . . 185
4.1
Module test case 1 . . . . . . . . . . . . . . . . . . . . . . . . . . . . . . . . 187
4.2
Module test case 2 . . . . . . . . . . . . . . . . . . . . . . . . . . . . . . . . 188
5.1
System test case 1 . . . . . . . . . . . . . . . . . . . . . . . . . . . . . . . . 189
5.2
System test case 2 . . . . . . . . . . . . . . . . . . . . . . . . . . . . . . . . 190
5.3
System test case 3 . . . . . . . . . . . . . . . . . . . . . . . . . . . . . . . . 190
5.4
System test case 4 . . . . . . . . . . . . . . . . . . . . . . . . . . . . . . . . 191
5.5
System test case 5 . . . . . . . . . . . . . . . . . . . . . . . . . . . . . . . . 191
5.6
System test case 6 . . . . . . . . . . . . . . . . . . . . . . . . . . . . . . . . 192
5.7
System test case 7 . . . . . . . . . . . . . . . . . . . . . . . . . . . . . . . . 192
5.8
System test case 8 . . . . . . . . . . . . . . . . . . . . . . . . . . . . . . . . 193
5.9
System test case 9 . . . . . . . . . . . . . . . . . . . . . . . . . . . . . . . . 193
5.10 System test case 10 . . . . . . . . . . . . . . . . . . . . . . . . . . . . . . . . 194
5.11 System test case 11 . . . . . . . . . . . . . . . . . . . . . . . . . . . . . . . . 194
5.12 System test case 12 . . . . . . . . . . . . . . . . . . . . . . . . . . . . . . . . 195
6.1
Scoring description . . . . . . . . . . . . . . . . . . . . . . . . . . . . . . . . 196
6.2
Customer product evaluation . . . . . . . . . . . . . . . . . . . . . . . . . . 197
7.1
Module test case 1 result . . . . . . . . . . . . . . . . . . . . . . . . . . . . . 198
7.2
Module test case 2 result . . . . . . . . . . . . . . . . . . . . . . . . . . . . . 198
7.3
System test case 1 result . . . . . . . . . . . . . . . . . . . . . . . . . . . . . 198
7.4
System test case 2 result . . . . . . . . . . . . . . . . . . . . . . . . . . . . . 199
7.5
System test case 3 result . . . . . . . . . . . . . . . . . . . . . . . . . . . . . 199
7.6
System test case 4 result . . . . . . . . . . . . . . . . . . . . . . . . . . . . . 199
7.7
System test case 5 result . . . . . . . . . . . . . . . . . . . . . . . . . . . . . 199
7.8
System test case 6 result . . . . . . . . . . . . . . . . . . . . . . . . . . . . . 199
7.9
System test case 7 result . . . . . . . . . . . . . . . . . . . . . . . . . . . . . 200
7.10 System test case 8 result . . . . . . . . . . . . . . . . . . . . . . . . . . . . . 200
7.11 System test case 9 result . . . . . . . . . . . . . . . . . . . . . . . . . . . . . 200
179
TABLES
7.12 System test case 10 result . . . . . . . . . . . . . . . . . . . . . . . . . . . . 200
7.13 System test case 11 result . . . . . . . . . . . . . . . . . . . . . . . . . . . . 201
7.14 System test case 12 result . . . . . . . . . . . . . . . . . . . . . . . . . . . . 201
7.15 Test results . . . . . . . . . . . . . . . . . . . . . . . . . . . . . . . . . . . . 201
A.1 Test case template . . . . . . . . . . . . . . . . . . . . . . . . . . . . . . . . 204
A.2 Test log template . . . . . . . . . . . . . . . . . . . . . . . . . . . . . . . . . 204
180
Chapter 1
Introduction
This document contains all documented testing of Glove3D.
1.1
Purpose
The purpose of testing is to ensure that all parts of the product functions properly. Even
though the product may seem to function properly while implementing it, there is a big
chance some parts may not work as intended or at all.
1.2
Scope
Most IT projects spend around 40% of their budget on testing. Since this projects has a
very low budget we are only able to spend around 5% on testing. Because of this, we will
only do a minimum of testing. All functional requirements will have their own testcase, but
we will do very few module tests. The units will be reviewed but not tested. The template
used for the test cases and test case results can be found in Appendix A.5. Because all
system test uses the Airwolf VR-glove no individual tests of it will be conducted.
1.3
Overview
The chapters of this document are structured in the following way:
Test procedures contains our testing guideline and test plan.
• Unit test specification contains all test cases regarding units of the system.
• Module test specification contains all test cases regarding modules of the system.
• System test specification contains all test cases regarding the system as a whole.
• Acceptance test specification contains the description and result of the
acceptance test done by the customer.
•
181
CHAPTER 1. INTRODUCTION
•
Test plan contains the plan for when the tests are to be executed.
•
Test log contains the results of all tests.
•
Test summary contains a summary of the test log.
182
Chapter 2
Test procedures
This chapter contains general information about how and when we will conduct the tests.
2.1
Test plan
If we are to repair problems found during testing, we have to do it in good time before the
project deadline. The project deadline is on the 24th of November and we need at least
four days to complete all the documentation for the implementation. The first test date is
set to a date we know the implementation will be done. The second date is set in such a
way that we have time to repair problems found the first time and have time to complete
the implementation documentation.
The two dates of testing:
1. 18th of November
2. 20th of November
2.2
Test problems
Because of the short time frame for testing, we have to be aware of most possible problems
in advance. Table 2.1 shows possible problems and the solutions we have chosen for them.
2.3
Test requirements
To ensure quality when testing we have made a list of requirements that are to be followed
at all times. These requirements are shown in Table 2.2. If we fail to follow any of these
requirements, this will be noted in chapter 8, test summary.
183
CHAPTER 2. TEST PROCEDURES
Problem
A test is obsolete because user actions
has changed
A test case is not implemented
A test can not be conducted because of
glove malfunction
Solution
Change the test according to correct
user action
Mark tested output and result with not
implemented
If the test can not be conducted without the glove, wait until the glove has
been repaired.
Table 2.1: Possible problems and solutions when testing
Requirement
TR-1
TR-2
TR-3
TR-4
TR-5
TR-6
TR-7
Description
If an error is found during the test, the test
shall be repeated after correcting the error.
Test data used during the tests is to span a
reasonable size of the input data domain for
the component.
Should an error be found during a module
test, the test shall be repeated after the error
has been fixed.
The input data for the module tests must
cover a reasonable size of the input data domain for the module.
All testing must be done by two people working together.
All functional requirements must be tested.
If a problem occurs during the system tests
that the project does not have time to fix,
this problem shall be documented thoroughly
enough to allow a later project or person to
correct the error.
Table 2.2: Test requirements
2.4
Error classification
Any error found during testing shall be classified. By doing this we ensure that serious
errors can be treated first. Table 2.3 describes the different levels of seriousness. High level
errors must be treated. Medium and low level errors will only be fixed if we have time, but
will be thoroughly documented.
184
CHAPTER 2. TEST PROCEDURES
Level
Low
Medium
High
Description
Do not prevent the system from functioning properly, for example not correct colors.
Makes the system give inaccurate results or prevent non-crucial parts of the
system to function properly.
Makes the system give incorrect results
or crash.
Table 2.3: Error classification
185
Chapter 3
Unit test specification
In most projects you implement test classes to test methods and objects. We do not have
enough time to do that. Therefore we will do a code review. We think this will be the most
efficient way based on the available time.
The following checklists must be used during the code review:
•
Does the code and comments correspond with the project code standard?
•
Is there only one code line per text line?
•
Does any variable and constant have a confusing name?
•
Could any variable be set as a constant?
•
Does any method have a confusing name?
•
Is the return value correct for every return point in every method?
•
Is the correct comparison operators used?
•
Are all boolean expression correct?
186
Chapter 4
Module test specification
This chapter contains all test cases for the modules of the system. A module consists of
several classes and can be used as a component for other systems. As long as the interface
to the module stay the same, you can change it without any regards to the rest of the
system. We have two modules in our system the Blender Scripting Interface(BSI) and
Holoserver. The test cases are divided into cases for each of these modules. Since we have
done extensive testing while programming, only one case is made for each of the modules.
4.1
Holoserver test case
Identification
Description
Environment
Execution and input
MT-1
Test the speed of connecting to and getting information
from Holoserver.
Holoserver running.
Running Holoserver test program:
1. Start holotest.py, this will connect to the server.
2. Read the output from holotest.py it will contain
the min,max and average connection and information retrieval latency.
Expected output
Min,max and average latency should be less than 20ms.
Table 4.1: Module test case 1
187
CHAPTER 4. MODULE TEST SPECIFICATION
4.2
BSI test case
Identification
Description
Environment
Execution and input
MT-2
Test if BSI moves the cone in a perfect circle when the
data given to it form a perfect circle.
Blender in Object Mode, BSI and Java BSI test server
running. Test scene 1 open.
Perfect circle test:
1. The test server feeds BSI with matrices containing
a perfect circle movement.
Expected output
The cursor cone should rotate in a perfect clockwise circle.
Table 4.2: Module test case 2
188
Chapter 5
System test specification
This chapter contains the test cases for the system as a whole. Since tests regarding
correctness of the inner workings of the system is done in the unit and module tests, this
chapter will focus on testing the requirements given in the Requirements Specification. All
functional requirements will be tested. We will also do some usability tests to check how
intuitive the glove usage is. The usability test cases will be done by one of the group
members not involved in implementation.
5.1
Functional requirement test cases
Identification
Description
Environment
Execution and input
ST-1
Test if item selection works. FREQ1 is tested.
Blender in Object Mode, BSI and Holoserver running.
Test scene 1 open.
Select the three objects in the scene:
1. Select the cube by moving the pointer inside the
cube and pressing the index finger button.
2. Select the sphere by moving the pointer inside the
sphere and pressing the index finger button.
3. Select the pyramid by moving the pointer inside
the pyramid and pressing the index finger button.
Expected output
The selected item should be outlined in pink.
Table 5.1: System test case 1
189
CHAPTER 5. SYSTEM TEST SPECIFICATION
Identification
Description
Environment
Execution and input
ST-2
Test if item deselection works. FREQ2 is tested.
Blender in Object Mode, BSI and Holoserver running.
Test scene 1 open. The sphere is selected.
Deselect the sphere:
1. Deselect the sphere by putting the pointer far away
from the sphere and push the index finger button.
Expected output
The sphere should no longer be selected, and change
back to its original color.
Table 5.2: System test case 2
Identification
Description
Environment
Execution and input
ST-3
Test if creating a new object works. FREQ3 is tested.
Blender in Object Mode, BSI and Holoserver running.
An empty scene is open.
Creating an object:
1. Move the pointer to the location you want to make
an object and push the index finger.
2. Push space on the keyboard.
3. Move mouse over mesh in the add menu.
4. Click on Cone in the mesh menu.
5. Click OK.
Expected output
A new Cone should be added at the pointers location.
Table 5.3: System test case 3
190
CHAPTER 5. SYSTEM TEST SPECIFICATION
Identification
Description
Environment
Execution and input
ST-4
Test if adding vertex to an object works. FREQ4 is
tested.
Blender in Object Mode, BSI and Holoserver running.
Test scene 1 is open.
Adding a vertex to the cube:
1. Select the cube by pushing the index finger button
inside the cube.
2. Move the pointer to the location you want to add
a vertex. This must be on an existing edge of the
object.
3. While pushing down V on the keyboard, click index finger button.
Expected output
A new vertex should be added to the object at the location of the pointer on an existing edge.
Table 5.4: System test case 4
Identification
Description
Environment
Execution and input
ST-5
Test if deleting an item works. FREQ5 is tested.
Blender in Object Mode, BSI and Holoserver running.
Test scene 1 is open.
Deleting the sphere:
1. Select the sphere by pushing index finger button
inside the sphere.
2. Press Del on the keyboard.
3. Press Enter on the keyboard.
Expected output
The sphere should no longer be part the scene.
Table 5.5: System test case 5
191
CHAPTER 5. SYSTEM TEST SPECIFICATION
Identification
Description
Environment
Execution and input
ST-6
Test if moving an item works. FREQ6 is tested.
Blender in Object Mode, BSI and Holoserver running.
Test scene 1 is open.
Moving the sphere:
1. Select the sphere by pushing and holding index
finger button inside the sphere.
2. Move the pointer to the left and release the index
finger button.
Expected output
The sphere should be moved to the left of the users point
of view.
Table 5.6: System test case 6
Identification
Description
Environment
Execution and input
ST-7
Test if rotating an item an item works. FREQ7 is tested.
Blender in Object Mode, BSI and Holoserver running.
Test scene 1 is open.
Rotating the pyramid:
1. Move pointer inside the pyramid and press and
hold the index finger button.
2. Rotate your hand clockwise 90 degrees and release
the index finger button.
Expected output
The pyramid should be rotated 90 degrees clockwise
from the users point of view.
Table 5.7: System test case 7
192
CHAPTER 5. SYSTEM TEST SPECIFICATION
Identification
Description
Environment
Execution and input
ST-8
Test if adding texture to an object works. FREQ8 is
tested.
Blender in Object Mode, BSI and Holoserver running.
Test scene 1 is open.
Adding a texture to the sphere:
1. Select the sphere by pushing the index finger button while the pointer is inside the sphere.
2. Press and hold T, then push the index finger button.
3. Select brick wall texture from the popup list.
4. Press F12 on the keyboard to render the scene.
Expected output
The sphere should have a brick texture in the rendered
window.
Table 5.8: System test case 8
Identification
Description
Environment
Execution and input
ST-9
Test if moving and rotating the view works. FREQ9 is
tested.
Blender in Object Mode, BSI and Holoserver running.
Test scene 1 is open.
Moving and rotating the view:
1. Push and hold the middle finger button.
2. Move and rotate your hand to alter the view.
Expected output
The view should rotate and move according to the hand
movement.
Table 5.9: System test case 9
193
CHAPTER 5. SYSTEM TEST SPECIFICATION
5.2
Usability test cases
Identification
Description
Environment
Execution and input
ST-10
Test if moving an object in 3D space feels intuitive.
Blender in Object Mode, BSI and Holoserver running.
Test scene 1 is open.
Make the sphere and pyramid change places:
1. Instruct the user to move the sphere away to make
room for the pyramid.
2. Instruct the user to move the pyramid where the
sphere was.
3. Instruct the user to move the sphere to the last
location of the pyramid.
Expected output
The user should be able to do this within 30 seconds
with no help.
Table 5.10: System test case 10
Identification
Description
Environment
Execution and input
ST-11
Test if rotating an object in 3D space feels intuitive.
Blender in Object Mode, BSI and Holoserver running.
Test scene 1 is open.
Rotating the pyramid to see its bottom only:
1. Instruct the user to rotate the pyramid in such a
way that only the bottom is visible.
Expected output
The user should be able to do this within 30 seconds
with no help.
Table 5.11: System test case 11
194
CHAPTER 5. SYSTEM TEST SPECIFICATION
Identification
Description
Environment
Execution and input
ST-12
Testing if moving and rotating the view feels intuitive.
Blender in Object Mode, BSI and Holoserver running.
Test scene 1 is open.
Moving and rotating the view:
1. Instruct the user to move the view in such a way
that you are looking at the objects from the opposite side.
Expected output
The user should be able to do this within 30 seconds
with no help.
Table 5.12: System test case 12
195
Chapter 6
Acceptance test
Acceptance test is a test to see weather or not we have made the system according to the
customer wishes.
The test will be conducted very much like the system test. The only difference is that the
customer will first do the tests using a mouse. After being given a short introduction about
glove usage, the customer will do the same tests with the glove. By doing the same actions
with both he will get a much better foundation for evaluating the product.
The customer will evaluate our product by giving statements a score from 0-3. 3 being the
best score. A short description for each number 0-3 can be found in Table 6.1. We have
divided the evaluating into two tables; one for the product itself and one for the product
documentation. Product evaluation can be found in Table 6.2. Because we were not able
to deliver a finished product with all requirements specified in the Requirements
Specification, the customer will evaluate based on the feature we have implemented.
Score
0
1
2
3
Description
Hard
Fair
Easy
Very easy
Table 6.1: Scoring description
196
CHAPTER 6. ACCEPTANCE TEST
Description
How easy is selecting an object with the glove?
How easy is selecting multiple objects with the glove?
How easy is moving an object with the glove?
How easy is rotating an object with the glove?
How easy is moving multiple objects with the glove?
How easy is rotating multiple objects with the glove?
How easy is moving the view with the glove?
How easy is rotating the view with the glove?
Table 6.2: Customer product evaluation
197
Score
2
2
3
3
3
3
Not evaluated
Not evaluated
Chapter 7
Test log
The following tables displays the result from all test cases given in chapters 4, 5 and 6.
Each test case will have their own table with results. All tests are summarized in Table
7.15.
Identification
Expected output
Tested output
Result
Conducted by
Test date
MT-1
Min,max and average latency should be less than 20ms.
Min = 13, Average = 16ms , Max = 19ms.
Passed
Jørgen Braseth
20 - 11 - 2005
Table 7.1: Module test case 1 result
Identification
Expected output
Tested output
Result
Conducted by
Test date
MT-2
The cursor cone should rotate in a perfect clockwise circle.
The cursor cone rotated in a perfect clockwise circle.
Passed
Jørgen Braseth
20 - 11 - 2005
Table 7.2: Module test case 2 result
Identification
Expected output
Tested output
Result
Conducted by
Test date
ST-1
The selected item should be outlined in pink.
All selected items where outlined in pink.
Passed
Ola Haavik and Jørgen Braseth
18 - 11 - 2005
Table 7.3: System test case 1 result
198
CHAPTER 7. TEST LOG
Identification
Expected output
Tested output
Result
Conducted by
Test date
ST-2
The sphere should no longer be selected, and change
back to its original color.
The sphere was deselected.
Passed
Ola Haavik and Jørgen Braseth
18 - 11 - 2005
Table 7.4: System test case 2 result
Identification
Expected output
Tested output
Result
Conducted by
Test date
ST-3
A new Cone should be added at the pointers location.
A new Cone was added at the pointers location.
Passed
Ola Haavik and Jørgen Braseth
18 - 11 - 2005
Table 7.5: System test case 3 result
Identification
Expected output
Tested output
Result
Conducted by
Test date
ST-4
A new vertex should be added to the object at the location of the pointer on an existing edge.
Not implemented
Not implemented
Ola Haavik and Jørgen Braseth
18 - 11 - 2005
Table 7.6: System test case 4 result
Identification
Expected output
Tested output
Result
Conducted by
Test date
ST-5
The sphere should no longer be part the scene.
The sphere is no longer a part of the scene.
Passed
Ola Haavik and Jørgen Braseth
18 - 11 - 2005
Table 7.7: System test case 5 result
Identification
Expected output
Tested output
Result
Conducted by
Test date
ST-6
The sphere should be moved to the left of the users point
of view.
The sphere was moved to the left.
Passed
Ola Haavik and Jørgen Braseth
18 - 11 - 2005
Table 7.8: System test case 6 result
199
CHAPTER 7. TEST LOG
Identification
Expected output
Tested output
Result
Conducted by
Test date
ST-7
The pyramid should be rotated 90 degrees clockwise
from the users point of view.
The pyramid was rotated 90 degrees clockwise.
Passed
Ola Haavik and Jørgen Braseth
18 - 11 - 2005
Table 7.9: System test case 7 result
Identification
Expected output
Tested output
Result
Conducted by
Test date
ST-8
The sphere should have a brick texture in the rendered
window.
Not implemented
Not implemented
Ola Haavik and Jørgen Braseth
None
Table 7.10: System test case 8 result
Identification
Expected output
Tested output
Result
Conducted by
Test date
ST-9
The view should rotate and move according to the hand
movement
The view rotated and moved naturally according to the
hand movement.
Passed
Ola Haavik and Jørgen Braseth
18 - 11 - 2005
Table 7.11: System test case 9 result
Identification
Expected output
Tested output
Result
Conducted by
Test date
ST-10
The user should be able to do this within 45 seconds
with no help.
The user did this in 37 seconds.
Passed
Ola Haavik and Jørgen Braseth
18 - 11 - 2005
Table 7.12: System test case 10 result
200
CHAPTER 7. TEST LOG
Identification
Expected output
ST-11
The user should be able to do this within 45 seconds
with no help.
The user did this in 25 seconds.
Passed
Ola Haavik and Jørgen Braseth
18 - 11 - 2005
Tested output
Result
Conducted by
Test date
Table 7.13: System test case 11 result
Identification
Expected output
ST-12
The user should be able to do this within 45 seconds
with no help.
The user did this in 40 seconds.
Passed
Ola Haavik and Jørgen Braseth
18 - 11 - 2005
Tested output
Result
Conducted by
Test date
Table 7.14: System test case 12 result
Test identification
MT-1
MT-2
ST-1
ST-2
ST-3
ST-4
ST-5
ST-6
ST-7
ST-8
ST-9
ST-10
ST-11
ST-12
Result
Passed
Passed
Passed
Passed
Passed
Not implemented
Passed
Passed
Passed
Not implemented
Passed
Passed
Passed
Passed
Table 7.15: Test results
201
Chapter 8
Test summary
This chapter provides a summary of all the tests. It is divided up into sections based on
the four different test types we have done.
8.1
Unit review summary
Looking for errors by review worked very well for this project. Our implementation does
not have many lines of code, and the review took only three hours. Only a few errors was
found and they where all corrected during the review.
8.2
Module test summary
We did two module tests and both passed. The people responsible for coding had not done
that kind of coding before. Because of this a lot of testing was done during the
implementation. Therefore we are confident that the modules function properly.
8.3
System test summary
Two of the system tests could not be conducted because the functionality was not
implemented. The rest of the tests were conducted without any errors. You can never
conclude that code is error free, but since none of our tests failed we are confident that our
product will function properly.
8.4
Acceptance test summary
The acceptance test went very well. We got a tip to move the Flock of Birds (FoB) sensor
to the index finger. After trying the product with an ad lib FoB attachment on the index
202
CHAPTER 8. TEST SUMMARY
finger, he was very pleased. We could not test moving and rotating the view because the
middle finger button did not function properly. This was a hardware error and will be fixed
straight away. We had knowledge about this error but did not have time to fix it in time
for the acceptance test.
The customer was also very pleased with the product as a whole. He felt that there was
very little work needed to make this a usable product. The only reason he felt that
selecting an object was not very good, was because there was no stereoscopic view. It was
sometimes hard to select and object because you could not see how far into the view the
object was. In our evaluation we have listed this feature as something a future version of
our product should have.
203
CHAPTER 8. TEST SUMMARY
A.5
Test case template
This Appendix describes the template we use for making the test cases. All test cases are
made according to the test case template found in Table A.1. The template for the test log
can be found in Table A.2.
Identification
Description
Environment
Execution and input
MT-X for module tests and ST-X for system tests, where
X is the number of the test.
A short description on what this case test is testing, for
instance a method, functional requirement etc.
Describes the setup done prior to the test. Installation
of the system is considered done according to the installation manual.
Describes the input and steps needed to execute the test:
1. Step 1
2. Step 2
3. etc.
Expected output
Describes the expected output of the test.
Table A.1: Test case template
Identification
Expected output
Tested output
Result
Conducted by
Test date
MT-X for module tests and ST-X for system tests, where
X is the number of the test.
Describes the expected output of the test.
Describes the output from the test.
Describes weather the test failed or passed and why.
The person or persons who conducted the test.
The date the test was executed.
Table A.2: Test log template
204
Part VII
User Manuals
205
206
CONTENTS
Contents
1
Introduction
211
1.1
Purpose . . . . . . . . . . . . . . . . . . . . . . . . . . . . . . . . . . . . . . 211
1.2
Scope . . . . . . . . . . . . . . . . . . . . . . . . . . . . . . . . . . . . . . . 211
1.3
Overview
. . . . . . . . . . . . . . . . . . . . . . . . . . . . . . . . . . . . . 211
2
Getting started
212
3
User guide
214
3.1
Creating an object . . . . . . . . . . . . . . . . . . . . . . . . . . . . . . . . 214
3.2
Selecting an item . . . . . . . . . . . . . . . . . . . . . . . . . . . . . . . . . 215
3.2.1
Selecting more than one item . . . . . . . . . . . . . . . . . . . . . . 216
3.3
Deselecting an item . . . . . . . . . . . . . . . . . . . . . . . . . . . . . . . . 216
3.4
Deleting an item . . . . . . . . . . . . . . . . . . . . . . . . . . . . . . . . . 216
3.5
Moving an item . . . . . . . . . . . . . . . . . . . . . . . . . . . . . . . . . . 217
3.5.1
Moving more than one item . . . . . . . . . . . . . . . . . . . . . . . 217
3.6
Rotating an item . . . . . . . . . . . . . . . . . . . . . . . . . . . . . . . . . 217
3.7
Moving and reorienting the view . . . . . . . . . . . . . . . . . . . . . . . . . 217
207
CONTENTS
208
FIGURES
Figures
3.1
Creating an object . . . . . . . . . . . . . . . . . . . . . . . . . . . . . . . . 215
3.2
The cone is red when it is not touching any items . . . . . . . . . . . . . . . 216
3.3
The cone turns green when it is touching an item . . . . . . . . . . . . . . . 216
209
FIGURES
210
Chapter 1
Introduction
This document contains an installation and user manual for Glove3D.
1.1
Purpose
The purpose of this document is to make it easier for users of Glove3D to install and use
the system. It satisfies the non-functional requirements UD1, UD2, UD3, UD4, ID1, ID2
and ID3. For more details about these requirements, see the Requirements Specification
chapter.
1.2
Scope
This document containts an installation guide and user manual for Glove3D.
1.3
Overview
The chapters of this document are structured in the following way:
•
•
Getting started contains detailed instructions for installing and starting the
system.
User guide contains a user guide for the system.
211
Chapter 2
Getting started
On the Glove3D cd, the following files are present:
•
Report.pdf is Glove3D’s project report.
•
Src is a folder which contains all the source code for Glove3D.
•
Server is the executable file for Holoserver.
•
Glove3D.blend is the Blender scene for Glove3D.
•
PythonDoc.pdf is the documentation for the Python code created for this project.
To install and start Glove3D, the following prerequisites need to be met:
•
The Linux kernel must be version 2.4 or newer.
•
Python 2.3 or newer must be installed on your system.
•
Blender must be installed on your system.
•
•
The Flock of Birds hardware must be connected to the computer and the sensor set
to ”Fly”. When set to ”Fly”, the lamp will blink 5 times to signal that the sensor is
working.
The Airwolf VR glove must be connected to the computer.
To install Glove3D, perform the following procedure:
1. Insert the Glove3D cd into the cd-rom.
2. Create a folder on your harddrive to hold the Glove3D application.
3. Copy the ”server” file from the cd to the folder.
4. Copy the ”Glove3D.blend” file from the cd to the folder.
5. Make the ”‘server”’ file executable, for instance by using ”‘chmod a+x server”’.
When you wish to begin working with Glove3D, perform the following procedure:
212
CHAPTER 2. GETTING STARTED
1. Ensure that the hardware is connected and that the Flock of Birds sensor is set to
”Fly”.
2. Start the ”server” executable.
3. Open ”Glove3D.blend” in Blender.
4. Select ”File, Save as” from Blender’s menu system, and save the scene in a new file.
You are now ready to begin working with the Glove.
213
Chapter 3
User guide
This chapter contains a user guide for Glove3D.
3.1
Creating an object
A new object is created by pressing Space and then selecting the type of object to be
created with the mouse cursor. See Figure 3.1. The new object will show up centered
around the Blender’s 3D cursor (the black crosshair with a red and white circle). The 3D
cursor can be positioned by clicking the index finger button on the glove while the pointer
cone is not inside any other objects.
214
CHAPTER 3. USER GUIDE
Figure 3.1: Creating an object
3.2
Selecting an item
An item is selected by pushing the index finger button on the glove, and holding it down
briefly, when the tip of the cone is inside the item to be selected. The cone turns green
when it is close enough. The item remains selected after the index finger button has been
released. See Figure 3.3.
215
CHAPTER 3. USER GUIDE
Figure 3.2: The cone is red when it is not touching any items
Figure 3.3: The cone turns green when it is touching an item
3.2.1
Selecting more than one item
Several items can be selected by selecting them as described above. Each time you select
an object, this object will be added to the selection.
3.3
Deselecting an item
A selected item can be deselected by selecting it briefly a second time. Alternately you can
deselect all selected items by pushing the index finger button briefly while the pointer-cone
is not inside any objects.
3.4
Deleting an item
An item is deleted by first selecting it, see section 3.2, then pressing Delete on the
keyboard. Confirm the deletion by pressing Enter on the keyboard.
216
CHAPTER 3. USER GUIDE
3.5
Moving an item
Items can be moved by first selecting them, see section 3.2, then pushing the index finger
button and moving the hand to wanted position, before releasing the index finger button.
While in object manipulating mode, the pointer-cone is colored blue.
3.5.1
Moving more than one item
As above, with the pre-condition that several items have been selected first.
3.6
Rotating an item
An item is rotated by first selecting it, see section 3.2, then pushing the index finger
button. Rotate the hand until the item on the screen has the correct orientation and release
the grip. Note that the object(s) will be rotated with the tip of the pointing-cone as the
pivot point. As when moving items, the pointer-cone is colored blu while rotating them.
3.7
Moving and reorienting the view
The view is moved and reoriented by pushing the middle finger button, and moving and/or
reorienting the hand until the view is satisfactory. Release the grip of the middle finger
button to stop changing the view. While in view manipulating mode, the pointer-cone is
colored yellow.
217
CHAPTER 3. USER GUIDE
218
Part VIII
Evaluation
219
220
CONTENTS
Contents
1
2
Introduction
1.1
Purpose . . . . . . . . . . . . . . . . . . . . . . . . . . . . . . . . . . . . . . 227
1.2
Scope . . . . . . . . . . . . . . . . . . . . . . . . . . . . . . . . . . . . . . . 227
1.3
Overview
. . . . . . . . . . . . . . . . . . . . . . . . . . . . . . . . . . . . . 227
The process
229
2.1
The roles . . . . . . . . . . . . . . . . . . . . . . . . . . . . . . . . . . . . . . 229
2.2
Quality Assurance
2.3
Communication and cooperation . . . . . . . . . . . . . . . . . . . . . . . . . 230
2.4
Problems and difficulties . . . . . . . . . . . . . . . . . . . . . . . . . . . . . 230
2.5
Accomplishment of the phases . . . . . . . . . . . . . . . . . . . . . . . . . . 231
2.6
3
4
227
. . . . . . . . . . . . . . . . . . . . . . . . . . . . . . . . 229
2.5.1
Planning . . . . . . . . . . . . . . . . . . . . . . . . . . . . . . . . . . 231
2.5.2
Preliminary Study . . . . . . . . . . . . . . . . . . . . . . . . . . . . 231
2.5.3
Requirements specification . . . . . . . . . . . . . . . . . . . . . . . . 231
2.5.4
Construction . . . . . . . . . . . . . . . . . . . . . . . . . . . . . . . 232
2.5.5
Implementation . . . . . . . . . . . . . . . . . . . . . . . . . . . . . . 232
2.5.6
Testing . . . . . . . . . . . . . . . . . . . . . . . . . . . . . . . . . . . 232
Person-hours planned and consumed . . . . . . . . . . . . . . . . . . . . . . 232
The final result
234
3.1
Result goal achievement . . . . . . . . . . . . . . . . . . . . . . . . . . . . . 234
3.2
Effect goal achievement . . . . . . . . . . . . . . . . . . . . . . . . . . . . . . 235
The customer and the given task
236
4.1
The customer . . . . . . . . . . . . . . . . . . . . . . . . . . . . . . . . . . . 236
4.2
Communication with the customer . . . . . . . . . . . . . . . . . . . . . . . 236
4.3
The given task . . . . . . . . . . . . . . . . . . . . . . . . . . . . . . . . . . 236
221
CONTENTS
5
Used tools
5.1
5.2
5.3
6
7
238
Project tools . . . . . . . . . . . . . . . . . . . . . . . . . . . . . . . . . . . . 238
5.1.1
Linux . . . . . . . . . . . . . . . . . . . . . . . . . . . . . . . . . . . 238
5.1.2
Blender . . . . . . . . . . . . . . . . . . . . . . . . . . . . . . . . . . 238
Documentation tools . . . . . . . . . . . . . . . . . . . . . . . . . . . . . . . 238
5.2.1
LaTeX . . . . . . . . . . . . . . . . . . . . . . . . . . . . . . . . . . . 239
5.2.2
TeXnicCenter . . . . . . . . . . . . . . . . . . . . . . . . . . . . . . . 239
Modeling tools . . . . . . . . . . . . . . . . . . . . . . . . . . . . . . . . . . 239
5.3.1
Microsoft Visio 2003 . . . . . . . . . . . . . . . . . . . . . . . . . . . 239
5.3.2
Microsoft Paint . . . . . . . . . . . . . . . . . . . . . . . . . . . . . . 239
5.4
Programming languages . . . . . . . . . . . . . . . . . . . . . . . . . . . . . 239
5.5
Version control . . . . . . . . . . . . . . . . . . . . . . . . . . . . . . . . . . 240
The subject
241
6.1
Supervisors . . . . . . . . . . . . . . . . . . . . . . . . . . . . . . . . . . . . 241
6.2
Lectures . . . . . . . . . . . . . . . . . . . . . . . . . . . . . . . . . . . . . . 241
6.3
Seminars . . . . . . . . . . . . . . . . . . . . . . . . . . . . . . . . . . . . . . 241
6.4
Total impression . . . . . . . . . . . . . . . . . . . . . . . . . . . . . . . . . 242
Future work
243
7.1
Lacking functionality . . . . . . . . . . . . . . . . . . . . . . . . . . . . . . . 243
7.2
Time needed for completion . . . . . . . . . . . . . . . . . . . . . . . . . . . 244
7.2.1
Conclusion . . . . . . . . . . . . . . . . . . . . . . . . . . . . . . . . . 245
222
FIGURES
Figures
2.1
Original Gantt diagram and the final hours used . . . . . . . . . . . . . . . . 233
223
FIGURES
224
TABLES
Tables
7.1
Features needed to fully capture Airwolf VR glove’s capabilites . . . . . . . . 243
225
TABLES
226
Chapter 1
Introduction
This document contains an evaluation of the different aspects of the course TDT4290
Customer driven project and an appreciation of our project.
1.1
Purpose
The purpose of this document is to evaluate the project as a whole. We give special
attention to the work process and group dynamics.
An evaluation of the project gives us a chance to reflect on the different aspects of the
project; what went well and what could have been done different. We will get an
understanding of what caused mistakes to be made, and how we can avoid similar
problems in the future.
This document may be helpful both for future students taking this subject and the course
staff. Future students can learn from our mistakes so that they do not make the same
mistakes. This document will provide feedback for the course staff. It can help them
evaluate the course as a whole as well as a more specific evaluation of the different aspects
of the course.
1.2
Scope
As stated above the Evaluation document will give an extensive evaluation not just of the
different phases of the project but also the group dynamics, the project process and the
course as a whole. The document will give the course staff, the customer, other interested
parties and ourselves a description of the group collaboration.
1.3
Overview
The chapters of this document are structured in the following way:
227
CHAPTER 1. INTRODUCTION
•
The process contains the evaluation of how the project process has been.
•
The result contains a discussion about the final result.
•
•
The customer and the task contains how the communication with the customer
has been and then an evaluation of the task we were assigned.
Used tools contains a short evaluation of the tools used for documentation and
modeling, the programming languages we used and the version control we choose.
•
The course contains evaluations of the different aspects of the course.
•
Future work contains an estimation of the work left to finish our project.
•
Conclusion contains a conclusion of the project.
228
Chapter 2
The process
In this chapter we will focus on the project process. We will evaluate how the group
worked together and the problems and difficulties we faced. We will then look at the
accomplishment of the specified phases, how much time was planned for each phase, and
how much time was actually spent.
2.1
The roles
The roles are given in the Project Directive. Everyone in the group worked well at fulfilling
their roles. At one point, a role was moved from one person to another, because the person
originally responsible was occupied with other duties.
2.2
Quality Assurance
In the planning phase we discussed how to assure the quality of our work, and our routines
for QA are given in the Project Directive.
We had routines for response times internally in the group, with the supervisors and with
the customer. This was followed up by the project group and the supervisors, but the
customer did not always answer our e-mails within the time frame.
Before the supervisor and customer meetings, the group members were supposed to read
all documents concerning the meeting. This routine was not followed up. The main reason
for this was that the size of the documents got very large, and it took too much time to
read through them all every week.
In the beginning of the project, the customer was on vacation, and we did not have many
meetings with him. Later on in the project, we had meetings every week. The minutes
from the meetings were always sent to the customer no more than one work day after the
meeting had taken place.
At the start of the supervisor meetings, we always went through the meeting minutes from
229
CHAPTER 2. THE PROCESS
the last supervisor meeting to ensure that we had a common understanding of what was
stated last meeting.
2.3
Communication and cooperation
Everyone in the group agrees that the internal cooperation has worked well in this project.
Through out the project period we had meetings at least two times a week. In these
meetings we updated each other on the work we had done since last meeting, organized
and allocated the work to be done, and discussed how to solve tasks and problems.
In addition to the meetings, all group members worked together in the same room every
Wednesday from 10AM to 15PM. When not working together, we communicated by using
Microsoft Network (MSN) Messenger, e-mail and telephone. All group members have been
reachable at almost all times through the project period, and this has made the
cooperation easier.
2.4
Problems and difficulties
All group members have had two other subjects in addition to this project. Because the
subjects have different workloads through out the semester, the workload for each group
member has varied from week to week. Some of the subjects have had important
assignments counting on the final grade. This means that members have had weeks where
other courses have been given priority than Customer-driven Project.
In addition to other subjects, members of the group have been busy with other activities.
Three of the members have been working with UKA for a period, and one member with
two other jobs.
Another problem we had was that four of the group members got sick, though not at the
same time. This resulted in that the work to be carried out by the sick persons had to be
delayed, and this affected the progress of the project.
In the beginning of the project we had some difficulties with LaTeX because the group
members did not use the same text editor. This problem got fixed when we decided that
everyone in the group had to use TeXnicCenter.
Since none of the group members have used Linux before, we had some difficulties with the
use of the computer on the VR-lab. In addition to this none of us have had much prior
experience with C++ and Python. Therefore a lot of time had to be used on manage
Linux, Python and C++.
We experienced problems with other people using the VR-lab computer, resulting in
difficulties with the use of the computer. Late in the project we got the customer to inform
everyone with access to the room that the computer were not to be used by anyone else
but us. This solved our problem.
230
CHAPTER 2. THE PROCESS
Another problem we had was that there were no documentation on FoB in the VR lab. We
asked the customer to provide it, but he could not find it. Late in the project we found the
documentation on the Internet, but it would have been nice if we had it from the
beginning. This resulted in that the progress halted in the beginning.
The customer went on vacation several times throughout the project. The customer told us
about it on forehand, but we also experienced one time that the customer went on vacation
for a week without us knowing. In these periods we missed having contact with the
customer and felt that the progress halted a bit. Also the response times from the QA plan
were not met at all times, and we had to wait longer than planned for replies from e-mails
we sent.
2.5
Accomplishment of the phases
This section will give a description and evaluation of the phases the project has consisted
of.
2.5.1
Planning
This phase consisted mainly of writing the Project Directive, but also organizing weekly
meetings and assigning different roles to the group members. In addition we had to get
CVS and LaTeX up and running. Also we arranged social activities to get to know each
other.
2.5.2
Preliminary Study
The preliminary study phase consisted of studying different aspects of the project, and
finding alternative solutions to the problem. In the end we evaluated the different
solutions, and decided which solution to implement based on the evaluation.
In this phase we had some difficulties in the beginning. It was hard to find any alternative
solutions since the solutions either were to expensive or they were not open source, which
was a client demand. In the end we felt we had to just come up with some alternative
solutions that were not actually of interest. Since we had some trouble getting started with
this document, we used more time on this phase than first planned.
2.5.3
Requirements specification
Since the preliminary study phase took more time than first planned, some of the project
members started with the requirements specification document while the rest of the group
still worked on the preliminary study document. When the preliminary study phase ended,
two of the group members joined the work on the requirements specification, while the last
231
CHAPTER 2. THE PROCESS
group member started directly on the construction phase. So all in all five group members
worked on the requirements specification.
We decided to use the IEEE Std. 830-1998, the IEEE’s recommended practice for software
requirements specification, to help structure the document. Each section of the document
got one responsible person that carried out most of the writing on the section. This worked
out well, since the different sections could be written simultaneously, and in this way we
gained some time.
There were no special problems during this phase.
2.5.4
Construction
In the construction phase we encountered some problems. Our system is divided into two
main parts, Holoserver and the Blender Scripting Interface(BSI). Because BSI need the
data from Holoserver to be programmed, we made a Java application that simulated
Holoserver making it possible for both parts to be written simultaneously.
2.5.5
Implementation
This phase of the project was in a way divided in two; the hardware side, involving the
collection of in-data from the Airwolf VR Glove, converting this and sending it to Blender,
and the software side, consisting of the Blender scripts that use this data to modify objects
in Blender. We had some difficulties on both sides. On the hardware side, there were some
difficulties getting the correct data from the Flock of Birds sensors, while on the software
side, the main problem was enabling regularly run scripts to poll for the Glove’s status.
Both of these problems were solved however. In retrospect, a deeper understanding of the
programming languages used and an earlier start with the implementation might have
helped us resolve these problems faster.
2.5.6
Testing
Our programmers had not done this particular kind of coding before. Therefore they had
to do extensive testing while implementing. This almost made the testing phase obsolete.
The product had been tested many times before the official testing took place, and all tests
passed without any errors.
2.6
Person-hours planned and consumed
The course staff estimated that each student should work approximately 310 hours with
this project. As we are six persons in our group, this adds up to 1860 hours.
In the planning phase we estimated how many person-hours we would use in each phase.
We based our estimate on what previous project group have used, because none of us have
232
CHAPTER 2. THE PROCESS
had any experience with projects like this before. Both planned and used person-hours are
given in Figure 2.1. In the beginning we almost used the estimated time each week, but the
Project Directive and preliminary study took more then the anticipated time. This,
combined with a week when everyone had a lot to do in other subjects, made us fall
slightly behind. Three weeks before the project deadline we started to work a lot more,
and in the these last weeks we made up for the lost time. The 12-hour days the last week
made us use a total of 2035 hours. This is 175 more hours than the estimated 1860. It may
seem strange that we used the same amount of time on each phase the last week, this is
because we spend a lot of time fixing all the documents.
Figure 2.1: Original Gantt diagram and the final hours used
233
Chapter 3
The final result
In this chapter we try to evaluate the final result. In the Project Directive we defined the
effect and result goals of this project. We give a review comparing to them to the actual
result.
3.1
Result goal achievement
We made three result goals in conjunction with the customer at the beginning of the
project:
1. We will use a glove, in conjunction with Flock of Birds (FoB) sensors to make a
hardware device for 3D modeling.
2. We will use this glove to create and modify objects in the open source 3D modeling
application Blender.
3. We will use passive stereoscopic projection to give a feeling of depth while creating
the models.
Goal achievement:
1. We made the Airwolf VR glove that uses FoB.
2. Airwolf VR glove works as a modeling tool for Blender.
3. In the start we thought that Blender had native support of passive stereoscopic
projection. The reason for this was that the customer says he had read about it
somewhere. Implementing this feature would have been too large a task for this
project.
234
CHAPTER 3. THE FINAL RESULT
3.2
Effect goal achievement
The effect goal was to develop an intuitive method for modeling object in 3D. Based on the
acceptance test with the customer, we have fulfilled this goal. He gave almost all
evaluation criteria top score. Even though we could not fulfill all the result goals, the final
product delivered good results.
235
Chapter 4
The customer and the given task
In this chapter we discuss the aspects of the project concerning the customer. Then we will
evaluate the task we were given and how we solved this task.
4.1
The customer
Our projects customer was the Department of Chemistry at the Norwegian University of
Science and Technology (NTNU) and our contact person was Bjørn K. Alsberg.
4.2
Communication with the customer
In the beginning of the project we agreed on not having fixed customer meetings each
week, but rather have them when we felt it was needed. The customer also seemed rather
busy. When we found out that this did not work we planned weekly meetings. This has
worked very well and the customer has almost always showed up prepared for the
meetings, answered all our questions and been very interested and helpful. We experienced
however that the customer was slow in responding to our e-mails.
The customer knew what he wanted right from the start and has not changed his mind
during the process. He has been open for new solutions concerning the glove though, which
was a good thing for us as we got some room for new thoughts and development. We thus
choose to use not just the glove but also a keyboard.
4.3
The given task
Our project task was to make a system for 3D-modeling with gloves. The glove was to be
integrated with the 3D-modeling tool Blender, and was to be used as a simple and intuitive
way to model in 3D. The product could be used for teaching and presentations.
236
CHAPTER 4. THE CUSTOMER AND THE GIVEN TASK
Since our task has been very specific from the start, we hope we have managed to meet the
requirements of the customer, and that he will be pleased with the product.
237
Chapter 5
Used tools
This chapter gives an evaluation of the tools used in this project.
5.1
Project tools
In this section we will discuss the user-friendliness of the project tools used in the project;
Linux and Blender.
5.1.1
Linux
The use of Linux was a demand from the customer and was already installed on the
computer at the VR-laboratory. We found Linux very time absorbing to become familiar
with. The user-friendliness was also rather poor.
5.1.2
Blender
Using the 3D-modeling tool Blender was not an absolute requirement, but it had to be
open source and then after some research we found no other applications offering the same
functionality. Therefore the choice fell on Blender.
We found Blender to be a good 3D-model program, but there was many keyboard
shortcuts to learn for the program to be easy and effective to use.
5.2
Documentation tools
In this section we will discuss the documentation tools used in this project.
238
CHAPTER 5. USED TOOLS
5.2.1
LaTeX
In the beginning of the project, we discussed which typesetting tool we should choose. The
course staff recommended that we use LaTeX. None of us were previously familiar with
LaTeX, but the group agreed on learning the tool. It was easy to get information on
LaTeX and after a couple of weeks the whole group had learned the tool.
We had some problems getting our tables and figures on the right places, as LaTeX has a
tendency to move tables and figures to undesired locations. But in general, the whole
group is very pleased with the use of LaTeX and finds it a useful tool to know for later
projects and master thesis.
5.2.2
TeXnicCenter
We found it necessary to use the same text editor when some editors accepted more
compile errors than others. Our choice fell on TeXnicCenter, a text editor specially
developed for LaTeX.
5.3
Modeling tools
In this section we will elaborate on the modeling tools used during this project.
5.3.1
Microsoft Visio 2003
We used Microsoft Visio 2003 to design system description models. Visio is a good tool to
make figures and class-diagrams, but it had a tendency to be slightly more advanced and
have too much functionality than we needed for our purpose.
5.3.2
Microsoft Paint
Microsoft Paint was used for different imaging tasks, as changing image formats and
changing image size. We found it easy to use and specially nice for creating screenshots.
5.4
Programming languages
The programming languages used in this project are C++ and Python. Communication
with the glove and with Flock of Birds (FoB) has been done in C++. The communication
with Blender has been in Python. None of us had any deep prior knowledge to neither
C++ nor Python. With C++ it was some bother getting things to work. Python was on
the other hand easy to understand, but often got untidy.
239
CHAPTER 5. USED TOOLS
5.5
Version control
We used concurrent versions system (CVS) as version control for our project. This was
something we decided in an early stage of the project because several people in the group
had good experience with it. The CVS client we used was TortoiseCVS which has worked
very well. By using CVS we avoided problems when several people on the group worked on
the same file. We are very pleased with our choice and have never regretted this.
240
Chapter 6
The subject
In this chapter we evaluate the subject TDT4290 Customer driven project. We discuss how
the communication with the supervisors, the lectures and the seminars have been. Finally
we comment on our total impression of the subject.
6.1
Supervisors
The communication with the supervisors has generally been good. They have mostly been
prepared for the meetings and given constructive feedback and they have both responded
quickly to questions we have had outside the formal meetings. We thought that the
supervisors though could have focused more on the quality of the phase documents rather
than focusing on smaller and less important aspects as spelling and document structure.
6.2
Lectures
We should have had four lectures in this project. Unfortunately the one lesson we felt we
needed were canceled. This lecture was about presentation technique which we never have
had in any of our prior subjects at NTNU. The three other lectures which went as planned
were; Project planning, Use-case estimation and IT-architecture. These lectures did not
provide us with more knowledge than we already had or got from the information booklet.
6.3
Seminars
We had one seminar during this project about group dynamics. This seminar was held at
Røros, and the seminar was split in two parts. The first part consisted of four hours spent
in a Norwegian lavvo where Endre Sjøvold lectured us in group dynamics and group
development. The second part of this seminar was outdoors and was meant to improve our
group cooperation and communication.
241
CHAPTER 6. THE SUBJECT
We found the day at Røros fun, but cold and exhausting. The first part we found very
interesting and Endre Sjøvold was good at getting peoples’ attention. Even though we got
to know each other slightly better, the group thought that the second part could have
consisted of more cooperating tasks, as the tasks we were to perform were more one person
tasks that did not need any cooperation with the fellow group members.
6.4
Total impression
Our total impression of the subject TDT4290 Customer driven project is good. The
workload has been high. We think the composition of groups could have been thought
better through, so most of the group members had subjects related to the task. Despite a
high workload, we are left with a very good impression of the subject, and more knowledge
on group dynamics, work process and virtual reality than we started this subject with.
We have made a list of things in the course we found good, medium and poor:
Good
•
We learn to cooperate.
•
At least two girls on every group there were girls on.
•
It is a course that teaches you about the working life.
Medium
•
•
Composition of groups. The students qualifications and subjects should be taken in
consideration when they are placed on the different groups.
The information booklet gave little information about the documents except from a
very paramount structure. It is hard to know if the documents are as they should be.
Poor
•
•
The course takes disproportionately much time and is thus destructive to the other
subjects.
The lecture on presentation technique were canceled.
242
Chapter 7
Future work
This chapter contains an overview of the functionality we did not have time to implement.
We also give an estimation of the amount of person-hours needed to complete the product.
7.1
Lacking functionality
There where only two functional requirements we where not able to implement, FREQ4
and FREQ8. During the implementation and testing we found several features that would
be needed to fully capture the Airwolf VR glove’s potential.
Only one of the functional requirements, we where not able to implement is needed in a
fully functional product. Moving and making vertices on objects is needed if you want to
make more complex object than cubes, spheres etc. The features we found that would be
needed to fully capture Airwolf VR glove’s capabilities are shown in Table 7.1. We have
given them an importance ranging from low to high.
Feature
Make it possible for the glove to be used as a mouse in
Blender’s menus.
Make some sort of locking making you able to just move
or just rotate.
Stereoscopic 3D view would make it a lot easier to see
how far into the view something is.
Adjustable sensitivity when moving the glove would
make it easier to be accurate.
Adding one more button would give the glove a lot more
functionality, for example scaling.
Importance
Medium
High
High
Medium
Low
Table 7.1: Features needed to fully capture Airwolf VR glove’s capabilites
243
CHAPTER 7. FUTURE WORK
7.2
Time needed for completion
The time needed for completion of FREQ4 greatly depends on the knowledge of the
developer. Most of the time needed for implementation was spent just learning how to
code in Python and C++. Our main programmer in Python scripts estimated 2-3 weeks of
development if one person with knowledge of Python and the Blender API does it. In
person-hours this is between 80 and 120 hours. If the developer has to learn Python the
Blender API this would add around 30-40 person-hours.
244
CHAPTER 7. FUTURE WORK
7.2.1
Conclusion
The course TDT4290 Customer driven project has been a great experience for us. We have
learned the different phases of a software development project and what the phases should
contain. During the project we have faced problems of different kinds, some larger and
some smaller, but we have always manage to solve them together.
We used more time than estimated. There are several reasons for this: We unexperienced
with project planning, and we encountered some problems that we did not foresee. There
were also some periods where other subjects demanded much of our time. This resulted in
that we had to do much of the work close to the end.
245
CHAPTER 7. FUTURE WORK
246
Part IX
Glossary and References
247
248
CONTENTS
Contents
1
Glossary
251
2
References
253
249
CONTENTS
250
Chapter 1
Glossary
2D: Two dimensional.
3D: Three dimensional.
5DT: Fifth Dimension Technologies.
5DT Dataglove: 5DT Dataglove is a dataglove made by Fifth Dimension Technologies.
A dataglove is a glove-like input device for virtual reality environments. Various
sensor technologies are used to capture physical data such as bending of fingers.
Airwolf VR-glove: Airwolf VR-glove is the name we have given the custom glove.
Blender: Blender is an open source 3D modeling program which is released under the
GNU’s Not Unix General Public-license.
BSI: BSI is an abbreviation for Blender scripting interface.
C++: An object oriented programming language.
CBG: the Chemometrics and Bio-informatics Group at NTNU.
CVS: CVS is an abbreviation for Concurrent Versioning System. It implements a version
control system that keeps track of all work and all changes in a set of files and allows
several developers to collaborate.
EEPROM: Electrically Erasable Programmable Read Only Memory.
FoB: Flock of Birds. A sensory system for tracking motion and orientation in 3
dimensions.
FUGE Functional Genome research bio-informatics platform in Trondheim.
gesture: A physical movement that the users do with his hands, for instance making a
circle.
GLISA: GLISA is an abbreviation for Glove is in the air, which is last year project in this
subject from the same costumer.
251
CHAPTER 1. GLOSSARY
GNU: GNU’s Not Unix. A free operating system.
GPL: GNU General Public License.
Hololib: A C++ API for getting input from the glove.
Middelware: Middleware consists of software agents acting as an intermediary between
different application components.
NaN: Not a Number. A company founded to continue development of Blender.
NTNU: The Norwegian University of Science and Technology.
Pitch: Term to describe orientation in 3D-space.
Posture: A posture is one specific hand position.
Python: Python is an interpreted, interactive programming language created by Guido
van Rossum in 1990. Python is fully dynamically typed and uses automatic memory
management. Python is developed as an open source project, managed by the
non-profit Python Software Foundation.
QA: QA is an abbreviation for quality assurance.
QSAR: Quantitative Structure-Activity Relationships.
Roll: Term to describe orientation in 3D-space.
TortoiseCVS: TortoiseCVS is the CVS program we are using.
TRSCQ: TRSCQ stands for Time, Risk, Scope, Cost and Quality. It is a technique for
project monitoring and managing, where you go through these factors at a specific
interval.
UI: User interface.
VR: Virtual reality. is an environment that is simulated by a computer. Most virtual
reality environments are primarily visual experiences, displayed either on a computer
screen or through special stereoscopic displays, but some simulations include
additional sensory information, such as sound through speakers or headphones. Some
advanced and experimental systems have included limited tactile feedback.
YaRay: Yet Another Free Raytracer.
Yaw: Term to describe orientation in 3D-space.
X Windows: X Windows is the windowing software used on virtually every GNU/Linux
systems.
252
Chapter 2
References
[1] Gnu general public license. http://www.gnu.org/licenses/gpl.html.
[2] Gnu manifest. http://www.gnu.org/gnu/manifesto.html.
[3] Gnu’s not unix. http://www.gnu.org.
[4] Scicraft. http://www.scicraft.org.
[5] Spaceball 5000 product page. http://www.3dconnexion.com/spaceball5000.htm.
[6] Conradi and Anda. Use of usecase-based estimation.
http://www.idi.ntnu.no/emner/tdt4290/docs/faglig/usecase-estimering.doc.
[7] Tripp et al. Ieee std.830-1998 - ieee’s recommended practice for software requirements
specifications.
http://ieeexplore.ieee.org/iel4/5841/15571/00720574.pdf?isnumber=15571
&prod=STD&arnumber=720574&arSt=&ared=&arAuthor=.
[8] Martin Fowler. UML Distilled Third Edition - A brief guide to the standard object
omdeling language. Pearson 2003.
[9] Open Source Initiative. Open source. http://www.opensource.org/docs/definition.php.
[10] Sun Developer Network. Code conventions for the java programming language.
http://java.sun.com/docs/codeconv/.
[11] Ton Roosendaal. History. http://www.blender3d.org.
[12] Wikipedia. Blender. http://en.wikipedia.org/wiki/Blender (software).
253