1
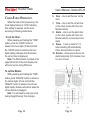
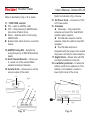
Weather Radio
User’s Manual - Model WX-39
Emergency Alert
Weather Radio
with AM/FM/Weather Band and Alarm Clock
Model WX-39
©2002 BRK Brands, Inc. All rights reserved
First Alert® is a registered trademark of
The First Alert Trust used under license
SPC Corporation
140 Pennsylvania Ave.
Bldg #5
Oakmont, PA 15139
800-391-3650 412-828-3700
www.simacorp.com
User’s Manual
Weather Radio
Congratulations on your purchase of a
First Alert® brand Weather Alert Radio –
Model WX-39. This product is designed to
exacting standards, which provide reliability,
long life and outstanding performance.
This unit is designed to receive National
Weather Service (NWS) broadcasts, by
NOAA Weather Radio which provide
information about weather conditions,
forecasts and other hazard information 24
hours a day.
With its built-in siren and flashing light,
your Weather Alert Radio will notify you
about emergency warnings, watches and
alerts issued by NOAA.
In the package you will find:
One (1) Model WX-39 Weather Alert Radio
One (1) User’s Manual
If you find any of the above missing,
contact SPC Corporation at 1-800-391-3650.
Please read this manual carefully and heed
the following cautions:
User’s Manual - Model WX-39
90 Day Limited Warranty
SPC Corporation warrants that its Weather Alert System
Receivers, and the component parts thereof, will be free of
defects in workmanship and materials for a period of 90 days
from the date of first consumer purchase. This warranty may be
enforced by the first consumer purchaser, provided that the
product is utilized within the U.S.A.
SPC Corporation will, without charge, repair or replace, at
it’s option, Weather Alert System Receivers products or
component parts upon delivery to the SPC’s Customer Service
Department, accompanied by proof of the date of first consumer
purchase, such as a duplicated copy of a sales receipt.
The consumer must pay any charges required to ship the
product for warranty service, but the return charges will be at
SPC Corporation expense, if the product is repaired or replaced
under warranty.
Exclusions: this limited warranty does not apply; 1) to any
product damaged by accident; 2) in the event of misuse or
abuse of the product in as a result of unauthorized alterations or
repairs; 3) if the serial number has been altered, defaced or
removed; 4) if the owner of the product resides outside the
U.S.A.
All implied warranties, including warranties of merchantability and
fitness for a particular purpose are limited in duration to the length
of this warranty.
SPC Corporation shall not be liable for any incidental,
consequential or other damages; including, without limitation,
damages resulting from loss of use or cost of installation.
Some states do not allow limitations on how long an implied
warranty lasts and/or do not allow the exclusion or limitation of
incidental of consequential damages, so the above limitation may
not apply to the consumer.
Copyright
© Copyright SPC Corporation 2002
This document contains proprietary information
protected by copyright. All rights are reserved.
PN 21665
WARNING! TO PREVENT FIRE OR ELECTRICAL SHOCK
HAZARD, DO NOT EXPOSE THIS PRODUCT TO RAIN OR
MOISTURE
Page 2
Page 23
Weather Radio
Weather Channel Freq.
Channel 1……………………..162.400 MHz
Channel 2……………………..162.425MHz
Channel 3……………………..162.450 MHz
Channel 4……………………..162.475 MHz
Channel 5……………………..162.500 MHz
Channel 6……………………..162.525 MHz
Channel 7……………………..162.550 MHz
AM/FM Channel Freq.
FM …………………...........…...87-109 MHz
AM ..........…………………...530 - 1700 KHz
WX-39 SPECIFICATIONS
Power Requirements:
120VAC 60 Hz, 6 Watts AC
9V alkaline battery (not included) for power
backup approximately 8 hrs. backup power
Integrated Antenna - ferrite core AM radio
Telescopic Rod Antenna - Weather channel
Integrated Power Cord Antenna - FM radio
Size: 5-1/2”(L) X8-3/4” (WX2-1/2” (D)
Weight: 28 oz. (without Battery)
Page 22
User’s Manual - Model WX-39
CAUTIONS
IMPORTANT SAFEGUARDS FOR AUDIO PRODUCTS.
PLEASE READ CAREFULLY THE FOLLOWING IMPORTANT
SAFEGUARDS THAT ARE APPLICABLE TO YOUR EQUIPMENT
1.
Read instructions - All the safety and operating instructions should
be read before the appliance is operated.
2. Retain instructions - The safety and operating instructions should be
retained for future reference.
3. Heed Warnings - All warnings on the appliance and in the operating
instructions should be adhered to.
4. Follow instructions - Follow all operating and use instructions.
5. Water and Moisture - the appliance should not be used near water for example: near a bathtub, washbowl, kitchen sink, laundry tub, in a
wet basement or near a swimming pool.
6. Ventilation - The appliance should be located so that its location or
position does not interfere with proper ventilation. For example: the
appliance should not be situated on a bed, sofa, rug or similar surface
that may block the ventilation openings.
7. Heat - the appliance should be situated away from heat sources such
as radiators, registers, stoves or other heat-producing appliances .
8. Power sources - the appliance should be connected to a power
supply only of the type described in the operating instructions or as
marked on the appliance.
9. Grounding or polarization. - Precautions should be taken so that the
polarization or grounding means of the appliance is not defeated.
Caution: To prevent elecric shock, match the wide blade of this plug
to the wide slot, fully insert. Do not use this polarized plug with an
extention cord, receptacle or other outlet unless the blades can be fully
inserted to prevent blade exposure.
10. Power cord Protection - Power supply cords should be routed so
they are not likely to be walked on or pinched by items placed upon or
against them, paying particular attention to cords at plugs,
convenience receptacles, and where they exit from the appliance.
11. Cleaning - Only clean the appliance as recommended by SPC.
12. Nonuse periods - The power cord of the appliance should be
unplugged from the outlet when left unused for a long period of time.
13. Object and Liquid entry - Care should be taken so that objects do not
fall and liquids are not spilled into the enclosure through openings.
14. Damage requiring service - The appliance should be serviced by
qualified personnel when: the power cord has been damaged, objects
have fallen or liquids spilled into the appliance, the appliance has been
exposed to rain, does not appear to operate normally or exhibits a
marked change in performance or the unit has been dropped or the
enclosure damaged.
15. Service - The user should not attempt to service the appliance beyond
that described in the operating manual. All other servicing should be
referred to qualified service personnel.
Page 3
Weather Radio
Quick Star
Startt Guide
Clock R
adio Operation
Radio
SET THE ALARM
SET THE TIME
While holding down the While holding down the
ALARM button, use the
TIME button, use the
Hour and Minute buttons Hour and Minute buttons
to set the correct time. to set the alarm time.
Note: To use sleep function, press SLEEP button,
radio will play up to 1 hour then turn off. Press
SNOOZE button to cancel.While holding down the
SLEEP button, use the Hour and Minute buttons to
set the sleep timer.
Weather R
adio Operation
Radio
WEATHER BAND
STANDBY MODE
Press the red button to
set radio into Standby
Mode. Green Standby
light will be lit. AM/FM
radio can be played.
Weather warnings will
interrupt AM/FM radio.
Press the red button again
to hear weather band.
Green Standby light will
not be lit. Alert siren and
lights disabled.
Note: Use the ALERT CHANNEL dial to select the
weather band frequency for your location.
Weather Alert System
In STANDBY MODE, the WX-39 will sound a loud
siren and flash a bright red light when a weather
warning is received. Press the red button to tune to
the weather band to hear the warning information.
Page 4
User’s Manual - Model WX-39
REMEMBER – FOR YOUR SYSTEM TO BE
EFFECTIVE, YOU MUST PLACE THE RADIO IN A
LOCATION THAT CAN RECEIVE AN EMERGENCY
ALERT SIGNAL AND WHERE YOU CAN HEAR THE
ALERT SIREN OR SEE THE FLASHING LIGHTS.
Notice to Users
The system may cause interference to a TV or radio
even when it is operating properly. To determine whether
the system is causing the interference, turn it off. If the
interference goes away, the system is causing the
interference.
NOTE:This equipment has been tested and found to
comply with the limits for a class B digital device, pursuant
to part 15 of the FCC Rules.
These limits are designed to provide reasonable
protection against harmful interference in a residential
installation. This equipment generates, uses, and can
radiate radio frequency energy and, if not installed and
used in accordance with the instructions, may cause
harmful interference to radio communications.
However, there is no guarantee that interference will
not occur in a particular installation. If this equipment does
cause harmful interference to radio or television reception,
which can be deter-mined by turning the equipment off
and on, the user is encouraged to try to correct the
interference by one or more of the following measures:
Reorient or relocate the receiving antenna.
Increase the separation between the equipment
and receiver.
Connect the equipment into an outlet on a circuit
different from that to which the receiver is needed.
Contact your dealer for help.
This device complies with part 15 of the FCC Rules.
Operation is subject to the following two Conditions:
1. This device may not cause harmful interference.
2. This device must accept any interference
received, including interference that may cause undesired
operation.
Warning: Changes or modifications to this unit not
expressly approved by the party responsible for compliance
could void the user’s authority to operate the equipment
Page 21
Weather Radio
SERVICE PROCEDURE
If the radio needs service, Call 1-800-391-3650. For
service, it will be necessary to furnish:
1. For Warranty Repair, include some form of proofof-purchase, such as a copy of a sales receipt.
Don’t send the original receipt, it can’t be returned.
3. Enclose a description of the problem with the
unit. Also Include a clearly printed name and address
where the unit is to be returned and an email and
phone number where you can be contacted.
4. Pack the unit securely to prevent damage in
transit. If possible, use the original packing material.
5. Ship the unit prepaid and insured by way of a
traceable carrier (to avoid loss in transit) such as
United Parcel Service (UPS), Roadway Parcel
Service (RPS) or First Class insured. SPC
Corporation is not responsible for units not received if
package has not been properly insured.
Mail to:
Attention Customer Service
SPC Corporation
140 Pennsylvania Ave.
Bldg #5
Oakmont, PA 15139
6.
If the unit is in warranty, upon receipt of your unit
it will either be repaired or exchanged depending
on the model. Please allow approximately 3 to 4
weeks before contacting us. If the unit is out of
warranty a letter will automatically be sent informing
you of the repair charge or replacement charge
SPC Corporation Customer Service Department,
E-Mail Address: www.simacorp.com
Monday-Friday, 8:00am-5:00pm, EST.
Please have the model and serial number ready.
SPC Toll Free Number:
1-800-391-3650
Page 20
User’s Manual - Model WX-39
Contents
Congratulations .............................................. 2
Cautions ........................................................... 3
Quick Start Guide ........................................... 4
Introduction .................................................... 6
NOAA info and website .............................. 6
WX-39 features: .............................................. 7
Alert Function: ............................................. 7
7 Weather-Channels:.................................... 7
Large Display Digital Alarm Clock: ............ 7
Standby Indicator Light: .............................. 7
Battery Backup - .......................................... 7
Installation....................................................... 8
Battery .......................................................... 9
To replace the battery: ................................. 9
Using the WX-39 ....................................... 10
To Turn the Radio On/Off ......................... 10
Description of functions ............................... 10
Clock Radio Operation ............................... 14
To set the Hour: ......................................... 14
To set the Minute: ...................................... 14
To Set the Alarm Clock ............................. 15
Snooze Feature ........................................... 16
Sleep Timer Feature ................................... 17
To set the sleep timer: ................................ 17
Weather Radio Operation............................ 18
To Test the Radio ....................................... 19
Service Procedure ......................................... 20
Notice to Users .......................................... 21
Weather channel frequencies ...................... 22
Warranty .................................................... 23
Page 5
Weather Radio
INTRODUCTION
The Department of Commerce’s
National Oceanic and Aerospace
Administration (NOAA) provides NOAA
Weather Radio broadcasts as a public
service. NOAA broadcasts reach up to 95%
of the U.S. population using more than 720
stations in the 50 states and near adjacent
coastal waters, Puerto Rico, the U.S. Virgin
Islands and the U.S. Pacific Territories. The
WX-39 Weather Alert Radio receives all
seven of the NOAA weather channels.
NOTE: You have to select the correct
weather channel in order to receive
warnings for the state/county where you are
located. The unit will sound an audible alert
tone and operate the flashing alert light
when an alert is received.
Working with other Federal agencies
and the FCC’s new Emergency Alert
System (EAS), NOAA is the single source
for weather and emergency information
available to the public.
NOAA info and website
For up-to-date information on NOAA and
weather frequencies used in your area, Visit
the NOAA National Weather Service web
site at
http://www.nws.noaa.gov/nwr.
Page 6
User’s Manual - Model WX-39
NOTE: lf severe weather is imminent
and threatening, do not wait for the siren
and flashing light. Listen to the voice
broadcast for the latest weather
information.
NOTE: the alert siren will sound at full
audio power output for approximately 10
seconds, regardless of the radio’s volume
setting. After sounding, the radio returns to
standby mode and will not sound again
unless another alert is broadcast by NOAA.
To Test the Radio
The National Oceanic and Atmospheric
Administration (NOAA) broadcasts a Test
Alert every week on Wednesday between
11AM and 12PM (noon). To find out the
specific test schedule in your area, contact
your local NOAA or National Weather
Service (NWS) office.
These offices are usually listed in the
telephone book under “US Government”.
When you are traveling with your radio
and want to use it in a new location, make
sure you have selected the correct Weather
Channel (1-7). Verify that the unit can be
activated by the test broadcast in the new
location.
Page 19
Weather Radio
User’s Manual - Model WX-39
WEATHER RADIO OPERATION
WX-39 FEATURES:
To Listen to the Weather Band
Alert Function:
You must first properly set up the weather
radio before you can receive an alert
broadcast. Follow the steps below to set the
radio up.
1. If the green Stand-by light is on, press
the red Weather ALERT button once –
the green indicator light turns OFF - and
the weather broadcast comes on. If the
green Standby light is OFF, the radio is
already set to listen to the weather band.
Adjust volume as needed. Proceed to Step
2.
2. Select the desired weather broadcast
channel by turning the “CHANNEL”
selector between 1-7. Confirm that the
NWR broadcast for your area is
received clearly and reliably.
3. Adjust the antenna for best reception.
4. Remember to reset to Standby Mode by
pressing the red Weather ALERT button
after listening to the weather broadcasts.
CAUTION!
The radio will not respond to alert signals
when listening to the Weather Band
Broadcast. To trigger the alert siren and
flashing lights, the radio must be in Standby
mode (with green light on).
Page 18
Your Weather Alert Radio will sound
an alert siren and turn on the flashing
alert light when it receives a weather
emergency broadcast from NOAA.
7 Weather-Channels:
Allows you to select any one of 7
NOAA weather broadcast channels.
Note: The channel that gives you the
best reception may not broadcast
weather information for your own
location or county. Check with NOAA/
NWS for the correct channel and
station in your area.
Large Display Digital Alarm Clock:
Includes large push button operation,
sleep timer, and snooze button.
Standby Indicator Light:
Allows you to check that the unit is
working properly and ready to receive
NOAA alert.
Battery Backup The Weather Alert Radio is normally
powered by AC Power. The unit will
maintain operation with the 9V alkaline
battery during short AC power blackout
periods.
Page 7
Weather Radio
Note: The Alarm Clock Display will not
operate during a power blackout
period, although the time-keeping and
alarm settings will be maintained by
the backup battery for up to 8 hours.
Note: Use an alkaline battery only. This
radio does not recharge batteries.
INSTALLATION
For peak effectiveness, place the unit
where it can receive an emergency alert
signal broadcast and where you can
hear its alert tone or see the flashing
alert light. Always test by pressing the
red Weather Alert button to be sure you
can hear the NOAA broadcast
The best location to install the unit is:
• Clear of obstructions or metal surfaces.
• Near windows or large openings for best
radio reception.
• Near to where you would normally stay-e.g.
in a bedroom, living room or in the office.
NOTE:
• Keep the receiver away from interference
sources e.g. motors, computers, TV or
microwave ovens.
• To avoid damage to the product, do not
expose it to direct sunlight, extreme heat or
humid environments for prolonged periods.
Page 8
User’s Manual - Model WX-39
Sleep Timer Feature
Pressing the “SLEEP” button activates
the sleep timer. The radio turns itself ON
for 1 hour and then automatically turns
OFF. The sleep timer can be set for up to
2 hours. This allows you to enjoy radio
programs as you go to sleep. Press the
“SNOOZE” button to turn off the radio
before the sleep timer expires.
To set the sleep timer:
Press and hold the “SLEEP” button, the
clock will display 0:59 Adjust the timer to
any time between 1:59 and 0:01 by
following these instructions:
1. While pressing and holding the
“SLEEP” button, press the “HOUR” button
to change the hour digit from 0 to 1.
Release the HOUR” button when the
desired hour is displayed.
2. While pressing and holding the
“SLEEP” button, press the “MINUTE”
button to decrease the minute digits
between 59 and 00.
3 Press and hold the “MINUTE” button
to rapidly decrease the minute digits.
Release all buttons when the desired time
is displayed. The timer will then start
counting.
Page 17
Weather Radio
4.Select the type of alarm: Set the
ALARM switch to “Buzzer” to activate the
buzzer, or “MUSIC” to activate the AM/
FM radio at the preset alarm time.
5.To silence the buzzer or the radio
after the alarm is activated, you have the
following options:
a) Press “ALARM” once. The alarm
will turn off and sound at the same time
the next day.
b) Set “ALARM” switch to the “OFF”
position. The alarm will be turned off
permanently.
c) No manual intervention – The alarm
will activate for 2 hours and turn off
automatically. It will sound at the same
time the next day.
Snooze Feature
User’s Manual - Model WX-39
Battery
To replace the battery:
1 Turn unit upside down.
2 Locate the battery compartment cover
3 Press the tab and lift the battery
compartment door.
4 Remove the old battery.
5 Insert the battery into the battery cap.
6 Be careful to observe the correct polarity
(+ and -) when installing the battery.
7 Place the battery in the battery
compartment and replace the cover.
NOTE:
To maintain maximum backup time,
do not disconnect AC power supply from
the unit while in use. To conserve battery
power, disconnect the battery when the
unit is not plugged into the AC power
source for more than 30 minutes.
While the alarm is activated, press the
“SNOOZE” button to temporarily silence
the alarm. It will automatically sound again
after about 9 minutes. You can repeat the
snooze operation for about 2 hours. To
silence the alarm, press the “ALARM”
button or set the “ALARM” switch to
“OFF”.
Page 16
Page 9
Weather Radio
User’s Manual - Model WX-39
Using the WX-39
This radio is equipped with two
independent radio receivers. One receives
the standard AM/FM channels. The other
continuously receives only the NOAA
weather broadcasts. Use the red Weather
Alert button to toggle between the two
radio receivers. When receiving a weather
warning, the siren and flashing light will
automatically interrupt the AM/FM broadcast
or will sound if the AM/FM radio is turned
off. The radio must remain connected to the
power source or on backup battery power to
receive any emergency alert broadcasts and
keep the alarm clock working.
To Set the Alarm Clock
DESCRIPTION OF FUNCTIONS
3. Set the minutes: While pressing
and holding the “ALARM” button, press
the “MINUTE” button to advance the
minute digits. Press and hold the
“MINUTE” button to rapidly advance the
minute digits. Release all buttons when
the desired minute is displayed.
Refer to the illustration (Fig. 1) at the bottom of page 11.
1. Standby Light - Steady green light
when the unit is in Standby Mode. (Light
is off when listening to weather band.)
2. Alert Light - Bright flashing red light
when an alert signal is received.
3. Weather Alert button - Toggles
between AM/FM and weather band
broadcast channels.
4. Band Selector – Allows you to select
AM or FM broadcast bands.
5. Minute – Use to set the minute on the
clock.
Page 10
1. Set “RADIO” switch to “OFF”.
2. Set the Hour: While pressing
and holding the “ALARM” button, press
the “HOUR” button to advance the hour
digits. Press and hold the “HOUR”
button to rapidly advance the hour digits.
Release all buttons when the desired
hour is displayed.
NOTE: The PM indicator is located in
the upper left corner of the clock display
and turns on during PM hours.
NOTE: Press the “ALARM” button
anytime to view the preset alarm time.
Page 15
Weather Radio
CLOCK RADIO OPERATION
When the radio is first powered up, the
clock display flashes at 12:00 indicating
time setting is required, set the clock
according to following instructions.
To set the Hour:
While pressing and holding the “TIME”
button, press the “HOUR” button to
advance the hour digits.( Press and hold
the “HOUR” button to advance the hour
digits rapidly.) Release all buttons when
the correct hour is displayed.
Note: The PM indicator is located in the
upper left corner of the clock display and
will be turned on during PM hours.
User’s Manual - Model WX-39
6.
Hour – Use to set the hour on the
clock.
7. Time – Use to set the correct time
on the clock (works with Hour and
Minute buttons).
8. Alarm – Use to set the alarm time
on the clock (works with Hour and
Minute buttons) or press stop to the
alarm.
9. Sleep – Turns on radio for 1 hr
before shutting off automatically.
Press Snooze button to cancel.
10. Snooze – Allows you to silence the
alarm temporarily (8-9 minutes). Use
for up to 2 hours.
1
3
2
To set the Minute:
While pressing and holding the “TIME”
button, press “MINUTE” button to advance
the minute digits. (Press and hold the
“MINUTE” button to advance the minute
digits rapidly. Release all buttons when the
correct minute is displayed.
Note: You will need to reset your clock
during Daylight Saving Time changes.
10
9
8
7
6
Fig. 1
Page 14
Page 11
5
4
Weather Radio
User’s Manual - Model WX-39
Refer to illustrations (Fig. 2 & 3) below
11. FUNCTION selector:
ON – Listen to AM/FM radio
OFF – Stop listening to AM/FM radio.
Also turns off alarm clock.
Music – Sets the alarm clock to play
AM/FM radio
Buzzer–Sets Alarm clock to sound the
buzzer
12. AM/FM Tuning Dial – Selects the
tuning frequency of AM/FM broadcast
bands.
13. Alert Channel Selector – Allows you
to select one of the seven NOAA
weather broadcast channels.
14. Volume Knob – Allows you to set the
volume output of the radio.
Refer to illustration (Fig. 4) below
15. AC Power Cord – Connects to 120V
AC Power outlet.
16. Antennas
Telescopic - Fully extend the
antenna and orient it for best NOAA
weather radio reception
The AM radio uses an internal
antenna, rotate the radio for best AM
reception.
The FM radio antenna is
integrated with the power cord, extend
the power cord fully for best reception.
17. Digital Clock – Shows time with PM
and Alarm indicators on the left.
18. Low Battery Indicator - Lit when the
battery needs to be replaced or if the
battery is not installed. Located in
lower right corner of the clock.
11
Fig.2
16
15
12
13
14
17
Fig.3
Page 12
18
Fig.4
Page 13


![User Manual [PDF 1.83MB]](http://vs1.manualzilla.com/store/data/005708072_1-847484e89010f626b2bba7bc797371fb-150x150.png)