1
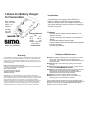
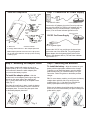
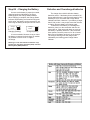
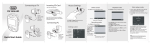
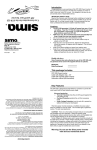
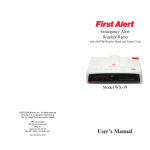
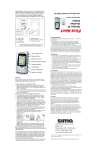
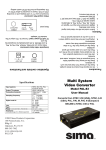
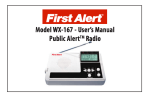
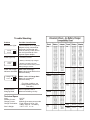
Trouble Shooting
Problem
Possible Cause/Solution
No Indicator Lights
Confirm that the AC or cigarette
adapter is firmly connected at
both ends. Confirm that wall
outlet is working. Check fuse in
car cord (un-screw tip of the
cigarette lighter adapter.
Charge
Power
Power Light Only
• No battery inserted
• Battery is already fully charged.
Charge
Power
Power and Charge
Indicators both Blink
Charge
Power
• Battery mounted incorrectly;
remove and remount battery. Clean
battery/charger contacts.
After 8 hrs of Charge Battery larger than 6000 ma hrs.
Defective battery
Within 1 min. of Charge Start
Battery is overcharged.
Defective battery
(For either condition, see
Charging Battery section on
other side.)
Hissing noise in
Charging Mode
Normal operation due to
advanced switching circuitry.
Technical Specs
Input:
Standby Current:
Charge Current:
Charge Termination:
Size & Weight
12V DC
30mA
800mA @ constant current mode
Fixed voltage (4.2V for 3.6V
battery, 8.4V for 7.2V battery
5.25” x 2.75” 3.1 oz.
Lithium Ion Battery Charger
for Camcorders
With 3 adapter
trays to fit most
lithium - ion
batteries
Includes
AC & DC
adapters
Model SPM - 13N
Charge batteries
for:
Introduction
Congratulations on buying the Sima SPM-13N, a
lithium-ion battery charger for use with camcorder
batteries. Using the AC or DC adapters included, you
can quickly and easily charge your lithium ion batteries
at home or in the car.
Features
j
j
www.simacorp.com
Sony
JVC
RCA
Canon
Sharp
Fuji
Hitachi Samsung
& Panasonic
Simple, Fun, Affordable
camcorders!
j
Warranty
Sima Products Corporation (”Company”) warrants that if this product proves
to be defective to the original purchaser in material or workmanship within
90 days from the date of original retail purchase, the company will, at the
company’s option, either repair or replace same without charge (but no cash
refund will be made).
What you must do to enforce warranty:
Ship your unit, freight pre-paid, including reasonable proof of date and place
of purchase and description of problem to:
Attn: Customer Service
c/o Sima Products Corporation
140 Pennsylvania Ave. Bldg #5
Oakmont, PA 15139
Exclusions: This Limited Warranty covers all defects in material and
workmanship in the product, except damage resulting from accident, misuse,
abuse, attempted repair by anyone other than the Company, neglect or from
their normal and ordinary use of the product. The Company accepts no
liabilities or obligations for consequential or incidental damage arising out of
or in connection with the use or performance of the product. The Limited
Warranty provides you with specific legal rights, you may have additional
legal rights provided to you under the laws of your state or federal laws.
j
j
Precision end-of-charge detection assures a full
charge every time.
”Top-off” function trickle charges to maintain a full
charge.
LED indicator displays charger mode.
Defective battery dectection identifies faulty batteries
and halts charging.
Overcharge protection.
Safety and Maintenance
DO NOT use charger inside a drawer, closed cabinet, or cover
with a cloth. The charger will become slightly warm in
normal use, but if contained, heat may damage the charger
and battery pack.
DO NOT atttempt to open the charger. Doing so will void the
warranty.
DO NOT allow moisture of any kind to come in contact with the
charger. NEVER IMMERSE IN LIQUID!!!
DO NOT store the charger where it may be exposed to extreme
temperatures; avoid placing in direct sunlight. High
temperatures can shorten the life of electronic devices,
damage batteries and warp metal or plastics.
DO NOT short circuit the output terminal or contacts.
DO NOT drop the unit ; a severe jolt can cause permanent
damage and is not covered by the warranty.
If the charger must be cleaned, be sure it is unplugged. Wipe
the body of the unit with a clean cloth, lightly dampened with mild
detergent. Use a clean cloth, lightly dampened with rubbing
alcohol to clean the metal contacts.
Parts and Components
notch
Step 1 - Connect to AC Power Supply
1
Plate A
To 120V AC outlet
notch
See
note on
flip-up
door
below
Plate B
Power Input jack
Connect the AC adapter plug to the Power Input jack on
the rear of the SPM-13N. Plug the AC adapter into any
standard 120V AC household outlet. ( See diagram
above.) The red Power indicator light will turn on.
Power Input jack
notch
12V DC Car Power Supply
2
4
3
Plate C
To car cigarette lighter
1. Base Unit
3. Power Indicator
2. Charge Status indicator 4. Batt. Adapter plate latch
Note: Adapter plates B and C each have a flip-up door
for use with certain batteries. See flip-up door for listing
of battery types.
Connect the 12V DC car cord plug to the power input
jack on the rear of the SPM-13N. Plug the cigarette
lighter adapter into the cigarette lighter socket of the
vehicle. (See diagram above.) The red Power indicator
light will turn on.
Step 2 - Mounting the Adapter Plates
Step 3 - Mounting the Batteries
Some battery models will require the use of an
adapter plate (A, B or C). Consult the battery chart
in this manual to determine which adapter plate
your camcorder battery requires.
To install the battery - Align the contacts on your
To install the adapter plates - slide the
central notch on the adapter plate’s upper edge into
the slot on the upper edge of the charging bay
(Fig. 1), then press down firmly on the plate’s lower
edge (Fig. 2).
The plate will snap firmly in place. Install the battery
so the contacts on the battery meet the contacts on
the adapter plate. To remove the plate push down
on the battery/adapter plate latch.
battery with the appropriate contacts on the charger.
Typically you can install the battery onto the charger
plate the same way you install the battery onto your
camcorder. Follow the guides on the battery and the
charger.
TIP: For some battery models, you will press the battery
straight down and then slide it up, away from the
indicator light, (Fig. 1). On others you will slide the
battery up and press it down (Figs.2 and 3).
Either way the battery should slide easily into place. If it
does not, do not force the battery into place. Realign the
guides and try again.
Fig. 1
Fig. 2
Fig. 1
Fig. 2
Fig. 3
Step #4 - Charging the Battery
As soon as the battery is properly mounted,
charging begins as indicated by the green
blinking light on the Charge Status indicator.
When charging is complete, the Charge Status
indicator stops flashing and remains solid green.
At this point, the battery can be removed for use.
Removing the battery at this point will not harm it.
Charge
Power
Charging (flashing)
Charge
Power
Charged (steady)
It is recommended, however, that you leave
the battery connected to the charger for another
30 mintutes to ensure a full or “topped
off”charge.
Warning: For use with lithium ion batteries only!
DO NOT use with Nickel Cadmium (NiCd) or Nickel
Metal Hydride (NiMH) batteries
Defective and Overcharged batteries
The charger has a built-in defective battery
detection sensor. If the battery does not attain a full
charge within 8 hours, it may be overcharged or fully
discharged. If so, the Power and Charge Status
indicators will flash. However, if your battery is larger
than 6,000 ma hrs. it may require more than 8 hours
to charge. Remove battery and charge again.
To determine if the battery is overcharged or
defective, place it on the camcorder and turn the
camcorder on. If the camcorder does not come on,
the battery is probably defective. If the camcorder
does operate, leave the power on for 30+ minutes,
then remove the battery and put it on the charger.
The charger should go into the charge mode
indicated by the blinking green Charge Status
indicator.