1
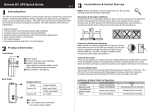
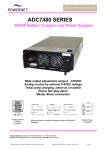
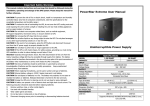
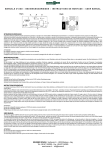
SolaPalm Lighting Unit Quick Guide
Version. 1.0
1. Package Contents
You should have received the following items inside of package:
- Lighting Unit
- External battery connector x 1 pc
- Quick Guide
- E27 lamp holder with 2-m cable x 1 pc
2. Product Overview
Front View:
Back View:
1.
1A/2A charger select
2.
CFL on/off switch
3.
Charging status indicator
4.
Battery status indicator
5.
Fault indicator
6.
USB charger ports
7.
Main power switch
8.
PV input
1.
CFL output receptacles
2.
12VDC output connector
3.
2A AC fuse
4.
AC input
5.
External battery connector
3. Installation and Initial Startup
NOTE: Before installation, please inspect the unit. Be sure that nothing inside the package is
damaged.
Placement & Storage Conditions
Install the unit in a protected area that is free of excessive dust and has adequate air flow.
Please place the unit away from other units at least 20 cm to avoid interference. Do NOT
operate it where the temperature and humidity is outside the specific limits. (Please check
the specs for the limitations.)
Connect to Utility and Solar Panel
Before initial use, please plug in the AC input cord. If using solar power to charge, please
select suitable 24W solar modules and connect to PV input connector. The spec for solar
modules is listed below:
Recommended Power
rating
24W
Max. Open Circuit Voltage
Max. Input Current
30 VDC
1.6 A
When solar power is efficient, it will use solar power to charge battery first. Please refer to
below table to select charging current:
Charger source
Using built-in
battery
Using external
battery
Charging current
Utility only
Utility only
Yes
Yes
No
Yes
1A
2A
Solar power (24W)
Solar power (24W)
Yes
Yes
No
Yes
2 A*
2 A*
*Real charging current may be changed according to spec of solar panel.
Connect to External Battery Bank and Charging
If the model is already built in battery and applying external battery at the same time, please
use same brand and same spec of inside battery. Assemble external battery connector with
battery cable. Then, simply plug external battery bank to the unit. For the best results,
suggest to charge battery at least 8 hours before initial use.
Connect the Load
There are three kinds of output connectors for different devices. Please follow below
instructions to connect suitable loads to the unit.
CFL Output Receptacles
Plug in the bundled lamp cable to output receptacle on the rear panel of the unit. Built-in
power switch in cable is to control power for lamp holder with utility connection. There are
three output receptacles on the rear panel of this unit to support up to 3 CFL lamps at the
same time.
USB Charger Ports
Plug your mobile phones/devices into USB charger ports. Then, your devices will start to be
charged when this unit is powered on. You also can connect two USB charger ports into one
2Amp charger port.
12VDC Output Connector
This output connector is for LED bulb lighting or DC fan.
Turn On/Off the Unit
Turn on the unit by pressing the main power switch to “RESET” position. At the moment,
the CFL output receptacles are not powered on yet, but there will be output power on USB
charger ports and 12VDC connector. If connecting to utility before, CFL output receptacles
will be automatically turned on. If not, please press “CFL On/Off” switch to turn on the CFL
output receptacles. Turn off the unit by pressing again the power switch.
Indicators Table for Operation
LED
Charging
status
indicator
Condition
Battery is charging by AC utility.
Visual Condition
Green LED flashing every 3 seconds
Battery is charging by solar panel.
Charging is complete.
Green LED flashing every 5 seconds
Green LED lighting
Battery
status
indicator
Battery power is sufficient.
Battery power is low.
Fault
indicator
Fault occurs.
Yellow LED lighting
Yellow LED flashing
Red LED lighting
5. Trouble Shooting
Use the table below to solve minor problems.
Problem
Possible Cause
No LED display on the Low battery.
front panel.
Battery fault.
The unit is not turned on.
No solar energy input Wires are not firmly
during daytime.
connected.
Solar module defect.
Back-up time is
shorten.
4. Important Safety Warning (SAVE THESE INSTRUCTIONS)
CAUTION! To prevent the risk of fire or electric shock, install in a temperature and humidity
controlled indoor area free of conductive contaminants. (See the specifications for the
acceptable temperature and humidity range.)
CAUTION! To reduce the risk of overheating the unit, do not cover the cooling vents of this
unit and avoid exposing the unit to direct sunlight or installing the unit near heat emitting
appliances such as space heaters or furnaces.
CAUTION! Do not attach non-computer-related items, such as medical equipment,
life-support equipment, microwave ovens, or vacuum cleaners to the unit.
CAUTION! Do not plug the unit input into its own output.
CAUTION! Do not allow liquids or any foreign object to enter inside of this unit. Do not place
beverages or any other liquid-containing vessels on or near the unit.
CAUTION! In the event of an emergency, press the OFF button and disconnect the power
cord from the AC power supply to properly disable the unit.
CAUTION! Do not attach a power strip or surge suppressor to the unit.
Attention hazardous through electric shock. Also with disconnection of this unit from the
mains, hazardous voltage still may be accessible through supply from battery. The battery
supply should be therefore disconnected in the plus and minus pole at the quick connectors of
the battery when maintenance or service work inside the unit is necessary.
CAUTION! Servicing of batteries should be performed or supervised by personnel
knowledgeable of batteries and the required precautions. Keep unauthorized personnel away
from batteries.
CAUTION! When replacing the batteries, use the same number and type of batteries.
CAUTION! Internal battery voltage is 12VDC. Sealed, lead-acid, 6-cell battery.
CAUTION! Do not dispose of batteries in a fire. The battery may explode. Do not open or
mutilate the battery or batteries. Released electrolyte is harmful to the skin and eyes.
CAUTION! Unplug the unit prior to cleaning and do not use liquid or spray detergent.
CAUTION! A battery can present a risk of electric shock and high short circuit current. The
following precaution should be observed before replacing batteries:
1)
Remove watches, rings, or other metal objects.
2)
Use tools with insulated handles.
3)
Wear rubber gloves and boots.
4)
Do not lay tools or metal parts on top of batteries.
5)
Disconnect charging source prior to connecting or disconnecting batteries terminal.
Solutions
Charge the unit at least 8 hours.
Replace the battery with the same
type of battery.
Press the power switch again to turn
on the unit.
Check if all wires are connected
properly.
The unit is overload.
Battery voltage is too low.
Battery defect. It might be
due to high temperature
operation environment, or
improper operation to battery.
Check solar modules or call local
dealer to replace solar modules.
Remove excess loads.
Charge the unit at least 8 hours.
Replace the battery with the same
type of battery.
6 Specifications
Model
CAPACITY
AC INPUT
Voltage
Voltage Range
Frequency
PV INPUT
Max. DC Power
Max. DC Voltage
CFL OUTPUT
Rated Power
Voltage
DC OUTPUT
USB
DC Connector
BATTERY
Type & Number
Charging Time
PHYSICAL
Dimension (DxWxH)
Net Weight (kgs)
Environment
Humidity
Temperature
Lighting Unit
70W
230VAC
100VAC ~ 300VAC
50 Hz or 60 Hz
24W
30Vdc
30W
160-230VDC+/-10%
5V/1A
12VDC/2A
12 V / 7 Ah x 1 (Built-in)
External battery bank
8 hours recover to 90% capacity
201 X 110 X 131 mm
3.0
0.9
0-90 %
0-40°C ( non-condensing)