1
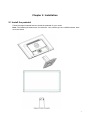
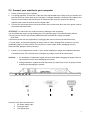
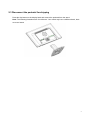
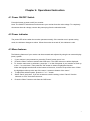
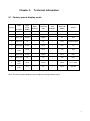
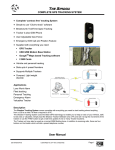
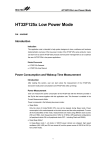
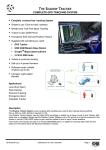
User Guide © 2015 Hewlett-Packard Development Company, L.P. Microsoft, Windows, and Windows Vista are either trademarks or registered trademarks of Microsoft Corporation in the United States and/or other countries. The only warranties for HP products and services are set forth in the express warranty statements accompanying such products and services. Nothing herein should be construed as constituting an additional warranty. HP shall not be liable for technical or editorial errors or omissions contained herein. This document contains proprietary information that is protected by copyright. No part of this document may be photocopied, reproduced, or translated to another language without the prior written consent of Hewlett-Packard Company. First Edition (Feb 2015) Document Part Number: 814779-001 1 Chapter 1. Introduction 1.1 Features Multilingual OSD adjustment Compatible with IBM VGA, extended VGA, VESA VGA, SVGA, XGA, and WXGA modes Wide range of applicable voltages (AC 100-240V 50/60Hz ) enables direct use without any setting. Plug-and-play VESA DDC1/ 2B Standard. 1.2 Check list Please make sure the following items are included with your LCD monitor; The monitor (and the pedestal) Stand Power cord VGA cable DVI cable (Optional) Documentation Setup poster Warranty If any of these items are missing, please contact your dealer for technical support and customer service. To locate driver and software updates for your product, go to http://www.hp.com/support and select your country. Select Drivers & Downloads, and then follow the on-screen instructions. 1.3 Regulatory Information For safety and regulatory information, refer to the Product Notices document provided with your monitor. Note: Be sure to save original box and all packing materials for future transport. 2 Chapter 2. Installation 2.1 Install the pedestal Follow the steps illustrated below to install the pedestal for your model. Note: The following illustrations are for reference. Your model may have a different bezel, back cover and stand. 3 2.2 Connect your monitor to your computer 1. 2. 3. Power off and unplug your computer. For analog operation, connect the 15-pin end of the signal cable to the VGA port of your monitor and the VGA OUT jack on the back of your computer. For digital operation, connect the DVI cable to the DVI port on the monitor and the DVI port on the back of the computer. Secure the cable by tightening the screws on both ends of the signal cable. Connect one end of the power cord to the monitor, then connect the other end of the power cords to the nearest electrical outlet. WARNING! To reduce the risk of electric shock or damage to the equipment: • Do not disable the power cord grounding plug. The grounding plug is an important safety feature. • Plug the power cord into a grounded (earthed) electrical outlet that is easily accessible at all times. • Disconnect power from the equipment by unplugging the power cord from the electrical outlet. • For your safety, do not place anything on power cords or cables. Arrange them so that no one may accidentally step on or trip over them. Do not pull on a cord or cable. When unplugging from the electrical outlet, grasp the cord by the plug. 4. Power on your computer and monitor. If your monitor displays an image, the installation has been successfully done. If the monitor does not display any image, check all the connections. Cautions: 1. For installation, complete the signal cord connection before plugging the power cord into the electrical outlet to avoid damaging the monitor. 2. During installation, support the front frame with your hand at its center of gravity to avoid dropping and damaging the monitor. 1 2 3 Overview of the ports of the monitor: 1. AC power supply input 2. DVI signal input 3. VGA signal input 4 2.3 Disconnect the pedestal for shipping Press the clip button on the display head and remove the pedestal from the stand. Note: The following illustrations are for reference. Your model may have a different bezel, back cover and stand. 5 Chapter 3. Monitor overview Overview of front panel controls Note: The following illustration is for reference. Your model may have a different on-screen display (OSD) button icon. 6 Chapter 4. Operational Instruction 4.1 Power ON/OFF Switch Press the button to power on/off your monitor. Note: The ON/OFF switch does not disconnect your monitor from the main voltage. To completely disconnect the main voltage, remove the power plug from the electrical outlet. 4.2 Power indicator The power LED is blue when the monitor operates normally. If the monitor runs in power-saving mode, the indicator changes to amber. When the monitor is turned off, this indicator is unlit. 4.3 Menu features The following features of your monitor can be accessed and adjusted by using the on screen display (menu) system. 1. If your monitor is not powered on, press the "Power” button to turn it on. 2. Press the "Menu” button to activate the OSD menu. The OSD main menu will be displayed. 3. To view the main menu or submenu, press the “+” on the front panel of your monitor to scroll up or the “-” to scroll down. Then press the "OK” button to select a highlighted function. When the highlight scrolls down to the bottom of the menu, it returns to top of the menu. When the highlight scrolls up to the top of the menu, it returns to bottom of the menu." 4. To adjust the selected option, press the “+” or “-” button. 5 Select “Save” and return. If you do not want to save the setting, select “Cancel” from the submenu or “Exit” from the main menu. 6. Press the “Menu” button to exit from the OSD menu. 7 Chapter 5. Technical Information 5.1 Factory preset display mode Horz Polarity Vert Freq (Hz) Vert Polarity Pixel Clk (MHz) Source Format Horz Freq (KHz) 1 640 x 480 31.469 - 59.94 - 25.175 VGA 2 800 x 600 37.879 + 60.317 + 40 VESA 3 1024 x 768 48.363 - 60.004 - 65 VESA 4 1280 x 720 45 + 60 + 74.25 VESA/CEA-861D 5 1280 x 800 49.702 - 59.81 + 83.5 CVT 63.98 + 60.02 + 108 VESA Pixel Preset 6 1280 x 1024 7 1440 x 900 55.935 - 59.887 + 106.5 DMT 8 1600 x 900 60 + 60 + 108 DMT 65.29 - 59.954 + 146.25 CVT 1.76MA 67.5 + 60 + 148.5 CEA-861 9 10 1680 x 1050 1920 x 1080 Note: The factory preset display mode is subject to change without notice. 8 5.2 Product specifications Size 54.61cm/21.5" wide screen Models Max. resolution 1920 x 1080 @ 60 Hz Recommended resolution 1920 x 1080 @ 60 Hz Horizontal frequency 24-80 kHz Vertical frequency 50-60 Hz Viewable size 476.64 x 268.11 mm Viewable angle 90 (H) 65 (V) Tilt angle -5º to 22º Pixel frequency 170 MHz OSD functions Brightness, Contrast, Image Control, OSD control, Languages, Color, Management, Information, Factory Reset, Exit Size (Packing) 567 (L) x 126(W) x 396 (H) mm Net weight/ Gross weight 3.3 KG / 4.5 KG Power supply 100-240VAC,50/60Hz Altitude (under operational condition) 0 ~ 5000 m (0 ~16400 feet) Altitude (under storing condition) 0 ~ 12192 m (0 ~ 40,000 feet) Input signal VGA ,DVI Contrast 600: 1 Brightness 200 cd/m2 Response time 5 ms Color displayed 16.7 M Power (max) 25W Operational environment Temperature: 5-35℃; humidity: 20% ~ 80% Storing environment Temperature: -20-60℃; humidity: 5% ~ 95% 9 5.3 Panel testing The ratio of valid pixels on each LCD screen reaches 99.99% or higher. However, less than 0.01% of the pixels may cause dark dots displayed on the screen. 10 A Safety and Maintenance Guidelines Important Safety Information A power cord is included with the monitor. If another cord is used, use only a power source and connection appropriate for this monitor. For information on the correct power cord set to use with the monitor, refer to the “Product Notices” document included with your monitor. WARNING! To reduce the risk of electric shock or damage to the equipment: Do not disable the power cord grounding plug. The grounding plug is an important safety feature. Plug the power cord into a grounded (earthed) electrical outlet that is easily accessible at all times. Disconnect power from the equipment by unplugging the power cord from the electrical outlet. For your safety, do not place anything on power cords or cables. Arrange them so that no one may accidentally step on or trip over them. Do not pull on a cord or cable. When unplugging from the electrical outlet, grasp the cord by the plug. To reduce the risk of serious injury, read the Safety and Comfort Guide. It describes proper workstation, setup, posture, and health and work habits for computer users, and provides important electrical and mechanical safety information. This guide is located on the Web at http://www.hp.com/ergo and/or on the documentation disc, if one is included with the monitor. CAUTION: For the protection of the monitor, as well as the computer, connect all power cords for the computer and its peripheral devices (such as a monitor, printer and scanner) to some form of surge protection device such as a power strip or Uninterruptible Power Supply (UPS). Not all power strips provide surge protection; the power strips must be specifically labeled as having this ability. Use a power strip whose manufacturer offers a Damage Replacement Policy so you can replace the equipment, if surge protection fails. Use the appropriate and correctly sized furniture designed to properly support your HP LCD monitor. WARNING! LCD monitors that are inappropriately situated on dressers, bookcases, shelves, desks, speakers, chests, or carts may fall over and cause personal injury. Care should be taken to route all cords and cables connected to the LCD monitor so that they can not be pulled, grabbed, or tripped over. Safety Precautions Use only a power source and connection compatible with this monitor, as indicated on the label/ back plate of the monitor. 11 Be sure the total ampere rating of the products connected to the outlet does not exceed the current rating of the electrical outlet, and the total ampere rating of the products connected to the power cord does not exceed the rating of the power cord. Look on the power label to determine the ampere rating (Amps or A) for each device. Install your monitor near a power outlet that you can easily reach. Disconnect the monitor by grasping the plug firmly and pulling it from the outlet. Never disconnect the monitor by pulling the cord. Do not allow anything to rest on the power cord. Do not walk on the cord. Maintenance Guidelines To enhance the performance and extend the life of your monitor: ● Do not open your monitor cabinet or attempt to service this product yourself. Adjust only those controls that are covered in the operating instructions. If your monitor is not operating properly or has been dropped or damaged, contact your HP authorized dealer, reseller, or service provider. ● Use only a power source and connection appropriate for this monitor, as indicated on the label/ back plate of the monitor. ● Be sure the total ampere rating of the products connected to the outlet does not exceed the current rating of the electrical outlet, and the total ampere rating of the products connected to the cord does not exceed the rating of the cord. Check the power label to determine the ampere rating (AMPS or A) for each device. ● Install your monitor near an outlet that you can easily reach. Disconnect the monitor by grasping the plug firmly and pulling it from the outlet. Never disconnect the monitor by pulling the cord. ● Turn your monitor off when not in use. You can substantially increase the life expectancy of your monitor by using a screen saver program and turning off the monitor when not in use. Note: The HP Warranty does not cover monitors with a burned-in image. ● Slots and openings in the cabinet are provided for ventilation. These openings must not be blocked or covered. Never push objects of any kind into cabinet slots or other openings. ● Do not drop your monitor or place it on an unstable surface. ● Do not allow anything to rest on the power cord. Do not walk on the cord. ● Keep your monitor in a well-ventilated area, away from excessive light, heat or moisture. ● When removing the monitor base, you must lay the monitor face down on a soft area to prevent it from being scratched, defaced, or broken. Cleaning your monitor 1. Turn off the monitor and the computer. 2. Unplug the monitor from the wall outlet. 3. Clean the monitor plastics with a clean cloth dampened with water. 4. Clean the monitor screen with an antistatic screen cleaner. CAUTION: Do not use benzene, thinner, ammonia, or any other volatile substances to clean the monitor or the screen. These chemicals may damage the cabinet finish as well as the screen. 12 Shipping the monitor Keep the original packing box in a storage area. You may need it later if you move or ship your monitor. To prepare the monitor for shipping, refer to Chapter 2, “Disconnect the Pedestal for Shipping.” 13 B Troubleshooting Solving common problems Shown below are possible problems, reasons, and recommended solutions: Problems The LED power indicator is not lit Solutions Ensure the Power button is switched on and the power cord is properly connected to the grounded power outlet and the monitor. Select Management in the OSD menu before selecting the power indicator on the panel. Check if the Panel Power Indicator is set as Off. If so, set it as On. Nothing displayed on the screen Connect the power cord. Power on the device. Connect the video cable correctly. For more information, see "Installation" chapter. Press any key on your keyboard or move your mouse to disable the screensaver. Blurred or dark image Image is not centered. The screen display input signal is out of the valid scope. Press the Menu button to activate the OSD menu. Select Image Control. Then select Horizontal Position or Vertical Position to adjust the position of the image. Connect the monitor VGA signal cable to the VGA connector on the computer. Be sure that the computer power is off while connecting the video cable. Enter Safe Mode after your computer is restarted. Apply the setting supported by your monitor (See table 5.1 in Chapter 5. B: Factory Preset Display Mode). Restart your computer to activate the new setting. Blurred and ghost image. Adjust the contrast and brightness controls. Make sure no extension cord or switch box is used. HP suggests you to connect your monitor to the graphic card output port on the back of your computer. For VGA input, Auto-adjustment will solve problems of this kind. The optimum resolution of the monitor is not available Make sure the graphic card supports optimum resolution. Make sure latest applicable driver for graphic card is installed. For HP and Compaq systems, you may download the latest applicable graphic card drivers at: www.hp.com/support. For other systems, visit the websites for your graphic card. Plug-and-play is not available To enable the plug-and-play feature for your monitor, you should have plug-and-play-ready computer and graphic card. Please contact the manufacturer of your computer. Check the video cable of your monitor. Make sure there are no bent PINs. Make sure the HP monitor driver is installed. You may download the HP monitor driver at: www.hp.com/support 14 Problems Solutions (Continued) Withering, flicker or moiré effect Keep the monitor away from electric devices that may cause possible electrical interference. Use the maximum refresh rate of the monitor under current resolution. The “Sleep Mode” is always enabled for the monitor (yellow LED). Make sure your monitor is powered on. The graphic card of your computer should be secured in the slot. Make sure the video cable of your monitor is correctly connected to your computer. Check the video cable of your monitor. Make sure there are no bent PINs. Make sure your computer is working normally. Press the Caps Lock key on your keyboard and have a look at the Caps Lock LED (available on most keyboards). The LED will light or fade out. Product Support For additional information on using your monitor, go to http://www.hp.com/support. Select your country or region, select Troubleshooting, and then enter your model in the search window and click the Go button. Note: The monitor user guide, reference material, and drivers are available at http://www.hp.com/support. If the information provided in the guide does not address your questions, you can contact support. For U.S. support, go to http://www.hp.com/go/contactHP. For worldwide support, go to http://welcome.hp.com/country/us/en/wwcontact_us.html. Here you can: • Chat online with an HP technician Note: When support chat is not available in a particular language, it is available in English. • Find support telephone numbers • Locate an HP service center Preparing to Call Technical Support If you cannot solve a problem by using the troubleshooting tips in this section, you may need to call technical support. Have the following information available when you call: Monitor model number Monitor serial number Purchase date on invoice Conditions under which the problem occurred Error messages received Hardware configuration Name and version of hardware and software you are using Locating the Rating Label The rating label on the monitor provides the product number and serial number. You may need these numbers when contacting HP about your monitor model. The rating label is on the back of the monitor. 15