1
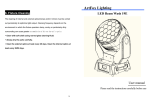
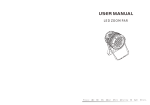
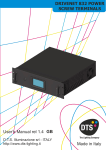
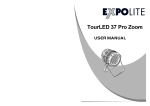
User Manual
LED Disco Panel
Please read over this manual before using
LED Disco Panel
【Before Installatio
】
Guide
In order to optimize the performance of this product, please read the following details to be familiar with
the basic product operation instruction, security matters, way of use And maintain. Please keep this manual for
future reference.
Product withdrawal
Thank you for purchasing the LED DISCO PANEL, every tiles of floor have passed the strict factory test,
please feel free to use it. After receiving the goods, please firstly inspect them then to sign in. If the cartons
have damaged, check carefully the internal lamps and the parts are intact; If not, please contact with the
manufacturer or your dealer to get further instructions, please do not directly reject the goods.
Brief Introduction
LED DISCO PANELis a type of smart lamp which have the Auto and Sound-Active mode, and also can be
controlled by DMX.
Warning
Please do not try to maintain and repair the lamps by yourselves, there is no parts to be repaired or
replaced inside the lamp, or we will not offer the warranty service. If there is damage happens in
using process, please contact with the manufacturer or your dealer at the first time, or do the
maintenance and replacement under the guidance of professional
Carton
Packing Carton can be recyclable.
2
LED Disco Panel
【Description】
Features
Various color mixing and effect optional
Various color strobe
Electronic dimming:0-100%
Sound-Active inside
DMX-512/Computer Control
Master-Slave
Digital operation menu and function button
Power off Memorry
Electronic Specification
Input Voltage:90~250V
Lamp Source:1 w high brightness led lamps inside.
Each panel with 36pcs led lamps (R:12 G:12 B:12)
Each tile with 4 modules (modules are interchangeable),Each module are comprised by 9
led lamps.
Power Supply :High quality power switch which are flexible between 110 V and 220 V. A good quality
power is essential to extend the lifetime of a lamp.
Lifetime:≥50000 hours(in normal operating condition)
Working Environment:-10℃~+40℃
Cooling Way:Convection cooling with no fans
Protection Rate:IP65,dustproof and shock resistance(Which can be used indoor or outdoor)
Physical Specifications(Photo below is the measurement)
Material:ABS base and cover,base can bear 100 kg with no shape change and no cover bear
Panel Size:500x500x138mm
Net Weight:2.8KG
Packing Size:560x560x175mm (1 pcs/Carton ) xxmm(4 pcs/Carton)
Packing Weight :3.7KG(1 pcs/Carton)
16.7KG(4 pcs/Carton )
3
LED Disco Panel
Operating Instructions
Sound Active Mode:different effects changed with the sound
Auto Mode :Can change different color automatically and operate the built-in program
Master-Slave Mode:The product shall be run in slave mode. After all the lamp signal cable and power
cord are connected normally, select any one of lamp and set the control board to be Auto mode as the host.
Others are set in the address code d.001 as a slave, all the product will be synchronized with the host.
DMX Control Mode:Controlled and edit by international agreement DMX-512
Light will go to Auto mode by setting control board when not have DMX controller connected. The effect
same change with the first light while many lights connected.
Connect the lights and connect the DMX controller, later go the LED DISCO PANEL channels chart.
Note: Lights are operated by computer if connected with computer software.
Control Board
NO.
1
2
3
4
5
6
Menu
A001
G-1G-2G-3G-4G-5G-6G-7G-8G-9r000
G000
b000
FADE
SMTH
STRO
menu display and function Settings
Function
console mode or slave mode
sound mode
AUTO effect 1
AUTO effect 2
AUTO effect 3
AUTO effect 4
AUTO effect 5
AUTO effect 6
AUTO effect 7
lighting-off
Manual dimming
remark
press ENTER to
choose color
effect of pulse variable
gradient effect
Random strobe
If you want to keep the origin mode after power off include all mode above, Please press “ENTER” to
confirm after operation.
4
LED Disco Panel
DMX Mode
Users can create your own needs program by DMX console.
International standard DMX-512 signal control to achieve a variety of effects
Detail channel functions please refer to the following <channels of LED DISCO PANEL >
Use Manual: connect the DMX console with the lights by XLR plug and set the DMX address
Pixels Distinguish Figure
54-63
64-79
80-95
96-111
112-127
128-143
144-159
160-175
176-224
225-245
245-255
0-127
AUTO effect 4
AUTO effect 5
AUTO effect 6
AUTO effect 7
AUTO effect 8
AUTO effect 9
AUTO effect 10
AUTO effect 11
AUTO effect 12
sound control effect
CH4-CH7 dimmer
auto speed from fast to slow , effect with positive sequence
128-255
auto speed from slow to fast , effect with reverse sequence
CH 4
0
1-127
128-254
255
0-255
strobe off
strobe effect 1 speed , from fast to slow
strobe effect 2 speed , from slow to fast
strobe off
dimmer
valid in dimmer mode
CH 5
0-255
1 st pixels light , red , brightness adjusted , brighter as value bigger
set up overall R
CH 6
0-255
1 st pixels light , green , brightness adjusted , brighter as value bigger
set up overall G
CH 7
0-255
1 st pixels light , bule , brightness adjusted , brighter as value bigger
set up overall B
CH 8
0-255
2 st pixels light , red , brightness adjusted , brighter as value bigger
CH 9
0-255
2 st pixels light , green , brightness adjusted , brighter as value bigger
CH 10
0-255
2 st pixels light , bule , brightness adjusted , brighter as value bigger
CH 11
0-255
3 st pixels light , red , brightness adjusted , brighter as value bigger
CH 12
0-255
3 st pixels light , green , brightness adjusted , brighter as value bigger
CH 13
0-255
3 st pixels light , green , brightness adjusted , brighter as value bigger
CH 14
0-255
4 st pixels light , red , brightness adjusted , brighter as value bigger
CH 15
0-255
4 st pixels light , green , brightness adjusted , brighter as value bigger
CH 16
0-255
4 st pixels light , green , brightness adjusted , brighter as value bigger
CH 17
CH 18
CH 19
CH 20
0-255
White1
0-255
White2
0-255
White3
0-255
White4
CH 1
CH 2
CH 3
auto
sound
mode
mode
valid in auto mode
valid in auto mode
5
LED Disco Panel
【Installation and Settings】
Safety Precautions
Do not spill water or other liquids into the product;
Ensure that your local power outlet match with the product voltage;
If the power cord is frayed or damaged, do not attempt to operate the product, and do not attempt to
re-moved or broken wire GND which can reduce internal short circuit caused by electric shock and fire hazard;
Disconnect the main power supply before any type of connection;
Any case are not allowed to disassemble the cover, no parts you can repair or replace inside the lamp;
Do not operate the product when the cover is removed;
Failure, do not force to run the product;
Disconnect the main power supply when not in use for a long time;
The path of the power lines should be properly arranged, so that the line will not be walked on or pinched.
Pay special attention to this point while pulled off the line from the device;
Clean up the product for detail information see “cleaning”;
Equipment should position away from heat sources such as radiators, stoves or other appliances
(including amplifiers) which can produce heat;
The following occurs in need of repair:
A. The power cord or the power supply has been injury
B. Products falling from height, or product internal splashed into water or other liquid
C. Product get wet by rainstorm or water
D. Product can not operate normally or when significant changes occur in the performance;
Installation
1 The connectit o
of th signal
cable and powe
cables between panels
The female of one panel should
Connect the 3 cores female with
Adjust the cables position to let
be close to the male of another
panel.
the 3 cores male. Connect the
2 cores female with the 2 cores
male. And screw up them in the
them hide in the grooves of the
panels.Then put the panels to
gether.
clockwise direction
Please lock the nearby panels by our cross fixtures.
Note:500mm from central between two plates as picture shown
6
LED Disco Panel
2
The first or last panel are connected with the controller
How to fix the panel on the wall
1
Drawing on the wall with 50*50cm size as photo show;
2
Fix the screw we equip for you on the cross place as photo show:
7
LED DiscoPanel
3
Fix the cross fixture of led bubble panel on the wall by screw:
4
Push the bubble panel on the cross fixture directly and finalize the installation.
To easy punch and fixed, please use flameproof board or PC board as a fixed plate if possible.
8
LED Disco
Trouble
Panel
Shooting
Listed below are some common problems solutions:
1.Product can not receive DMX signal
Check the DMX signal cable is properly connected, besides check all the wiring is connected
to the correct connector, especially the input and output connection
2.Product can not receive sound
Quiet or sharp sound will not activate the product, change another panel if the problem persists,
please contact your dealer to serve you when it still useless.
Regular Cleaning
Keep this product around no other heat-generating items, some dust adhesion will be in after using for
some time, timely clean-up is very important;
Cleaning should be extra carefully when you clean the product and should avoid liquid spilled into the
inside of the product;
Using water or a mild soap and a soft cloth to wipe the exterior of the product (avoid using strong base,
concentrated alcohol or organic solvents);
The frequency of cleaning for the product depends on the influence of the environment (such as smoke,
fog residue, dust, dew, etc.)
Note: Data are subject to change without notice. If you are interested in this product, please check with your
dealer or our requests for updated information or video.
9