1
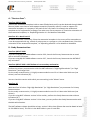
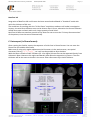
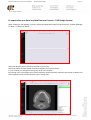
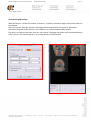
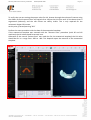
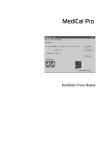
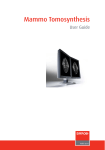
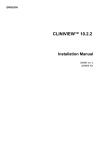
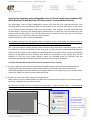
NewTom_Nobel Procera Protocol_Final Rev.doc Dated September 2008 Pag. 1 / 7 Protocol for importing axial radiographic slices in Dicom format from NewTom DVT 9000, NewTom 3G and NewTom VG into Procera System (Nobel Biocare). The technology used in CB3D radiographic systems (like NewTom) for three-dimensional x-ray scanning requires very low radiation dose. For this reason, there are some differences in the nature of the reconstructed volumetric data sets and studies, with respect to those obtained from conventional CT scanning that require higher radiation dose. In particular, the 3D rendering of the maxilla could be sub-optimal. This will not affect the final result and the accuracy of the implant simulation since it is merely an issue of visual rendition. CB3D usually has a 100% success on Mandible. Do not stop working if the 3D rendition does not appear “pretty” and shows non-existent holes in the maxillary bone, go on anyhow with the simulation by assessing the x-ray images. The x-ray cross-section images (always visible and clear with the Procera software) will be used as for reference, not the 3D rendition! If the user goes on with the work notwithstanding apparent holes in the 3D rendition, the simulation and planning will be accurate anyway, thanks to the special features of the Nobel Procera software that allows to superimpose X-ray images with the 3D rendition. In fact the X-ray image correctly shows the available space for implants, and the anatomical template data (always excellent) show how to position and tilt them. Two (2) scans must be performed in order to use the Procera system. 1. Perform a patient’s scan with the anatomical template (the part that will eventually become the surgical guide after practising the drill guidance holes) in the mouth. Be careful to place the anatomical template correctly. Stabilise, and slightly separate, the patient's jaws, for instance with a cotton roll. Make sure that the patient does not move. 2. Perform an x-ray scan of the anatomical template only. Make sure to name the obtained data set differently from the one of the patient, for instance with the word “template” as a part of the name. For NewTom 3G and VG users, a special scanning mode – called "Denture Scan" – is provided for scanning the anatomical template only (see picture below) Patient Scan, when scanning the patient (with anatomical template in place) Denture Scan, for the scan of the anatomical template alone t NewTom_Nobel Procera Protocol_Final Rev.doc Dated September 2008 Pag. 2 / 7 A - “Denture Scan”: NewTom QR DVT 9000 Position the anatomical template inside a water-filled plastic tank (it can be obtained through Nobel Biocare). Make sure than no radio-opaque materials (especially metal!) is used to support the anatomical template, or is anyway in the path of the x-ray beam. For example the anatomical template can be supported by a sponge, but make sure not to compress it. Check the orientation of the anatomical template, i.e. depending whether it is for Maxilla or Mandible. NewTom 3G or NewTom VG: No water-filled tank is necessary. Place the anatomical template in the centre of the scanned area. It can be supported with e.g. a block of polystyrene or a sponge or a thin cardboard case. Check the orientation of the anatomical template, i.e. depending whether it is for Maxilla or Mandible. B - Study Reconstruction: NewTom QR DVT 9000 If you are using QR DVT 9000 software version 3.30, launch the Primary Reconstruction as usual with or without inclination. If you are using QR DVT 9000 software version 3.37, launch the Primary Reconstruction WITHOUT any inclination. NewTom QR DVT 9000 + NNT Software in a secondary workstation Perform the primary reconstruction with the NNT software in “High High Resolution” (or “High Resolution”) and Large Field. For the study reconstruction, it's highly recommended to use 0.3 or 0.4mm axial thickness (not thinner) and no inclination (0°). You can check the version with which you are working in the “About” menu. NewTom 3G With NewTom 3G select “High High Resolution” (or “High Resolution”) as parameter for Primary Reconstruction. For the study reconstruction, it's highly recommended to use 0.3 or 0.4mm axial thickness (not thinner). If you are using NNT software version 2.04 or earlier, perform the Study Reconstruction without inclination (0°). If you are using NNT software version 2.11 or later, you can perform the Study Reconstruction with the desired inclination. The NNT software release should be at least version 2.04 or later (Dicom.dat must be dated at least 11 Feb 2006 or later). This file is in the NNT folder in your C: hard disk. t NewTom_Nobel Procera Protocol_Final Rev.doc Dated September 2008 Pag. 3 / 7 NewTom VG Integration of NewTom VG and Procera has been tested and validated in "Standard” mode with axial slice thickness of 0.4 mm. The conditions for working with the "Hi Res Zoom" acquisition mode are still under investigation. Anyway, the axial slice thickness must not be thinner than 0.3 mm, otherwise the Procera software would not accept and work with such a large quantity of axial slices. NewTom VG does not need any special set-up after the scan to start the "Primary Reconstruction" of the patient, since that occurs automatically. C. Data export (in Dicom format): After creating the Studies, export the sequence of axial slices in Dicom format. You can store the Dicom files on suitable data media. Make sure of using only regular alphanumerical characters in the patient name, not special characters (like e.g. " / : * ? < > \ | ; ) or it will not be possible to save the data. With the latest releases of NNT software (V2.13 or higher) Dicom files can be exported directly from Volumetric Data. However this might considerably slow down the operation in Procera. The slice thickness will be the same as shown in the menu View->Document Info->Axial Thickness t NewTom_Nobel Procera Protocol_Final Rev.doc Dated September 2008 Pag. 4 / 7 D. Import data sets from any NewTom into Procera CAD Design System: After creating a new patient, you can import the data with step2 of the Procera System (Manage CT Data -> Convert CT-Data) Select the data file path in the import window and press GO. Select the patient and the related anatomical template from the list shown. It’s not necessary to change the settings for “level” and “window”. By pressing “GO” the complete set of Dicom data files will be imported, otherwise the number of Dicom files to be imported can be selected with the option “Dicom files”. t NewTom_Nobel Procera Protocol_Final Rev.doc Dated September 2008 Pag. 5 / 7 1) Generating 3D Surface: With the function “Select the Volume of Interest”, a specific volumetric Region Of Interest (ROI) can be selected. Then click on the “Settings” button and change the HU (Haunsfield Unit) value for 3D surface. Instead of using the values written in the software, try a value between 400 and 650. The goal is to segment the bone from the soft tissues. Changing the Radius and Standard deviation from 1; 10 to 3; 12 respectively (as in the image below) can help as well t NewTom_Nobel Procera Protocol_Final Rev.doc Dated September 2008 Pag. 6 / 7 To verify that you are setting the proper value for HU, browse through the volume of interest using the sliders for axial coronal slices and sagital slices. Adjust the HU value until all the bone tissue is segmented (coloured), and the soft tissues are clearly visible. This is only required for the volumetric Region Of Interest. At this point, proceed pressing “GO” Perform the same procedure with the data of the anatomical template. If the anatomical template was scanned with the "Denture Scan" procedure (with 3G and VG machines) the HU value should be around zero. Otherwise (if the normal “Patient Scan” was used also for the anatomical template) the HU value should be set in a range from -650 to -400. This depends upon the material of the anatomical template. // t NewTom_Nobel Procera Protocol_Final Rev.doc Dated September 2008 Pag. 7 / 7 2) Searching the markers: The final step is the identification/location of the markers. For this function, the area of the Region Of Interest can be decreased as long as the markers are still inside. For the Marker Extraction Settings, a HU value between 1950 to 2350 is recommended. The values for NSI Threshold should normally be 1.1, but very occasionally it may be useful to change it to 1.2 in order to help the SW to automatically locate all the markers. The value for Volume Threshold should not to be changed from the standard values that appears on the mask (see image below. The values indicated have been estimated from several cases with different NewTom machines and patients, with results which were judged to be good enough for all the relevant specialities. This small guide is not a complete user manual. For further information about using the Procera System, consult its user manual, or call Nobel Biocare. t